SkyBitz CMANA00052 User manual

SkyBitz CMANA00052 WMS Door Sensor Install Guide Rev A 11/30/2018 1
CMANA00052 WMS Door Sensor Install Guide
WMS Kit:
WMS
WMS Bracket
2, 8-32 by 5/16 Tamper Proof Screws
6, 3/16 DIA Stainless Steel Rivets
1, Activation Magnet
1, Strike Plate with VHB
4, Strike Plate Screws
3M Primer 94 Ampoule
Tools Required:
Power Drill
3/16 Inch Drill Bit
1/8 Inch Drill Bit
Heavy Duty Blind Rivet Tool
T-15 “Pin in Torx”Tamper Resist Screw Driver
#2 Phillips Screwdriver
50/50 Isopropyl Alcohol/Water Solution
Clean Rags
WMS Door Sensor Installation Overview
This guide is for the installation of the SkyBitz
WMS Door Sensor on Dry Vans or Containers
with swing doors. The WMS will be mounted high
on the door frame of the asset and will sense the
ferrous steel of the door when it is closed. The
WMS will be mounted on the frame of the primary
door if the asset has double doors. If the door is
nonferrous, a ferrous strike plate is included in
the kit and will be mounted on the door. Once
installed, the WMS must be activated and
calibrated to ensure the sensor is functioning
properly after installation. Please contact SkyBitz
at CustomerCare@SkyBitz.com for help with any
issues you may encounter with the installation of
the SkyBitz WMS product.
Install the WMS Mounting Bracket
With the door fully closed and latched, position
the WMS Bracket as shown with the bracket
pushed against the door. Mark the upper and
lower center hole locations. Remove the bracket
and use a 3/16 inch drill bit to drill the top hole.

SkyBitz CMANA00052 WMS Door Sensor Install Guide Rev A 11/30/2018 2
With the bracket oriented as shown, install the
bracket to the door frame using one 3/16
stainless steel rivet in the top center hole. Push
the bottom of the bracket against the door and
use a 3/16 inch drill bit to match drill the lower
center hole.
Install a 3/16 inch stainless steel rivet in the lower
center hole. Match drill the remaining four WMS
bracket mounting holes.
Open the door and install the remaining four
rivets to complete the bracket installation.

SkyBitz CMANA00052 WMS Door Sensor Install Guide Rev A 11/30/2018 3
Install the WMS to the Mounting Bracket
Orient the WMS on the bracket as shown and
fasten with two 8-32 tamper resistant screws with
thread locker.
Activate the WMS
The WMS is shipped in inventory mode to prohibit
RF transmission and save battery power. The
WMS must be activated to make it operational.
Place the magnet as shown for 3 seconds and
confirm both LEDs are blinking together. This
confirms the WMS is still in inventory mode and
functioning properly.
Once the LEDs turn off after 10 seconds, hold the
magnet in the location shown again for at least 15
seconds. The LED on the left will begin to blink
RED to confirm the WMS has been activated.

SkyBitz CMANA00052 WMS Door Sensor Install Guide Rev A 11/30/2018 4
Calibrate the WMS
With the door wide open, hold the magnet in
place until the LED on the right turn’s solid blue.
Continue holding the magnet in place for at least
15 seconds until both LEDs begin an alternating
blink pattern then remove the magnet. The LEDs
will continue alternating for about 10 seconds
indicating a “Door Open” calibration reading is
about to take place.
The LEDs will begin blinking together rapidly to
signify they are taking a “Door Open” calibration
measurement. After about 10 seconds the LEDs
will return to the alternating blink pattern for 30
seconds.
During this 30 second alternating blink pattern,
close and latch the door as the WMS waits to
take a “Door Closed” calibration measurement.
The LEDs will begin blinking together rapidly to
signify the WMS is taking a “Door Closed”
calibration measurement.
SkyBitz CMANA00052 WMS Door Sensor Install Guide Rev A 11/30/2018 5
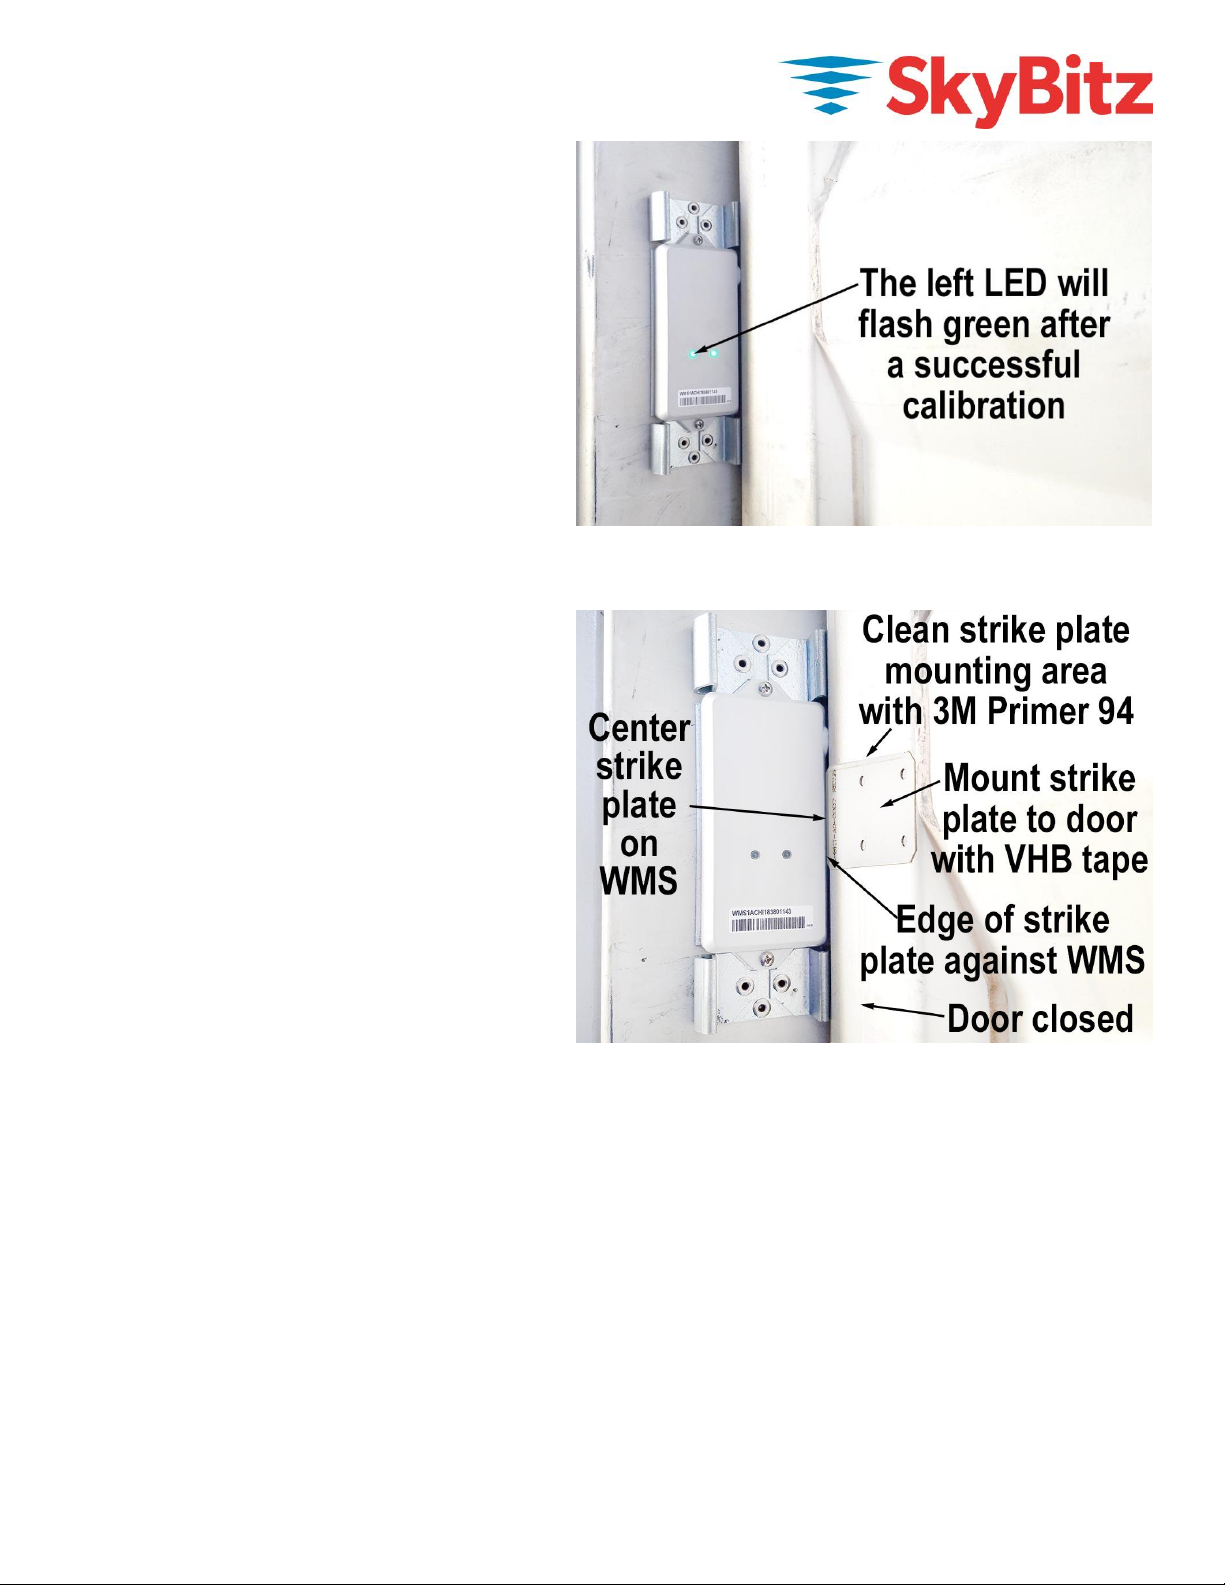
After about 10 seconds the LED on the left will
begin to blink Green to confirm a successful
calibration. If the LED on the left begins to blink
Red then the calibration has failed. Carefully
repeat the calibration procedure ensuring all the
steps are followed correctly. If the WMS still fails
calibration you will need to install a strike plate on
the door and repeat the calibration.
Install Ferrous Strike Plate
If the initial calibration has failed you will need to
install the ferrous strike plate on the door. Fully
close and latch the door. Place the edge of the
strike plate against the WMS and center it along
the side of the WMS as shown then mark the
location of the strike plate on the door. Clean the
mounting location with the 3M Primer 94 and
allow it to dry for at least 3 minutes. Remove the
film liner from the VHB tape on the back of the
strike plate and mount the strike plate to the door
in the marked location. Press firmly on the strike
plate to activate the VHB tape then pull up on the
strike to ensure a good bond has been achieved.
Repeat the calibration procedure ensuring all the
steps are followed correctly.
1) FCC Interference Statement (Part 15.105 (b))
This equipment has been tested and found to comply with the limits for a Class B digital device, pursuant to Part
15 of the FCC Rules. These limits are designed to provide reasonable protection against harmful interference in
a residential installation. This equipment generates uses and can radiate radio frequency energy and, if not
installed and used in accordance with the instructions, may cause harmful interference to radio communications.
However, there is no guarantee that interference will not occur in a particular installation. If this equipment does
cause harmful interference to radio or television reception, which can be determined by turning the equipment off
and on, the user is encouraged to try to correct the interference by one of the following measures:
Reorient or relocate the receiving antenna.
Increase the separation between the equipment and receiver.
Connect the equipment into an outlet on a circuit different from that to which the receiver is connected.
Consult the dealer or an experienced radio/TV technician for help.
2) FCC Part 15 Clause 15.21
“Changes or modifications not expressly approved by the party responsible for compliance could void the user's
authority to operate the equipment”

SkyBitz CMANA00052 WMS Door Sensor Install Guide Rev A 11/30/2018 6
3) FCC Part 15.19(a)
“This device complies with part 15 of the FCC Rules. Operation is subject to the following two conditions: (1) This
device may not cause harmful interference, and (2) this device must accept any interference received, including
interference that may cause undesired operation.”
4) ISED RSS-Gen Notice:
“This device complies with Industry Canada’s licence-exempt RSSs. Operation is subject to the following two
conditions:
(1) This device may not cause interference; and
(2) This device must accept any interference, including interference that may cause undesired operation of the
device.”
“Le présent appareil est conforme aux CNR d’Industrie Canada applicables aux appareils radio exempts de
licence. L’exploitation est autorisée aux deux conditions suivantes :
1) l’appareil ne doit pas produire de brouillage;
2) l’appareil doit accepter tout brouillage radioélectrique subi, même si le brouillage est susceptible d’en
compromettre le fonctionnement.”
5) ISED Canada ICES-003 Compliance Label:
“CAN ICES-3 (B)/NMB-3(B)”
This equipment complies with FCC radiation exposure limits set forth for an uncontrolled
environment. This equipment should be installed and operated to provide a separation
distance of at least 20 cm from all persons.
Cet équipement est conforme aux limites d'exposition aux radiations de la FCC définies
pour un environnement non contrôlé. Cet équipement doit être installé et utilisé de
manière à assurer une distance de séparation d'au moins 20 cm de toutes les personnes.
Table of contents


