skybox Appliance 5500 User manual

Skybox Appliance 5500
Quick Start Guide
10.1.200
CentOS Linux release 7.7.1908 (Core)

Proprietary and Confidential to Skybox Security. © 2020 Skybox Security,
Inc. All rights reserved.
Due to continued product development, the information contained in this
document may change without notice. The information and intellectual property
contained herein are confidential and remain the exclusive intellectual property of
Skybox Security. If you find any problems in the documentation, please report
them to us in writing. Skybox Security does not warrant that this document is
error-free.
No part of this publication may be reproduced, stored in a retrieval system, or
transmitted in any form or by any means—electronic, mechanical, photocopying,
recording, or otherwise—without the prior written permission of Skybox Security.
Skybox®, Skybox®Security, Skybox Firewall Assurance, Skybox Network
Assurance, Skybox Vulnerability Control, Skybox Threat Manager, Skybox
Change Manager, Skybox Appliance 5500/6000/7000/8000/8050, and the
Skybox Security logo are either registered trademarks or trademarks of Skybox
Security, Inc., in the United States and/or other countries. All other trademarks
are the property of their respective owners.
Contact information
Contact Skybox using the form on our website or by emailing
info@skyboxsecurity.com
Customers and partners can contact Skybox technical support via the Skybox
Support portal

Skybox version 10.1.200 3
Overview ............................................................................................... 5
Basic architecture.....................................................................................5
Related documentation..............................................................................5
Skybox Appliance specifications ................................................................ 6
Before you open the box ...........................................................................6
What’s in the box .....................................................................................6
Physical specifications ...............................................................................7
Environmental specifications ......................................................................7
MTBF estimates for Skybox Appliance .........................................................8
Front panel..............................................................................................9
Back panel connectors.............................................................................10
Port mapping ....................................................................................10
File system partitions..............................................................................11
Setting up Skybox Appliance ...................................................................12
Hardware installation ..............................................................................12
Starting Skybox Appliance .......................................................................12
System configuration ..............................................................................13
Configuring connection.......................................................................13
Setting up the Appliance for configuration ............................................15
First-time configuration......................................................................15
What’s next ...........................................................................................15
Configuring the Appliance .......................................................................17
Configuration and management options.....................................................17
Setting up network interface bonding........................................................19
Supported bond modes ......................................................................19
Setting up SNMP configuration .................................................................21
RADIUS authentication............................................................................21
LDAP authentication................................................................................22
Changing the TLS version ........................................................................23
Customizing the syslog server .................................................................26
Setting up TCP and UDP listeners .............................................................26
How to work with syslog files ...................................................................26
Skybox Manager Installation....................................................................28
Skybox Manager system requirements ......................................................28
Contents

Skybox Appliance 5500 Quick Start Guide
Skybox version 10.1.200 4
Installing Skybox Manager.......................................................................29
Upgrading Skybox Manager .....................................................................29
Updating the operating system on Skybox Appliance ..................................31
ISO burning ..........................................................................................33
SSH hardening.......................................................................................34
Firmware updates for Skybox Appliance....................................................35
Checking your firmware revision via the console.........................................35
Checking your firmware revision via RMM..................................................36
Preparing to update ................................................................................38
Updating via the console .........................................................................39
Updating via RMM...................................................................................39
Updating the firmware........................................................................39
Configuring Java for login ...................................................................45
Adding your own certificate .....................................................................49
Exporting the Server certificate and private key from the Java keystore ........50
Restoring the Appliance to factory defaults................................................52
Monitoring SNMP....................................................................................53
Troubleshooting.....................................................................................55
Wiping the hard disk drive.......................................................................56
CIS benchmarks for CentOS 7 .................................................................57
Regulatory and safety information............................................................64
Product regulatory compliance .................................................................64
Safety compliance .............................................................................64
EMC compliance – Class A compliance..................................................65
Environmental requirements ...............................................................65
Regulatory compliance markings ..............................................................65
Electromagnetic compatibility notices for the server board...........................68

Skybox version 10.1.200 5
Chapter 1
Skybox®Appliance is a hardware solution that enables you to deploy Skybox
without the burden of maintaining your own server.
Skybox®is an Automated Risk and Compliance Management (ARCM) platform
that helps enterprise IT departments to discover and resolve potential security
and compliance risks before they impact your organization.
Skybox is a multi-tier platform. Skybox Appliance runs the Skybox Server and
users run Skybox Managers (clients) that connect to the Skybox Server over the
network. Skybox also runs an additional Skybox component, the Skybox
Collector, which connects to data sources and imports the data to the Skybox
Server.
The Skybox Server and Collector are preinstalled on Skybox Appliance and run at
startup.
In this chapter
Basic architecture ................................................................. 5
Related documentation.......................................................... 5
Basic architecture
The Skybox platform consists of a 3-tiered architecture with a centralized server
(Skybox Server), data collectors (Skybox Collectors), and a user interface
(Skybox Manager). Skybox can be scaled to suit the complexity and size of any
infrastructure.
See the Skybox architecture topic in the Skybox Installation and Administration
Guide.
Related documentation
Related documentation includes:
›Skybox online help
›Skybox documentation
Note: If you are not using the latest version of Skybox, you can find the
documentation for your version at
http://downloads.skyboxsecurity.com/files/Installers/Skybox_Vi
ew/<your major version/<your minor version>/Docs. For example,
http://downloads.skyboxsecurity.com/files/Installers/Skybox_Vi
ew/10.0/10.0.400/Docs
Overview

Skybox version 10.1.200 6
Chapter 2
This chapter contains product specifications and packaging information for
Skybox Appliance 5500.
In this chapter
Before you open the box........................................................ 6
What’s in the box.................................................................. 6
Physical specifications ........................................................... 7
Environmental specifications .................................................. 7
MTBF estimates for Skybox Appliance...................................... 8
Front panel .......................................................................... 9
Back panel connectors......................................................... 10
File system partitions .......................................................... 11
Before you open the box
Inspect the shipping carton to ensure that the packaging has not been damaged
and verify that all tamper evident seals are intact. Verify that the Appliance serial
number, purchase order number, and FedEx tracking number match the
information provided by Skybox Customer Support.
What’s in the box
The following items are included in the shipping carton:
›Skybox Appliance
›Rack mount kit
›Front bezel
›AC power cord
›RJ45 to DB9 serial console cable
›Skybox Quick Start Guide
›2 DVDs
•
Skybox: Installs Skybox on the Appliance; it contains the Skybox
software and additional Appliance documentation
•
Restore Appliance: Restores the Appliance to factory settings
Skybox Appliance specifications

Chapter 2 Skybox Appliance specifications
Skybox version 10.1.200 7
Physical specifications
The physical features of Skybox Appliance 5500 are listed in the following table.
Feature Description
Form factor 1U rack
Rack dimensions
(H x W x D) 1.70” x 17.24” x 27.93” (43.2mm x 438 mm x 709.37
mm)
Weight
•System weight: 35.8 lb (16.24 kg)
•Packaged weight: 42.4 lb (19.23 kg)
Power supply 450W 1+1 redundant AC +12V DC and +5V standby
Data storage RAID 1
System cooling
•2 dual-rotor, managed 40mm x 56mm system fans
•1 40mm x 40mm system fan
•2 power supply fans
Front panel
features
•1 power button with integrated LED
•1 system ID button with integrated LED
•1 system status LED
•4 NIC LEDs
•1 HDD activity LED
•1 system cold reset button
•2 USB 2.0 connectors
•Bezel with lock support
External I/O
connectors
(back panel)
•DB-15 video connector
•DB-9 serial port A connector
•2 USB 2.0 Ports
•2 USB 3.0 Ports
•6 RJ-
45 network interface (LAN) connectors supporting
10/100/1000 Mb
Compliant
standards Ctick, NRTL, CE, FCC, EMC, BSMI, KC, and more
For detailed information, see Regulatory and safety
information (on page 64).
Environmental specifications
Environmental specifications for Skybox are listed in the following table.
Property Limits
Operating
temperature +10°C to +35°C with the maximum rate of change not to
exceed 10°C per hour
Non-operating
temperature -40°C to +70°C
Non-operating
humidity 50% to 90%, non-condensing with a maximum wet bulb
of 28°C
Acoustic noise Sound pressure: 55 dBA (rack mount) in an idle state at
typical office ambient temperature. (23 C +/- 2 C)
Sound power: 7.0 dBA in an idle state at typical office
ambient temperature. (23 +/- 2 degrees C)
Shock, operating Half sine, 2 g peak, 11 msec
Shock,
Trapezoidal, 25 g, velocity change is based on packaged

Skybox Appliance 5500 Quick Start Guide
Skybox version 10.1.200 8
Property Limits
unpackaged
weight
Shock, packaged Non-palletized free fall height 18 inches (
≧
40 lb to < 80
lb)
Vibration Unpackaged: 5 Hz to 500 Hz, 2.20 g RMS random
Packaged: 5 Hz to 500 Hz, 1.09 g RMS random
ESD Air discharge: 12.0 kV
Contact discharge: 8.0 kV
System cooling
requirement 744 BTU/hour
EMI operating EMI testing of this product is conducted at an open field
site according to the current BKM methodology.
Conducted and radiated emissions shall comply with FCC
and CISPR 22 limits for Class A products. Test reports are
made available through EPG Product Regulations
MTBF estimates for Skybox Appliance
The estimated mean time between failures (MTBF) and Failures in Time (FIT) for
Skybox Appliance 5500 are listed in the following table.
Subassembly MTBF (hours) FIT (failures/10^9
hours)
Intel®Server Board S1200V3RPM
371523 2692
Backplane board 935180 1069
Power supply 450W MiniERPS 967300 1034
Cooling fan (1-fixed fans) 490000 2041
Cooling fans (2-fixed fans) 77680 12873
Front panel board 8272282 121
Total without motherboard 58300 17138
Total with motherboard 50400 19830
Note: The estimates listed here are for Skybox Appliance in 40°C ambient air.
Chapter 2 Skybox Appliance specifications
Skybox version 10.1.200 9
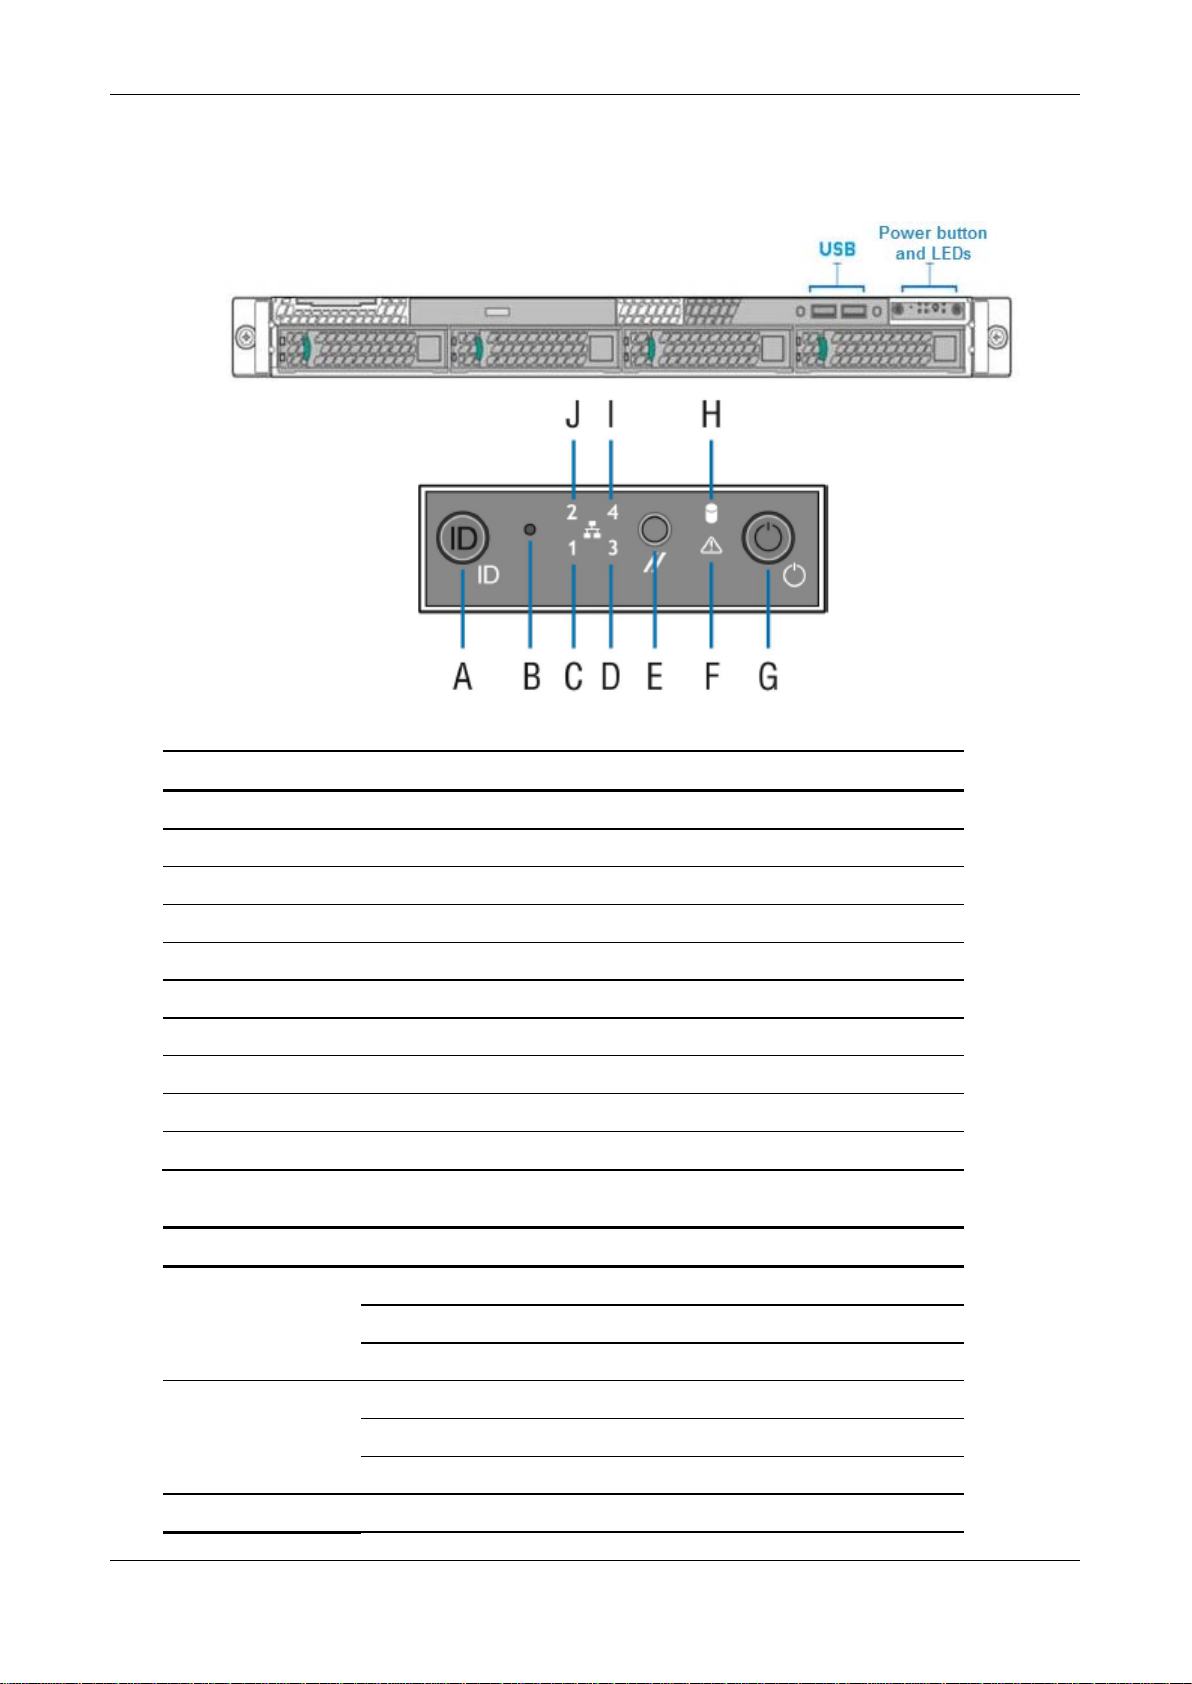
Front panel
The Appliance front panel includes 2 USB connectors, a power button, and LEDs.
Power button and LEDs
Letter Feature
A System ID button with integrated LED
B NMI button (recessed; tool required for use)
C NIC-1 activity LED
D NIC-3 activity LED
E System cold reset button
F System status LED
G Power button with integrated LED
H Hard drive activity LED
I NIC-4 activity LED
J NIC-2 activity LED
Front panel LED functions
LED Color / State Description
Power/Sleep
Green / on Power on
Green / blinking Sleep
Off Power off
NIC LEDs
Green / on Network link but no network activity
Green / blinking Network activity
Off No link
System Status Green / on System ready/no alarm

Skybox Appliance 5500 Quick Start Guide
Skybox version 10.1.200 10
LED Color / State Description
Green / blinking System ready but degraded:
Redundancy lost (for example, a
power supply or fan failure); non-
critical temperature or voltage
threshold reached; battery failure; or
predictive power supply failure.
Amber / on Critical Alarm: Critical power modules
failure, critical fans failure, voltage
(power supply), critical temperature
and voltage
Amber / blinking Non-Critical Alarm: Redundant fan
failure, redundant power module
failure, non-critical temperature and
voltage
Off Power off: System unplugged
Power on: System powered off and in
standby, no prior degraded/non-
critical/critical state
Back panel connectors
The Appliance back panel includes the connectors shown in the following figure.
PORT MAPPING
The mappings between physical ports on the back panel of Skybox Appliance and
logical ports are listed in the following table.
Back panel
connector Logical port to which it is
mapped
NIC1 eno1
NIC2 eno2
NIC3 enp2s0f0
NIC4 enp2s0f1
NIC5 enp2s0f2
NIC6 enp2s0f3

Chapter 2 Skybox Appliance specifications
Skybox version 10.1.200 11
By default:
›NIC1 / eno1 is enabled and configured as DHCP
›NIC2 / eno2 is enabled and configured as static with the IP address:
192.168.1.1 /24
You can change these values.
File system partitions
The Skybox Appliance file system is partitioned as follows:
›SWAP: 4 GB
›/tmp: 5% of the entire space
›/: 20% of the entire space
›/var: 45% of the entire space
›/opt: All remaining space on the disk

Skybox version 10.1.200 12
Chapter 3
This chapter explains how to set up Skybox Appliance.
In this chapter
Hardware installation .......................................................... 12
Starting Skybox Appliance ................................................... 12
System configuration .......................................................... 13
What’s next........................................................................ 15
Hardware installation
Before you start
Before installing the rack mount kit, observe these safety guidelines:
1Turn off all peripheral devices connected to Skybox Appliance.
2Turn off Skybox Appliance by pressing the Power button on the front of the
chassis and then unplug the AC power cords from the chassis or wall outlet.
3Label and disconnect all peripheral cables and all telecommunications lines
connected to I/O connectors or ports on the back of the chassis.
4Provide electrostatic discharge (ESD) protection by wearing an antistatic wrist
strap attached to a chassis ground—any unpainted metal surface—when
handling components.
Required tools and supplies
›Phillips (cross head) screwdriver (#1 bit and #2 bit)
›(Recommended) Antistatic wrist strap and conductive foam pad
Installation
To install your Skybox Appliance, refer to the installation instructions included
with the rack mount kit.
Starting Skybox Appliance
To start the Appliance
1Connect the AC power cords to the AC connectors on the Appliance back panel
and connect the other ends to a power supply.
Note: You can use Skybox with either a 110- or 220-volt power supply.
Setting up Skybox Appliance

Chapter 3 Setting up Skybox Appliance
Skybox version 10.1.200 13
2On the Appliance front panel, press the Power button.
3Lock the front bezel in place using the key provided.
System configuration
Before running the Skybox Server, configure Skybox Appliance to be part of your
network and perform initial system configuration.
CONFIGURING CONNECTION
Before using the Skybox Appliance Administration, configure connection of
Skybox to your network locally using any of:
›A console (mouse, keyboard, and screen) connection
›A serial port connection
›A network connection via static NIC
Note: For a figure of the connectors used in the following procedures, see Back
panel connectors (on page 10).
Configuration via console
To configure connection using a mouse, keyboard, and screen
1Connect one end of a standard network cable to the NIC 1 (eno1) port on the
Appliance back panel; connect the other end of the cable to a network socket.
2Connect a mouse, keyboard, and screen to the connectors on the Appliance
back panel.
3Log in to the Appliance using the default user name (root) and the default
password (skyboxview).
4Configure a network interface with an IP address, netmask, and default
gateway:
a. Run the command set_appliance_network
b. Select a network interface to configure.
c. Select the IP mode (static or DHCP).
—If you select static mode, provide the IP address, netmask, and default
gateway.
5If you are using DHCP, run ifconfig, and note the IP address assigned to
the Appliance. You need it later.

Skybox Appliance 5500 Quick Start Guide
Skybox version 10.1.200 14
Configuration via serial port
To configure connection using a serial port connection
1Connect one end of the serial cable to a serial port on the management
computer; connect the other end to the serial port on the Appliance.
2On the management computer start a terminal emulation program, select the
port that you connected to in the previous step, and configure the following
port settings:
•
Bits per second: 9600
•
Data bits: 8
•
Parity: none
•
Stop bits: 1
•
Flow control: none
•
(If using PuTTY as your terminal emulator) Character set translation on
received data: UTF-8
3Press the Power button on the Appliance front panel and verify that the Power
LED turns green.
4Log in to the Appliance using the default user name (root) and the default
password (skyboxview).
5Configure a network interface with an IP address, netmask, and default
gateway:
a. Run the command set_appliance_network
b. Select a network interface to configure.
c. Select the IP mode (static or DHCP).
—If you select static mode, provide the IP address, netmask, and default
gateway.
6If you are using DHCP, run ifconfig, and note the IP address assigned to
the Appliance. You need it later.
Configuration via network port
You can connect to the Appliance via the preconfigured static network port
(eno2), whose IP address is 192.168.1.1 /24.
To configure connection via eno2
1Configure the IP address of the client side to a different IP address on the
same network. For example, 192.168.1.50 /24.
2In your browser, connect via the IP address for eno2:
https://192.168.1.1:444/

Chapter 3 Setting up Skybox Appliance
Skybox version 10.1.200 15
SETTING UP THE APPLIANCE FOR CONFIGURATION
To prepare for configuring the system remotely
1From a different machine on the network, open a browser to connect to the
Skybox Appliance Administration using the following URL (<Appliance IP
address> is the IP address of the Appliance that you configured in Configuring
connection (on page 13)):
•
https://<Appliance IP address>:444
2The default user name is skyboxview; the default password is skyboxview.
The Skybox Appliance Administration main page appears.
FIRST-TIME CONFIGURATION
You must change the passwords and configure the date and time before using
the Skybox Server. All other settings are optional; you can configure them later.
To change the passwords
1On the Security tab, select Appliance Passwords.
2To change the root password of the machine, click Change Root Password.
3To change the Appliance Administration password, click Change Skyboxview
Password.
To configure the date and time
1On the System tab, select Date and Time Configuration.
2To configure the date and time manually:
a. Select Manual Date and Time Configuration.
b. Click Change Date and Time; set the date and time for Skybox’s time
zone.
c. Click Change Time Zone; set the time zone for the location of the
Appliance, so that reports and other data are timestamped correctly.
3To set the date and time from NTP servers:
a. Select Automatic Date and Time Configuration Using NTP Server.
b. Click Change NTP Servers; add the IP address or DNS of up to 3 NTP
servers to use.
If you specify multiple NTP servers, the Appliance synchronizes to the
average time between the servers.
c. Click Change Time Zone; set the time zone for the location of the
Appliance, so that reports and other data are timestamped correctly.
What’s next
Skybox Manager is the client application that communicates with the Server.
After installing and configuring the Appliance, you must install Skybox Manager
on at least 1 remote machine (see Skybox Manager Installation (on page 28)).

Skybox Appliance 5500 Quick Start Guide
Skybox version 10.1.200 16
Using Skybox for change tracking
You can use Skybox to track changes on firewalls. Although much change
information can be collected directly from the firewalls, additional information
(including a timestamp and the user who made the change) is available only
from syslog change events that are sent to the syslog server in the Appliance.
You collect the change events using Change Tracking Events – Syslog Import
tasks.
Syslog server
The syslog server in the Appliance is preconfigured and is enabled by default.
Updates to the configuration files of the syslog server and syslog log file rotation
are included (when necessary) as part of Skybox updates.
For information about customizing the syslog server, see Customizing the syslog
server (on page 26).

Skybox version 10.1.200 17
Chapter 4
This chapter explains how to configure the Appliance.
In this chapter
Configuration and management options................................. 17
Setting up network interface bonding .................................... 19
Setting up SNMP configuration ............................................. 21
RADIUS authentication ........................................................ 21
LDAP authentication............................................................ 22
Changing the TLS version .................................................... 23
Configuration and management options
Skybox Appliance configuration options are described in the following table.
Pane Description
About tab
System
Information Provides information about Skybox configuration.
Network tab
Note that configuration changes made in this tab are only saved after you
click Save Network Configuration.
Network
Configuration Enables you to configure network settings (connection
method, IP address, netmask, and gateway) and
bonding for each network interface connection, and to
configure the DNS servers.
Note: For non-virtual Appliances, this pane includes a
link to a figure of the back panel to help you to
understand the connections.
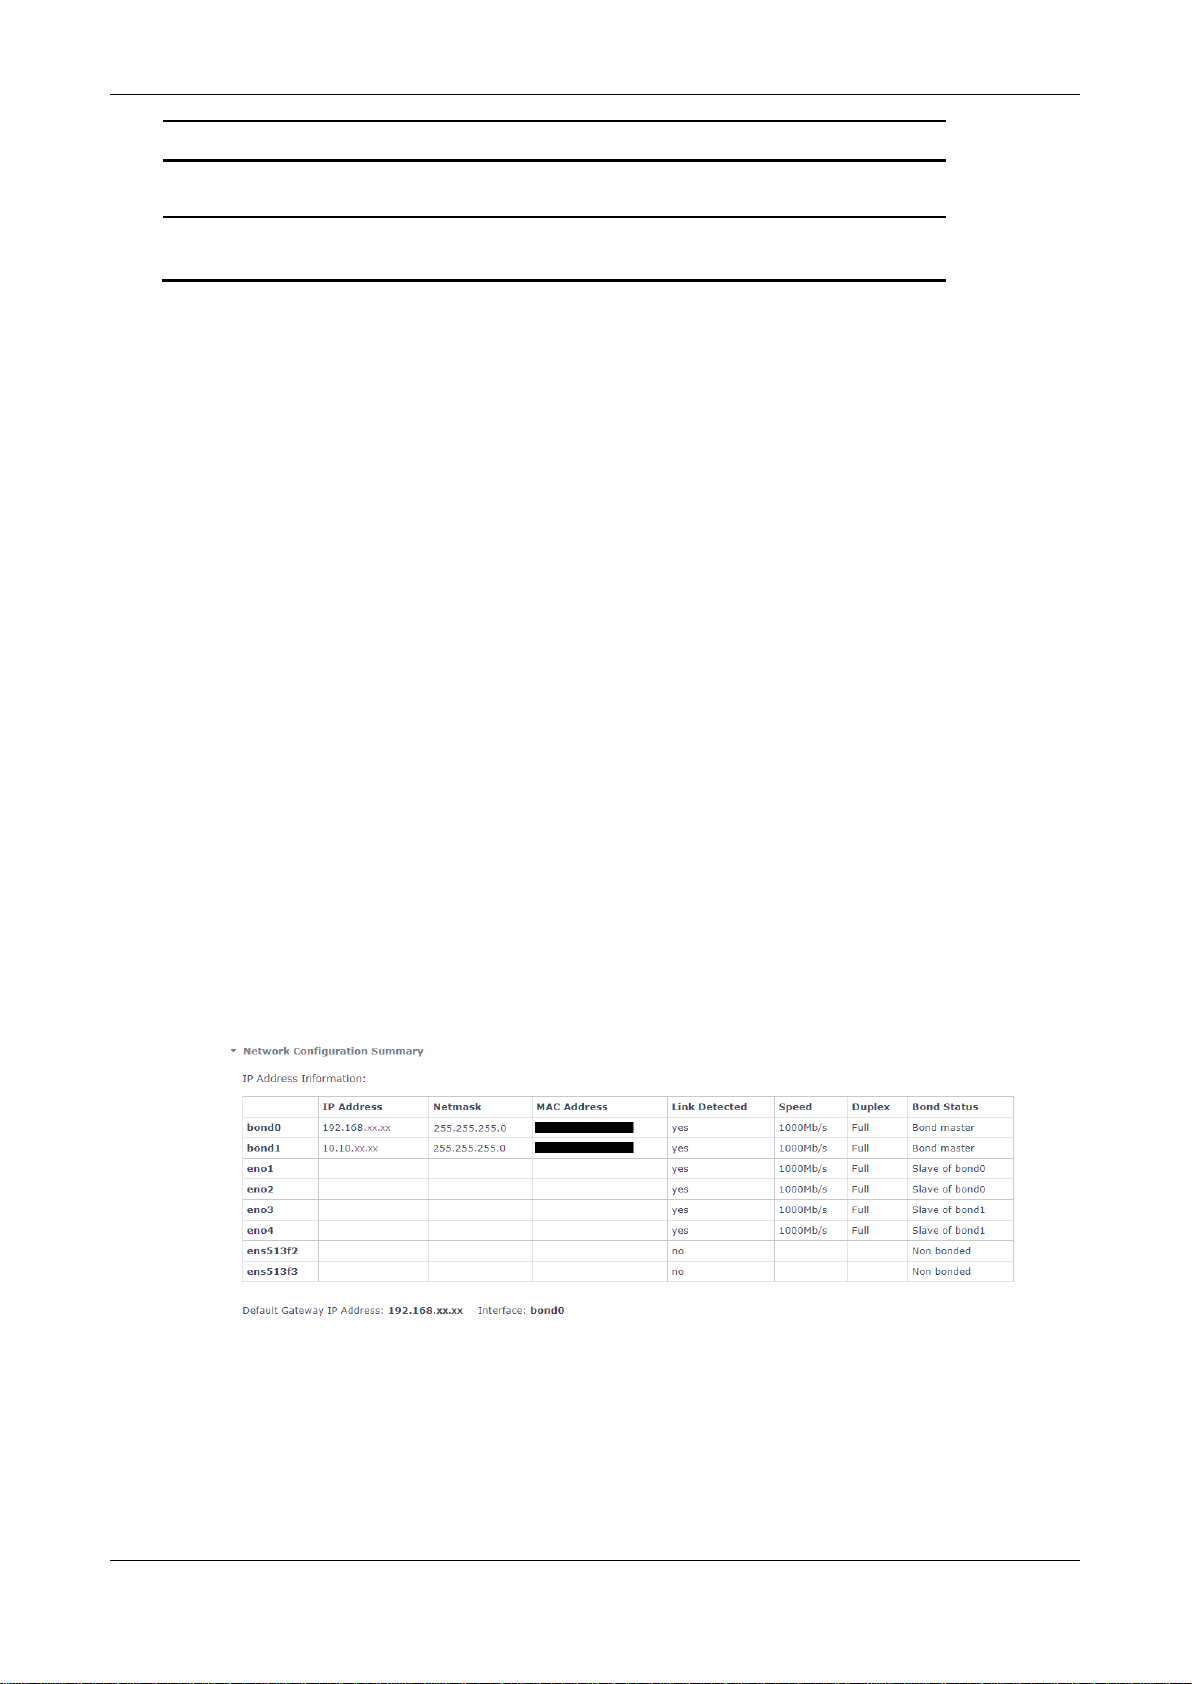
Network
Configuration
Summary
Displays a summary of the Appliance configuration.
Click Export to save this information to an HTML file.
Configuring the Appliance

Skybox Appliance 5500 Quick Start Guide
Skybox version 10.1.200 18
Pane Description
System tab
Date and Time
Configuration Enables you to view and change the date and time in
the Appliance’s time zone.
Notes:
•
If you set this information manually, set the date and
time and then the time zone for the location of the
Appliance, so that reports and other data are
timestamped correctly.
•
Automatic configuration synchronizes Skybox with an
NTP server. Provide the IP address or DNS of the NTP
server to use. (You can use up to 3 NTP servers.)
Set the time zone after setting the NTP server.
Syslog Server
•Enables sending CentOS logs automatically from the
Appliance to a remote syslog server (see Sending
CentOS log to a remote syslog server).
•Starts or stops the Appliance syslog server service
and enables you to configure TCP and UDP listeners
(see Customizing the syslog server (on page 26)).
Host Name Enables you to change the name of the Appliance.
Change System
Mode Toggles between Server mode (the Appliance functions
as both the Skybox Server and a Skybox Collector) and
Collector mode (the Appliance functions only as a
Skybox Collector).
SNMP Select Enable SNMP Service to set up SNMP
configuration, host configuration, and sending traps
(see Setting up SNMP configuration (on page 21)).
You can also download the Appliance MIBs.
Security tab
Appliance
Passwords Enables you to change the root password for the
Appliance, the password for the Appliance
Administration, and the RMM password.
LDAP Enables you to set up the Appliance to support
authentication via LDAP (see LDAP authentication). (on
page 22)
SSH Toggles the SSH service on and off and enables the root
user to log in via SSH.
Control tab
Skybox Services Toggles the Skybox Server and Skybox Collector on and
off.
Note: Turning a Skybox service off stops the service
and switches it to Manual mode. Turning the service on
switches it back to Automatic mode.
Appliance
Operations Enables you to reboot or shut down the Appliance.
Support tab
Logs Enables you to view Skybox Server, Skybox Collector,
and other logs of the Appliance.
Get Packlogs: Runs the packlogs utility and saves the
Chapter 4 Configuring the Appliance
Skybox version 10.1.200 19
Pane Description
packlogs (ZIP) file to a local directory so that you can
send the logs to Skybox Support.
Skybox Manager Enables you to download Skybox Manager for
installation.
Setting up network interface bonding
Skybox Appliances support network interface bonding for redundancy and for
higher bandwidth.
To create a network interface bonding
1On the Network tab, click Network Configuration.
2Select Network Interfaces.
3Select the interface to add to a network bond and click Add to Network
Bond.
4In the Network Bond Setup dialog box, add a new bond interface.
5Select the interfaces to bond to this new interface (as slaves).
6Select the method for assigning the IP address for this interface.
•
If you select static mode, provide the IP address, netmask, and gateway.
7Select the mode in which the bond is to work; we recommend active-backup.
For information about the supported bond modes, see Supported bond modes
(on page 19).
8Click Save.
To view a list of the network interface bonding
›On the Network tab, click Network Configuration Summary.
SUPPORTED BOND MODES
This section lists supported bond modes. We recommend active-backup for
Skybox clusters.
mode=0 (balance-rr)
Round-robin policy: Transmits packets in sequential order from the 1st available
slave to the last. This mode provides load balancing and fault tolerance.

Skybox Appliance 5500 Quick Start Guide
Skybox version 10.1.200 20
mode=1 (active-backup)
Active-backup policy: Only a single slave in the bond is active. A different slave
becomes active if, and only if, the active slave fails. The bond’s MAC address is
externally visible on a single port (network adapter) to avoid confusing the
switch. This mode provides fault tolerance. The primary option affects the
behavior of the mode.
mode=2 (balance-xor)
XOR policy: Transmits based on [(source MAC address XORed with destination
MAC address) modulo slave count]. This selects the same slave for each
destination MAC address. This mode provides load balancing and fault tolerance.
mode=3 (broadcast)
Broadcast policy: Transmits everything on all slave interfaces. This mode
provides fault tolerance.
mode=4 (802.3ad)
IEEE 802.3ad Dynamic link aggregation: Creates aggregation groups that share
the same speed and duplex settings. Utilizes all slaves in the active aggregator
according to the 802.3ad specification.
Prerequisites:
›ethtool support in the base drivers for retrieving the speed and duplex of each
slave.
›A switch that supports IEEE 802.3ad Dynamic link aggregation. Most switches
require configuration to enable 802.3ad mode.
mode=5 (balance-tlb)
Adaptive transmit load balancing: Channel bonding that does not require any
special switch support. The outgoing traffic is distributed according to the load
(computed relative to the speed) on each slave. Incoming traffic is received by
the current slave. If the receiving slave fails, another slave takes over the MAC
address of the failed receiving slave.
Prerequisite:
›ethtool support in the base drivers for retrieving the speed of each slave.
mode=6 (balance-alb)
Adaptive load balancing: Includes transmit load balancing and receive load
balancing for IPV4 traffic, and does not require any special switch support. The
receive load balancing is achieved by ARP negotiation. The bonding driver
intercepts the ARP replies sent by the local system on their way out and
overwrites the source hardware address with the unique hardware address of a
slave in the bond such that different peers use different hardware addresses for
the server.
This manual suits for next models
1
Table of contents
Other skybox Server manuals

Popular Server manuals by other brands


IBM
IBM N Series Installation and configuration instructions

Meinberg
Meinberg IMS-LANTIME M500 manual

Supermicro
Supermicro SUPERSERVER 1028UX-LL1-B8 user manual

HPE
HPE ProLiant DL160 Gen10 Product End-of-Life Disassembly Instructions

Lenovo
Lenovo ThinkAgile SXM4200 Administrator's guide

Dell
Dell PowerEdge T610 Getting started with


