Skydroid C10 User manual

Skydroid C10用户手册
V1.0
小型高清三轴云台
建议:在您阅读本用户手册时,边阅读边操作。您在阅读这些说明时,如遇到困难请查阅本
用户手册或致电我们售后( 400-6996-520 )及云卓微信公众平台,云卓官方群:318480806 查
看相关问题问答。
泉州云卓科技有限公司

售后服务条款
云卓官方群2群 云卓微信公众平台
1.本条款仅适用于泉州云卓科技有限公司所生产的产品,云卓授权经销商销售的产品亦适用本
条 款 。
2.本公司产品自购买之日起,一周内经我司核实为非人为造成的质量问题,由云卓承担返修产
品的往返快递费,购买云卓产品一周以上一年以内经我司核实为质量问题,用户和云卓各自承
担寄出返修产品的快递费。
3.返修时需提供购买凭证和保修卡或网络平台交易记录。
4.云卓产品自购买之日起七天内,在正常使用情况下出现非人为造成的质量问题,外观无损坏,
凭保修卡及购机凭证在经销商处协商可以免费更换同型号产品;经销商在收到更换产品时烦请
第一时间通知云卓公司予以备案更换。
5.云卓产品将由泉州云卓科技有限公司提供终身售后服务, 属于非人为造成的质量问题,一年
内免费保修;对于自购买之日起人为的损坏、改装、拆机及超过一年免费保修期的,用户须支付
往返邮费及维修费用。
6.为确保您的权益受到保护,并能及时有效的为您服务,请在购买云卓产品时完整填写好保修
卡及索要购机凭证。 用户享受本售后服务条款必须提供保修卡及购机凭证。
7.返修产品将于云卓公司收到后的 15 个工作日内寄回给顾客,并附上维修报告。
8.以上售后服务条款仅限于中国大陆销售的云卓产品。
港澳台及海外客户的售后问题发至邮箱 [email protected],具体售后细则视情况而定。

警告和免责申明
目录
本文所提及的内容关系到您的安全以及合法权益与责任。使用本产品之前,请仔细阅读本文
以确保已对产品进行正确的设置,不遵守和不按照本文的说明与警告来操作可能会给您和周围
的人带来伤害,损坏本产品或其他周围的物品。本文档及所有相关的文档最终解释权归云卓科
技所有。如有更新,恕不另行通知。请访问http://www.skydroid.xin/官方网站以获取最新的产
品信息。
C10云台出厂前已根据其所搭载的相机和镜头完成调试,切勿自行调整云台或者改变其机械
机构,也不要为云台增加其他外接设备。云台结构精密,请勿自行对C10作任何拆装,否则将会
导致云台相机工作异常。
为了您和他人的安全,请确保云台调试时,飞行器处于安全的状态,不在易燃易爆及有儿童的
环境下通电调试,强烈建议您在调试前取下飞行器的螺旋桨。
A) 环境温度:-10°C~z+60°
B)贮存温度:-25°C~+60°C。
C)大气压力:86kPa~106kPa
D)使用地点不允许有爆炸危险的介质,周围介质中不应含有腐蚀金属和破坏绝缘的气体及导
电介
质 ,不允许充满水蒸气及有严重的霉菌存在。
E)使用地点应具有防御雨、雪、风、沙、灰的设施。
由于我公司无法控制用户的具体使用、安装、改装以及使用不当等情况。由以上所造成的直接、
间接损失或损伤,我公司将不承担相应的损失及赔偿责任。如使用、安装、组装云卓科技产品,相
应的结果由用户承担。因使用本产品而造成的间接或直接损失与伤害,我公司概不负责。
目录...........................................................................................................................................
一、产品简介..............................................................................................................................
二、产品清单..............................................................................................................................
三、安装与调试..........................................................................................................................
3.1 云台安装注意事项........................................................................................................
3.2 云台主体结构说明........................................................................................................
3.3 云台线路连接图及说明.................................................................................................
四、云台功能的使用...................................................................................................................
五、产品参数..............................................................................................................................
六、云台尺寸,角度标注.............................................................................................................
1
2
2
3
3
4
5
6
7
8
1

一、产品简介
二、产品清单
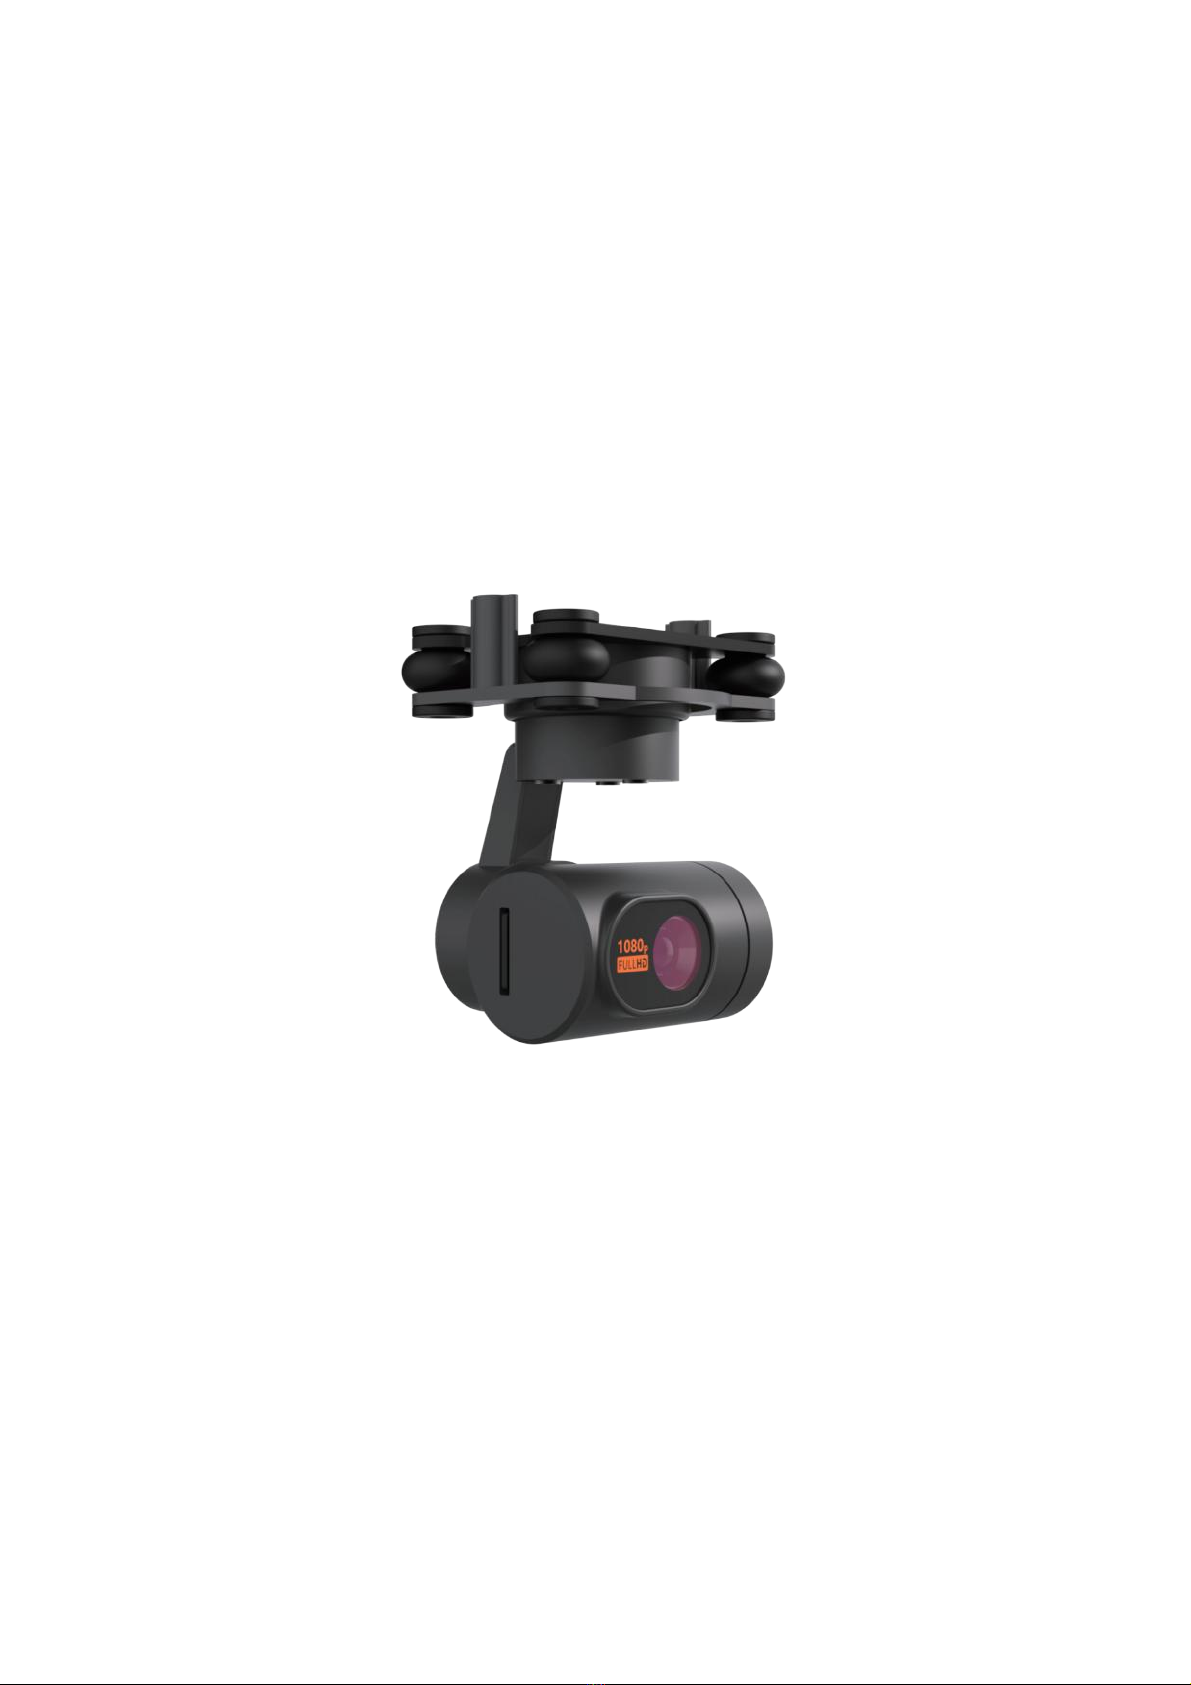
C10是一款小型高清三轴云台,搭配H16使用,云台相机720P 25fps高清无畸变摄像头,为您
展现真实视野。使用工业级三轴增稳结构,大幅降低画面抖动,使画面始终处于平稳状态。轻量
化设计,重量仅61g,减轻载具负荷,可用于各种规格尺寸的载具。
云台主体×1
(云台机身采用特殊的走线方
式以免线材缠绕)
云台固定螺丝(M2*6)×2
(不标配)
电源及网络控制线×1
Micro-SD存储卡×1
(16G内存卡出厂已插入云台内)
2
三、安装与调试
1.云台不使用的时候请勿悬挂于飞行器上,长期悬挂会加速避震球变形导致避震效果下降出现
果冻现象;
2.云台安装时挂载杆、悬挂钩及避震板之间必须保持相互间的绝对垂直与平行,不正确的安装
将引起避震球变形导致避震效果下降和无法自检,见下图。
3.云台出厂已调试好,连接H16时可以直接使用。
4.以下为云台安装示意图:
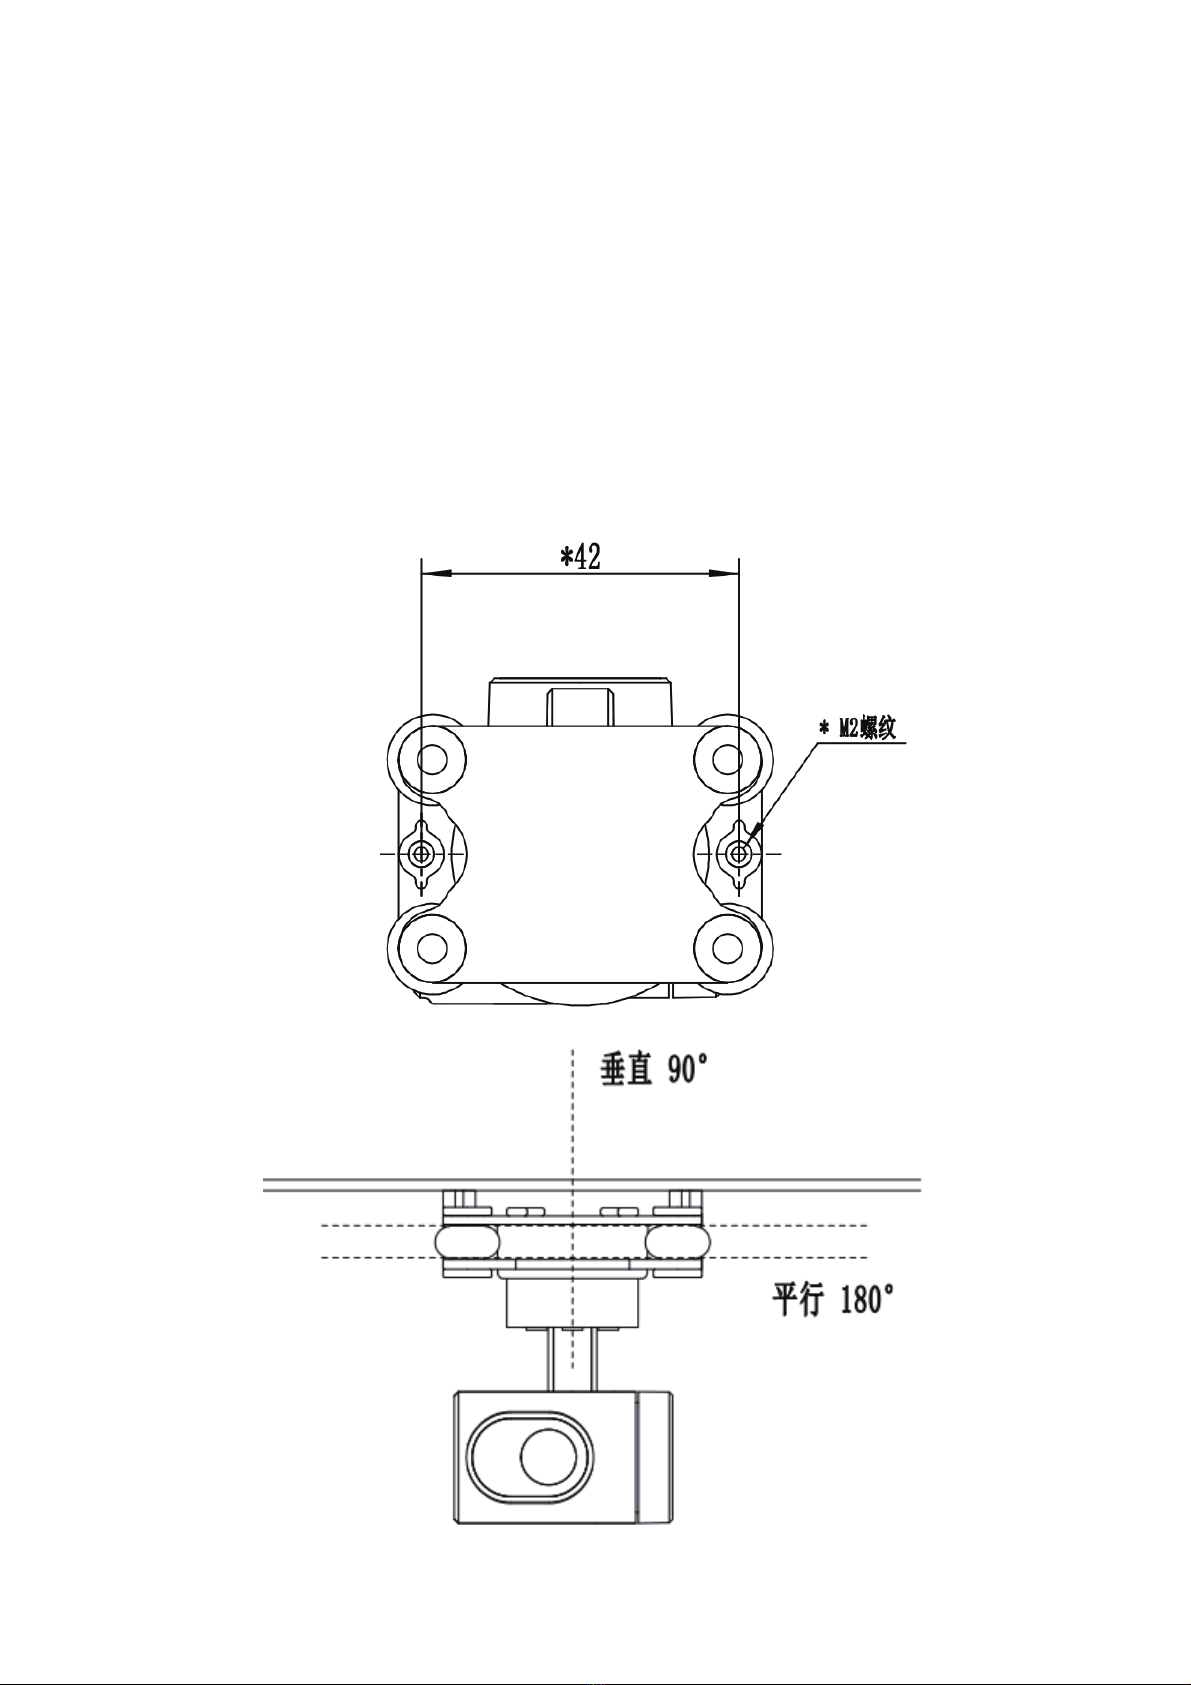
3.1 云台安装注意事项
3

3.2 云台主体结构说明
4
1
2
3
5
6
4
1
2
3
4
5
6
固定孔(带螺纹)M2*6
指向轴电机
横滚轴电机
俯仰轴电机
镜头
内存卡槽
对应部位序号
3.3 云台线路连接图及说明
5
➀7.2V-72V ➁网口线
POW+SBUS
GND7.2V-72V GND SBU
S
①电源线
(长度50cm)
红色JST-2P公头,供电电源:7.2V-72V (直流电源或者锂电池)
与H16接收机POW供电电压范围相同。
云台相机目前可支持最高容量为64 GB的金士顿Micro SD卡。由于云
台相机要求快速读写720P视频数据,请使用标配的闪迪16G内存卡或
者另购金士顿32G Class 10规格的Micro SD卡,以保证视频正常录制。
注:请勿在录影过程中拔出Micro SD卡,否则拍摄过程中得到的影像
有可能会丢失。
网络IP高清视频输出 RTSP码流rtsp://192.168.144.108:554/stream=0
网络IP信号
RX-:网络IP信号
RX+:网络IP信号
TX-:网络IP信号
TX+:网络IP信号
视频传输
存储卡
②网口线
(信号传输
长度50cm)
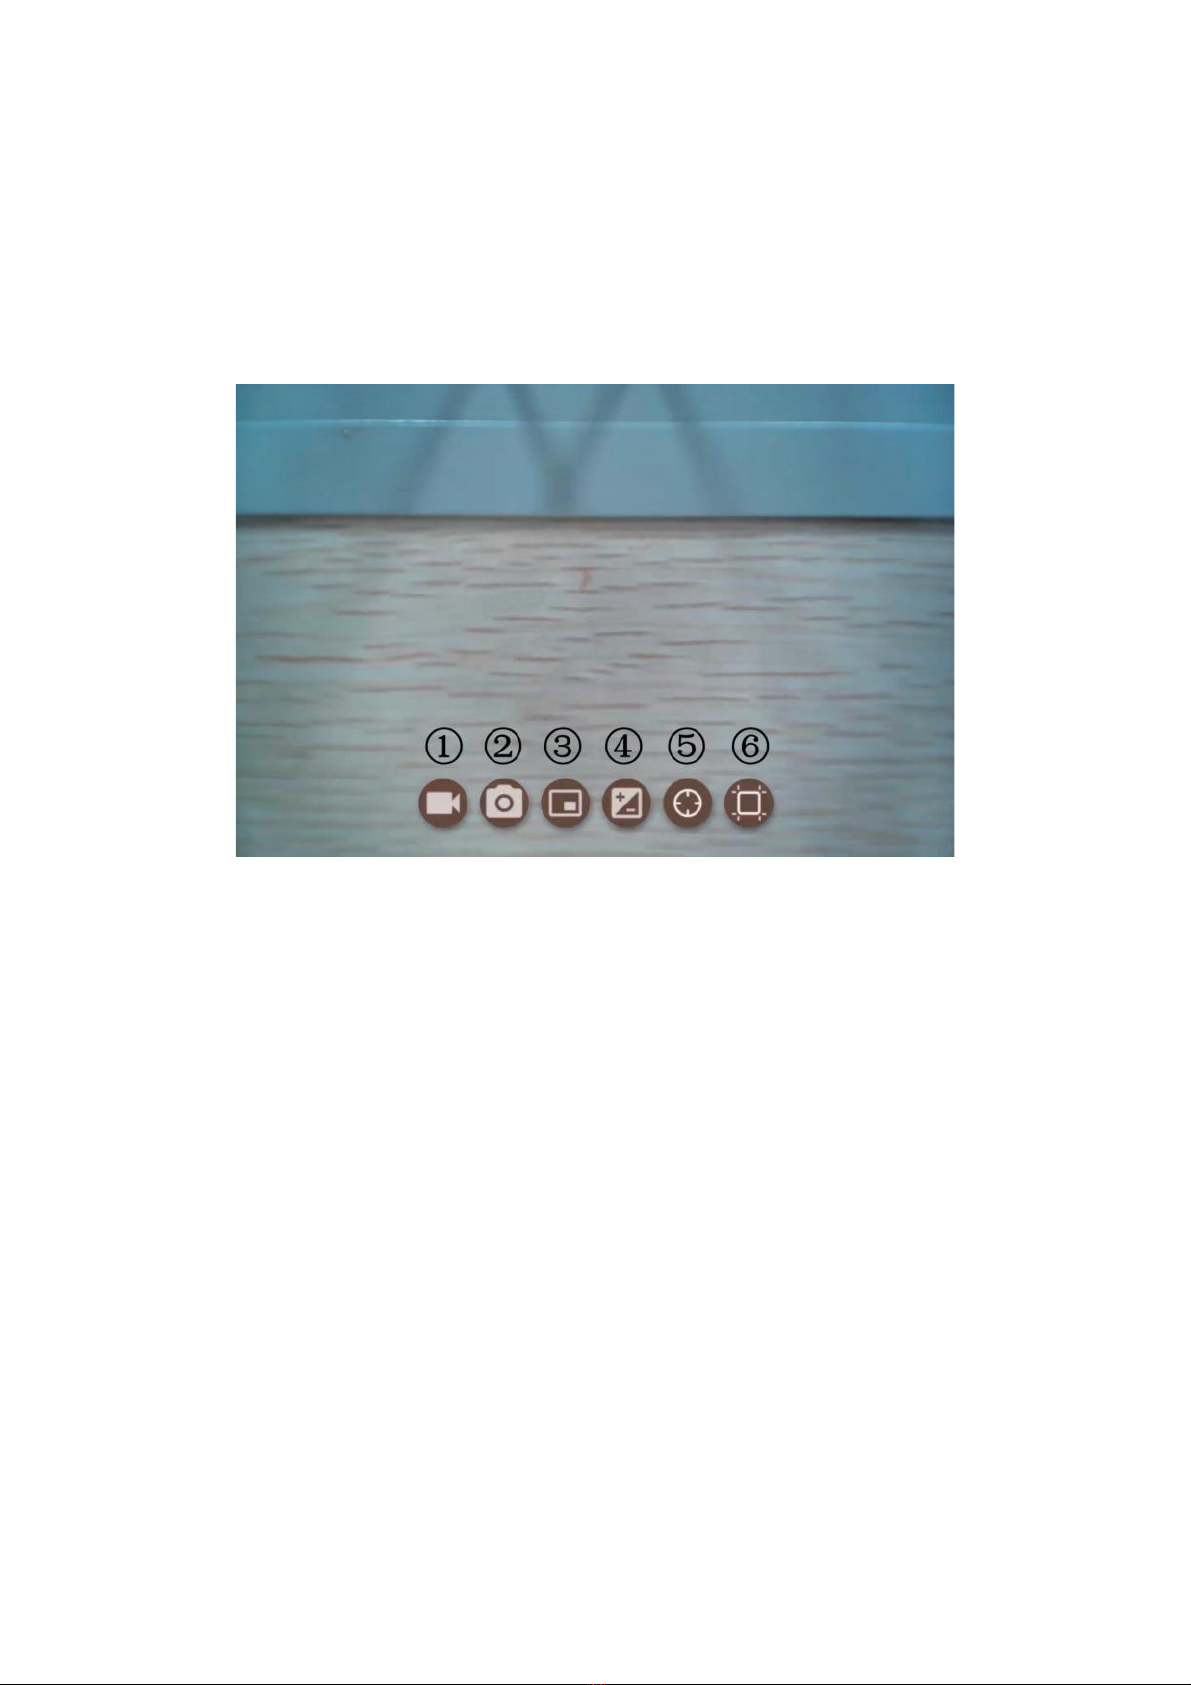
四、云台功能的使用
H16遥控器安装云台FPV软件,并打开。软件地址:
http://file.skydroid.xin/SkydroidCameraFPV.apk
1. 云台自检
云台吊装安装固定好后,供电,云台会进入上下,左右自检,等待自检完成。
2. 录像、拍照
检查云台是否插入了内存卡,如无法识别内存卡,APP右下角会提示No TFCard。
2.1 单击①录像键,云台开始录制视频,录像图标变成红色,RECORD...(表示正在录制)再次单
击录像键停止录像,SAVING...(文字消失后表示存储完毕)。
2.2 单击②拍照键,云台开始拍照,SAVING...(文字消失后表示存储完毕)。
3. 云台悬浮窗,单击图中③悬浮窗,界面进入悬浮状态。
4.④调参设置
4.1 其他参数。可设置云台画面翻转,显示当前云台的版本号、帧率、GOP、码率(不可更改)。
4.2 云台控制。打开虚拟摇杆,可以控制云台上下左右。
右侧模式键可控制[一键仰头],[一键回中],[一键向下]模式。
4.3 云台校准。可设置水平校准,垂直校准,云台微调。注意,云台出厂已校准完成不需要校准。
随意校准会导致云台无法正常工作!
4.4工作模式。吊装模式(出厂默认)此时云台不可倒装。倒装模式:可设置云台倒装工作。点击
倒装模式,云台会进入倒装模式,将云台倒放,选择4.1其他设置,选择翻转打勾,确认。倒装后此
时不可吊装,如要切回吊装模式安装,需要点击吊装模式,再把云台吊装,选择4.1其他设置,选择
翻转打勾,确认。
5.单击⑤十字瞄准,画面显示十字准星。
6.单击⑥辅助线,画面显示辅助线。
6

五、产品参数
7
产品名称
输入电源
工作电流
工作环境温度
重量
外形尺寸(长宽高)
俯仰角度
指向轴角度
横滚轴角度
像素
镜头规格
输出方式
图传分辨率
视频录像存储分辨率
视频存储格式
照片存储分辨率
照片存储格式
一键回中
一键向下
一键仰头
支持存储卡类型
支持文件系统
产品参数
工作模式
C10
7.2V~72V直流
210mA
-10℃~+60℃
61g
51mm*43.3mm*61.7mm
-90°~+10°
-90°~+90°
45°
有效像素:200W
1/2.7 sensor EFL=2.4mm
RTSP码流H264
720P
720P
720P
JPEG
吊装模式(出厂默认)
倒装模式(可自行设置)
支持
支持
支持
FAT32
目前只支持标配的闪迪16G内存卡与
金士顿32G Class 10规格的Micro SD卡
H264
(可使用PotPlayer播放器或者其他支持H264格式的播放器播放)
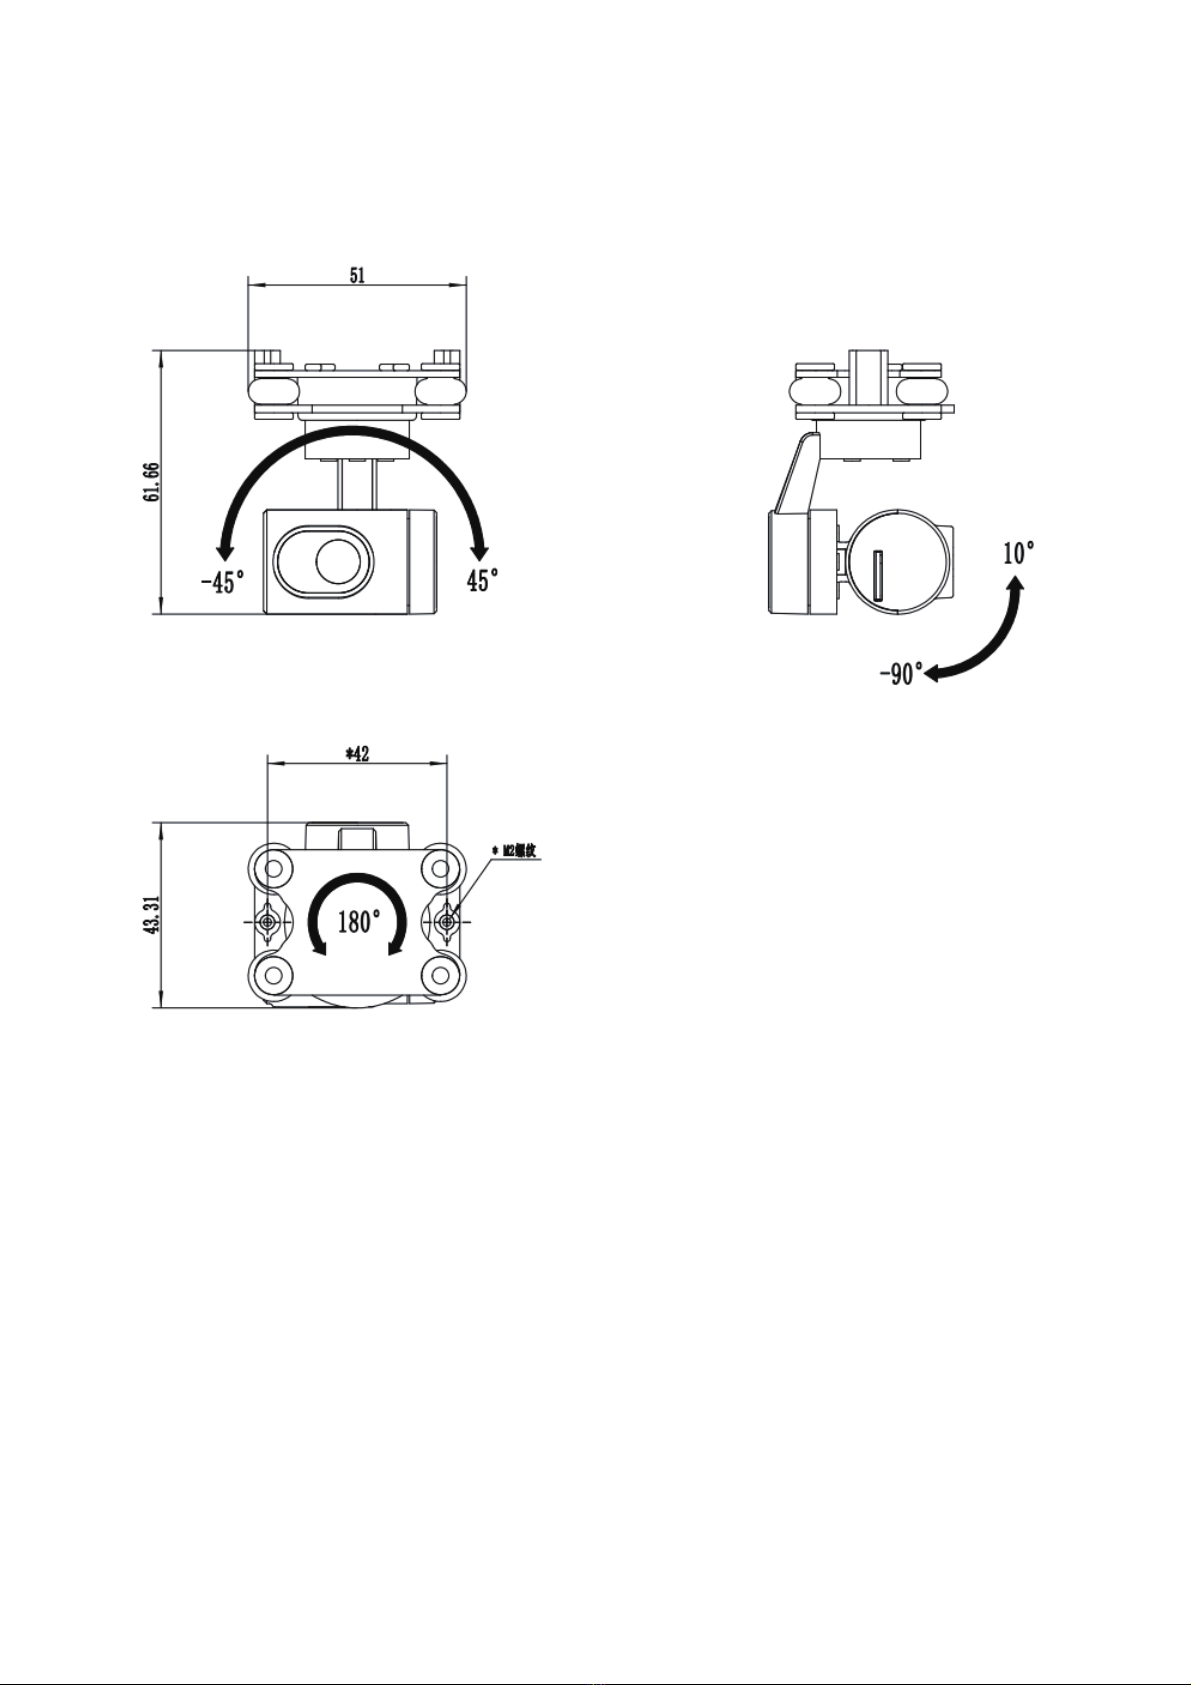
六、云台尺寸,角度标注
因版本演进及客户需求变更,相应命令及控制会有所变更. 请联系云卓科技有限公司, 来获取最
新资讯及技术支持.因产品更新升级,尺寸重量等参数可能会有变化, 敬请谅解.
8

泉州云卓科技全国服务热线
400-6996-520
产品名称:C10
制造商:泉州云卓科技有限公司
地址:福建省泉州市高新产业园区海西育成基地A幢2楼
www.skydroid.xin
温馨提示:使用前请仔细阅读操作说明书!
微信公众号
Skydroid C10
User Manual
V1.0
Small HD 3 Axis Gimbal
Suggestion: When you read this User Manual, you should read and operate at the
same time. When reading these instructions, if you encounter difficulties, please refer to
this user manual or call our after-sales service (400-6996-520) or visit our official QQ chat
group: 318480806 to view the relevant questions and answers.
Skydroid Co., Ltd

After sales service terms
1. This clause is only applicable to the products produced by Skydroid, and the products
sold by Skydroid authorized dealers are also applicable to this clause.
2. As of the date of purchase, if the product of our company is verified by our technicians
as a quality problem caused by non-human factors within one week, Skydroid shall afford
the shipping fee for the repaired product. If the Skydroid product is verified as a quality
problem by our technicians within one week and one year after purchase, the user and
Skydroid shall afford the shipping fee for sending the repaired product respectively.
3. Purchase voucher and warranty card or on-line transaction record shall be provided
when repairing.
4. Within 7 days from the date of purchase, Skydroid products have quality problems that
are not caused by human activities under normal use, and the appearance is not dam-
aged. With the warranty card and purchase proof, the users can negotiate to replace prod-
ucts of the same model for free from our local dealers; When receiving the replacement
product, the dealer is kindly requested to inform Skydroid of the replacement at the first
time.
5. Skydroid will provide lifelong after-sales service for Skydroid products. If the quality
problem is caused by non-human factors, it will be guaranteed free of charge within one
year; The user shall pay the round-trip shipping and maintenance fees for man-made
damage, modification, dismantling and exceeding the one-year free warranty period
from the date of purchase.
6. To ensure your rights and interests are protected and that you can be served in a timely
and effective manner, please complete the warranty card and ask for the purchase vouch-
er when purchasing Skydroid products. Users shall provide warranty card and purchase
certificate to enjoy the after-sales service terms.
7. The repaired products will be sent back to the customer within 15 working days after
receiving by Skydroid, and the repair report will be enclosed.
8. The above after-sales service terms are limited to Skydroid products sold in Chinese
Mainland. Send the after-sales problems of Hong Kong, Macao, Taiwan and overseas cus-
tomers to the email: [email protected]
The specific after-sales rules depend on the situations.

Warnings and Disclaimers
Contents
The content mentioned in this article relates to your safety, legal rights and responsibil-
ities. Before using this product, please read this manual carefully to ensure that the prod-
uct has been correctly set. Failure to observe and operate in accordance with the instruc-
tions and warnings in this document may cause harm to you and the people around you,
and damage this product or other surrounding objects. The right of final interpretation of
this document and all relevant documents belongs to Skydroid. It is subject to update
without notice. Please visit: http://www.skydroid.xin/ Official website to obtain the latest
product information.
C10 gimbal has been commissioned according to the camera and lens it carries before
deliver out the factory. Do not adjust the gimbal or change its mechanical mechanism,
nor add other external equipment to the C10. The structure of the C10 is precise. Do not
disassemble the C10 by yourself, or it will cause the gimbal working abnormally.
For the safety of you and others, please ensure that the drone is in a safe state during
the gimbal commissioning and is not energized for commissioning in a flammable, explo-
sive and children's environment. It is strongly recommended that you remove the propel-
lers of the drone before commissioning
A) Working temperature: - 10 ° C~z+60 ° C
B)Storage temperature: - 25 ° C~+60 ° C
C)Atmospheric pressure: 86kPa~106kPa
D)The place of use shall not have explosive media, the surrounding media shall not con-
tain gases and conductive media that corrode metals and damage insulation, and shall
not be filled with water vapor or have serious mold.
E)The place of use shall be equipped with facilities to prevent rain, snow, wind, sand and
ash.
Because our company cannot control the specific use, installation, modification and
improper use of users. For the direct and indirect loss or damage caused by the above,
our company will not bear the corresponding loss and compensation liability. If you use,
install, and assemble Skydroid products, the corresponding results will be borne by the
user. Our company is not responsible for indirect or direct losses and injuries caused by
the use of this product.
Contents...................................................................................................................................
1.Product Introduction............................................................................................................
2.Product packing List.............................................................................................................
3.Installation and debugging..................................................................................................
3.1 Precautions for C10 installation.................................................................................
3.2 Description of main structure of C10.........................................................................
3.3 Cable connection diagram and description of C10..................................................
4.Use of C10..............................................................................................................................
5.Product specifications.........................................................................................................
6.Dimensions and angle dimensions of C10.........................................................................
1
2
2
3
3
4
5
6
8
9
1

1.Product introduction
2.Product packing List
C10 is a small high-definition three-axis gimbal camera, which is used with H16/H16 Pro.
The C10 equipped with 720P 25fps high-definition distortion-free camera shows you a
true vision. The industrial three-axis stabilization structure is used to greatly reduce the
picture jitter, so that the picture is always in a stable state. Lightweight design, its net
weight is only 61g, reduce the load of the vehicle, and can be used for various sizes vehi-
cles.
C10 main body × 1
(The gimbal body adopts a
special wiring method to
avoid wire entanglement)
Fixing screw (M2 * 6) × 2
(not standard configurated)
Power supply and
network control cable × 1
Micro SD memory card × 1
(16G memory card has been
inserted into the gimbal before
delivering)
2

3.Installation and debugging
1.When the C10 is not in use, please do not hang it on the drone. Long term suspension
will accelerate the deformation of the shock absorber ball, resulting in the reduction of
the shock absorber effect and jelly phenomenon;
2.When installing the gimbal, the mounting bar, suspension hook and shock absorber
plate must be absolutely perpendicular and parallel to each other. Incorrect installation
will cause the deformation of the shock absorber ball, which will lead to the reduction of
the shock absorption effect and the failure of self inspection. Please see the below
pictures.
3.The C10 has been commissioned in the factory and can be directly used when connect-
ing H16/H16 Pro.
4.The following is the installation diagram of the C10:
3.1 Precautions for C10 installation
3
M2 thread
Vertical 90 °
Parallel 180 °

3.2 Description of main structure of. C10
4
1
2
3
5
6
4
1
2
3
4
5
6
Fixing hole (with thread) M2 * 6
Pointing axis motor
Roller axis motor
Pitch axis motor
camera lens
Memory card slot
Corresponding partsNo.
3.3 Cable connection diagram and description of C10
5
➀7.2V-72V
➁Network port cable
POW+SBUS
GND7.2V-72V GND SBU
S
①Power cable
(50cm long)
red JST-2P male plug, power supply: 7.2V~72V
(DC power supply or lithium battery)
C10 can currently support a Kingston Micro SD card with a maximum
capacity of 64 GB. As the C10 requires fast reading and writing of 1080P
video data, please use the standard Sandisk 16G memory card or
purchase a Kingston 64G Class 10 Micro SD card to ensure normal
video recording. Note: Please do not unplug the Micro SD card during
the recording process, otherwise the video obtained during the
shooting process may be lost.
network IP HD video output RTSP code stream
rtsp://192.168.144.108:554/stream=0
Network IP signal
RX -: network IP signal
RX+:network IP signal
TX-:network IP signal
TX+:network IP signal
Video transmission
The storage card
②Network port
cable (signal
transmission
length 50cm)

4.Use of C10
Installed Skydroid FPV App into the H16/H16 Pro, and opened it. App downloading
address is: http://file.skydroid.xin/SkydroidCameraFPV.apk
1. C10 self inspection
After the C10 is hoisted, installed and fixed, power is supplied, C10 will go up and down,
turn left and right for self inspection, waiting for the completion of self inspection.
2. Video recording and photography
Check whether the C10 is inserted with a memory card. If the memory card is not recog-
nized, the APP will prompt No TF card message at the lower right corner.
2.1 Click the (1) Record key, C10 starts to record video, and the recording icon turns
red, RECORD... (indicating recording is in progress) Click the Record key again to stop
recording, SAVING... (indicating storage is completed after the text disappears).
2.2 Click the ② photographing button, the C10 starts to take photos, SAVING... (the
storage is completed when the text disappears).
3. For C10 suspension window, click ③ suspension window icon, and the interface will
enter suspension state.
4.④Parameter adjustment setting
4.1 Other parameters. The C10 screen can be set to flip to display the version number,
frame rate, GOP and code rate (cannot be changed).
4.2 C10 tilt control. Open the virtual rocker to control the C10 up, down, left and right.
The mode key on the right can control it [One key Up], [One key Back] and [One key
Down] modes.
6

4.3 C10 tilt calibration. Horizontal calibration, vertical calibration and trim adjustment
can be set.Note: that the C10 has been calibrated from the factory and does not need to
be calibrated. Random calibration will cause the gimbal to fail to work normally!
4.4 Working mode. In the hoisting mode (factory default), the C10 cannot be inverted
at this time. Upside down mode: you can set the C10 upside down operation. Click upside
down mode, the C10 will enter upside down mode, please make the C10 upside down,
select other settings in 4.1, select flip check, and confirm. After inversion, hoisting is not
allowed at this time. If you want to switch back to the hoisting mode for installation, you
need to click the hoisting mode, then hoist the C10, select other settings in 4.1, select flip
check, and confirm.
5. Click ⑤ Cross aim, and the screen will display the crosshair.
6. Click ⑥ auxiliary line to display auxiliary line.
7
Table of contents
Popular Camera Accessories manuals by other brands


ROLLEIFLEX
ROLLEIFLEX 4K S-Cage user guide

Nauticam
Nauticam 83211 instruction manual

Nauticam
Nauticam NA-GX85 instruction manual

Customidea
Customidea GeoPic II instruction manual

ORION TELESCOPES & BINOCULARS
ORION TELESCOPES & BINOCULARS Solar StarSeeker 10382 instruction manual

Energizer
Energizer Digital Camera Battery NH50 Product data sheet