Slendertone ACTIVE User manual
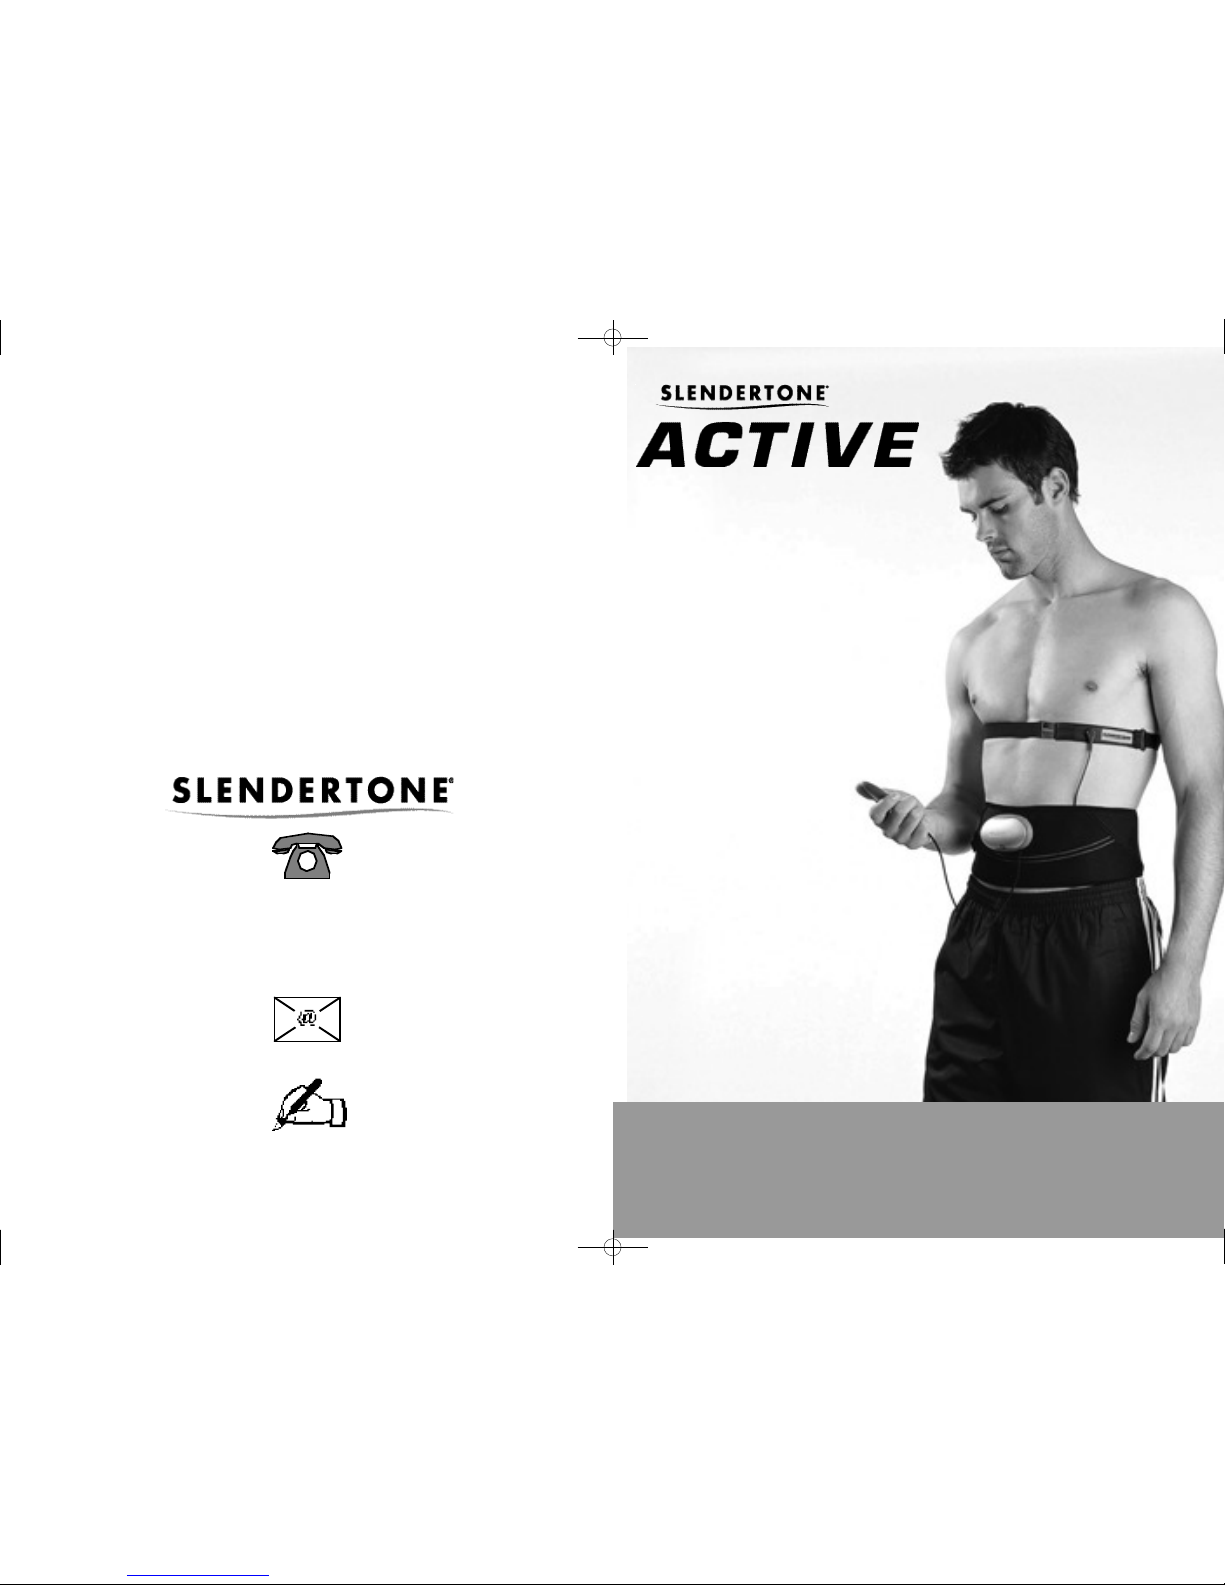
Instructions for Use
www.slendertone.com
Designed by & Manufactured for:
Bio-Medical Research Ltd., Parkmore Business Park West, Galway, Ireland.
Copyright: © 2005, Bio-Medical Research Ltd. All Rights Reserved
Part No: 2400-5401 Rev.: 10 Date of Issue: 11/05
Mode D’emploi
Bedienungsanleitung
Instrucciones de Uso
Gebruiksaanwijzingen
Istruzioni per l'Uso
Instruções Para a Utilização
United Kingdom 0845 070 77 77
Republic of Ireland 1890 92 33 88
France 0810 347 450
España: 900994467
International: +353 1 844 1016
info@slendertone.com
Active IM Male Rev 10 04/01/2006 10:31 Page 2

DETERMINE YOUR READINESS FOR PHYSICAL ACTIVITY
As with any exercise, before starting a SLENDERTONE ACTIVE training plan you must first ensure you are
physically ready for exercise. If you are in any doubt, please check the contra-indications on page 11
and if necessary, consult your doctor before beginning.
Please answer the questions below.
1. Has your doctor ever warned you of a heart condition or said
that you should only do exercises recommended by a doctor? Yes / No
2. Do you feel chest pains when you exercise? Yes/ No
3. In the past month, have you experienced any chest pain while
you were not participating in any physical activity? Yes/ N0
4. Do you lose your balance because of dizziness or do you
ever lose consciousness? Yes/ N0
5. Do you have any bone or joint problems which could be
made worse by a change in your level of physical activity? Yes/ N0
6. Are you currently taking medication for blood pressure or
for an underlying heart condition? Yes/ N0
7. Do you know of any other reason why you should not
participate in physical activity? Yes/ N0
If you answer yes to one or more of the above questions, you should consult your doctor before
starting a SLENDERTONE ACTIVE training plan. SLENDERTONE recommends that you consult your doctor before
undertaking the physical exercises mentioned in this manual. As with any new exercise, remember to
always begin slowly and gradually build-up the level of exercise.
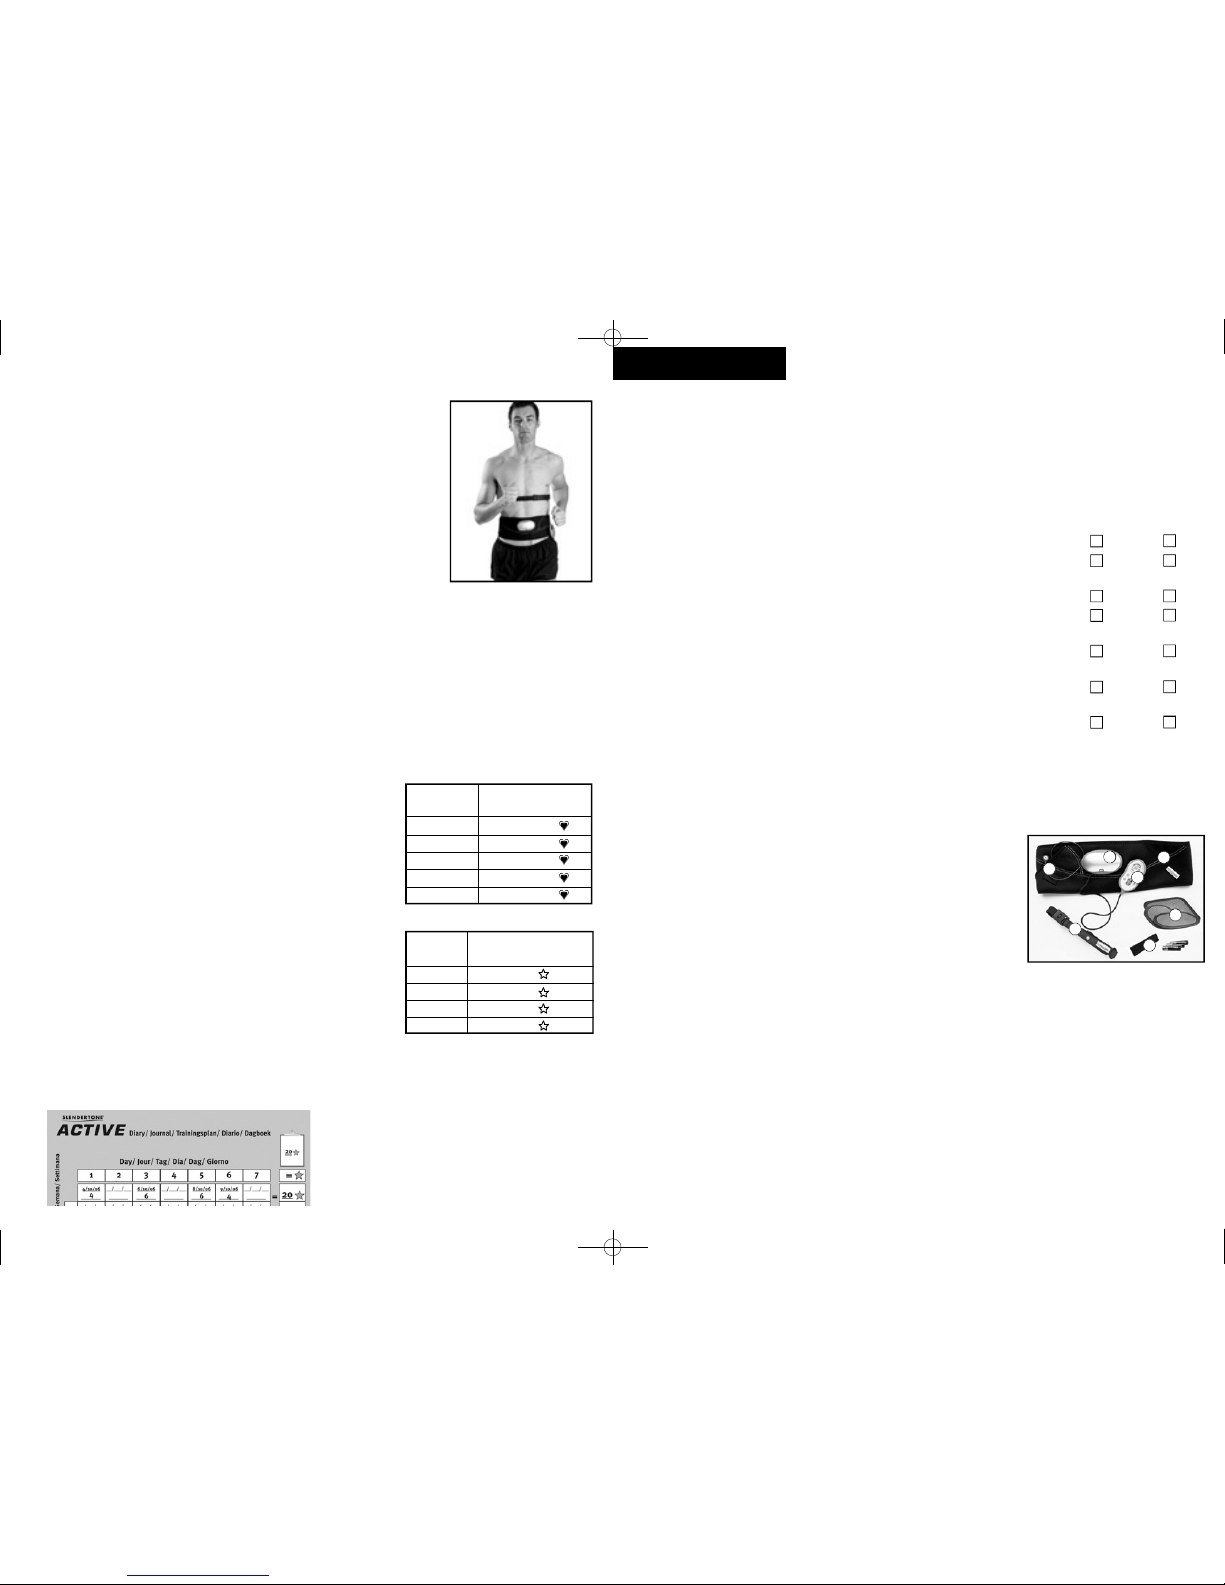
YOUR SLENDERTONE ACTIVE PACK
1. ACTIVE Belt (fits waist 28” – 42”):
With the three SLENDERTONE pads (1a) positioned on the belt (page
6), fasten the belt securely but comfortably around your waist.
2. Base Unit:
Slide the cover off the base unit and insert the batteries. Then
close the cover and slide the base unit into the holster on the belt.
3. Heart Rate Pad:
The heart rate pad is placed on the chest strap to monitor your heart rate during each SLENDERTONE
ACTIVE session.
4. Heart Rate Lead:
This lead is used to connect the belt to the chest strap.
5. Chest Strap (fits chest size 24”– 47”):
Fasten this strap around your chest in order to hold the pad firmly in place.
6. Control Unit:
This is the brain of your SLENDERTONE ACTIVE unit. It controls all of the functions described overleaf.
3
1
1a
2
6
4
5
3
English
2
If this is your first ACTIVE session, you must read the rest of this manual before you begin.
WHAT IS SLENDERTONE ACTIVE?
SLEND ERTO N E AC TI VE is a breakthrough in personalised health and fitness technology,
which tracks your heart rate to ensure you exercise at the best pace to burn fat
and improve fitness. As you exercise, ACTI VE d e l i ver s a specially designed muscle
toning treatment, using an abdominal belt, which strengthens, firms and flattens
your whole abdominal area while you exercise.
THE SLENDERTONE ACTIVE THEORY
We all need exercise in order to stay fit and healthy. However, how do you
know whether or not you are exercising at the right level? One tried and tested method is to measure
your heart rate and this is exactly what SLENDERTONE ACTIVE does for you. It monitors your heart rate as
you exercise. You can then check your display to see what your heart rate is and you’ll know whether
you are exercising below, above or at your optimum level.
Using this technique, ACTIVE ensures that you always exercise at peak efficiency.The reason for this is
simple. When you exercise with your heart rate at its optimum range (your “Training Zone”), your
fitness improves.
QUICK GUIDE TO USING SLENDERTONE ACTIVE
As an example; if you wish to use the Walk and Tone plan (P1), just follow the steps below.
(a) SET-UP
1. Setup and switch on your ACTIVE unit (see page 6).
2. Increase the intensity from the belt to a level you find comfortable.
(b) GO
3. Go! Walk as the unit tones your abs.
4. Complete your session, checking your heart rate on the display
from time to time. Make sure you are exercising at the correct level –
see the heart rate table. e.g. if you are aged 45 keep your heart rate
between 106 and 141.
(c) STOP
5. Once your session is over, complete the training diary with your
ACTIVE points score for that session. The ACTIVE points table tells you
how many points to fill in.
(d) FOLLOW THE PLAN
6. Reach your recommended weekly points target and feel the results!
In the example below the target is 20 AC TIVE points. We recommend this
target for beginners.
Time
15:00
30:00
45:00
60:00
Walk & Tone
2
4
6
8
HEART RATE TABLE
ACTIVE POINTS TABLE
(FOR WALK & TONE)
Age Walk & Tone
20 - 29 114 - 152
30 - 39 110 - 147
40 - 49 106 - 141
50 - 59 102 - 136
60 - 69 98 - 130
Replacement SLENDERTONE ACTIVE diaries
are available on www.slendertone.com.
Active IM Male Rev 10 04/01/2006 10:31 Page 4
SLENDERTONE ACTIVE TRAINING PLANS
SLENDERTONE ACTIVE offers you a choice of three training plans. Each plan will benefit you in a different
way. For example, if you want to improve your health and fitness, you can use either Plan 1 or Plan 2,
depending on your current level of fitness. On the other hand, if you want to just tone your abdominal
muscles, you can use Plan 3.
Each plan has a weekly points target. When you use your SLENDERTONE ACTIVE you earn ACTIVE points. The
table below shows you the weekly targets for each of the 3 training plans.
NOTE:
SLENDERTONE ACTIVE may also be used with a treadmill or a stationary exercise bike.
SLENDERTONE ACTIVE POINTS
The ACTIVE Points Table below shows you how many points you get for each of your SLENDERTONE ACTIVE
Training Plans. You will also receive more points by exercising for longer within the individual plans.
As you can see from the table below, 30 minutes of Walk & Tone earns you 4 points, whereas 45
minutes of Walk & Tone earns you 6 points. Feel free to go over your weekly target if you wish to get
even more from your SLENDERTONE ACTIVE unit.
When exercising, you must keep your heart rate at the correct level. The Heart Rate Table below
shows you what your heart rate should be when using the Walk & Tone and Jog & Tone plans,
depending on your age. This is called your Training Zone. This is necessary to train at the best pace to
burn fat. For best results, use the highest muscle training intensity you can.
Age Walk & Tone Jog & Tone
20 - 29 114 - 152 143 - 168
30 - 39 110 - 147 138 - 161
40 - 49 106 - 141 132 - 155
50 - 59 102 - 136 127 - 149
60 - 69 98 - 130 122 - 143
5
Plan Description What to do Weekly target
P1 Walk & Tone Go for a brisk walk while using the 20 ★
SLENDERTONE ACTIVE belt 3-5 times per week.
P2 Jog & Tone Go jogging while using the SLENDERTONE 18 ★
ACTIVE belt 2-4 times per week.
P3 Tone Use the SLENDERTONE ACTIVE belt at work or in 5★
the comfort of your home 5 times per week
for 30 minutes.
MINUTES WALK &JOG &TONE
EXERCISED TONE TONE
15:00
30:00
45:00
60:00
1/2
1
-
-
2
4
6
8
3
6
9
12
ACTIVE POINTS TABLE ( )
1~ 50 kcal.
HEART RATE TABLE ( )
English
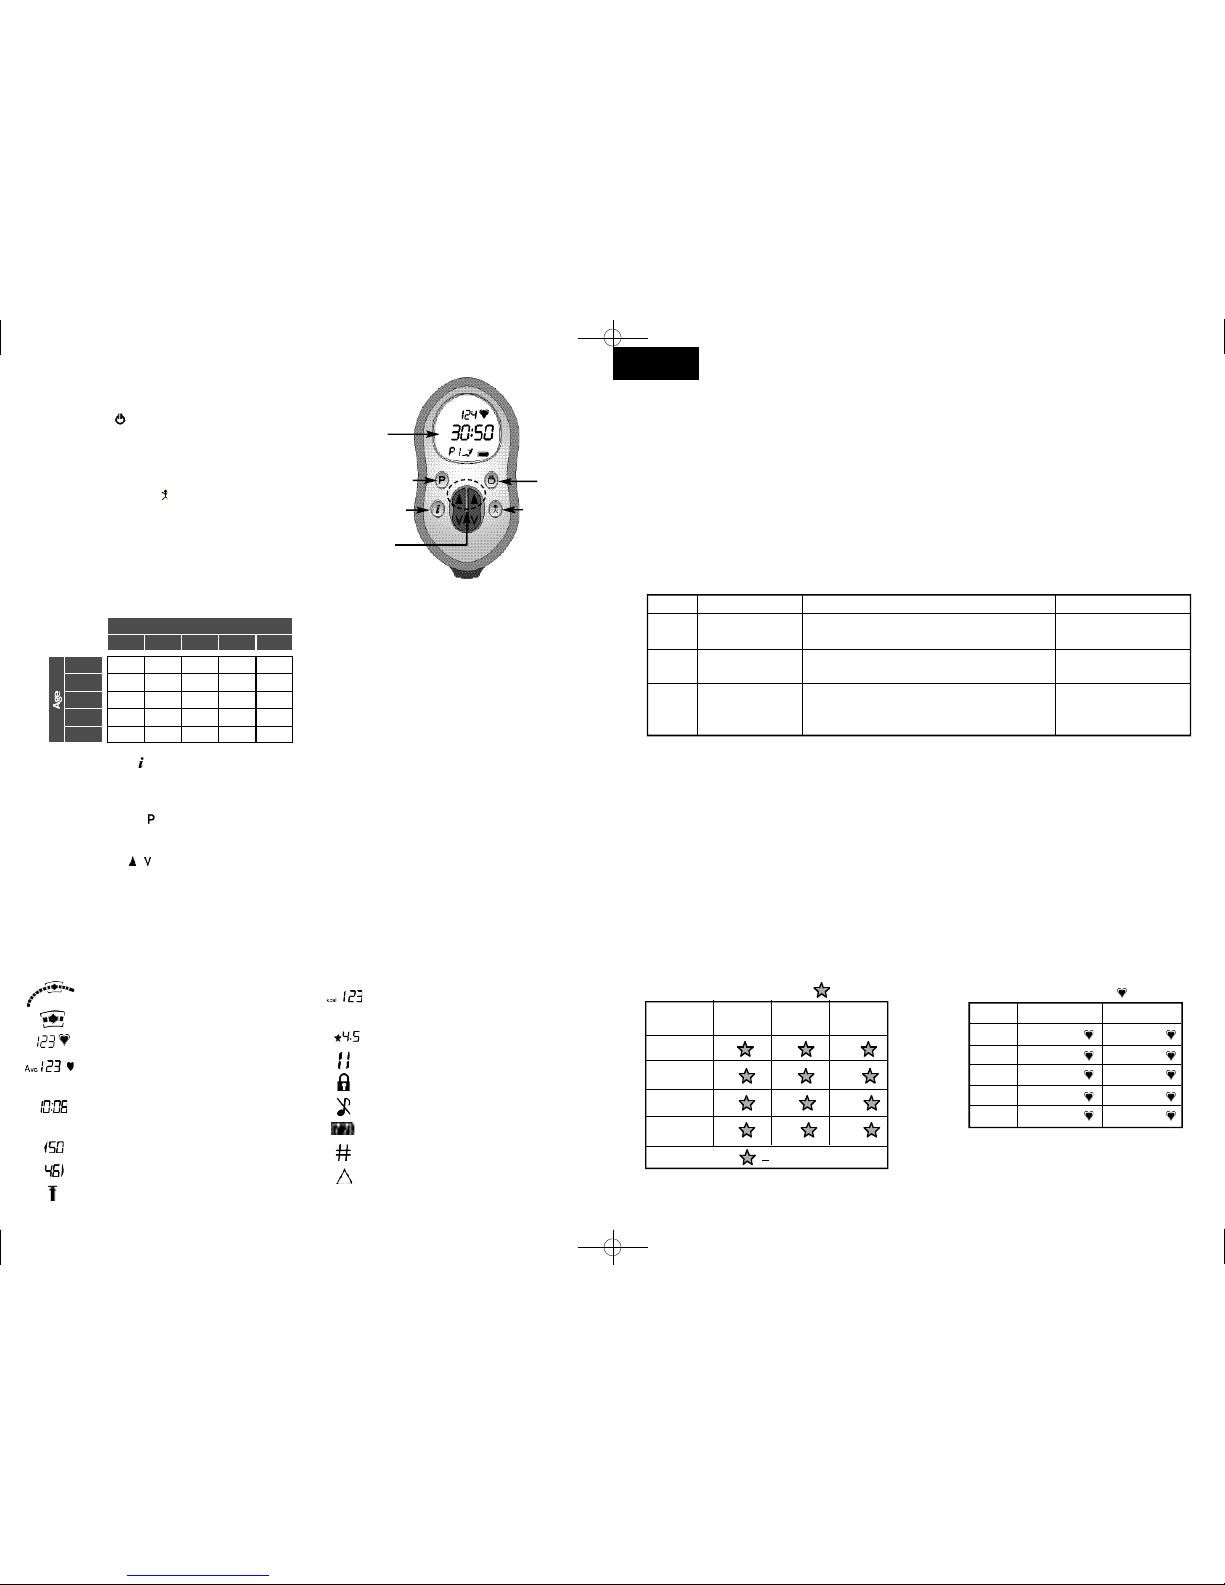
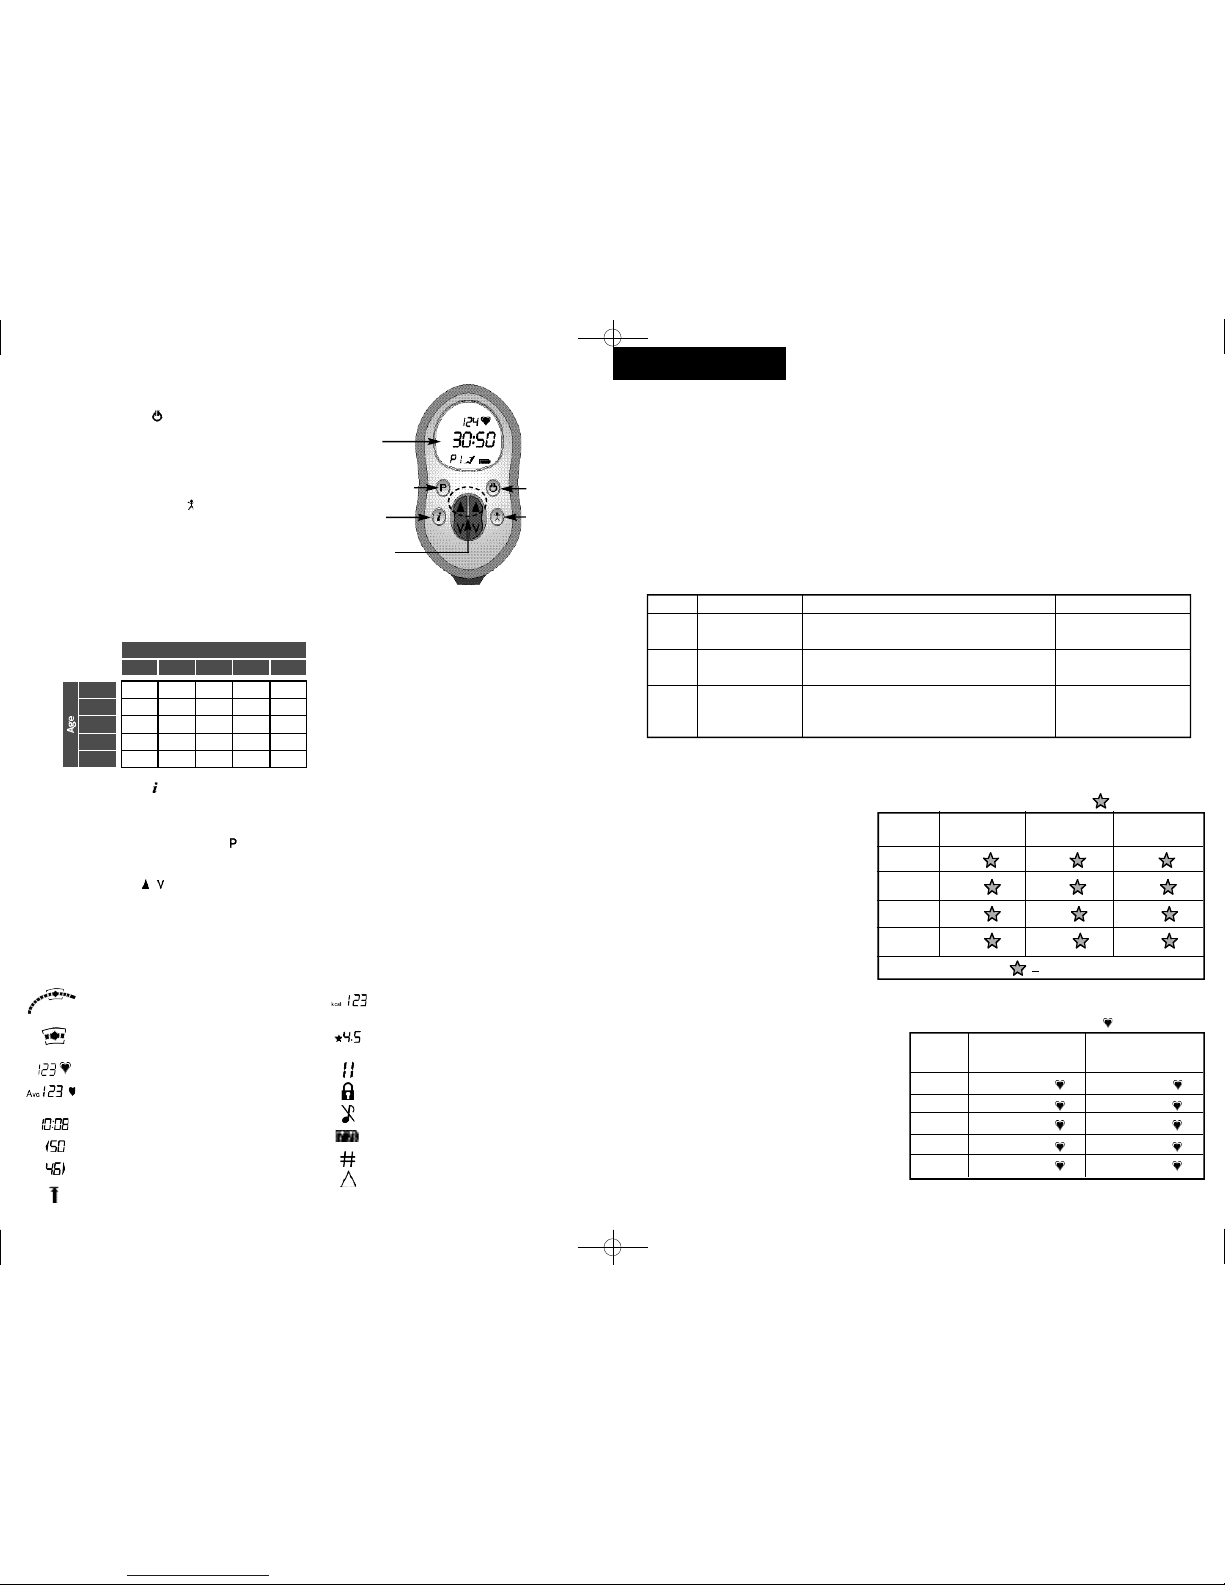
SLENDERTONE ACTIVE CONTROL UNIT
ON/ Off Button ( ):
Press for 2 seconds to switch your unit on or off. Press
briefly during a session to pause the session and press
briefly again to restart it.
Personalisation Button ( ):
Press this button to activate the personalisation
screen. Use either intensity button to scroll to the
code which best corresponds to you and then press
the personalisation button again to enter.
Example:
If John is 44 years old (read line across from 40-49) and weighs 65 Kg (read down from 60-69), you can
determine, using this chart, that John’s code is 9. Now determine your code from the chart.
Information Button ( ):
Press this button to check your average heart rate, calories burned, ACTIVE points, intensity levels and
total number of sessions (see page 7).
Training Plan Button ( ):
Select one of the three Training Plans using this button (see page 5).
Intensity Buttons ( / ):
Press the up/down arrows to increase/decrease the muscle training intensity.
50 - 5960 - 69
20 - 29
30 - 39
15 15 14 13 13
12 12 11 10 10
9 9 8 8 7
6 5 5 4 4
3 3 2 2 1
40 - 49
50 - 59
60 - 65
70 - 79 80 - 89 90 +
Weight (Kg)
Graphical heart rate indicator.
Heart rate Training Zone.
Your current heart rate.
Average heart rate in current
session.
Time remaining/ elapsed in current
session.
Intensity on your left side.
Intensity on your right side.
Highest intensity for current/ last session.
Number of calories burned in the
current session.
ACTIVE points scored in current session.
Programme is paused.
Keylock function activated.
Mute function activated.
Battery power remaining.
Number of sessions to date.
Poor pad contact.
4
SLENDERTONE ACTIVE DISPLAY
The display on your SLENDERTONE ACTIVE control unit supplies you with all the information you need to
exercise at your ideal pace. This will let you keep track of your progress.
Display
Screen
Training Plan
Button On/Off
Button
Persona li sation
Button
Information
Button
Intensity
Buttons
Personalising gives extra heart rate feedback and
improves the accuracy of your calorie counter.
NOTE:
Calorie feedback is an estimate and is based on
keeping your heart rate within your Training
Zone.
Code Table:
Active IM Male Rev 10 04/01/2006 10:31 Page 6

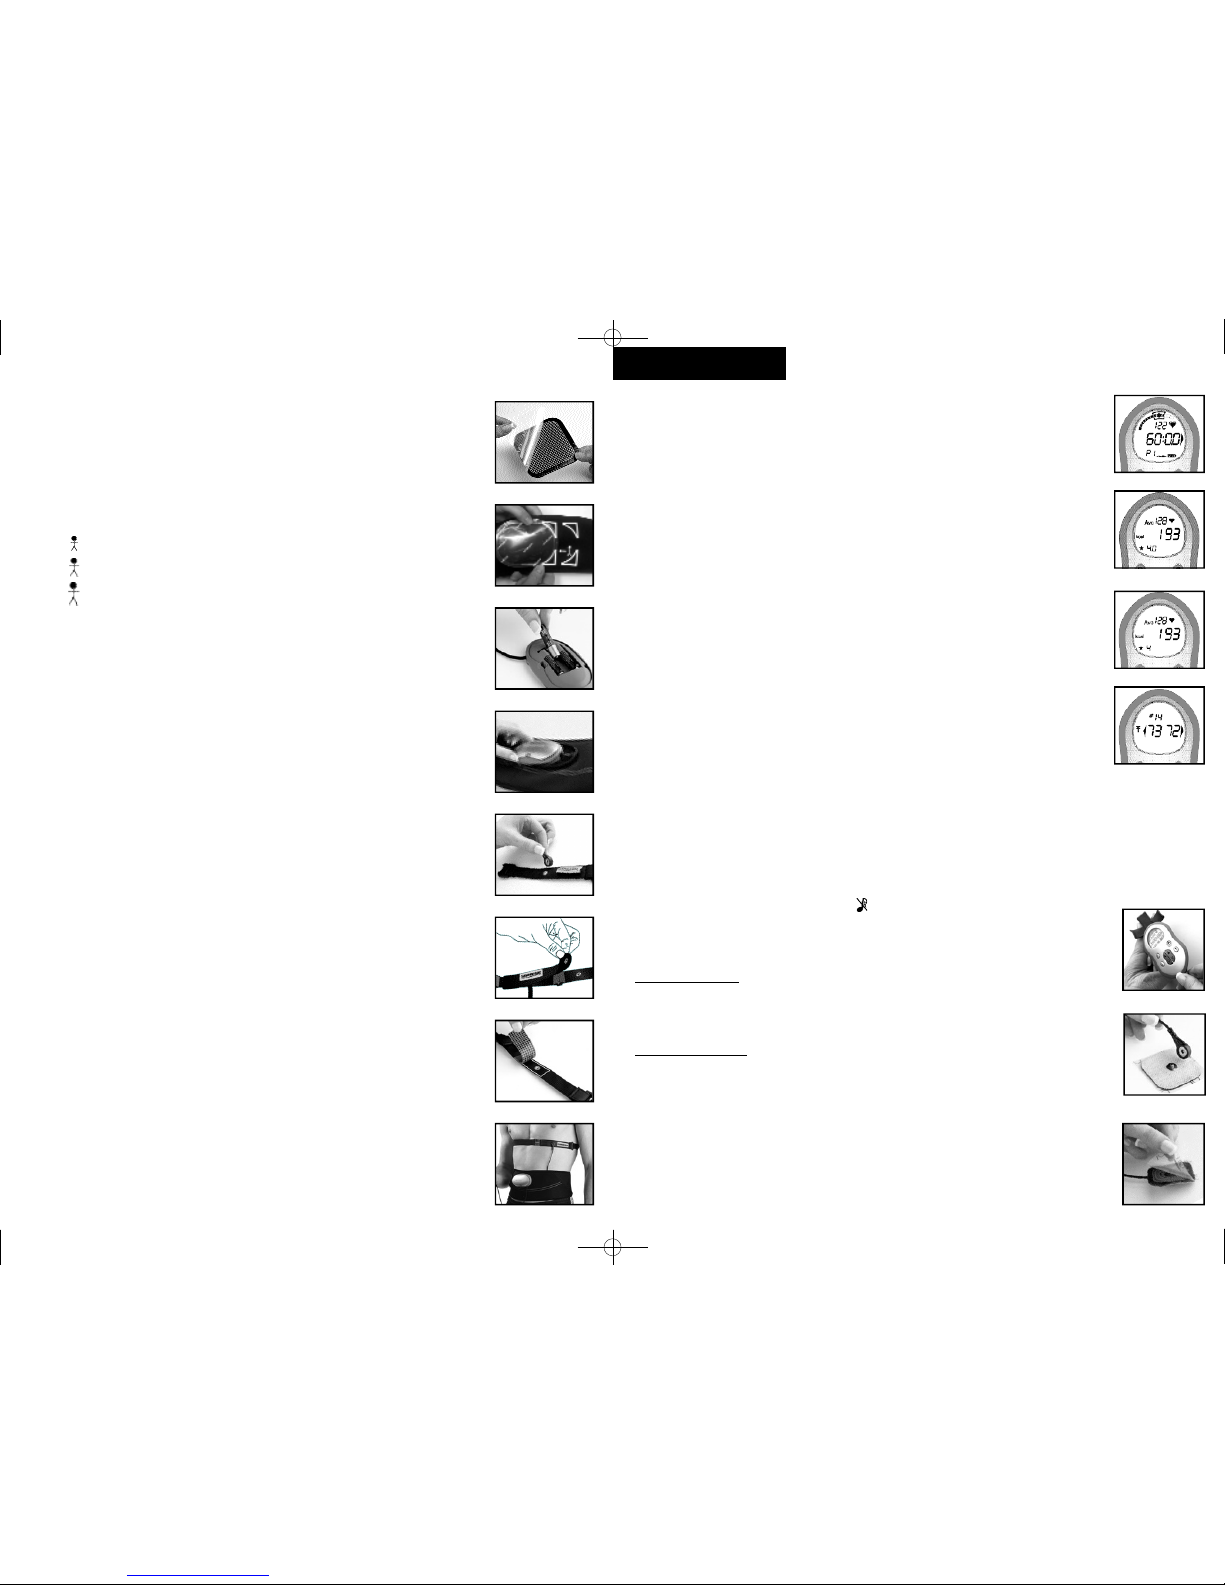
9. At the end of a session, the control unit’s display will alternate between Fig. a
and Fig. b. You can use this information to record your average heart rate for
that session, the number of calories you have burned and the ACTIVE points
earned. You can also check your heart rate at the end of the session and whether
or not you were exercising within your training zone.
THE INFORMATION BUTTON (i)
Your SLENDERTONE ACTIVE unit stores information about current and previous sessions
which can be accessed by using the information button. You can access this
inf orm ation while a programme is running.
Press the information button once to see (Fig. c):
1. Your average heart rate for the current session.
2. The number of calories you’ve burnt during the current session.
3. Your ACTIVE points score for the current session.
Press the information button twice to see (Fig. d):
4. The total number of sessions you have completed (returns to zero after 199).
5. The highest intensity you have reached in the current session.
Press the information button a third time to return to the default display.
OTHER FUNCTIONS
Intensity Keylock Function
If you find a comfortable intensity level, press the training plan button and then press
the information button within 3 seconds to activate the keylock function. Do the same
again to deactivate this function.
Mute Function
If you want to switch off your unit’s sound effects, press the personalisation button for
2 seconds. The symbol will appear on the display. Do the same again to deactivate
the mute function.
ADDITIONAL INFORMATION
THE BELT CLIP
Your SLENDERTONE ACTIVE unit is supplied with a magnetic belt clip. Simply press the
rounded side of the clip onto the back of control unit (Fig. e) and then attach the belt
clip to your SLENDERTONE ACTIVE belt or another item of clothing.
ADHESIVE PADS
As well as the heart rate pad for the chest strap, you will also find 2 other heart rate
pads in the pack. These pads can be used on individuals with no body hair in the
upper chest area. To use one of these instead of the chest strap and pad;
1. Attach the heart rate pad to the lead (Fig. f).
2. Remove the cover from the adhesive side of the heart rate pad (Fig. g) and position
the pad on the upper-right side of your chest bone. You may need to try this a
couple of times in order to get the correct position for a strong heart rate signal.
7
Fig. a
Fig. b
Fig. c
Fig. d
Fig. e
Fig. f
Fig. g
English
USING YOUR ACTIVE UNIT
1. Remove the cover from the patterned side of the large adhesive pad (Fig. a).
Place the pad between the parallel lines in the centre of the belt. Ensure the
pad completely covers the metal stud.
2. Remove the covers from the patterned side of the 2 smaller pads. Position
these either side of the large pad within the markings best suited to your figure
(Fig. b). Make sure the studs are fully covered by the pads.
3. Remove the covers from the black side of the 3 pads. Position the belt with the
large pad over your belly-button and the small pads between your hip-bones
and ribs and fasten the belt securely but comfortably around your waist.
NOTES:
Do not throw any of the covers away, as you will need them later. Ensure you
position the belt the right way up.
4. Open the battery cover on the base unit and insert 3 AAA batteries, as indicated
in the base of the compartment (Fig. c). Push the base unit into the holder until
the guidelines are correctly aligned. This may require some force (Fig. d).
5. Attach heart rate lead to the chest strap (fig. e) and close the outer cover over it
(Fig. f ).
6. Rem ove the cover from the patterned side of the heart rate pad and place it on
the inside of the chest strap, directly over the metal contact (Fig. g). Re m ove the
cover from the black side of the heart rate pad (do not throw any of the covers
away) and fasten the chest strap around your chest with the pad just under yo ur
heart (Fig. h). Adjust the chest strap to fit comfortably around your chest and
secure it using the buckle. You may need to try this a couple of times in order to
get the correct position for a strong heart rate signal.
NOTE:
If you have any problems, adjust the position of the chest strap to get better
contact with your chest.
7. Press the on/ off button for 2 seconds to switch your unit on.
8. Select your required training plan using the training plan button (P) and then
increase the intensity until you feel your abs being exercised.
NOTE:
You do not have to reach the same intensity on both sides of your body.
PAUSING THE SES SI ON :
Press the on/ off button briefly if you wish to pause the session. Press it briefly a
second time to resta r t.
6
Fig. a
Fig. b
Fig. c
Fig. d
Fig. e
Fig. f
Fig. g
Fig. h
71cm - 82cm / 28-32”
84cm - 94cm / 33-37”
96cm - 107cm / 38-42”
Active IM Male Rev 10 04/01/2006 10:31 Page 8
QUESTIONS AND ANSWERS
What if the heart rate reading becomes
extremely high (e.g. above 180)?
Your ACTIVE unit is a very sensitive piece of equip-
ment and may be temporarily affected by strong
electro-magnetic signals. This may cause erratic
and often elevated heart rate displays. Stop exer-
cising and wait 30 seconds to see if the heart rate
returns to a stable level. It is also recommended
that you continuously monitor your heart rate on
the display. If you are exercising too far over your
recommended maximum heart rate, you should
stop exercising and rest until your heart rate
drops to a more normal level.
Your Maximum Heart rate = 220 minus your age!
The pads won’t stick to the belt even though they
are fairly new.Why is this?
Ensure the patterned side of each pad is placed
on the belt. The black side of the pads goes onto
your skin. Press the edges of each pad very firmly
onto the belt before and after each session.
My skin is red after a session. Why?
Some skin redness after a session is natural. It is
par tly due to an increase in blood-flow and
should fade after the treatment. It can also occur
due to the pressure of the stretched belt. You
should not be concerned about this, but should
only wear the belt during a session. If it is exces-
sive, you may have the intensity too high. If the
problem persists, you should stop using the unit.
I can feel a tingling in my legs during a session.
What should I do?
Move the two small pads upward and inward on
your waist (i.e. towards the centre of your body).
My waist muscles are exercising but not my
stomach muscles. Why?
Move the large pad down slightly. If this doesn’t
help, move the small pads to a smaller figure
setting and/ or increase the intensity.
Can I use ACTIVE to treat muscles weakened from
lack of use due to injury?
Your ACTIVE belt may additionally be used for the
alleviation of or compensation for injury.
Consultation with your doctor or physio is
required to establish a rehabilitation programme
with the ACTIVE unit, which would safely provide
improvement to the strength and tone of the
abdominal muscles.
What should I do if I see E00X on the display?
E002 or E006 appears on the display:
-The batteries are dead.
- Replace the batteries.
- If the problem persists with new batteries return
your unit to SLENDERTONE
E001, E003, E004 or E005 appears on the display:
- Internal fault.
- Return your unit to SLENDERTONE for repair.
9
English
QUESTIONS AND ANSWERS
How does ACTIVE train the abdominal muscles?
(i) ACTIVE sends gentle signals between the pads
on the belt.
(ii) These signals travel into the muscle and switch
on the nerves in that area.
(iii)The nerves, in turn, switch on the muscles and
the muscles contract.
NOTE:We do not recommend more than 60
minutes of abdominal muscle training per day.
Will the product cause muscle soreness?
As with all exercise some muscle soreness can be
expected. Use a low toning intensity on your
Active if you are experiencing muscle soreness.
Can I use ACTIVE for post natal exercise?
Yes, but you must wait a minimum of six weeks
after childbirth and consult your doctor first. If
you have had a Caesarean in the past three
months, consult your doctor before using ACTIVE.
The stimulation is uncomfortable. How can I
improve this?
Ensure the pads are correctly positioned and
pressed firmly against your skin. Tighten the belt
around your waist. Remember to switch off your
unit before repositioning the belt.
How do I know when to replace the pads?
If the signal is weakening, even though the
batteries are still OK, it usually indicates that the
pads are worn and need replacing. Check this by
inserting new batteries and/or adjusting the belt
to ensure correct positioning. Replacement pads
can be purchased from your nearest SLENDERTONE
stockist, from www.slendertone.com or by
calling your local SLENDERTONE Careline.
What if the heart rate reading is erratic or totally
absent?
Move the chest strap upwards trying positions
that are more to the side or center and place on a
area where there is less body hair. Check to see
that the heart rate pad is securely fastened and
correctly positioned. If the heart rate pad has
slipped, pause your unit and adjust it. Tighten the
belt around your waist. Use a cotton shirt instead
of a synthetic shirt. Use a tighter shirt to avoid
fluttering of the material. Make sure you are not
standing too close to any electrical equipment
which may intefere with the signal. Check the
batteries and replace them if necessary.
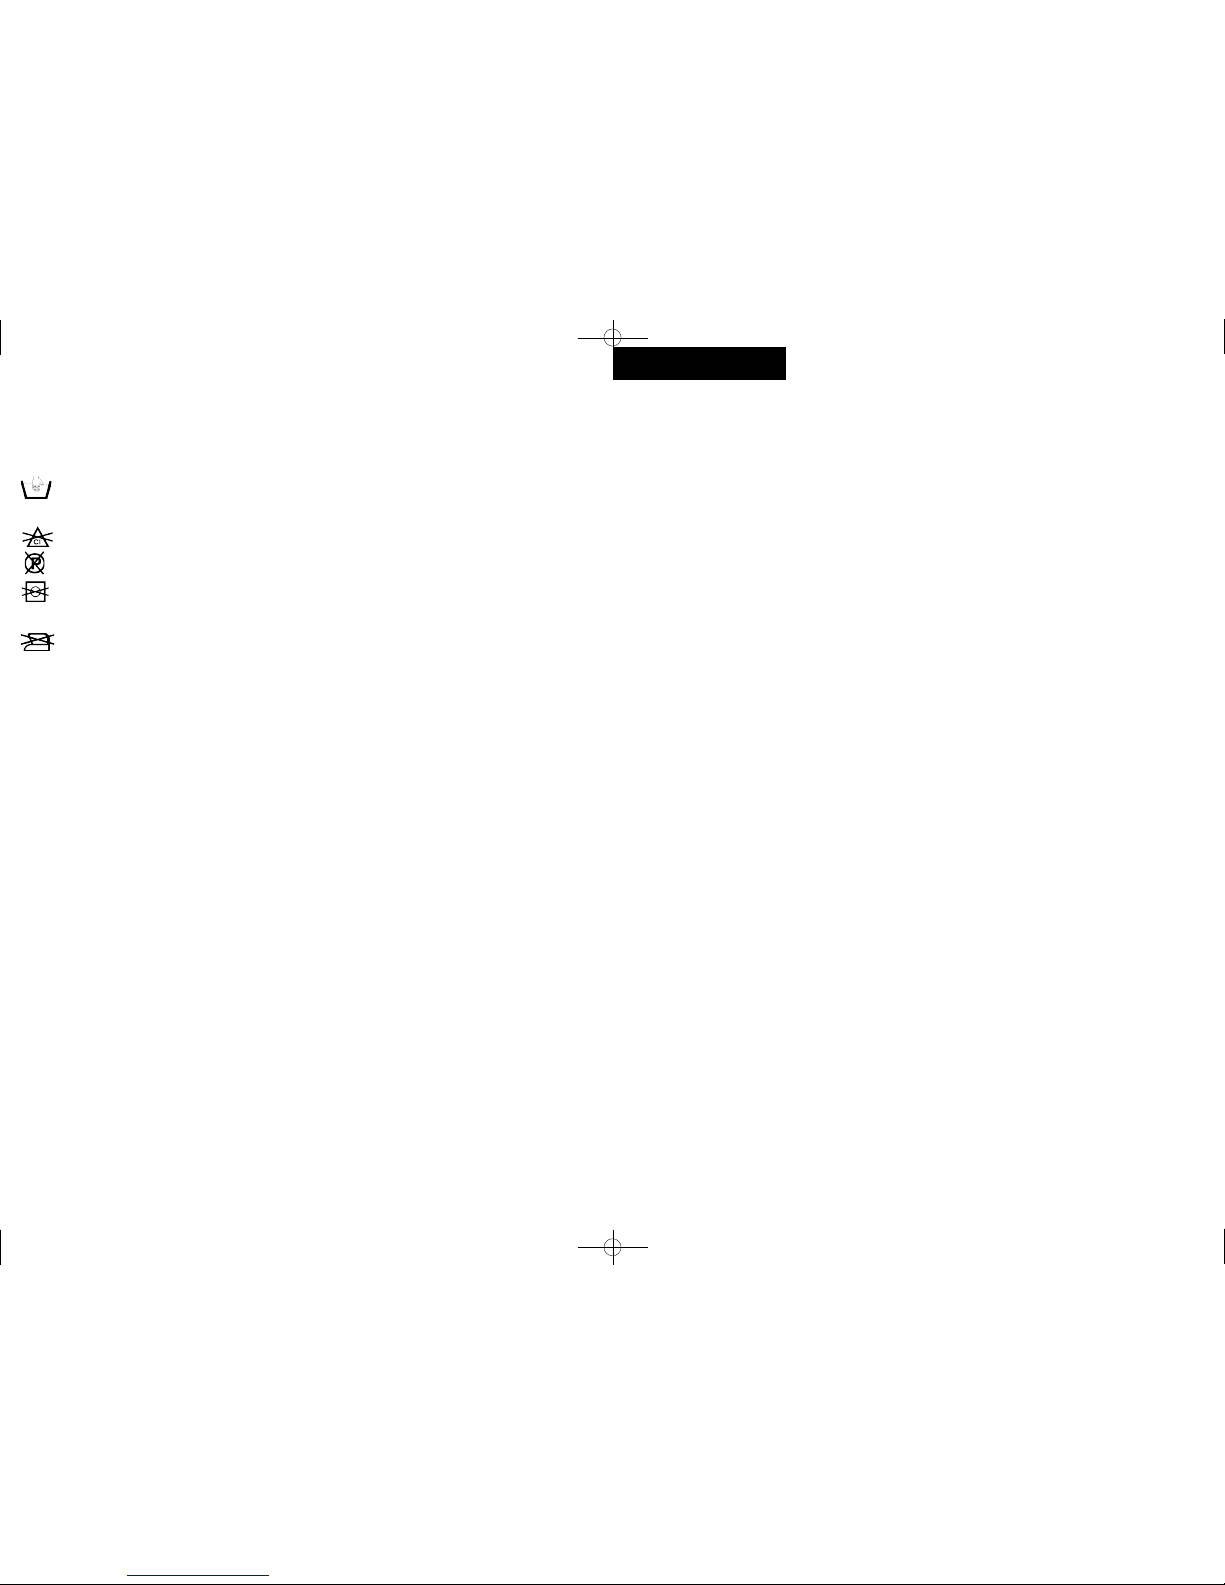
CARING FOR YOUR BELT
You should not let your unit get wet, but you may wipe it clean with a lightly dampened cloth. The belt
can be washed, but you must first remove the unit and pads. Always follow the instructions on the label
when washing the belt.
Never machine wash your belt. Always hand wash it in lukewarm water. This protects the
internal wiring from damage in the washing machine.You should take care even when hand
washing and never wring the belt to remove water.
Do not use any bleach when washing your belt.
Do not dry clean your belt.
Do not tumble dry your belt. Dry the belt on a flat surface, but not on anything hot (e.g. a
radiator) as the belt contains plastic parts. Ensure the belt is completely dry before use.
The belt must not be ironed.
CARING FOR YOUR CHEST STRAP
Wipe with a lightly dampened cloth regularly to remove any dirt/ residue.
8
SLENDERTONE RECOMMENDATIONS
• We recommend that you pause the stimulator while walking up steps or over uneven ground.
• For first time users, muscle stimulation can be an unusual sensation. We recommend that you
familiarise yourself with muscle stimulation at rest before progressing to muscle stimulation while
walking.
• For hygiene reasons this device is for single person use only. Do not share your belt with anyone
else.
• Take care while reading the display or adjusting the product while moving. These actions can result
in you being less aware of your surrounding environment.
•Do not connect the units to any other device, for example portable music systems.
•Do not over-exert yourself during exercise / muscle stimulation. Any workout should be at a level
that is comfortable for you.
• You should leave at least six hours between sessions.
Active IM Male Rev 10 04/01/2006 10:31 Page 10

CONTRA-INDICATIONS
SLENDERTONE ACTIVE is suitable for use by all healthy adults.
However, as with other forms of exercise, some care is
needed when using it, so always follow the points below
and read the support pack before use. Some of the
points below are gender specific.
Please do not use if:
• You have an electronic implant (e.g. cardiac pacemaker
or defibrillator) or suffer from any other heart problem.
• You are pregnant.
• You suffer from cancer, epilepsy or are under medical
supervision for cognitive dysfunction.
•The unit is in close proximity (e.g. 1m) to shortwave or
microwave therapy equipment.
• You are connected to high-frequency surgical equipment.
• Wearing the device necessitates placement over areas
where drugs/medicines are administered by injection
(short term or long term) e.g. hormone treatment.
Please wait before using your SLENDERTONE ACTIVE until:
• At least six weeks after the birth of your baby (you
must consult your doctor first).
• One month after an IUD contraceptive device (e.g. coil)
has been fitted.
• At least three months after having a Caesarean (you
must consult your doctor first).
•The heavy days of your period have finished.
Please get your doctor’s or physio’s permission before
using this product if:
• If you’re feeling light headed/faint please slow down or
stop and pause your stimulation until you feel ready to
begin again. Consult your doctor if this happens.
• You wish to use a SLENDERTONE belt and have a bad back.
You should also ensure the intensity is kept low.
• You have any serious illness or injury not mentioned in
this guide.
• You have recently had an operation.
• You take insulin for diabetes.
• You want to use it on a young child.
• You suffer from muscle or joint problems.
• Using the device as part of a rehabilitation programme.
When applying the pads, belt and chest strap always
remember to:
• Place the pads and belt ONLY as indicated in this
manual.
• Avoid placing the pads or belt on the front or sides of
the neck, across or through the heart (i.e. one pad on
the front of the chest and one on the back), in the
genital region or on the head. (Other SLENDERTONE units
are available for other areas of the body - details are
available from your stockist)
• Avoid any recent scars, broken or inflamed skin, areas
of infection or susceptibility to acne, thrombosis or
other vascular problems (e.g. varicose veins), or any
parts of the body where feeling is limited.
• Avoid areas of injury or restricted movement (e.g.
frac t u r es or sprai n s ) .
• Avoid placing the pads directly over metal implants.
They may be placed on the nearest muscle.
Possible adverse reactions:
• A small number of isolated skin reactions have been
reported by people using muscle stimulation devices,
including allergies, a prolonged reddening of the skin
and acne.
To reposition pads during a session:
• Always pause the pro g ramme currently running,
unfasten the belt and then refasten it behind your back
once the pads’ position has been adjusted.
After strenuous exercise or exertion:
• Always use a lower intensity to avoid muscle fatigue.
Contact SLENDERTONE or an authorised distributor if:
• Your unit is not working correctly. Do not use in the
meantime.
• You experience irritation, skin reaction, hypersensi-
tivity or other adverse reaction. You should, however,
note that some reddening of the skin can appear under
the belt during and for a short time after a session.
NOTE:
•An effective treatment should not cause undue discom-
for t.
Important:
•The heart rate is an estimate and does not provide
diagnostic information. Consult your doctor if in doubt.
• Rain may interfere with this device while using it
outdoors. Ensure that this device is kept dry at all
times.
• Keep your unit out of the reach of children.
•The studs, leads and pads must not be connected to
other objects.
• Do not use your unit at the same time as any other
device which transfers an electrical current into the
body (e.g. another muscle stimulator).
• Do not touch the pads or metal studs while the unit is
switched on.
• Avoid using while driving, crossing in traffic, operating
machinery or cycling
• Your SLENDERTONE ACTIVE unit should not be used with a
garment from any other SLENDERTONE product. Doing so
may result in an unbalanced stimulation and an ineffi-
cient toning session.
•SLENDERTONE will not accept responsibility if the guide-
lines and instructions supplied with this unit are not
followed.
NB: If you are in any doubt about using a SLENDERTONE
belt for any reason, please consult your doctor before
use.
11
English
*The symbol always appears in conjunction with the left/right arrows. If the left arrow appears,
there is a problem with the left pad, the right arrow indicates a problem with the right pad and if both
arrows appear, there is a problem with either the middle pad, all three pads or the unit is not properly
inserted into the holster.
TROUBLE-SHOOTING GUIDE
PROBLEM
The display doesn’t come on &
there is no signal from the unit
The display is on but there’s no
signal
The battery symbol is flashing
Unpleasant feeling beneath
the pads
The symbol has appeared
on the display *
The contractions are very weak
even when the intensity is high
The unit is on but there is no
heart rate reading
POSSIBLE CAUSE
The batteries are inserted
incorrectly
The batteries are dead
Low-quality batteries used
The unit has been paused
No intensity set
The batteries are low
Pads not covering the studs
The pads are worn
Too many consecutive sessions
Pads not in contact with skin
Unit is not fully inserted in
holster
Pads not covering the studs
The pads are worn
The pads are on the wrong way
around
The covers are still on the pads
Belt is loose or open on body
The batteries are low
The pads are worn
Poor pad positioning
Pads not covering the studs
Low quality batteries used
Chest strap too loose
Heart rate lead not connected
SOLUTION
Reposition the batteries as
described on page 3
Replace the batteries
Use only high-quality batteries
Press the on/off button briefly
Increase the intensity
Replace the batteries
Reposition the pads
Contact your local stockist for
new SLENDERTONE pads
You should leave at least six
hours between sessions
See page 6 for correct
positioning of the pads & belt
Push the unit fully into the
holster
Reposition the pads
Contact your local stockist for
new SLENDERTONE pads
Ensure the black surface of each
pads is placed on your skin
Ensure the covers are removed
from both sides of the pads
Refasten the belt properly
Replace the batteries
Contact your local stockist for
new SLENDERTONE pads
Reposition the pads
Reposition the pads
Use only high-quality batteries
Tighten chest strap
Ensure lead connected to chest
strap and belt stud
10
Active IM Male Rev 10 04/01/2006 10:31 Page 12

DIARY
Fill in your diary after every session to reach your weekly target. Replacement SLENDERTONE ACTIVE diaries
are available on www.slendertone.com.
13
1 2 3 4 5 67
Day
4/10/06
__4__ __/___/___
_____
6/10/06
__6__ __/___/___
_____
8/10/06
__6__ 9/10/06
__4__ __/___/___
_____ 20
__/___/___
_____
__/___/___
_____
__/___/___
_____
__/___/___
_____
__/___/___
_____
__/___/___
_____
__/___/___
_____
__/___/___
_____
__/___/___
_____
__/___/___
_____
__/___/___
_____
__/___/___
_____
__/___/___
_____
__/___/___
_____
__/___/___
_____
__/___/___
_____
__/___/___
_____
__/___/___
_____
__/___/___
_____
__/___/___
_____
__/___/___
_____
__/___/___
_____
__/___/___
_____
__/___/___
_____
__/___/___
_____
__/___/___
_____
__/___/___
_____
__/___/___
_____
1
2
3
4
=
=
=
=
=
__/___/___
_____
__/___/___
_____
__/___/___
_____
__/___/___
_____
__/___/___
_____
__/___/___
_____
__/___/___
_____
__/___/___
_____
__/___/___
_____
__/___/___
_____
__/___/___
_____
__/___/___
_____
__/___/___
_____
__/___/___
_____
__/___/___
_____
__/___/___
_____
__/___/___
_____
__/___/___
_____
__/___/___
_____
__/___/___
_____
__/___/___
_____
__/___/___
_____
__/___/___
_____
__/___/___
_____
__/___/___
_____
__/___/___
_____
__/___/___
_____
__/___/___
_____
5
6
7
8
=
=
=
=
__/___/___
_____
__/___/___
_____
__/___/___
_____
__/___/___
_____
__/___/___
_____
__/___/___
_____
__/___/___
_____
__/___/___
_____
__/___/___
_____
__/___/___
_____
__/___/___
_____
__/___/___
_____
__/___/___
_____
__/___/___
_____
9
10
=
=
Sample
English
PRODUCT GUARANTEE
Should your unit develop a fault within two years of purchase, SLENDERTONE will undertake to replace or
repair the unit or any parts found to be defective with no charge for labour or materials *, provided the
unit:
• Has been used for its intended purpose and in the manner described in this instruction manual.
• Has not been connected to an unsuitable power source.
• Has not been subjected to misuse or neglect.
• Has not been modified or repaired by anyone other than an approved SLENDERTONE agent.
This guarantee complements existing national guarantee obligations and does not affect your statutory
rights as a consumer.
*This excludes consumables (e.g. pads, belt etc.) when subject to normal wear and tear.
Caring for your unit
Your unit should not be left in excessive sunlight. Do not allow
the interior of your unit to become wet. Do not use detergents,
alcohol, spray aerosols or strong solvents on your unit.
Access to the unit’s interior is not required for maintenance
purposes.
If your unit is damaged, you should not use it but should return
it to SLENDERTONE or your local distributor for replacement or
repair. Repairs, service and modifications may not be carried
out by anyone other than qualified service personnel autho-
rised bySLENDERTONE.
NOTE:Using leak-proof batteries is advised. You should never
leave the batteries inside your unit if you do not intend to use it
for a long period of time. If you do, the batteries may leak and
damage your unit. You should be aware that some batteries
sold as ‘leak-proof’can still release corrosive substances,
which may damage your unit. Under no circumstance should
anything other than the correct type of batteries 1.5v (LR03 /
AAA) be used with your unit. You must only insert the batteries
in the manner specified in this manual.
Disposing of the pads and batteries
Used pads and batteries must never be disposed of in a fire but
in accordance with your country’s national laws governing the
disposal of such items.
The battery compartment must be closed when the unit is on.
When the symbol appears the stimulus is significantly
reduced.
The signal gradually increases to a peak intensity level at the
start of a contraction phase (i.e. ramp up) and gradually
decreases to nothing at start of a relaxation phase (i.e. ramp
down).
Accessories
When ordering new pads, you should only use those carrying
the SLENDERTONE brand. Others may not be compatible with your
unit and could degrade the minimum safety levels.
SLENDERTONE Adhesive Pads:
• 1 large adhesive pad Type 706 or 709
• 2 small adhesive pads Type 707 or 710
• 3 heart rate pads Type 711 x 1; 712 x 2
Batteries (3 x 1.5v AAA)
SLENDERTONE ACTIVE Belt
Chest Strap
SLENDERTONE Belt Extension
Intended use: Muscle stimulator/ Heart Rate Monitor
Waveform: Symmetrical bi-phasic square waveform when
measured into a resistive load.
Environmental Specifications
Operating: Temperature Range: 0 to 35°C
Humidity: 20 to 65 % RH
Storage: Temperature Range: 0 to 55°C
Humidity: 10 to 90 % RH
Description of your unit’s symbols:
There are a number of technical markings on your unit. These
can be explained as follows:
Inside the battery compartment ‘+’ indicates positive polarity
and ‘-’ indicates negative polarity.The batteries’ position is also
shown by 3 embossed outlines in the base of the compartment.
The unit requires three 1.5 volt (LR03 /AAA) DC batteries. DC is
indicated by the symbol:
The unit and belt are manufactured for Bio-Medical Research
Ltd., Parkmore Business Park West, Galway, Ireland.
The Output Frequency indicates the number of pulses per
second transmitted by the unit. This is measured in hertz (‘Hz’).
Output (RMSA) mean the max. output root mean square current
for each channel.
Output (RMSV) mean the max. output root mean square voltage
for each channel.
This symbol means ‘Attention, consult the
accompanying documents’.
This symbol means type BF equipment.
This symbol on your SLENDERTONE unit is to indicate
conformity to the requirements of the Medical Device
Directive (93/42/EEC). 0366 is the number of the
notified body (VDE).
Inside the box, on the back of the unit is the serial number
specific to this unit. The letter preceding the number indicates
the year of manufacture, where ‘A’ denotes 1995, ‘G’ denotes
2001, ‘H’ denotes 2002 etc.
The belt’s batch number is represented on the belt packaging,
by the number corresponding with the LOT symbol.
Product Type: 551
Parameter 500Ω1KΩ1K5Ω
Output RMSV 5.8V 9.0V 11.1V
Output RMSA 11.7mA 9.0mA 7.4mA
Output Frequency 50-60Hz. 50-60Hz. 50-60Hz.
DC Component: Approx. 0 C 0 C 0 C
Positive Pulse Width: 250-300 µs 250-300 µs 250-300 µs
Negative Pulse Width: 250-300 µs 250-300 µs 250-300 µs
Interphase Interval: 100 µs 100 µs 100 µs
NOTE:In accordance with the laws within the member states,
safety testing on the device should be carried out every two
years.
NOTE:In compliance with German law, product safety testing
must be conducted every two years by an authorised test
service.
BELTMATERIALS
Outer material: 100% Nylon
Binding: 82% Nylon, 18% Elastane
Hook & Loop: 100% Nylon
Foam: 100% Polychloroprene
At the end of the product lifecycle, do not throw this
product into the normal household garbage, but bring
it to a collection point for the recycling of electronic
equipment.
Some product materials can be re-used if you bring
them to a recycling point. By re-using some parts or raw
materials from used products you make an important
contribution to the protection of the environment.
Please contact your local authorities if you need more
information about collection points in your area.
Waste Electrical and Electronic Equipment can have
potentially harmful effects on the environme nt . Incorrect
disposal can cause harmful toxins to build up in the air,
water and soil and can be harmful to human health.
TECHNICAL SPECIFICATIONS
!
0366
!
12
Active IM Male Rev 10 04/01/2006 10:31 Page 14
DETERMINER VOTRE CONDITION POUR UNE ACTIVITE PHYSIQUE
Comme dans tout autre sport, vous devez tout d’abord déterminer votre forme physique avant de
commencer votre programme d’entraînement avec le SLENDERTONE ACTIVE. Si vous avez un quelconque
doute, consultez les contre-indications en page 11. Vous pouvez également consulter votre médecin
avant de commencer.
Veuillez répondre aux questions suivantes.
1. Votre médecin vous a-t-il déjà averti d’un problème cardiaque ou vous a-t-il dit
que vous ne devriez pratiquer que les sports recommandés par un médecin ? Oui / Non
2. Ressentez-vous des douleurs de poitrine lorsque vous faites de l’exercice ? Oui / Non
3. Au cours du dernier mois, avez-vous ressenti une quelconque douleur
de poitrine au cours d’une activité physique de n’importe quel type ? Oui / Non
4. Perdez-vous parfois l’équilibre (vertiges) ou la conscience ? Oui / Non
5. Avez-vous des problèmes osseux ou articulaires pouvant
empirer si vous modifiez votre condition physique ? Oui / Non
6. Prenez-vous actuellement des médicaments pour la pression sanguine ou
un problème cardiaque sous-jacent ? Oui / Non
7. Pensez-vous à un quelconque motif qui vous pousserait
à ne participer à aucune activité physique ? Oui / Non
Si vous avez répondu par l’affirmative à une ou plusieurs questions, nous vous conseillons de consulter
votre médecin avant d’entamer un programme d’entraînement avec le SLENDERTONE ACTIVE.SLENDERTONE
vous recommande de consulter vo t r e médecin avant de commencer les exe rcices physiques
mentionnés dans ce manuel. Comme dans tout sport, rappelez-vous de toujours commencer doucement
puis d’augmenter petit à petit le degré de difficulté de l’exercice.
VOTRE KIT SLENDERTONE ACTIVE
1. CeintureACTIVE (taille 71 – 107 cm) :
Utilisez les trois électrodes adhésifs S LEND E RTO N E(1a) situés sur la
ce i nt u re (voir page 6) pour attacher la ceinture. Veillez à ce qu’elle
soit serrée tout en vous sentant à l’aise.
2. Unité de base :
Faites glisser le couvercle des piles de l’unité principale et insérez les piles. Refermez ensuite le
couvercle puis glissez l’unité dans le fourreau de la ceinture.
3. Electrode du rythme cardiaque :
L’électrode du rythme cardiaque doit être placé sur la sangle thoracique afin de surveiller vos pulsations
lors de chaque séance SLENDERTONE ACTIVE.
4. Fil de rythme cardiaque :
Ce fil vous permet de relier la ceinture à la sangle thoracique.
5. Sangle thoracique (taille 61 – 120 cm) :
Attachez cette sangle autour de votre torse afin de le maintenir bien en place.
6. Unité de contrôle :
Il s’agit là du cerveau de l’unité SLENDERTONE ACTIVE. Elle contrôle toutes les fonctions décrites dans ce
manuel.
3
Français
S'il s'agit de votre première séance ACTIVE, lisez l’ensemble de ce manuel avant de commencer.
QU’EST-CE QUE LE SLENDERTONE ACTIVE ?
Le SLENDERTONE ACTIVE représente une avancée considérable dans le domaine
de la santé et du fitness personnalisés. Il suit votre rythme cardiaque pour
veiller à ce que vous fassiez de l’exercice à la cadence qui vous convient le
mieux pour brûler des calories et améliorer votre forme physique. Grâce à
sa ceinture abdominale, ACTIVE offre un traitement de raffermissement des
muscles spécialement conçu pour renforcer, tonifier et affiner toute la zone
abdominale tout au long de l’exercice physique.
LA THEORIE SLENDERTONE ACTIVE
Nous avons tous besoin de faire de l’exercice pour garder la ligne et rester en bonne santé. Mais êtes-
vous certain de pratiquer à votre niveau ? Une des méthodes testées consiste à mesurer votre rythme
cardiaque et c’est justement ce que fait SLENDERTONE ACTIVE. Il surveille votre rythme cardiaque au cours
de l’exercice. Il vous suffit de regarder l’affichage pour lire vos pulsations et savoir si vous êtes en
sous-effort, en sur-effort ou à votre niveau optimal.
Par le biais de cette technique, ACTIVE vous permet d’être certain de pratiquer à votre juste niveau. La
logique est simple : lorsque vous faites de l’exercice à votre rythme cardiaque optimal (votre « Zone
d’Entraînement »), vous êtes alors en train d’améliorer votre condition physique.
UN PETIT GUIDE RAPIDE POUR SAVOIR COMMENT UTILISER SLENDERTONE ACTIVE
(a) PREPARATION
1. Préparez puis branchez votre unité ACTIVE (voir page 6).
2. Augmentez l’intensité de la ceinture pour atteindre le niveau
auquel vous vous sentez le plus à l’aise.
(b) EN AVANT
3. Allez-y ! Il ne vous reste plus qu’à marcher ou courrir, l’unité se
chargera de tonifier vos abdominaux.
4. Terminez la séance puis vérifiez de temps à autre votre rythme
cardiaque sur l’affichage. Vérifiez que vous vous trouvez bien au bon
niveau. Pour cela, consultez le tableau des rythmes cardiaques : si
vous êtes âgé de 45 ans, par exemple, votre rythme cardiaque doit
se maintenir entre 106 et 141 pulsations.
(c) STOP
5. Une fois votre séance terminée, remplissez votre journal
d’ en traînement en indiquant vos points AC TI VE obtenus. Le tableau de
points vous indique le nombre de points correspondant à vo t rescore.
(d) SUIVRE LE PROGRAMME
6. Obtenez tous les points recommandés par semaine et sentez le
résultat ! Dans l’exemple ci-dessous, l’objectif est de 20 points
ACTIVE. Nous recommandons cet objectif pour les néophytes.
2
Durée Marche +
Raffermissement
15:00 2
30:00 4
45:00 6
60:00 8
TABLEAU DES RYTHMES
TABLEAU DE POINTS ACTIVE
(pour Marche + Raffermissement)
Age Marche +
Raffermissement
20 - 29 114 - 152
30 - 39 110 - 147
40 - 49 106 - 141
50 - 59 102 - 136
60 - 69 98 - 130
Des journaux de remplacement de SLENDERTONE
ACTIVE sont disponibles sur www.slendertone.com.
1
1a
2
6
4
5
3
Active IM Male Rev 10 04/01/2006 10:31 Page 16
5
PROGRAMMES D’ENTRAINEMENT DU SLENDERTONE ACTIVE
Le SLENDERTONE ACTIVE vous propose trois programmes d’entraînement. Chaque programme vous sera
utile. Par exemple, si vous souhaitez améliorer votre santé et votre condition physique, utilisez le
Programme 1 ou le Programme 2, en fonction de votre niveau actuel. Mais si vous souhaitez juste toni-
fier vos muscles abdominaux, utilisez le Programme 3.
Chaque programme dispose d’un objectif hebdomadaire en points. Vous remportez des points ACTIVE
chaque fois que vous utilisez votreSLENDERTONE ACTIVE. Le tableau ci-dessous reprend les objectifs
hebdomadaires pour chacun des trois programmes d’entraînement.
REMARQUE :
Vous pouvez combiner le SLENDERTONE ACTIVE avec un tapis roulant ou un vélo d’appartement.
POINTS SLENDERTONE ACTIVE
Chacun des trois programmes d’entraîne-
ment vous octroie un certain nombre de
points ACTIVE. Vous recevrez plus de points
si vous faites plus d’exercice avec les
programmes individuels. Comme vous
pouvez le voir dans le Tableau de Points
ACTIVE, 30 minutes de Marche +
Raffermissement vous octroie 4 points,
alors que 45 minutes de Marche +
Raffermissement vous octroie 6 points.
N’hésitez pas à dépasser votre objectif
hebdomadaire si vous souhaitez tirer
meilleur parti de votreSLENDERTONE ACTIVE.
Lorsque vous marchez/courez, vous devez
§vous assurer que votre rythme cardiaque
se trouve à un niveau correct ; reportez-vous
au Tableau des Rythmes pour savoir quel
devrait être votre rythme cardiaque. Il s’agit
de votre Zone d’Entraînement. Il est important
de vous entraîner à la bonne cadence pour
brûler des graisses. Vous obtiendrez les
meilleurs résultats en appliquant la plus haute
intensité d’entraînement que vous pouvez.
Progr. Description Que faire ? Objectif hebdo
P1 Marche + Allez marcher à bon train avec le 20 ★
Raffermissement SLENDERTONE ACTIVE 3-5 fois par semaine.
P2 Jogging + Allez faire du jogging avec le SLENDERTONE 18 ★
Raffermissement ACTIVE 2-4 fois par semaine.
P3 Raffermissement Utilisez la ceintureSLENDERTONE ACTIVE au 5★
travail ou à la maison pour 30 minutes
5 fois par semaine.
Age Marche et Jogging et
Raffermissement Raffermissement
20 - 29 114 - 152 143 - 168
30 - 39 110 - 147 138 - 161
40 - 49 106 - 141 132 - 155
50 - 59 102 - 136 127 - 149
60 - 69 98 - 130 122 - 143
MINUTES MARCHE ET JOGGING ET RAFFERMISSEMENT
D’EXERCICE RAFFERMISSEMENT RAFFERMISSEMENT
15:00
30:00
45:00
60:00
1/2
1
-
-
2
4
6
8
3
6
9
12
TABLEAU DE POINTS ACTIVE ( )
1~ 50 kcal.
TABLEAU DES RYTHMES ( )
Français
UNITE DE CONTROLE SLENDERTONE ACTIVE
Bouton Marche/Arrêt ( ) :
Appuyez sur ce bouton pendant 2 secondes pour allumer
ou éteindre l’unité. Appuyez brièvement sur ce bouton au
cours d’une séance pour la mettre en pause puis une
seconde fois pour reprendre.
Bouton de personnalisation ( ) :
Appuyez sur ce bouton pour ACTIVEr l’écran de personnali-
sation. Utilisez les boutons d’intensité pour vous déplacer
entre les codes puis choisissez celui qui vous correspond
en appuyant une nouvelle fois sur le bouton de personnal-
isation pour confirmer.
Exemple:
Jean a 44 ans (ligne 40-49) et pèse 65 Kg (colonne 60-69). D’après le tableau, le code de Jean est donc
le 9. Procédez de même pour déterminer le vôtre.
Bouton d’information ( ) :
Appuyez sur ce bouton pour contrôler votre rythme cardiaque moyen, les calories brûlées, les points
ACTIVE, les niveaux d’intensité et le nombre total de séances (voir page 7).
Bouton programme d’entraînement ( ) :
Utilisez ce bouton pour sélectionner l’un des trois programmes d’entraînement (voir page 5).
Boutons d’intensité ( / ) :
Utilisez les flèches haut/bas pour augmenter/diminuer le niveau d’entraînement musculaire.
50 - 5960 - 69
20 - 29
30 - 39
15 15 14 13 13
12 12 11 10 10
9 9 8 8 7
6 5 5 4 4
3 3 2 2 1
40 - 49
50 - 59
60 - 65
70 - 79 80 - 89 90 +
Poids (Kg)
Indicateur graphique de rythme
cardiaque.
Plage d’entraînement du rythme
cardiaque.
Votre rythme cardiaque actuel.
La moyenne de votre rythme
cardiaque au cours de la séance.
Durée restante/écoulée de la séance.
Intensité côté gauche.
Intensité côté droit.
Intensité maximale atteinte au cours
de la séance passée/actuelle.
Nombre de calories brûlées au cours
de la séance actuelle.
Cumul de points ACTIVE pour la séance
actuelle.
Programme en pause.
Verrouillage clavier activé.
Fonction sourdine activée.
Témoin de charge des piles.
Nombre de séances jusqu’à aujourd’hui.
Mauvais contact avec l’électrode.
4
AFFICHAGE DU SLENDERTONE ACTIVE
L’affichage de l’unité de contrôle du SLEND ERTO N E ACTI V E vous offre toutes les informations dont vous avez
besoin pour faire de l’exe rcice à vo t remeilleur niveau. Vous pourrez ainsi facilement suivre vos prog rès.
Ecran
d’affichage
Bouton Prog.
d’entra în em ent Bouton
Marche/Arrêt
Bouton de
personnalisatio n
Bouton
d’information
Boutons
d’intensité
Grâce à la fonction de personnalisation, vous
obtiendrez un meilleur retour de votre rythme
cardiaque et améliorerez la précision du compteur
de calories.
REMARQUE :
Le résultat en calorie est une estimation basée
sur le maintien de votre rythme cardiaque en
votre Zone d'Entrainement.
Tableau de
Codes :
Active IM Male Rev 10 04/01/2006 10:31 Page 18
9. A la fin de la séance, l’affichage de l’unité de contrôle indiquera alternativement
ce qui apparaît en Fig. a et en Fig. b. Utilisez cette information pour enregistrer
votre rythme cardiaque moyen au cours de la séance, le nombre de calories
brûlées et les points ACTIVE gagnés. Vous pouvez également contrôler votre rythme
cardiaque à la fin de la séance pour savoir si vous vous trouviez ou non dans votre
plage d’entraînement.
LE BOUTON D’INFORMATION (i)
Votre unité SLENDERTONE ACTIVE enregistre les informations relatives à votre séance
actuelle et aux précédentes. Pour accéder à ces informations, utilisez le bouton
d’information. Vous pouvez parfaitement accéder à ces informations au cours d’un
programme.
Appuyez une fois sur le bouton d’information pour consulter (Fig. c) :
1. votre rythme cardiaque moyen au cours de la séance actuelle ;
2. le nombre de calories brûlées au cours de la séance actuelle ;
3. votre nombre de points ACTIVE au cours de la séance actuelle.
Appuyez deux fois sur le bouton d’information pour consulter (Fig. d) :
4. le nombre total de séances réalisées (retourne à 0 après 199) ;
5. l’intensité maximale atteinte au cours de la séance actuelle.
Appuyez une troisième fois sur le bouton d’information pour retourner à l’écran par
défaut.
AUTRES FONCTIONS
Fonction de verrouillage de l’intensité
Si vous atteignez un niveau d’intensité confortable, appuyez sur le bouton de
prog ramme d’entraînement puis sur le bouton d’information pendant 3 secondes
pour activer la fonction de verrouillage. Répétez cette procédure pour la désactiver.
Fonction silence
Si vous souhaitez éteindre les sons de votre unité, appuyez sur le bouton de personnali-
sati on pendant 2 secondes. Le symbole ap p a ra î t ra alors sur l’affichage. Répétez
cette procédure pour la désactiver.
INFORMATION SUPPLEMENTAIRE
CLIP DE LA CEINTURE
Votre unité SLENDERTONE ACTIVE comporte un clip de ceinture magnétique. Faites
simplement pression sur le côté rond du clip à l’arrière de l’unité de contrôle puis
fixez le clip de la ceinture de votreSLENDERTONE ACTIVE ou à un vêtement (Fig. e).
ELECTRODES ADHÉSIFS
En plus de la sangle thoracique vous trou ve rez également deux autres électro d e s
du rythme cardiaque. Ces électrodes peuvent être utilisés par les personnes sans
pilosité sur le haut du thorax. Pour ce faire :
1. Reliez l’électrode du rythme cardiaque au fil (Fig. f).
2. Retirez la protection du côté adhésif de l’électrode du rythme cardiaque (Fig. g)
puis placez ce dernier en haut à droite de votre cage thoracique. N’hésitez pas à le
déplacer plusieurs fois pour qu’il soit correctement positionné. Vous obtiendrez
ainsi un très bon signal de votre rythme cardiaque.
7
Fig. e
Fig. f
Fig. g
Français
UTILISER VOTRE UNITE ACTIVE
1. Retirez la protection du côté à dessin de la grande électrode adhésif (Fig. a).
Placez l’électrode entre les lignes parallèles au centre de la ceinture. Veillez à ce
que l’électrode couvre parfaitement le plot métallique.
2. Retirez la protection du côté à dessin des deux petites électrodes. Placez-les de
chaque côté de la grande électrode en fonction des re p è res correspondant à vo t re
taille (Fig. b). Veillez à ce que les électrodes recouvrent parfaitement les plots.
3. Retirez la protection du côté noir des trois électrodes. Mettez la ceinture en plaçant
la grande électrode sur votre nombril et les deux petits entre vos hanches et vos
côtes. Serrez bien la ceinture tout en veillant à vous sentir à l’aise.
REMARQUES :
Ne jetez pas les protections car vous en aurez besoin plus tard. Vérifiez que vous
avez bien mis la ceinture à l’endroit.
4. Ouvrez le couvercle des piles de l’unité de base et insérez 3 piles AAA, comme
indiqué sur la base du compartiment (Fig. c). Enfoncez l'unité dans le fourreau
jusqu'à ce que les repères soient correctement alignés. Vous devrez peut-être
forcer quelque peu (Fig. d).
5. Fixez le fil du rythme cardiaque à la sangle thoracique (Fig. e) et fermez le
couvercle externe (Fig. f).
6. Retirez la protection du côté à dessin de l’électrode du rythme cardiaque et placez
ce côté sur la sangle thoracique, directement sur le contact métallique (Fig. g).
Retirez la protection du côté noir de l’électrode du rythme cardiaque (ne jetez pas
le protection) et attachez la sangle thoracique autour de votre torse en plaçant
l’électrode juste en dessous de votre coeur (Fig. h). Ajustez la sangle thoracique
afin d’être à l’aise puis fixez-la à l’aide de la boucle. N’hésitez pas à le déplacer
plusieurs fois pour qu’il soit correctement positionné. Vous obtiendrez ainsi un
très bon signal de votre rythme cardiaque.
REMARQUES :
En cas de problème, ajustez la position de la sangle thoracique pour améliorer le
contact avec votre torse.
7. Appuyez pendant 2 secondes sur le bouton Marche/Arrêt pour allumer l’unité.
8. A l’aide du bouton de programme d’entraînement (P), sélectionnez le programme
qui vous convient le mieux puis augmentez peu à peu l’intensité jusqu’à sentir
que vos abdominaux commencent à travailler.
REMARQUES :
Il n’est pas indispensable de programmer la même intensité des deux côtés du corps.
PAUSE AU COURS DE LA SÉANCE :
Appuyez brièvement sur le bouton Marche/Arrêt si vous souhaitez faire une pause
au cours de la séance. Appuyez une nouvelle fois pour reprendre l’exercice.
6
Fig. a
Fig. b
Fig. c
Fig. d
Fig. a
Fig. b
Fig. c
Fig. d
Fig. e
Fig. f
Fig. g
Fig. h
71cm - 82cm / 28-32”
84cm - 94cm / 33-37”
96cm - 107cm / 38-42”
Active IM Male Rev 10 04/01/2006 10:31 Page 20
RECOMMANDATIONS DE SLENDERTONE
• Nous vous conseillons d’interrompre la stimulation des muscles lorsque vous montez des escaliers
ou marchez sur un sol irrégulier.
• Pour les utilisateurs débutants, la stimulation des muscles peut procurer une sensation bizarre.
Nous vous recommandons de vous y familiariser au repos avant de le faire en marchant.
• Pour des raisons d’hygiène, cet appareil doit être utilisé par une seule personne. Ne partagez votre
ceinture avec personne..
• En consultant l’écran ou en réglant l’appareil, restez attentif à ce qui vous entoure, un accident est
vite arrivé.
• Ne raccordez pas les unités à d’autres appareils, par exemple un baladeur.
• N’en faites pas trop pendant les séances / exercices de stimulation. Adaptez les séances à vos
possibilités.
• Les séances doivent être séparées d’au moins six heures.
QUESTIONS ET REPONSES
La lecture du rythme cardiaque est extrêmement
élevée (180+ pulsations). Que dois-je faire ?
Votre unité ACTIVE est extrêmement sensible et peut
se voir tempora i rement affectée par de fort s
signaux électromagnétiques. Ceci pourra i t
entraîner une lecture irrégulière et généralement
très élevée. Arrêtez l’entraînement et attendez 30
secondes afin de savoir si votre rythme cardiaque
se stabilise. Nous vous conseillons également de
bien suivre votre rythme cardiaque sur l’affichage.
Si vous forcez trop et dépassez vo t re ryt hme
c a rdiaque maximum recommandé, arrêtez et
reposez-vous jusqu’à ce que votre pouls revienne à
la normale.
Votre rythme cardiaque maximum = 220 pulsa-
tions moins votre âge !
Mes muscles autour de la taille travaillent mais
pas ceux autour de l’estomac. Pourquoi ?
Baissez légèrement la grande électrode. Si ceci ne
résout rien, placez les petites électrodes sur une
taille inférieure et /ou augmentez l’intensité.
Ma peau est rouge après une séance. Pourquoi ?
Il est tout à fait normal que quelques rougeurs
apparaissent après une séance. Ceci est princi-
palement dû à une augmentation du flux sanguin
et elles devraient disparaître peu après l’exercice.
Ceci peut également provenir de la ceinture : peut-
être est-elle trop serrée. Ne vous inquiétez pas
pour cela mais portez la ceinture pendant les
séances uniquement. Si ces rougeurs sont impor-
tantes, vous avez peut-être réglé l’intensité trop
fort. Si le problème persiste, vous devrez arrêter
d’utiliser l’unité.
Les électrodes n’adhèrent pas à la ceinture, pour-
tant ils sont neufs. Pourquoi ?
Veillez à ce que le côté à dessin de chaque élec-
trode soit orienté vers la ceinture. Le côté noir des
é l e c t rodes doit être appliqué sur vo t r e peau.
Appuyez correctement sur les bordures des élec-
trodes pour que ceux-ci adhèrent à la ceinture,
avant et après chaque séance.
Je sens des picotements dans les jambes au cours
de la séance. Que dois-je faire ?
Déplacez les deux petites électrodes vers le haut et
l’intérieur de votre taille (vers le centre de votre
corps).
Puis-je utiliser ACTIVE pour tonifier les muscles
après un manque d’exercice ou une blessure ?
Votre ceintureACTIVE peut également vous être utile
pour vous soulager d’une blessure ou compenser
une perte musculaire. Consultez votre médecin ou
ki n é s it h érapeute pour mettre sur pied un
pro g ramme de rééducation à l’aide de l’unité
ACTIVE. Elle vous permettra d’améliorer votre force
et de tonifier vos muscles abdominaux.
Que dois-je faire si l’écran affiche E00X ?
E002 ou E006 apparaissent à l’écran.
- Les piles sont usées.
- Remplacez les piles.
- Si le problème persiste avec les nouvelles piles,
renvoyez votre appareil à SLENDERTONE.
E001, E003, E004 ou E005 apparaissent à l’écran.
- Erreur interne.
- Renvoyez votre appareil à SLENDERTONE pour
réparation.
9
Français
QUESTIONS ET REPONSES
Comment la ceintureACTIVE entraîne-t-elle les
muscles abdominaux ?
(i) ACTIVE envoie des signaux doux entre les
électrodes et la ceinture.
(ii) Ces signaux traversent les muscles et stimulent
les nerfs de la zone.
(iii) À leur tour, les nerfs stimulent les muscles qui
se contractent alors.
REMARQUE :nous vous recommandons de ne pas
p ratiquer plus de 60 minutes d’entraî n em ent
abdominal par jour.
Le produit peut-il provoquer une irritation des
muscles ?
Comme avec tous les exercices, on peut s’attendre
à une irritation des muscles. Si vous ressentez de
telles irritations, employez une intensité de tonifi-
cation faible sur votre Active.
Quand saurai-je que les électrodes sont à
remplacer ?
Un signal faible alors que les piles sont en bon état
indique généralement que les électrodes sont usés et
doivent être remplacés. Vérifiez en insérant de nouvelles
piles et / ou en ajustant la ceinture pour être sûr qu’elle
est correctement placée. Vous pouvez acheter des élec-
trodes de remplacement chez votre revendeur
SLENDERTONE leplus proche,sur www.slendertone.comou
en appelantvotre ligne d’assistanceSLENDERTONE locale.
Puis-je utiliser ACTIVE pour des exercices postna-
tals ?
Oui, mais vous devez attendre un minimum de six
semaines après l’accouchement et consulter votre
médecin en premier lieu. Si vous avez subi une
césarienne dans les trois derniers mois, consultez
votre médecin avant d’utiliser ACTIVE.
La stimulation n’est pas agréable. Puis-je
l’améliorer ?
Vérifiez que les électrodes sont correc te m en t
placés et appliquez-les bien contre votre peau.
Ser rez la ceinture autour de votre taille. N’oubliez
pas d’éteindre l’unité avant de replacer la ceinture.
La lecture du rythme cardiaque est irrégulière ou
totalement absente. Que dois-je faire ?
Déplacez la sangle de la cage thoracique vers le
haut en essayant des positions plus latérales ou
centrales et placez l’appareil sur une zone à faible
pilosité. Vérifiez que l’électrode du ry t h m e
cardiaque est bien branché et correctement placé.
Si l’électrode du rythme cardiaque a glissé, mettez
votre unité en pause et ajustez-le. Serrez la cein-
ture autour de votre taille. Utilisez un maillot en
coton plutôt qu’un maillot synthétique. Utilisez un
maillot re l a t i vement moulant pour éviter de
secouer le matériel. Veillez à ne pas vous trouver à
proximité d’un appareil électrique pouvant créer
des interférences. Vérifiez les piles et remplacez-
les si besoin.
PRENDRE SOIN DE VOTRE CEINTURE
Ne mouillez pas votre unité. Vous pouvez cependant l’essuyer avec un chiffon légèrement humide. Vous
pouvez laver la ceinture mais vous devez tout d’abord retirer l’unité et les électrodes. Pour la laver,
respectez bien les instructions de l’étiquette.
Ne lavez jamais votre ceinture en machine, toujours à la main et à l’eau tiède. Le lavage en
machine abîmerait les fils internes. Faites également attention en lavant la ceinture à la main et
surtout ne la tordez jamais pour l’essorer.
N’utilisez jamais d’eau de javel pour laver la ceinture.
Ne lavez jamais votre ceinture à sec.
Ne séchez jamais votre ceinture dans un tambour. Séchez-la sur une surface plane et froide (pas
sur un radiateur, par exemple) car elle contient des éléments en plastique. Avant de l’utiliser,
veillez à ce qu’elle soit bien sèche.
Ne repassez jamais votre ceinture.
PRENDRE SOIN DE VOTRE SANGLE THORACIQUE
Essuyez-la régulièrement avec un chiffon légèrement humide pour retirer poussières et saletés.
8
Active IM Male Rev 10 04/01/2006 10:31 Page 22

CONTRE-INDICATIONS
SLENDERTONE ACTIVE convient à tous les adultes en bonne
santé. Toutefois, et comme c’est le cas avec d’autres
sports, il convient de prendre quelques précautions.
Nous vous demandons donc de toujours suivre les
points suivants et de lire le kit d’assistance avant de
commencer à utiliser l’appareil. Certains des points suiv-
ants sont en fonction du sexe de l’utilisateur.
Ne l’utilisez pas si :
• Vous avez un implant électronique (stimulateur cardiaque
ou défibrillateur par ex.) ou souffrez d’un quelconque
problème cardiaque.
• Vous êtes enceinte.
• Vous souffrez de cancer, de crises d’épilepsie ou êtes
suivi(e) pour un dysfonctionnement cognitif.
• L’unité se trouve à proximité (1 m par ex.) d’équipements
médicaux à ondes courtes ou micro-ondes.
• Vous êtes branché à un équipement chirurgical à haute
fréquence.
• Le port de l’appareil sollicite des zones où sont générale-
ment administrés des médicaments par injection (court ou
long terme) comme un traitement aux hormones.
Avant d’utiliser votreSLENDERTONE ACTIVE, veuillez attendre :
• Au moins six semaines après un accouchement (n’oubliez
pas de consulter votre médecin au préalable).
• Un mois après l’installation d’un instrument contraceptif
(un stérilet, par ex.).
• Au moins trois mois après une césarienne (n’oubliez pas
de consulter votre médecin au préalable).
• La fin du pic de menstruation.
Demandez l’autorisation à vo t re médecin ou
kinésithérapeute avant d’utiliser le produit si :
• Vous sentez des défaillances ou faiblesses, ralentissez
puis arrêtez la stimulation jusqu’à ce que vous vo u s
sentiez à nouveau bien. Si le cas se présente, consultez
votre médecin.
• Vous souhaitez utiliser le SLENDERTONE et souffrez de mal au
dos. Veillez également à ne pas trop élever l’intensité.
• Vous avez des blessures importantes ou souffrez de
maladies non mentionnées dans ce manuel.
• Vous avez récemment subi une opération.
• Vous prenez de l’insuline pour le diabète.
• Vous souhaitez utiliser le produit avec un jeune enfant.
• Vous souffrez de problèmes articulaires ou musculaires.
• Vous utilisez l’appareil au sein d’un programme de réédu-
cation.
Au moment de poser les électrodes, la ceinture et la sangle
thoracique, rappelez-vous de :
• Placer les électrodes et la ceinture UNIQUEMENT comme
indiqué dans ce manuel.
• Eviter de placer les électrodes ou la ceinture sur le front,
autour du cou ou du coeur (une électrode sur le thorax et
un autre dans le dos, par ex.), sur les parties génitales.
( D ’ a u t res unités S LEND ERTO N Esont disponibles pour
d’autres parties du corps. Votre revendeur vous fournira
tous les conseils nécessaires.)
• Eviter le contact avec les cicatrices récentes, une inflam-
mation ou une écorc h u re de la peau, des zo n e s
infectieuses ou à tendance acnéique, une thrombose ou
un autre problème vasculaire (varices, par ex.) ... et de
manière générale toutes les zones du corps ou les sensa-
tions sont limitées.
• Eviter les zones de blessure ou de mouvement réduit (frac-
tures ou foulures, par ex.).
• Eviter de placer les électrodes directement sur des
implants en métal. Essayez plutôt de les placer sur le
muscle le plus proche.
Effets indésirables éventuels :
• Un nombre réduit de personnes a souffert de réactions
cutanées isolées suite à l’utilisation d’appareils de stimu-
lation : allergies, rougeurs persistantes et acné.
Pour remplacer les électrodes au cours d’une séance :
• Mettez toujours le programme en pause si vous êtes en
train d’utiliser l’appareil ; détachez la ceinture puis
rattachez-la dans le dos une fois les électrodes remis en
place.
Après une séance énergique ou en cas de fatigue :
• Utilisez toujours une intensité plus faible pour éviter de
fatiguer encore un peu plus les muscles.
Contactez SLENDERTONE ou un distributeur autorisé si :
• Votre unité ne fonctionne pas correctement. En attendant,
ne l’utilisez pas.
• Vous souffrez d’irritations, de réactions cutanées, d’hyper-
sensibilité ou toute autre réaction indésirable. Notez
toutefois que quelques rougeurs peuvent apparaître sous
la ceinture pendant et quelques minutes après une
séance.
REMARQUE :
• Un traitement efficace ne devrait causer aucune gêne parti-
culière.
Important :
• Le rythme cardiaque n’est qu’une estimation et en aucun
cas une information de diagnostic. En cas de doute,
consultez votre médecin.
• La pluie pourrait troubler le bon fonctionnement de l’ap-
pareil en cas d’utilisation en extérieur. Veillez à toujours le
maintenir au sec.
• Conservez votre unité hors de portée des enfants.
• Les plots, les fils et électrodes ne doivent pas être
branchés à d’autres objets que ceux prévus.
• N’utilisez jamais votre unité en même temps qu’un autre
appareil transférant un courant électrique dans le corps
(autre stimulateur musculaire, par ex.).
• Ne touchez jamais les électrodes ou les plots si l’appareil
est allumé.
• Evitez de l’utiliser en conduisant, en faisant du jogging en
zone urbaine, en faisant fonctionner des machines ou en
faisant du vélo.
• N’utilisez pas votre unité SLENDERTONE ACTIVE avec un vête-
ment d’un autre produit SLENDERTONE. Si tel est le cas, la
stimulation pourrait ne pas être équilibrée et la séance de
raffermissement serait alors inefficace.
• SLEND ERTO NEdécline toute responsabilité en cas de non
respect des indications et instructions fournies avec l’unité.
N.B. : Si vous avez un quelconque doute concernant
l’utilisation de la ceinture S LE N D E RTO N E , veu il l e z
consulter votre médecin avant de l’utiliser.
11
Français
* Le symbole apparaît toujours avec les flèches droite et gauche. Si la flèche gauche apparaît, il y a
un problème avec l’électrode gauche ; si la flèche droite apparaît, il y a un problème avec l’électrode
droit et si les deux flèches apparaissent, il y a un problème avec l’électrode du milieu, avec les trois
électrodes ou l’unité n’est peut-être pas correctement insérée dans le fourreau.
GUIDE DE RESOLUTION DES PROBLEMES
PROBLEME
L’écran n’affiche rien et l’unité
n’émet aucun signal
L’affichage est allumé mais il
n’y a aucun signal
Le symbole des piles clignote
Sensation désagréable sous les
électrodes
Le symbole apparaît sur
l’affichage *
Les contractions sont très faibles
même lorsque l’intensité est
élevée
L’unité est allumée mais il n’y a
aucune lecture du rythme
cardiaque
CAUSES POSSIBLES
Les piles sont mal insérées
Les piles sont usées
Des piles de mauvaise qualité sont
utilisées
L’unité se trouve en pause
Pas d’intensité
Les piles sont faibles
Les électrodes ne couvrent pas les
plots
Les électrodes sont usés
Trop de séances à la suite
Les électrodes ne sont pas en
contact avec la peau
L’unité n’est pas entièrement
insérée dans son fourreau
Les électrodes ne couvrent pas les
plots
Les électrodes sont usés
Les électrodes sont à l’envers
Les protections des électrodes
n’ont pas été enlevées
La ceinture est lâche ou détachée
Les piles sont faibles
Les électrodes sont usés
Les électrodes sont mal positionnés
Les électrodes ne couvrent pas les
plots
Des piles de mauvaise qualité sont
utilisées
Sangle thoracique détendue
Fil du rythme cardiaque non
branché
SOLUTIONS
Replacer les piles comme décrit en page 3
Remplacer les piles
N’utiliser que des piles de bonne qualité
Appuyer brièvement sur le bouton
Marche/Arrêt
Augmentez l’intensité
Remplacer les piles
Replacer les électrodes
Contacter un re vendeur local pour acheter
des nouvelles électrodes SLENDERTONE
Les séances doivent être séparées d’au
moins six heures
Voir la page 6 pour consulter le bon
placement des électrodes et de la ceinture
Enfoncer l’unité dans le fourreau
Replacer les électrodes
Contacter un re vendeur local pour acheter
des nouvelles électrodes S LEND ERTO NE
Veiller à ce que la surface noire de chaque
électrode soit placée sur la peau
Vérifier que les protections des électrodes
ont bien été enlevées (de chaque côté)
Attacher correctement la ceinture
Remplacer les piles
Contacter un re vendeur local pour acheter
des nouvelles électrodes SLENDERTONE
Replacer les électrodes
Replacer les électrodes
N’utiliser que des piles de bonne qualité
Serrer la sangle thoracique
Vérifier que le fil est branché à la sangle
thoracique et au plot de la ceinture
10
Active IM Male Rev 10 04/01/2006 10:31 Page 24

JOURNAL
Remplissez votre journal apres chaque seance pour atteindre votre objectif hebdomadaire. Des journaux
de remplacement de SLENDERTONE ACTIVE sont disponibles sur www.slendertone.com.
13
1 2 3 4 5 67
Jour
4/10/06
__4__ __/___/___
_____
6/10/06
__6__ __/___/___
_____
8/10/06
__6__ 9/10/06
__4__ __/___/___
_____ 20
__/___/___
_____
__/___/___
_____
__/___/___
_____
__/___/___
_____
__/___/___
_____
__/___/___
_____
__/___/___
_____
__/___/___
_____
__/___/___
_____
__/___/___
_____
__/___/___
_____
__/___/___
_____
__/___/___
_____
__/___/___
_____
__/___/___
_____
__/___/___
_____
__/___/___
_____
__/___/___
_____
__/___/___
_____
__/___/___
_____
__/___/___
_____
__/___/___
_____
__/___/___
_____
__/___/___
_____
__/___/___
_____
__/___/___
_____
__/___/___
_____
__/___/___
_____
1
2
3
4
=
=
=
=
=
__/___/___
_____
__/___/___
_____
__/___/___
_____
__/___/___
_____
__/___/___
_____
__/___/___
_____
__/___/___
_____
__/___/___
_____
__/___/___
_____
__/___/___
_____
__/___/___
_____
__/___/___
_____
__/___/___
_____
__/___/___
_____
__/___/___
_____
__/___/___
_____
__/___/___
_____
__/___/___
_____
__/___/___
_____
__/___/___
_____
__/___/___
_____
__/___/___
_____
__/___/___
_____
__/___/___
_____
__/___/___
_____
__/___/___
_____
__/___/___
_____
__/___/___
_____
5
6
7
8
=
=
=
=
__/___/___
_____
__/___/___
_____
__/___/___
_____
__/___/___
_____
__/___/___
_____
__/___/___
_____
__/___/___
_____
__/___/___
_____
__/___/___
_____
__/___/___
_____
__/___/___
_____
__/___/___
_____
__/___/___
_____
__/___/___
_____
9
10
=
=
Exemple
Français
GARANTIE DU PRODUIT
Si votre unité souffre d’un défaut dans les deux ans suivant l’achat, SLENDERTONE s’engage à remplacer
ou réparer l’unité ou les éléments défectueux sans frais aucun (heure de travail, matériel)*, si et seule-
ment si :
• L’unité a été utilisée pour ce à quoi elle a été conçue et conformément aux consignes de ce manuel.
• L’unité n’a pas été branchée à une source d’alimentation inappropriée.
• L’unité n’a pas été mal utilisée ou négligemment.
• L’unité n’a pas été modifiée ou réparée par une personne autre qu’un agent SLENDERTONE agrée.
Cette garantie vient compléter les obligations de garantie nationale existantes et n’affecte en rien vos
droits statutaires en tant que consommateur.
* Ceci exclut les consommables (électrodes, ceinture, etc.) lorsque ceux-ci sont sujets à une usure
normale.
Entretien de l’appareil
Votre appareil ne doit pas être mouillé ou laissé sous une lumière
solaire intense. Nettoyez-le régulièrement avec un chiffon doux,
légèrement imbibé d’eau savonneuse. L’intérieur de votre appareil
ne doit pas être mouillé. N’utilisez pas de détergents, d’alcool,
d’aérosols ou de solvants puissants.
Il n’est pas nécessaire d’accéder à l’intérieur de l’appareil pour son
entretien.
Si votre appareil est endommagé, cessez de l’utiliser et renvoyez-le
àSLENDERTONE ou à votre distributeur le plus proche pour l’échanger
ou le faire réparer. Les réparations, les interventions et les modifi-
cations ne doivent être réalisées que par le personnel qualifié et
agréé SLENDERTONE.
Remarque : il est conseillé d’utiliser des piles étanches. Ne laissez
jamais de piles à l’intérieur de votre appareil si vous ne comptez
pas l’utiliser pendant une période prolongée. En effet, les piles
pourraient fuir et endommager votre appareil. Sachez que certaines
piles étanches peuvent dégager des substances corrosives suscep-
tibles d’endommager votre appareil. N’utilisez en aucun cas des
piles d’un type autre que celui recommandé (1,5v,LR03/ AAA) dans
votre appareil. Positionnez les piles uniquement de la façon décrite
dans ce manuel.
Que faire des piles et des électrodes usées ?
Ne brûlez jamais des piles ou des électrodes usées. Respectez la
réglementation en vigueur dans votre pays pour l’élimination de ce
type d’objets.
Le couve rcle du compartiment à piles doit toujours être fermé
lorsque l’appareil est en marc h e .
Lorsque le symbole clignote, la stimulation est nettement
réduite.
Le signal augmente progre ss ivement jusqu’à un niveau d’intensité
maximum au début de la phase de contraction (accélération) et
redescend progressivement à zéro au début de la phase de décon-
traction (ralentissement).
Accessoires
Lorsque vous commandez de nouvelles électrodes, exigez la
marque SLENDERTONE. Les électrodes d’autres marques ne sont pas
forcément compatibles avec votre appareil et pourraient compro-
mettre les niveaux de sécurité minimums.
Électrodes adhésives SLENDERTONE :
• 1 grande électrode adhésive Type 706 ou 709
• 2 petites électrodes adhésives Type 707 ou 710
• 3 électrodes du rythme cardiaques Type 711 x 1; 712 x 2
Piles (3 x 1.5v AAA)
Ceinture SLENDERTONE ACTIVE
Sangle thoracique
Extension de ceintureSLENDERTONE
Usage prévu : Stimulateur musculaire /
Surveillance du rythme cardiaque
Forme d’onde : Forme d’onde biphasée symétrique lorsque
mesurée sur une charge résistive.
Caractéristiques environnementales :
En fonctionnement : Plage de températures : 0 à 35°C
Humidité : de 20 à 65 % HR
Rangement : Plage de températures : 0 à 55°C
Humidité : de 10 à 90 % HR
Description des symboles de l’appareil :
Un certain nombre d’indications techniques figurent sur votre
appareil. Leur signification est la suivante :
À l’intérieur du compartiment à piles, le “+” indique le pôle positif
et le “-” le pôle négatif. La façon dont les piles doivent être placées
est également indiquée par les trois contours en relief figurant à la
base du compartiment.
L’appareil et la ceinture sont fabriqué pour Bio-Medical Research
Ltd., Parkmore Business Park West, Galway, Irlande.
L’appareil fonctionne avec trois piles de 1,5 V c.c. (LR03/ AAA). Le
courant continu est indiqué par le symbole :
La fréquence de sortie indique le nombre d’impulsions par seconde
transmises par l’appareil. Cette fréquence est mesurée en hertz
(Hz).
La sortie (RMSA) correspond au courant effectif de sortie maximum
pour chaque canal.
La sortie (RMSV) correspond à la tension effective de sortie
maximum pour chaque canal.
Ce symbole signifie “Attention, reportez-vous à la
documentation jointe”.
Ce symbole signifie que le matériel est de type BF.
Ce symbole présent sur votre appareil SLENDERTONE sert à
indiquer que l’appareil répond aux exigences de la direc-
tive européenne relative aux appareils médicaux
(93/42/CEE). 0366 correspond au numéro de l’organ-
isme notifié (VDE).
SN correspond au “numéro de série”. Le numéro de série de l’a p-
pareil est indiqué à l’intérieur du coffret, au dos de l’appareil. La lettre
précédant le nombre désigne l’année de fabrication, “A” correspon-
dant à 1995, “G” à 2001, “H” à 2002, etc.
Le numéro de lot de la ceinture est indiqué sur son emballage par le
nombre correspondant au symbole LOT .
Type de produit : 551
Paramètre 500Ω1KΩ1K5Ω
Sortie RMSV 5.8V 9.0V 11.1V
Sortie RMSA 11.7mA 9.0mA 7.4mA
Fréquence de sortie 50-60Hz. 50-60Hz. 50-60Hz.
Composant c.c. : Approx. 0 C 0 C 0 C
Largeur d’impulsion positive : 250–300 µs 250–300 µs 250–300 µs
Largeur d’impulsion négative : 250–300 µs 250–300 µs 250–300 µs
Intervalle d’interphase : 100 µs 100 µs 100 µs
REMARQUE:Selon les lois établies à l’intérieur de chaque état
membre, les tests de sécurité de l’appareil doivent être effectués
tous les deux ans.
REMARQUE:Selon la loi allemande, les tests de sécurité doivent être
effectués tous les deux ans par un service de test agréé.
MATIERES DE LA CEINTURE
Matière externe : 100 % nylon, Coutures : 82 % nylon, 18 %
élasthanne, Crochet et boucle : 100 % nylon, Mousse : 100 % poly-
chloroprèn
Au terme du cycle de vie de ce produit, vous ne devez pas
jeter le produit dans les déchets ordinaires mais le déposer
dans un point de collecte pour le recyclage des
équipements électroniques.
Certaines matériaux du produit peuvent être reutilisés si
vous les déposez dans un point dere c yclage. En réutilisant
certaines pièces ou matières premières des produits
usagés, vous apportez une contribution importante à la
protection de l’environnement. Veuillez contactez vos
autoritées locales pour toutes information supplémentaire
sur les points de collecte dans votre région.
Les appareils électroniques et électriques usés peuvent
avoir des effets néfastes sur l’environnement. Le fait de ne
pas correctement mettre ces appareils au rebus peut
entraîner l’accumulation de toxines dans l’air, l’eau et le sol
et peut s’avérer toxique pour l’homme.
CARACTERISTIQUES TECHNIQUES
!
0366
!
12
Active IM Male Rev 10 04/01/2006 10:31 Page 26
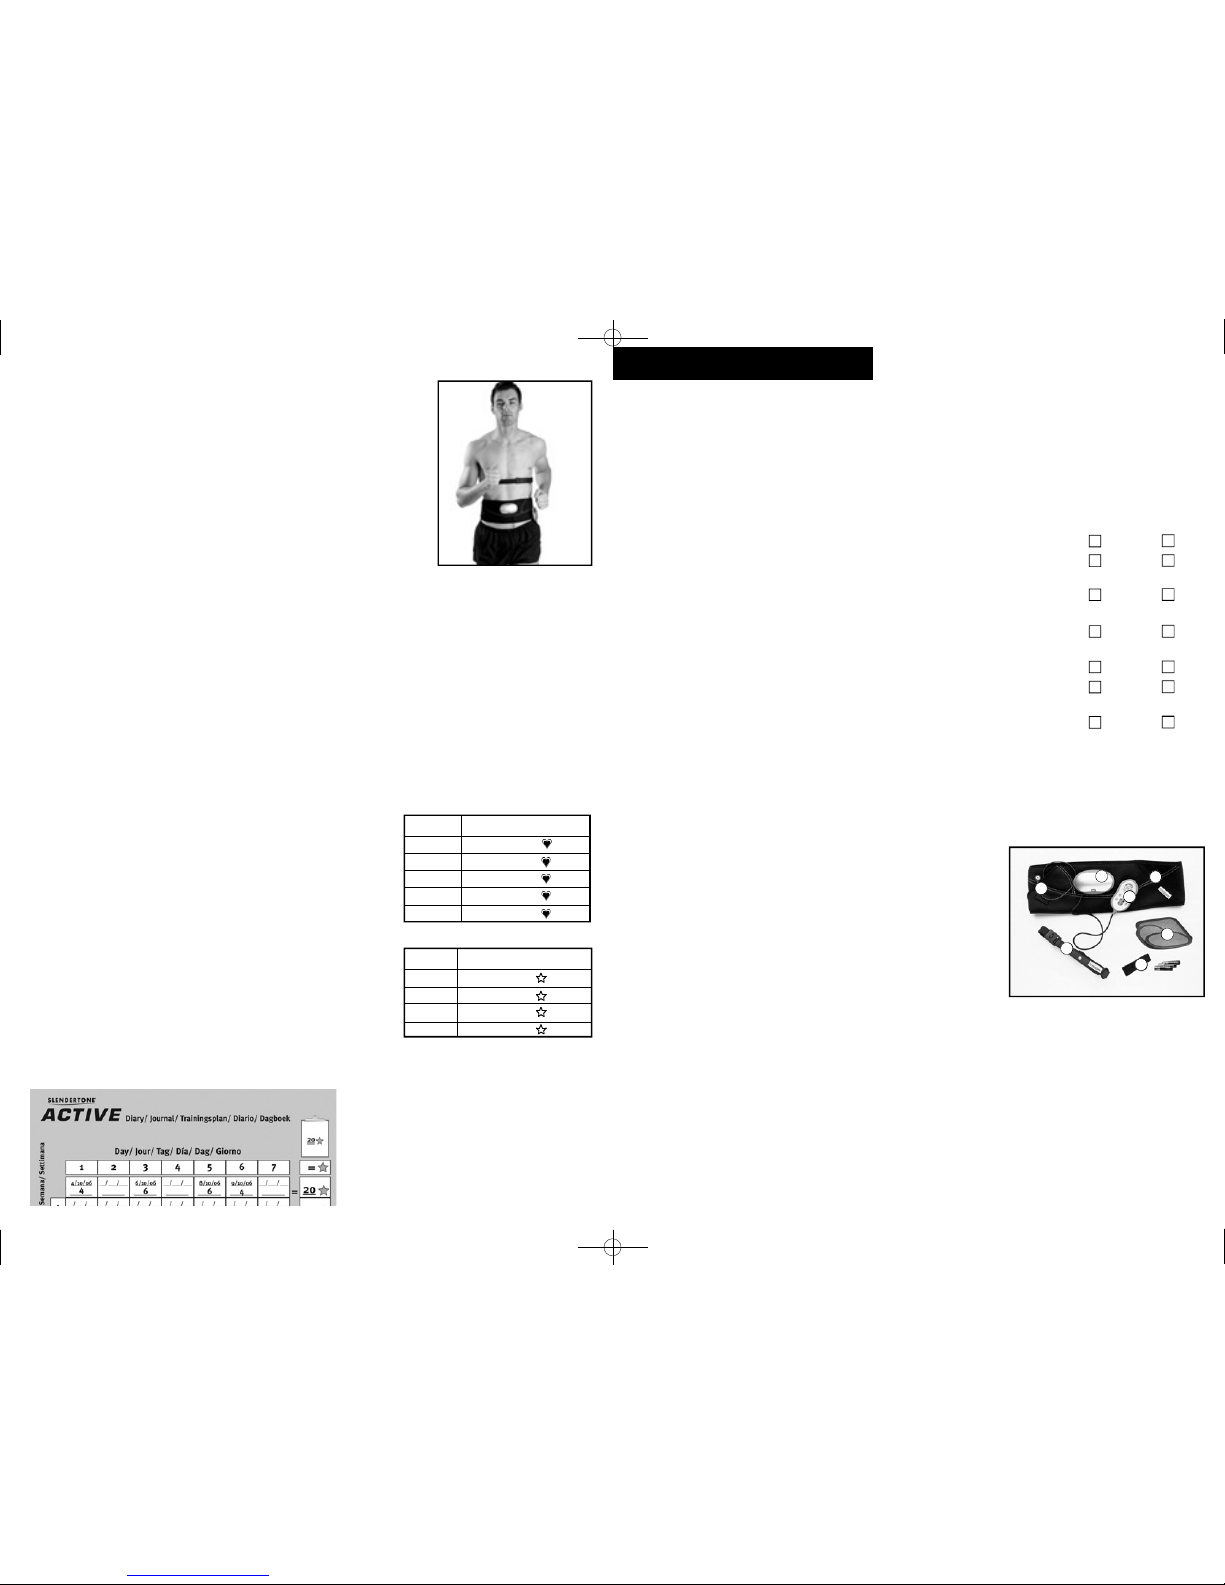
WIE FIT SIND SIE?
Wie bei jedem Sport müssen Sie auch vor Beginn eines SLENDERTONE ACTIVE-Trainingsplans sicherstellen,
dass Ihr Körper dem Training gewachsen ist. Wenn Sie Zweifel haben, überprüfen Sie bitte die
Gegenanzeigen auf Seite 11 und ziehen Sie, falls notwendig, Ihren Arzt zu Rate, bevor Sie mit dem
Training beginnen.
Bitte beantworten Sie die nachfolgenden Fragen:
1. Hat Ihr Arzt Sie jemals vor einem Herzleiden gewarnt oder Ihnen gesagt,
dass Sie Sport nur nach Empfehlungen eines Arztes betreiben dürfen? Ja / Nein
2. Haben Sie Schmerzen in der Brust, wenn Sie Sport treiben? Ja / Nein
3. Hatten Sie in den vergangenen Monaten Schmerzen in der Brust,
auch wenn Sie keinerlei Sport getrieben haben? Ja / Nein
4. Leiden Sie an Schwindel und Gleichgewichtsproblemen oder werden
Sie manchmal ohnmächtig? Ja / Neinc
5. Haben Sie Knochen- oder Gelenkprobleme, die sich durch eine
intensivere körperliche Betätigung verstärken könnten? Ja / Nein
6. Nehmen Sie zurzeit Blutdruck- oder Herzmedikamente ein? Ja / Nein
7. Gibt es einen Grund, weshalb Sie sich nicht körperlich betätigen
sollten? Ja / Nein
Wenn Sie eine oder mehrere Fragen mit „Ja“ beantwortet haben, sollten Sie Ihren Arzt zu Rate
beziehen, bevor Sie mit einem SLENDERTONE ACTIVE-Trainingsplan beginnen. SLENDERTONE empfiehlt das
Aufsuchen eines Arztes, bevor Sie die Übungen, die in dieser Bedienungsanleitung erwähnt werden,
durchführen. Wie bei jedem neuen Training sollten Sie auch hier immer daran denken, langsam zu
beginnen und das Trainingsniveau Schritt für Schritt zu steigern.
IHR SLENDERTONE ACTIVE-PAKET
1. ACTIVE-Gurt (für Taillenumfang 71 bis 107 cm):
Legen Sie den Gurt mit den drei SLENDERTONE-Elektroden (1a)
so um Ihre Taille, dass er fest, aber bequem sitzt (Seite 6).
2. Basisgerät:
Öffnen Sie das Batteriefach im Basisgerät und legen Sie die
Batterien ein. Schließen Sie das Fach und schieben Sie das
Basisgerät anschließend in die Gurthalterung.
3. Herzfrequenz-Elektrode:
Die Herzfrequenz-Elektrode wird auf dem Brustgurt angebracht und überwacht Ihre Herzfrequenz
während Ihres Trainings mit SLENDERTONE ACTIVE.
4. Elektrodenkabel:
Mit diesem Kabel wird der Gürtel mit dem Brustgurt verbunden.
5. Brustgurt (umfang 61 bis 120 cm):
Legen Sie diesen Gurt um Ihre Brust, sodass diese festgehalten wird.
6. Regler:
Das Gehirn Ihres SLENDERTONE ACTIVE-Geräts. Der Regler steuert die Funktionen Ihres Trainingsgurts.
3
Deutsch
2
Wenn dies Ihre erste ACTIVE-Anwendung ist, sollten Sie diese Anleitung
vor Beginn der Anwendung aufmerksam lesen.
WAS IST SLENDERTONE ACTIVE?
SLENDERTONE ACTIVE ist ein Durchbruch im Gesundheits- und Heimfitness-
Bereich. Das Gerät überwacht Ihre Herzfrequenz und stellt damit sicher,
dass Sie in Ihrem optimalen Pu ls be reich trainieren, um Fett zu verbrennen
und Ihre Fitness zu verbessern. Während Sie sich körperlich betätigen,
sorgt der SLEND ERTO NE AC TIVE-Bauchtrainer für ein spezielles Muskeltraining,
das Ihren gesamten Bauchbereich festigt, strafft und formt.
DIE FUNKTIONSWEISE VON SLENDERTONE ACTIVE
Wir alle müssen Sport treiben, um fit und gesund zu bleiben. Wie aber finden Sie heraus, ob Sie auf
dem richtigen Niveau trainieren? Eine bewährte Methode ist die Messung der Herzfrequenz, und
genau das macht SLENDERTONE ACTIVE für Sie. Das Gerät überwacht Ihre Herzfrequenz, während Sie sich
bewegen. Sie können Ihre Herzfrequenz auf der Anzeige überprüfen und so schnell feststellen, ob Sie
im optimalen Pulsbereich trainieren oder darunter bzw. darüber liegen.
Mithilfe dieser Technik stellt SLENDERTONE ACTIVE sicher, dass Sie immer so effizient wie möglich
trainieren. Der Grund hierfür ist einfach. Wenn Sie mit optimaler Herzfrequenz Sport treiben (Ihr
„Trainingsbereich“), verbessern Sie Ihre Fitness.
KURZANLEITUNG ZUR VERWENDUNG VON SLENDERTONE ACTIVE
(a) EINRICHTEN
1. Richten Sie das ACTIVE-Gerät ein und schalten Sie es ein (siehe Seite 6).
2. Erhöhen Sie die Reizintensität auf eine für Sie angenehme Stufe.
(b) TRAINIEREN
3. Los! Laufen Sie, während das Gerät Ihre Bauchmuskeln trainiert.
4. Überprüfen Sie während der Anwendung immer wieder Ihre
Herzfrequenz auf der Anzeige. Stellen Sie sicher, dass Sie in Ihrem
optimalen Bereich trainieren – siehe Herzfrequenztabelle (z. B.
sollte die Herzfrequenz bei einem Alter von 45 Jahren zwischen 106
und 141 liegen).
(c) BEENDEN
5. Wenn Sie die Anwendung abgeschlossen haben, tragen Sie Ihre
erzielten ACTIVE-Punkte in Ihren Trainingsplan ein. Die Anzahl der
Punkte können Sie mithilfe der Punktetabelle ermitteln.
(d) TRAININGSPLAN EINHALTEN
6. Versuchen Sie, das empfohlene Wochenziel zu erreichen, und
freuen Sie sich über sichtbare Ergebnisse! Im nachfolgenden
Beispiel müssen 20 ACTIVE-Punkte erreicht werden. Wir empfehlen
dieses Ziel für Anfänger.
Zeit Gehen und Trainieren
15:00 2
30:00 4
45:00 6
60:00 8
HERZFREQUENZTABELLE
ACTIVE-PUNKTE-TABELLE
(Für Gehen und Trainieren)
Alter Gehen und Trainieren
20 - 29 114 - 152
30 - 39 110 - 147
40 - 49 106 - 141
50 - 59 102 - 136
60 - 69 98 - 130
SLENDERTON ACTIVE-Ersatzkalender sind
erhältlich bei www.slendertone.com.
1
1a
2
6
4
5
3
Active IM Male Rev 10 04/01/2006 10:31 Page 28
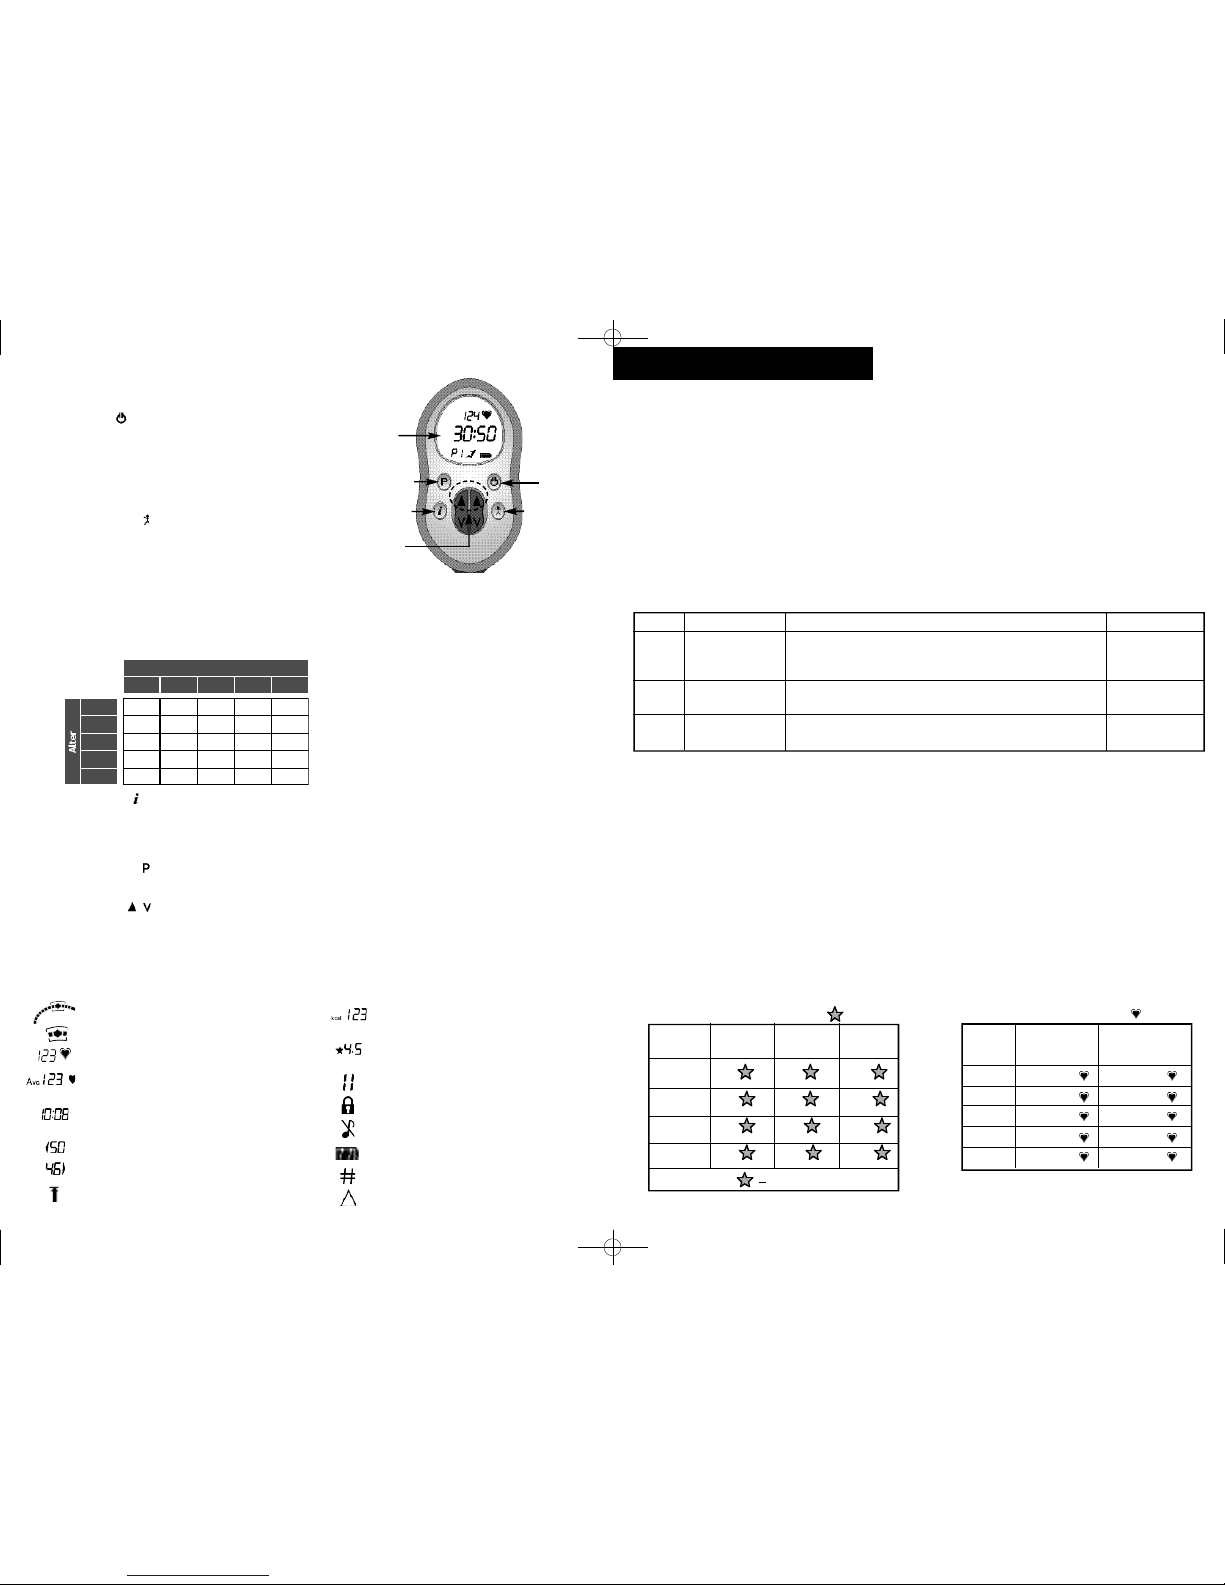
5
SLENDERTONE ACTIVE-TRAININGSPLÄNE
SLENDERTONE ACTIVE stellt Ihnen drei Trainingspläne zur Auswahl. Jeder Plan kommt Ihnen auf eine andere
Art und Weise zugute. Möchten Sie zum Beispiel Ihre Gesundheit und Fitness verbessern, können Sie,
je nach Fitnessniveau, entweder Plan 1 oder Plan 2 verwenden. Wenn Sie ausschließlich Ihre
Bauchmuskeln trainieren wollen, befolgen Sie Plan 3.
Jeder Plan gibt eine Punktezahl vor, die pro Woche erreicht werden sollte. Jedes Mal, wenn Sie Ihr SLEN-
DERTONE ACTIVE-Gerät verwenden, erhalten Sie ACTIVE-Punkte. In der nachfolgenden Tabelle werden die
Wochenziele für die drei Trainingspläne aufgeführt.
HINWEIS:
SLENDERTONE ACTIVE kann auch während des Trainings auf einem Laufband oder Fahrradergometer
verwendet werden.
SLENDERTONE ACTIVE-PUNKTE
Jeder Trainingsplan ist eine bestimmte Anzahl von ACTIVE-Punkten wert. Wenn Sie die Trainingszeiten
im Rahmen der einzelnen Pläne überschreiten, erhalten Sie außerdem zusätzliche Punkte. Wie Sie in
der nachfolgenden ACTIVE-Punkte-Tabelle erkennen können, bringen Ihnen 30 Minuten Gehen und
Trainieren vier Punkte ein, wohingegen Sie sich mit 45 Minuten Gehen und Trainieren sechs Punkte
ve rdienen. Sie dürfen natürlich Ihr Wochenziel überschreiten, wenn Sie noch mehr von Ihrem SLEND ERTO NE
ACTIVE-Gerät profitieren wollen.
Beim Walking/Jogging ist sicherzustellen, dass die Herzfrequenz auf richtiger Höhe gehalten wird. Die
für Sie angemessene Herzfrequenz ist in der Herzfrequenztabelle angeführt. Das ist Ihr sog.
Trainingsbereich. Hier muss in der optimalen Geschwindigkeit trainiert werden, damit Fett verbrannt
wird. Die besten Ergebnisse erzielen Sie, wenn Sie die Trainingsintensität so hoch wie möglich
einstellen.
Plan Beschreibung Art des Trainings Wochenziel
P1 Gehen und Unternehmen Sie 3-5 Mal die Woche einen strammen 20 ★
Trainieren Spaziergang und verwenden Sie dabei den SLENDERTONE
ACTIVE-Gurt.
P2 Joggen und Gehen Sie 2-4 Mal die Woche Joggen und verwenden 18 ★
Trainieren Sie dabei den SLENDERTONE ACTIVE-Gurt.
P3 Trainieren Verwenden Sie 5 Mal wöchentlich 30 Minuten den 5★
ACTIVE-Gurt in der Arbeit oder bequem zu Hause.
Alter Gehen und Joggen und
Trainieren Trainieren
20 - 29 114 - 152 143 - 168
30 - 39 110 - 147 138 - 161
40 - 49 106 - 141 132 - 155
50 - 59 102 - 136 127 - 149
60 - 69 98 - 130 122 - 143
MINUTEN GEHEN UND JOGGEN UND TRAINIEREN
TRAINIERTTRAINIEREN TRAINIEREN
15:00
30:00
45:00
60:00
1/2
1
-
-
2
4
6
8
3
6
9
12
ACTIVE-PUNKTE-TABELLE ( )
1~ 50 kcal.
HERZFREQUENZTABELLE ( )
Deutsch
SLENDERTONEACTIVE-REGLER
Ein-/Aus-Taste ( ):
Halten Sie die Taste zwei Sekunden lang gedrückt, um Ihr
Gerät ein- oder auszuschalten. Drücken Sie im Laufe einer
Anwendung kurz auf die Taste, um das Programm
anzuhalten bzw. nach einer Unterbrechung wieder
aufzunehmen.
Konfigurationstaste ( ):
Drücken Sie auf diese Taste, um den Konfigurationsbildschirm
zu aktivieren. Scrollen Sie mit einem der beiden Intensitäts-
regler zu dem Code, der am besten zu Ihnen passt, und
drücken Sie dann zur Bestätigung noch einmal auf die Konfigurationstaste.
Beispiel:
Angenommen, Sie sind 44 Jahre alt (40 bis 49, von links nach rechts) und wiegen 65 kg (60 bis 69, von
oben nach unten), so können Sie anhand dieser Tabelle ermitteln, dass der richtige Code für Sie „9“
ist. Bestimmen jetzt Sie Ihren Code mithilfe dieser Tabelle.
Informationstaste ( ):
Drücken Sie einmal auf diese Taste, um Ihre durchschnittliche Herzfrequenz, den Kalorienverbrauch,
die Anzahl ACTIVE-Punkte, die Trainingsintensität und die Anzahl bisheriger Anwendungen zu über-
prüfen. (siehe Seite 7).
Trainingsplan-Taste ( ):
Mit dieser Taste können Sie einen von drei Trainingsplänen auswählen (siehe Seite 5).
Intensitätstasten ( / ):
Drücken Sie den Auf/Ab-Pfeilen, um die Intensität des Muskeltrainings zu verstärken/verringern.
50 - 5960 - 69
20 - 29
30 - 39
15 15 14 13 13
12 12 11 10 10
9 9 8 8 7
6 5 5 4 4
3 3 2 2 1
40 - 49
50 - 59
60 - 65
70 - 79 80 - 89 90 +
Gewicht (Kg)
Graphische Herzfrequenz-Anzeige.
Herzfrequenz-Trainingsbereich.
Ihre aktuelle Herzfrequenz.
Durchschnittliche Herzfrequenz in
aktueller Anwendung.
Verbleibende/Abgelaufene Zeit in
aktueller Anwendung.
Intensität auf der linken Seite.
Intensität auf der rechten Seite.
Höchste Intensität der aktuellen/
letzten Trainingssitzung.
Kalorienverbrauch während der
aktuellen Anwendung.
Erzielte ACTIVE-Punkte in aktueller
Anwendung.
Programm wurde angehalten.
Tastensperre aktiviert.
Stummschaltung aktiviert.
Ladezustand der Batterien.
Anzahl der bisherigen Anwendungen.
Schlechter Elektrodenkontakt.
4
SLENDERTONE ACTIVE-ANZEIGE
Die Anzeige Ihres SLENDERTONE ACTIVE-Reglers liefert Ihnen alle Informationen, die Sie benötigen, um in
Ihrem optimalen Pulsbereich zu trainieren. So können Sie Ihre Fortschritte leichter verfolgen.
Anzeige-
Bildschirm
Trainingsplan
-Taste Ein-/Aus-
Taste
Konfigurations
-taste
Informations
-taste
Intensitäts-
regler
Durch die individuelle Konfiguration erhalten Sie
zusätzliches Herzfrequenz-Feedback und erhöhen
die Genauigkeit des Kalorienzählers.
HINWEIS:
Die Rückmeldung über verbrauchte Kalorien
beruht auf einer Schätzung, wobei Ihr
Herzfrequenz in Ihrem Trainingbereich liegt.
Code-Tabelle:
Active IM Male Rev 10 04/01/2006 10:31 Page 30

9. Am Ende einer Anwendung wird auf dem Gerätedisplay abwechselnd Abb. a und
Abb. b angezeigt. Notieren Sie sich die durchschnittliche Herzfrequenz, die Anzahl
verbrannter Kalorien und IhreACTIVE-Punkte für diese Anwendung. Neben Ihrer
Herzfrequenz können Sie außerdem überprüfen, ob Sie innerhalb Ihres
Trainingsbereichs trainiert haben.
DIE INFORMATIONSTASTE (i)
Ihr SLEND ERTO N E ACTIV E s p ei che rt Informationen über laufende und frühereAnwe n du n g en .
Mit der Informationstaste greifen Sie auf diese Informationen zu. Dies ist auch
möglich während ein Programm läuft.
Einmaliges Drücken der Informationstaste zeigt (Abb. c):
1. Ihre durchschnittliche Herzfrequenz in der laufenden Anwendung.
2. Die während der laufenden Anwendung verbrannte Kalorienanzahl.
3. Ihre ACTIVE-Punktwertung für die laufende Anwendung.
Zweimaliges Drücken der Informationstaste zeigt (Abb. d):
4. Die Gesamtanzahl bisher abgeschlossener Anwendungen (kehrt nach 199 wieder
auf Null zurück).
5. Die in der laufenden Sitzung erreichte Höchstintensität.
Drücken Sie die Informationstaste ein drittes Mal, um zur Standardanzeige zurück-
zukehren.
SONSTIGE FUNKTIONEN
Tastensperre für die Intensitätsregelung
Haben Sie eine angenehme Intensitätsstufe gefunden, können Sie diese speichern, indem Sie die
Trainingsplantaste und danach innerhalb von drei Sekunden die Informationstaste drücken, um die
Tastensperre zu aktivieren. Die Tastensperre wird auf dieselbe Weise wieder deaktiviert.
Stummschaltung
Wenn Sie die Tonsignale Ihres Geräts ausschalten möchten, drücken Sie die Konfigurationstaste für
zwei Sekunden. Das Symbol erscheint auf dem Display. Die Stummschaltung wird
auf dieselbe Weise wieder deaktiviert.
ZUSATZINFORMATIONEN
GÜRTELCLIP
Ihr SLENDERTONE ACTIVE ist mit einem magnetischen Gürtelclip ausgestattet. Drücken Sie
die abgerundete Seite des Clips auf der Rückseite des Reglers und befestigen Sie den
Clip an Ihrem SLENDERTONE ACTIVE-Gürtel oder einem anderen Kleidungsstück (Abb. e).
SELBSTHAFTENDE ELEKTRODEN
Neben der Herzfrequenz-Elektrode für den Brustgurt liegen dem Gerät zwei weitere
Herzfrequenz-Elektroden bei. Diese beiden Elektroden können bei Personen verwendet
werden, die im oberen Brustbereich keine Körperbehaarung haben. Gehen Sie folgen-
dermaßen vor:
1. Befestigen Sie die Herzfrequenz-Elektrode am Kabel (Abb. f).
2. Ziehen Sie die Folie von der selbsthaftenden Seite der Herzfrequenz-Elektrode ab
(A bb. g) und platzieren Sie die Elektrode rechts oben von Ihrem Brustknochen.
Möglicherweise sind mehrere Versuche nötig, bis Sie die richtige Position für ein
starkes Herzsignal gefunden haben. 7
Abb. e
Abb. f
Abb. g
Deutsch
VERWENDEN DES ACTIVE-GERÄTS
1. Entfernen Sie die Schutzfolie von der strukturierten Seite der größeren, selbst-
haftenden Elektrode (Abb. a). Platzieren Sie die Elektrode zwischen den parallel
verlaufenden Linien in der Gürtelmitte. Stellen Sie sicher, dass die Elektrode den
Metallstift vollständig bedeckt.
2. Entfernen Sie die Folie von der s tr uktur ie r te n Seite der beiden kleineren Elektrode n .
Platzieren Sie die kleinen Elektroden seitlich von der großen Elektrode. Wählen Sie
dabei eine Ihrer Körpergröße entsprechende Markierung aus (Abb. b). Stellen Sie
sicher, dass die Knöpfe vollständig von der Elektroden abgedeckt sind.
3. Entfernen Sie die Folie von der schwarzen Seite der drei Elektroden. Legen Sie den
Gürtel so um Ihre Taille, dass sich die große Elektrode mittig auf Ihrem Bauchnabel
befindet und die zwei kleineren Elektroden auf beiden Seiten Ihrer Taille direkt
zwischen Hüftknochen und Rippenbogen liegen. Ziehen Sie den Gürtel fest, sodass
er bequem sitzt.
HINWEISE:
Bewahren Sie die Schutzfolien für den späteren Gebrauch auf. Stellen Sie sicher,
dass Sie den Gürtel mit der richtigen Seite nach oben anlegen.
4. Öffnen Sie das Batteriefach des Basisgeräts und legen Sie, wie in der Innenseite des
Fachs gezeigt, drei AAA-Batterien ein (Abb. c). Schieben Sie das Basisgerät
anschließend in die Gurthalterung. Schieben Sie das Basisgerät in die Halterung, bis
die Führungslinien aufeinander ausgerichtet sind. Dies kann einen gewissen
Kraftaufwand erfordern (Abb. d).
5. Befestigen Sie das Herzfrequenz-Kabel am Brustgurt (Abb. e) und schließen die
äußere Abdeckung darüber (Abb. f ).
6. Ziehen Sie die Folie von der strukturierten Seite der Herzfrequenz-Elektrode ab
und schieben Sie die Elektrode in den Brustgurt direkt über den Metallstift (Abb.
g). Ziehen Sie die Folie von der schwarzen Seite der Herzfrequenz-Elektrode
(bewahren Sie die Schutzfolien) und ziehen Sie den Brustgurt fest, sodass die
Elektrode direkt unter Ihrem Herzen liegt (Abb. h). Passen Sie den Brustgurt so an,
dass er bequem um Ihre Brust sitzt und schließen Sie ihn mit der Schnalle.
Möglicherweise sind mehrere Versuche nötig, bis Sie die richtige Position für ein
starkes Herzsignal gefunden haben.
HINWEIS:
Wenn dabei Schwierigkeiten auftreten, müssen Sie den Brustgurt möglicherweise
enger ziehen.
7. Schalten Sie das Gerät ein, indem Sie die Ein-/Aus-Taste zwei Sekunden lang
gedrückt halten.
8. Wählen Sie mit der Trainingsplan- Taste (P) einen Trainingsplan aus und erhöhen Sie
die Reizintensität, bis Sie eine deutliche Beanspruchung Ihrer Bauchmuskeln fühlen.
HINWEIS:
Sie müssen dabei nicht auf beiden Seiten dieselbe Intensität einstellen.
UNTERBRECHUNG DER TRAININGSSITZUNG:
Drücken Sie kurz auf die Ein-/Aus-Taste, um das Training zu unterbrechen. Drücken
Sie abermals kurz auf die Ein-/Aus-Taste, um das Training fortzusetzen.
6
Abb. a
Abb. b
Abb. c
Abb. d
Abb. a
Abb. b
Abb. c
Abb. d
Abb. e
Abb. f
Abb. g
Abb. h
71cm - 82cm / 28-32”
84cm - 94cm / 33-37”
96cm - 107cm / 38-42”
Active IM Male Rev 10 04/01/2006 10:31 Page 32

FRAGEN UND ANTWORTEN
Was tun, wenn die Herzfrequenz sehr hoch ist (z. B.
über 180)?
Das ACTIVE-Trainingsgerät ist sehr empfindlich und
kann bisweilen durch starke elektro m ag n et i s c he
Signale gestört werden. Dies kann eine Ursache für
eine falsch oder zu hoch angezeigte Herzfrequenz sein.
Unterbrechen Sie das Training 30 Sekunden und prüfen
Sie, ob sich Ihre Herzfrequenz wieder stabilisiert. Sie
sollten die angezeigte Herzfrequenz ständig
überwachen. Sie sollten die angezeigte Herzfrequenz
ständig überwachen. Wenn Sie weit über der für Sie
empfohlenen Herzfrequenz trainieren, sollten Sie die
Anwendung sofort unterbrechen und warten, bis Ihre
Herzfrequenz auf ein normales Niveau absinkt.
Formel zur Berechnung Ihrer maximalen
Herzfrequenz: 220 minus Ihr Alter!
Die Elektroden haften nicht richtig am Gürte l,
obwohl sie relativ neu sind. Was ist der Grund dafür?
Vergewissern Sie sich, dass alle Elektroden mit der
strukturierten Seite auf dem Gürtel aufliegen. Die
sc h w a r zen Seiten müssen auf Ihrer Haut liegen.
Drücken Sie die Ecken jeder Elektrode vor und nach
jedem Gebrauch fest auf den Gürtel.
Meine Haut weist nach einer Anwendung Rötungen
auf. Was ist der Grund dafür?
Eine leichte Hautrötung nach einer Anwendung ist
normal. Diese beruht teilweise auf einer stärkeren
Dur chblutung der Haut und sollte nach der
Anwendung zurückgehen. Eine we i t e re Ursache
können Druckmale durch einen eng anliegenden
Gürtel sein. Ein Grund zur Besorgnis besteht nicht.
Sie sollten jedoch den Gürtel nur während der
Anwendung tragen. Bei extremen Hautrötungen
haben Sie vielleicht eine zu hohe Intensität
eingestellt. Wenn das Problem weiterhin besteht,
sollten Sie das Gerät nicht mehr benutzen.
Während des Trainings verspüre ich ein Prickeln in
den Beinen. Was kann ich dagegen tun?
Verschieben Sie die beiden kleineren Elektroden von
der Taille weiter nach oben und nach innen (d. h. zur
Körpermitte hin).
Im Taillenbereich wird meine Muskulatur stimuliert,
im Bauchbereich jedoch nicht. Was ist der Grund
dafür?
Verschieben Sie die große Elektrode ein wenig nach
unten. Tritt daraufhin keine Verbesserung ein, sollten
Sie die kleineren Elektroden für ein kleinere s
Körpermaß einstellen und/oder die Intensität erhöhen.
Kann ich das SLENDERTONE ACTIVE auch für das Training
von Muskeln ve r wenden, die durch Beweg u n g s -
mangel aufgrund einer Verletzung geschwächt sind?
Ihr AC T IV E- Gür tel kann zur Linderung bzw. zum
Muskelaufbau nach Verletzungen verwendet werden.
Wenden Sie sich zuvor an Ihren Arzt, damit dieser ein
spezifisches Trainingsprogramm für das ACTIVE-Gerät
erstellt, das eine Verbesserung der Kraft und
Straffheit der Bauchmuskeln garantiert.
Was muss ich tun, wenn auf der Anzeige E00X
erscheint?
E002 oder E006 erscheint auf der Anzeige.
- Die Batterien sind leer.
- Ersetzen Sie die Batterien.
- Sollte das Problem weiter bestehen, nachdem Sie
neue Batterien eingelegt haben, geben Sie das
Gerät an SLENDERTONE zurück.
E001, E003, E004 oder E005 erscheint auf der
Anzeige.
- Interner Fehler.
- Geben Sie das Gerät zur Reparatur zurück an
SLENDERTONE.
9
Deutsch
FRAGEN UND ANTWORTEN
Wie trainiert ACTIVE die Bauchmuskulatur?
(i) AC TI V E sendet schwache Signale an die
Elektroden auf dem Gürtel.
(ii) Diese Signale gehen weiter in den Muskel und
schalten die Nerven in diesem Bereich ein.
(iii) Die Nerven wiederum schalten die Muskeln ein,
und die Muskeln ziehen sich zusammen.
HINWEIS:Wir empfehlen maximal 60 Minuten
Bauchmuskeltraining pro Tag.
Verursacht das Produkt Muskelkater?
Bei jeder sportlichen Betätigung muss mit einem
Muskelkater gerechnet werden. Stellen Sie an Ihrem
Active eine niedrige Trainingsintensität ein, wenn Sie
Muskelkater bekommen.
Kann ich S LE N D E RTO NE ACT IVE für gymnastische
Übungen nach einer Geburt nutzen?
Ja, aber Sie müssen nach der Geburt mindestens
sechs Wochen warten und zuvor einen Arzt
aufsuchen. Wenn Sie einen Kaiserschnitt hatten und
dieser weniger als 3 Monate zurückliegt, konsul-
tieren Sie vor der Verwendung von SLENDERTONE ACTIVE
in jedem Fall Ihren Arzt.
Woran erkenne ich, dass die Elektroden ausgewech-
selt werden müssen?
Ein typisches Anzeichen für die Abnutzung der
E l e k t roden ist eine Signalabeschwächung tro t z
ausreichend geladener Batterien. Sie können dies
überprüfen, indem Sie neue Batterien einsetzen
und/oder die Anordnung der Gürt e l besta n d teil e
korr i gieren, um sicherzugehen, dass der Gürtel
k o r rekt sitzt. Er s a tze l e k t roden können Sie im
Fachhandel kaufen, auf der SLE N DERTO N E-Webs i t e
(www.slendertone.com) bestellen oder auch tele-
fonisch beim SLENDERTONE-Kundenservice ordern.
Die Muskelstimulation verursacht ein unangenehmes
Gefühl. Was kann ich tun?
Vergewissern Sie sich, dass sich die Elektroden in der
richtigen Position befinden und fest am Körper
aufliegen. Ziehen Sie den Gürtel enger. Bevor Sie den
Gürtel anders anlegen, müssen Sie das Gerät aus-
schalten.
Was tun, wenn die Herzfrequenz falsch oder gar
nicht angezeigt wird?
Verschieben Sie den Brustgurt nach oben und posi-
tio nieren Sie ihn mehr zur Seite oder Mitte hin. Legen
Sie den Gurt über eine Stelle mit we n i g
Körperbehaarung. Überprüfen Sie die Position und
Haftung der Herzfre q ue n z- E le k trode. Wenn die
Her zfrequ enz-Ele ktrode abgerutscht ist, schalten Sie
das Gerät aus und korrigieren Sie ihre Position. Ziehen
Sie den Gürtel enger. Tragen Sie ein Traini ngshemd
aus Baumwolle. Vermeiden Sie Synthetik materia lien.
Das Hemd sollte eng sitzen und nicht flattern. Stell e n
Sie sich nicht direkt neben Elektrogeräte, die das
Signal beeinflussen könnten. Überprüfen Sie die
Batterien und tauschen Sie sie bei Bedarf aus.
PFLEGE IHRER GÜRTEL
Ihr Gerät sollte unter keinen Umständen Nässe ausgesetzt werden. Sie können es jedoch mit einem
leicht angefeuchteten Tuch reinigen. Der Gurt kann gewaschen werden, Sie müssen jedoch zuvor das
Gerät und die Elektroden abnehmen. Wenn Sie den Gürtel waschen, beachten Sie unbedingt die
Hinweise auf dem Etikett.
Waschen Sie Ihren Gurt nicht in der Waschmaschine. Reinigen Sie ihn immer von Hand in
lauwarmem Wasser. In der Waschmaschine kann die empfindliche Gürtel-Elektronik beschädigt
werden. Auch beim Waschen von Hand müssen Sie vorsichtig sein und dürfen den Gürtel
niemals auswringen.
Verwenden Sie für die Reinigung Ihres Gurts keine Bleichmittel.
Lassen Sie den Gürtel nicht chemisch reinigen.
Schleudern Sie den Gürtel nicht. Der Gürtel enthält Plastikteile. Legen Sie ihn daher zum
Trocknen niemals über heiße Gegenstände (wie einen Heizkörper). Vor erneuter Verwendung
muss der Gürtel vollständig trocken sein.
Sie dürfen den Gurt keinesfalls bügeln.
PFLEGE DES BRUSTGURTS
Wischen Sie den Brustgurt regelmäßig mit einem feuchten Tuch ab, um Schmutz und Rückstände zu
entfernen.
8
SLENDERTONE-EMPFEHLUNGEN
• Es wird empfohlen, dass Sie die Muskelstimulation während dem Treppensteigen oder Laufen auf
unebenem Untergrund unterbrechen.
• Bei erstmaliger Verwendung kann sich die Muskelstimulation ungewohnt anfühlen. Wir empfehlen,
dass Sie sich zuerst an die Muskelstimulation selbst gewöhnen, bevor Sie versuchen, während der
Stimulation zu laufen.
• Aus hygienischen Gründen sollte dieses Gerät nur von einer Person verwendet werden. Nutzen Sie
Ihren Gürtel nicht gemeinsam mit einer anderen Person.
• Passen Sie auf, wenn Sie während dem Laufen die Anzeige ablesen oder Einstellungen am Produkt
vornehmen. Unachtsamkeit kann zu Unfällen führen.
• Schließen Sie die Geräte nicht an andere Geräte an, zum Beispiel an einen tragbaren Audioplayer.
• Überanstrengen Sie sich nicht bei Ihrer Übung bzw. Muskelstimulation. Trainieren Sie auf einem für
Sie angenehmen Niveau.
• Ein Zeitraum von mindestens sechs Stunden zwischen Anwendungen lassen.
Active IM Male Rev 10 04/01/2006 10:31 Page 34

GEGENANZEIGEN
Das S LEND E RTO NEAC T IVE ist für jeden gesunden Erwachsenen
geeignet. Wie bei jedem anderen Training müssen jedoch auch
beim Gebrauch dieses Geräts einige Regeln beachtet werden.
Lesen Sie sich daher vor Inbetriebnahme des Geräts die
Gebrauchsanweisung sorgfältig durch und beachten Sie in jedem
Fall die im Folgenden aufgeführten Hinweise. Einige der folgenden
Punkte betreffen ausschließlich Frauen.
Benutzen Sie das Gerät nicht, wenn:
• Sie ein elektronisches Implantat tragen (z. B. einen
Herzschrittmacher oder Defibrillator) oder an andere n
Erkrankungen des Herzens leiden.
• Sie schwanger sind.
• Sie an Krebs oder Epilepsie leiden oder aufgrund einer
Funktionsstörung des Nervenssystems in ärztlicher
Behandlung sind.
• sich in unmittelbarer Nähe (1 m) des Geräts Apparaturen für
Kurzwellen- oder Mikrowellen-Therapie befinden.
• Sie an medizinische Geräte, die mit Hochfrequenz-technik
arbeiten, angeschlossen sind.
• die Elektroden an Körperregionen platziert we rden müssten, an
denen Medikamente oder Drogen (kurz- oder langfristig)
injizier t we rden,wie z. B. bei einer Hormonbehandlung.
Warten Sie bitte, bevor Sie das SLENDERTONE ACTIVE-Gerät in
Gebrauch nehmen:
• Mindestens sechs Wochen nach einer Entbindung (konsul-
tieren Sie in jedem Fall zuerst Ihren Arzt).
• Mindestens einen Monat nach dem Einsetzen eines
Kontrazeptivums in die Gebärmutter (z. B. einer Spirale).
• Mindestens drei Monate nach einem Kaiserschnitt (konsul-
tieren Sie in jedem Fall zunächst Ihren Arzt).
•Während der Menstruation, bis die stärkeren Tage vorüber
sind.
Benutzen Sie dieses Produkt nur mit der Erlaubnis Ihres Arztes
oder Physiotherapeuten, wenn:
• Sie sich schwindelig oder schwach fühlen. Verringern oder
beenden Sie in diesem Fall die Stimulation, bis Sie sich wieder
erholt haben. Wenden Sie sich auf jeden Fall an Ihren Arzt.
• den SLEND E RTO NE-G ür tel ve r wenden möchten, jedoch unter
starken Rückenbeschwerden leiden. In diesem Fall sollten Sie
nur bei niedriger Intensitätsstufe trainieren.
• unter einer ernsten Krankheit leiden oder eine schwe re
Verletzung haben, die hier nicht genannt ist.
• erst vor kurzer Zeit operiert wurden.
• Sie Diabetiker sind und Insulin spritzen.
• Sie das Gerät einem jüngeren Kind zur Benutzung überlassen
möchten.
• Sie an Erkrankungen der Muskeln oder Gelenke leiden.
• Sie das Gerät im Rahmen eines Rehabilitationsplans nutzen
möchten.
Folgendes sollten Sie beim Anlegen der Elektroden, des Gürtels
und des Brustgurts stets beachten:
• Legen Sie die Elektroden und den Gürtel AUSS C HLIESS L ICH wie
in dieser Anleitung beschrieben.
• Positionieren Sie die Elektroden oder den Gürtel nicht an Ihrem
Hals oder über der Herzgegend (d. h. eine Elektrode auf dem
Brustkorb und eine auf dem Rücken), im Genitalbereich oder
am Kopf. (SLENDERTONE bietet Geräte für das Training anderer
Körperregionen an. Nähere Informationen erhalten Sie bei
Ihrem Fachhändler.)
• Vermeiden Sie die Positionierung der Elektroden auf frischem
Narbe n g e webe, rissigen oder entzündeten Hautstellen,
Infe k t i o n sherden und auf Körperstellen, die für Akne,
Thrombose oder andere Gefäßkrankheiten (z. B. Krampfadern)
anfällig sind, bzw. in Körperbereichen, in denen die
Empfindungsfähigkeit eingeschränkt ist.
• Vermeiden Sie auch, das Gerät auf solchen Teilen des Körpers
zu platzieren, die verletzt oder in ihrer Bewegungsfähigkeit
eingeschränkt sind (z. B. bei Brüchen und Verstauchungen).
• Platzieren Sie die Elektroden nicht direkt über
Metallimplantate. Platzieren Sie das Gerät stattdessen auf
dem nächst gelegenen Muskel.
Mögliche Überempfindlichkeitsreaktionen:
• In wenigen Fällen traten durch den Gebrauch muskelstim-
ulierender Geräte vereinzelt Hautreizungen auf, einschließlich
allergischer Reaktionen, lang anhaltender Hautrötungen und
Akne.
Korrektur der Elektrodenposition während der Anwendung:
• Unterbrechen Sie zuerst das derzeit laufende Prog ra m m ,
öffnen Sie den Gurt und schließen Sie ihn dann erneut hinter
Ihrem Rücken, wenn Sie die Positionen der Elektroden geän-
dert haben.
Nach Anstrengung oder Verausgabung beim Sport:
•Wählen Sie immer eine niedrigere Intensitätsstufe, um eine
Überanstrengung der Muskeln zu vermeiden.
Se t zen Sie sich mit S LE N D E RTO N E oder einem autorisierte n
Fachhändler in Verbindung, wenn:
• Ihr Gerät nicht einwandfrei funktioniert. Sehen Sie in der
Zwischenzeit vom Gebrauch des Geräts ab.
• Ihr Körper mit einer Irritation, Hautreizung, Hype rse ns iti vi tät
rea g ier t oder Sie andere Nebenwirkungen feststellen.
Beachten Sie dabei jedoch, dass geringfügigere Rötungen auf
den vom Gürtel bedeckten Hautpartien während und kurz nach
der Anwendung normal sind.
HINWEIS:
• Eine wirksame Anwendung darf niemals unangenehm sein.
Wichtig:
• Die Herzfrequenz ist lediglich eine Schätzung und liefert keine
exakten Diagnosedaten. Wenden Sie sich im Zweifelsfall an
Ihren Arzt.
• Bei Verwendung des Geräts im Freien darauf achten, dass es
vor Regen geschützt ist. Stellen Sie sicher, dass das Gerät
immer trocken ist.
• Bewahren Sie das Gerät außerhalb der Reichweite von Kindern
auf.
• Die Metallstifte, Kabeln und Elektroden dürfen an keinerlei
andere Objekte oder Geräte angeschlossen werden.
• Ver wenden Sie Ihr Gerät nicht gleichzeitig mit einem anderen
Gerät, das eine elektrische Spannung in Ihren Körper überträ gt
(z. B. ein anderes Gerät zur Muskelstimulation).
• Berühren Sie Metallstifte und Elektroden nicht, während das
Gerät angeschaltet ist.
• Verwenden Sie das Gerät nicht während dem Autofahren,
Radfahren oder während der Bedienung einer Maschine
• Der SLENDERTONE ACTIVE Gerät sollte nicht zusammen mit Textilien
anderer SLENDERTONE-Produkte benutzt werden. Dies könnte zu
einer ungleichmäßigen Muskelstimulierung und so zu einem
unbefriedigenden Ergebnis der Muskelstraffung führen.
•SLENDERTONE übernimmt keinerlei Haftung für Schäden, die auf
die Nichtbeachtung der Richtlinien und Anweisungen für das
Gerät zurückzuführen sind.
NB: Wenn Sie aus irgendeinem Grund Zweifel hegen, dass das
SLENDERTONE-Gerät für Sie geeignet ist, sprechen Sie bitte mit
Ihrem Arzt, bevor Sie das Gerät in Gebrauch nehmen.
11
Deutsch
* Das Symbol erscheint immer zusammen mit dem Rechts- bzw. Linkspfeil. Leuchtet der Linkspfeil
auf, liegt bei der linken Elektrode eine Funktionsstörung vor, leuchtet der Rechtspfeil, liegt eine
Störung der rechten Elektrode vor. Wenn beide Pfeile aufleuchten, besteht eine Störung entweder bei
der Mittelelektrode oder bei allen drei Elektroden.
10
RATSCHLÄGE ZUR FEHLERBEHEBUNG
PROBLEM
Die Anzeige erscheint nicht und
das Gerät gibt kein Signal ab
Das Display leuchtet auf, das
Gerät gibt aber kein Signal ab
Das Batteriesymbol blinkt
Unangenehmes Gefühl im
Bereich der Elektroden
Das Symbol erscheint auf dem
Display*
Die Muskelkontraktion ist sehr
gering, obwohl die Intensität
sehr hoch eingestellt ist
Das Gerät ist eingeschaltet, es
wird aber keine Herzfrequenz
angezeigt
POSSIBLE CAUSE
Die Batterien wurden falsch eingelegt
Die Batterien sind leer
Minderwertige Batterien
Der Gerätebetrieb wurde unterbrochen
Intensität wurde nicht erhöht
Die Batterien sind fast leer
Die Elektroden bedecken die
Metallstifte nicht vollständig
Die Elektroden sind abgenutzt
Zu viele aufeinander folgende
Anwendungen
Die Elektroden haben keinen Kontakt
zur Haut
Das Gerät befindet sich nicht vollständig
in der Halterung
Die Elektroden bedecken die
Metallstifte nicht vollständig
Die Elektroden sind abgenutzt
Die Elektroden wurden falsch herum
angebracht
Es wurde vergessen, die Schutzfolien
von den Elektroden zu entfernen
Der Gürtel sitzt locker oder wurde nicht
geschlossen
Die Batterien sind fast leer
Die Elektroden sind abgenutzt
Falsche Position der Elektroden
Die Elektroden bedecken die
Metallstifte nicht vollständig
Minderwertige Batterien
Der Brustgurt ist locker
Das Herzfrequenz-Elektrodenkabel ist
nicht angeschlossen
LÖSUNG
Setzen Sie die Batterien richtig ein, wie auf
Seite 3 beschrieben
Ersetzen Sie die Batterien
Verwenden Sie nur qualitativ hochwertige
Batterien
Drücken Sie kurz die Ein-/Aus-Taste
Erhöhen Sie die Intensität
Ersetzen Sie die Batterien
Korrigieren Sie die Position der Elektroden
Ersatzelektroden für Ihr SLENDERTONE-Gerät
erhalten Sie im Fachhandel
Achten Sie darauf, dass zwischen zwei
Anwendungen ein Zeitraum von mindestens
sechs Stunden liegt
Lesen Sie auf Seite 6 den Abschnitt über die
richtige Positionierung von Elektroden und
Gürtel
Schieben Sie das Gerät in die Halterung fest
Korrigieren Sie die Position der Elektroden
Ersatzelektroden für Ihr SLENDERTONE-Gerät
erhalten Sie im Fachhandel
Achten Sie darauf, dass die schwarze
Elektrodenseite auf Ihrer Haut liegt
Vergewissern Sie sich, dass sämtliche
Schutzfolien von den Elektroden entfernt
wurden
Überprüfen Sie den Sitz des Gürtels
Ersetzen Sie die Batterien
Ersatzelektroden für Ihr SLENDERTONE-Gerät
erhalten Sie im Fachhandel
Korrigieren Sie die Position der Elektroden
Korrigieren Sie die Position der Elektroden
Verwenden Sie nur qualitativ hochwertige
Batterien
Ziehen Sie den Brustgurt fester
Vergewissern Sie sich, dass das Kabel mit
dem Metallstift und dem Brustgurt
verbunden ist
Active IM Male Rev 10 04/01/2006 10:31 Page 36
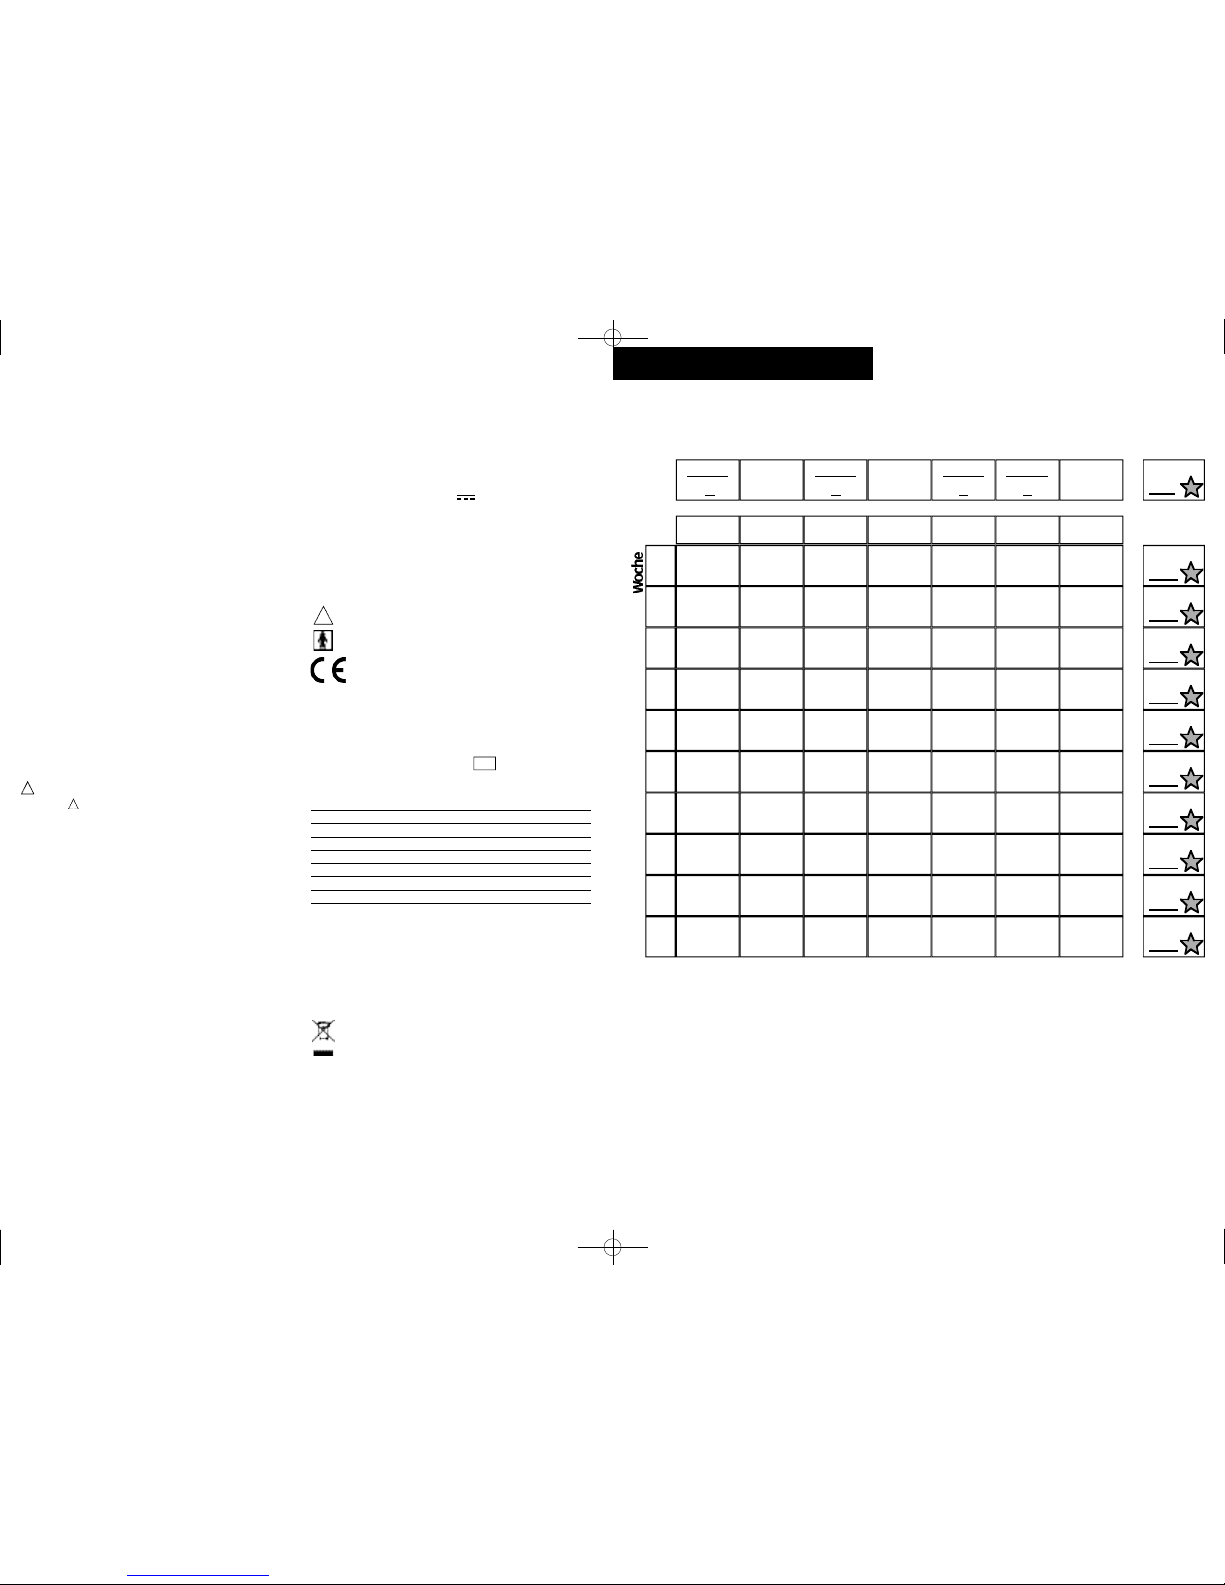
TRAININGSPLAN
Tragen Sie Ihren Fortschritt nach jeder Sitzung in Ihren Trainingsplan ein, damit Sie Ihr Wochenziel
sicher erreichen. SLENDERTON ACTIVE-Ersatzkalender sind erhältlich bei www.slendertone.com.
13
1 2 3 4 5 67
Tag
4/10/06
__4__
__/___/___
_____
6/10/06
__6__
__/___/___
_____
8/10/06
__6__
9/10/06
__4__
__/___/___
_____ 20
__/___/___
_____
__/___/___
_____
__/___/___
_____
__/___/___
_____
__/___/___
_____
__/___/___
_____
__/___/___
_____
__/___/___
_____
__/___/___
_____
__/___/___
_____
__/___/___
_____
__/___/___
_____
__/___/___
_____
__/___/___
_____
__/___/___
_____
__/___/___
_____
__/___/___
_____
__/___/___
_____
__/___/___
_____
__/___/___
_____
__/___/___
_____
__/___/___
_____
__/___/___
_____
__/___/___
_____
__/___/___
_____
__/___/___
_____
__/___/___
_____
__/___/___
_____
1
2
3
4
=
=
=
=
=
__/___/___
_____
__/___/___
_____
__/___/___
_____
__/___/___
_____
__/___/___
_____
__/___/___
_____
__/___/___
_____
__/___/___
_____
__/___/___
_____
__/___/___
_____
__/___/___
_____
__/___/___
_____
__/___/___
_____
__/___/___
_____
__/___/___
_____
__/___/___
_____
__/___/___
_____
__/___/___
_____
__/___/___
_____
__/___/___
_____
__/___/___
_____
__/___/___
_____
__/___/___
_____
__/___/___
_____
__/___/___
_____
__/___/___
_____
__/___/___
_____
__/___/___
_____
5
6
7
8
=
=
=
=
__/___/___
_____
__/___/___
_____
__/___/___
_____
__/___/___
_____
__/___/___
_____
__/___/___
_____
__/___/___
_____
__/___/___
_____
__/___/___
_____
__/___/___
_____
__/___/___
_____
__/___/___
_____
__/___/___
_____
__/___/___
_____
9
10
=
=
Beispiel
Deutsch
PRODUKTGARANTIE
Sollte an Ihrem Gerät innerhalb von zwei Jahren nach dem Kauf ein Fehler auftreten, verpflichtet sich
SLENDERTONE, das Gerät oder fehlerhafte Teile des Geräts zu ersetzen oder zu reparieren, ohne Arbeits-
und Materialkosten zu berechnen*. Voraussetzung ist, dass das Gerät:
• nur für den vorgesehenen Zweck benutzt und gemäß den in der Bedienungsanleitung
vorgeschriebenen Anweisungen verwendet wurde
• nicht an eine ungeeignete Stromquelle angeschlossen wurde
• sachgemäß gehandhabt und gewartet wurde
• eventuell durchgeführte Reparaturen ausschließlich von autorisierten SLENDERTONE-Händlern
vorgenommen wurden und das Gerät nicht verändert wurde
Diese Ga rantie ergänzt die Verpflichtungen, die sich aus der bestehenden länderspezifischen Gewähr-
leistung ergeben, und beeinträchtigt nicht Ihre gesetzlich festgeschriebenen Rechte als Verbra u c her.
* Von der Garantie ausgeschlossen sind Verbrauchsmaterialien (wie z. B. Elektroden, Gürtel usw.),
wenn diese die üblichen Abnutzungserscheinungen aufweisen.
Pflege Ihres Geräts:
Ihr Gerät sollte unter keinen Umständen Nässe oder übermäßiger
Sonne ne instrahlung ausgesetzt we rden. Sie sollten es regelmäß ig
mit einem leicht in Seifenlauge angefeuchteten weichen Tu ch
reinigen. In das Innere des Geräts darf keine Feuchtigkeit gelangen.
Ver wenden Sie zur Reinigung Ihres Geräts weder Reinigung sm ittel,
Alkohol, Rei ni gun gss prays noch ätzende Lösungsmittel.
Für Wartungszwecke ist kein Zugang zum Geräteinneren
erforderlich.
Wurde Ihr Gerät beschädigt, sollten Sie den Gebrauch einstellen und
an SLENDERTONE oder Ihren Händler vor Ort zur Reparatur oder zum
Ersatz zurückbringen. Reparaturen, Wartungsarbeiten und Mod-
ifikationen dürfen nur von entsprechend geschulten Wartungs-
technikern mit Autorisierung durch SLEND ERTONEdur chg ef ührt werden.
HINWEIS:Die Verwendung von auslaufsicheren Batterien wird
empfohlen. Die Batterien sollten nie im Gerät gelassen werden,
wenn es lange Zeit nicht verwendet wird. Falls Sie die Batterien
nicht entfernen, könnten Sie auslaufen und Ihr Gerät beschädigen.
Bitte beachten Sie, daß bei einigen Batterien, die als "auslauf-
sicher" verkauft we rden, immer noch eine gewisse Menge an korro d-
ierenden Substanzen austreten kann, die Ihr Gerät beschädigen
könnten. Unter keinen Umständen dürfen andere als für das Gerät
geeignete Batterien (1,5 V, LR03/ AAA) verwendet werden. Die
Batterien sollten wie in der Gebrauchsanleitung angegeben
eingelegt werden.
Entsorgung der Elektroden und Batterien
Elekt roden und Batterien dürfen in keinem Fall verbrannt we rden.
Entsorgen Sie die Elektroden und Batterien gemässden inIhrem Land
geltenden Bestimmungen für die Entsorgung von Sondermüll.
Das Batteriefach muss bei laufendem Gerätgeschlossen sein.
Wenn das Symbol aufleuchtet, ist der Impuls deutlich
reduziert worden.
Sobald die Muskeln zusammengezogen werden, wird allmählich
die höchste Intensität erreicht (d. h. Impulsanstieg) und beim
Einsetzen der Entspannungsphase sinkt diese langsam auf Null
(d. h. Impulsnachlaß).
Zubehör:
Beim Kauf neuer Elektroden sollten Sie darauf achten, nur
Elektroden der Marke SLENDERTONE zu erwerben. Andere Fabrikate
könnten mit Ihrem Gerät nicht kompatibel sein und evtl. nicht
den Sicherheitsstandards entsprechen.
Selbsthaftende SLENDERTONE-Elektroden:
• 1 große selbsthaftende Elektrode Typ 706 oder 709
• 2 kleine selbsthaftende Elektroden Typ 707 oder 710
• 3 Herzfrequenz-Elektroden Typ 711 x 1; 712 x 2
Batterien (3 x 1.5v AAA)
sLENDERTONE ACTIVE-Gürtel
Brustgurt
SLENDERTONE-Gürtelverlängerung
Verwendung: Muskelstimulation/ Herzfrequenzüberwachung
Wellenform: Symmetrisches, zweiphasiges Sprungsignal, in
ohmscher Belastung.
Umgebungsbedingungen
Betrieb: Temperaturbereich: 0 bis 35 °C
Luftfeuchtigkeit: 20 bis 65 %H
Lagerung: Temperaturbereich: 0 bis 55 °C
Luftfeuchtigkeit: 10 bis 90 %
Erklärung zu den Symbolen Ihres Gerätes:
Auf Ihrem Gerät befinden sich eine Reihe technischer Beschreibungen.
Diese können wie folgt erklärt werden:
Im Batteriefach steht "+" für Pluspol und "-" für Minuspol. Die
Positionierung der Batterien wird durch drei reliefartige
Batterieumrisse im Inneren des Batteriefaches angezeigt.
Das Gerät und der Gürtel wurde für Bio-Medical Research Ltd.,
Parkmore Business Park West, Galway, Irland hergestellt.
Das Gerät läuft mit drei 1,5V-GS-Batterien (LR03/ AAA). GS wird
durch dieses Symbol angegeben:
Die Ausgangsfrequenz zeigt die vom Gerät abgegebene
Impulsanzahl pro Sekunde an. Diese wird in Hertz gemessen und
als "Hz" angegeben.
Ausgangs-RMSV ist die Stromstärke für jeden Kanal, die bei
einem Widerstand von 500 Ωgemessen wird.
Ausgangs-RMSA ist die Spannungsstärke für jeden Kanal, die bei
einem Widerstand von 500 Ωgemessen wird.
Dieses Symbol bedeutet "Achtung, konsultieren Sie das
Handbuch".
Dieses Symbol bedeutet Gerät des Typs BF.
Dieses Symbol bestätigt, daß SLENDERTONE den
Anforderungen der Richtlinie für medizinische Geräte
(93/42/EWG) entspricht. Die Nummer des gemeldeten
Gerätes (VDE) lautet 0366.
Im Inneren des Gerätes befindet sich die spezifische Serien-
nummer. Der Buchstabe vor der Nummer gibt das Herstellungs-
jahr an, wobei "A" für 1995, "G" für 2001, usw. steht.
Die Chargennummer des Gürtels ist auf der Verpackung durch
die LOT Nummer angegeben, die dem LOT -Symbol entspricht
Produkttyp: 551
Nennleistung Spannung/Strom:
Parameter 500Ω1KΩ1K5Ω
Ausgangs-RMSV 5.8V 9.0V 11.1V
Ausgangs-RMSA 11.7mA 9.0mA 7.4mA
Ausgangsfrequenz 50-60Hz. 50-60Hz. 50-60Hz.
GS-komponente ungefähr 0 C 0 C 0 C
Positive Pulsbreite 250–300 µs 250–300 µs 250–300 µs
Negative Pulsbreite 250–300 µs 250–300 µs 250–300 µs
Phaseninterval 100 µs 100 µs 100 µs
HINWEIS:Gemäß den Bestimmungen der Mitgliedsländer muss das
Gerät alle zwei Jahre einem Sicherheitstest unterzogen werden.
HINWEIS:Laut deutschem Recht muss die Sicherheitsüberprüfung
alle zwei Jahre von einer autorisierten Prüfstelle vorgenommen
werden.
GÜRTELMATERIALIEN
Außen: 100 % Nylon, Überzug: 82 % Nylon, 18 % Elastan, Haken
und Schlaufen: 100 % Nylon, Schaumstoff: 100 % Polychlo ropren
Am Ende der Lebensdauer des Produkts sollten Sie d i e s e s
Produkt nicht in den normalen Hausmüll werf en , sondern an
einer Sammelstelle für die Aufbereitung von elektrischen
Geräten abgeben.
Einige der Materialen des Produkts können wiederverwe rt et
werden, wenn man sie in einer Aufbereitungs-stelle abgibt. Mit
der Wiederverwertung einiger Teile oder Roh-materialen aus
gebrauchten Produkten liefern Sie einen wichtigen Beitrag
zum Umweltschutz. Wenden Sie sich bitte and Ihre örtlichen
Behörden, wenn Sie weitere Informationen über die
Sammel-punkte in Ihrer Umgebung benötigen.
Elektrischer und elektronischer Abfall kann umweltschädlich
sein. Unsachgemäße Entsorgung kann gesundheitsschädlich
sein und zur Bildung von Giftstoffen in der Luft, im Wasser
und in der Erde führen.
TECHNISCHE DATEN
!
0366
!
12
Active IM Male Rev 10 04/01/2006 10:31 Page 38
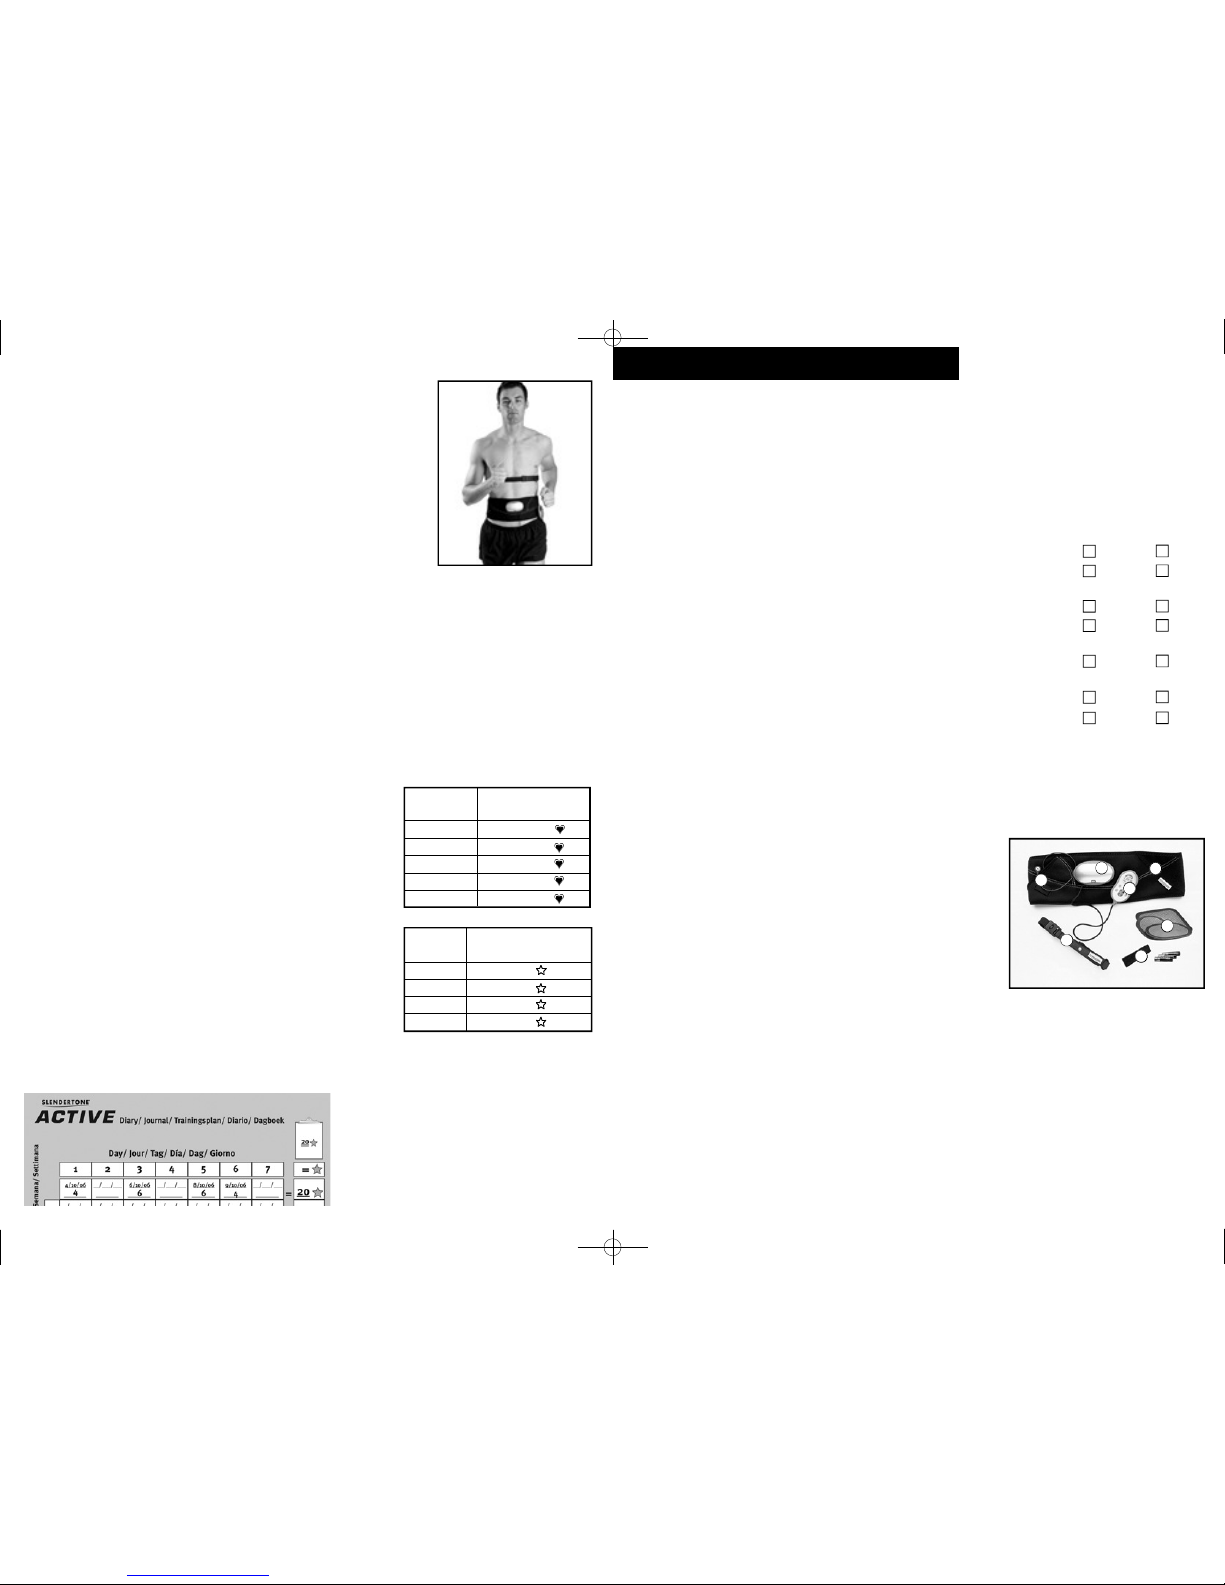
DETERMINE SU PREPARACIÓN PARA LA ACTIVIDAD FÍSICA
Al igual que con cualquier otro ejercicio, antes de iniciar un plan de entrenamiento de SLENDERTONE
ACTIVE, deberá asegurarse de que está físicamente preparado para ello. Si tiene la menor duda, le
rogamos que compruebe las contraindicaciones que figuran en la página 11 y, si es necesario, consulte
a su médico antes de empezar.
Le rogamos que responda a las siguientes preguntas.
1. ¿Le ha hecho su médico alguna advertencia acerca de alguna patología
cardíaca o le ha dicho que debería practicar tan sólo los ejercicios
recomendados por un médico? Sí / No
2. ¿Le duele el pecho cuando hace ejercicio? Sí / No
3. Durante el último mes, ¿ha sentido algún dolor en el pecho sin realizar
ninguna actividad física? Sí / No
4. ¿Pierde usted el equilibrio por sensación de vértigo o sufre desmayos? Sí / No
5. ¿Padece algún problema de huesos o de articulaciones susceptible de
empeorar a causa de un cambio en la intensidad de su actividad física? Sí / No
6. ¿Está medicándose en la actualidad por problemas de tensión arterial o
por una patología cardíaca subyacente? Sí / No
7. ¿Sabe de alguna otra razón por la que no debería realizar ejercicio físico? Sí / No
Si usted responde Sí a una o varias de las preguntas anteriores, debería consultar a su médico antes
de iniciar un plan de entrenamiento de SLENDERTONE ACTIVE.SLENDERTONE recomienda que consulte a su
médico antes de emprender los ejercicios mencionados en este manual. Como con cualquier otro ejer-
cicio, recuerde que siempre debe comenzar a ritmo lento e ir incrementando de forma gradual el nivel
de ejercicio.
SU PAQUETE SLENDERTONE ACTIVE
1. Cinturón ACTIVE (se adapta a cinturas de 71 – 107 cm):
Con los tres electrodos SLENDERTONE colocadas en el cinturón (1a),
sujételo a su cintura de forma fija pero cómoda (véase la pág. 6).
2. Unidad de base:
Retire la cubierta de la unidad de base e introduzca las baterías.
Cierre después la cubierta e introduzca la unidad de base en la
funda del cinturón.
3. Electrodo de la frecuencia cardíaca:
El electrodo de frecuencia cardiaca se coloca en la correa para el pecho con el fin de controlar la
frecuencia cardíaca durante cada sesión de SLENDERTONE ACTIVE.
4. Cable de la frecuencia cardíaca:
Este cable se utiliza para conectar el cinturón a la correa del pecho.
5. Correa para el pecho (se adapta a cavidades pectorales de 61 – 120 cm):
Abroche la correa en torno a su pecho a fin de mantenerla inmóvil.
6. Unidad de control:
Éste es el cerebro de la unidad SLENDERTONE ACTIVE. Controla todas las funciones descritas al dorso.
3
Español
2
Si esta es su primera sesión con la unidad ACTIVE, le recomendamos que
lea el resto de este manual antes de comenzar.
¿QUÉ ES SLENDERTONE ACTIVE?
SLENDERTONE ACTIVE es un gran avance en la tecnología personalizada para
la salud y la condición física, que controla su frecuencia cardíaca a fin de
garantizar que usted haga ejercicio al ritmo más adecuado para quemar
grasas y mejorar su condición física. Mientras usted hace ejercicio, ACTIVE
le administra un tratamiento especialmente diseñado de tonificación
muscular, a través de un cinturón abdominal que fortalece, da firmeza y
alisa la zona abdominal al tiempo que hace ejercicio.
LA TEORÍA SLENDERTONE ACTIVE
Todos necesitamos hacer ejercicio para mantenernos sanos y en forma. Pero, ¿cuándo sabe si está
practicando el ejercicio al nivel adecuado? Un método más que probado es el que consiste en medir la
f recuencia cardíaca, y eso exactamente es lo que SLEND E RTO N E ACTIV E hace por usted. Controla su frecuencia
c a rdíaca mientras hace ejercicio. Después, usted podrá comprobar la pantalla para ver cuál es su frecuencia
cardíaca y saber si está haciendo ejercicio por debajo, por encima o al nivel idóneo para usted.
Gracias a esta técnica, ACTIVE le garantiza que siempre que practique ejercicio, lo hará con la máxima
eficacia. La razón es muy simple. Cuando usted haga ejercicio en el intervalo óptimo de su frecuencia
cardíaca (su “Zona de Entrenamiento”), su condición física mejorará.
GUÍA RÁPIDA PARA USAR SLENDERTONE ACTIVE
(a) PREPARACIÓN
1. Prepare y encienda la unidad ACTIVE (véa página 6).
2. Incremente la intensidad del cinturón hasta un nivel que le
resulte cómodo.
(b) ADELANTE
3. ¡ADELANTE! Camine mientras la unidad le tonifica el abdomen.
4. Complete la sesión, comprobando de vez en cuando la frecuencia
cardíaca indicada en la pantalla. Asegúrese de que hace ejercicio al
nivel correcto – véase la tabla de frecuencia cardíaca; por ejemplo, si
usted tiene 45 años, deberá mantener la frecuencia entre 106 y 141.
(c) PARAR
5. Una vez concluida la sesión, rellene en el diario de entre-
namiento los puntos ACTIVE obtenidos en dicha sesión. La tabla de
puntuación le indicará cuántos puntos debe anotar.
(d) SIGA EL PLAN
6. Alcance la puntuación semanal recomendada y ¡compruebe los
resultados! En el ejemplo siguiente, el objetivo es de 16 puntos
ACTIVE. Éste es el objetivo que recomendamos a los principiantes.
Tiempo Tonifíquese
mientras camina
15:00 2
30:00 4
45:00 6
60:00 8
TABLA DE FRECUENCIA CARDÍACA
TABLA DE PUNTUACIÓN ACTIVE
(Tonifíquese mientras camina)
Edad Tonifíquese
mientras camina
20 - 29 114 - 152
30 - 39 110 - 147
40 - 49 106 - 141
50 - 59 102 - 136
60 - 69 98 - 130
Los diarios SLENDERTONE ACTIVE están a su
disposición en www.slendertone.com.
1
1a
2
6
4
5
3
Active IM Male Rev 10 04/01/2006 10:31 Page 40
Table of contents
Languages:
Other Slendertone Fitness Electronic manuals


