Slick SLICK MP212-2 User manual

2
GB
User Guide
MP212-2
2
User Guide
POP
cisuMyM
51:30200
3pm
Manufactured by Southern Telecom Inc. Brooklyn, NY 11232
Slick is a registered trademark of Southern Telecom Inc. Brooklyn, NY USA
© 2009 Southern Telecom Inc. All rights reserved.
Microsoft, the Windows logo, and Windows Media are either registered trademarks or
trademarks of Microsoft Corporation in the United States and/or other countries.

FCC Part 15
This equipment has been tested and found to comply with the requirements for a Class B digital device
under Part 15 of the Federal Communications Commission (FCC) rules. These requirements are intended
to provide reasonable protection against harmful interference in a residential installation. This equipment
generates, uses and can radiate radio frequency energy and, if not installed and used in accordance with
the instructions, may cause harmful interference to radio communications. However, there is no guarantee
that interference will not occur in a particular installation. If this equipment does cause harmful interference
to radio or television reception, which can be determined by turning the equipment off and on, the user is
encouraged to try to correct the interference by one or more of the following measures:
● Re-orient or relocate the receiving antenna.
● Increase the separation between the equipment and receiver.
● Connect the equipment into an outlet on a circuit different from that to which the receiver is connected.
● Consult the dealer or an experienced radio/TV technician for help.
Warning:Changes or modifications to this equipment not expressly approved by the party responsible
for compliance could void the user’s authority to operate the equipment.
Introduction
Congratulations on purchasing the Emerson MP3Music Player. .
This manual contains important safety information and correct operation instructions.
Before using the player, read this manual thoroughly and keep it for future reference.
Copyright Information
Trademarks and trade names used in this instruction manual are owned by their respective companies
or organi
zations.
Unauthorized duplication of any recordings whether downloaded from the internet or made from audio
CDs is a violation of copyright laws and international treaties.
The making of unauthorized copies of copy-protected material, may be an infringement of copyrights
and constitute a criminal offence. This equipment should not be used for such purposes.
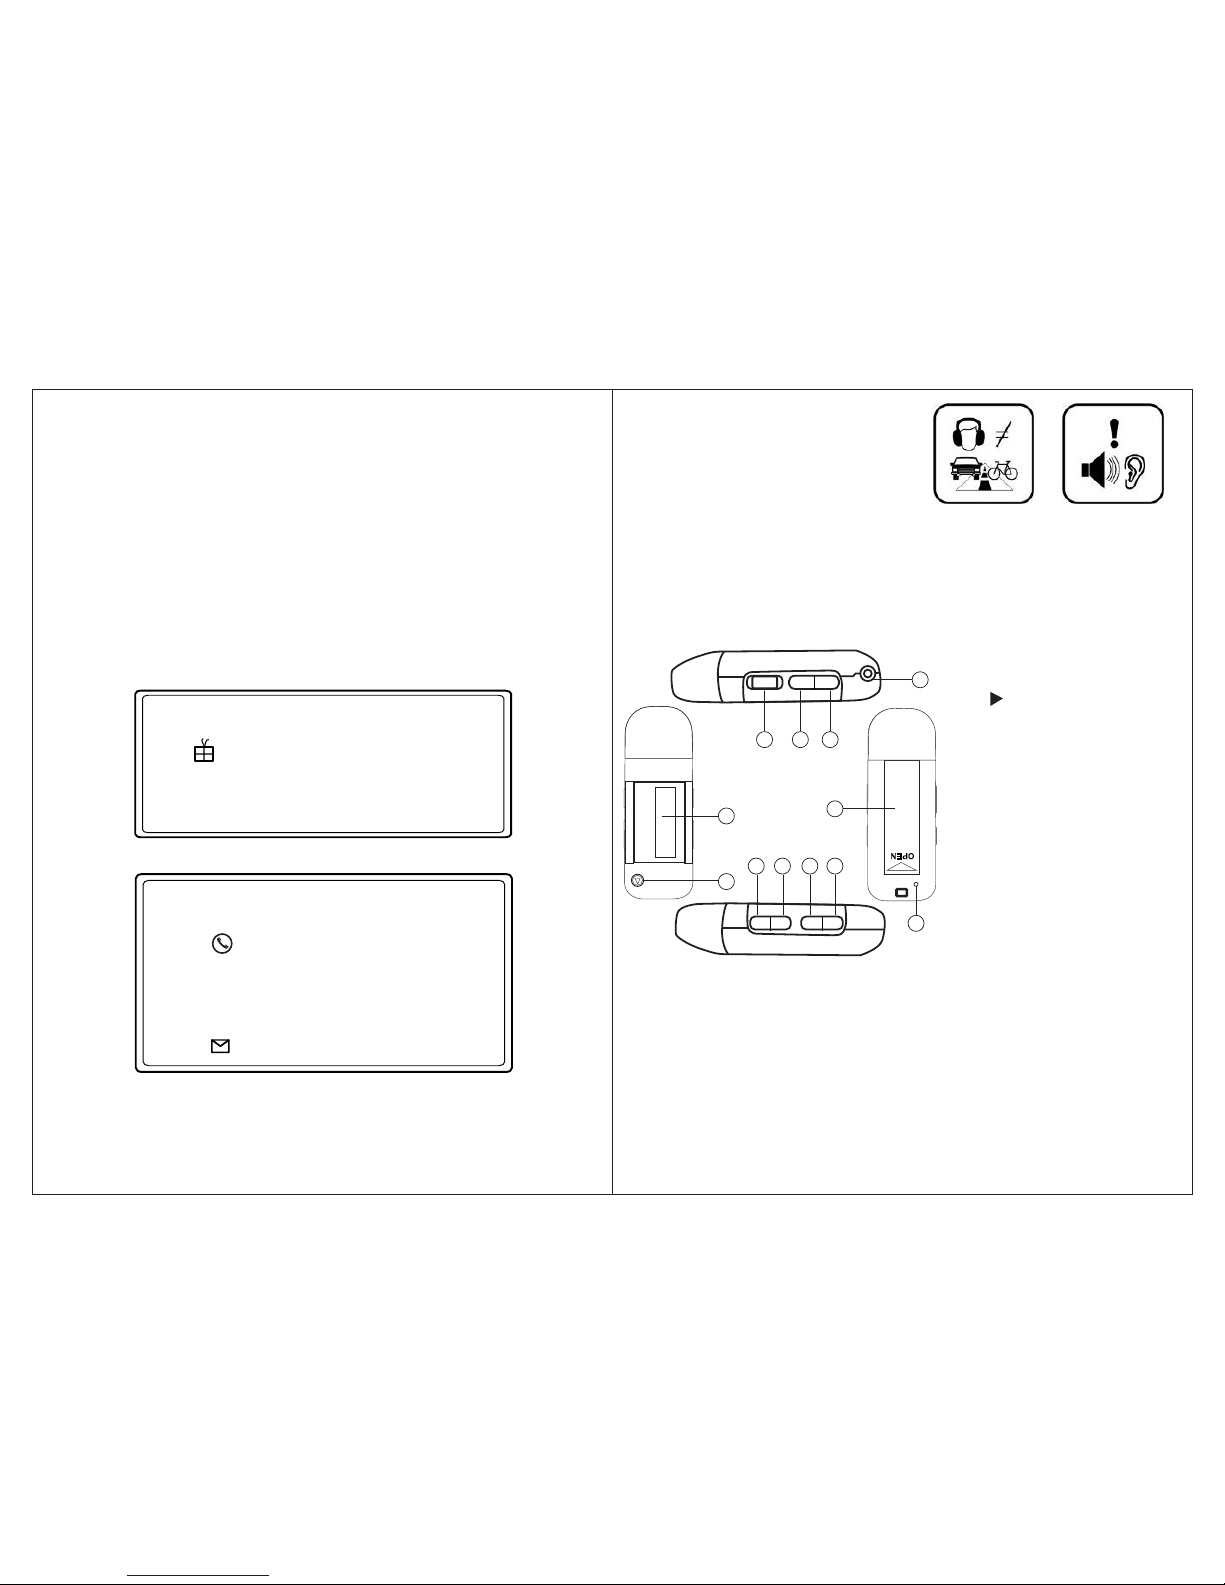
Imortant Safety Information
Always follow these basic safety precautions when using your player. This will reduce the risk of product
damage and personal injury.
● Do not disassemble, repair or modify the player by yourself. Refer servicing to qualified personnel.
●This device requires a “AAA” size battery, do not dispose of in fire.
● In the event that the battery is leaking, do not handle the device with your bare hands. Contact the
service center for help since the liquid may remain in the player. If your body or clothes had contact with
the battery liquid, wash it off thoroughly with water.Also, if some liquid gets into your eyes, do not rub
your eyes but immediately wash them with clean water and consult a doctor.
● Keep the player away from direct sunlight and any direct heat source.
● Do not expose the unit to rain or moisture.
● Do not use the player in dry environments to avoid static.
● Never apply heavy impact on the player, or place it on a magnet.
● Disconnect from the computer, if you will not be using the player for a long time.
● Clean only with a dry cloth. Make sure the player is turned off before cleaning. Do not use a liquid
cleanser.
● Be sure to back up your files to avoid data loss.
1
Warranty service not provided:
This warranty does not cover damage resulting from accident, misuse, abuse, improper
installation or operation, lack of reasonable care, and unauthorized modification. This
warranty is voided in the event any unauthorized person opens, alters, or repairs this product.
All products being returned to the authorized service center for repair must be suitably
packaged.
Limitation of Warranty:
● THE WARRANTY STATED ABOVE IS THE ONLYWARRANTY APPLICABLE TO THIS PRODUCT. ALL OTHER WARRANTIES,
EXPRESS OR IMPLIED (INCLUDING ALL IMPLIED WARRANTIES OF MERCHANTABILITY OR FITNESS FOR APARTICULAR
PURPOSE) ARE HEREBY DISCLAIMED. NO VERBAL OR WRITTEN INFORMATION GIVEN BY SOUTHERN TELECOM INC.
IT’SAGENTS, OR EMPLOYEES SHALL CREATE AGUARANTY OR IN ANY WAYINCREASE THE SCOPE OF THIS
WARRANTY.
● REPAIR OR REPLACEMENT AS PROVIDED UNDER THIS WARRANTY IS THE EXCLUSIVE REMEDY OF THE CONSUMER,
SOUTHERN TELECOM INC. SHALL NOT BE LIABLE FOR INCIDENTAL OR CONSEQUENTIAL DAMAGES RESULTING FROM
THE USE OF THIS PRODUCT OR ARISING OUT OF ANY BREACH OF ANY EXPRESS OR IMPLIED WARRANTY ON THIS
PRODUCT. THIS DISLAIMER OF WARRANTIES AND LIMITED WARRANTY ARE GOVERNED BY THE LAWS OF THE STATE
OF NEW YORK, EXCEPT TO THE EXTENT PROHIBITED BY APPLICABLE LAW, ANY IMPLIED WARRANTY OF
MERCHANABILITY OR FITNESS FOR APARTICULAR PURPOSE ON THIS PRODUCT IS LIMITED TO THE APPLICABLE
WARRANTY PERIOD SET FORTH ABOVE.
How state law relates to this warranty:
● Some states do not allow the exclusion nor limitation of incidental, consequential
damages, or limitations on how long an implied warranty lasts so the above limitations or
exclusion may not apply to you.
●This warranty gives you specific legal rights, and you also may have other rights that vary
from state to state.
14

13 2
Precautions in using the headphones
● Do not use the headphones while driving
an automobile or riding a bicycle. It is
dangerous, and against the law. To avoid an
accident, do not turn up the volume of the
headphones too high while walking.
● It is not recommended that you use the headphones at a high volume for an extended
time, as this may cause hearing damage.
Location of controls
The shipping address of the authorized
service center is:
Southern Telecom Inc.
ATTN: Returns Department
14-C 53rd Street
Brooklyn, NY 11232
Limited Warranty
In the unlikely event that this product is defective, or does not perform properly, you may
within ninety (90) days from your original date of purchase return it to the authorized service
center for repair or exchange.
TO OBTAIN WARRANTY SERVICE:
- Provide proof of the date of purchase within the package (dated bill of sale).
- Prepay all shipping costs to the authorized service center, and remember to insure your
return.
- Include a return shipping address (no P.O.Boxes), a telephone contact number, and the
defective unit within the package.
- Describe the defect or reason you are returning the product.
Your product will be repaired or replaced, at our option, for the same or similar model of equal
value if examination by the service center determines this product is defective. Products
received damaged as a result of shipping will require you to file a claim with the carrier.
Continued →
Battery installation
● Remove the USB cap.
● Open the battery cover on the back of the player by sliding it in the direction of
the arrow.
● Insert one alkaline “AAA” size battery (included) into the battery compartment.
● Replace the battery cover.
Should you have any questions or problems concerning this
product, please contact our customer service department at:
1-877-768-8483 (Toll Free)
Monday - Thursday: 9AM - 5PM (EST)
Friday: 9AM - 3PM (EST)
or
via e-mail at
To obtain service after the warranty period, please e-mail: [email protected] with
product information, date of purchase and nature of the problem. Customer service will reply
to the e-mail with service instructions.
1. Headphone jack
2. [ ] - Power ON/OFF /
Play / Pause / Stop
3. LCD Display
4. HOLD/LOCK Switch
9. [
] - Previous / Fast Rewind
5. [ ] - Mode Button
10. [
] - Next / Fast Forward
11. [ ] - Microphone
12. Battery Cover
6. [ ] - Record Button
7. [ ] -
1
2
3
4 5 6
7 8 9 10
11
VOL-
VOL+
REC
M
8. [ ] -
12
MIC
volume down
volume up

123
MP3 (G:)
“MP3”
When it has finished, “MP3”will appear in “ My Computer”.
Connecting to a computer
Connect the player to a computer to transfer your music files.
1. Connect the player to the computer’s USB port.
2. The computer system detects “New hardware” and starts to install the driver
automatically. Wait for the system to finish the installation.
System requirements
Your computer system must meet the following specifications:
● Pentium 200MHz or above
● Microsoft Windows 2000/ME/XP/Vista
● USB port supported
The buttons do not work
●The player may be locked. Slide the [HOLD / LOCK] switch to the right to
deactivate the lock function
My computer is not detecting the MP3 Player
● Try disconnecting and then reconnecting the MP3 Player to your computer
● There is a USB mass storage devices recognition issue with Windows Vista
acknowledged by Microsoft. A solution is available in the Service Pack 1 which
may be downloaded from Microsoft’s website
Specifications
Play file:
Flash memory:
Power source:
Weight:
Working condition:
In the package:
MP3 / WMA
2GB
1 x DC 1.5VAAA alkaline battery
23g
0-400C
MP3 Player / User Guide / Stereo Headphones

4
MP3 (G:)
Emerson MP3
Drag or copy
files here
Locate “MP3”
Find your music files on your
computer
Connect the MP3 Player to your computer,
and locate “MP3” and drag the
Note: Please do not disconnect the player during loading as it may cause a
malfunction of the player and the files.
Transferring media files to the player
To copy and transfer your music to the player follow the steps below:
1. Connect the MP3 Player to the USB port of your computer.
2. Open the “Windows Explorer” or click on “My Computer”, and locate “MP3”.
3. Select the files on your computer and simply move it into “MP3” in the
Disconnecting the player
After completing the file transfer, disconnect the player the following way:
1. Double click the green arrow “Safely Remove Hardware” in the task bar on the
bottom right of the window.
2. Select “USB Device” and click “Stop”.
3. When the “Stop a Hardware device”
appears, click “OK” to disconnect the
USB mass storage device, and unplug
the player safely.
11
Settings Options
● Clock: Setthe clock.
● Backlight: Selectfrom 0to 30seconds (selecting“0” will shutthe backlightfeature).
● Language: Select the desired language.
● Power off: Choose from the following options:
a) Off time: Set from 0 to 60 seconds. Use the [] or [] button to decrease
or increase the value by 10. If there’s no operation on the player for the set
time, the player will turn off automatically.
b) Sleep time: Set from 0 to 120 minutes. Use the [] or [] button to decrease
or increase the value by 10. The player will turn off automatically when it has
reachedthe settime. Thesleep modeis unavailableunder USBconnecting mode.
● Ear protection:Disable / enable
● Replay mode: Manual / Auto replay
● Contrast: Adjust the display’s contrast.
● Memory info: Displays the percentage of used memory and the total capacity.
● Firmware version: Displays the firmware version number.
● Exit: Exit the settings menu.
Troubleshooting
If you have problems while operating your player, please check the points below
before sending it to the service center.
Cannot power on
The battery may be exhausted, please change the battery.
Files can not be transferred to the player
● Check if the driver is installed correctly in the computer by disconnecting and
then reconnecting the player to the computer
● Check the connection between the player and PC, and confirm that it is properly
connected to the computer’s USB port.
● Make sure the [HOLD/LOCK] switch is in the UNLOCK position.
No sound from the headphones
● Please ensure the volume is turned up, and the headphones are properly connected.
● Check if the format of music file is supported by the player.
Can not record
Check if there is enough memory and battery capacity.
Display is in the wrong language
Please ensure you selected the correct language from the “SYS Setup”menu.
usual way
(drag and drop, or copy and paste). After copying is completed, the data will
be available on the player.
files into
the area shown below.

5
Basic operation
Make sure the battery and headphones are installed properly before using the
player.
Turning on/off
●To turn on the player, press and HOLD the [ ] button until the displayturns on.
●To turn off the player, press and HOLD the [ ] button untilthedisplay turnsoff.
Adjusting the volume
●To increase the volume, pressthe [ ] button.
●To decrease the volume, press the
] button to return to the main music screen.
Main menu
1. Use the [] or [] button to select :“Music”, “Record”, “Voice”,
.”kooB-E“
2. Press the [ ] button to enter and confirm your selections.
3. Press and HOLD the [ ] button to return back to the main menu from anymode.
Unlock/lock buttons
This feature prevents you from accidentally pressing the buttons while using the
player on the move.
●To lock the buttons, slide the [HOLD/LOCK] switch to the left.
● To unlock the buttons, slide the [HOLD/LOCK] switch to the right.
Windows Media Player
To organize and play your music, rip CD tracks to your hard drive, and transfer
music to your player, we recommend using Windows Media Player. If Windows
Media Player is not installed on your computer, you may download the latest version
(Windows Media Player 11) of the player from:
www.microsoft.com/windows/windowsmedia/player/download
If you are unsure of which version of Windows Media Player is compatible with your
operating system, you may use the link below for more information regarding
previous versions of the Windows Media Player.
www.microsoft.com/windows/windowsmedia/player/versions.aspx
10
Voice Recording and Playback
Recording
1. Press the [ M ] button to select “ RECORD”.
2. Press the [ ] button to start recording.
While in recording mode you can:
● Pause/Resume Recording: Press the [ ] button to pause or resume
recording.
● Save and start a new recording: Press and HOLD the [ ] button to save
the recording and start a new recording.
● Save and exit the recording mode: Press and HOLD the [ ] button to
save the recording and return to the main menu.
Playing back voice recordings
from the main menu, and press the
2. Use the [] or [button to select the recorded file you wish to listen to.
3. Press the [ ] button to begin playback.
While playing back voice recordings you can:
● Pause/Resume Playing: Press the [ ] button to pause or resume playback.
● Skipping Tracks: Use the [] or []button to skip to the previous or next
track.
● Adjust Volume: Use the [ ] or [ ] button to increase or decrease volume.
● Main Menu: Press and HOLD the [ ] button to return to the main menu.
Changing the player’s settings
In the “SYS Setup” mode you can customize and configure your MP3 player.
1. Select “SYS Setup”from the main menu, and press the [ ] button.
2. Use the [] or [] button to select an option, and press the [ ] button.
3. Use the [] or [] button to select a value, and press the [ ] button.
4. Select “Exit” and press the [ ] button to return to the main menu.
REC
M
VOL+
[ ] button.
VOL-
HOLD
● Press and [
“SYS Setup”,
MM
REC
REC
M
.nottubtceleS.1 M”ECIOV“ [ ]
M
V -
V+
MM
M
M

69
While the music is in the PLAYING MODE, press the [ ] button to access
Music Menu #2.
1. Use the [] or [] button to select among “Repeat”, “Equalizer”,
and “Exit”.
2. Press the [ ] button to enter, and confirm your selections.
● Repeat: Set the music repeat mode. Use the [] or [] button to select:
“Normal”, “Repeat One”, “Folder”, “Repeat Folder”, “Repeat All”,
“Random”, or “Intro”, and press the [ ]
button.
● Equalizer: Setthe equalizerof theplayer. Usethe [] or [] button to select:
“Natural”, “Rock”, “Pop”, “Classic”, “Soft”, “Jazz”, and “DBB”, and press
the [ ] button.
● SRS WOW mode:
1. SRS WOW: Used to improve the timbre of music in the MP3 format.
2. User setting:
● Replay (A-B Repeat Function):
Getting music on your computer using Windows Media Player 11
1. Open Windows Media Player.
2. Click on the “Rip” tab.
3. Insert a music CD into the CD-ROM drive of your computer.
4. Click the check boxes to select which tracks to rip. If you would like to rip the
entire album, click the check box next to “Album”.
5. Cllick “Start Rip”.
Click “Rip” tab to start ripping
Default Setting
Click “Start Rip”
Select individual
tracks to rip
Check here to rip
entire album
M
“SRS WOW mode”, “Tempo rate”, “Replay”, “Replay times”,
M
“Replay gap”,
● Replay times: Set playing time from A to B. Use the [] or [] button to adjust
the time from 1 to 10.
● Replay gap: Set the replay break time. Use the [] or [] button to adjust
the time from 1 to 10 second (s).
● Tempo rate: Set the music playing rate. Use the [] or [] button to adjust
the tempo of the music from -8 to +8.
M
M
SRS 3D (0-10), TruBass (0-10), FOCUS (0-10),Exit.
Use this feature to loop play a certain section of a song.
[] button to set the “A” point
( willappearinthedisplay)and
press the [ ] button again to set the “B” point.
3. Press the [ ] button to resume normal playback.
M
1. While listening to a song or audio press the [ ] button, select
M“Replay”
M
and press button again.
[ ]
2. Press the

8
7
MP3 Player
Getting music on your MP3 Player using Windows Media Player 11
1. Open Windows Media Player.
2. Windows Media Player will display the
music that you have on your computer
(you will need to search for your music
files if they are not located in the default
folder).
3. Connect your MP3 Player to the USB
port of the computer.
4. Click on the “Sync” tab.
5. To easily identify your player within
Windows Media Player, name it in the
“Device Setup” screen. “Device Setup” window
6. Drag the songs you would like to sync to your MP3 Player, and click on the
“Start Sync” button.
7. The selected songs will sync to your MP3 Player.
“Sync” Tab
Click on “Start Sync”
Drag your
songs here
Sync in Progress
You may also transfer music
files by dragging / copying
them directly into your player.
See “Transferring media
files to the player” on
page 4.
Music
Store and playback music on your MP3 Player. See “Transferring media files to
the player” (page 4) to transfer songs to the MP3 Player
1. Select “Music” from the main menu, and press the [ ] button.
2. Press the [ ] button to
While playing music you can:
● Pause/Resume Playing: Press the [
] button to pause or resume playback.
● Skipping Tracks: Use the [] or [] button to skip to the previous or next
track.
● Adjust Volume: Press the [ ] or [ ] to decrease or increase the volume.
● Main Menu: Press and HOLD the [ ] button to return to the main menu.
Using the music menu
While the music is in the STOP MODE, press the [ ] button to access Music
Menu #1.
1. Use the [] or [] button to select among “Local folder”, “Delete”,
“Delete all”, or “Exit”.
2. Press the [ ] button to enter, and confirm your selections.
● Local folder: Display all of the files in the local disk.
● Delete: Delete the current file.
● Delete all: Delete all of the files in the current folder.
● Exit: Return to the main music screen.
V- V+
M
begin playback.
M
M
M
● Press andSearch backward or forward: HOLD [] or [] buttons.
Table of contents
Other Slick MP3 Player manuals

Slick
Slick MP418C-4 User manual

Slick
Slick MP150-2 User manual

Slick
Slick MP212-2 User manual

Slick
Slick MP416-1 User manual

Slick
Slick MP416SP-2 User manual

Slick
Slick MP312-2 User manual

Slick
Slick MP305-1 User manual

Slick
Slick MP316CB-2 User manual

Slick
Slick MP82 User manual

Slick
Slick MP305-2 User manual