Sloan EHD-511 SPOUT User manual
LIMITED WARRANTY
Unless otherwise noted, Sloan Valve Company warrants this product, manufactured and sold for commercial or industrial uses, to be free from defects
in material and workmanship for a period of three (3) years (one (1) year for special finishes, SF faucets, PWT electronics and 30 days for PWT software)
from date of first purchase. During this period, Sloan Valve Company will, at its option, repair, replace, or refund the purchase price of any product
which fails to conform with this warranty under normal use and service. This shall be the sole and exclusive remedy under this warranty. Products must
be returned to Sloan Valve Company, at customer’s cost. No claims will be allowed for labor, transportation or other costs. This warranty extends only
to persons or organizations who purchase Sloan Valve Company’s products directly from Sloan Valve Company for purpose of resale. This warranty
does not cover the life of the batteries.
THERE ARE NO WARRANTIES WHICH EXTEND BEYOND THE DESCRIPTION ON THE FACE HEREOF. IN NO EVENT IS SLOAN VALVE
COMPANY RESPONSIBLE FOR ANY CONSEQUENTIAL DAMAGES OF ANY MEASURE WHATSOEVER.
INSTALLATION INSTRUCTIONS
FOR COMPLETE SLOAN HAND
DRYER SPOUT
Code No. 0816673
Rev. 2 (07/15)
EHD-511 SPOUT
Read this entire installation manual to ensure proper
installation. When nished with the installation, le this
manual with the owner or maintenance department.
Compliance and conformity to local codes and ordinances is
the responsibility of the installers.
Separate parts from packaging and make sure all parts are
accounted for before discarding any packaging material.
If any parts are missing, do not begin installation until you
obtain the missing parts.
Turn OFF electrical power to the electrical outlets, then
unplug all electrical units prior to installation. Electrical
power MUST remain off until installation is complete.
Wear all proper safety equipment prior to installation.
IMPORTANT
TOOLS REQUIRED FOR INSTALLATION
• Slotted screwdriver • Wire stripper/crimping tool
PRIOR TO INSTALLATION
Prior to installing the Hand Dryer spout install the items listed below.
IMPORTANT:
• INSTALL ALL ELECTRICAL WIRING IN ACCORDANCE
WITH NATIONAL/LOCAL CODES AND REGULATIONS.
• INSTALL ALL PLUMBING IN ACCORDANCE WITH
APPLICABLE CODES AND REGULATIONS.
• A 24 VAC STEP-DOWN TRANSFORMER MUST BE USED.
• USE APPROPRIATE PRECAUTIONS WHILE CONNECTING
THE POWER SOURCE.
THIS PRODUCT CONTAINS MECHANICAL AND/OR
ELECTRICAL COMPONENTS THAT ARE SUBJECT TO NORMAL
WEAR. THESE COMPONENTS SHOULD BE CHECKED ON A
REGULAR BASIS AND REPLACED AS NEEDED TO MAINTAIN
THE VALVES PERFORMANCE.
!!! IMPORTANT !!!
If you have questions about how to install your hand dryer, consult
your local Sloan Representative
or call Sloan Technical Support at:
1-888-SLOAN-14 (1-888-756-2614)
2
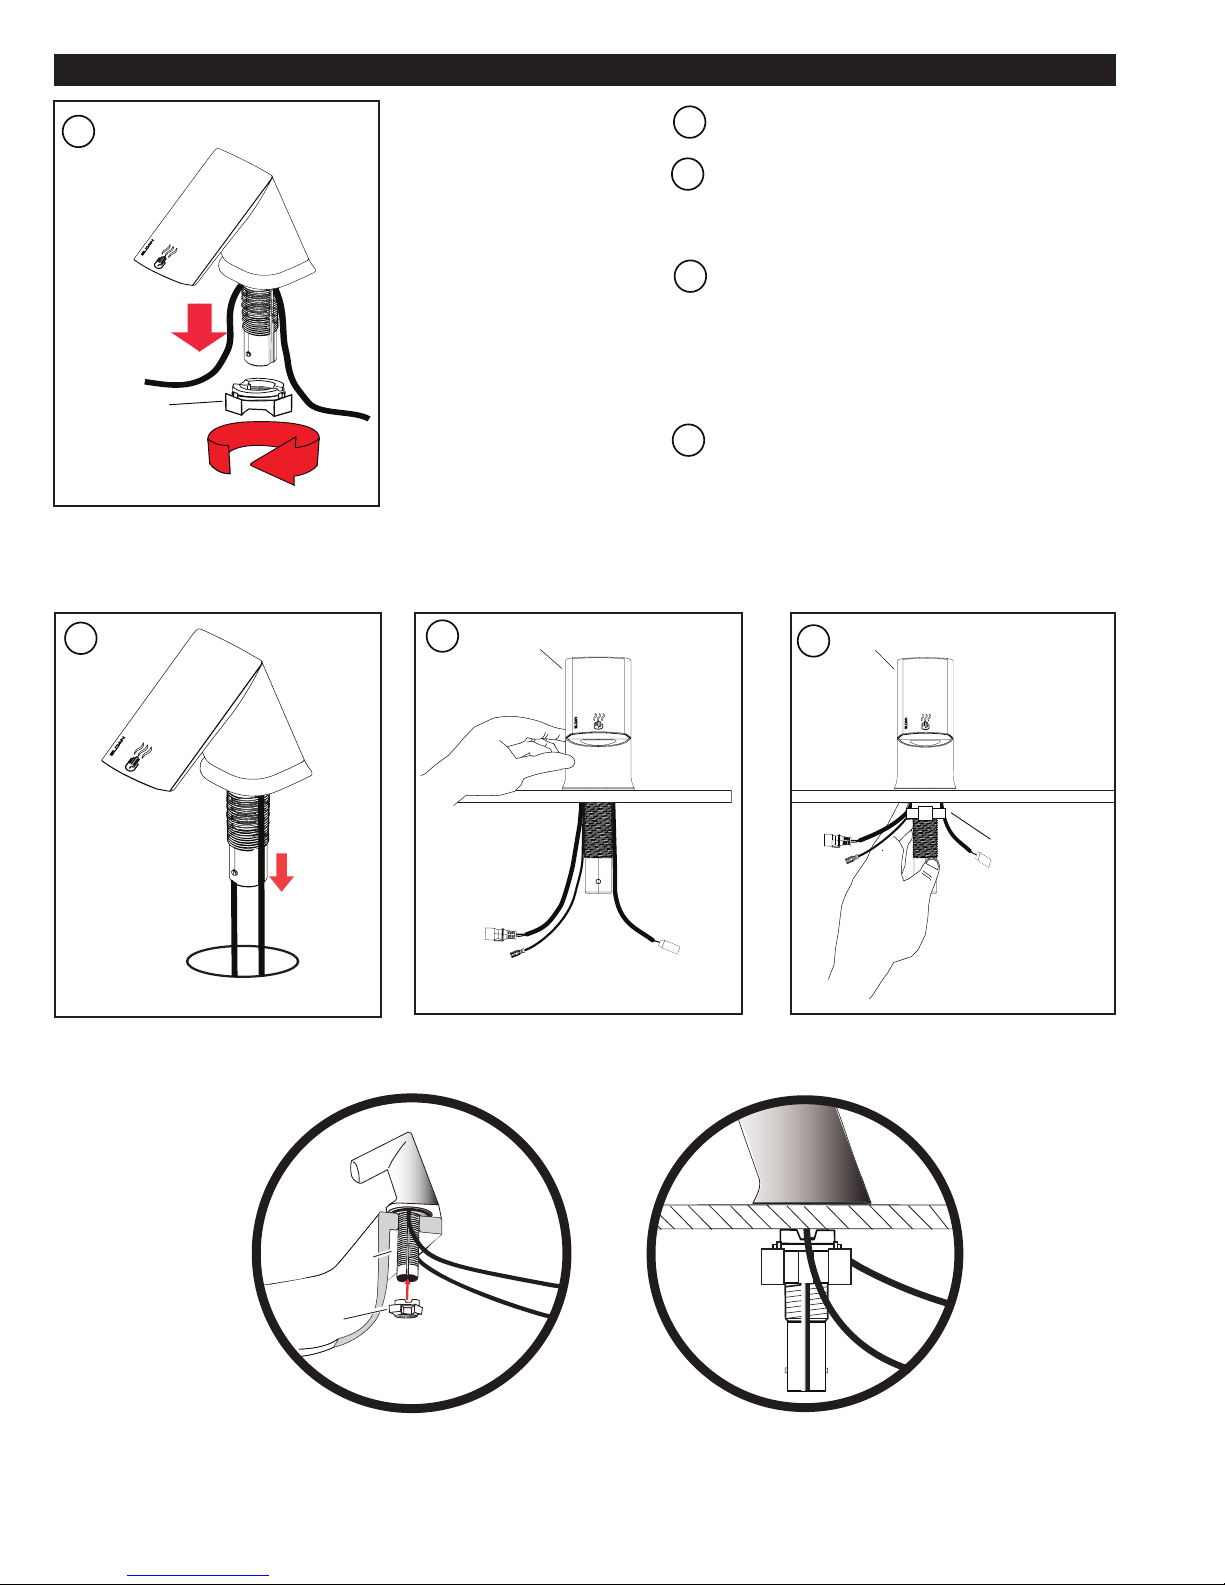
1 - INSTALL SPOUT
HOLDING NUT
A
SSEMBLY
A
B
C
D
A
B
C
D
BASYS DRYER
SPOUT
LOCKING NUT
WASHER
A
B
C
D
BASYS DRYER
SPOUT
LOCKING NUT
WASHER
A
B
C
D
A
B
C
D
A
B
C
D
A
B
C
D
A
B
C
D
Remove holding nut assembly from the spout shank.
Unscrew counterclockwise.
Ensure the wires are located inside corresponding
slots on the sides of the spout shank. Insert spout
shank into the deck hole.
Holding the spout down on the sink deck, Spread wires
away from spout shank, align wires into grooves on
locking nut washer (1). Turn the locking nut until it
makes contact with the wires. Align spread wires in
corresponding relief grooves on top of the locking nut
washer.
(2) Spread the wires horizontally. Turn the locking nut
until snug making sure the wires are in the
corresponding wire relief grooves on the locking nut
washer. Align the spout as desired and tighten the
locking nut until the spout is rmly locked into place.
HOLDING NUT
ASSEMBLY
SPOUT
SHANK
1. 2.

BLOWER MOTOR
4 PIN CABLE
GROUND
PROGRAMMING
CABLE
3
2 - CONNECT HOSE
BASYS DRYER
SPOUT
LOCKING NUT
WASHER
HOSE
SPOUT
SHANK
BLOWER MOTOR
A
B
C
D
A
B
C
D
Align slots in ared connector end of hose with shank guides.
Slide over the spout shank until it stops. Rotate the ared con-
nector clockwise until it locks into place (will feel it snap into
place).
A
B
C
D
A
B
C
D
3- CONNECT WIRES
BLOWER MOTOR
GROUND
4 PIN CABLE
PROGRAMMING
CABLE
A
B
C
D
A
B
C
D
Plug the four (4) pin cable from the spout into
the Four (4) pin socket on the Hand Dryer
Motor. Plug the ground cable into the ground
tab on the Blower Motor.
A
B
C
D
A
B
C
D
Leave the Programming Cable unattached. Do not
remove or cut-off cable. Cord can be bundled.
Align slots of round squared connector end of hose
to opening guides on hand dryer motor into the
opening until it stops, rotate the connector
counterclockwise until it locks into place.
CARE AND CLEANING
Important:
DISCONNECT ELECTRICAL SUPPLY TO DRYER PRIOR TO SERVICING.
Gently wash spout using a soft cloth or sponge and a mild soap or detergent with lukewarm water to loosen dirt and grime.
CLEANING SHOULD BE PERFORMED BY QUALIFIED SERVICE PERSONNEL
With normal use, dryer will require cleaning once a year. Heavier usage requires more frequent cleaning. Use a small, soft
brush to gently clean all parts.

4
ERROR CODES AND SOLUTIONS
DRYER
STATE
ERROR
MESSAGE
1st FLASH 2nd
FLASH
DRYER
OPERATION
POSSIBLE
SOLUTION
OFF No error or
condition, user absent
No ash, steady OFF
(at dryer box) and No
ash, steady ON
(at spout)
_ Dryer ready for
operation
Normal
ON No error or
condition, user
presenting hands
No ash, steady OFF
(at dryer box) and No
ash, steady ON
(at spout)
_ Dryer running Dryer running while hands are under unit.
Normal
ON Time to clean prelter
or change HEPA Filter
1 Short 1 long Dryer still runs Check and clean prelter. Code should reset
after repowering unit. If code reappears then
HEPA lter may need replacing.
OFF Motor over current
severe
1 long 3 short dryer stops running until
power is removed, fault
has been repaired and
power reapplied
Motor is drawing much more current than
normal. Motor coould be failing. Replace motor.
Call Sloan Tech Support 1-888-756-2614.
OFF Motor quick over
current
1 long 3 short dryer stops running until
power is removed, fault
has been repaired and
power reapplied
Motor drew a quick over current than normal.
Could have been caused by a quick over
voltage condition or something blocking motor.
Motor could be failing. Replace motor. Call
Sloan Tech Support 1-888-756-2614.
ON Heater open condition 2 long 4 short Dryer still runs. Code
clears when power is
removed and fault is
repaired.
Heating element had opened during operation
(thermostat tripped). check for clogged lter,
blocked or kinked hose and blocked mufer.
If problem persists heating element may be
broken or disconnected. Replace or reconnect.
Call Sloan Tech Support 1-888-756-2614.
ON Notication of recent
mains over voltage
3 long 1 short Dryer still runs Dryer had a spike of higher voltage than
normal. Code is for information purposes. Code
will clear if unit power is removed and
reapplied.
ON Notication of recent
mains under voltage
3 long 2 short Dryer still runs Dryer had a spike of lower voltage than normal.
Code is for information purposes. Code will
clear if unit power is removed and reapplied.
Off Mains over voltage in
progress
3 long 3 short Dryer stops running until
mains voltage returns
to a safe level. When
safe level returns, dryer
runs. The code changes
to notication of recent
mains over voltage.
Dryer has unsafe voltage applied. Check
voltage source. Code will reset when voltage is
back to normal.
OFF Mains under voltage
in progress
3 long 4 short Dryer stops running
untill mains voltage
returns to a safe level.
When safe level returns,
dryer runs. The code
changes to notication
of recent mains under
voltage.
Dryer has unsafe voltage applied.
Check voltage source. Code will reset when
voltage is back to normal.
OFF Control Temperature
over temp severe
4 long 3 short Dryer stops running until
power is removed, fault
has been repaired and
power reapplied.
Dryer control is running very hot. Filter clog
may have been disregarded. Check lter and
reapply power. If continues Call Sloan Tech
Support 1-888-756-2614.

SLOAN • 10500 SEYMOUR AVENUE • FRANKLIN PARK, IL 60131
Phone: 1-888-SLOAN-14 (1-888-756-2614) • Fax: 1-800-447-8329 • www.sloanvalve.com
© 2015 SLOAN VALVE COMPANY Code No. 0816673 – Rev. 2 (07/15)
Item Code No. Part No. Description
1. 0366050 EHD-511A BASYS Style Dryer Spout Repair Kit
2. 0366015 EHD-515A Holding Nut Assembly Repair Kit
3. 0366008 EHD-512A Hose and Muffler Repair Kit
4. 0366009 EHD-513A Motor Assembly 110/120V w/HEPA Filter
5. 0366014 EHD-514A HEPA Filter Repair Kit (filter with screen)
PARTS LIST
1
23
4
5
The information contained in this document is subject to change without notice.
If further assistance is required, please
contact Sloan Technical Support at:
1-888-SLOAN-14 or visit us online at:
www.sloanvalve.com
Table of contents
Other Sloan Dryer manuals


