SMA PPM-10 User manual

PPM-10-IA-en-10 | 118987-00.01 | Version 1.0ENGLISH
Installation Manual
SMAPOWERPLANTMANAGER

Legal Provisions SMA Solar Technology AG
Installation ManualPPM-10-IA-en-102
Legal Provisions
The information contained in these documents is the property of SMA Solar Technology AG. No part of this document
may be reproduced, stored in a retrieval system, or transmitted, in any form or by any means, be it electronic,
mechanical, photographic, magnetic or otherwise, without the prior written permission of SMA Solar Technology AG.
Internal reproduction used solely for the purpose of product evaluation or other proper use is allowed and does not
require prior approval.
SMA Solar Technology AG makes no representations or warranties, express or implied, with respect to this
documentation or any of the equipment and/or software it may describe, including (with no limitation) any implied
warranties of utility, merchantability, or fitness for any particular purpose. All such representations or warranties are
expressly disclaimed. Neither SMA Solar Technology AG nor its distributors or dealers shall be liable for any indirect,
incidental, or consequential damages under any circumstances.
The exclusion of implied warranties may not apply in all cases under some statutes, and thus the above exclusion may
not apply.
Specifications are subject to change without notice. Every attempt has been made to make this document complete,
accurate and up-to-date. Readers are cautioned, however, that product improvements and field usage experience may
cause SMA Solar Technology AG to make changes to these specifications without advance notice or per contract
provisions. SMA Solar Technology AG shall not be responsible for any damages, including indirect, incidental or
consequential damages, caused by reliance on the material presented, including, but not limited to, omissions,
typographical errors, arithmetical errors or listing errors in the content material.
SMA Warranty
You can download the current warranty conditions from the Internet at www.SMA-Solar.com.
Trademarks
All trademarks are recognized, even if not explicitly identified as such. Missing designations do not mean that a
product or brand is not a registered trademark.
SMA Solar Technology AG
Sonnenallee 1
34266 Niestetal
Germany
Tel. +49 561 9522-0
Fax +49 561 9522-100
www.SMA.de
Email: [email protected]
As of: 4/2/2020
Copyright © 2020 SMA Solar Technology AG. All rights reserved.

Table of Contents
SMA Solar Technology AG
Installation Manual 3PPM-10-IA-en-10
Table of Contents
1 Information on this Document..................................................................................................... 5
1.1 Validity ............................................................................................................................................................. 5
1.2 Target Group ................................................................................................................................................... 5
1.3 Levels of Warning Messages.......................................................................................................................... 5
1.4 Symbols in the Document................................................................................................................................ 5
1.5 Typographical Elements in the Document...................................................................................................... 6
1.6 Designations in the Document ........................................................................................................................ 6
1.7 Explanation of Used Terms ............................................................................................................................. 6
1.8 Additional Information..................................................................................................................................... 6
2 Safety ............................................................................................................................................ 8
2.1 Intended Use.................................................................................................................................................... 8
2.2 IMPORTANT SAFETY INSTRUCTIONS......................................................................................................... 10
3 Scope of Delivery ......................................................................................................................... 13
4 Product Overview ........................................................................................................................ 14
4.1 Product Description.......................................................................................................................................... 14
4.2 Symbols on the Product................................................................................................................................... 14
5 Mounting....................................................................................................................................... 16
5.1 Requirements for Mounting............................................................................................................................. 16
5.2 Mounting the product...................................................................................................................................... 17
5.3 Installing the Device in Customer Installation Location ................................................................................. 18
6 Electrical Connection .................................................................................................................... 20
6.1 Overview of the Connection Area.................................................................................................................. 20
6.1.1 View from Below.............................................................................................................................................. 20
6.1.2 Interior View ..................................................................................................................................................... 22
6.1.3 Assignment of the Jumpers .............................................................................................................................. 24
6.2 Connecting the Supply Voltage...................................................................................................................... 24
6.3 Connecting the Contactors to the Switching Outputs.................................................................................... 25
6.4 Connection of Different Signal Generators to Switching Inputs ................................................................... 27
6.4.1 Connecting of Circuit Breakers........................................................................................................................ 27
6.4.2 Connecting the Ripple Control Receiver......................................................................................................... 29
6.5 Connection of the Measuring System ............................................................................................................ 30
6.5.1 Setup of the Current and Voltage Measurement........................................................................................... 30
6.5.2 Connecting the Current Transformer............................................................................................................... 33
6.5.3 Connecting the Voltage Measurement........................................................................................................... 36
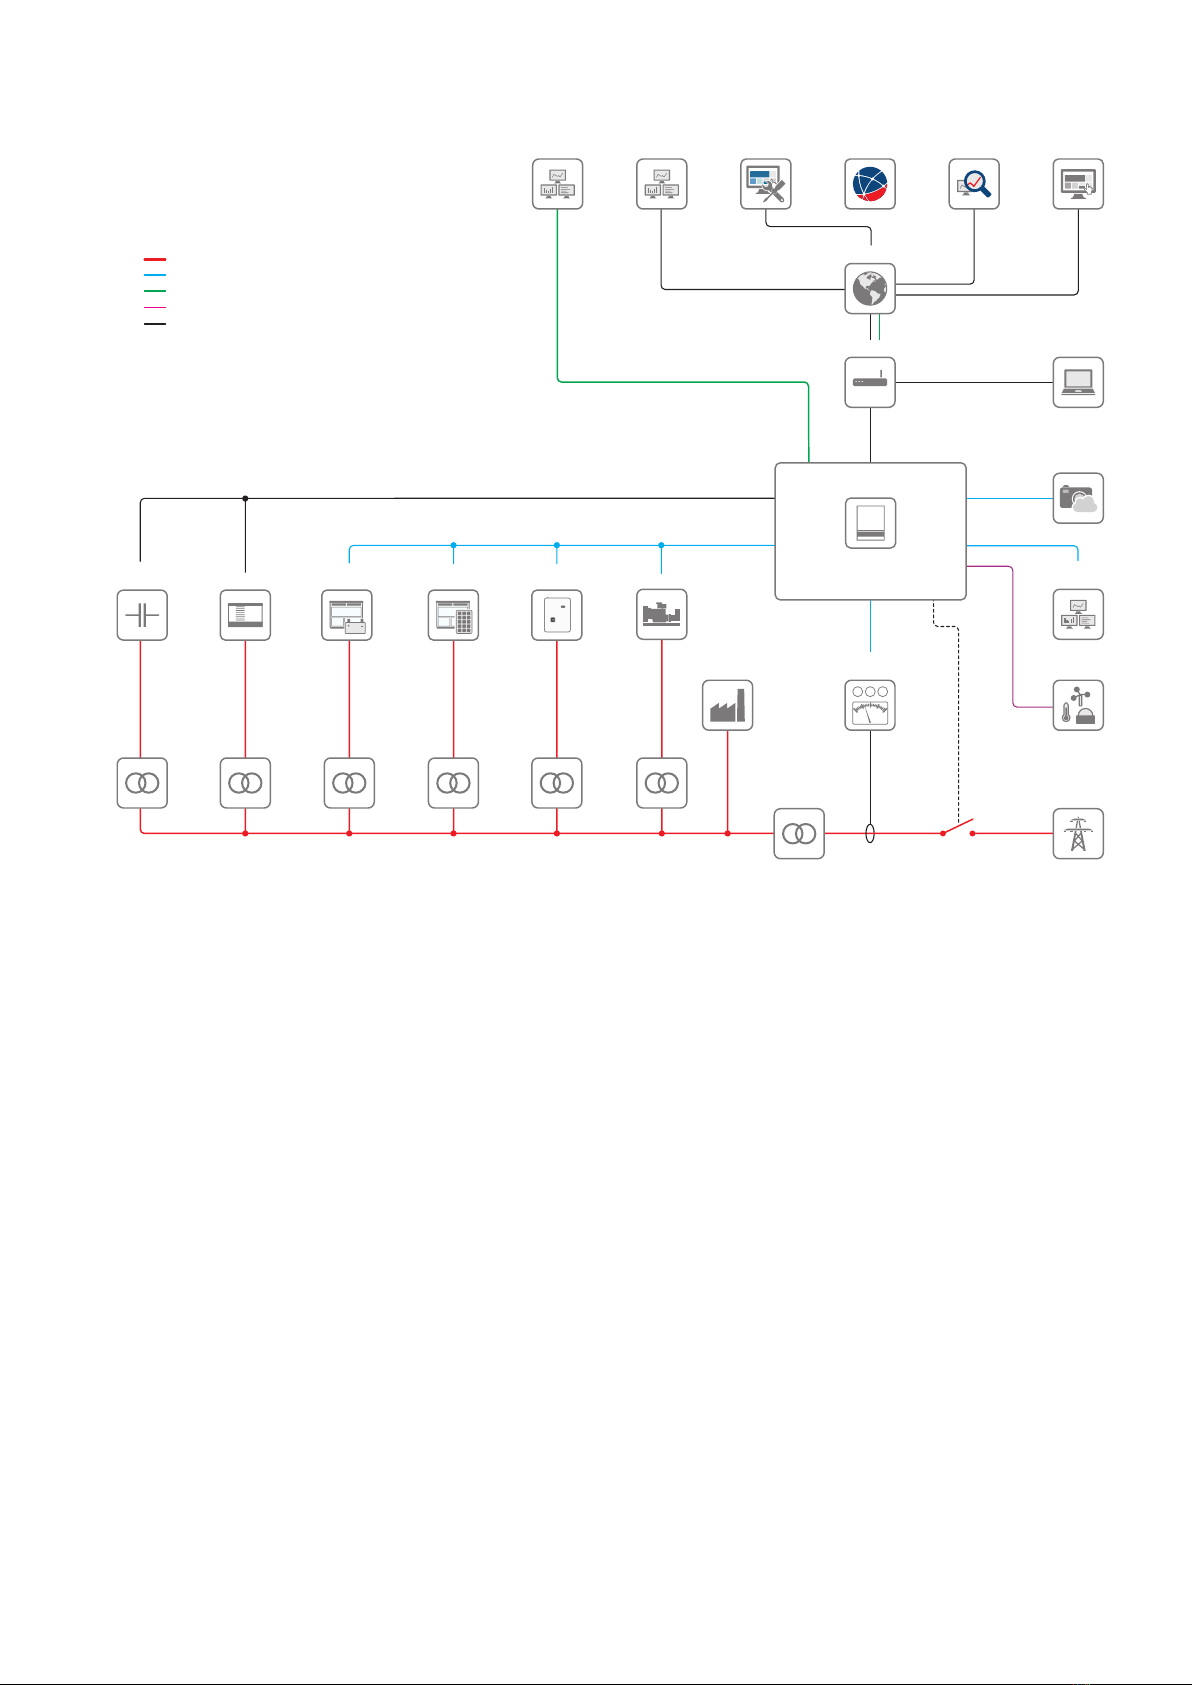
6.6 Internal Communication Network................................................................................................................... 38
6.6.1 Requirements for the Internal Communication Network................................................................................ 38
6.6.2 Connecting Network Cables and Optical Fibers........................................................................................... 39
6.6.3 Connecting the Communication with the Data Acquisition Module via Optical Fibers .............................. 42
6.7 Connecting the Communication with the Genset Control System via CAN Network ................................ 43
6.8 Connecting the I/O Module........................................................................................................................... 44
6.9 Connecting RS485 Devices............................................................................................................................ 44
7 Periodic Actions ............................................................................................................................ 46
7.1 Inserting the Cables......................................................................................................................................... 46
7.2 Connecting the Stranded Wire to the Spring-Cage Terminal....................................................................... 47
8 Disconnect from voltage sources ................................................................................................ 48

Table of Contents SMA Solar Technology AG
Installation ManualPPM-10-IA-en-104
9 Decommissioning the Product ..................................................................................................... 49
10 Technical Data .............................................................................................................................. 50
11 Contact .......................................................................................................................................... 52
12 EU Declaration of Conformity ..................................................................................................... 54

1 Information on this Document
SMA Solar Technology AG
Installation Manual 5PPM-10-IA-en-10
1 Information on this Document
1.1 Validity
This document is valid for:
• PPM-10 (Power Plant Manager) from production version A1
1.2 Target Group
The tasks described in this document must only be performed by qualified persons. Qualified persons must have the
following skills:
• Training in the installation and configuration of IT systems
• Knowledge of how the product works and is operated
• Training in how to deal with the dangers and risks associated with installing, repairing and using electrical devices
and installations
• Training in the installation and commissioning of electrical devices and installations
• Knowledge of all applicable laws, standards and directives
• Knowledge of and compliance with this document and all safety information
1.3 Levels of Warning Messages
The following levels of warning messages may occur when handling the product.
DANGER
Indicates a hazardous situation which, if not avoided, will result in death or serious injury.
WARNING
Indicates a hazardous situation which, if not avoided, could result in death or serious injury.
CAUTION
Indicates a hazardous situation which, if not avoided, could result in minor or moderate injury.
NOTICE
Indicates a situation which, if not avoided, can result in property damage.
1.4 Symbols in the Document
Symbol Explanation
Information that is important for a specific topic or goal, but is not safety-relevant
☐
Indicates a requirement for meeting a specific goal
☑
Desired result
✖
A problem that might occur
Example

1 Information on this Document SMA Solar Technology AG
Installation ManualPPM-10-IA-en-106
1.5 Typographical Elements in the Document
Typography Use Example
bold • Messages
• Terminals
• Elements on a user interface
• Elements to be selected
• Elements to be entered
• Connect the insulated conductors
to the terminals X703:1 to
X703:6.
• Enter 10 in the field Minutes.
>• Connects several elements to be
selected
• Select Settings > Date.
[Button]
[Key]
• Button or key to be selected or pressed • Select [Enter].
# • Placeholder for variable components
(e.g., parameter names)
• Parameter WCtlHz.Hz#
1.6 Designations in the Document
Complete designation Designation in this document
SMA Power Plant Manager Power Plant Manager, product
1.7 Explanation of Used Terms
Term Explanation
Genset Electric generator with combustion engine
Hybrid system System for control of energy flows based on the SMAHybridController
1.8 Additional Information
Title and information content Type of information
"Plant Communication in Large-Scale PV Power Plants" Technical Information
"Use of Gensets in hybrid systems with SMAHybridController"
Communication interface requirements and Genset Controller configuration
Technical Information
"Parameters and Measured Values"
Overview of all inverter operating parameters and their configuration options
Technical Information
"PPM-10" Circuit diagram
"PUBLIC CYBER SECURITY - Guidelines for a Secure PV System Communication" Technical information
"RS485 Cabling Plan" Installation Manual
"SMA DATA MANAGER L" Operating manual
"SMAHYBRIDCONTROLLER" User Manual

1 Information on this Document
SMA Solar Technology AG
Installation Manual 7PPM-10-IA-en-10
Title and information content Type of information
"SMAHYBRIDCONTROLLER Modbus® Interface"
Information on the commissioning and configuration of the SMA Modbus inter-
face
Technical Information
"SMA GRID GUARD 10.0 - Grid management services through SMA Inverter" Technical Information
Additional information about ioLogik E1200 User manual at www.moxa.com
Additional information about the WAGO-I/O-SYSTEM 750 System description at
www.wago.com

2 Safety SMA Solar Technology AG
Installation ManualPPM-10-IA-en-108
2 Safety
2.1 Intended Use
The PowerPlantManager is the central communication unit for monitoring, management and grid-compliant power
control of large-scale PV power plants with PV inverters, battery inverters and genset devices. System components and
systems are integrated into the SMA infrastructure via the PowerPlantManager. This includes energy generators and
loads, I/O systems and energy meters. The PowerPlantManager supports communication with up to 200 devices.
The PowerPlantManager is responsible for power control and energy management in large PV and hybrid systems.
Both central inverters and decentralized string inverters, which are monitored and controlled by communication
gateways, can be connected in the system.
In the PowerPlantManager, the setpoints for grid management services are received and compared with the values
measured at the point of interconnection. Based on this comparison, the PowerPlantManager calculates the required
control values and transmits these values to the connected devices. The PowerPlantManager can receive setpoints in
digital and analog form and via Modbus/TCP protocol. The setpoints of a superordinate SCADA system are
transmitted via Modbus/TCP protocol. Setpoints from the grid operator can also be received via an optionally
integrated protocol converter in accordance with IEC 60870 5 101, IEC 60870 5 104, IEC 61850 or DNP3.
The values measured at the point of interconnection are processed by a power analyzer and retrieved by the
PowerPlantManager. As an alternative, measuring modules of the programmable logic controller integrated in the
PowerPlantManager are used to receive the measured values at the point of interconnection.
The PowerPlantManager is operated via the integrated user interface. Via the user interface, you can set parameters,
configure functions, view actual values and read out error messages.
SCADA systems can also be used for system management and for this purpose can exchange high-resolution data with
the PowerPlantManager.
If you have selected the option "Customer Installation Location" in the option code, the PowerPlantController is
supplied with 1 installation location for your own communication devices. In this option, the PowerPlantController
does not include a programmable logic controller. During installation, observe the requirements for each device to be
installed.

2 Safety
SMA Solar Technology AG
Installation Manual 9PPM-10-IA-en-10
SUNNY PORTAL
powered by ennexOS
SMA SERVICE SMA O&M
V WA
STATCOM GENSETS
SMA POWER PLANT MANAGER
IEC 60870-5-104, DNP3 etc.
Modbus TCP, SMA Data2+
DIRECT
MARKETER
PV CENTRAL
INVERTER
CLOUD
CAMERA
SCADA
SYSTEM
INTERNET
GRID OPERATOR
3rd PARTY
PORTAL
ROUTER
PV STRING
INVERTER
HMI
CAPACITOR
BANK
POWER
ANALYZER WEATHER
STATION
UTILITY
GRID
TRANSFORMER
AC
serial
others
BATTERY CENTRAL
INVERTER
LOADS
Figure 1: System overview of a large-scale PV power plant with Power Plant Manager (example)
The product is not suitable for supplying life-sustaining medical devices. A power outage must not lead to personal
injury.
The product is for use in weather-protected outdoor areas and in indoor areas. The ambient conditions prescribed for
the product must be observed at all times.
The product is intended for use in industrial environments.
All components must remain within their permitted operating ranges and their installation requirements at all times.
Use SMA products only in accordance with the information provided in the enclosed documentation and with the
locally applicable laws, regulations, standards and directives. Any other application may cause personal injury or
property damage.
Alterations to the SMA products, e.g., changes or modifications, are only permitted with the express written permission
of SMA Solar Technology AG. Unauthorized alterations will void guarantee and warranty claims and in most cases
terminate the operating license. SMA Solar Technology AG shall not be held liable for any damage caused by such
changes.
Any use of the product other than that described in the Intended Use section does not qualify as the intended use.
The enclosed documentation is an integral part of this product. Keep the documentation in a convenient, dry place for
future reference and observe all instructions contained therein.
This document does not replace and is not intended to replace any local, state, provincial, federal or national laws,
regulations or codes applicable to the installation, electrical safety and use of the product. SMA Solar Technology AG
assumes no responsibility for the compliance or non-compliance with such laws or codes in connection with the
installation of the product.
The type label must remain permanently attached to the product.

2 Safety SMA Solar Technology AG
Installation ManualPPM-10-IA-en-1010
2.2 IMPORTANT SAFETY INSTRUCTIONS
SAVE THESE INSTRUCTIONS
This section contains safety information that must be observed at all times when working.
The product has been designed and tested in accordance with international safety requirements. As with all electrical
or electronical devices, there are residual risks despite careful construction. To prevent personal injury and property
damage and to ensure long-term operation of the product, read this section carefully and observe all safety
information at all times.
DANGER
Danger to life due to electric shock when live components or cables are touched
High voltages are present in the conductive components or cables of the product. Touching live parts and cables
results in death or lethal injuries due to electric shock.
• Do not touch non-insulated parts or cables.
• Externally disconnect the supply voltage and cables for the current- and voltage measurement before
performing any work or opening the product.
• Observe all safety information on components associated with the product.
• Wear suitable personal protective equipment for all work on the product.
• Always perform all work in accordance with the locally applicable standards, directives and laws.
• Cover or isolate all live components.
WARNING
Danger to life due to electric shock
Under fault conditions, when working on the power supply circuit there may be dangerous voltages present on the
product. This can result in death or serious injury.
• For power supply units with a fixed connection, make sure that a disconnection unit (e.g. miniature circuit
breaker) is present outside the power supply unit.
• For power supply units with a plug connection, make sure that the electrical outlet for the power supply unit is
close to the power supply unit.
• The disconnection unit and the electrical outlet for the power supply unit must be freely accessible at all times.
CAUTION
Damage to eyes and skin due to visible and invisible laser radiation
The product contains class1 LED or laser components in accordance with IEC60825-1(2003). The laser beam
appears at the end of the optical fiber. Incorrect handling with laser beams can result in damage to eyes and skin.
• Do not look into the laser beam.
• Do not look at the laser beam using optical instruments.
• Do not point the laser beam at persons.

2 Safety
SMA Solar Technology AG
Installation Manual 11PPM-10-IA-en-10
CAUTION
Risk of injury due to weight of product
Injuries may result if the product is lifted incorrectly or dropped while being transported or mounted.
• Transport and lift the product carefully. Take the weight of the product into account.
• Always have two persons mount and disassemble the product.
• Wear suitable personal protective equipment for all work on the product.
NOTICE
Damage to the product due to sand, dust and moisture ingress
Sand, dust and moisture penetration can damage the product and impair its functionality.
• Only open the product if the humidity is within the thresholds and the environment is free of sand and dust.
• The product must not be opened in case of splashing water (e.g. from an irrigation system).
• Do not open the product during a dust storm or precipitation.
• In case of interruption of work or after finishing work, mount all enclosure parts and close and lock all doors.
• Only operate the product when it is closed.
• Store the closed product in a dry and covered location. Observe storage conditions.
• The temperature at the storage location must be in the specified range.
• When using cable glands: Do not take the filler plugs out of the unused cable glands.
NOTICE
Property damage due to unauthorized access to the system on account of freely available
switch cabinet key
Parameters may be set incorrectly due to unauthorized access to the system on account of freely available switch
cabinet key. When parameters are set incorrectly, technical thresholds are being exceeded. An exceeding of
technical thresholds can lead to damage of the affected products.
• Remove the switch cabinet keys from the door locks.
• Store the switch cabinet keys in a safe place.
• Ensure that only qualified persons have access to the switch cabinet keys.
NOTICE
Damage to electronic components due to electrostatic discharge
Electrostatic discharge can damage or destroy electronic components.
• Observe the ESD safety regulations when working on the product.
• Wear suitable personal protective equipment for all work on the product.
• Discharge electrostatic charge by touching grounded elements. Only then is it safe to touch electronic
components.

2 Safety SMA Solar Technology AG
Installation ManualPPM-10-IA-en-1012
NOTICE
Product can cause radio interference in living areas
The product is a device of ITE class A (EN55022) and can cause radio interference in living areas.
• Take suitable measures for shielding radio waves when the ClusterController is used in the vicinity of living
areas.
NOTICE
Manipulation of PV system data in networks
You can connect the supported SMA products to the Internet. When connected to the Internet, there is a risk that
unauthorized users can access and manipulate the data of your PV system.
• Set up a firewall.
• Close unnecessary network ports.
• If absolutely necessary, only enable remote access via a virtual private network (VPN).
• Do not use the port forwarding feature. This also applies to the used Modbus ports.
• Disconnect system components from other network components (network segmentation).
NOTICE
Damage of gensets due to overload of the system network
The system network can be overloaded due to direct communication with individual system components. As a result,
control commands from the product can no longer be sent correctly to the system components. This may lead to
reverse currents and damage to the gensets.
• Only operate the system network as documented in the acceptance test during commissioning.
• Only retrieve system data from individual system components via the product.
• Do not communicate directly with the individual system components.
Electrical installations (for North America)
All installations must conform with the laws, regulations, codes and standards applicable in the jurisdiction of
installation (e.g. National Electrical Code® ANSI/NFPA 70 or Canadian Electrical Code® CSA-C22.1.).
• Before connecting the product to the utility grid, contact your local grid operator. The electrical connection of
the product must be carried out by qualified persons only.
• Ensure that the cables or conductors used for electrical connection are not damaged.

3 Scope of Delivery
SMA Solar Technology AG
Installation Manual 13PPM-10-IA-en-10
3 Scope of Delivery
Check the scope of delivery for completeness and any externally visible damage. Contact your distributor if the scope
of delivery is incomplete or damaged.
The scope of delivery differs depending on the option ordered.
PowerPlantManager
AC
B
K
D E F
J
L
G H I
M
Figure 2: Components included in the scope of delivery
Position Quantity Designation
A 1 PowerPlantManager
B 4 Wall mounting bracket
C 1 Switch cabinet key
D 4 Cable gland M40 with seal insert and counter nut*
E 8 Cable gland M32 with seal insert and counter nut*
F 11 Cable gland M25 with seal insert and counter nut*
G 12 Cable gland M20 with seal insert and counter nut*
H 1 Cable gland M12 with seal insert and counter nut*
I 1 Multiple cable gland M32 with multiple seal insert and counter nut*
J 3 Filler plug
K 3 Jumper*
L 1 Accessory kit for cables*
M 1 Installation manual, circuit diagram, manuals of the installed devices*
* depending on the ordered option

4 Product Overview SMA Solar Technology AG
Installation ManualPPM-10-IA-en-1014
4 Product Overview
4.1 Product Description
A
B
Figure 3: Design of the product
Position Designation
A Switch cabinet lock
B Type label
The type label clearly identifies the product. The type label must remain permanently at-
tached to the product. You will find the following information on the type label:
• Device type (Model)
• Serial number (Serial No. or S/N)
• Date of manufacture
• Device-specific characteristics
4.2 Symbols on the Product
Symbol Explanation
Beware of electrical voltage
The product operates at high voltages.
Beware of hot surface
The product can get hot during operation.
Warning of laser radiation
The product contains LED or laser components in accordance with IEC60825-1(2003).
Laser class 1 - Class 1 Laser Product
Light emitting diode class 1 - Class 1 LED Product

4 Product Overview
SMA Solar Technology AG
Installation Manual 15PPM-10-IA-en-10
Symbol Explanation
Observe the documentation
Observe all documentation supplied with the product.
Grounding conductor
This symbol indicates the position for connecting a grounding conductor.
Direct current
WEEE designation
Do not dispose of the product together with the household waste but in accordance with the
disposal regulations for electronic waste applicable at the installation site.
Degree of protectionIP54
The product is protected against interior dust deposits and against water splashing from all
angles against the enclosure.
CE marking
The product complies with the requirements of the applicable EU directives.
RoHS
RoHS labeling
The product complies with the requirements of the applicable EU directives.

5 Mounting SMA Solar Technology AG
Installation ManualPPM-10-IA-en-1016
5 Mounting
5.1 Requirements for Mounting
Requirements for the Mounting Location:
WARNING
Danger to life due to fire or explosion
Despite careful construction, electrical devices can cause fires. This can result in death or serious injury.
• Do not mount the product in areas containing highly flammable materials or gases.
• Do not mount the product in potentially explosive atmospheres.
☐ A solid, flat support surface must be available for mounting.
☐ The mounting location must be suitable for the weight and dimensions of the product (see Section10 "Technical
Data", page50).
☐ The mounting location must not be exposed to direct solar irradiation. Direct solar irradiation can cause the
product to overheat.
☐ All local requirements concerning minimum passage widths and escape routes must be observed.
☐ The mounting location should be freely and safely accessible at all times without the need for any auxiliary
equipment (such as scaffolding or lifting platforms). Non-fulfillment of these criteria may restrict servicing.
☐ All ambient conditions must be met (see Section10, page50).
Permitted and prohibited mounting positions:
☐ The product may only be mounted in a permitted mounting position.
90°90°
Figure 4: Permitted and prohibited mounting positions

5 Mounting
SMA Solar Technology AG
Installation Manual 17PPM-10-IA-en-10
Dimensions for mounting:
800 (31.5)
830 (32.7)
1000 (39.4)
924 (36.4)
Ø10.2 (0.04)
47
(1.85)
854 (33.6)
29
(1.14)
Ø10.2 (0.04)
Figure 5: Position of the anchoring points(Dimensions in mm (in))
5.2 Mounting the product
CAUTION
Risk of injury due to weight of product
Injuries may result if the product is lifted incorrectly or dropped while being transported or mounted.
• Transport and lift the product carefully. Take the weight of the product into account.
• Always have two persons mount and disassemble the product.
• Wear suitable personal protective equipment for all work on the product.
Additionally required mounting material (not included in the scope of delivery):
☐ 4 screws, washers and fastening material suitable for the support surface
Requirements for anchoring points:
☐ Weight force at each of the 4 anchoring points (screw and fastening material): at least 60kg70kg (154lb)

5 Mounting SMA Solar Technology AG
Installation ManualPPM-10-IA-en-1018
Procedure:
1. Attach the wall mounting bracket to the enclosure using fastening
material, torque: 8 Nm (71 in-lb)).
2. Mark the position of the 4 drill holes and drill the holes. Use the recesses for the upper wall mounting brackets
and the holes for the lower wall mounting brackets.
3. If necessary, provide the 4 drill holes with suitable screw anchors.
4. Turn suitable screws with washers into the upper 2 drill holes. Turn the screws far enough to be able to hang the
product on them.
5. Hang the product onto both upper screws.
6. Turn 2 suitable screws with washers through the holes in the lower
wall mounting brackets.
7. Tighten all 4 screws.
8. Ensure that the product is securely in place.
5.3 Installing the Device in Customer Installation Location
Own devices can be installed if the product has a customer installation location.

5 Mounting
SMA Solar Technology AG
Installation Manual 19PPM-10-IA-en-10
Requirements:
☐ The device must be approved for operation at the installation site. In Europe, there must be a valid ECdeclaration
of conformity for the device for example.
☐ The circuit diagram of the product must be provided.
☐ The device must meet the following technical requirements:
– Permissible ambient temperatures: -20°C to +60°C (-4°F to +140°F)
– Emitted interference: Class A (as per EN55022: 2006+A1: 2007)
– Interference immunity: Class A (as per EN55024: 1998+A1: 2001 +A2:2003)
☐ The device can be mounted on a DIN rail.
☐ The device has suitable dimensions for the available space (width x height x depth): 590mm x 165mm x 71mm
(23.2in x 6.5in x 2.8in)
☐ The device must be suitable for connection to voltage supply:
– AC voltage supply (see details on type label of product) or DC voltage supply (24VDC)
– Maximum power consumption: 20W
Procedure:
1. Mount each device on the DIN rail of the product.
2. Ensure that the device is firmly attached to the DIN rail.

6 Electrical Connection SMA Solar Technology AG
Installation ManualPPM-10-IA-en-1020
6 Electrical Connection
6.1 Overview of the Connection Area
6.1.1 View from Below
A standard connecting plate with knockouts for attaching cable glands is included in the scope of delivery. Another
connecting plate without knockouts for attaching conduits can be purchased optionally.
The individual devices in the product have been cabled. The cable entry for connection is through the cable glands or
cable conduits in the connecting plate in the bottom of the product.
The left area of the connecting plate is intended for the connection of the communication system and the digital and
analog I/O systems. The right area of the connecting plate is intended for the connection of the voltage supply and the
current and voltage measurement.
Connecting plate for cable glands
B
A
Figure 6: Bottom view of product
Position Designation
A Area for connection of communication and I/O systems
B Area for connection of voltage supply and current/voltage measurement
AC
CC
A
A A
B B
D D
D D
E
Figure 7: Bottom view of product
Position Quantity Designation
A 4 Anchoring points for cable glands M40
B 8 Anchoring points for cable glands M32
C 11 Anchoring points for cable glands M25
Other manuals for PPM-10
1
This manual suits for next models
1
Table of contents
Other SMA Portable Generator manuals
Popular Portable Generator manuals by other brands

Generac Power Systems
Generac Power Systems Portable Generator user guide

Telair
Telair ENERGY 4000B User's operating instruction and installation manual

PR electronics
PR electronics 2281 product manual

Briggs & Stratton
Briggs & Stratton 30555 Operator's manual

SINOLTECH
SINOLTECH SP500A user manual

DuroStar
DuroStar DS4500DX user manual