SMART 3D Multimaterial Dryer User manual

Multimaterial Dryer
User Manual

Important: Read this instruction manual. Failure to read, understand, and follow the
instructions in this manual may result in damage to the unit, injury to operating
personnel, or poor equipment performance.
Congratulations on your selection of the Smart3D Multimaterial Dryer! Please read
these operating instructions, user notes, and the warranty card thoroughly before the
initial operation of your Multimaterial Dryer. This will ensure proper operating
procedures and extended life for the unit. Please keep the operating instructions
together with the warranty card for easy access whenever you need them.
Caution: All internal adjustments and maintenance must be performed by
02

03
Liability statement
The information provided in this user manual is subject to change without notice, and
we reserve the right to modify the manual at any given time. We have made every
liability for any inaccuracies or omissions. We shall not be liable for errors contained
herein or for incidental or consequential damages in connection with the furnishing,
performance, or use of this equipment/material. We make no warranty of any kind with
regard to this equipment/material, including, but not limited to, the implied warranties
equipment/material purchaser to determine that any Smart3D product is safe, lawful,
and technically suitable for the intended application. Likewise, it is your responsibility
to identify the proper disposal (or recycling) method consistent with your local
environmental regulations. Except as provided in Smart3D's standard conditions of
sale, we shall not be responsible for any loss resulting from any use of any Smart3D
product described herein. Some hardware, software, user interface, and elements may
Copyright statement
Upon our written consent, you may download, view, print and reproduce this
reserved. This document and its contents are made available on an "as is" basis, and all
implied warranties are disclaimed. All drawings and information herein are the
property of Smart3D. All unauthorized use and reproduction is prohibited.
EMC Class A warning
Warning!
may cause radio interference in which case the user may be required to take
adequate measures.
!
MSDS (Material Safety Data Sheet)
Material Safety Data Sheets for the materials supported by this device are available for
download at: www.smart3d.tech/materials

04
Waste Electrical and Electronic Equipment Statement (WEEE)
This symbol on the Product or on its packaging indicates that the device
your responsibility to dispose of your waste equipment by handing it over
to a designated collection point for the recycling of waste electrical and
electronic equipment. The separate collection and recycling of your
waste equipment at the time of disposal will help to conserve natural resources and
ensure that it is recycled in a manner that protects human health and the environment.
or the shop where you purchased the product.
California Proposition 65
chemicals listed by the State of California that cause cancer, birth defects or other
reproductive harm. By requiring that this information be provided, Proposition 65
enables consumers to make informed decisions about their exposures to these
chemicals. Proposition 65 also prohibits businesses from knowingly discharging

INDEX
The importance of properly dryed material
Components
Requirements for installation
Handling warnings
Control panel
Operating instructions
01.
02.
03.
04.
05.
06.
07.
08.
05
06
08
09
11
13
16
18
19

Current solutions vs. Smart3D hybrid drying technology™
THE IMPORTANCE OF PROPERLY DRIED MATERIALS
06
Time
Moisture rate
hard or even imposible with such techniques
Performance
Since this method depends on contact with dry air, moisture may be found even
after a full drying cycle
Quantity
These solutions cannot process more than a few pounds of material
Versatility
Cost
Why are other current solutions suboptimal for engineering needs?
either ruin your filament by altering its physical properties or not dry it
properly.

Moisture, the silent enemy
Hydrolysis is a chemical reaction in which a molecule of water ruptures one or more
filaments that have a certain chemical structure,
resistance to impact, since the polymer chain is changed. This consequence is
What is hydrolysis?
07
on the place, but there is always, at least a small percentage of water in the
atmosphere.
source of a lot of issues like degradation or fragility.
prone to absorb moisture more easily than others. As a major rule, if you leave a
WET FILAMENT DRY FILAMENT
Moisture can affect the filament within only two hours of exposure. Since an
average print takes between 5 and 7 hours, the exposed filament can ruin the
entire print and may ruin your spool.
THE IMPORTANCE OF PROPERLY DRIED MATERIALS

IMPORTANT SECURITY INSTRUCTIONS
When using electrical appliances, basic safety precautions should always be followed,
including the following:
1. Please read all instructions carefully before using this appliance. Then keep them in
a safe place for future reference.
2. This product is not intended for use by people (including children) with reduced
physical, sensory, or mental abilities, or lack of experience and knowledge.
3. This product is not designed to be moved frequently. But if necessary, never move
or drag the appliance by pulling on the power cord. Make sure the cord is not caught,
crushed, lying on the edge of the Dryer, or in contact with hot surfaces.
4.
technical service for its revision, repair or adjustment.
5. Leave at least a 30 cm clearance around the sides of the dryer and 25 cm between
the backside and the wall, allowing adequate air circulation.
6. The use of accessories not included in this manual by the manufacturer may result
7. Before plugging or unplugging the unit, check that it is OFF.
8. Unplug the unit by pulling from the plug and never from the power cord.
9.
10.
11.Do not use the Dryer cavity as a place to store items that do not correspond to the
unit.
12. ATTENTION: THIS UNIT MUST BE EARTHED. The manufacturer is not
responsible for the damages caused to people or things by an incorrect ground
13.
adequate thermal protection.
14.
authorized technical service.
15. This unit has a short power cord to reduce the risks that a longer cable can
produce. An extension can be used as long as the following care is taken:
• The cable extension must be carefully located avoiding excess on tables or grills that
can be hooked, crushed, or cut into accidentally.
08

major problem for low glass transition
temperature (Tg) materials.
The Smart3D Multimaterial Dryer manages
to dry all kind of materials simultaneously in
steady, controlled environment with a
Setting the temperature
Two cartidges of silica gel, one inside
the chamber and other at the exterior.
These manage to regulate the humidity
that comes from the outside during the
Controlling humidity
1. Generic drying
3. ABS drying
Then, there is the possibility that the user can make their own custom cycles.
Drying cycles
to dry a variety of materials at the same time, including TPU and PA simultaneously.
GENERAL SPECIFICATIONS
The Smart3D Multimaterial Dryer is the only current solution that integrates a hybrid
perfect conditions and ready to use.
09
45ºC - 113ºF
Pipe tubing
to the valve
Silica cartridge
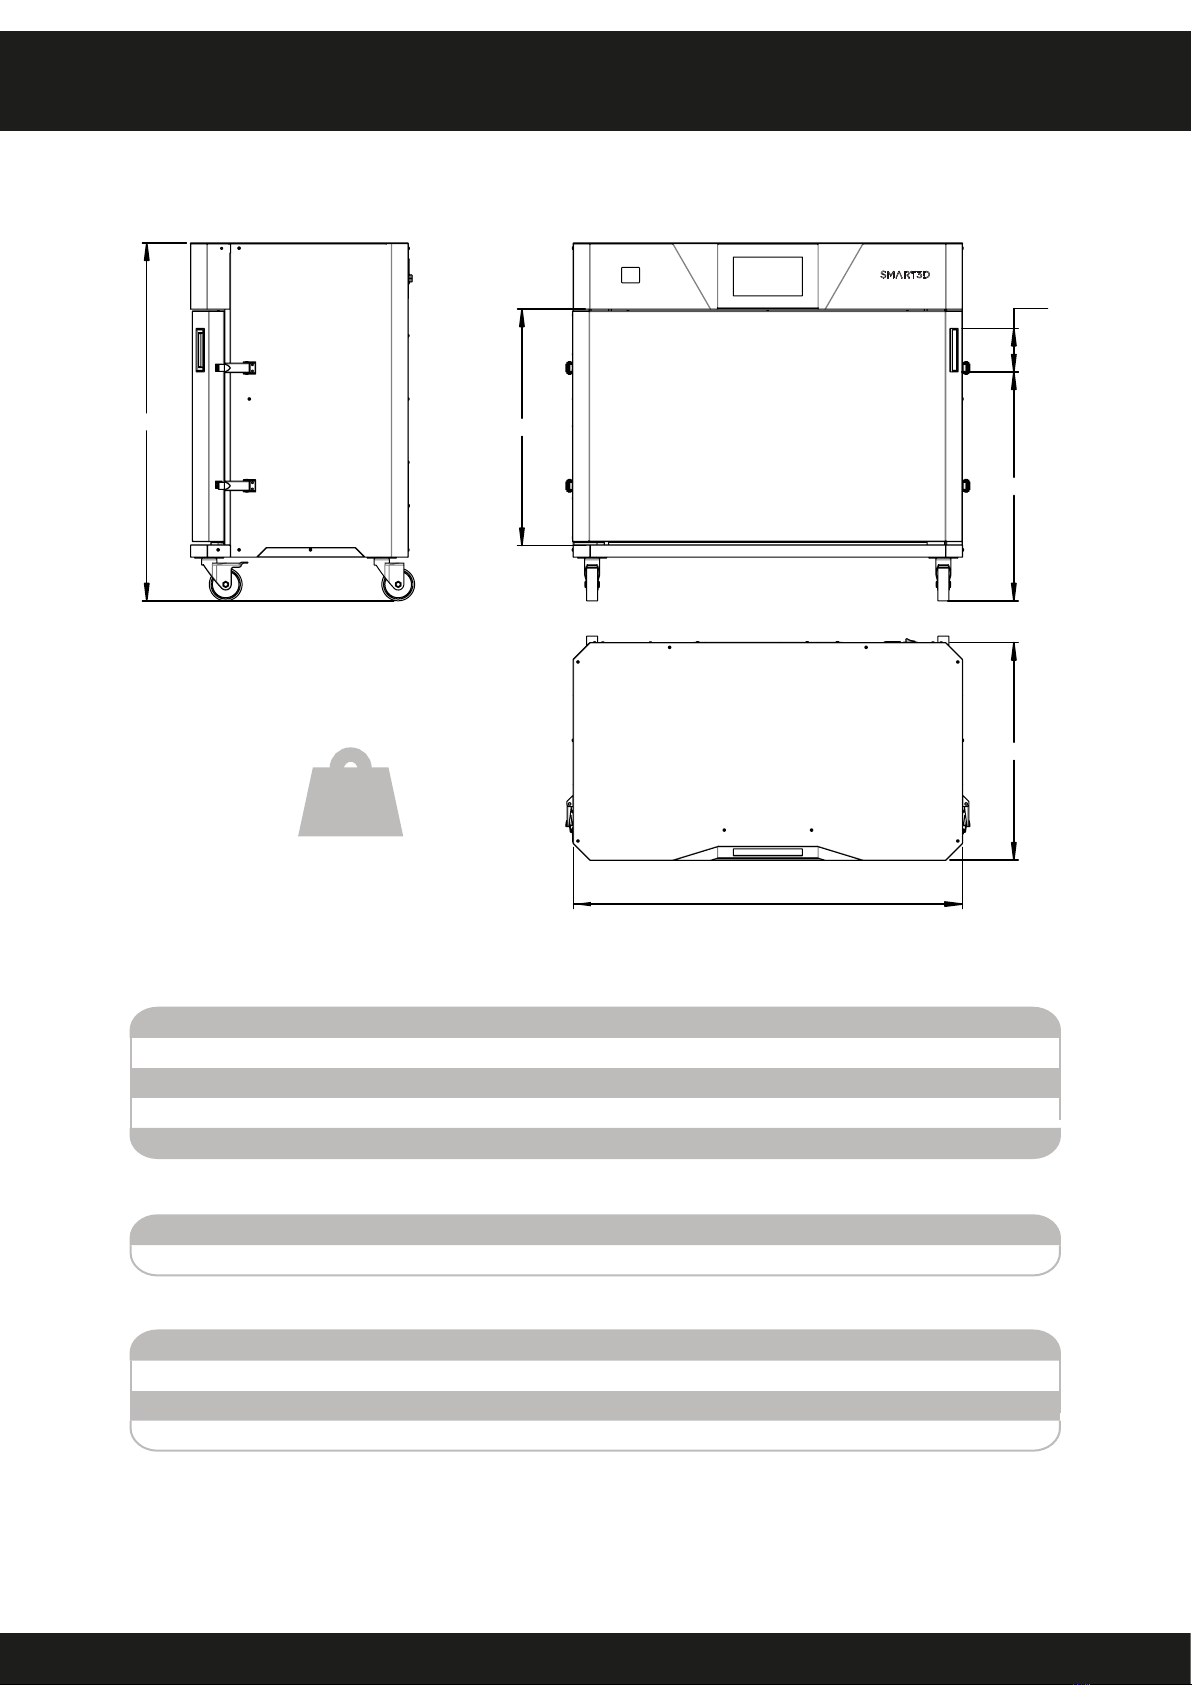
GENERAL SPECIFICATIONS
General dimensions
100
540
525
820
890
500
Performance
Cycle duration: <3h
Drying capacity: Up to 24 spools (depending on spool size)
Compatibility: Filament spools of any material and brand
Connectivity: WiFi, Ethernet, USB
Display: 7” full color touch screen
Electrical
Rated voltage: 110 - 240V / 50 - 60 Hz / 1500W
Auxiliary power outlet: 110 - 240V / 50 - 60 Hz / 4 - 2A
Software
Spool recognition: Through RFID tag
Reports and statistics: Temperature and drying cycles
Updates: Internet/Manual
I4.0 compliant: Yes
10
WEIGHT
175kg

COMPONENTS
3
1
2
4
7
8
9
10
6
5
11

12
COMPONENTS
Handle
Side locks (four in total, two on each side)
Power supply plug
Button switch
USB ports (two in total)
Access door to the Raspberry Pi
Ethernet port
Bars (four in total)
Heating system
Wheels with brake (two in total)
Wheels without brake (two in total)
This Dryer requires permanent connection wiring to a power source.
11
12 13
14
1
2
3
4
5
6
7
8
9
10
11
12
13
14
13
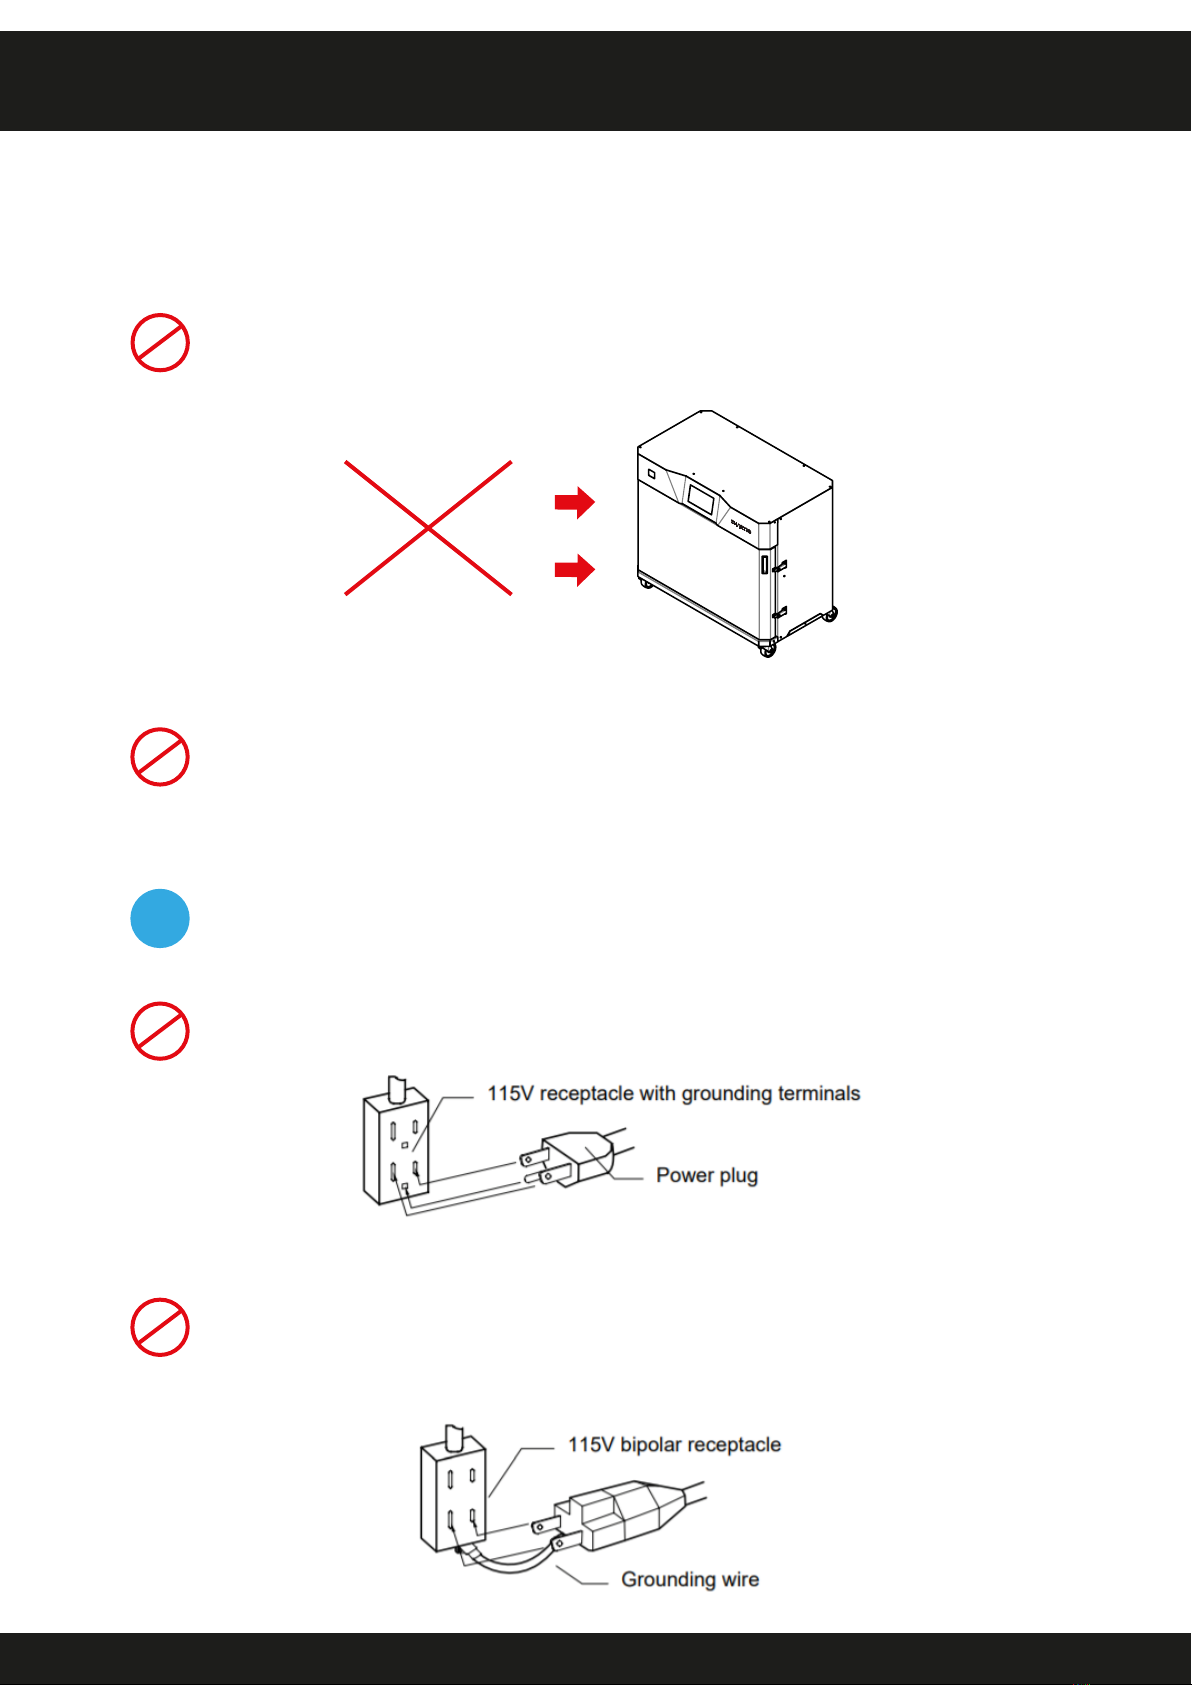
REQUIREMENTS FOR INSTALLATION
make sure you follow the following advice:
Do not use the unit in an area where there is a �lammable or explosive gas
operator and create problems during operation.
Install the Dryer on a level area
not forget to ground the Dryer, to protect you and the unit from electrical shock
in case of a power surge. Choose a receptacle with grounding connectors as
often as possible.
Do not connect the grounding wire to a gas pipe, or use a lightning rod or
receptacle before connecting the adapter to the receptacle. Connect the
our service center for additional information or assistance.
!
Always ground the unit
Explosive gas
Flammable gas

14
Multimaterial Dryer in a proper
press the brake with your foot. Make
sure the unit does not move at all.
Lock the wheels
REQUIREMENTS FOR INSTALLATION
Take measures to prevent the unit from falling in case of an earthquake, high
impact, etc. as it could lead to personal injury.
After installation
!
Do not process, bend, wring, or stretch the power cord forcibly. Fire or electrical
shock may result.
Do not put the power cord under or through an object. Otherwise, there is the
Do not run the power cord next to the heating equipment. When the power cord
and the main power. Contact customer service.
Handling of the power cord
Do not install the Dryer in a place where:
Choose a proper place for installation
More than
25 cm / 10 inches
More than
25 cm / 10 inches
More than
30 cm / 12 inches
More than 25 cm / 10 inches
!
Keep the following clearance around the Dryer
15
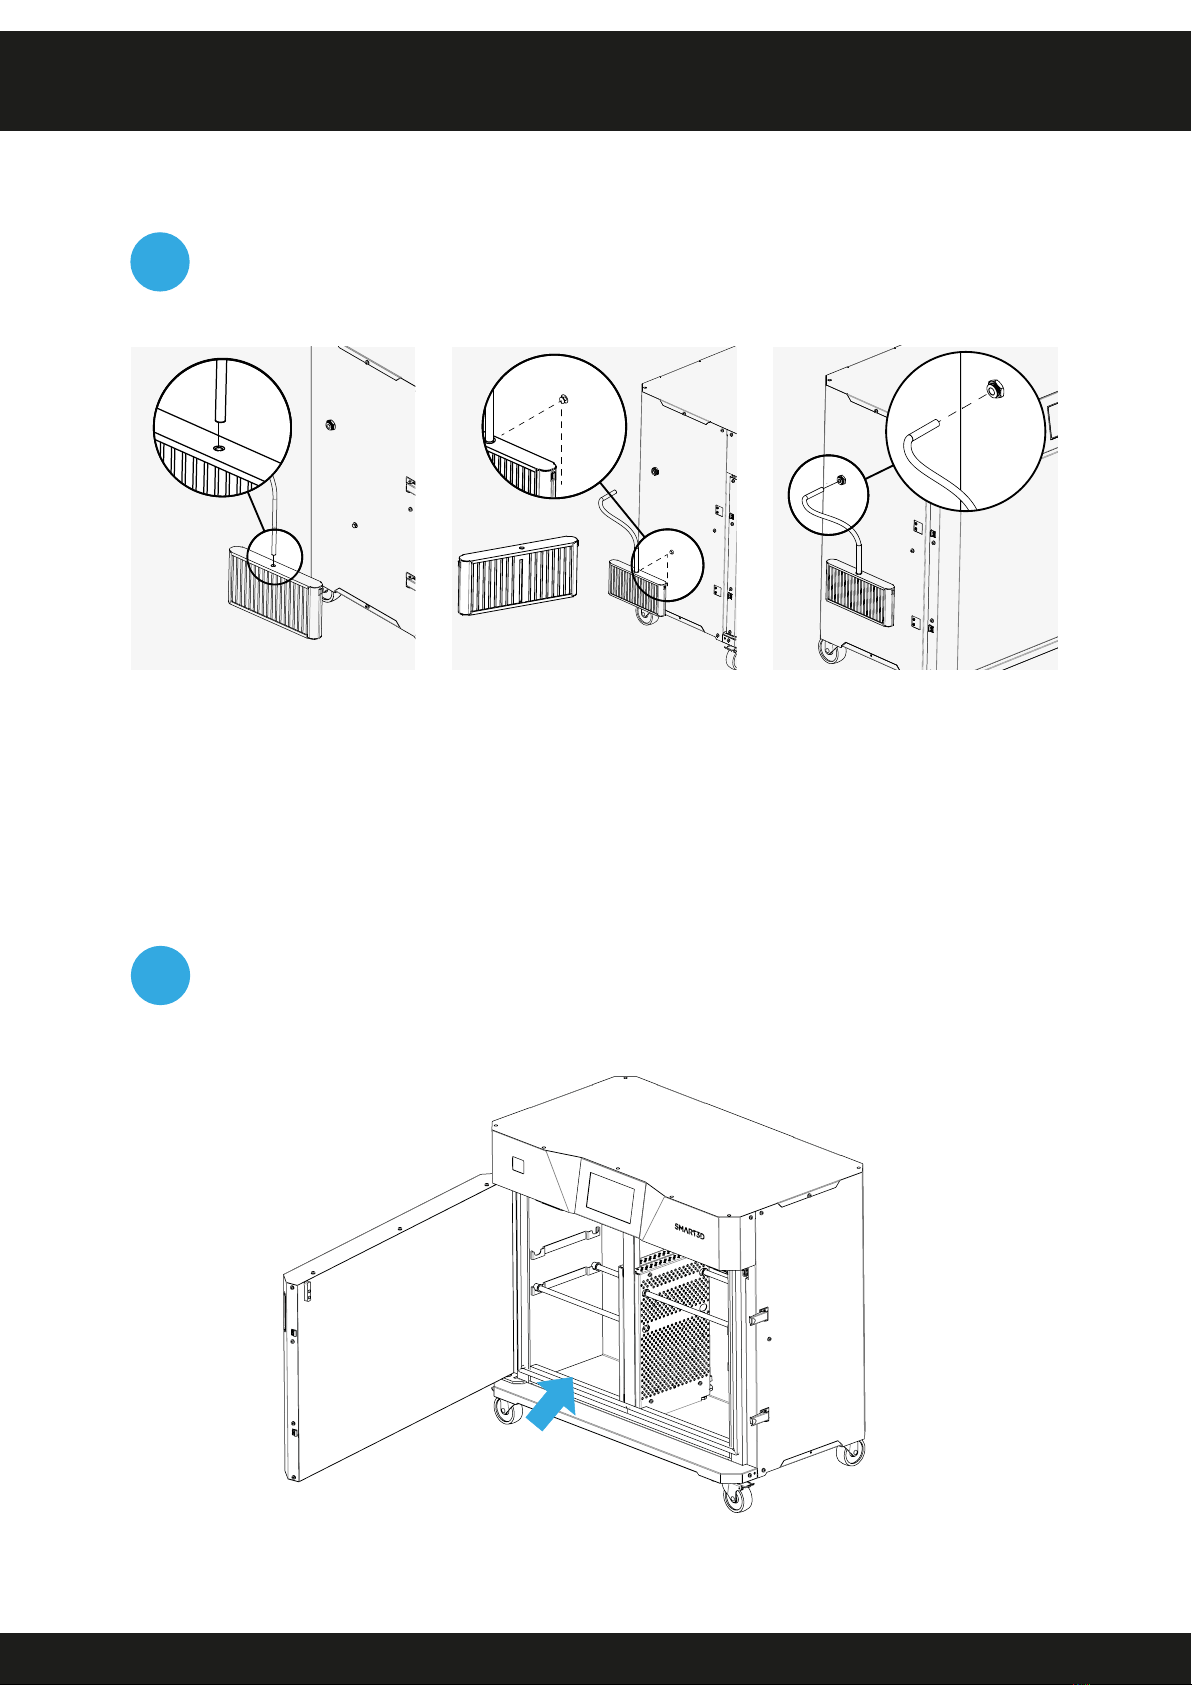
REQUIREMENTS FOR INSTALLATION
cartridge
. For perfect installation, you
shou
previous section,
you must replace the exterior cartridge with this one after
every drying cycle, ensuring the silica used is always dry.
Place the silica gel correctly
!
highly recommended to replace this cartridge after the drying cycle for the one
that was on the inside, ensuring the silica used is always dry.
Place the exterior silica cartridge
!
Finally, insert the tubing in
the connector on the left
lateral case.
hole. Apply some
pressure.
Slide the cartridge and
hang it to the two binding
barrels that the Dryer has
on its side.
Silica gel cartridge

16
HANDLING WARNINGS
n the bars or the base of the chamber.
WARNING!
compartment during the drying cycle. This surface may get very hot and could
Sort your �ilament spools
This central heating
compartment may
get hot. Please be
careful!
bars with two levels.
WARNING!
Heating and drying other objects may cause damage to the Multimaterial Dryer.
!
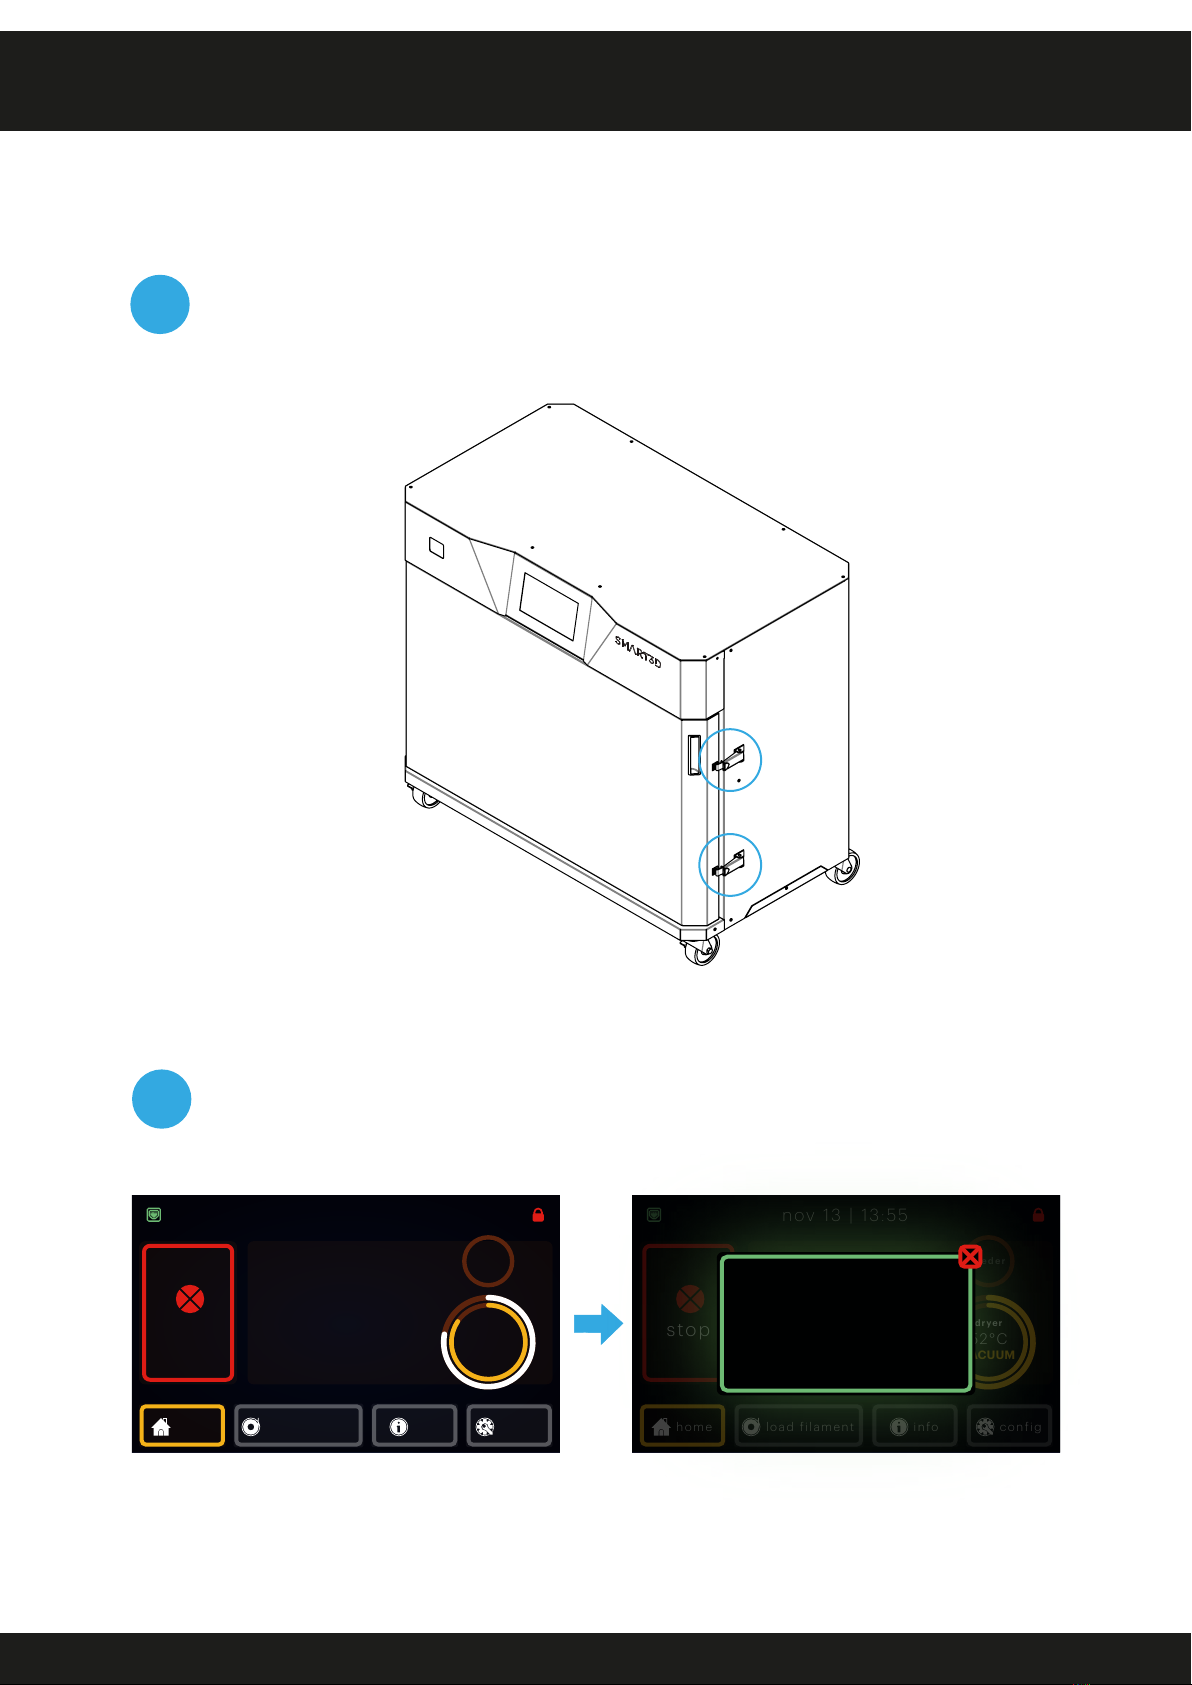
17
Before running any drying cycle, check the door seal for any debris which could
prevent proper closing and then secure the door with both locks. Remember to
take good care of the door seal as there can't be any leaks during the cycle's
vacuum process. Be sure to contact Customer Support if you encounter any
problems.
Lock the door during the cycle
!
HANDLING WARNINGS
icon must have turned green. Under no circumstance, open the door before it
is enabled on the screen
Do not open the door until the cycle is over
!
stop
00:35
elapsed time
00:55
remaining time dryer
DRYING
feeder
home info
nov 13 | 13:55
stop
00:35
elapsed time
00:55
remaining time dryer
VACUUM
feeder
home info
nov 13 | 13:55
Drying cycle
completed
successfully!

18
CONTROL PANEL
Multimaterial Dryer.
Network connection
Start drying
Pressing this button will start the drying cycle. Before starting the drying cycle, the door
must be properly closed and locked. The drying cycle will not start unless the chamber is
Home
Pressing this button while on any other screen, will lead you back to the home screen.
Load �ilament
Information
more details) you store inside the Dryer, as well as those that went through a drying cycle.
Con�iguration
and allows to create drying programs with customized values. Also, you may update the
software here and set up the network connection settings.
Door sensor
When the door is open the padlock is green and open. But once you close the door this
icon changes to red and closed.
feeder
dryer
READY
start
drying
home info
nov 13 | 13:55
2
17
3 4 5 6
2
3
4
5
6
1
7
19
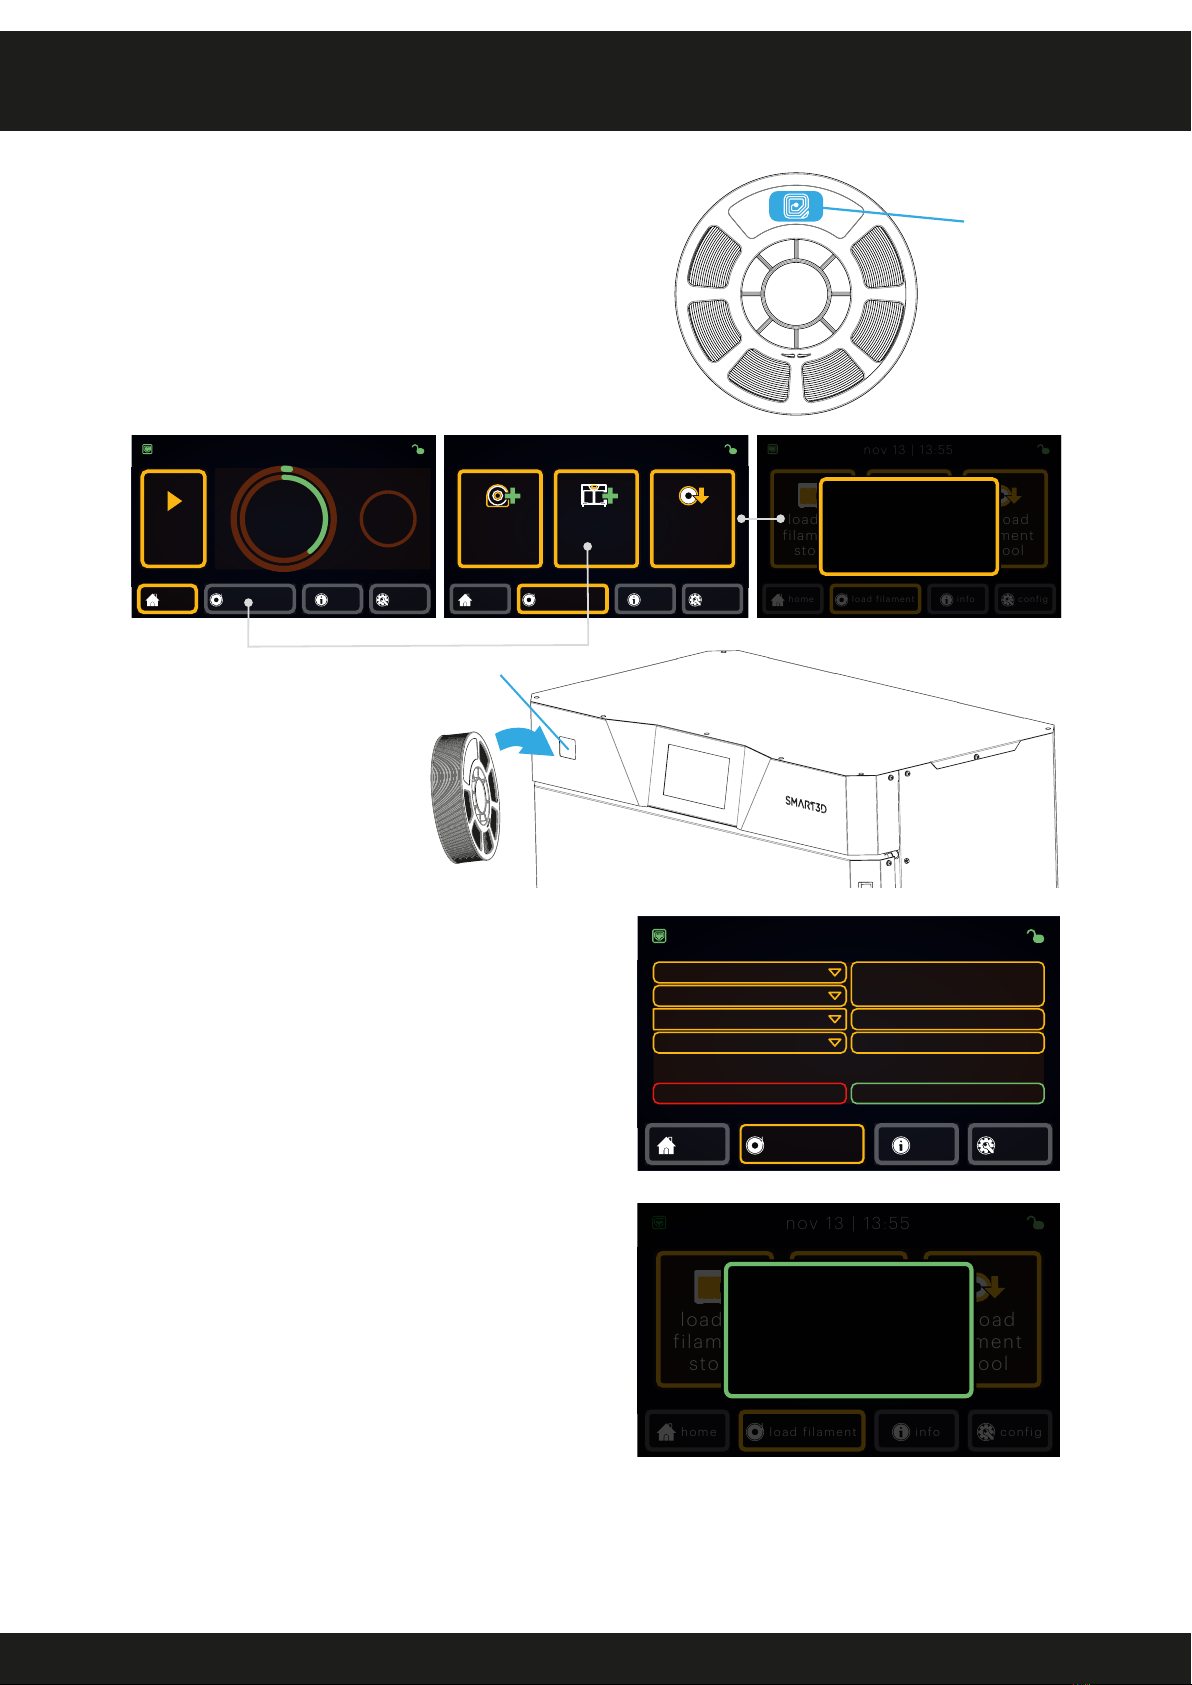
OPERATING INSTRUCTIONS
The Smart3D Filaments have their own
When the screen shows
the scanning popup,
you can take the spool
near the scanner.
should show you this screen on the right.
Once you've completed all the data, press
Dryer.
NFC Recognition
NFC Tag
Scanner
home info
nov 13 | 13:55
add
in feeder
load
in dryer
unload
spool
feeder
dryer
READY
start
drying
home info
nov 13 | 13:55
home info
nov 13 | 13:55
load in
store
load in
dryer
unload
spool
Scanning
Put the label on the
scan and wait please
home info
label’s information
Brand
Spool size
Diameter
Material Colour
KODAK
|
750g
1.75 mm
ABS
Density
Black
1.04 g/cm3
okback
home info
nov 13 | 13:55
load in
store
load in
dryer
unload
spool
The spool load
was completed
successfully
code properly.

20
OPERATING INSTRUCTIONS
Drying programs
feeder
dryer
READY
start
drying
home info
nov 13 | 13:55
network
info
custom
drying
program
dryer
info
home
nov 13 | 13:55
info
at the same time. For example, TPU needs low heat
to be dried, unlike nylon that needs high exposures
to heat. With this program you can dry these two
materials together without damaging either of
them.
Duration of the cycle: 2 hours
Generic drying
is designed for ABS only, do not put other types of
material inside the dryer when using this cycle, as
can run the risk of them ruining them.
Duration of the cycle: 3 and a half hours
ABS drying
cycle you want for your materials. The one selected will change in color to green.
home
drying programs
info
Generic
ABS
Peek
Custom program 01
Custom program 02
Custom program 03
Custom program 05
home
drying programs
info
Generic
ABS
Peek
Custom program 01
Custom program 02
Custom program 03
Custom program 05
home info
Program material ABS chamber temperature 45°C
Drying pressure 500mb Pre heating time 10’
Drying duration 40’ number of subcicles 5
activatecancel
drying programs
home info
Program material ABS chamber temperature 45°C
Drying pressure 500mb Pre heating time 10’
Drying duration 40’ number of subcicles 5
activatecancel
drying programs
home info
Program material Generic chamber temperature 45°C
Drying pressure 450mb Pre heating time 10’
Drying duration 30’ number of subcicles 4
activatecancel
drying programs
Table of contents


