SMART-AVI SIGNAGEPRO User manual


Table of Contents
Introduction ......................................................................................................................................... 3
Disclaimer Notice ................................................................................................................................. 4
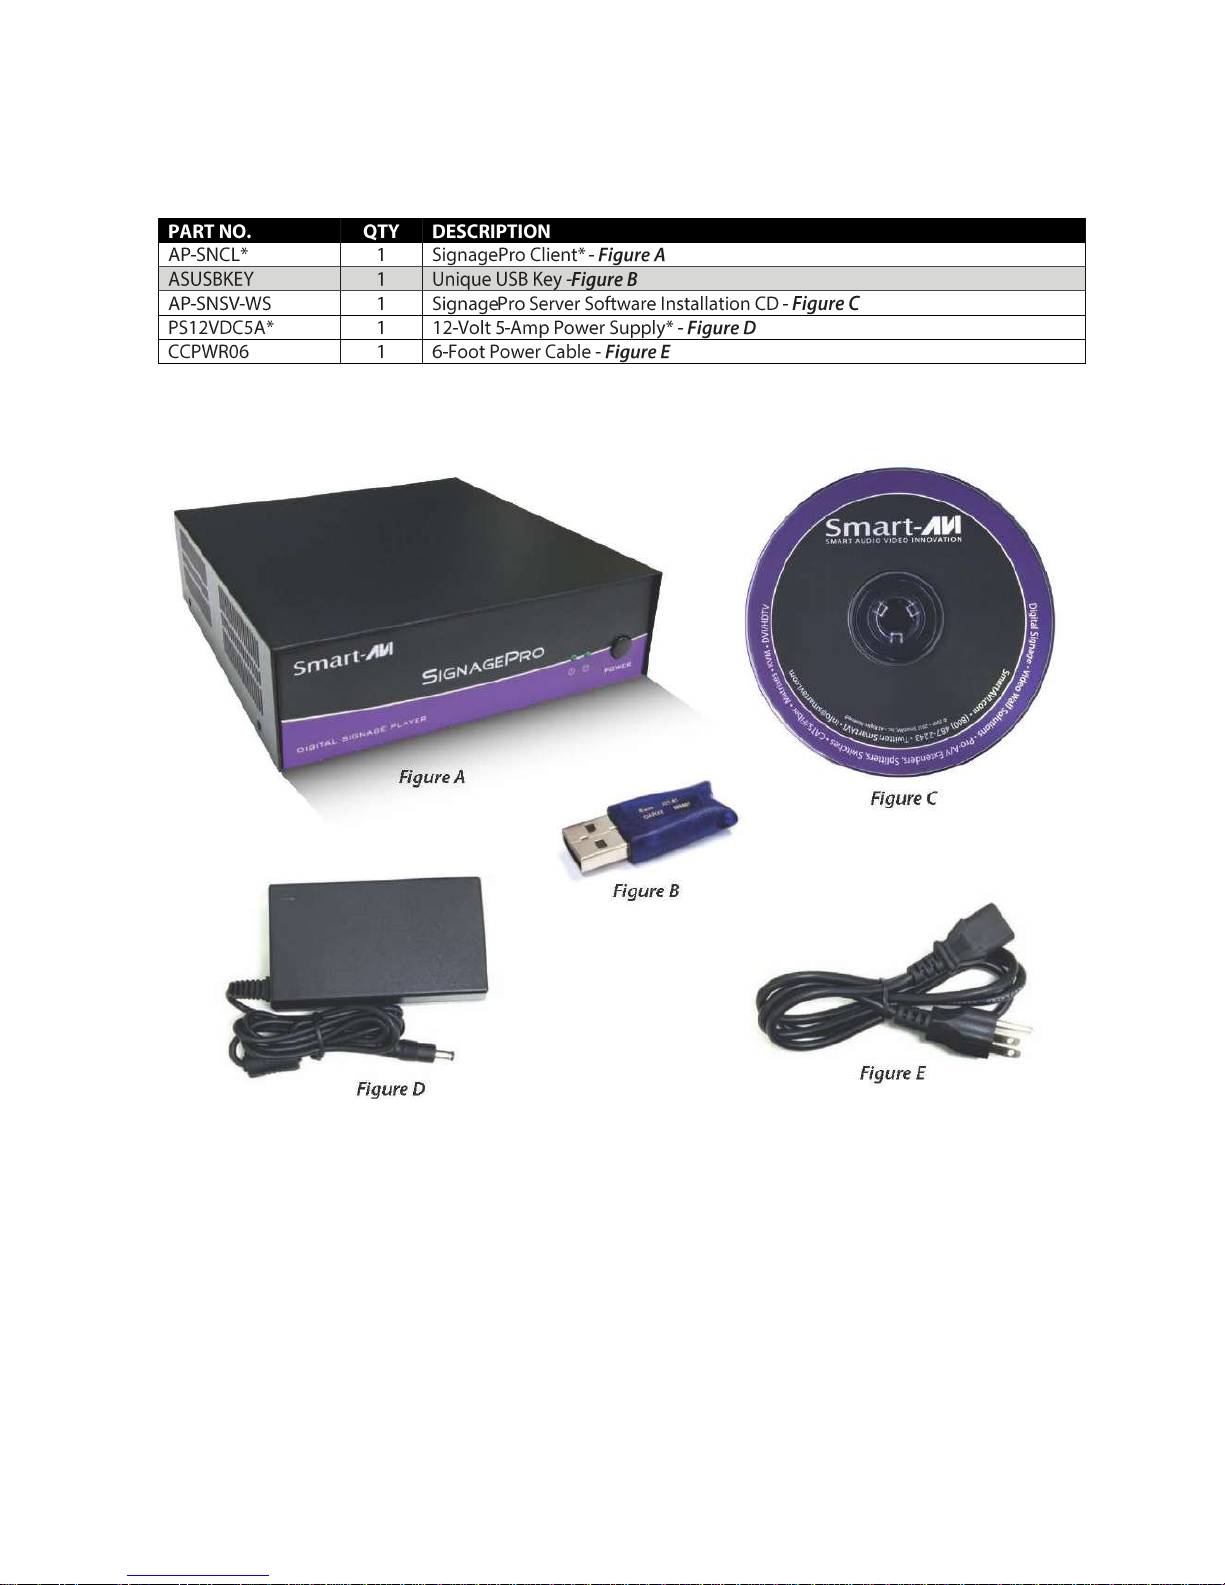
What’s in the Box? ............................................................................................................................... 5
Limited Warranty Statement ............................................................................................................... 6
Section 1 -Setting up the SignagePro Server Software
1. Getting Started .................................................................................................................... 7
2. Installing SignagePro Server ................................................................................................ 8
3. Setting up the SignagePro Client ......................................................................................... 9
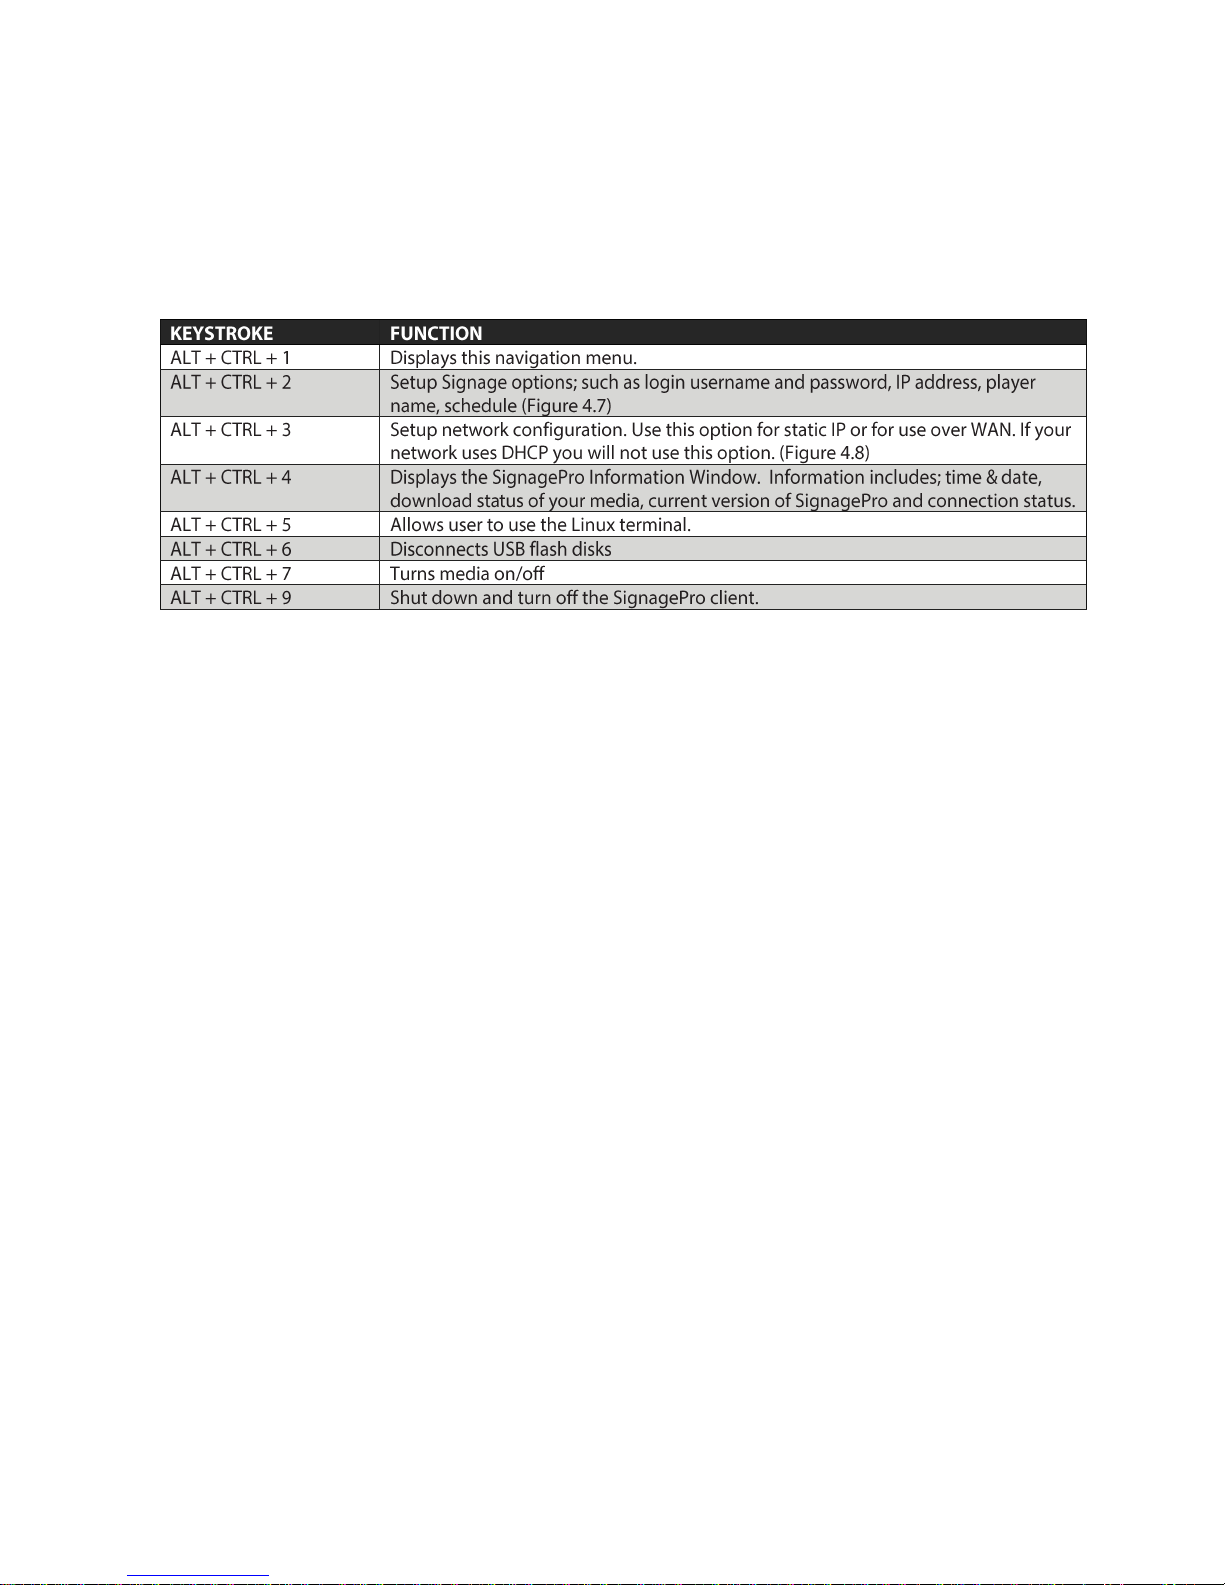
4. Navigating the SignagePro Client ...................................................................................... 10
5. Adding your company logo ............................................................................................... 14
6. Updating the SignagePro Client ........................................................................................ 17
Section 2 -Using the SignagePro Server Software
7. Running SignagePro Server Software for the first time ..................................................... 18
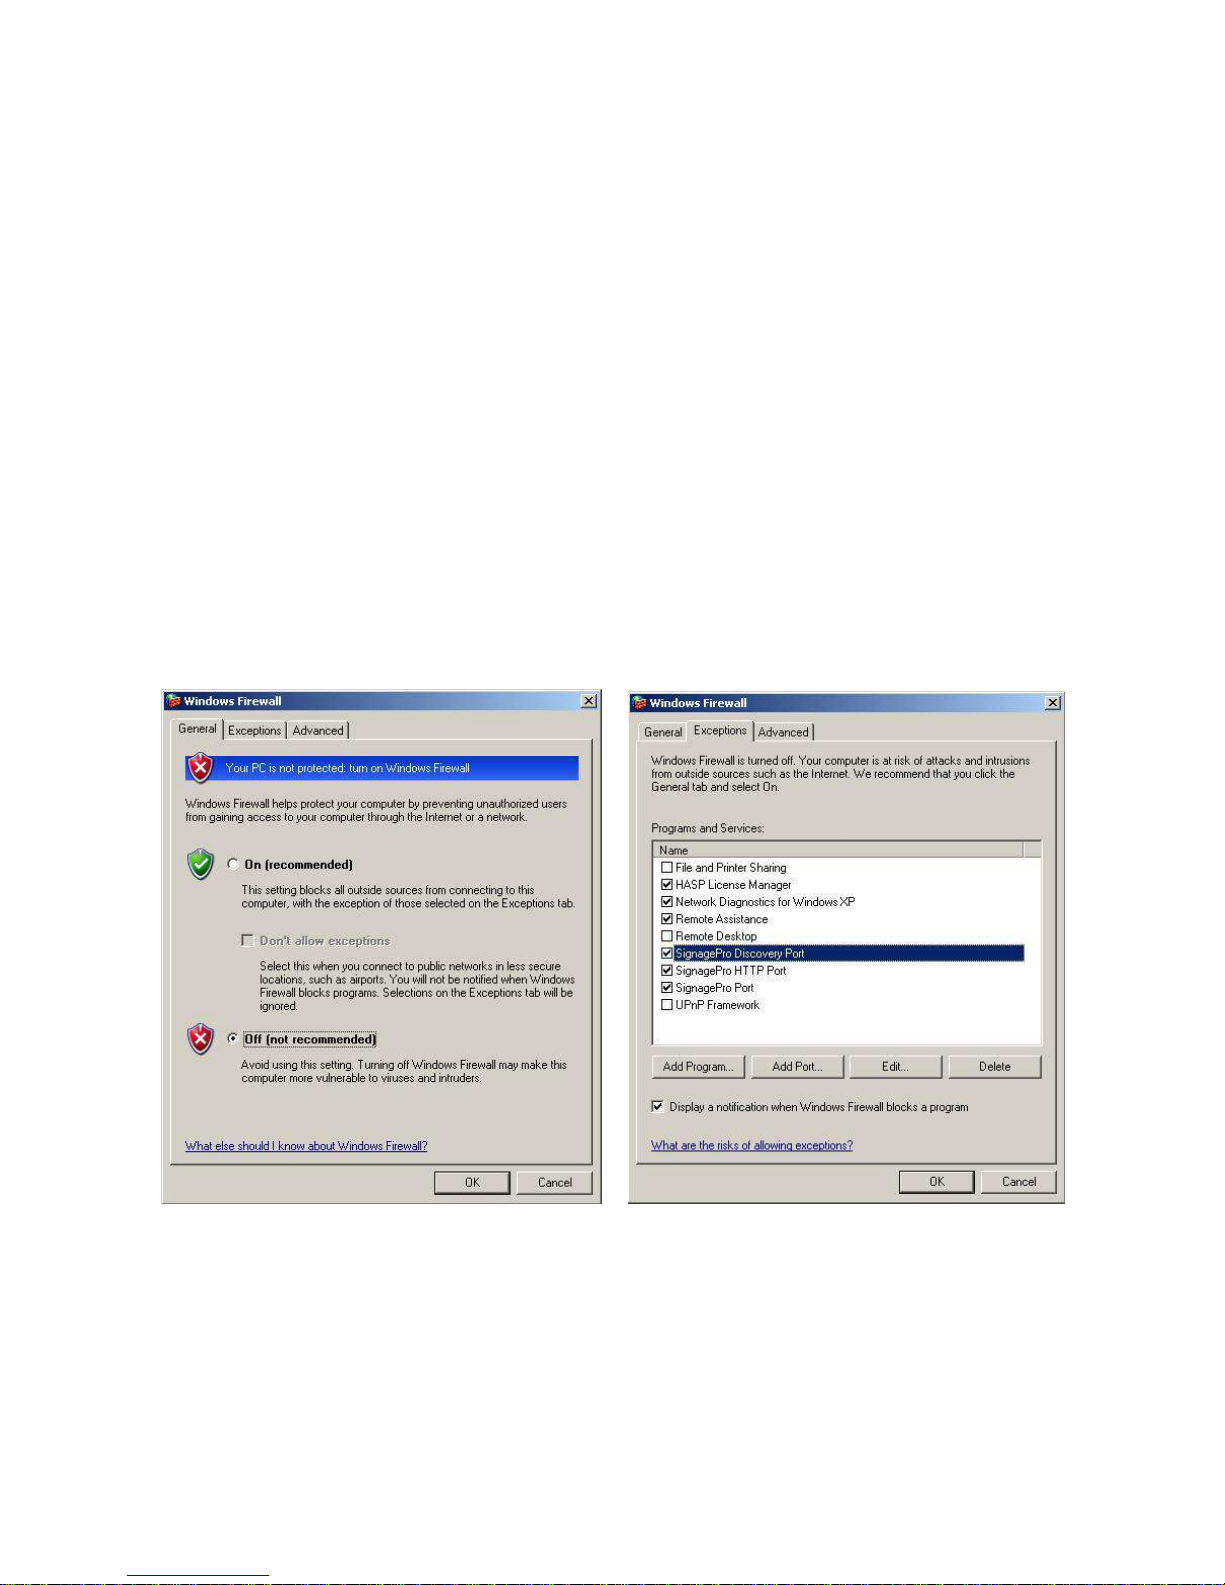
7.1 Firewall ............................................................................................................................ 19
7.2 User Manager .................................................................................................................. 20
8. Task Manager ..................................................................................................................... 21
9. Creating and working with schedules …............................................................................. 25
9.1 Super Schedules ............................................................................................................... 28
9.2 USB Schedule Support ..................................................................................................... 29
10. Template Creator.............................................................................................................. 30
11. Creeping Line Editor ......................................................................................................... 37
12. Configuring the SignagePro Client Screen Resolutions..................................................... 44
13. Registration and Activation ............................................................................................. 47
Specifications ..................................................................................................................................... 48
Server Requirements ......................................................................................................................... 48
Sample Configurations ....................................................................................................................... 49
Alphabetical Index ............................................................................................................................. 52

Introduction
Congratulations on your purchase of the SignagePro Digital Signage Solution. Please read the
instructions carefully before using.
SignagePro is a digital signage solution that creates new marketing and information sharing portals
to reach target audiences with real time information. SignagePro attracts audiences by displaying
your message using vivid, high-quality video and animation replacing traditional signs and posters.
SignagePro uses your IP network to remotely manage, control, and broadcast your information
to target audiences in specific locations across the globe. Because it uses a closed network, your
information is safe and secure.
SignagePro is capable of playing back all industry standards, such as Flash files, Video
.MPG, HTML, QuickTime, Power Point, .JPG’s, Java Applets, and more.
SignagePro is the ultimate solution that provides both hardware and software for the display and
management of your digital content. It is highly cost effective and easy to use. It is the perfect
solution for both small-scale and large-scale projects.

Disclaimer Notice
The information contained in this document is subject to change without notice. SmartAVI
makes no warranty of any kind with regard to this material, including but not limited to, implied
warranties of merchantability and fitness for particular purpose.
SmartAVI will not be liable for errors contained herein or for incidental or consequential
damages in connection with the furnishing, performance or use of this material.
No part of this document may be photocopied, reproduced, or translated into another language
without prior written consent from SmartAVI, Inc.

What’s in the Box?
* Actual part no/product may vary

Limited Warranty Statement
A. Extent of Limited Warranty
1. SmartAVI, Inc. warrants to the end-user customers that the SmartAVI product specified above
will be free from defects in materials and workmanship for the duration of 1 year, which duration
begins on the date of purchase by the customer. Customer is responsible for maintaining proof of
date of purchase.
2. SmartAVI’s limited warranty covers only those defects which arise as a result of normal use of the
product, and do not apply to any:
a. Improper or inadequate maintenance or modifications.
b. Operations outside product specifications.
c. Mechanical abuse and exposure to severe conditions.
3. If SmartAVI receives, during Applicable warranty period, a notice of defect, SmartAVI, Inc. will, at
its discretion, replace or repair the defective product. If SmartAVI is unable to replace or repair the
defective product covered by the SmartAVI warranty within a reasonable period of time, SmartAVI
shall refund the cost of the product.
4. SmartAVI shall have no obligation to repair, replace or refund unit until customer returns
defective product to SmartAVI.
5. Any replacement product could be new or like new, provided that it has functionality at least
equal to that of the product being replaced.
6. SmartAVI limited warranty is valid in any country where the covered product is distributed by
SmartAVI.

Section 1 Setting up the SignagePro Server Software
1. Getting Started
This quick setup guide will instruct you on how to install and setup the SignagePro software
onto your Server (Host PC) and how to setup the SignagePro client.
To ensure proper installation of the server software;
Please make sure you are running Windows XP Professional with Service Pack 2 or 3,
Windows 2003 or Windows Vista.
Make sure that you are logged in as the system administrator.
Turn off the Windows firewall. (see Figure 1.1 for Windows XP) You can alternately select
SignagePro under the exceptions tab. (Figure 1.2)
If you do not wish to turn off your firewall, please refer to Part 7.1 of the manual.
Figure 1.1 Figure 1.2

2. Installing SignagePro Server
SignagePro Server requires a unique USB key to be installed. You will find your key on back of the
SignagePro Server CD sleeve. In addition, you must complete the online registration for your copy of
SignagePro Server. If you do not register within the thirty-day window, your SignagePro Server
software will become disabled. A registration window will open automatically. If you wish to
register at a later date, simply select Help/Registration. For more help on registration, refer to Part
13 of the manual.
Note: For proper installation of the SignagePro Server software, you must insert the USB
protection key provided into any available USB port on your PC before you install the
SignagePro Server software. Once inserted, Windows will ask for the drivers; you may
cancel that request; drivers will be installed during installation of the software.
1. Double click on the SignagePro Server Setup executable. Read the License Agreement then
click ‘I Agree’
2. Enter in your name and organization and enter the unique serial number (IN ALL CAPS)
provided to you. Important: When entering the serial number, please make sure it is typed
with ALL CAPS, or registration will not give you a 30 day grace period. (Figure 2.1)
3. The next window will be to choose components, make sure “SignagePro Server” is checked.
(Figure 2.2)
4. Choose the installation location you would like to install the SignagePro Server. Click ‘Next’.
5. Before the installation completes, you will be asked to create a password for the
Administrator account. You must sign in as the Administrator for the first time you load the
SignagePro Manager. For more information on the User Manager, go to Section 2 of the
manual.
Figure 2.1 Figure 2.2

3. Setting up the SignagePro Client
1. Setting up the SignagePro Client
a. Connect the power supply cable to the SignagePro client and plug the cable into a
grounded power outlet.
b. Connect a USB mouse and keyboard to the USB ports.
c. Attach the VGA/DVI-D cable from the monitor or display to the VGA/DVI-D port on back
of the client.
d. Connect the SignagePro client to a router using CAT5 cable. (If you will be using a
wireless router, please refer to your router’s manual for additional information).
Press the power button to start the SignagePro client.
Turn on the display connected to the client.
2. Upon the initial reboot you may receive an error message stating that your password and
username are incorrect.
a. Click on the ‘Change Configuration’ button to setup user name and password.
i. Use the username and password you used during the SignagePro Server setup. (Step
2.5)
ii. You have the option of using any user you create in the SignagePro User Manager.
(Section 2)
iii. Once you have entered your new username and password click the ‘Apply’ button to
log onto the SignagePro client.

4. Navigating the SignagePro Client
1. Once you’ve logged in, use the keys described in Table 4.1 to navigate the various menus
and functions.
Table 4.1
2. Some of these menus include:
SignagePro Configuration Panel via ALT+CTRL+2
i. General (Figure 4.1)
Server: IP address of the SignagePro server
Username and Password
Player Name: A unique name given to identify this client on the SignagePro
Server network.
ii. System (Figure 4.2)
Monitor Control
Keyboard
Audio
Proxy: Allows your SignagePro client to connect through a proxy server.
Resolution: Configure your resolution settings without going back to the Xorg
Configuration panel
3G Internet
iii. Media (Figure 4.3)
Flash Quality: We recommend setting this to high quality for general use.
PowerPoint: If you are experiencing glitches in your PowerPoint presentations –
try changing this setting.
Video Output
oX11 (Ximage/Shm)
oX11/xv: Use this setting if you will be using the SignagePro template feature.
This also includes hardware acceleration.
Video Input: When using Video Input as a task, select the type of video input (i.e.
S-Video, Composite, Tuner)

iv. Resources (Figure 4.4)
Allows you to add your own Logos, Fonts and you can also setup the time for
new media to be downloaded.
v. Report (Figure 4.5)
Log level: Maximum, Normal or None.
Reports: Set the amount of days you would like to keep reports for.
Email Notification: Receive E-mail notifications of from logs via SMTP Server
vi. Preview
Schedules that are running on your client will be shown here.
vii. Reset (Figure 4.6)
This option will set your SignagePro client to factory default settings. All settings
and media will be erased.
Local Resources: Allows you to add your own Logos, Fonts and you can also
setup the time for new media to be downloaded.
b. Network Configuration Menu via ALT+CTRL+3
i. Wired Network (Figure 4.7)
If you are connected via CAT-5 cable, your wired connection will be shown here.
ii. Wireless Network
If you are connected via wireless dongle, your wireless connection will be shown
here.
iii. Static IP Address
If your network connection is setup through Static IPs, you can setup Static IP
connection by clicking on ‘Properties’ and checking the ‘Use Static IP’ box.
(Figure 4.8)
Figure 4.1 Figure 4.2 Figure 4.3

Figure 4.4 Figure 4.5 Figure 4.6
Figure 4.7 Figure 4.8

3. Once you have finished with your configuration click ‘OK’ to save your settings and connect
to the SignagePro Server.
4. Once you are connected, open the SignagePro Server Manager. You will see the Client.
(Figure 4.9)
Figure 4.9

5. Adding your company logo
One of the major functions of digital signage is to get your message out and to increase your
brand recognition. One of the most important aspects of your brand is your logo. Combining
your logo with informative content is one of the best ways to do this.
Each logo on the SignagePro server consists of two files; an image file and a text file. The text file
describes the placement of the logo and adds a time and date.
To enable your logo please do the following;
1. If you haven’t done so already, create an image file of your company logo. SignagePro
support the following image formats; .png, .jpg and .gif.
2. Create a text file using notepad (or comparable text editor) and insert the fields from Tables
5.2 and 5.3. See Table 5.1 for format examples.
Table 5.1
3. Save the file using the file name you used for your logo and .slogo as the extension.
Example= logoname.slogo
4. Copy the image file and the .slogo file onto your USB flash drive.
5. Insert the USB flash drive containing your logo image file and the .slogo file into the
SignagePro client.
6. Run the configuration tool by pressing ALT+CTRL+2.
7. Select the ‘Logo” tab.
8. Select logo in dialog box and click ‘Ok’
9. You can install more logos from USB flash disk pressing “Install from USB” button”.

The following table describes the different fields in the .slogo file and their meaning.
Table 5.2
You have the option of adding time and date to your logo by adding one of the following fields to
your .slogo file. (Table 5.3) See example (Table 5.1)
• • • •

Table 5.3
To uninstall a logo, select the logo you wish to uninstall and select the ‘Uninstall’ button.

6. Updating the SignagePro Client
In an effort to produce the best digital signage system on the market, we will continue to make
upgrades to our products. Starting from version v0.7.5, you can now update the client directly
from the SignagePro server.
To update to the newest version of the SignagePro client, you will need to do the following;
1. Unpack the SignagePro update file onto your server.
2. In Task manager create “Update” task and point to update.img as the task data. (Figure 6.1)
Important: update.inf should be placed in the same directory as flash.img or the update will
not work.
3. In Task manager, create a new schedule and add the update task you created in Step 2.
(Figure 6.2)
4. Right-Click the schedule and select ‘Start’ to run the update.
5. After updating, the SignagePro client will reboot automatically.
6. You may need to reconfigure client settings again.
IMPORTANT: During the update, the background on the SignagePro client will become RED.
DO NOT TURN OFF OR UNPLUG THE CLIENT during this operation. If you do so, the SignagePro client
will no longer operate and you will need contact customer support for a new system file.
Figure 6.1 Figure 6.2

Section 2 Using the SignagePro Server Software
7. Running SignagePro Server Software for the first time
1. Double click on the SignagePro Server Station Manager icon either on your desktop or start
menu.
2. You will first be prompted with a ‘Server Logon settings’ dialog box. The default IP address is
127.0.0.1. In the user name and password fields use the new Administrator user and
password you created in the installation process and click ‘OK’. (Figure 7.1)
3. Once the SignagePro Server Station Manager is loaded. You will see the following;
a. Connected SignagePro clients
b. Loopback IP. (127.0.0.1)
c. Your user name and password. Click Save Password to stay logged in. (Figure 7.2)
Figure 7.1 Figure 7.2

7.1 Firewall
SignagePro uses the TCP/IP suite to communicate between the server and client, proper
settings of your firewall and routers will be needed.
After the installation of SignagePro Manager, and the initial start of the software, you will be asked
to by the windows firewall to unblock, or keep blocking SignagePro Manager. You want to make
sure you unblock it. (Figure 7.1.1)
The port used for communication is ‘13325’ UDP and TCP. This will be used when forwarding
ports in your router, when using SignagePro via WAN.
Figure 7.1.1

7.2 User Manager
Our user manager now allows SignagePro users to manage and control their own user database.
Windows logins are no longer required. Each user created is allowed a set of permissions.
The user rights are described as followed:
•Administrator: Full access to everything, only user that is able to create and manage users.
•Task Manager: Allowed to access and control the task manager and selectable clients
assigned by the administrator.
•Station Manager: allowed to access and control the station manager.
•Client: used for the SignagePro clients to connect to the signage server only.
During the installation, you will be asked to create the administrator password. If you click ‘Cancel’,
you will be assigned default usernames and passwords. (Figure 7.2.1)
To have different users log in, always click on ‘Configuration’ then ‘Login server.’ Click ‘Save
Password’ while logged in. To log out, uncheck ‘Save Password’. (Figure 7.2.2)
Figure 7.2.1 Figure 7.2.2
Other manuals for SIGNAGEPRO
2
Table of contents
Other SMART-AVI Digital Signage manuals