manuals.online logo
Brands
  1. Home
  2. •
  3. Brands
  4. •
  5. SMART-AVI
  6. •
  7. Vacuum Cleaner
  8. •
  9. SMART-AVI H5 User manual

SMART-AVI H5 User manual

Popular Vacuum Cleaner manuals by other brands

Bissell LittleGreen Proheat 1425 Series user guide

Bissell

Bissell LittleGreen Proheat 1425 Series user guide

Panasonic MC-YL637S147-AE Service manual

Panasonic

Panasonic MC-YL637S147-AE Service manual

LG A9 Series owner's manual

LG

LG A9 Series owner's manual

Oreck Cordless Captura BK51700 Series user guide

Oreck

Oreck Cordless Captura BK51700 Series user guide

Kogan KAVACROBVWA user manual

Kogan

Kogan KAVACROBVWA user manual

Kränzle VENTOS 50 ID Use and maintenance

Kränzle

Kränzle VENTOS 50 ID Use and maintenance

NEFF N17XH10 0 Series instruction manual

NEFF

NEFF N17XH10 0 Series instruction manual

EVVO Ai35 instruction manual

EVVO

EVVO Ai35 instruction manual

DeWalt DWH200D instruction manual

DeWalt

DeWalt DWH200D instruction manual

Pontec Pondomatic Vacuum Cleaner operating instructions

Pontec

Pontec Pondomatic Vacuum Cleaner operating instructions

Cleanmaxx PC-P007E instruction manual

Cleanmaxx

Cleanmaxx PC-P007E instruction manual

RIDGID WD1685AU0 owner's manual

RIDGID

RIDGID WD1685AU0 owner's manual

Ezviz RE4P manual

Ezviz

Ezviz RE4P manual

STG global TANVAC HDV3000 Operator's manual

STG global

STG global TANVAC HDV3000 Operator's manual

Shark ROTATOR PRO COMPLETE NV550 Series manual

Shark

Shark ROTATOR PRO COMPLETE NV550 Series manual

Factory M3340 operating manual

Factory

Factory M3340 operating manual

Shop-Vac VN92 SERIES user manual

Shop-Vac

Shop-Vac VN92 SERIES user manual

Nobles 608669 Operator and parts manual

Nobles

Nobles 608669 Operator and parts manual

manuals.online logo
manuals.online logoBrands
  • About & Mission
  • Contact us
  • Privacy Policy
  • Terms and Conditions

Copyright 2025 Manuals.Online. All Rights Reserved.

CORDLESS
DIGITAL
VACUUM CLEANER
Model No. H5
Please read this manual carefully before using the product, and keep this manual safe for future reference.
Contents
··································································································P01-P08
···································································································P09-P16
Dear customers:
Thank you for choosing SmartAI Cordless Digital Vacuum Cleaner! Please
read all the operation instructions carefully before using your cleaner and
hang on to operating instructions for further reference. We know you will
love this cleaner!
We focus on creating high-quality and beautifully designed the internet of
things products that intelligently work together to provide your more easily
controlled, connected, enjoyable, wonderful life from wherever or whenever
you might be.
selas-retfalabolgIAtramSehttcatnocesaelP,esugnirudseussiynafoesacnI
service e-mail:
North America : [email protected]
Europe: [email protected]
India: [email protected]
*The products described in this document may not be exactly the same as
the actual product. Therefore, the actual product shall prevail.
SmartAI reserves the right to update the product without prior notice.
Safety Instructions
Before use this product, please exercise caution and observe the following basic rules:
1. Before using the appliance, carefully read the instructions for use and in particular the safety
warnings and follow them. Keep this manual for the entire duration of the appliance’s useful life, for
consultation purposes. Failure to follow the instructions could cause accidents and void the warran-
ty, relieving the manufacturer of all liability.
2. Before connecting the appliance, check that the mains voltage data shown on the data label
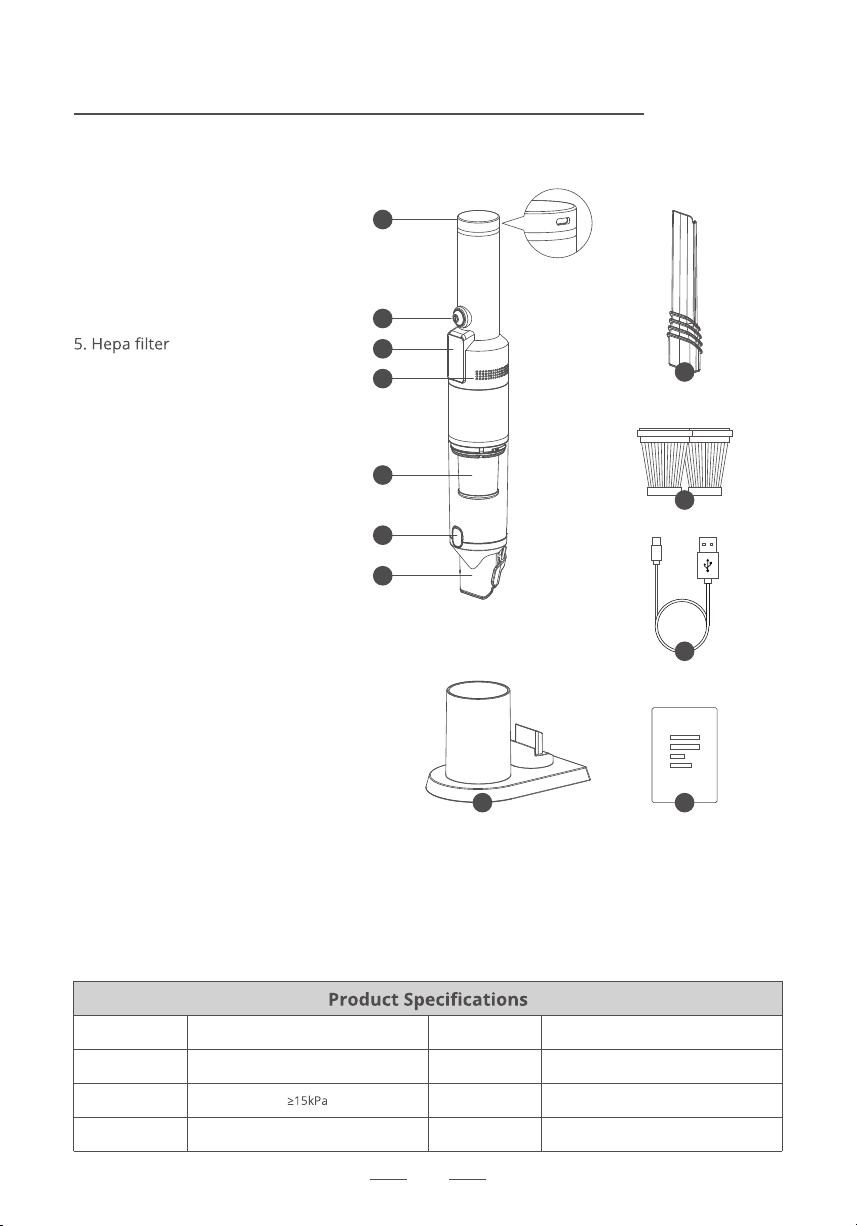
correspond to those of the local power supply. The rating label is located on the device itself.
3. Keep all packaging materials (plastic bags, cardboard, polystyrene etc.) out of reach of children as
they are potentially dangerous and must be disposed of as required by law.
4. After removing the device from its packaging, check for shipping damage and the integrity of the
supply in accordance with the drawing. In case of damage or doubt about the integrity, do not use it
and contact the authorized after sales service.
5. To reduce the risk of electric shock, do not use the product outdoors or on wet surfaces.
6. To protect yourself from electric shock, do not immerse the appliance or the cord in water or
other liquids.Do not allow the cord to come in contact with hot surfaces.
7. This product can be used by children from 8 years old and by persons with reduced physical,
mental or sensory abilities, or without experience and knowledge only if under supervision or if they
received instructions regarding the safe use of the product and understand the risks associated with
its use.
01
8. Cleaning and maintenance must not be performed by children without supervision.
9. This product is not a toy. Make sure that children do not play with the appliance.
10.This product has been designed for DOMESTIC use only, it has not been designed for industrial
or professional use.
11. Do not suction:
• Water or other liquids
• Sharp objects
• Piece of wood, chalk, cement, lime and other small granules.
repairs,contact only the authorized after sales centre.
13. Do not pull the mains cable to lift, carry or remove the plug from the socket.
14. Make sure the cable does not have knots or bends.
15. Check the condition of the electric cable. Damaged or
knotted cables increase the risk of electric shock.
order to avoid hazards. Do not use the appliance with wet hands or feet.
17. Do not put any objects in the openings.
18. Keep hair, fabrics and other objects away from the product openings as they may clog.
20. Do not use the appliance to vacuum lit cigarettes or still hot ashes.
22. Do not use the appliance towards people or animals. Always use the vacuum cleaner with the
23. WARNING: charge the product using only the power supply provided by the manufacturer.
During the charging phase, the power supply will be hot to the touch, this is completely normal and
does not constitute a defect in the appliance.
25. Keep the vacuum cleaner away from stoves and appliances that emit heat. Heat can deform and
discolour the plastic parts of the unit.
26. Always disconnect the plug from the socket when the appliance is not being charged.
27. Dispose of battery safely in accordance with current standards. The battery included in the
product cannot be removed by the user and the authorized center
28. Never use alcohol or other solvents to clean the appliance.
29. Do not insert any object into the openings or holes of the appliance. Do not obstruct the
02
12
7
8
6
5
10
3
4
2
1
1. TYPE-C charge inlet (back)
2. Switch button
3. LCD display screen
4. Air outlet
6. Dust cup release button
7. Brush
8. Charging base
9. Crevice tool
10.HEPA*2
11. USB TYPE-C cable
12. Instruction manual
back
11
9
Product category
Rated Voltage
Suction Power
Unit weight
Cordless slim vacuum cleaner
14.8V
1.17Ib
Model no.
Rated power
Dust cup capacity
Unit size
H5
120W
3.52oz
17*4.41*7.95in
03
Accessories and schematic diagram
When the machine is fully charged, it will enter the power-saving mode after 10 minutes, the
to restart.
High mode icon
Remaining
working time
Ambient lighting
Low mode icon
Charging icon
Remaining
battery capacity
04
H5 is a vacuum cleaner powered only by a rechargeable battery, i.e. it cannot be used when
connected to the mains.
1) Press the switch button to turn on the
2)Long press the switch button for 1~2s , it will
change between high power and low power.
Note: After the machine is working, the remaining
discharge time of the machine will be displayed on the
LCD screen. The battery icon will also decrease as the
battery power decreases.When the battery icon is
empty, the machine will stop working. And needs to be
recharged.
Operating instructions
Switch button
LCD display
screen
2.Use of the crevice tool:hold the crevice tool with one hand and the main unit with the other
it can be used to clean sofa, gaps etc, pull it out in the opposite direction to remove the crevice
tool.
3. Use of the base: The bottom of the
base is equipped with a non-slip mat,
which can be placed on the desktop.
Retract the suction brush as shown
above, and then insert the machine
into the base in the direction shown
crevice tool can also be stored on the
base.
05
Accessories operating instructions
Suction brush Retract it
3. Clean and assemble of dust cup: Hold the dust cup with one hand and the main unit with the
other hand, and then rotate in the direction of the arrow to remove the dust cup. The dust cup
then can be cleaned under running water, but please dry it fully and then reassemble. When
reassembling, align the positioning holes on the dust cup and the protrusions on the main unit,
and screw in the dust cup in the opposite direction to reset.
Dust cup
release button
Protrusion
Positioning hole
06
2. This machine has a one-button dust
dumping function. As shown in the left
the trash can, press the dust cup release
button, and the suction head assembly
can move along the arrow due to its own
weight, the dusts could be empty then.
Machine Cleaning and Assemble
with water, but they need to be fully dried before installation and use, otherwise it is easy to
direction opposite to the arrow.
Filter assembly
Positioning hole
Protrusion
Hepa lter hole
Hepa lter
Steel mesh
lter
07