Smart Bridge HC8301 User manual

Quick Guide
UM001-001 RF 2015/09/30
Notice:
1. Setting up your IoT camera.
2. Paring sensors to your IoT camera
3. Download full user manual:
Before Using
1 Requirement for first time setting:Camera and smart phone/tablet are under same Wi-Fi
router
2 Application for smart phone and tablet:“Cam Can”
Reset button: HC8301/HC8301A
SETUP
First Time Setup:
Wireless Setup
1. Search for “Cam Can” on Google Play or Apple Store, or scan the QR code on the next
page.
2. Plug in the adaptor to the wall and camera.
3. Wait for 15 seconds; camera will turn to AP mode when the LED blinks (green and
orange).
4. Go to “Wi-Fi settings“on your smart phone/ tablet (like No.1). Find “Cam Can-
XX:XX:XX:XX:XX:XX” and connect to it.(for iOS it is in***) The default password is
“12345678”.
5. Add camera to APP: Open “Cam can” and enter “Configuration–Wireless”(like No.2),
select the Wi-Fi router you want to use and key-in your Wi-Fi router’s password.
1.5.1 When the APP shows “Do you want to connect to Wi-Fi router”(like No.2),If
you want connect to internet, please select “Yes” and continue to 1.5.2. If not, please
select “No”. If you select no; the camera will connect your smart phone/tablet directly.
You cannot use the system out of camera’s wireless area.
1.5.2 (like No.3) Select the Wi-Fi router you want to use and key-in your password.
Wait 30-40 seconds, when the LED turns green; the setup was successful.
(No.1) (No.2) (No.3)
App Download:
Android:Apple:
Setup Video:
Quick Guide
UM001-001 RF 2015/09/30
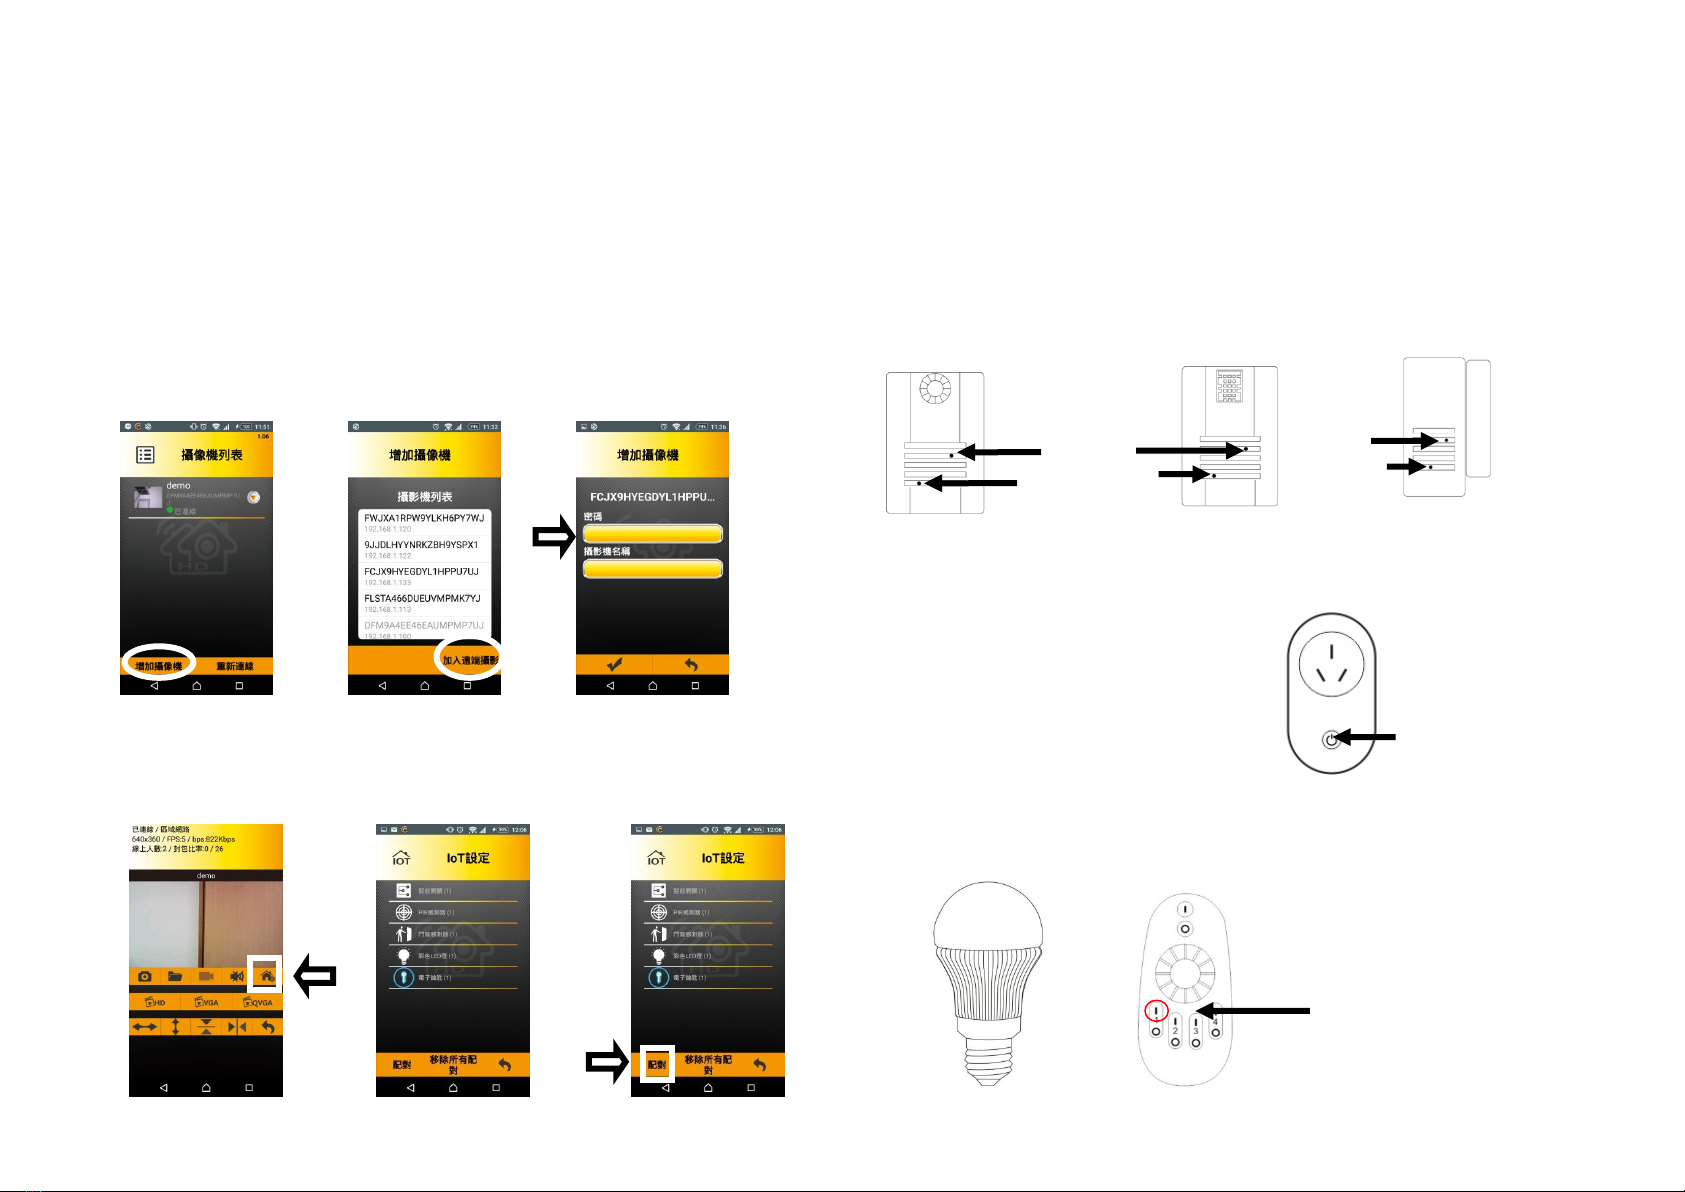
Adding New Camera on a Different Device:
1. Please install “Cam Can”.
2. Please connect to the same Wi-Fi router that the camera is connected to.
3. Open “Cam Can”; then select “Add New Camera”. (like No.4). The system will find
cameras under the same network. Match the available UID to the UID sticker under your
camera. The preset password is “admin” if you haven’t changed the password (we highly
recommend you change the password). If you have more cameras, please repeat the
steps again.
(No.4) (No.5) (No.6)
Paring sensors to your IoT Camera:
When the camera is connected to the internet, you can select the camera you want and find
the “Smart Home”icon (like No.7) to get into IoT Devices menu (like No.8).
(No.7) (No.8) (No.9)
Please put sensors nearby the camera then select “Pair”(like No.9). Hold the “Pairing
Button“ on the sensor with a paperclip for at least two seconds. If the LED on the sensor
lights on for 3 seconds, paring was successful. If not, please try again. You will see your
sensors in “IoT Devices”list when you have successfully paired the sensor. When the battery
is low, our system will send a push message notification.
While paring keep the sensor within 2 meters of the camera; you can place the sensor
where you want after pairing.
PIR Sensor Thermal/Humidity Sensor Door/Window Sensor
Please place sensors nearby the camera and select “Pair” Button (like No.9). Hold “Pair
Button“ on the smart plug for at least two seconds.
When the Smart Bulb is powered on; the first five seconds is for pairing to the remote control. The
next five seconds is for paring to the IoT Camera.
Reset Button
Pairing Button
LED
Reset Button
Pairing Button
LED
LED/Pairing Button/
Switch Button
Hold the on/”I”button of the
grouping you wish to pair the
SMART BULB to for about 3
seconds until you see the
remote flash, then turn on the
SMART BULB.
Other manuals for HC8301
1
This manual suits for next models
1


