Smart Electronic Mirage User manual


Introduction
2
Introduction
Dear customer,
Thank you for buying our HDTV cable receiver.
This user manual provides information on
•placement
•installation,
•adjustment
•operation,
•cleaning and disposal of the receiver.
Please carefully read the user manual before
operating the receiver.
We hope you enjoy your receiver.
Your
smart electronic GmbH
Industriestraße 29
78112 St. Georgen
Germany
Service hotline: +49 (0) 7724 9478-555
Telefax: +49 (0) 7724 9478-333
E-mail: service@smart-
electronic.de
© smart electronic GmbH 2014
All rights, technical changes, errors as well as printing
mistakes reserved. Any reproducing or copying of the
contents requires prior written permission from smart.
Table of Contents
Introduction.....................................................2
Table of Contents...........................................2
1User Information ......................................4
1.1 Use of this Manual 4
1.2 Signs, Symbols, Layout 4
2Product Description.................................5
2.1 Scope of Delivery 5
2.2 Receiver 5
2.2.1 Front Panel.................................5
2.2.2 Rear Panel.................................5
2.3 Remote Control 6
2.4 Save Energy 7
2.5 Guarantee 7
3Safety Instructions...................................7
3.1 Intended Use 7
3.2 Risks in Case of Intended
Use 7
3.3 Location 7
3.4 Handling of Batteries 8
3.5 Notes on Product Liability 8
4Installation of the Receiver .....................8
4.1 Connection Scheme 8
4.2 Connect TV Cable 9
4.3 Connect TV Set 9
4.4 Connect Home Cinema
System 9
4.5 Connect Data Storage 10
4.6 Connecting to a Home
Network 10
4.7 Installing a Smartcard 10
4.8 Connect Power Supply 10
4.9 Insert Batteries of Remote
Control 10
5Basic Operation......................................10
5.1 First Comissioning 10
5.1.1 Switch on Receiver ..................10
5.1.2 Upgrade of the Receiver
Software...................................10
5.1.3 Welcome..................................11
5.1.4 Auto Scan.................................12
5.2 Select Operation Mode 12
5.3 Call/Leave Menu 13
5.4 Menu Navigation 13

Table of Contents
3
5.5 Parental Lock 13
5.6 Set Time 14
5.7 Watching TV 14
5.7.1 Direct Channel Selection..........14
5.7.2 Channel Selection via
Selection Window.....................15
5.7.3 Channel Selection via Search
Function....................................16
5.7.4 Channel Information.................17
5.7.5 Recall .......................................18
5.7.6 EPG..........................................18
5.7.7 Audio Settings..........................19
5.7.8 Teletext.....................................19
5.7.9 Subtitles....................................20
5.7.10 Aspect Mode ............................20
5.7.11 Video Resolution......................20
5.7.12 Sleep Timer..............................21
5.7.13 CA Smartcard...........................21
6Media Player ...........................................21
6.1 Music 22
6.1.1 Playback...................................22
6.1.2 Playlist......................................22
6.1.3 Edit Audio Files ........................22
6.1.4 Sort Audio Files........................23
6.1.5 Playback Mode.........................23
6.2 Images 23
6.2.1 Configure a Slide Show............23
6.2.2 Showing all Images in the
Current Directory......................23
6.3 Video 23
6.3.1 Playback Video.........................23
6.3.2 Edit Video Files ........................24
6.3.3 Sorting Videos..........................24
7IP Functions............................................24
7.1 YouTube 24
7.2 Web Radio 24
7.3 Web News 24
7.4 Weather Forecast 24
8smartSTREAM - BOX2IP........................25
8.1 Preparation of the Devices 25
8.1.1 Receiver...................................25
8.1.2 Mobile Device - PC...................25
8.2 Operation 26
8.2.1 Live-TV on your TV Set ........... 26
8.2.2 smartSTREAM Mode
(BOX2IP Mode) ....................... 26
8.2.3 HDTV Streaming...................... 27
9Extended Settings and Functions........ 27
9.1 Channel Search 27
9.1.1 Automatic Channel Scan ......... 27
9.1.2 Manual Channel Scan ............. 27
9.2 RASS 28
9.3 TV Channel List / Radio
Channel List 28
9.3.1 Add Channel to Favorites........ 28
9.3.2 Provide Channels with
Password Protection (Lock
Against Unauthorized
Access).................................... 29
9.3.3 Skip Channels when
Switching from Channel to
Channel (Zapping)................... 29
9.3.4 Move Channels to Another
Channel Position:..................... 29
9.3.5 Rename Channels................... 29
9.3.6 Delete Individual Channels
from Channel List..................... 30
9.3.7 Delete All Channels................. 30
9.4 Rename Favorite Lists 30
9.5 Display Setting 30
9.6 Language Setting 31
9.7 Format of the Video Signal at
the SCART Output 31
9.8 Digital Audio Out 31
9.9 SmartLink (CEC) 31
9.10 Timer 31
9.11 OSD Setting 32
9.11.1 Undertext Display .................... 32
9.11.2 Hide OSD................................. 32
9.11.3 OSD Transparency.................. 32
9.12 Automatic Standby Function 33
9.13 Simultaneous Playback of
Picture and Sound 33
9.14 ANT IN / OUT Loop Through
(Loop Standby) 33
9.15 Software Version 33
9.16 Factory Settings 33
10 Cleaning.................................................. 34

Table of Contents
4
11 Transport and Decommissioning .........34
12 Troubleshooting .....................................35
13 Disposal...................................................36
14 Technical Data ........................................37
14.1 General Information 37
14.2 Remote Control 37
14.3 Mains Adapter 37
14.4 Connections 37
14.5 Temperature 37
14.6 Dimensions and Weight 37
15 Declaration of Conformity.....................37
Index..............................................................38
1User Information
1.1 Use of this Manual
•Please carefully read this user manual
before operating the device for the first
time.
•Please note all warnings and notes includ-
ed in this user manual.
•Consider this user manual to be an integral
part of the product, and store it at a well
accessible location.
•This user manual should also be enclosed
when handing over the device to a third
party.
•In case of loss or if you want to check new
functions, the most current version of the
user manual can be downloaded from the
internet page which is mentioned on the
extension page (menu item service).
•The software is still being further devel-
oped even after your purchase of the de-
vice. Thus, it may be possible that certain
operation steps do not fully correspond to
the user manual.
1.2 Signs, Symbols, Layout
Symbol/layout
Meaning
WARNING
Danger due to electric
shock with possible severe
bodily injury
CAUTION
Warning of possible physi-
cal damage
NOTE
Useful information and
hints
You are requested to per-
form an action.
1.
2.
Perform these steps in the
stated order.
List
italics
The various possibilities of
settings as well as image
captions are stated in
ital-
ics
.
bold
The designations of keys
are printed in bold letters.
bold & italics
Menu windows and menu
items (that often include
further hidden menu items
or direct settings) are print-
ed in
bold & italic
type

Product Description
5
2Product Description
2.1 Scope of Delivery
•HDTV cable receiver
•remote control
•2 batteries (AAA) for remote control
•user manual
2.2 Receiver
2.2.1 Front Panel
No.
Description
1
Display
4-digit display
2 LED red
Standby LED, lights if the
receiver is in Standby
mode.
3
CA-PORT
Conax smartcard reader
4 STANDBY
Switch between standby /
normal operation
5 PR-
Channel down / down-
navigation in menu
6 PR+
Channel up / up-navigation
in menu
7 LED green
Signal-LED, lights after if a
video signal is routed to the
TV set.
2.2.2 Rear Panel
No.
Description
1 USB
First connection for external
USB data storage
2
AUDIO
OUT (R)
Analog audio signal right
3
AUDIO
OUT (L)
Analog audio signal left
4
SERVICE
RS232 socket
5
ETHERNET
Network socket RJ45
6 ANT OUT
Loop-through cable signal
for connection of further
receivers, a video cassette
recorder or a TV device
7 ANT IN
Connection for TV cable
(DVB-C
0F
1
)
8 TV
SCART connection for TV
device (analog)
9
HDMI
1F
2
Digital audio and video out
10
DIGITAL
AUDIO
Digital RCA audio out
(SPDIF)
11
USB
Second connection for
external USB data storage
12
ON / OFF
Power switch (On/Off)
1DVB-C = Standard for transmission of digital TV and
radio broadcasting programs in the cable network.
This includes both programs of public and private
broadcasting. Depending on cable network provider,
receiving of programs of private stations can be
subject to payment of a fee.
2High Definition Multimedia Interface; interface for
fully digital transmission of audio and video data.

Product Description
6
2.3 Remote Control
No.
Key
Description
1
V-MODE
Switch aspect mode
2
Switch between operational
and standby mode.
3
AUDIO
Selection of audio format
4
IPTV
Not Used
5
1 - 9
Direct channel selection
6 0
Select playback format of
media player
7
FIND
Call of channel search function
8
PR+
Channel + or up-navigation in
menu
PR-
Channel - or down-navigation
in menu
No.
Key
Description
Volume + or menu navigation
to the right
Volume -or menu navigation
to the left
OK/LIST
Display channel list / confirm
menu item
9 EPG
Call of EPG (Electronic Pro-
gram Guide)
10
INFO
Display information on current
channel
11
Not used
12
Play (media player)
13
Fast rewinding
14
Fast forwarding
15
Red function key
16
Green function key
17
Mute
18
BOX2IP
Call of Box2IP mode
19
TV/RADIO
Switch between TV and radio
mode
20
PAGE+
10 entries up in menu / chan-
nel list
21
PAGE-
10 entries down in menu /
channel list
22
PR
Switch of previously selected
channels
23
FAV
Call list of favorites
24
MENU
Call main menu
25
EXIT
Exit menu or menu item
26
TXT
Display / hide teletext
27
Stop playback
28
Pause playback
29
Slow forwarding – slow motion
30
Slow rewinding
31
Blue function key
32
Yellow function key
Safety Instructions
7
2.4 Save Energy
The receiver is equipped with particularly
energy-saving electric and electronic compo-
nents. Furthermore, a sophisticated energy
management helps to save energy:
Thus, energy consumption during Save Energy
Standby Mode is reduced to less than
0.5 Watt!
2.5 Guarantee
The warranty of the HDTV cable receiver of
smart electronic GmbH corresponds to the
legal regulations at the time of purchase.
3Safety Instructions
3.1 Intended Use
The HDTV cable receiver is intended for private
receiving of encrypted and unencrypted digital
cable television (DVB-C). It is exclusively in-
tended for such purpose and must be used
exclusively for such purpose.
Any other use is deemed to be unintended use.
3.2 Risks in Case of Intended Use
CAU-
TION!
Humidity, wrong mains volt-
age and/or wrong mains fre-
quency, lightning stroke or
mechanical overload may
cause malfunction of or dam-
age to the device.
Ensure that the receiver (in
particular the mains plug)
and the remote control are
not exposed to any humidi-
ty. Example: Do not place
filled flower vases or similar
onto the receiver.
Only connect the receiver to
175…250 V ~, 50/60 Hz.
Disconnect mains plug in
case of thunderstorms or
malfunction.
Do not place heavy items
onto the receiver.
Do not bend or squeeze the
cable.
WARNING!
Risk of electric shock when
contacting mains voltage.
Damage to housing, mains
cable or improper repair
may result in contact to
mains voltage.
Do not place heavy items
onto the receiver.
Do not bend or squeeze the
cable.
Repairs of plug, cable or
receiver should only be per-
formed by qualified special-
ists.
3.3 Location
Place the receiver onto a solid and level
surface.

Installation of the Receiver
8
Protect the receiver from humidity, heat,
dust and dirt.
Do not place items filled with liquid, e.g.
flower vases, onto the receiver.
Protect the receiver from dripping and
splash water.
Do not place burning items, e.g. burning
candles, onto the receiver.
Ensure sufficient ventilation (ventilation
slots must not be blocked): the receiver
should have a distance of at least five cen-
timeters to its surrounding elements on all
sides.
Ensure that the ventilation openings are
not covered by objects such as newspa-
pers, table cloths, curtains etc.
Only operate the receiver in moderate
climate (not in tropical climate).
Place the receiver so that the mains plug
can be disconnected at any time, corre-
spondingly disconnecting the device from
the mains.
If the device is transported from
cold to hot environment, then
condensing humidity may build
up in the device.
Do not connect the device, but
leave it switched-off for some
hours.
3.4 Handling of Batteries
•Batteries should always be out of chil-
dren's reach.
•Leaking batteries cause damage to the
environment and the remote control.
•Batteries should not be exposed to ex-
treme heat, e.g. sunlight, fire etc.
Dispose of the batteries in accordance with
the applicable legal regulations (see chap-
ter Disposal, page 36).
3.5 Notes on Product Liability
In the following cases, the intended protection
of the device may be limited. Then, liability
regarding function of the device correspond-
ingly passes over to the operator:
•The device is not used in accordance with
the user manual.
•The device is used out of the field of appli-
cation as described above.
•The operator performs unauthorized
changes of the device.
4Installation of the Receiver
CAUTION!
First connect the receiver
to the cable connection
and any other devices be-
fore connecting the mains
plug to the power outlet.
Please also note the user
manuals of the other de-
vices.
4.1 Connection Scheme
default connection
optional connection
Home network

Installation of the Receiver
9
4.2 Connect TV Cable
Connect the TV cable to the receiver con-
nection ANT IN.
Further receivers can be connected at the
connection ANT OUT. The signal is looped
through from input ANT IN.
4.3 Connect TV Set
As stated in the connection scheme, the re-
ceiver offers various possibilities to connect TV
set and receiver. The possibilities applicable to
you depend on the connection possibilities of
your TV set.
If your receiver is in sleep mode
(deep standby) or the device was
disconnected from power (via pow-
er switch or by pulling the plug),
there is no or just a weakened signal
at ANT OUT.
The TV set provides
of an HDMI connec-
tion:
The TV set does not
provide of an HDMI
connection:
Connect TV set
and receiver by
using an HDMI
cable.
Connect TV set
and receiver by
using a SCART
cable.
If your TV set offers both possi-
bilities then always choose con-
nection via HDMI cable.
This ensures best possible au-
dio and video quality with digital
signals.
4.4 Connect Home Cinema System
To improve audio playback, you can connect
to the receiver - additionally to the TV set - also
a multichannel home cinema system or a hi-fi
system. There are various possibilities for
connection. Your type of connection depends
on the connection possibilities of your home
cinema system.
a.
Your home cinema system
is able to loop through an
HDMI signal, i.e. HDMI
connection for receiver
and HDMI connection for
TV set.
Receiver
TV set
Connect the home cine-
ma system and the re-
ceiver by using an HDMI
cable as well as home
cinema system and TV
set by using an HDMI ca-
ble.
b.
Your home cinema system
can process digital audio
data – connection for digital
data is present.
DIGITAL
AUDIO
Connect home cinema
system and receiver by us-
ing an RCA cable.
c.
Your home cinema system
cannot
process digital
audio data – no connec-
tions for digital data pre-
sent
Connect the home cine-
ma system and the re-
ceiver by using a 2-pole
RCA cable (stereo).

Basic Operation
10
If your home cinema system (hi-
fi system) supports HDMI con-
nection, then use such connec-
tion.
This ensures best possible
audio and video quality with
digital signals.
4.5 Connect Data Storage
Connect a data storage device (USB stick
or hard drive with USB connection) at the
USB connector to be able to access
MPEG, MP3, JPG or other media data files.
You can connect respectively one data
storage to each of the two connectors.
4.6 Connecting to a Home Network
In order to connect the receiver to the
internet (www) or to a home network, con-
nect the receiver’s ETHERNET socket with
a network cable to the appropriate inter-
face of your home network.
See section 8.1.1 on page 25 to
learn how to configure a wired
LAN.
4.7 Installing a Smartcard
If you want to watch scrambled programs,
put a Conax smartcard into the Conditional
Access (CA) slot at the receiver’s rear pan-
el.
For more info about smartcard see
section
CA Smartcard
.
4.8 Connect Power Supply
When all devices are properly connected to
the receiver you can connect the mains
plug to the power outlet.
4.9 Insert Batteries of Remote Control
This describes the steps for inserting new
batteries of the remote control or for replac-
ing empty batteries:
1. Open the battery compartment on the
bottom side of the remote control. Remove
the cover of the battery compartment.
2. Place the two batteries 1.5 V (type: AAA).
Ensure correct polarity!
3. Close the battery compartment
Replace the batteries if certain
remote control functions are not
performed any more or are per-
formed incorrectly.
When replacing batteries, al-
ways ensure that all batteries
are replaced.
5Basic Operation
This chapter describes the required steps to be
able to use the offer of radio and TV channels
provided via wide-band cable2F
3.
5.1 First Comissioning
5.1.1 Switch on Receiver
1. Switch on all connected devices.
2. Ensure that the correct AV input is selected
at the TV set (i.e. that the signals from the
receiver are displayed).
3. Ensure that the correct audio input is
selected at the connected home cinema or
hi-fi system.
4. Switch on the receiver by using the power
switch (on the rear panel of housing) (I,
ON).
5.1.2 Upgrade of the Receiver Software
The operation software of your receiver will be
updated via the USB port.
3The radio and TV programs available via wide-band
cable depend on your respective cable network
provider.

Basic Operation
11
1. Search for the upgrade file on the internet
page which is mentioned on the extension
page (menu item service) and save it to a
USB data storage.
2. Unpack the file with the ending .abs and
copy it to the USB data storage.
Please note that the upgrade file
(*.abs) is copied directly to the root
directory of the USB data storage
(no subdirectory)!
3. Connect the data storage to your receiver.
4. In the menu
Tools
, select the submenu
Upgrade by USB
and press the OK key.
5. At
Upgrade Mode
, select the upgrade
mode
All code
by using the keys
and .
6. At
Upgrade File
, select the file copied in
step 2.
7. Select the
Start
button and confirm by
pressing OK.
The message on the right will be displayed.
The upgrade will be performed after selecting
Yes
by using the keys / and
pressing OK. Then, the receiver will automati-
cally perform new start.
5.1.3 Welcome
After first switching-on or after resetting the
receivers, various windows will open:
The default
Language (Sprache)
is
Deutsch.
The default
Country (Land)
is
Deutschland.
Ensure that the entries are correct; you
may change the values, if required.
5.1.3.1 Deutschland - Germany
If you keep
Deutschland
your channel list is
sorted and also updated during subsequent
operation using RASS.
5.1.3.1.1 RASS
Your receiver is equipped with RASS (Receiver
Automatic Sorting System).
Today, in the networks of the various cable
operators, a large number of television and
radio channels in digital form can be received.
When you first install your receiver, RASS
ensures that these big number of channels are
stored in the channel list on your receiver in a
defined order.
Normally, during a channel scan incorrect data
are not deleted (for example, no longer fed
channels), and new channels usually added
just "behind", so that you have to reprogram
your channel list.
With RASS the channel list will always be up to
date, even if new channels are added or if
there are other changes.
5.1.3.1.2 RASS Works as Follows:
1. A RASS list is installed on the receiver
already in the factory. This list is processed
during the initial installation after the
search, i. e., the found channels are stored
in a predefined order.
Basic Operation
12
2. Occasionally it happens that cable opera-
tors feed a new channel, or remove any ex-
isting channels from their network. From
this reason it is important that the channel
list is kept up to date. Therefore, your re-
ceiver checks each time that you turn off
your receiver (in standby mode), if there is
a RASS update. If not, the receiver is com-
pletely switched off after a certain time,
then he goes into the power saving mode
(Deep Standby).
3. However, if the receiver determines that a
new RASS-update is available, this will be
loaded. Thereafter, the receiver will also
turn off completely.
4. Next time you turn on the receiver, you will
get a message: "RASS: It is recommended
to perform an automatic tuning". Then you
have the choice between
OK
and
Cancel
.
−If you select
OK
, the receiver makes a
complete cable-scan and the channels
get re-sorted using the new RASS list.
−If you select
Cancel
, the receiver is
started normally, no scanning is done
and the above message will even not
appear during the next turning on. You
can always achieve a re-sorting of the
channels based on the current RASS
list by starting manually a full scan.
5.1.3.2 Denmark, Sweden or Norway
If you select the countries Denmark, Sweden or
Norway, Max NorDig, a special kind of LCN
will be used during creation and updating your
channel list. LCN is an acronym for "Logical
Channel Numbering", which means that a
channel list given by the cable TV provider can
automatically be loaded into the receiver (and
therefore be updated at any time).
5.1.3.3 All Other Countries
For all other countries there is no special sort-
ing of the channel list. In case of a new channel
assignment it’s recommended to perform a
new channel search (section 9.1.1, page 27).
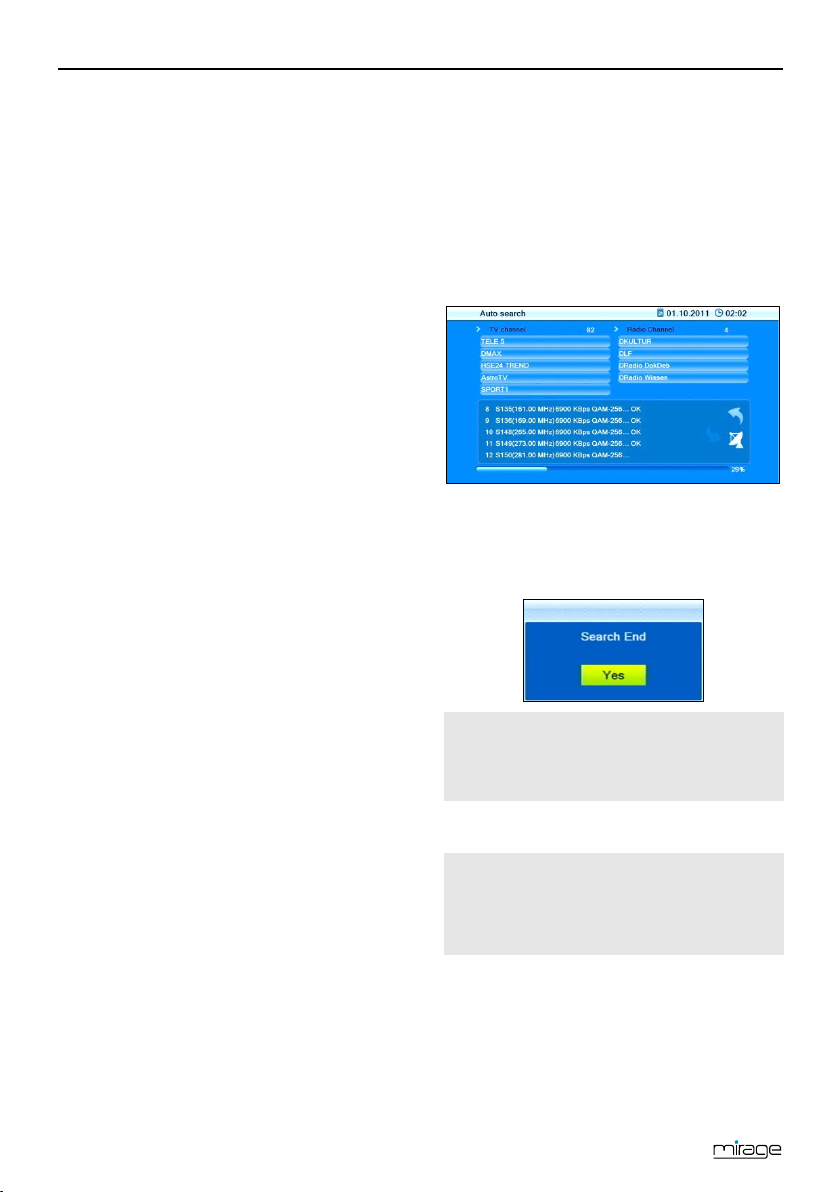
5.1.4 Auto Scan
Using the keys PR+ and PR, go to the
button
Start
and press OK to start auto-
matic channel search.
The second window of the installation process
displays the automatic channel search. The TV
cable is scanned for any available channels.
Such search then creates the channel lists
TV
Channel
and
Radio Channel
.
1. After end of search, please confirm the
corresponding message by pressing OK.
2. Leave the menu by pressing the EXIT key
until the screen shows the TV picture.
The menu item
Auto
search
can always be accessed via the
menu
Installation
.
5.2 Select Operation Mode
TV is the operation mode after
first switching-
on of the receiver
(or after restoration of factory
settings).
You can select between the operation
modes TV (TV channels) and RADIO (radio
channels) as follows:
Press the key TV/RADIO on the remote
control.
B
asic Operation
13
Press again the key TV/RADIO to return to
the previous operation mode.
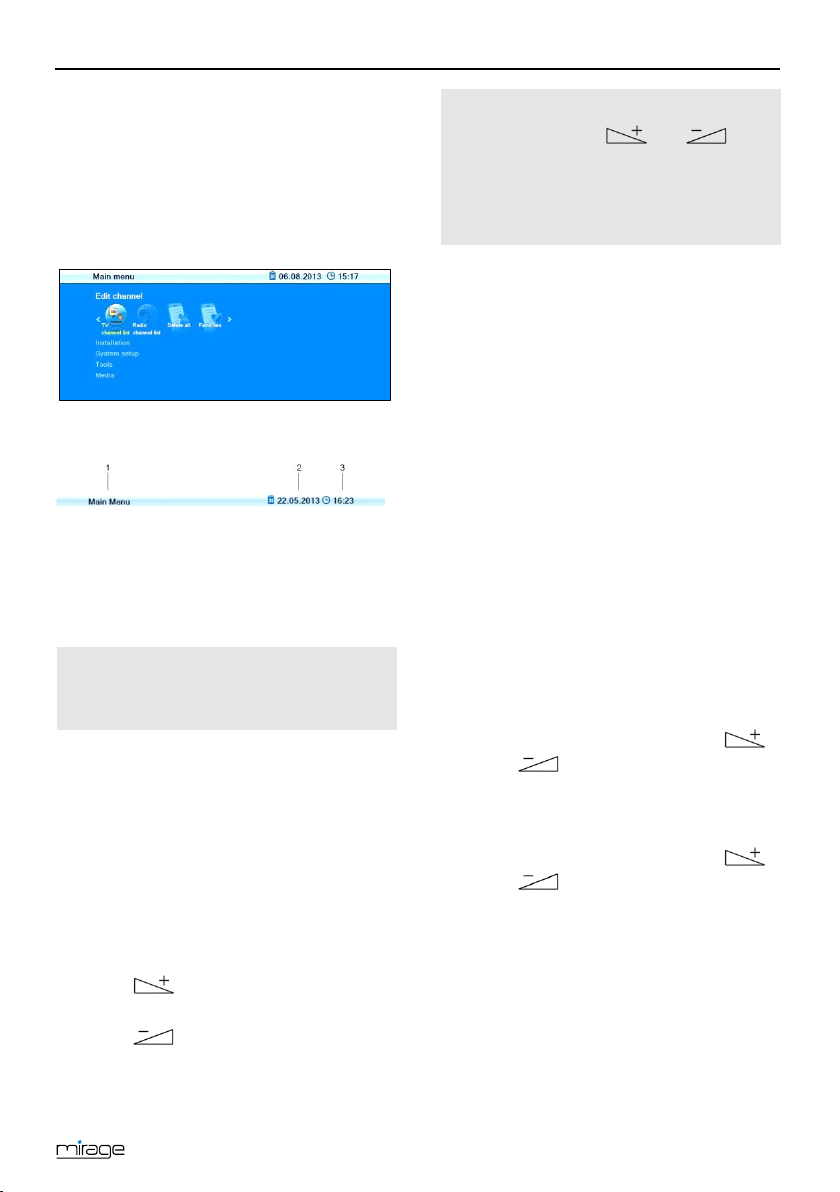
5.3 Call/Leave Menu
To call the menu, press the key MENU (of
the remote control or at the receiver).
The menu is called.
The following is displayed in the headline of the
various menu windows:
1 Name of menu window
2 Current date
3 Current time
Press the EXIT key to leave the menu or to
go back one step.
In could be possible that you have
to press EXIT several times to go
back to TV mode.
5.4 Menu Navigation
The menu items with the settings for TV and
radio can be respectively accessed in the two
operation modes TV and Radio.
For menu navigation, you can use both the
keys at the receiver as well as the remote
control:
Press PR+ to select the menu item above.
Press PR-to select the menu item below.
Press to change resp. increase the
selected value.
Press to change resp. decrease the
selected value.
Instead of changing a value by us-
ing the keys and , with
many menu items you can also
press the OK key, select a new val-
ue from the list, and confirm such
value by again pressing the OK key.
Active menu items are color-marked.
Although most settings for TV operation are
made, you can also make some further set-
tings via the menu.
5.5 Parental Lock
In the submenu
Parental Lock
you can lock
access to certain menus by using a PIN (e.g.
for protection of your settings) or block selec-
tion of certain channels by using a PIN.
Access the submenu
Parental Lock
as fol-
lows:
1. Press the MENU key.
2. Select the menu
System setup
.
3. Select
Parental lock
and confirm by
pressing OK.
After entry of password, you may
−set if access to the submenus is pro-
tected by password,
by selecting the
Menu lock
and select-
ing
Off
or
On
by using the keys
or ;
−set if certain channels are to be locked
by a PIN,
by selecting
Channel lock
and select-
ing
Off
or
On
by using the keys
or ; or
−change the password:
Select the field
New Password
.
Enter a new password.
Go to the field
Confirm Password
.
Again enter the new password.

Basic Operation
14
Predefined, both the menu and the
program lock are
on
. The default
password is
0000
.
4. Press OK to save your changes and to
leave the submenu.
5. Leave the menu by pressing EXIT until the
screen shows the TV picture.
Instead of completely leaving the
menu, you can also further stay in
the menu - or in the submenu - to
perform further settings.
5.6 Set Time
Reasonable operation of the receiver requires
setting of system time. By default, the receiver
is set to
GMT
3F
4usage
, i.e. date and time are
taken from the received signal. Time zone is
set to GMT + 1 hour (+ 1:00) by default. Re-
quired changes can be made in the submenu
Local Time Setting
:
1. Select the menu
System setup
(see
above).
2. Select the submenu
Local Time Setting
and confirm by pressing OK.
3. Select the item
GMT usage
and switch on
or off
GMT usage
by using the keys
or .
On
= automatic time setting via cable sig-
nal is activated.
Off
= automatic time setting via cable sig-
nal is deactivated.
It is recommended to keep the pre-
setting (
GMT usage
On
).
4. Select the item
GMT offset
and select your
time zone by using the keys or
; for example, the time zone of Ger-
many, Austria and Switzerland is
GMT
+1:00
.
4GMT = Greenwich Mean Time
5. Select the item
Summer time
and switch
Summer time
Off
or
On
by using the keys
or .
Please verify the pre
settings
and correct them, if required.
Please also consider corre-
sponding change of those set-
tings.
6. If automatic time setting (
GMT usage
) is
switched off, then date and time should be
manually entered:
For this, select the item
Date
, select the
position to be changed by using the keys
or , and enter the current date
by using the numeric keys. Then, select the
item
Time
, select the position to be
changed by using the keys or ,
and enter the current time by using the
numeric keys.
7. Leave the menu by pressing EXIT until the
screen shows the TV picture.
5.7 Watching TV
You have several possibilities to select a chan-
nel:
•Direct channel selection;
•Channel selection via selection window;
and
•Channel selection via search function;
as explained in the three following sections.
5.7.1 Direct Channel Selection
Select the desired channel by using the
keys PR+ and PR-.
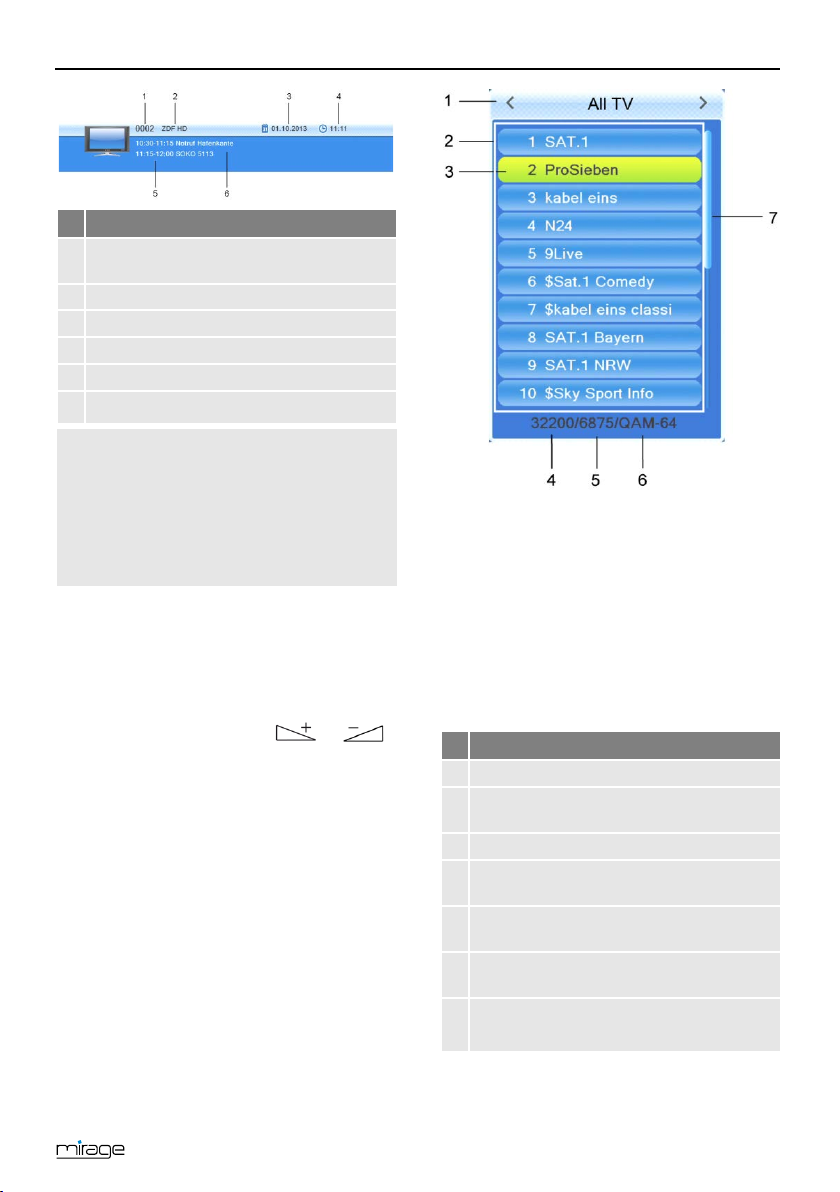
With each change of channel, an information
window with information on the current chan-
nel will be displayed:
Basic Operation
15
No.
Description
1
Channel number of current channel in
current channel list
2
Channel name of current channel
3
Date
4
Time
5
Name of next program
6 Name of current program
Press the INFO
key to call this
window at any time.
Set display time at
OSD
timeout
.
Press EXIT
two times to close
the information window.
5.7.2 Channel Selection via Selection Win-
dow
1. Press the OK key to display a selection
window with all available channels (2).
2. Select the channel list with the desired
channel by using the keys or
(1)
or
Press the FAV key to select from your fa-
vorite lists.
3. Select the channel to be displayed (3) by
using the keys PR+ and PR-for single
steps or PAGE+and PAGE-for steps of
ten, and confirm your selection by pressing
OK.
The channel will be correspondingly
switched.
4. Press OK or EXIT to close the selection
window.
Channel selection window:
No.
Description
1
Display of current channel list
2
Channels included in the current channel
list
3
Marked channel
4
Frequency of current channel (example:
33800 is 338.00 MHz)
5
Symbol rate of current channel (in
megasymbols/second)
6
Modulation of current channel (QAM-16,
QAM-32, QAM-64, QAM-128, QAM-256)
7 Scroll bar – shows position of current
channel in channel list
Basic Operation
16
5.7.3 Channel Selection via Search Function
The channel lists can be quite comprehensive;
correspondingly, the receiver offers various
possibilities to filter the list, search for channels
in the list, or sort the list:
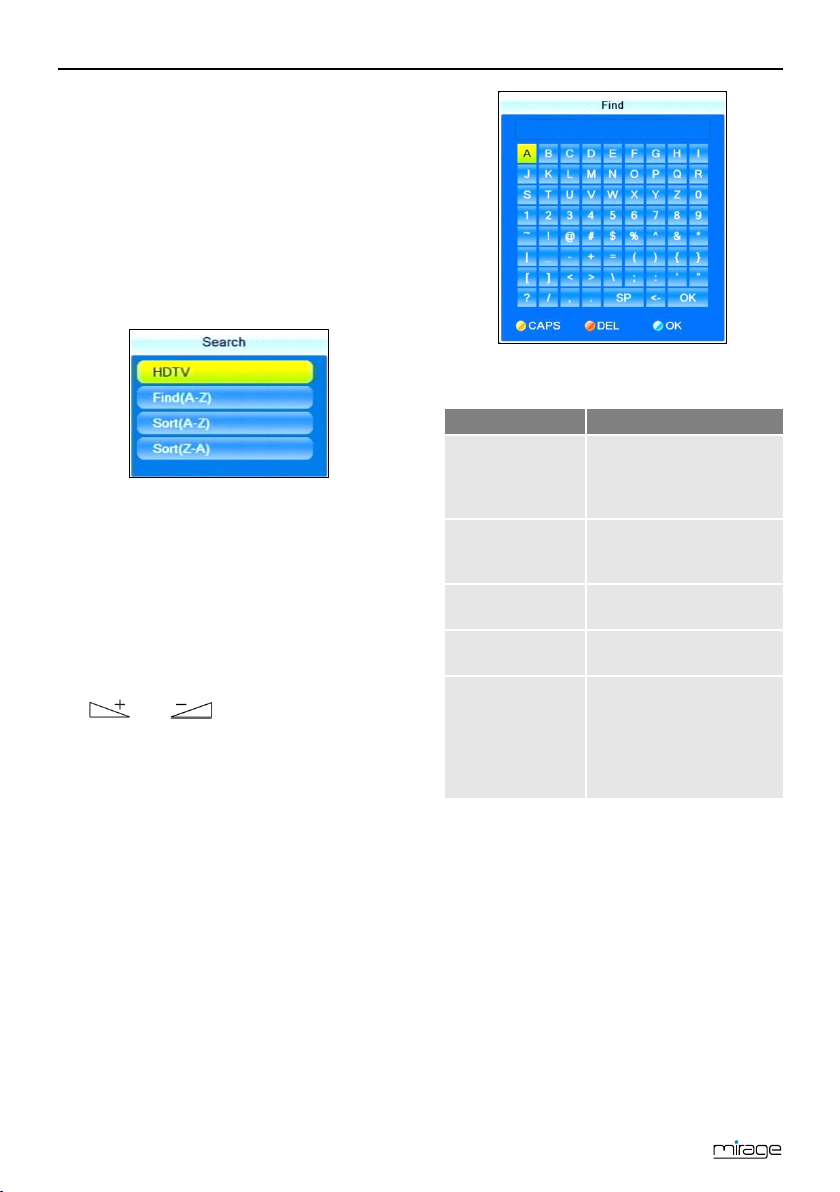
Press the FIND key to open the window
Search
.
Select one of the offered options by using
the keys PR+ and PR-, and confirm by
pressing OK.
5.7.3.1 HDTV Filter
Select
HDTV
to only show HDTV channels
in the channel selection window.
Use the steps as described in section 5.7.2
on page 15 to select a channel.
5.7.3.2 Find Channels (by Alphabet)
1. Select
Find(A-Z)
, to open the window
Find
.
2. Select a character by using the keys
and as well as PR+ and PR-
and respectively confirm by pressing OK to
accept such character in the field for the
name or part of the name of the desired
channel.
Additionally to letters and numbers, there are
also special buttons:
Button
Meaning
CAPS
(yellow function
key)
Changes between up-
per-case and lower case
(only effective with let-
ters).
DEL
(red function
key) or <-
Deletes the last entered
character.
OK (blue
function key)
Closes the windows.
SP
Enters a space charac-
ter.
?
The question mark as
first character has a
wildcard function. Ex-
ample: "?R" searches for
all channel names that
include an "R".
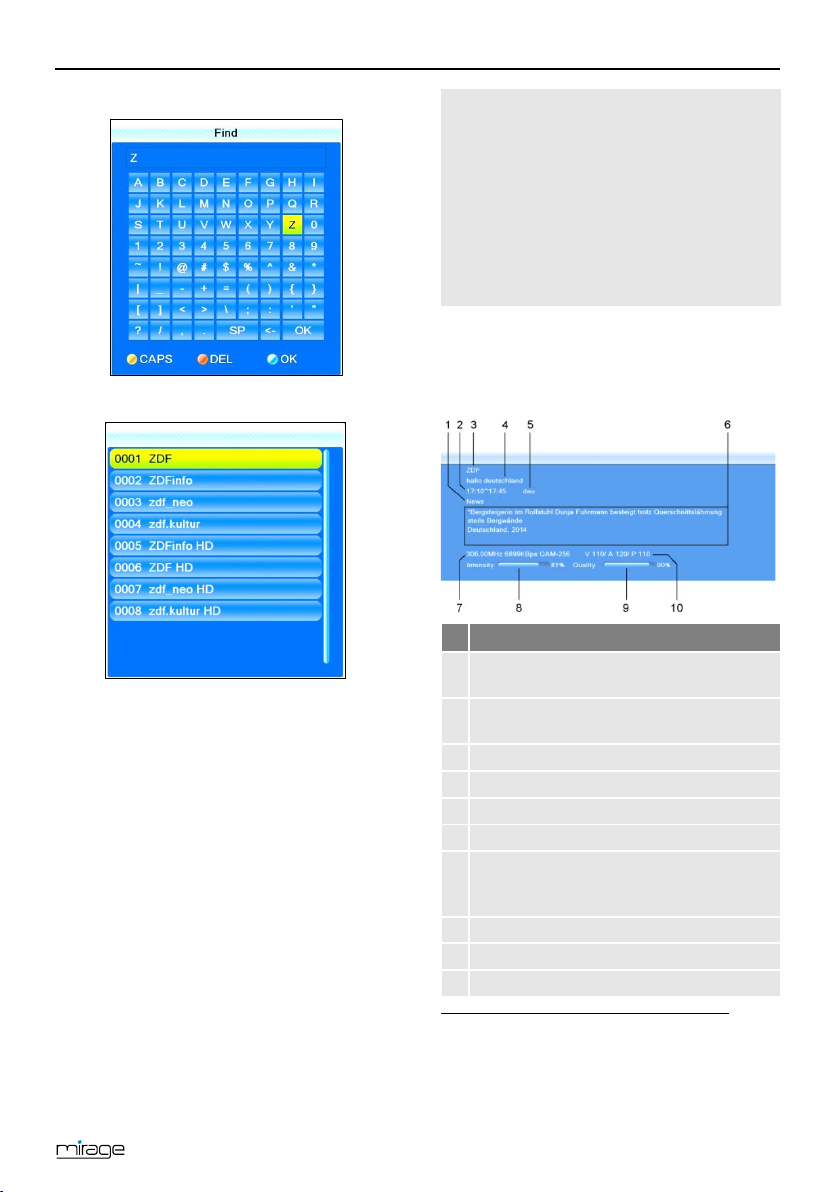
As soon as the first selected character has
been confirmed by pressing OK, a second
window will open, showing all channels starting
with this character (in most cases, the first
character is a letter).
Basic Operation
17
1:
2:
Press EXIT to close window 1, provided
that selection is sufficiently arranged for
your purposes. Now, you can select the
desired channel in window 2 by using the
keys PR+ and PR-, and confirm by press-
ing OK.
Return to entry of characters (see above) to
further limit channel selection.
5.7.3.3 Sort Channel List (by Alphabet)
Select
Sort (A-Z)
or
Sort (Z-A)
to sort the
displayed channels in ascending or de-
scending alphabetical order in the channel
selection window.
With all of the functions as de-
scribed in 5.7.3, the made selection
or sorting is deleted as soon as a
channel is selected by pressing OK,
i.e. if you are then pressing the OK
key to show the channel selection
window, the channel selection list is
displayed in its previous original
state.
5.7.4 Channel Information
Press the INFO key twice. The window on
the right will be displayed:
No.
Description
1
Genre of the current channel (info from
the DVB-C stream)
2
Start time and end time of current pro-
gram
3
Name of the channel
4
Name of current program
5
Language of current program
6
Detailed information on current program
7
DVB-C-Transponder (frequency, e. g.
12900 means 129 MHz / symbol rate /
modulation))
8
Signal intensity
9
Signal quality
10
DVB-C PIDs for video, audio, PCR
4F
5
5PID = Packet IDentifier, each table or each elemen-
tary stream in a transport stream is identified by a 13-
bit PID. PCR = Program Clock Reference; required to
enable the decoder to perform correct presentation
regarding time and speed.

Basic Operation
18
5.7.5 Recall
Press the PR key to go to the last
viewed channel.
5.7.6 EPG
The Electronic Program Guide is a comfortable
tool, replacing a printed TV guide.
5.7.6.1 Single EPG
Press the EPG key of the remote control.
The window Single EPG (information on
one channel) will open.
No.
Description
1
All programs during a day, with start and
end time; the selected program is color-
marked.
2
Date of day to which display applies.
3
Duration of current program (start time ~
end time).
4
Name of current program.
5 Illustration of the colored function keys
and their functions.
6 Detailed information on the current pro-
gram.
Press the keys PR+ and PR-to display a
later or earlier program (1).
Press the keys and to page
forward/back respectively one day (2).
Press the yellow function key to scroll
down in the information section (6).
Press the red function key to scroll up in
the function area (6).
Press the green function key to include
channel, date, switch-on time and duration
of the marked program into a timer. The
Timer mode
is set to
Once
by default;
Timer service
is set to
Channel
.
Press the blue function key to go to the
window
EPG
.
Press the EXIT key to close the window
Single EPG
and return to TV operation.
5.7.6.2 EPG
After pressing the blue function key in the
window
Single EPG
you will access the win-
dow
EPG
with the following display:
No.
Description
1
Thumbnail of selected channel.
2
Channel number of selected channel.
3
Name of selected channel.
4
Name of selected program.
5
Start time and end time of selected pro-
gram.
6
Current and next program with a
timeframe of approx. 1.5 hours for the
marked channel.
7
Illustration of the colored function keys
and their functions.
8
All channels included in the current chan-
nel list.
9
Day to which the displayed data apply.
Press OK to open a window with detailed
information on the selected program.
Press the OK key, the red function key or
the EXIT key to close such window.

Basic Operation
19
Press the keys PR+ and PR-to flip through
all available channels.
Press the keys and to page
back and forward respectively one pro-
gram within a channel.
The current program is marked with .
Press the red function key to access the
window
Time
:
Here, select the function on the bottom by
using the keys and :
Press OK when is selected to go to
the current program. The current pro-
gram is marked with .
Press OK when is selected to
go one program forward or back.
Press OK when is selected to
go two hours forward or back.
Press OK when is selected to
go one day forward or back.
Press OK when is selected or press
EXIT to close the window Time and to
return to the EPG window.
Press the green function key to include
channel, date, switch-on time and duration
of the marked program into a timer. The
Timer mode
is set to
Once
by default;
Timer service
is set to
Channel
.
Press the blue function key to leave the
EPG
window and return to the window
Single EPG
.
Press the EXIT key to leave the
EPG
win-
dow and return to the TV program.
5.7.7 Audio Settings
1. Press the key AUDIO.
2. Select the audio mode by using the keys
and .
Depending on the selected channel and
the current program, the following modes
are available:
Left - Right - Stereo - Mono.
3. Press the keys PR+ or PR-to select an-
other language or Dolby AC3 (Dolby Digi-
tal) as far as provided by the TV station.
4. After selecting the desired audio mode,
leave the menu by pressing the EXIT key.
5.7.8 Teletext
Teletext is an information system displayed on
your TV set. Teletext is only possible if the
selected channel supports such function. The
information is organized in the main pages and
sub pages.
Press the key TXT to activate teletext.
If subtitles are offered for the program in
the selected channel, a selection window
appears.
Press the keys and to select
Teletext
.
Press OK to switch on teletext. The first
teletext page no. 100.
If subtitles are offered for the pro-
gram in the selected channel, im-
mediately after pressing TXT the
first teletext page no. 100 is dis-
played.
To navigate inside teletext proceed as fol-
lows:
key
function
Keys 0 ... 9 of the
remote control
Direct input of a
page number
PR+
Next main page
PR-
Previous main page
(if there are
sub pages)
Next sub page
Basic Operation
20
key
function
(if there are
sub pages)
Previous sub page or
AUTO
: automatic
switch from one sub
page to another
Press the EXIT or TXT key to deactivate
teletext.
5.7.9 Subtitles
If subtitles are offered for the program in
the selected channel, these can be activat-
ed as follows:
1. Press the keys TXT to open the selection
window
Subtitles/Teletext.
2. Press the keys and to select
Subtitle
and confirm with OK. Another
window
Subtitle language
appears.
3. With the keys PR+ or PR- select a line
Subtitle language
and confirm your selec-
tion with OK to activate subtitles. Only if
several subtitle languages are being sent
there will appear several lines
Subtitle lan-
guage
. If for example only German subti-
tles are sent,
deu(D)
is preset as subtitle
language.
To switch off the subtitles proceed as fol-
lows:
1. Press the key TXT to open the selection
window
Subtitles/Teletext
.
2. Press the keys and to select
Subtitle
and confirm with OK. Another
window
Subtitle language
appears.
3. With the keys PR+ or PR- select the line
SUB OFF
and confirm your selection with
OK to deactivate the subtitles.
5.7.10 Aspect Mode
5.7.10.1 Setting the Aspect Mode with the V-MODE
key
Press the V-MODE key several times to set
the aspect ratio. Possible values:
Auto
,
4:3PS
,
4:3LB
,
16:9LB
(see below ta-
ble).
5.7.10.2 Setting the Aspect Mode via the Menu
In the menu
System setup
, select the
submenu
TV system
and then the menu
item
Aspect mode
to set the aspect ratio
by using the keys and .
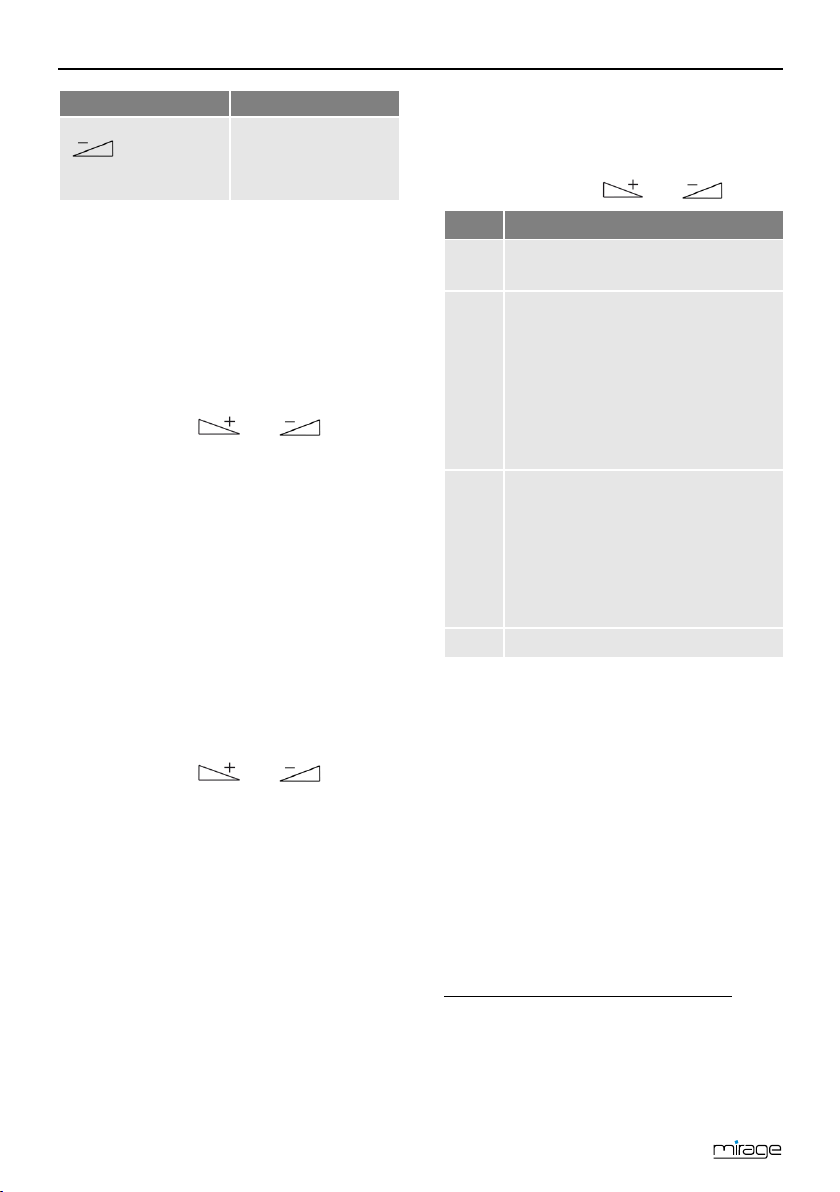
Value
Meaning
Auto
Default setting: the receiver selects
optimum value
4:3PS
For playback with a 4:3 screen, PS =
Pan & Scan:
•4:3 program: picture is optimal-
ly displayed.
•16:9 program: picture height is
adjusted to screen; picture in-
formation on the right and left
are missing.
4:3LB
For playback with a 4:3 screen, LB =
Letterbox
•4:3 program: picture is optimal-
ly displayed.
•16:9 program: picture width is
adjusted to screen; lacking
height is filled up by black bars.
16:9
For playback with a 16:9 TV set
5.7.11 Video Resolution
5.7.11.1 Switching the Video Resolution in the
Menu
In the menu
System setup
, select the
submenu
TV System
and confirm by
pressing OK.
1. Select the Video Resolution.
2. Press OK to display a list with the se-
lectable values.
3. Select the value appropriate to your TV set
by using the keys PR+ and PR-.
Example: If your TV set is capable of dis-
playing a resolution of 720p5F
6then you
6p = progressive scan: progressive scan images are
transmitted, e.g. 720p means that 50 progressive
scan images with a resolution of 1280 pixel/line and
720 lines/image are transmitted per second. i =
interlaced video: odd and even lines are transmitted
alternatingly.
Table of contents
Other Smart Electronic Receiver manuals

Smart Electronic
Smart Electronic DR12 User manual

Smart Electronic
Smart Electronic CX01 User manual

Smart Electronic
Smart Electronic Mirage CX06 User manual

Smart Electronic
Smart Electronic Joy C1 User manual

Smart Electronic
Smart Electronic MX Flat HD User manual

Smart Electronic
Smart Electronic CX20 User manual

Smart Electronic
Smart Electronic CX71 User manual

Smart Electronic
Smart Electronic CX10 User manual


