smart home 888R25 User manual

Weather Station with 433MHz Thermo-Hygrometer and
Radio Controlled Clock
Model: 888R25
USER’S MANUAL
Congratulations on your purchasing this new Weather Station. This unique product was designed for everyday use for
the home or office and is a definite asset of great use. To fully benefit from all the features and understand the correct
operation of this product, please read this instruction manual thoroughly.
FUNCTIONS OF THE WEATHER STATION
This weather station measures the environment of its surrounding area and receives weather data transmitting from
up to five outdoor thermo-hygrometers for temperature and humidity.
The data is continuously updated to bring you the latest weather information displayed on the LCD of the receiving
unit. Its wireless 433MHz can transmit data over a distance of 100 feet (30 meters) in open space.
FEATURES: MAIN UNIT
A. AIR PRESSURE TREND ARROWS
Indicate the trend of air pressure changes
B. WEATHER FORECAST WINDOW
Show weather forecast in animation with Snowfall indicator and Storm warning indicator
C. MOON PHASE
Graphically illustrate the current moon phase
D. IN INDICATOR
Indicates the current indoor temperature and humidity or maximum and minimum recorded readings are
displayed
E. MAIN UNIT LOW BATTERY INDICATOR
Appears when the batteries of the main unit are running dry
F. OUT REMOTE INDICATOR
Indicates the current outdoor remote up to 5 channels received by using wireless 433MHz signal transmission
G. AUTO SCROLL INDICATOR
Indicates the auto scroll of different outdoor remote channel temperature and humidity
H. REMOTE UNIT LOW BATTERY INDICATOR
Appears when the batteries of the remote unit are running dry
I. TEMPERATURE & HUMIDITY ALERT ICON
Appears when the high/low temperature & humidity alert is activated
J. BAROMETRIC HISTORY INDICATOR
Indicates the air pressure history of previous 24 hours
K. BAROMETRIC PRESSURE WINDOW
Displays the current barometric pressure in mb hPa, inHg or mmHg.
L. BAROMETRIC PRESSURE CHART
Shows the barometric pressure trend chart for the last 24 hours
A
E
M
P
U
V
F
G
H
I
B
HH
EE
CC
Y
FF
GG
BB
AA
DD
Z
C
D
J
K
L
T
S
R
O
Q
N
W
X
MIN
MIN
-24 -18 -12 -6 -3 -2 -1 0hr
HISTORY
HR
ALARM
ZONE

FIGURE A
FIGURE B
Slide to open
M. RADIO RECEPTION SIGNAL
Indicates the condition of wwvb radio controlled time reception
N. CLOCK WINDOW
Displays current time, current time and weekday, or date and weekday
O. T2 INDICATOR
Appears when international 2nd zone time is activated
P. ALARM ON ICON
Appears when alarm is activated
Q. ALARM ICON
Displays the alarm time
R. SNOOZE ALARM INDICATOR
Appears when snooze alarm is activated
S. TIME ZONE INDICATOR
Indicates the current time zone (Pacific, Mountain, Central & Eastern)
T. SNOOZE/LIGHT BUTTON
Turns on the backlight for five seconds, or activate snooze function when alarm happens
U. ALT/PRESSURE (+) BUTTON
Show altitude value for five seconds.
V. UNIT (-) BUTTON
Select pressure unit in mb/Hpa, inHg or mmHg. Decrease the altitude value in setting.
Hold down for five seconds to select the current weather condition.
W. HISTORY BUTTON
Selects the pressure history of previous 24 hours
X. CHANNEL BUTTON
Selects among channel 1, 2, 3, 4, 5 or to enter auto scroll mode
Hold down for three seconds to clear the current channel remote and re-start registration.
Y. HANGING HOLE
Mounts to the wall if desired
Z. UP/ ZONE BUTTON
Increase the value during time/alarm/alert/T2 offset setting mode. Turns Radio Reception on or off
Select time zone (PT = Pacific Time, MT = Mountain Time, CT = Central Time & ET = Eastern Time)
AA. DOWN/T2 BUTTON
Decrease the value during time/alarm/alert/T2 offset setting mode. Turns alarm on or off during alarm display is
selected. Select current time or 2nd zone time. Hold to enter T2 offset setting
BB. MAX/MIN BUTTON
Displays the maximum or minimum temperature and relative humidity or erases the memory
CC. CLK/CAL BUTTON
Select time, time and weekday, or date and weekday display. Hold to enter time setting. Confirm 2nd zone time
offset in T2 setting
DD. ALERT BUTTON
Activates temperature & humidity alert. Hold to trigger alert setting
EE. ALARM BUTTON
Selects to display alarm time. Hold to trigger alarm setting
FF. BATTERY COMPARTMENT
Accommodates three AA-size batteries
GG. RESET BUTON
Resets the unit by returning all settings to their default values
HH. DETACHABLE TABLE STAND
FEATURES: REMOTE UNIT
A. LCD
Displays temperature and humidity in toggle
B. LED indicator
Flashes when the remote unit transmits a reading
C. °C/°F slide switch
Selects Centigrade (°C) or Fahrenheit (°F)
D. TX
Press once to re-transmit manually. Press and hold to clear the TX ID and start re-registration
E. Battery compartment
Accommodates two AAA-size batteries
F. Battery door
G. Removable table stand with wall-mount hole
For standing the remote unit on a flat surface and supports it in wall-mounting.
GETTING STARTED
This Weather Station was designed for easy set up. For best operation, the following steps are required to be done in
the proper sequence.
1. INSERT BATTERIES FOR MAIN UNIT BEFORE DOING SO FOR THE SENSOR UNITS.
2. RECEIVING UNIT CANNOT BE PROGRAMMED MANUALLY UNTIL THE WIRELESS REMOTE SENSOR UNIT
REGISTRATION PROCEDURE HAS BEEN COMPLETED.
3. POSITION THE REMOTE UNIT AND MAIN UNIT WITHIN EFFECTIVE TRANSMISSION RANGE, WHICH, IN USUAL
CIRCUMSTANCES, IS 100 FEET.
Through the remote unit is weather resistant, it should be placed away from direct sunlight, rain or snow.
BATTERY INSTALLATION FOR RECEIVING UNIT
1. Remove the stand (if it was in place) by rotating the rear edge down and pulling away from the receiving unit.
2. Gently press and slide to remove the battery compartment door.
(Figure A)
3. Install 3 AA-size batteries according to + and – polarity marks inside the battery compartment. (Figure B)
4. The receiving unit will beep and a flashing (----) dash icon will appear on Line 3 of the LCD display to indicate the
unit is ready to register with the sensor unit(s).
5. Replace the battery compartment door and reinstall the stand.
Note: Replace the batteries when the low battery indicator on the in temperature and humidity
window appears.
WIRELESS REMOTE UNIT REGISTRATION PROCEDURE
Within 3 minutes of setting up the main unit, activates the sensor as follows:
1. Lift off the bracket stand by releasing two fixing snaps at 2 side panels.
2. Click open the bottom lock and flip open the battery cover located at the back of the sensor unit.
3. Select the temperature display unit on the °C/°F slide switch
4. Then insert 2 pieces AAA sized batteries according to the + and – polarity marks inside the battery compartment.
5. Once the batteries are inserted, the sensor unit will show the surrounding temperature and humidity, and
automatically transmit the readings if the temperature each change is more than 0.5°C/0.9°F within 12 seconds,
or at 2.5 minutes ~ 5 minutes interval to the receiving unit.
6. If the transmission was successful, the display of the receiving unit will show CH 1 and both the remote
RF REMOTE SENSOR
A
E
B
FC
G
D
°C °F TX
SLIDE
SLIDE
(HANG) (STAND)
)
)
)

Flashing this segment Flashing this segment
Very Weak Weak Medium Strong
ENGLISH GERMAN FRENCH ITALIANSPANISH
SUNDAY
MONDAY
TUESDAY
WEDNESDAY
THURSDAY
FRIDAY
SATURDAY
(SU)
(MO)
(TU)
(WE)
(TH)
(FR)
(SA)
(SO)
(MO)
(DI)
(MI)
(DO)
(FR)
(SA)
(DI)
(LU)
(MA)
(ME)
(JE)
(VE)
(SA)
(DO)
(LU)
(MA)
(MI)
(JU)
(VI)
(SA)
(DO)
(LU)
(MA)
(ME)
(GI)
(VE)
(SA)
Multi Language Day
display language
temperature & humidity reading. If failed, you can also press “TX” button once inside the battery compartment of
the sensor unit to send the signal manually to the receiving unit.
7. After the registration is complete for sensor unit 1, ensure the rubber seal is in place, replace the battery cover
and click close the bottom lock. Snap the bracket stand.
8. The receiving unit will start Radio controlled time reception for about 10 minutes after the registration of the first
RF sensor. After the Radio controlled time reception is complete, follow the same steps 1 to 6 to register other
sensor units one by one (if available).
Note:
• When the low-battery indicator of the particular channel appears on the main unit, hold down
CHANNEL button for 3 seconds to clear the old channel ID and enter new RF registering mode.
“----” dash will flash and follow the above 7 steps to replace the batteries of remote unit.
• It is important to distinguish which is “sensor 1” as this is used for snowfall indicator when the
temperature level falls to -1°C/30.2°F or below and must be positioned outdoor.
• Important note that once a channel is assigned to a remote unit, you can only change it by
removing the batteries or resetting the unit or hold down CHANNEL key for 3 seconds to re-
register.
• If the readings go above or below the specified range, the display will show flashing “HH.H” or
“LL.L”.
NOTE ON REMOTE TEMPERATURE & HUMIDITY SENSOR
Locate remote unit in a clear open area can attain a maximum of 100 feet (30 meters) transmission distance. Actual
transmission distance can be reduced by interference from building, obstruction or a screen between the remote
sensor(s) and the receiving unit. The remote sensor(s) have been designed to accommodate a variety of mounting
options. It can be hung on a flat wall by means of a wood screw. You can also use the detachable stand when you
desired a horizontal surface mount.
USING THE 6 FEET CORD TEMPERATURE PROBE (if supplied)
Your sensor unit is equipped witha6feetcordtemperature probe for measuring water, soil, freezer, etc. To use this
probe
1. Lift up the rubber cover from the probe socket at the side of the sensor unit.
2. Insert the temperature probe plug into the socket. The probe is now active.
3. The temperature reading from the temperature probe should appear on the remote sensor LCD display.
4. If the outside temperature is extremely low (below 0°C/32°F), leave the sensor unit indoor to avoid freezing up
the batteries. Extend the 6 feet probe cord outdoor to measure the temperature.
HOW TO USE THE BACKLIGHT
Press SNOOZE/LIGHT button once to turn on the backlight for 5 seconds.
REMOTE CHANNEL AUTO-SCROLLING (if more than one sensor unit is registered)
This device is equipped with an auto-scroll function that when more than one sensor units are active, it will automati-
cally cycle through the remote channels
1. To retrieve manually the specific sensor temperature and humidity reading, press CHANNEL button until desired
channel is displayed.
2. To enable auto-scroll function, use CHANNEL button to select channel 1, 2,.. until auto scroll icon appears on the
left hand corner of the 3rd line display.
WWVB 60 RADIO CONTROLLED CLOCK
The radio controlled time is calculated by the Atomic clock of Colorado (official clock of the US). Then the time is
coded and transmitted from Boulder- via a signal on wwvb-60- (60 kHz).
The transmitting range of the signal is 2000 miles (3200 km) so the received time is completely accurate.
Once sensor signal(s) are received, the wave icon will flash to indicate that the receiving unit starts to receive the
radio controlled time signal.
Radio Controlled wave icon can indicate 4 levels of signal status:
Once the time signal is received, the wave icon will stay on the LCD, and time and calendar will automatically be
updated.
Note: During 10 minutes of time signal reception, all manual settings will be suspended. If setting is
desired, press once UP/ RCC ZONE button to deactivate the reception. You can also press and
hold the same button for 3 seconds to manually activate the reception in normal mode.
SET THE TIME ZONE
This device is equipped with US time zone selection. On clock time display, press UP/ ZONE button to select the
time zone with the following icon indicators
P = Pacific Time Zone
M = Mountain Time Zone
C = Central Time Zone
E = Eastern Time Zone
SET THE CLOCK, CALENDAR, LANGUAGE & TEMPERATURE READING UNIT
1. When the current time is displayed, press & hold CLK/CAL button for 3 seconds to enter clock setting mode.
Flashing 12 hours will appear.
2. Press UP/ ZONE or DOWN/T2 button to switch between 24 hours and 12 hours format, and then press CLK/
CAL button to confirm.
3. The hour digits will flash. Use the UP/ ZONE button to increase by one hour or DOWN/T2 button to
decease by one hour to your desired hours. Holding down either button will change the increment unit rapidly.
Press CLK/CAL button to confirm.
4. The minute digits will flash. Use the UP/ ZONE button or DOWN/T2 button to set your desired minutes.
Holding down either button will change the increment unit rapidly. Press CLK/CAL button to confirm.
Note: Every change of minute digit will automatically reset the seconds to zero.
5. The year digit will flash and Yr icon appears. Press UP/ ZONE or DOWN/T2 button to decease by one year to
your desired year. Press CLK/CAL button to confirm.
Note: Year range is from 2000 to 2099.
6. “D—T” or “S—T” digit will flash. Press UP/ ZONE orDOWN/T2 button to select “D—T” (Daylight Saving Time)
or “S—T” (Standard Time). Press CLK/CAL button to confirm.
7. D and M icons will flash. Press UP/ ZONE or DOWN/T2 button to select D M (Date Month) or M D (Month
Date) format. Press CLK/CAL button to confirm.
8. Month digits will flash. Press UP/ ZONE or DOWN/T2 button to set your desired month. Press CLK/CAL
button to confirm. Do the same to set Date.
9. E digit will flash. Press UP/ ZONE or DOWN/T2 button to switch 5 languages display of weekday (English/
German/French/Spanish/Italian. See table2). Press CLK/CAL button to confirm.
Table 2
10. °C digit will flash. Press UP/ ZONE or DOWN/T2 button to select °Cor°
F temperature reading. See table 3.
Press CLK/CAL button to confirm and exit the setting mode.
Table 3
Note: If no entry during setting mode for 10 seconds, it will automatically keep the setting and exit
to normal display.
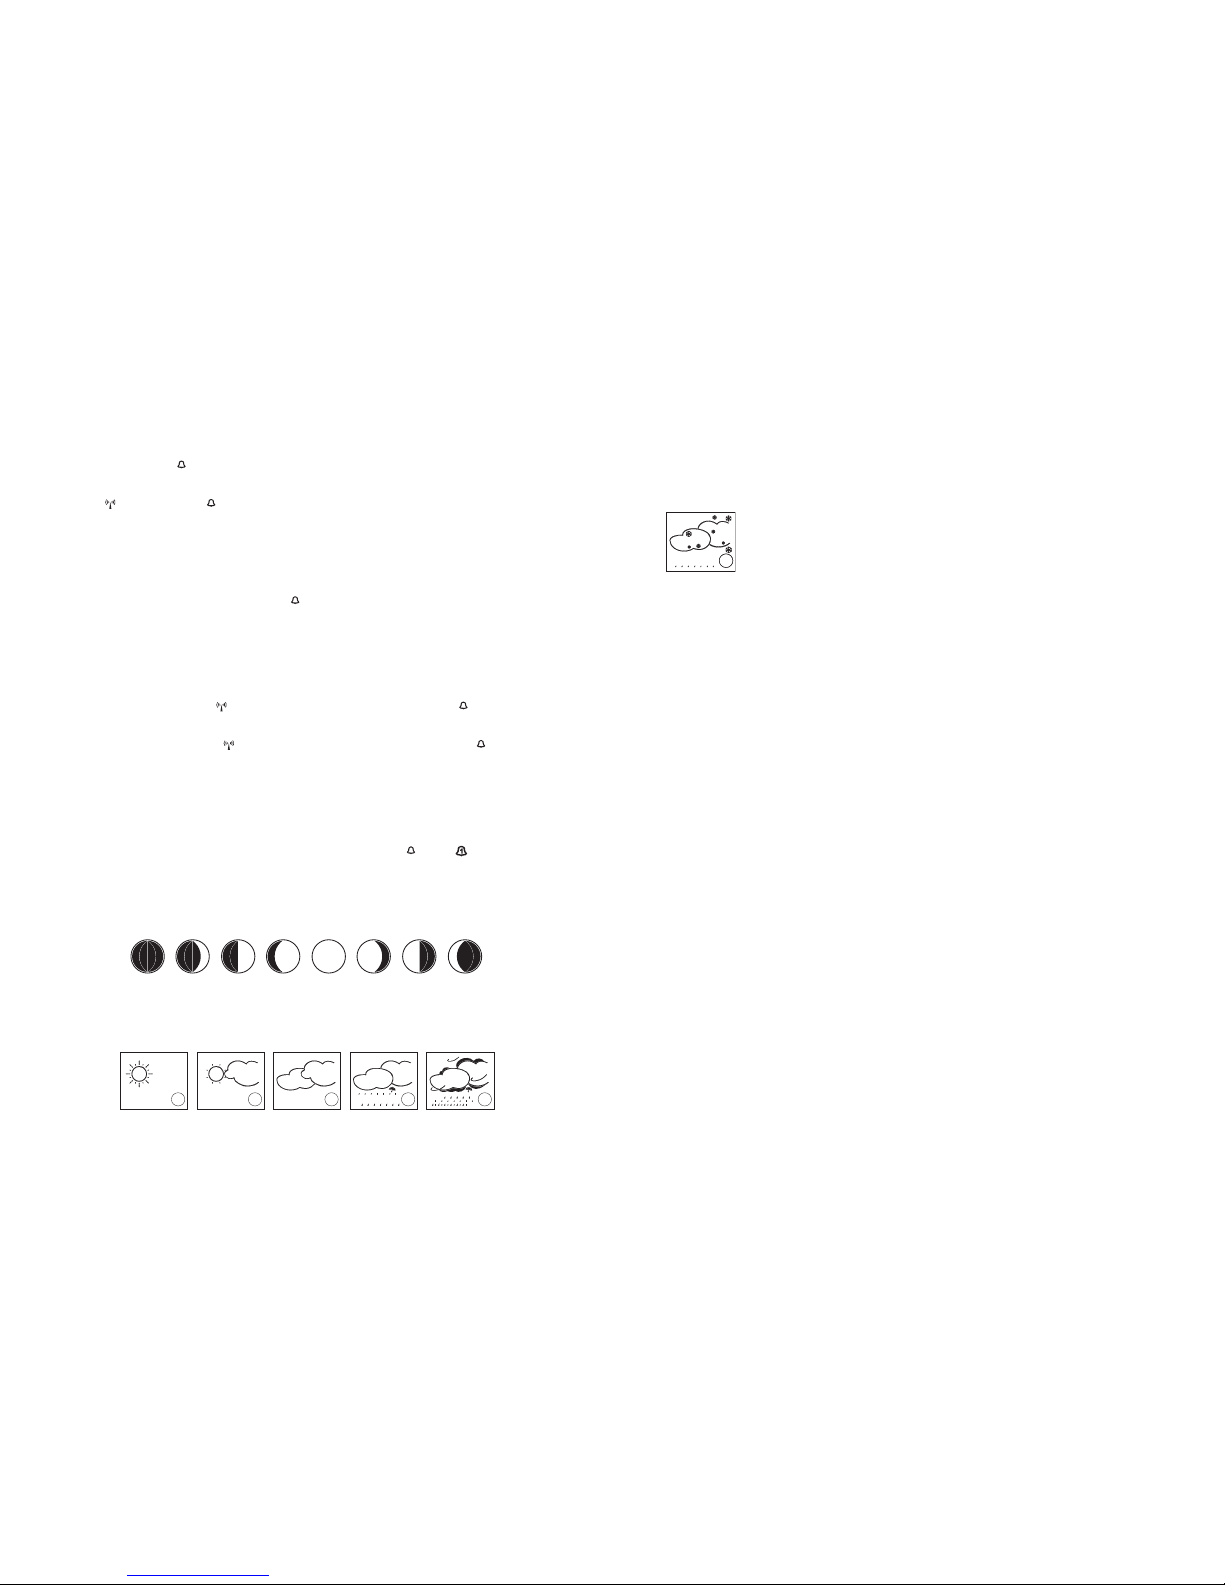
New Moon Waxing
Crescent
Waxing
Gibbous
Full Moon Waning
Gibbous
Last
Quarter
Waning
Crescent
First
Quarter
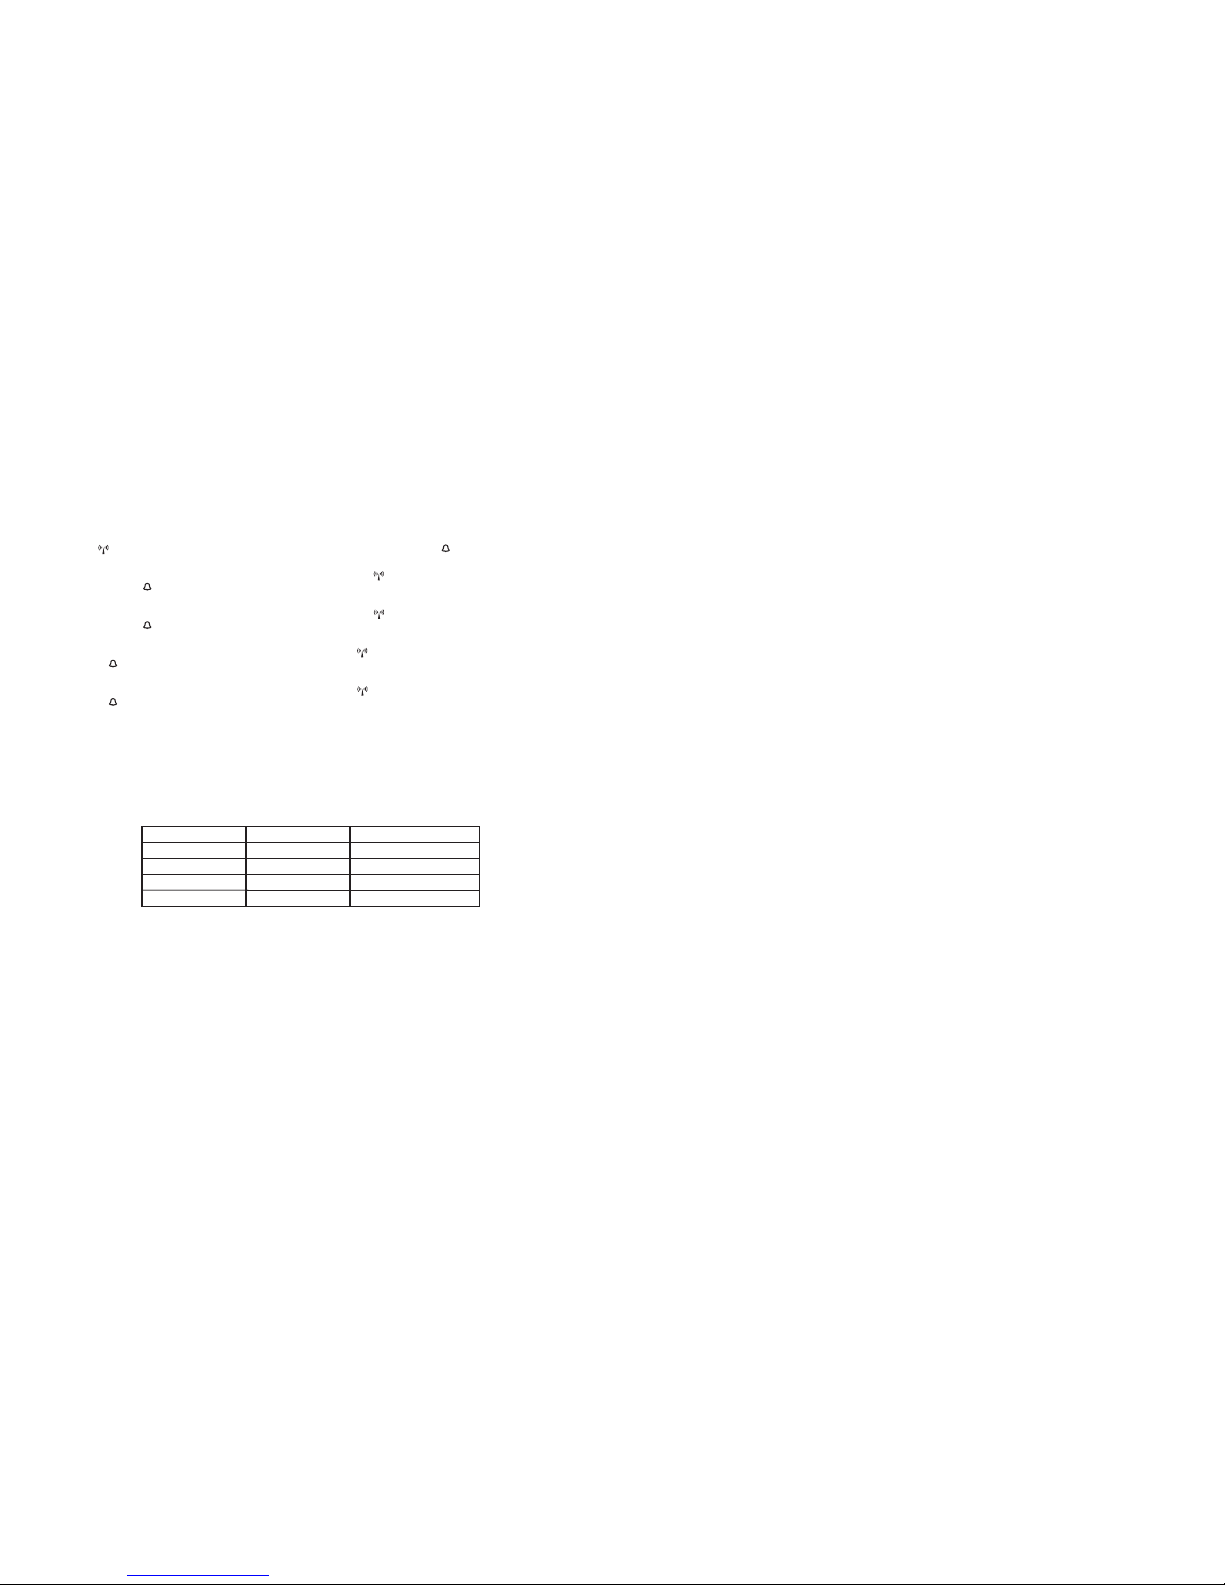
Sunny Slightly Cloudy Cloudy Rainy Stormy
TO SELECT TIME AND CALENDAR DISPLAY
Press CLK/CAL button repeatedly to switch between Time/Second, Time/Weekday and Calendar/Weekday format at
the lowest LCD display.
TO SELECT CURRENT TIME OR T2 TIME DISPLAY TO SET INTERNATIONAL 2ND ZONE TIME
1. Press and hold DOWN/T2 button for 3 seconds to enter the T2 setting
2. The last offset hour will flash and T2 icon appears. If the 2nd zone time display is not desirable, press CLK/CAL
button to confirm
3. Press UP/ ZONE or DOWN/T2 button to set your desired offset. Press CLK/CAL button to confirm
Note: The T2 offset range is dynamic according to the selected time zone and the “-” negative sign
appears if the value is negative.
P Pacific -5 hours to +20 hours
M Mountain -6 hours to +19 hours
C Central -7 hours to +18 hours
E Eastern -8 hours to +17 hours
4. If 2nd zone time was programmed, press DOWN/T2 button to select local time or 2nd zone time display.
Note: The T2 offset is fixed and will not be automically adjusted to Daylight saving time. Therefore,
during the transition from daylight saving time o standard, follow the step 1-3 to “spring
forward” one hour, and when DST is finished, do the same steps to “fall back” one hour.
TO SET DAILY ALARM
1. Press ALARM button to display the alarm time for 10 seconds.
2. During alarm display, press & hold ALARM button for 3 seconds to enter alarm setting mode.
3. The hour digits will flash. Use UP/ ZONE button to increase by one hour or DOWN/T2 button to decease by
one hour to your desired hours. Holding down the button will change the increment unit rapidly. Press ALARM
button to confirm.
4. The minute digits will flash. Use UP/ ZONE button to increase by one minute or DOWN/T2 button to decease
by one minute to your desired minutes. Holding down the button will change the increment unit rapidly. Press
ALARM button to confirm and finish the setting.
Note: If no entry during setting mode for 10 seconds, it will automatically keep the setting and exit
to normal display.
TO READ OR USE ALARM
1. Press ALARM button once to read Alarm time. Press CLK/CAL button to go back to display clock time.
2. To turn Alarm on or off, press ALARM button once, and then press DOWN/T2 button. icon appears to
indicate the Alarm is on.
3. When the alarm is beeping, press SNOOZE/LIGHT button to snooze for 5 minutes. Press other buttons except
ALT/PRESSURE (+), UNIT (-), HISTORY button to stop that alarm for a day.
MOON PHASE
Our weather station is equipped with 8 moon phases display (i.e. from new moon to waning crescent) on the screen.
WEATHER FORECAST
Our weather station is capable of detecting local barometric pressure changes, and based on the data collected, can
predict the weather for the next 12 to 24 hours.
Note
1. The accuracy of a general pressure-based weather forecast is about 70 to 75%, and therefore, we
cannot be held responsible for any inconveniences so caused by an inaccurate one.
2. The weather forecast is meant for the next 12 to 24 hours. It may not necessarily reflect the
current situation.
3. The “Sunny” forecast covering night hours indicates clear weather.
4. For the first use, if you desire to tell the main unit the current weather condition in order to quickly
offset the pressure difference and give you more accurate weather forecast, then press and hold
UNIT (-) button for 5 seconds repeatedly to select “Sunny”, “Snowfall”, “Stormy”, “Rainy”, “Cloudy”,
“Slight Cloudy” and “Sunny” graphic again.
Snowfall Indicator
The snowfall indicator is consisted of the cloud and snowflake icons (positioned over the raining icon) when the air
pressure goes to predict rainy or stormy weather & the temperature falls less than 30.2°F(-1°C)
Note: This snowfall indicator feature only applies to “sensor 1” which should be positioned outdoors
in an appropriate place but away from direct sunlight and rain to avoid inaccurate data
measurements.
HOW TO CHECK THE BAROMETRIC PRESSURE
The current and historical barometric pressure is shown on the atmospheric pressure window.
For monitoring the Sea Level barometric pressure reading at certain altitude, the user needs to select the local altitude
(-100 to 2500 meters or -330 to 8250 feet) for the altitude setting. Our weather station requires entry of elevation in
meters and in feet separately. Therefore, to convert feet to meters, multiply feet by 0.3048. To determine your
location elevation, please either contact your local library, TV/radio weather forecaster, or via Internet at
http://www.worldatlas.com/aatlas/infopage/elvation.htm.
1. To enter the altitude compensation setting mode, press ALT/PRESSURE button to switch from Barometric
Pressure to Altitude mode for 5 seconds.
2. During Altitude mode, press and hold ALT/PRESSURE button for 4 seconds until the meter icon flashes.
3. Use + ALT/PRESSURE or – UNIT button to toggle between meter and feet unit. Then press HISTORY button to
confirm.
4. Last altitude reading will flash. Press Use + ALT/PRESSURE button to increase the value by one or - UNIT button
to decrease the value by one. Hold down the button to have fast stepping. Press HISTORY button once to confirm
and exit setting.
The atmospheric pressure can be displayed in mb/hPa, inHg or mmHg. Press – UNIT button to select the pressure
unit.
Our weather station is equipped with barometer reading for 24hr history. If you want to check the pressure history for
a particular hour during the past 24 hours, press HISTORY button. Each press on the button will go back by an hour.
Note
1. If the weather station was just installed with batteries and past data was not yet measured, it will
display “---”.
2. The recorded barometric changes for the past 24 hours are displayed in a bar chart below the
barometric pressure window.
TROUBLESHOOTING FOR LOSTING SIGNALS
If without obvious reasons the display for particular channel suddenly goes (---) dash, check:
1. The remote unit of that channel is still in place
2. The batteries of both receiving and remote unit. Replace as necessary.
3. The transmission is within range and path is clear of obstacles and interferences. Shorten the distance when
necessary.
4. Signal from other household devices, such as bell, home security system and entry controls, it may interfere with
those of this product and cause temporary reception failure. This is normal and it doesn’t affect the general
performance of the product. The transmission and reception of temperature & humidity reading will resume once
the interference recedes.
MAXIMUM AND MINIMUM TEMPERATURE & HUMIDITY
This weather station records and displays maximum and minimum readings of the main and sensor unit locations.
1. Press MIN/MAX button once to display the minimum readings of in/out temperature and humidity for 6 seconds
2. Press MIN/MAX button twice to display the maximum readings of in/out temperature and humidity for 6 seconds
Indoor Outdoor
1
st
press Off On
2
nd
press On Off
3
rd
press On On
4
th
press Off Off
Note: In minimum or maximum memory display, press and hold down MIN/MAX button for 3
seconds to clear the records. If you press MIN/MAX button now, the maximum and minimum
temperature and humidity will have the same values as the current one until different readings
are recorded.
TO SET HIGH/LOW TEMPERATURE & HUMIDITY ALERTS
Our weather station can be programmed to alert that the temperature or humidity has gone beyond or below your
pre-set range at the receiving unit or any of the remote sensor locations.
1. Press and hold ALERT button for 3 seconds to enter CH 1 temperature alert setting mode.
2. The upper/lower icon and --- dash will appear and flash on the 3rd line display of the receiving unit to indicate it is
ready for temperature alert setting.
3. Use UP/ ZONE button to switch between Ch 1, 2, 3, 4, 5 or Indoor. Use DOWN/T2 button to switch the
temperature setting at reversed sequence. Press ALERT button to confirm
4. Upper limit icon and temperature digits will appear and flash. Use UP/ ZONE to increase upper temperature
limit or DOWN/T2 button to decrease it. Press and hold the button down to change the value rapidly. Press
ALERT button to confirm.
5. Lower limit icon and temperature digits will appear and flash. Use UP/ ZONE to increase lower temperature
limit or DOWN/T2 button to decrease it. Press and hold the button down to change the value rapidly. Press
ALERT button to confirm and go to humidity alert setting.
6. Upper limit icon and humidity digits will appear and flash. Use UP/ ZONE to increase upper humidity limit or
DOWN/T2 button to decrease it. Press and hold the button down to change the value rapidly. Press ALERT
button to confirm.
7. Lower limit icon and humidity digits will appear and flash. Use UP/ ZONE to increase lower humidity limit or
DOWN/T2 button to decrease it. Press and hold the button down to change the value rapidly. Press ALERT
button to confirm and exit
8. To set alert values for other registered channel, repeat the above steps 1 to 9.
Note: If no entry during setting mode for 10 seconds, it will automatically keep the setting and exit
to normal display.
TO ACTIVATE / DE-ACTIVATE TEMPERATURE & HUMIDITY ALERTS
1. In normal display, press ALERT button repeatedly to activate or de-activate the temperature & humidity alerts of
indoor or outdoor remote sensor locations in the following sequence:
The upper/lower limit icons appear on the Indoor and/or Channel display to indicate the temperature & humidity
alerts become active.
2. When the alert limit of the currently displayed channel is reached or passed, alarm will beep for 5 seconds every
minute. The upper or lower limit icon and the reading will flash to indicate the upper or lower alert is activated.
3. When the alert limit of another hidden channel is reached or passed, then alarm will also beep for 5 seconds
every minute. Only the upper or lower limit icon will flash and the reading remains solid. Press CHANNEL button
until the reading flashes to indicate which remote channel’s alert happens.
4. During alarm, press ALERT button to turn the temperature alert function off. Or press any other buttons to stop
alarm beeping but the reading digits will continue to flash and alarm beeps again after the 2nd trigger by the
reading that is out of pre-set range.
TO RESET THE MAIN UNIT
The RESET button allows you to return all settings to factory set values. The button is required only when the unit is
not operating in a favorable way, such as in the rare case of a malfunction.
Slide to open the battery door of the main unit and use a pointer to press the RESET button. The Weather Station will
be reset and all data will initiate with default value.
MAINTENANCE
1. For reasons of safety and operation, alterations to this device are strictly prohibited.
2. Do not immerse the unit in water. If the unit comes in contact with water, dry it immediately with a soft lint-free
cloth.
3. Do not clean the unit with abrasive or corrosive materials. Abrasive cleaning agents may scratch the plastic parts
and corrode the electronic circuit.
4. Do not subject the unit to excessive force, shock, dust, temperature or humidity. Such treatment may result in
malfunction, a shorter electronic life span, damaged batteries, or distorted parts.
5. Do not tamper with the unit’s internal components. Doing so will terminate the unit’s warranty and may cause
damage. The unit contains no user-serviceable parts.
6. Do not leave used-up batteries in the units (even leak proof batteries) as these may corrode and release
chemicals that may damage this product and also be dangerous to health.
7. Inserting batteries in an incorrect polarity will cause damage to this product. Do not mix new and old batteries as
old batteries may leak.
8. Do not dispose of new or used batteries to fire due to dangers of explosion or release of dangerous chemicals
9. This product is not to be used for medical purposes or for public information.
10. Read this instruction manual thoroughly before operating the unit.
CAUTION
1. The above content is subject to change without prior notice.
2. The display printed in this manual may be different from the actual display because of printing limitations
3. The manufacturer and its suppliers hold no responsibility to you or no any other person for any damage
expenses, lost profits, or any other claims arisen by improper handling, misuse or failue to comply with the
correct use of this product as described in this instruction manual.
SPECIFICATIONS
Main Unit:
Proposed operating temperature range : 32.0°F to 122.0°F (0°C to +50.0°C)
Temperature resolution : 0.2°F (0.1°C)
Relative humidity range : 20%RH to 99%RH
Relative humidity resolution : 1%RH
Remote Unit:
Proposed operating temperature range : -4.0°F to 122.0°F (-20°C to + 50.0°C)
Measuring range via cable : -58.0°F to 158.0°F (-50.0°C to 70.0°C)
Temperature resolution : 0.2°F (0.1C)
RF transmission frequency : 433 MHz
No. of remote unit : Up to 5 units
Outdoor humidity range : 20%RH to 99%RH
Other smart home Weather Station manuals


