Avidsen 107251 User manual

COLOUR WIRELESS WEATHER
STATION
with wireless outdoor sensor
EN Ref.107251
www.avidsen.com
V1
TECHNICAL
SUPPORT
WARRANTY
YEARS
LR03 AAA x2
(not included)
LR06 AA X2
(not included)
Mains
adaptor
Alarm
clock
IndoorOutdoor Backlighting
12hr/24hr Calendar

CONTENTS
A - SAFETY INSTRUCTIONS
1 - OPERATING PRECAUTIONS 05
2 - MAINTENANCE AND CLEANING 05
5 - RECYCLING 05
B - PRODUCT DESCRIPTION
1 - KIT CONTENTS 06
2 - WEATHER STATION 06
3 - MAIN FUNCTIONS 07
C - CONFIGURATION
1 - QUICK START-UP 08
Pairing the sensor to the station 08
Time and date setting 08
Alarm setting 08
Automatic time setting 08
Atmospheric pressure and weather forecast 09
Temperature and humidity 09
Setting the measurement unit / min-max memory / sensor 09
Temperature alert setting 10
Backlighting setting 10
Moon phase 10
COLOUR WIRELESS WEATHER STATION

D - TECHNICAL AND LEGAL INFORMATION
1 - TECHNICAL CHARACTERISTICS 11
2 - REPLACING THE BATTERIES 11
3 - WARRANTY 11
4 - HELP AND ADVICE 11
5 - DECLARATION OF CONFORMITY 12

EN 4
COLOUR WIRELESS WEATHER STATION
EN
5
A - SAFETY INSTRUCTIONS
1 - OPERATING PRECAUTIONS
• The weather station must not be installed where
the screen may be exposed to scratching and
dirt.
• The weather station is not designed for
outside installation and should not be installed
in locations that are subject to extremes of
humidity or temperature.
• Do not expose the sensor to direct sunlight or
any reected light source.
• Do not daisy-chain extension cords and/or
multi-socket adapters.
• Do not install near acidic chemicals, ammonia
or sources of toxic gases.
2 - MAINTENANCE AND CLEANING
• Always unplug the product from the mains
before carrying out any maintenance.
• Never use abrasive or corrosive substances to
clean the product.
• Use a soft, slightly damp cloth.
• Never use an aerosol to spray the product as
this may damage the internal workings.
3 - RECYCLING
This symbol means that devices no
longer in use should not be disposed of
with household waste as they are likely to
contain hazardous substances that are
dangerous to health and the environment.
Return the equipment to your local
distributor or use the recycling collection service
provided by your local council.
It is forbidden to throw used batteries into
the dustbin. Batteries/accumulators
containing harmful substances are
marked with symbols (shown opposite)
which indicate that they cannot be thrown
away as ordinary waste. The corresponding heavy
metals are referred to as follows: Cd = cadmium, Hg
= mercury, Pb = lead. You can dispose of these
used batteries/accumulators at local waste
treatment centres (centres for sorting recyclable
materials), which are required to accept them. Keep
batteries/button cells/accumulators out of reach of
children and store them in a safe place not
accessible to them. They could be swallowed by
children or pets. May be fatal if swallowed! In the
event that a battery is swallowed, consult a doctor
or go to A&E immediately. Never short-circuit the
batteries and do not burn or recharge them. They
may explode!
Pour en savoir plus :
www.quefairedemesdechets.fr
COLOUR WIRELESS WEATHER STATION
EN 6
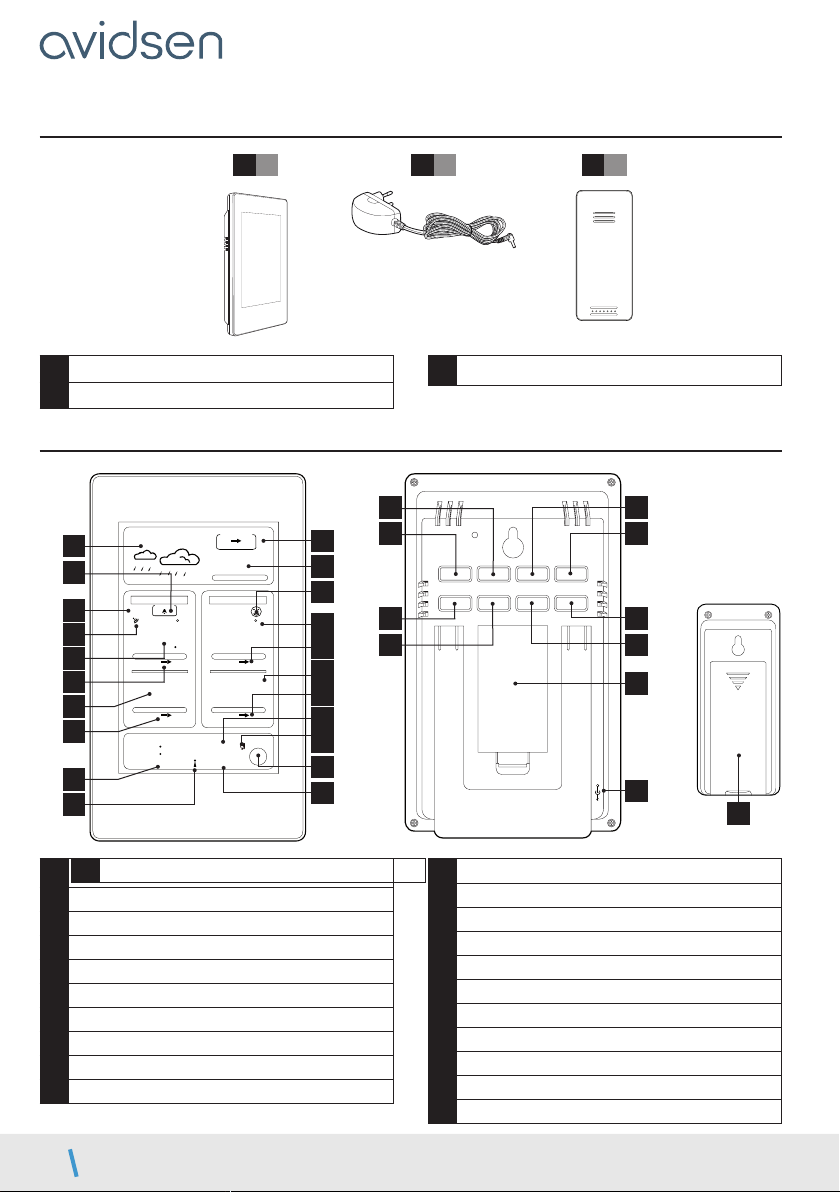
B - PRODUCT DESCRIPTION
1 - CONTENTS OF THE KIT
2 - WEATHER STATION
1x 1 3x 1
FORECAST
PRESSURE
OUTDOOR
INDOOR
TEMPERATURE
HUMIDITY HUMIDITY
TEMPERATURE
11
CH 3
72
44
23 13
DO
11
993
0
C
RH
%
RH
%
TENDENCY
TEMP ALERTS
TEND
TEND
DAY
DM
MOON
PHASE
TEND
TEND
22
7
C
DC
4.5V
MEMERY
DOWN UP SETALARM
HPA/INHG ALERT
SNOOZE/LIGHT
1
3
7
8
9
10
2
22
24
23
25
4
5
6
13
15
16
26
28
27
29
17
18
19
20
21
11
12
14
32
30
31
3Temperature sensor
1Weather forecast
2Temperature alert indicator
3Channels for the sensor
4Radio transmission icon
5Outdoor temperature
6Outdoor temperature changes
7Indoor humidity
8Indoor humidity changes
9Time
10 DCF77 indicator
11 Atmospheric pressure changes 12 Atmospheric pressure indicator
13 Comfort indicator
14 Indoor temperature
15 Indoor temperature changes
16 Indoor humidity
17 Indoor humidity changes
18 Date
19 Alarm indicator
20 Moon phase
21 Day of Week
22 UP button
2x 1
1Weather Station
2Mains adaptor
COLOUR WIRELESS WEATHER STATION

EN
7
B - PRODUCT DESCRIPTION
3 - MAIN FUNCTIONS
- Coloured backlit screen
- Indoor and outdoor temperature and humidity display
- "Current / MIN / MAX / Trend" indoor and outdoor temperature display
- Atmospheric pressure display
- 12- and 24-hour format time display
- Radio-controlled clock (DCF77)
- Daily alarm
- Calendar
- Weather forecast
- Moon phase display
- Wireless outdoor sensor
23 DOWN button
24 MEMORY button
25 HPA/INHG button
26 ALARM button
27 SET button
28 SNOOZE/LIGHT button
29 ALERT button
30 Battery compartment (2 x LR06 AA)
31 Socket for mains adaptor plug
32 Battery compartment (2 x LR03 AAA)
COLOUR WIRELESS WEATHER STATION
EN 8
C - CONFIGURATION
1 - QUICK START-UP
These steps must be followed in the order described.
Insert 2 x AA LR06 batteries (not supplied) into the
station 30. Then insert the 2 x AAA LR03 batteries
(not supplied) into the outdoor sensor, ensuring that
the polarity is respected 32.
Information: the use of batteries and the mains
transformer for the station is preferable: in the
event of a power failure or if the mains transformer
is unplugged, the weather station will maintain its
conguration.
PAIRING THE SENSOR TO THE STATION
Pairing is automatic once the batteries are inserted.
To force pairing, if required:
- On the station, press and hold the
DOWN button for 5 seconds. The indicator (4)
starts to ash
- On the outdoor sensor, remove then reinsert the
batteries whilst standing close to the weather
station.
TIME AND DATE SETTING
- Press and hold the SET button for 3 seconds.
24h or 12h ashes, Set the time display format
using the UP and DOWN buttons
- Press the SET button to conrm. The two digits:
00 ash. Set the time zone using the UP and
DOWN buttons
- Press the SET button to conrm, then set the
hours using the UP and DOWN buttons.
- Press the SET button to conrm, then set the
minutes using the UP and DOWN buttons.
- Press the SET button to conrm. The letters M
and D ash at the bottom right of the display,
Set the display order using the UP and DOWN
buttons (month / day or day / month)
- Press the SET button to conrm and set the year
using the DOWN and UP buttons.
- Press the SET button to conrm. The number to
the left of M ashes at the bottom right of the
display, Set the month using the UP and DOWN
buttons
- Press the SET button to conrm. The number
to the left of D ashes at the bottom right of the
display, Set the Day using the UP and DOWN
buttons
- Press the SET button to conrm. The two letters
(27) ash. Set the calendar language using the
UP and DOWN buttons (Ge = German / EN =
English / FR = French / IT = Italian / Sp = Spanish
/ DU = Netherlands / DA = Danish)
- Press the SET button for a last time to conrm the
settings.
Information: Pressing briey on the SET button
enables you to scroll through 3 display options. Date
display, seconds display and alarm time display.
ALARM SETTING
- Press and hold the ALARM button for 3 seconds:
The hour of the alarm ashes
Set the hour of the alarm using the UP and
DOWN buttons
- Press the ALARM button to conrm. The minutes
ash; set the alarm minutes using the UP and
DOWN buttons
- Complete the setting by pressing briey on the
ALARM button
When the alarm clock rings, you can press the
SNOOZE/LIGHT button to pause the alarm and
delay the ring for 5 minutes.
When the alarm clock rings, you can stop the ring
by pressing the ALARM button.
- To set the alarm, press the ALARM button once.
A bell (19) appears between the hour and the
minutes.
- To deactivate the alarm, press the ALARM button
once. The bell (19) disappears.
Information: The ring lasts for approximately 1
minute.
AUTOMATIC TIME SETTING
To launch the automatic time setting for the station,
press the UP button once. The LED (10) ashes
(the backlight is switched o temporarily). The
station switches to radio reception (for 7 minutes)
and attempts to pick up the DCF77 time signal to
automatically update the time and date.
Information: the time zone must be set correctly for
a correct display. If reception is insucient, bring the
station near to a window.
Ensure that you leave a gap of 2.5 m between the
station and any source of interference (television,
WiFi, microwave, etc.)
COLOUR WIRELESS WEATHER STATION
EN
9
C - CONFIGURATION
The signal search can be stopped at any point by
pressing the UP button, if the signal is not available.
ATMOSPHERIC PRESSURE AND WEATHER
FORECAST
The weather station is equipped with an
atmospheric pressure sensor to display this value
and its changes:
- This value can be expressed in hPa or in inHg. To
change the unit of this measurement, press and
hold for 3s the HPA/INGH button; as soon as
the unit ashes, press DOWN or UP to change it.
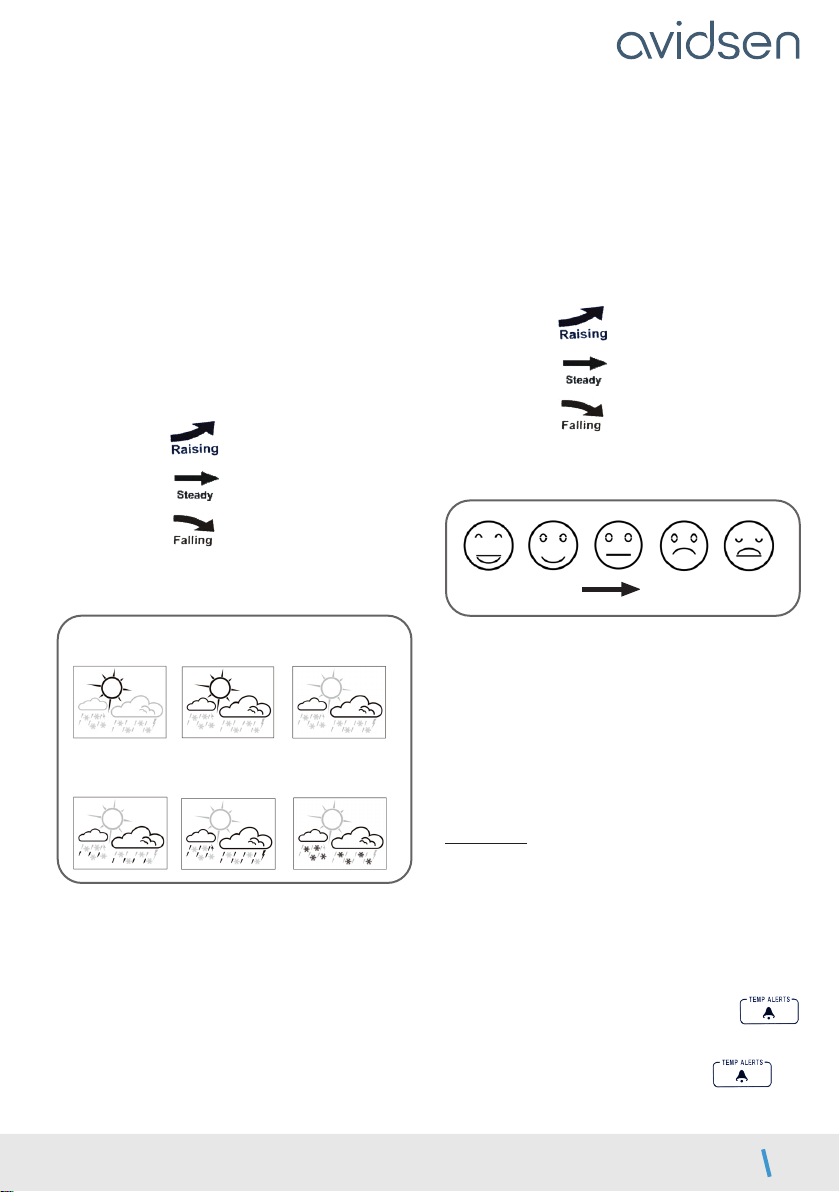
Monitoring the changes in atmospheric pressure:
3 statuses are possible:
Raising:
Steady:
Falling:
The weather station also has a weather forecast
function: It can display 6 dierent statuses:
Sun
Rainy
Slightly
cloudy
Heavy rain
Stormy
Cloudy
Snowy
It is possible to adjust this forecast depending on
the current weather:
- Hold down the HPA/INHG button for 3s; as
soon as the hPa mb or inHG unit ashes, press
the HPA/INHG button again.
- Once the forecast logo ashes, using the UP
and DOWN buttons, you can scroll through the
forecasts and adjust the station’s weather with
the actual weather where you are.
- Press the HPA/INHG button again to complete
this setting.
TEMPERATURE AND HUMIDITY
This weather station allows you to simultaneously
display the indoor and outdoor temperature as well
as the indoor and outdoor humidity.
The weather station also displays the changes to
these values:
3 statuses are possible:
Raising:
Steady:
Falling:
A comfort indication is symbolised by smiley displays
(13), according to the indoor readings.
Comfortable Too hot/cold
SETTING THE MEASUREMENT UNIT/MIN-
MAX MEMORY/SENSOR
- Press the Up button to alternate between Celsius
and Fahrenheit
- Press the MEMORY button and scroll through
Max / Min / Current value
- Press and hold for 3 seconds the MEMORY
button to erase the saved MIN/MAX values
Information: this weather station can display up to
3 channels for outdoor sensors; however, it will only
use channel no.1 (3). You can scroll through the
dierent channels by pressing the DOWN button
briey to display your outdoor sensor.
TEMPERATURE ALERT SETTING
- To activate the outdoor temperature alert function,
press the ALERT button once. The
indicator will be displayed to conrm the alert.
- To deactivate the ALERT function, press the
ALERT button again and the light will
COLOUR WIRELESS WEATHER STATION

EN 10
C - CONFIGURATION
disappear
- To set the high and low alert values, press and
hold the ALERT button for 3 seconds.The Hi
indicator ashes . Using the UP and
DOWN buttons, set the maximum temperature
that will trigger the alert.
Conrm this setting by pressing the ALERTbutton
once. The Lo indicator will ash in turn.
Using the UP and DOWN buttonsbuttons,
set the low temperature that will trigger the
temperature alert.
Finally, press the ALERT button one last time.
BACKLIGHT SETTING
- With battery power only, the backlight is o
by default. You can turn it on by pressing the
SNOOZE/LIGHT button. The weather station
will be backlit for 5s.
- With a mains power supply, the backlight is on
by default without time limit. You can change the
brightness or turn it o completely by pressing the
HPA/INHG button briefly and repeatedly.
MOON PHASE
The moon phase is calculated and displayed
automatically according to the date and the year.
It is therefore essential that the date and year are
correctly set. (See SETTINGS DATE and TIME)
New
moon
Full
moon
First crescent
Waning
moon
First
quarter
Last
quarter
Waxing
moon
Last crescent
COLOUR WIRELESS WEATHER STATION
EN
11
D - TECHNICAL AND LEGAL INFORMATION
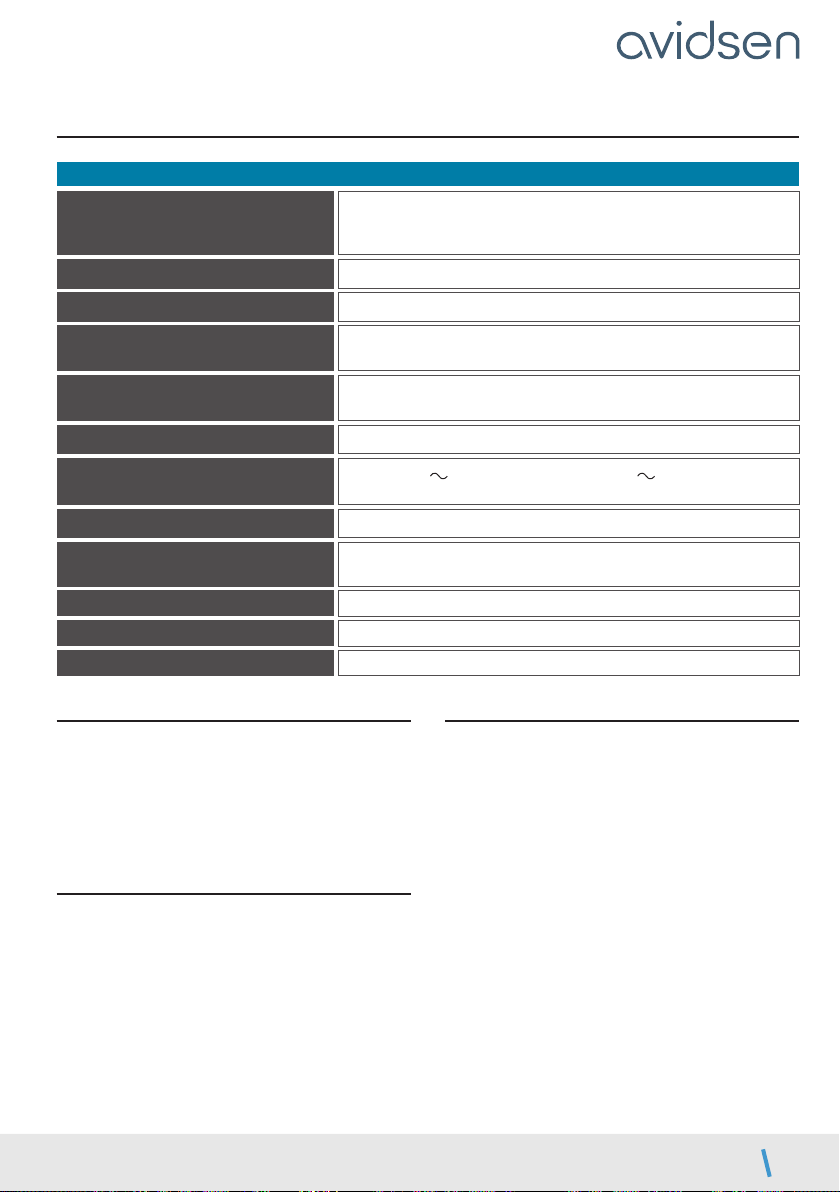
1 - TECHNICAL CHARACTERISTICS
Weather Station
Power supply
- The station operates with 2 x LR6 batteries (not included) and/
or a 4.5 V mains transformer (included)
- The sensor operates with 2 x LR3 batteries (not included)
Frequency 433.92MHz
Range between the sensor and the station 60m in free eld.
Range of indoor temperatures 0°C (32°F) ~ 50°C (122°F)
Range of outdoor temperatures -20°C (-4°F) ~ 60°C (140°F)
Humidity measurement range 20% RH ~ 95% RH
Atmospheric pressure measurement
range
600 hPa/mb 1100 hPa/mb & 17.72 inHg 32.50 inHg
Temperature measurement unit Celsius (°C) or Fahrenheit (°F).
Choice of atmospheric measurement
unit
Hectopascals (hPa mb) or inches of mercury (inHG).
Station dimensions 108 x 185 x 29 mm
Sensor dimensions 92 x 40 x 23 mm
Materials ABS
2 - REPLACING THE BATTERIES
Under normal conditions of use, battery life is
between on and two years.
Use 2 x LR06 AA alkaline batteries for the station
and 2 x LR03 AAA alkaline batteries for the
outdoor sensor, observing the indicated
polarity.
3 - WARRANTY
• This product is under warranty for parts and
labour for 2 years from the date of purchase.
Proof of purchase must be retained for the
duration of the warranty period.
• The warranty does not cover damage caused
by negligence, knocks or accidents.
• be opened or repaired by non-Avidsen
employees.
• The warranty will be void if the device is
tampered with.
4 - HELP AND SUGGESTIONS
• If, in spite of the care we have taken in designing
our products and drafting these instructions,
you encounter diculties when installing
your product or you have any questions, we
recommend you contact one of our specialists
who will be glad to help.
• If you encounter operating problems during
the installation or after a few days of use,
please ensure that you are in front of your
installation when contacting us, so that one of
our technicians can diagnose the source of the
problem, as it will probably be the result of a
setting that is incorrect or an installation that
is not to specication. If the problem is caused
by the product itself, the technician will give
you an RMA number so that you can return the
unit to the shop. Without this RMA number, the
shop may refuse to exchange the product.
COLOUR WIRELESS WEATHER STATION

EN 12
D - TECHNICAL AND LEGAL INFORMATION
Please contact our after-sales service team
technicians:
0,35 €
/ min
0 892 701 369
Monday to Friday, 9am to 12pm, and 2pm to 6pm.
Avidsen undertakes to keep a stock of spare parts
for this product throughout the contractual warranty
period.
5 - EU DECLARATION OF CONFORMITY
Avidsen declares, under its sole responsibility, that the
equipment with reference number 107251complies
with the applicable Union harmonisation legislation
and its conformity has been assessed pursuant to
the applicable standards in force:
- Directive RED 2014/53/EU
EN 300 220-1 V3.1.1
EN 300 220-2 V3.2.1
EN 300 330-2 V2.1.1
- Directive LVD 2014/35/EU
EN 62368-1:2014 + A11:2017
EN 62479:2010
EN 50663:2017
- Directive EMC 2014/30/EU
EN 301 489-1 V2.2.3
EN 301 489-3 V2.1.1
The above-mentioned product complies with the
RoHS 2011/65/EU Directive and delegated directive
2015/867/EU.
Signed by Alexandre Chaverot, CEO, on behalf of
Avidsen
19 avenue Marcel Dassault, 37200 Tours, France
Tours, 20/12/2022
COLOUR WIRELESS WEATHER STATION


Avidsen
19 avenue Marcel Dassault - ZAC des Deux Lions
37200 Tours - France
This manual suits for next models
1
Table of contents
Other Avidsen Weather Station manuals


