Smart Kitty SMARTKITTY User manual
1
SMARTKITTY®
USER MANUAL

2
Index
1. Introduction 3
2. Copyrights 3
3. Safety hazards 3
4. Size and weight of SmartKitty® litter 4
5. Litter box modules 5
6. Start-up procedure 6
6.1. Cover Assembly 6
6.2. Tent assembly. 7
7. Operating principles 8
7.1. Cat sense: Normal 8
7.2. Cat sense: High 8
8. Keeping the litter box clean 9
8.1. Dismantling the litter box for cleaning 9
8.2. Cleaning the litter box 11
8.3. Replacing disposable excrement containers 11
8.4. Assembling the litter box after the cleaning process. 12
9. Panel functions 13
9.1. ‘SmartKitty” function 13
9.2. Working time and clock setting functions 14
Setting the litter box time 14
Setting the litter box working time 15
Setting the working time after being used by a cat. 17
The ‘cat sens’ setting. 18
10. Emergency functions 19
10.1. Manual control 19
10.2. Factory reset 20
10.3. Preparing module before sending 21
11. Control via mobile application 22

3
1. Introduction
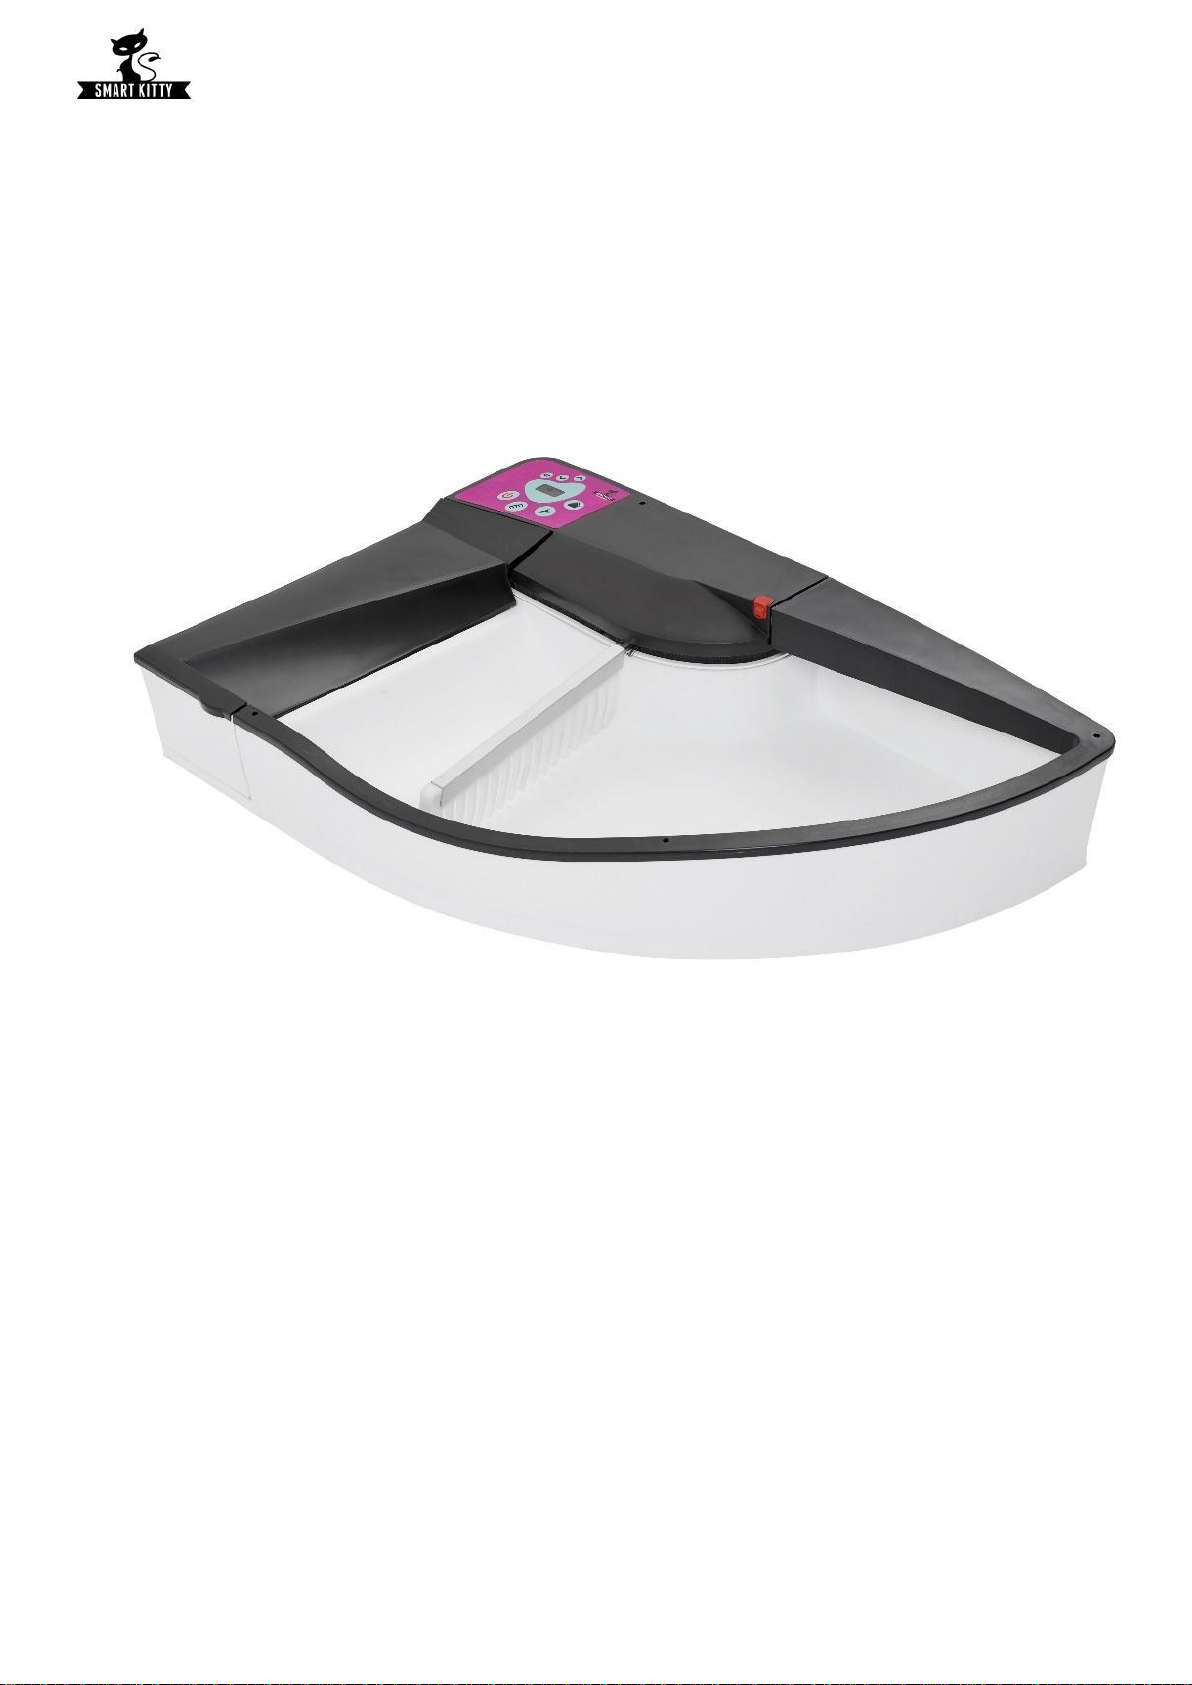
Congratulations on the purchase and welcome to the group of users of SmartKitty®- a self- cleaning litter
box.
SmartKitty® is perfectly adapted for all cat sizes and needs.
To ensure a safe use, we have implemented sensors and our patented solutions.
SmartKitty® is perfect for dealing with toilet waste of any size. The waste is pushed aside into a hygienic
container which remains closed.
It really works! Our system is efficient and requires no more than a minimal attention.
2. Copyrights
SmartKitty® promotes the policy of continuous development. SmartKitty® reserves the right to make changes
and improvements to any product described in this document without any obligation to give prior notice.
SmartKitty® denies all responsibility for any special, incidental, consequential or indirect damage however
caused. Except as provided in the warranty leaflet, SmartKitty® shall not make warranties of any kind, either
express or implied. Any graphics present in this manual are registered trademarks. The availability of particular
products may differ according to the region.
3. Safety hazards
While using power devices, the basic safety precautions must be kept in order to decrease the risk of fire,
electric shock or any other injuries.
In order to maximize safety, the following regulations must be obeyed::
Before using the unit read the following instructions.
●DO NOT immerse or expose the electrical module (1) to water or cleaning solutions.
●To protect from electric shock, DO NOT place electrical devices in water or other liquids.
●If the power supply gets wet, electricity should be cut off from the socket. In that case DO NOT remove
the plug or the power supply with bare hands.
●DO NOT position and store the device in a place where it can be exposed to damage or contact with water.
●This device is intended for internal use only. DO NOT expose it to atmospheric conditions.
●DO NOT pull the power cord to unplug the device. To unplug the device, hold the power supply/ plug,
NOT the power cord.
●DO NOT use accessories and add-on devices that are not recommended by the producer.
●DO NOT use if the power supply or plug is damaged. If the power supply or plug is or has been damaged,
the immediate contact with the producer is suggested.
●Pregnant women, babies, children and individuals suffering from immunodeficiency should avoid contact
with cat toilet waste. Cat toilet waste can contain Toxoplasma parasite which can beharmful for the people
mentioned above.
●The packaging material is not a toy. Keep away from children and animals.
●This product is intended to be used by cats or small dogs only. The litter box is designed exclusively for
the purpose of a hygienic removal of cat toilet waste.
●The litter box should be used according to its purpose and recommendations.
●Avoid contact with moving parts.
●To prevent the risk of tripping DO NOT plug the power supply in the area of people/ animal movement.
●The raking module can move automatically after plugging the litter box in. Make sure that inside the litter
box there is no object which could be damaged after plugging in the power cord.
●Adult supervision is recommended during the first cat’s use of the litter box.
4
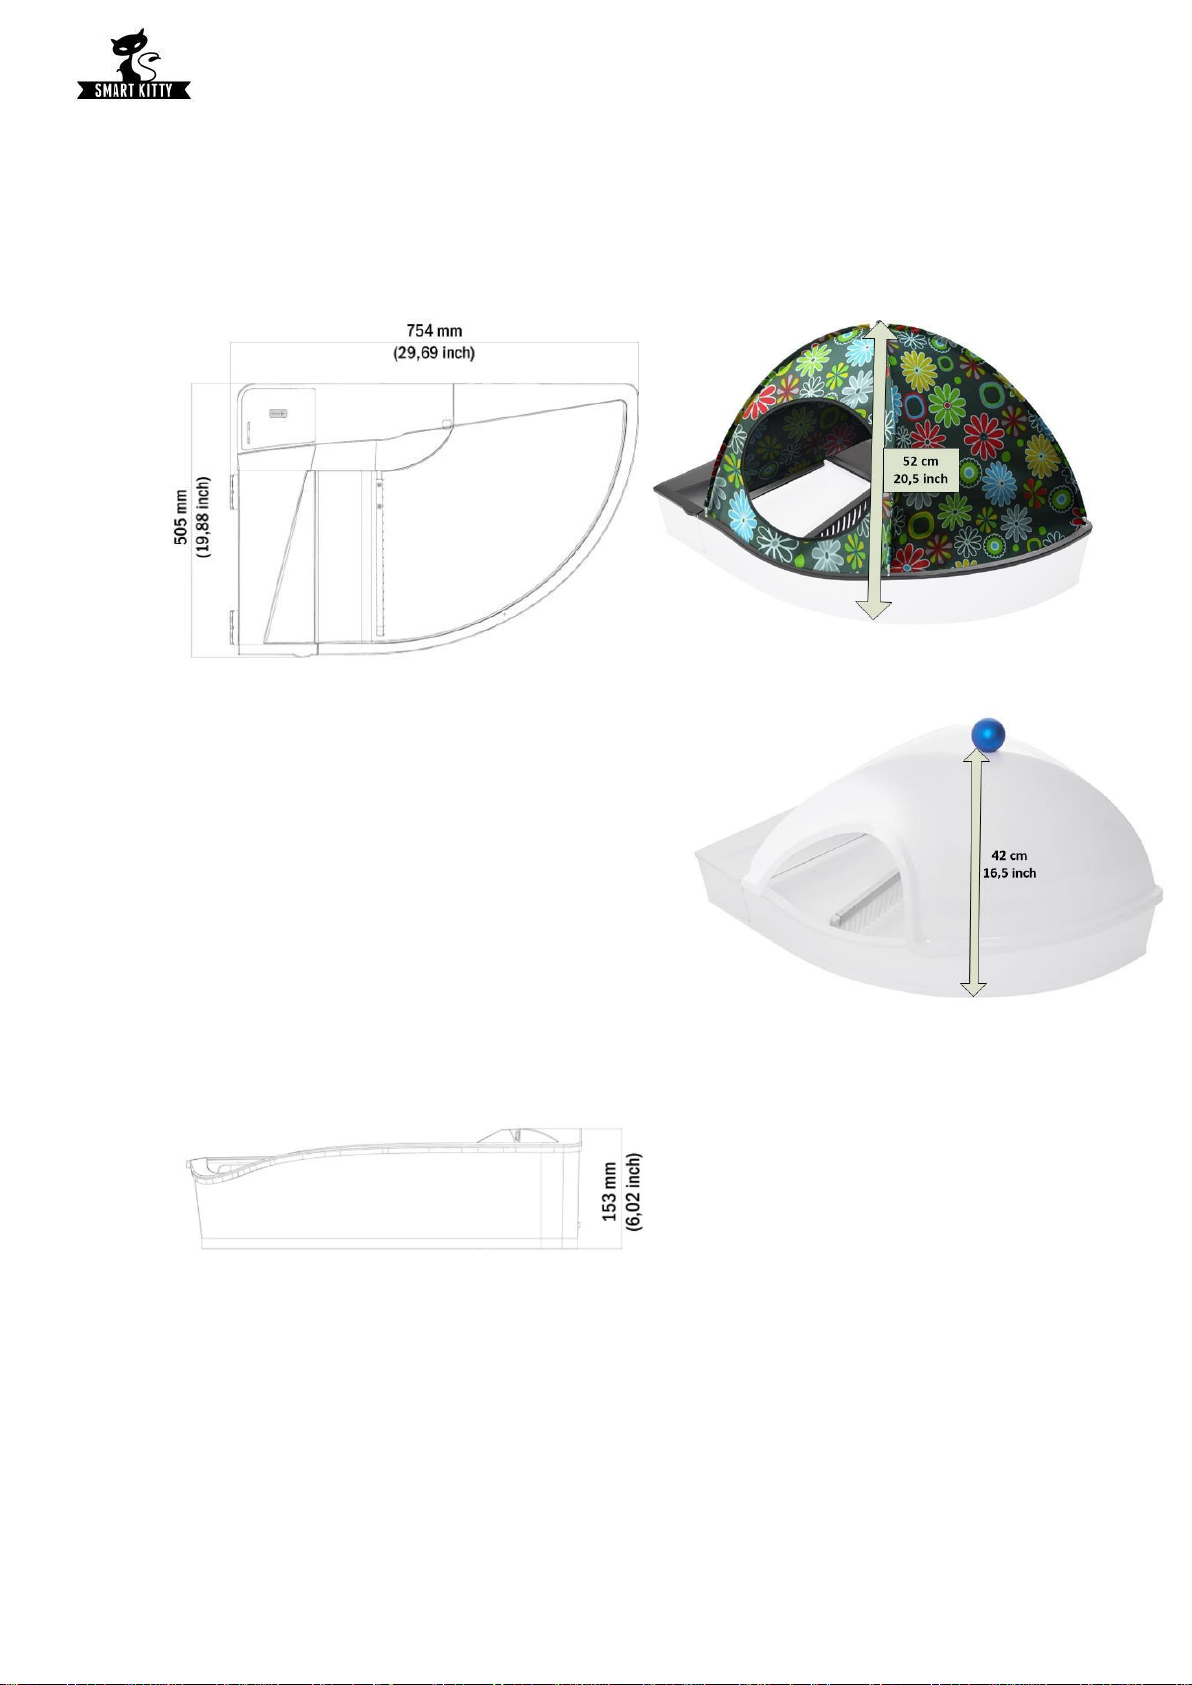
4. Size and weight of SmartKitty® litter
Weight: 5kg
5
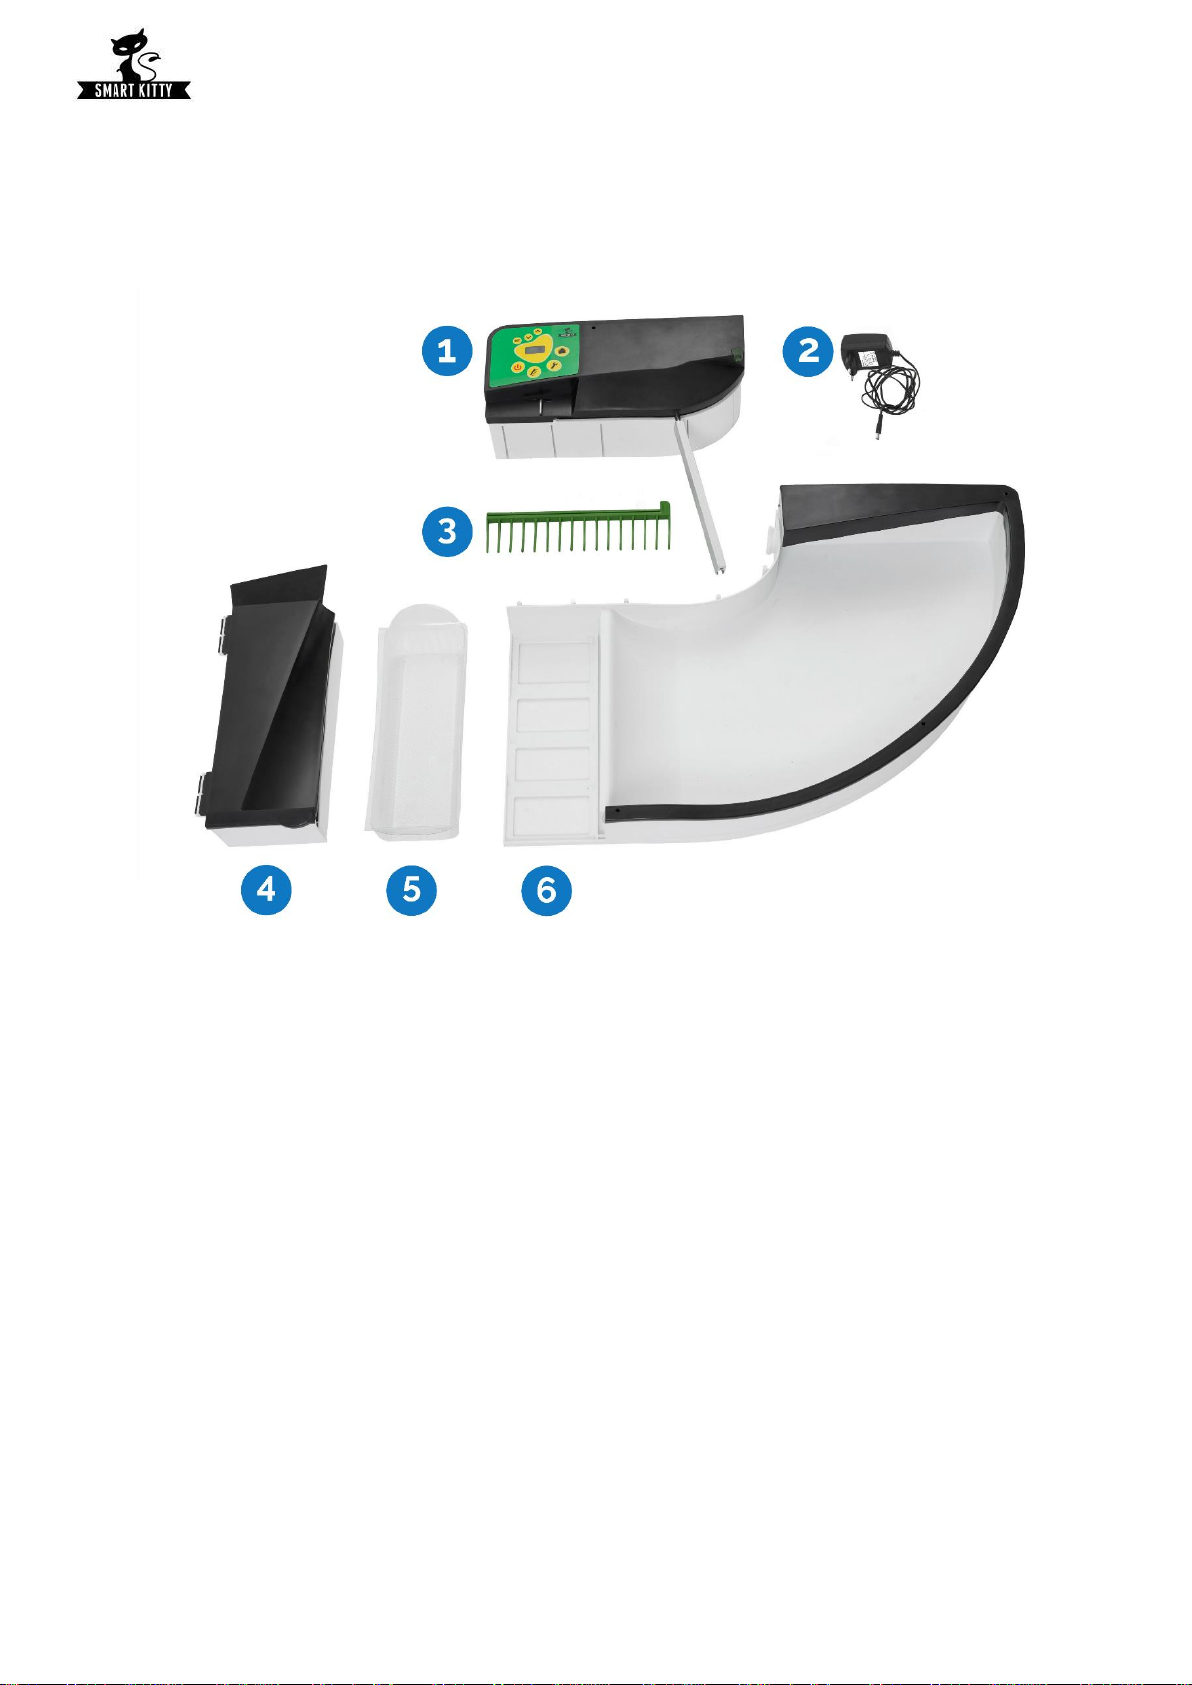
5. Litter box modules
The device is constructed of 3 independent modules, each of which can easily be removed.
1. Electrical module
4. Cat excrement container
2. Power
5. Disposable excrement containers
3. Rakes
6. Base box
6
6. Start-up procedure
1. For the purpose of transportation, the litter box is secured from damage by a packaging material. All
protective films and polystyrene must be removed. Protective films and packaging materials are not
toys. Keep away from children and animals!
2. Put the litter box in a flat, dry and clean place. Make sure that the litter box is placed no further than
within a 1-meter radius from the socket.
3. The cat excrement container should be placed in container No. 4.
WARNING: DO NOT place any objects on the power cable. DO NOT plug in the power cord in the area of
people/animal movement- the risk of tripping over the cord.
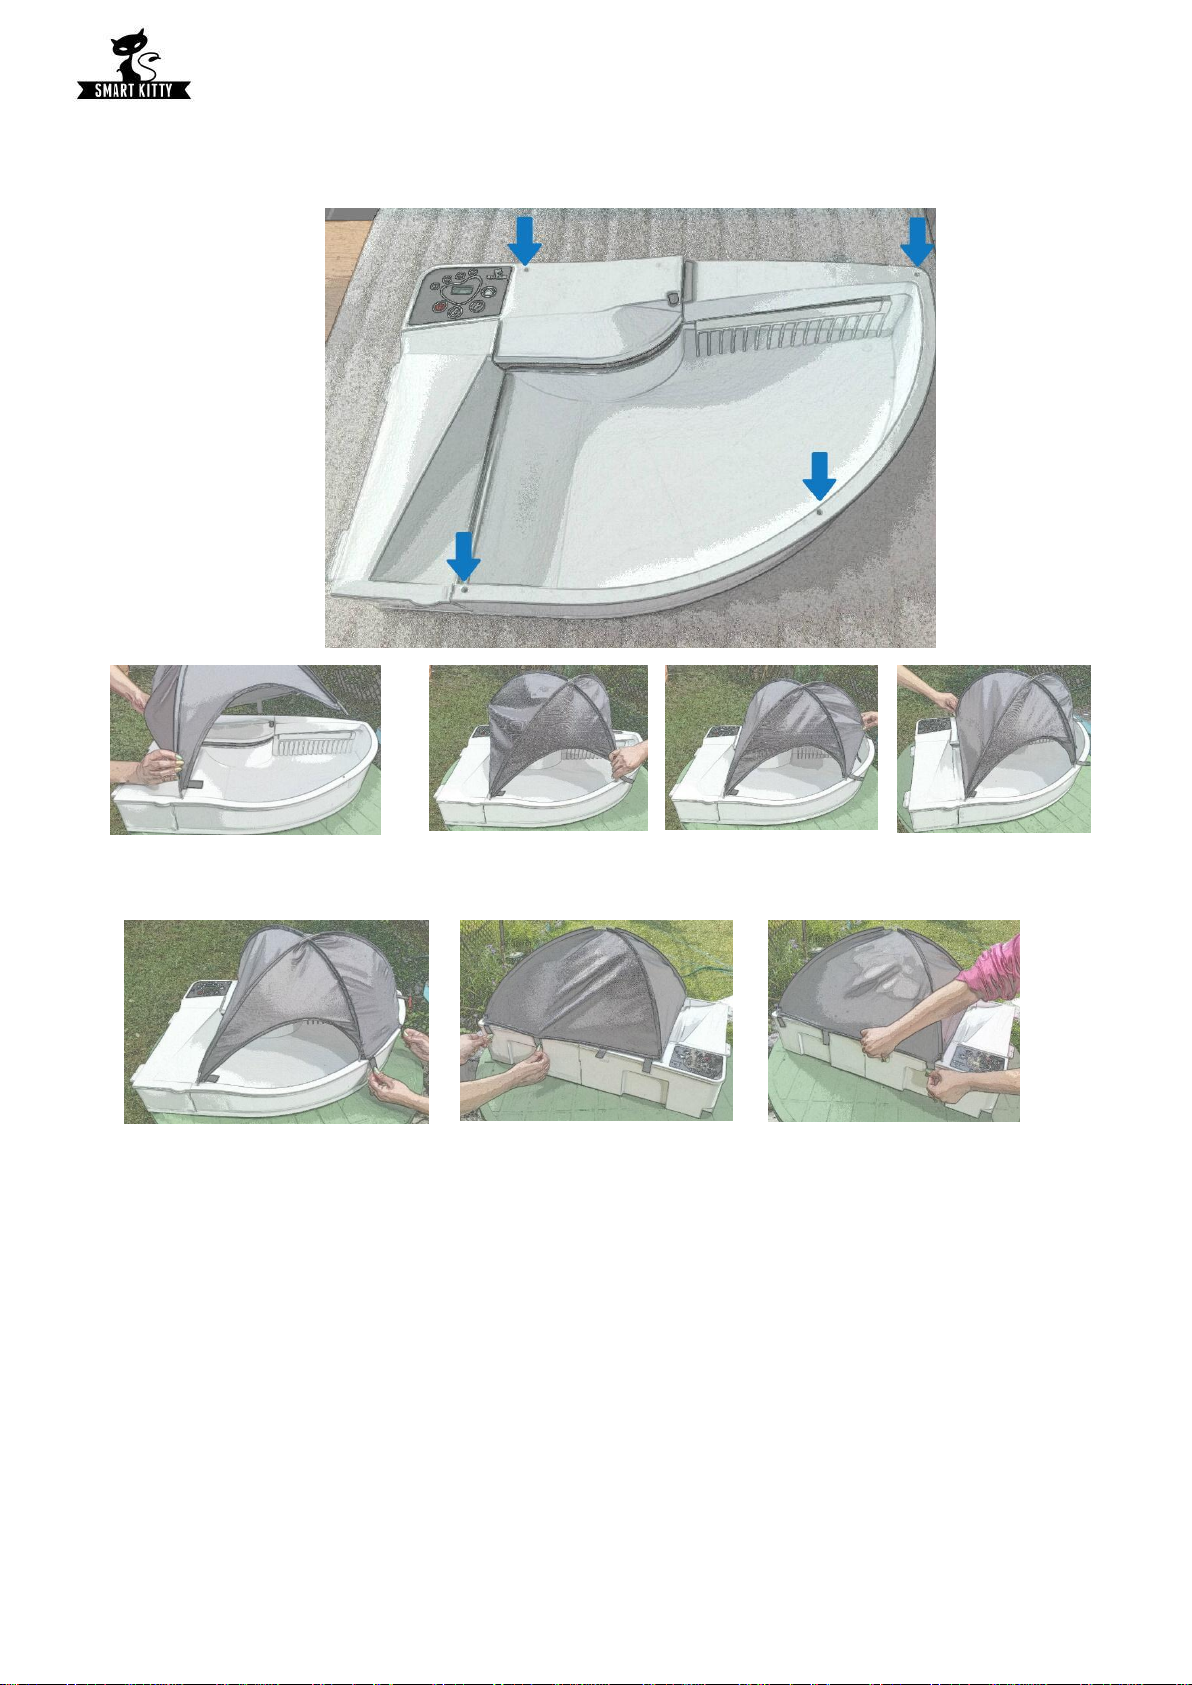
6.1. Cover Assembly
Pokrywa montowane jest poprzez właściwe przyłożenie , na kuwecie .
1. Screw the handle
2. put on the litter box
3. Ready ;-)
7
6.2. Tent assembly.
1. Spread the tent top on a flat surface.
2. Insert the frame endings into the slots of the main bowl.
3. Strain the top with Velcro closure tightening.
8
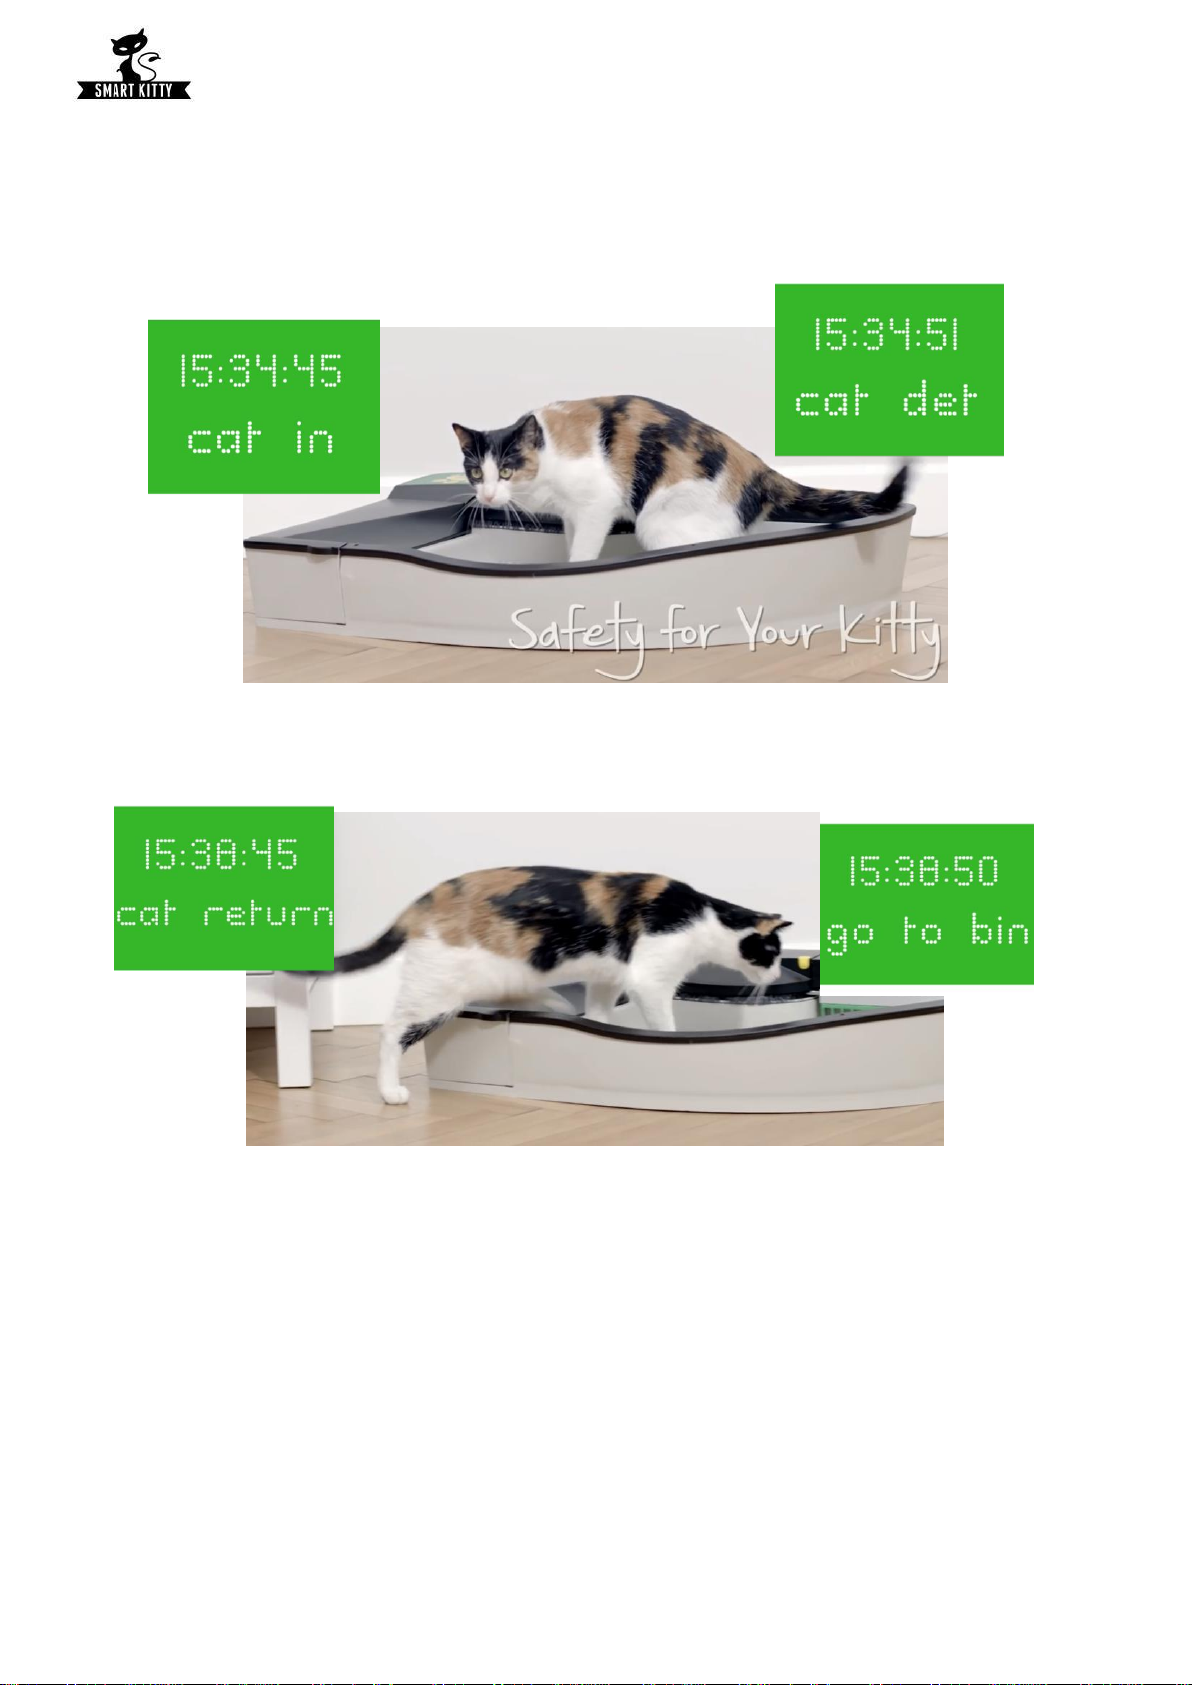
7. Operating principles
7.1. Cat sense: Normal
According to the personal control panel settings, the automatic cleaning process starts in a few minutes after
the cat has used the litter box. The excrements are scooped into a special container which closes after receiving
the waste. This ensures that next time the cat will use a hygienically clean litter box. It is important not only
in terms of comfort but also cats’ health- they are natural sticklers for cleanliness.
7.2. Cat sense: High
The litter box stops for 1 minute and then continues to move. If the cat comes in again, it stops, etc.
The only action done by a cat owner is to throw out the full excrement container and refill the grit.
9
8. Keeping the litter box clean
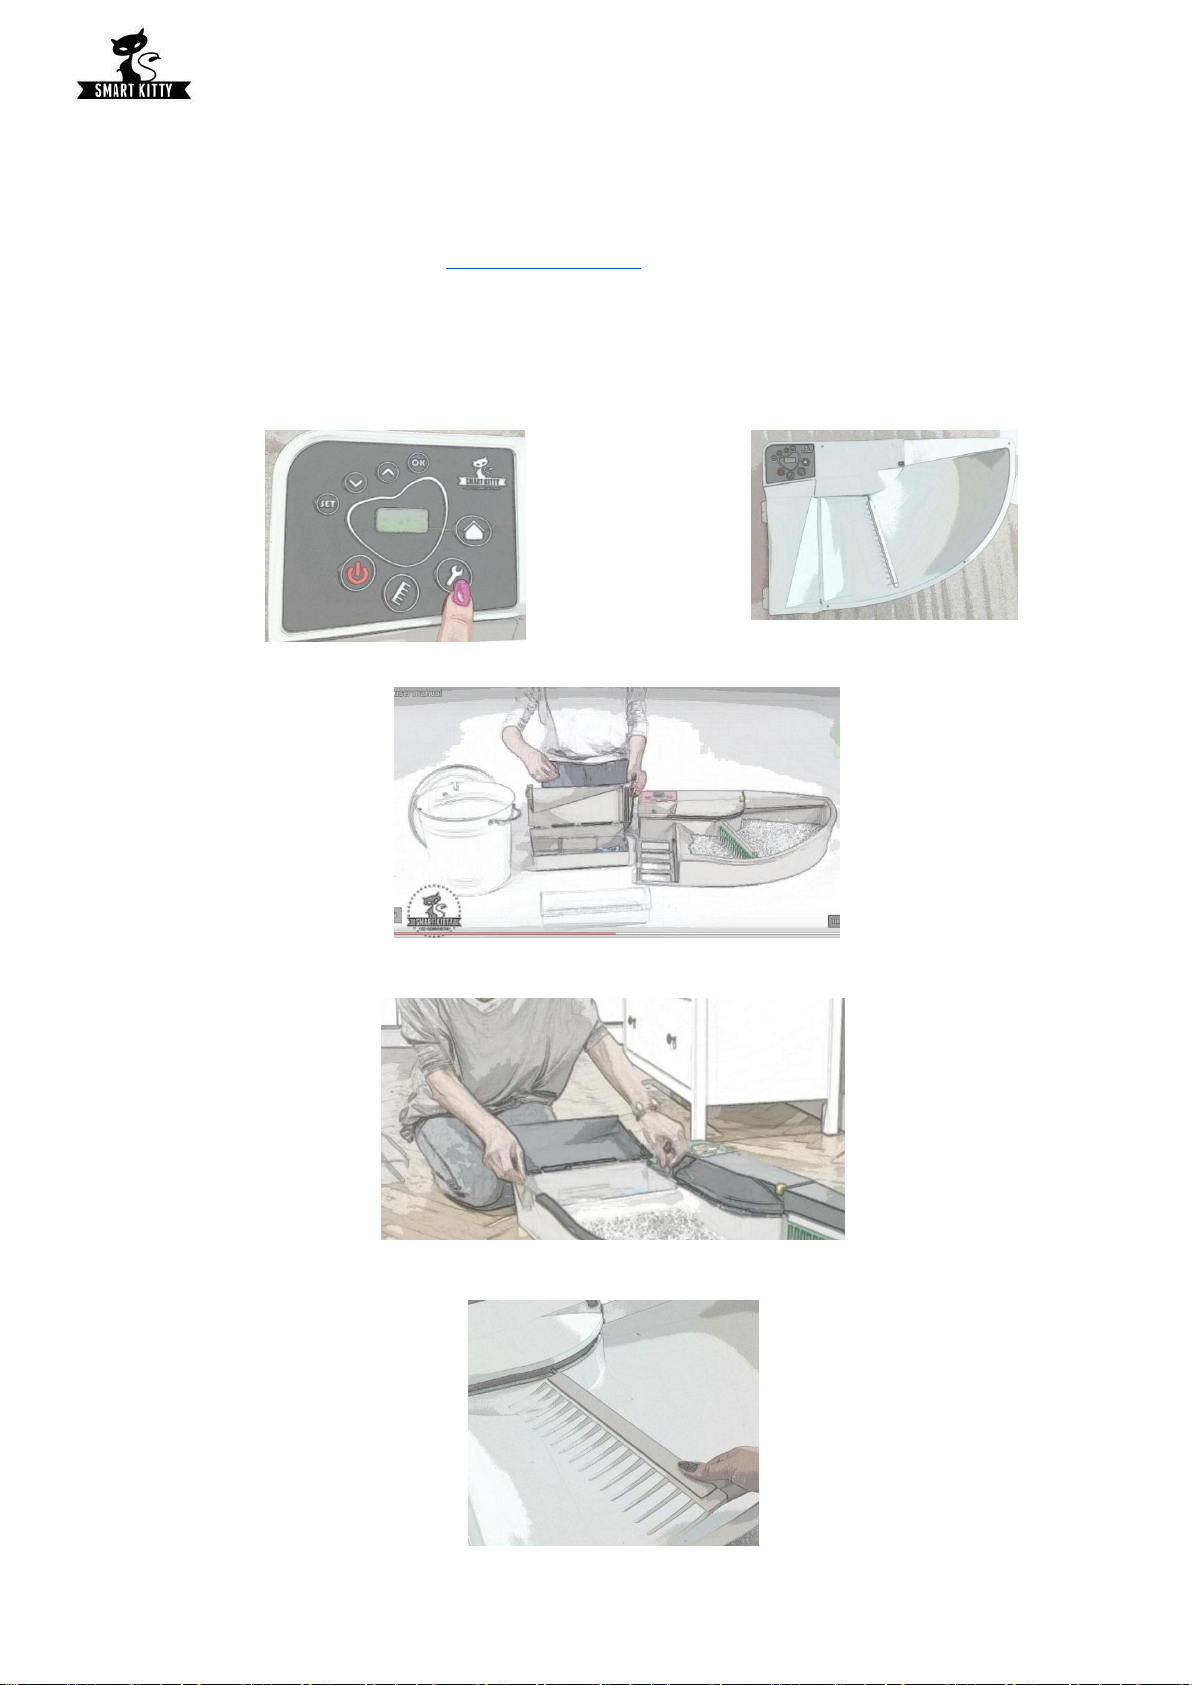
8.1. Dismantling the litter box for cleaning
We recommend our video manual on https://goo.gl/kk9aZK
WARNING: Before starting the cleaning process make sure that litter box is unplugged and the power supply
is in a safe place away from it.
1. Push the SERVICE button on the
control panel.
→
Wait until rakes are on service place.
2. Eject the excrement container (number 4)
3. Replace the disposable excrement container.
4. Turn the rakes 90 degrees left (clockwise).

10
5. Pull out the rakes from the aluminium profile.
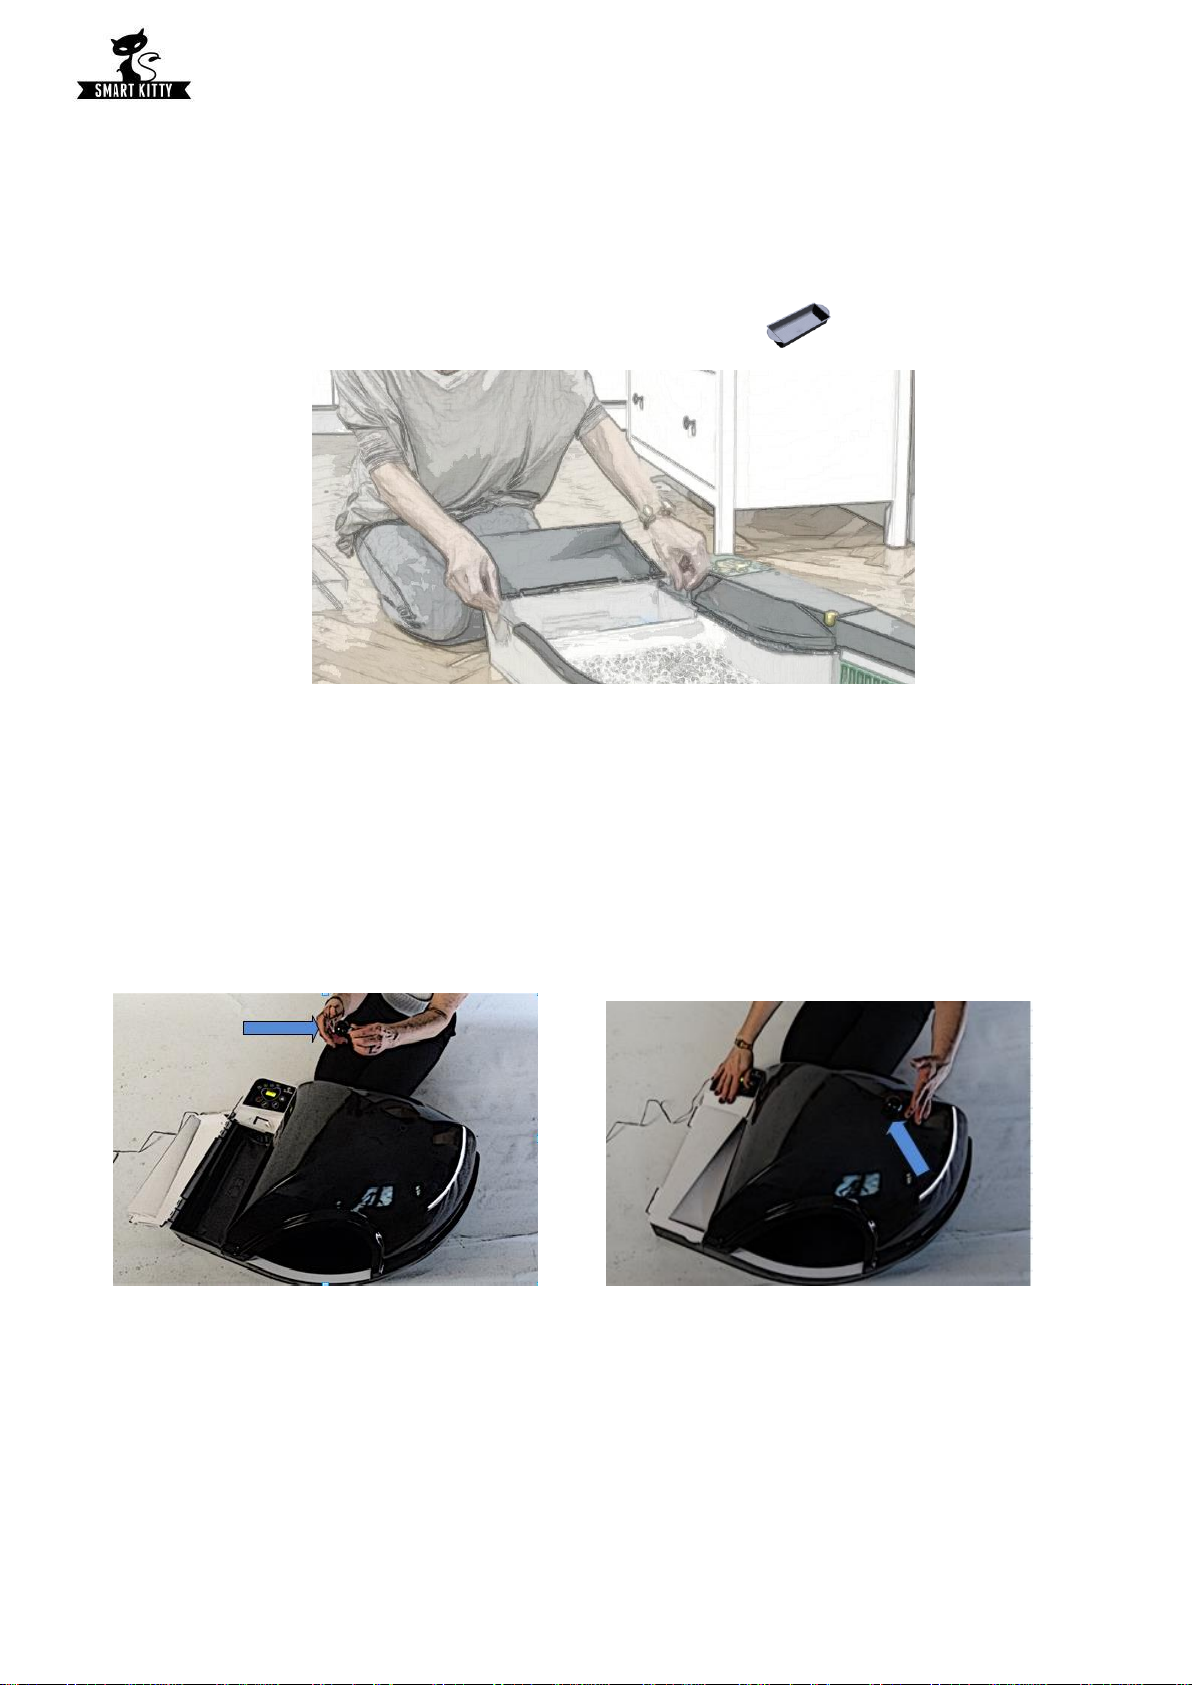
6. Pull out the module with the control panel up and place it away from areas exposed to water, damp or
damage.
→
→
WARNING: PULLING OUT THE MODULE REQUIRES PRESSING with one hand
7. Throw the grit and other waste from container 6 into the waste bin.
11
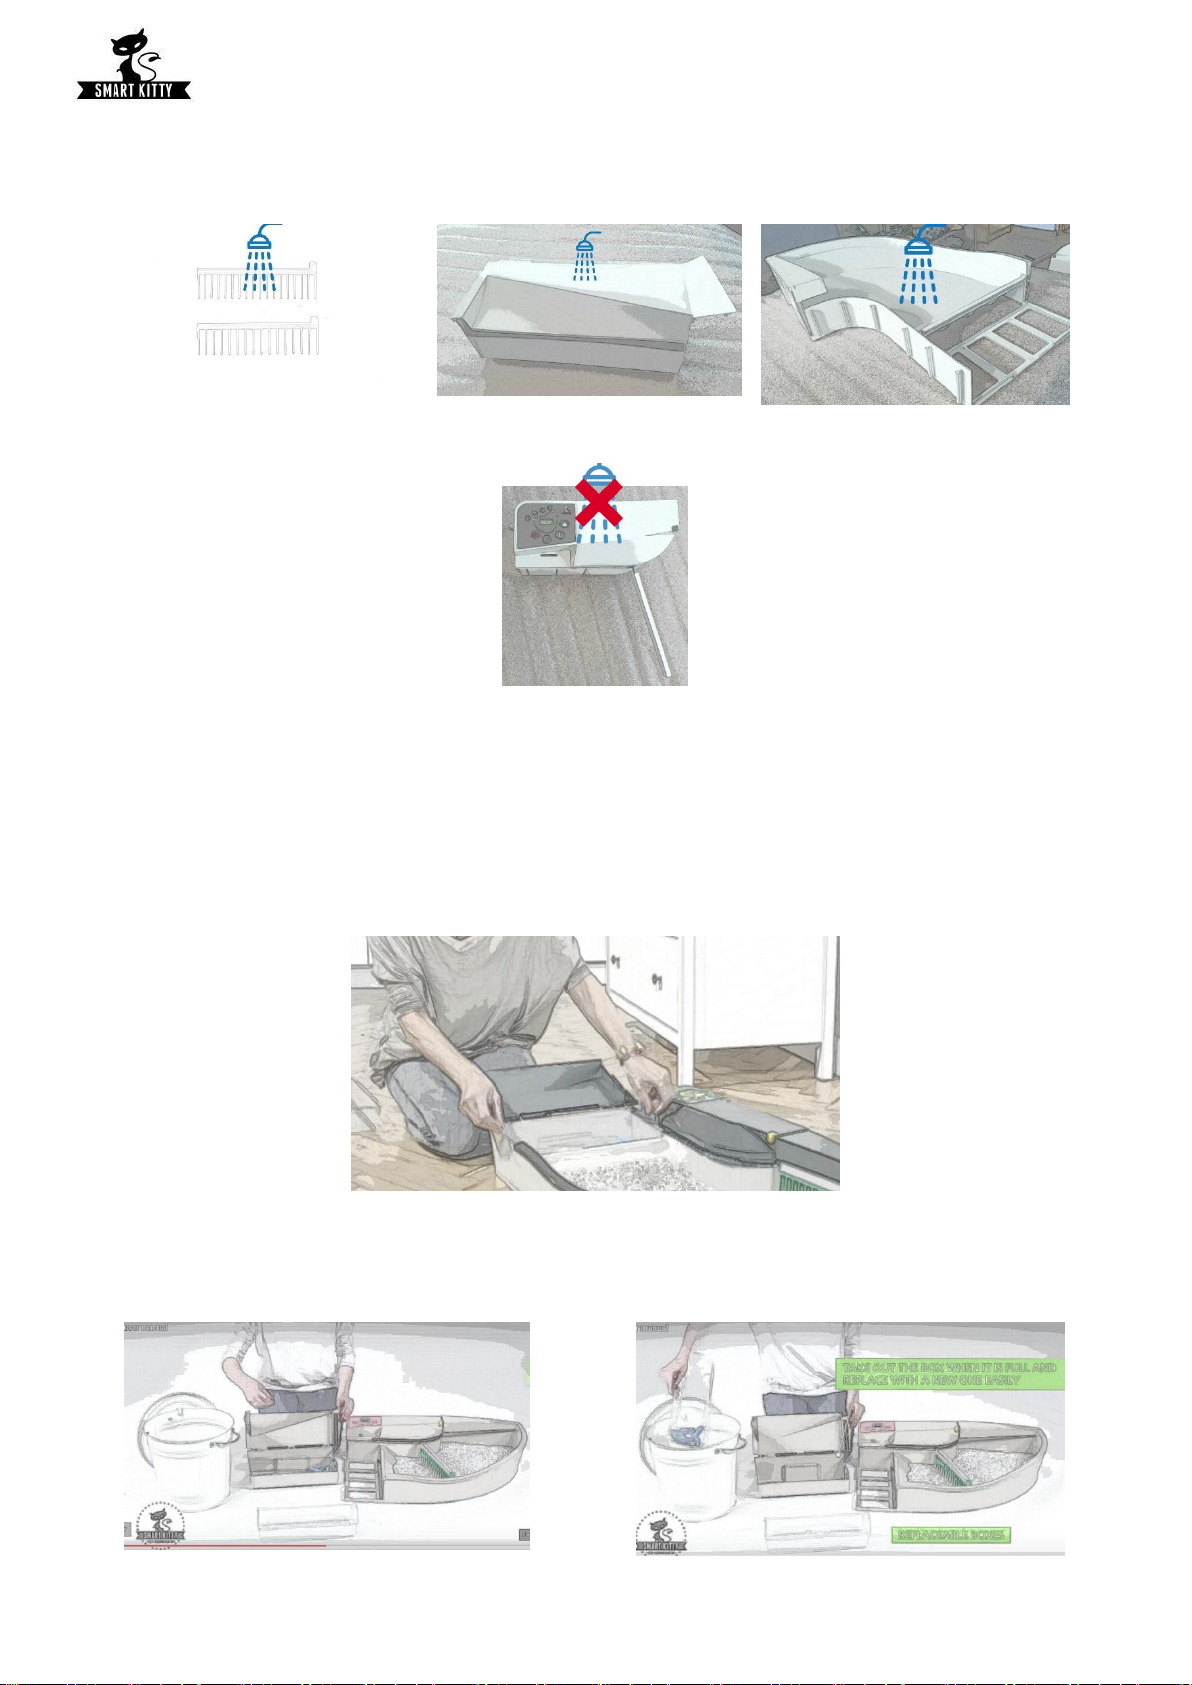
8.2. Cleaning the litter box
Modules 3,4 and 6 can be cleaned. Litter box components should be cleaned with warm water and cleaning
solutions.
WARNING: NEVER expose the electrical module (1) to water.
WARNING: Do not use sharp abbrasive tools which can damage or scratch the surface.
Leave the modules to dry or dry them well with a cloth or paper towel.
8.3. Replacing disposable excrement containers
Option 1- removing container only
Open the lid of component 4 by hand, take out the disposable container and throw it out to the waste bin. Put
a new disposable excrement container into container 4.
Option 2- with the large container removal.
Take out component 4- cat excrement container, remove a disposable container and throw it out to the waste
bin.
→

12
8.4. Assembling the litter box after the cleaning process.
1. Place the grit container on a flat, dry and clean surface.
2. Insert the module with the control panel from above.
→
→
3. Turn the raking module 90 degrees left (clockwise) and insert plastic rakes into it..
4. Place a clean excrement container into container 4.
5. Insert container 4 into the litter box base (no 6).
6. Plug in the litter box.
13
9. Panel functions
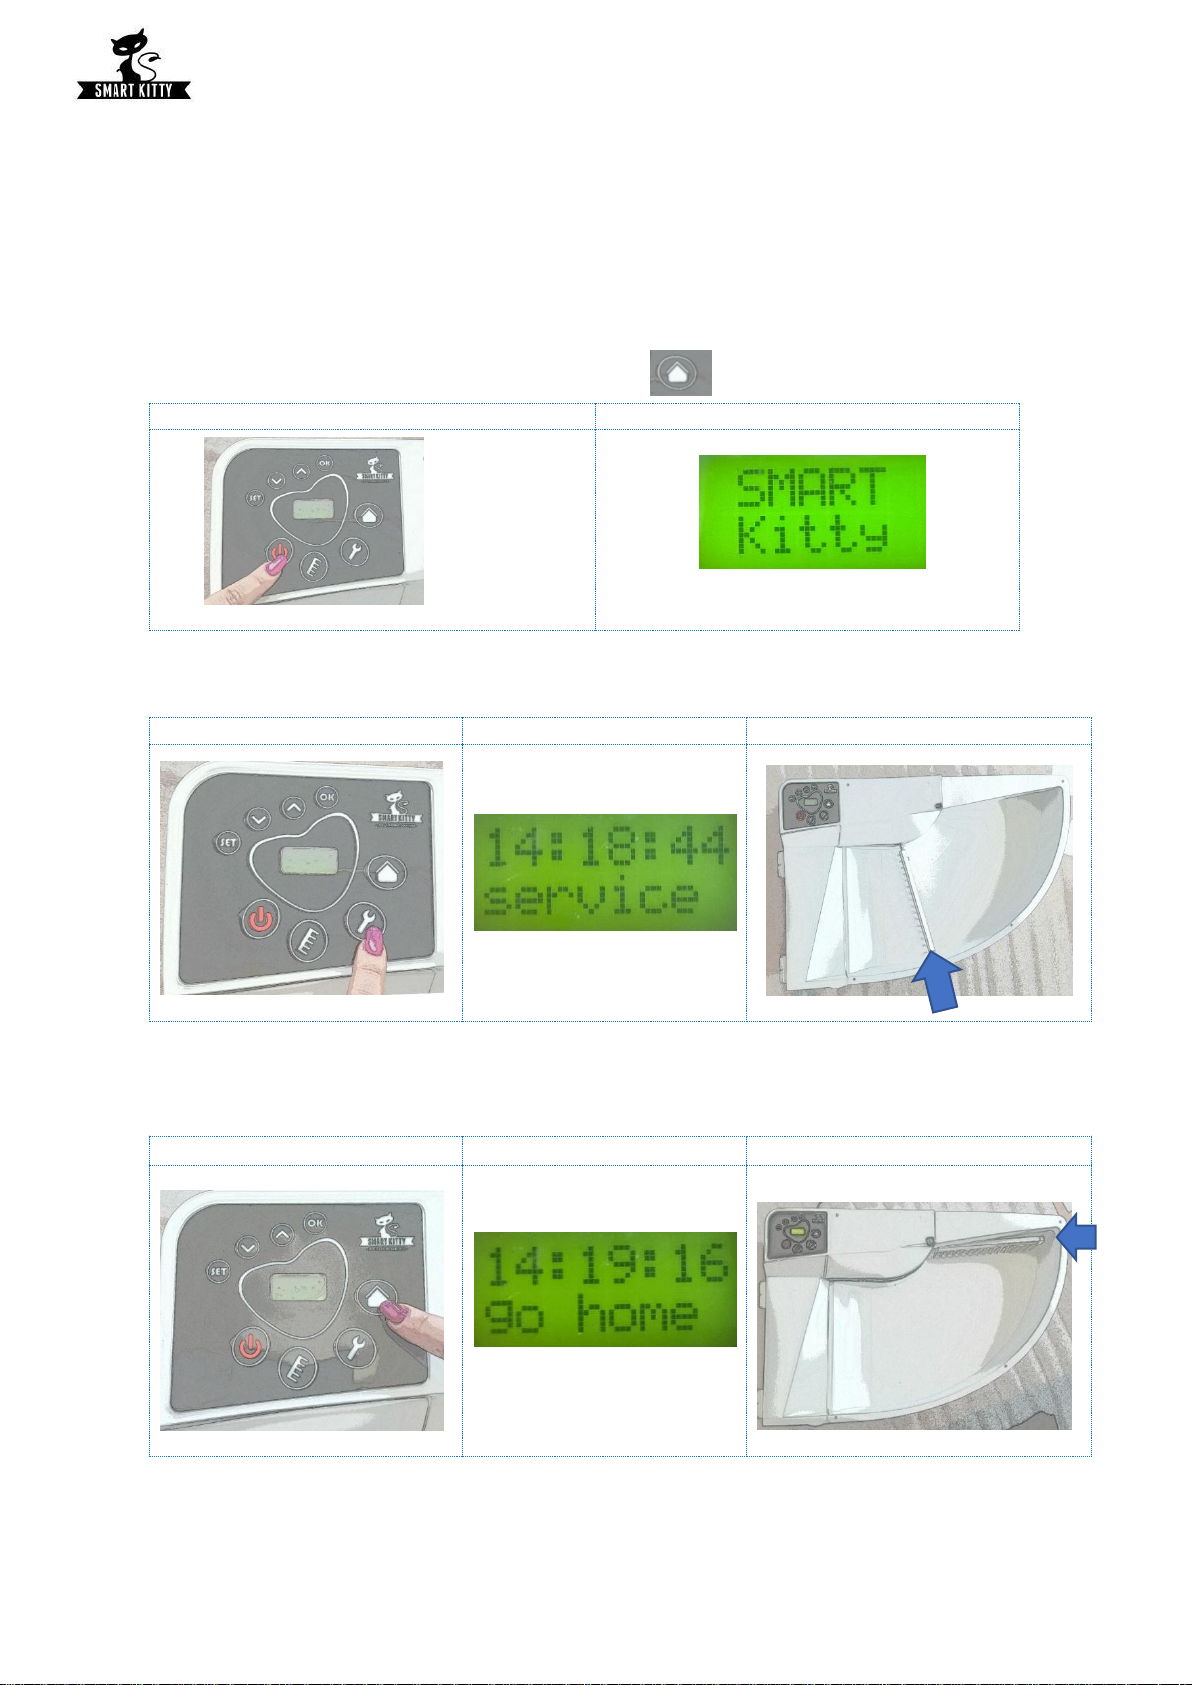
9.1. ‘SmartKitty” function
The basic panel function. It starts after pressing the red button. It resets previously programmed or
currently operating functions.
If the litter box is set to any mode, it is stopped immediately.
The function stops all actions: raking, service, set.
To restart the litter box, press the Home button.
Panel
Screen
1. ‘Service’ function
It moves the rakes into the Service position, which is safe for pulling out the rakes or the control panel.
Panel
Screen
Litter box
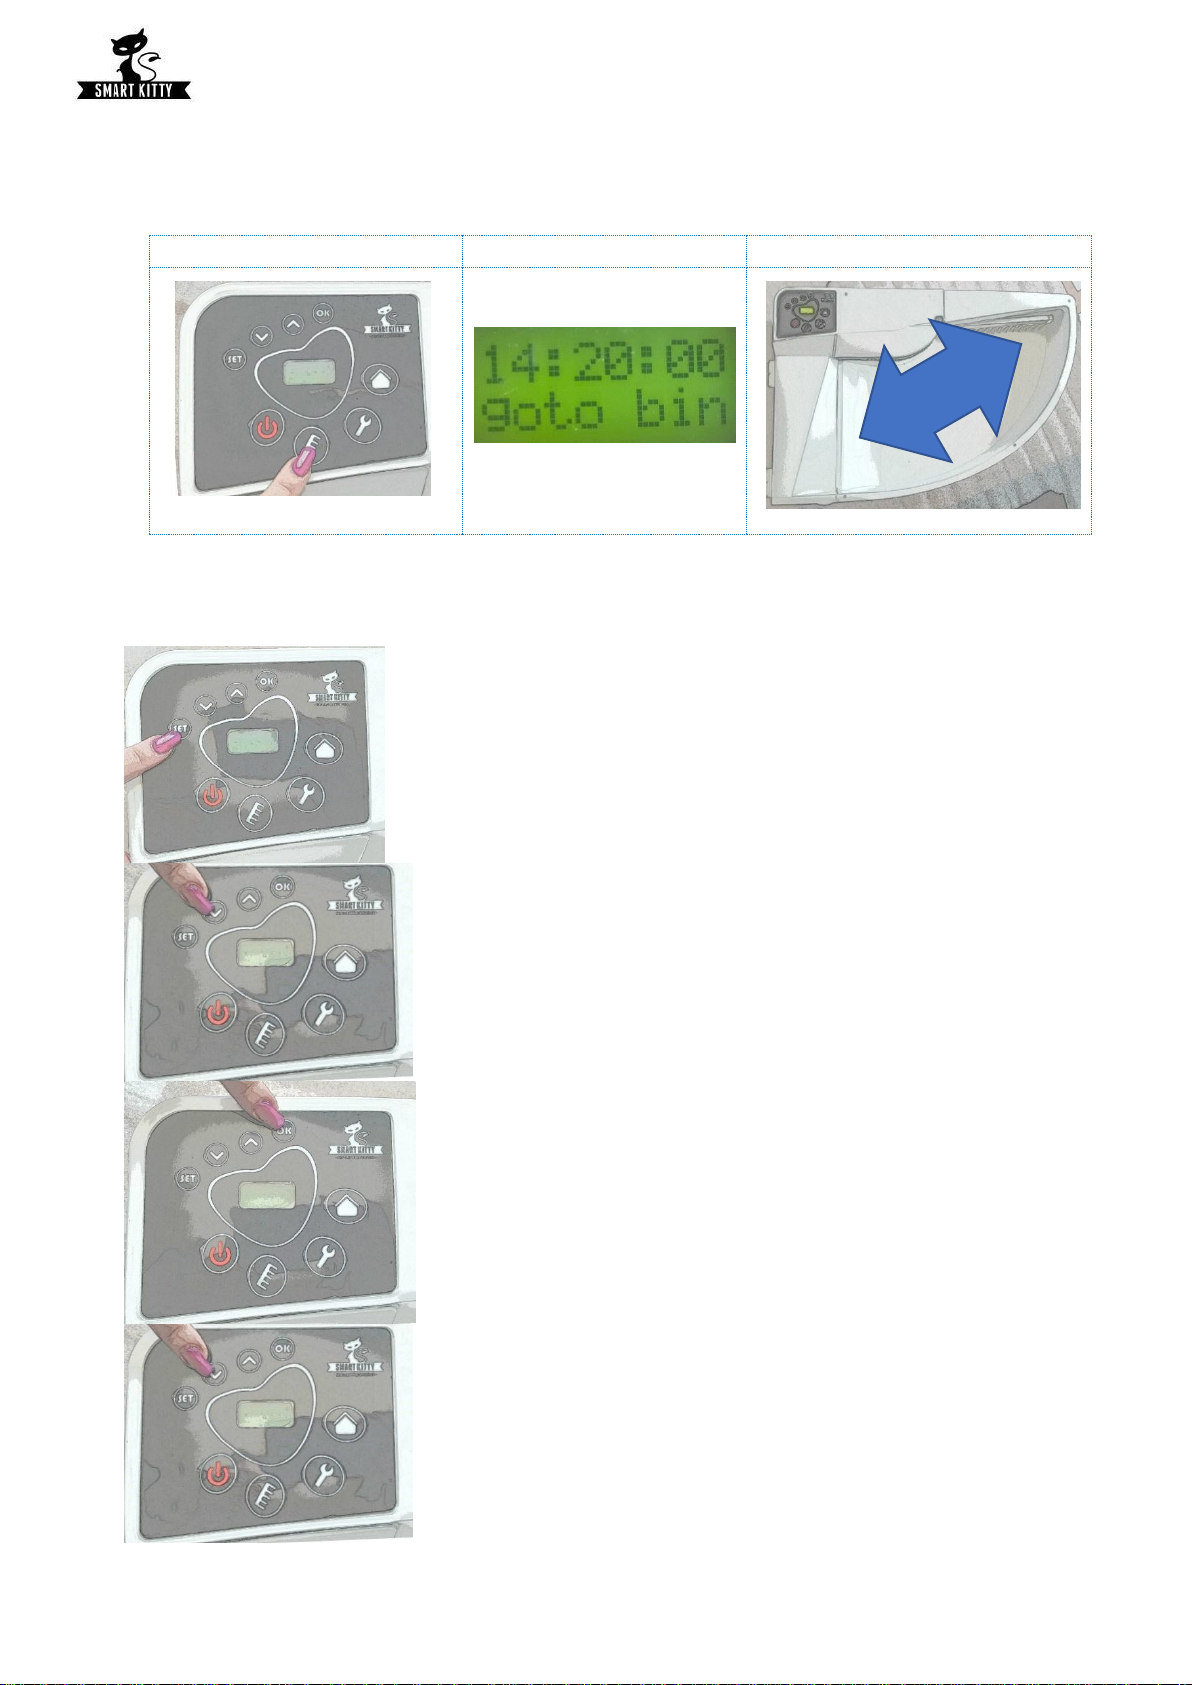
2. ‘Go Home’ function
It causes the rakes to move into ‘Home’ position- a setting in which the litter box should always start its
work.
Panel
Screen
Litter box
14
3. ‘Go to bin’ function
Allows to prompt the raking process in the direction of the cat excrement container manually. This function
is used to perform a faster working motion of the rakes..
Panel
Screen
Litter box
9.2. Working time and clock setting functions
Setting the litter box time
Press SET to enter the menu.
By pressing up and down arrows find the ‘set clk’ function.
Press OK to enter the set clk function
A flashing hour appears. By pressing up and down arrows set hour.
15
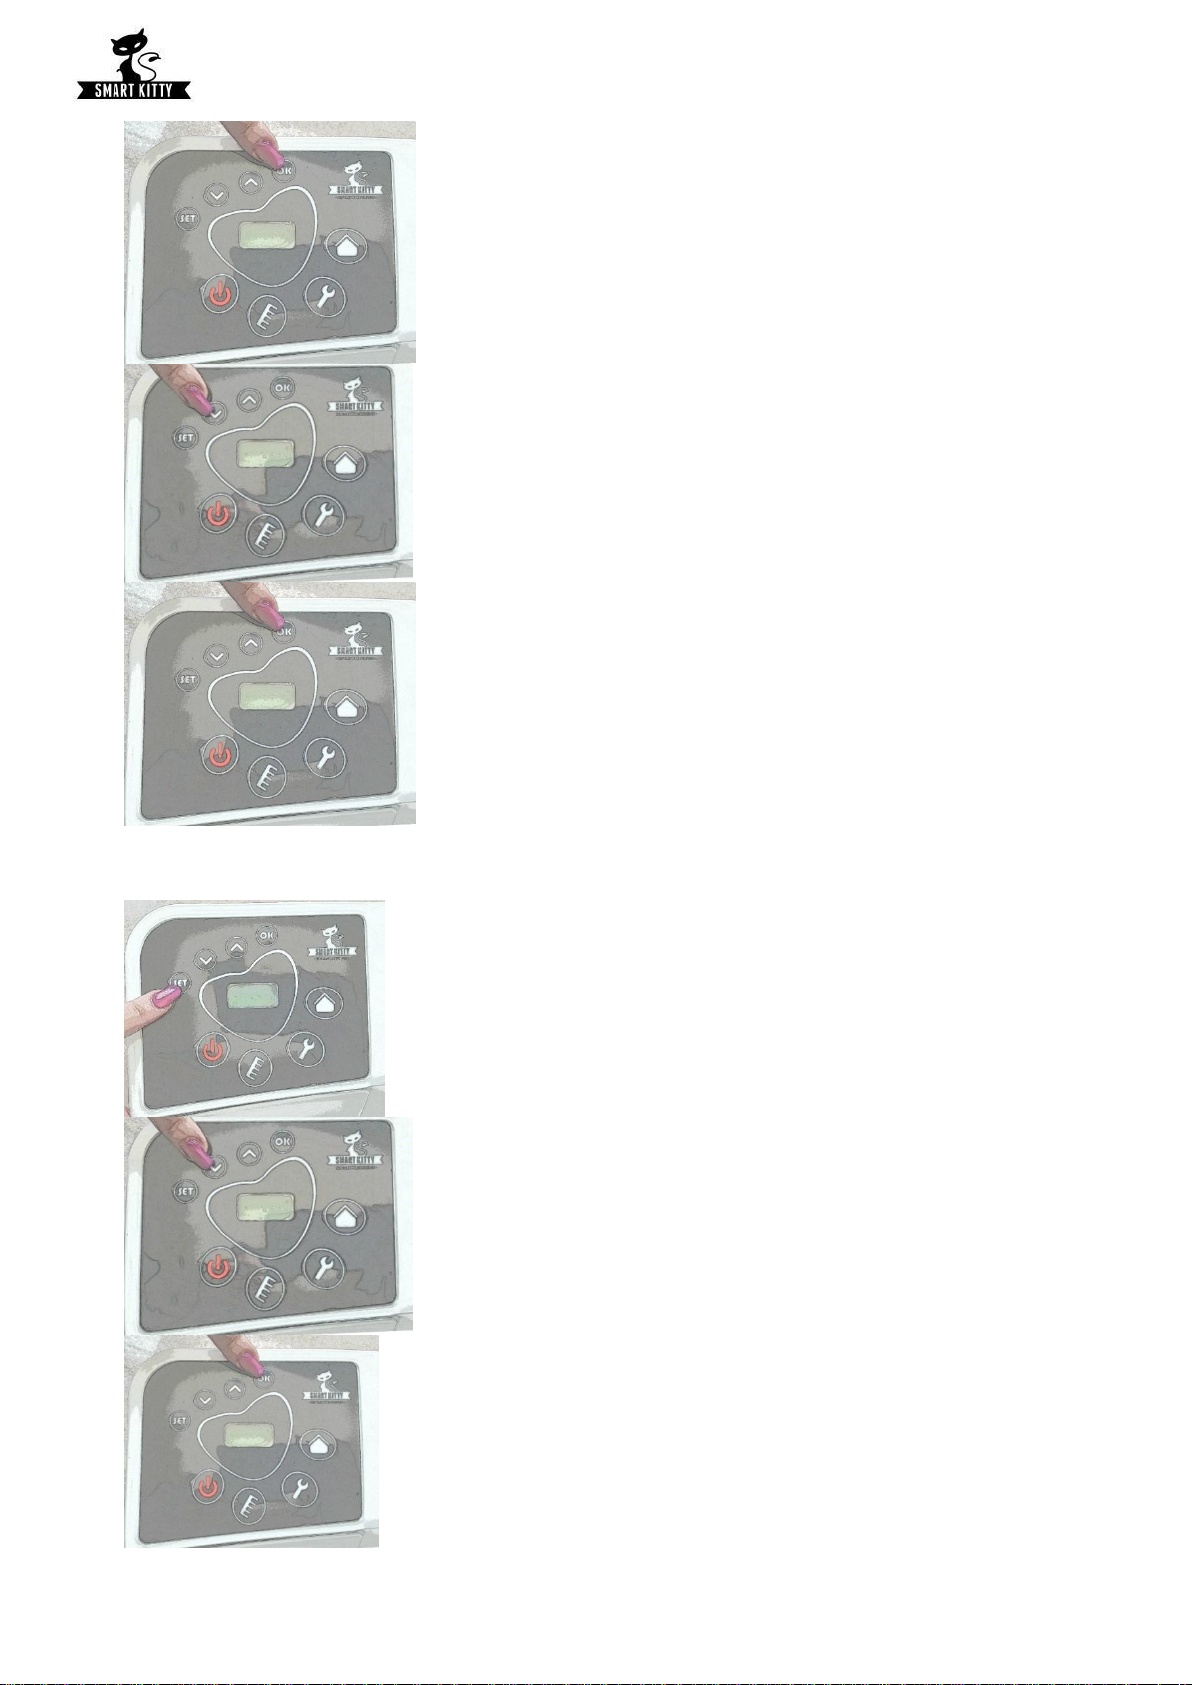
Confirm the time by pressing OK.. A flashing minutes appears.
Set the fixed time for the minutes with up/ down arrows.
Confirm the time by pressing OK..
Setting the litter box working time
Press SET to enter the menu
By pressing up and down arrows find the ‘sleep hr’ function.
Press OK to enter the ‘sleep hr’ function.

16
A flashing ‘from- to’ appears. Set the fixed time for the beginning of
standstill with up/ down arrows (‘from’).
Confirm the time by pressing OK. ’To’ starts to flash.
By pressing up/down arrows set the fixed time for the end of standstill.
Press OK. The sleep mode of the litter box is set.
WARNING: If the fixed time FROM=TO, the litter box will not work.

17
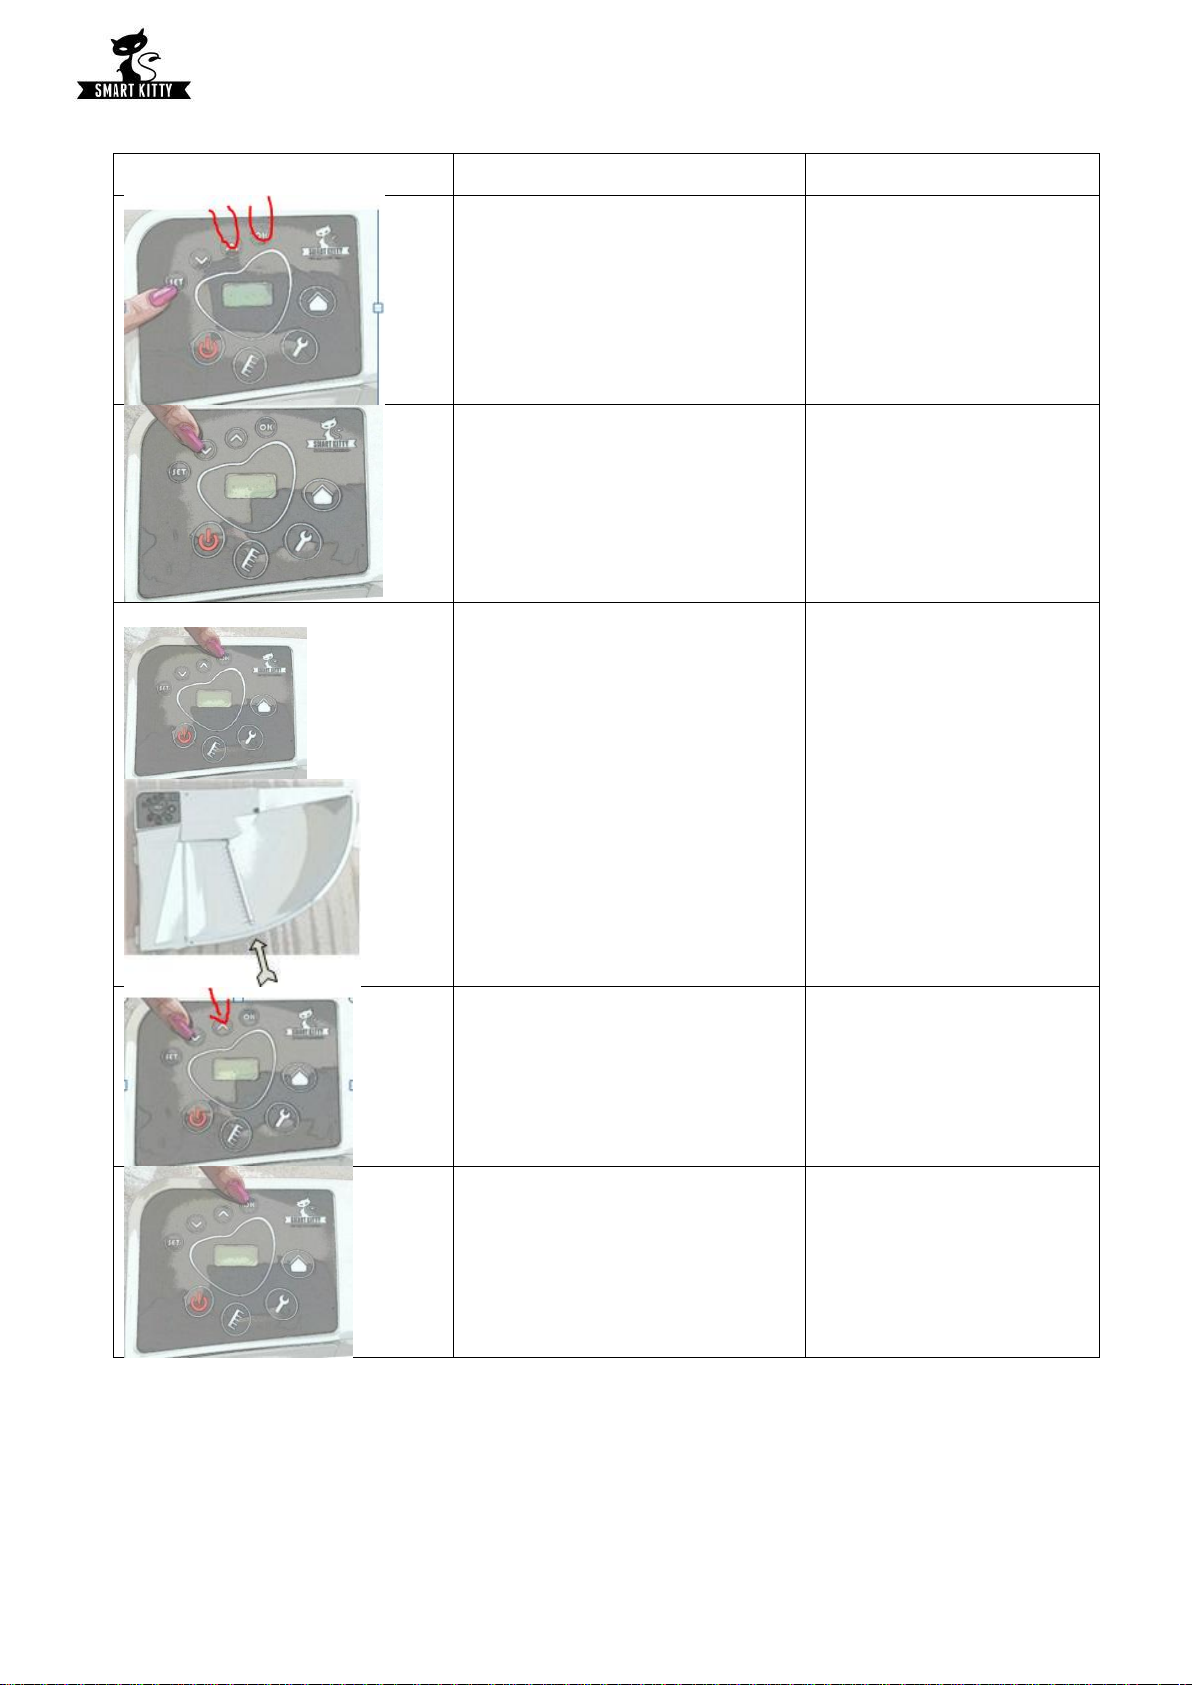
Setting the working time after being used by a cat.
The function used to set the start- up time is determined by the type of grit. The time should be set according
to the grit producer recommendations.
The most frequent time settings
Gravel type
Work time
bentonite
7 minutes
manioc
4 minutes
zeolith
11 minutes
silicone
6 minutes
Press SET to enter the menu.
By pressing up and down arrows find the clean dl function
Press OK to enter the clean dl function
A flashing ‘minutes’ appears. . Set the fixed time with up/ down
arrows.
Press OK.

18
The ‘cat sens’ setting.
- high- the litter box stops working for a minute in the presence of a cat or other object
- normal- the litter box does not stop working after sensing a cat or other object.
WARNING!
The litter box is equipped with the additional security system, which will allow for three attempts to remove
the obstacle when overloaded before the system is stopped.
The safe mode is recommended especially for kittens and with babies in a house.
Press SET to enter the menu.
By pressing up and down arrows find the cat sense function.
Press OK to enter the cat sens function.
By pressing up/down arrows set the normal or high mode.
Press OK. The safe mode of the litter box is set.

19
10. Emergency functions
10.1. Manual control
Manual rakes control „move – rak” use in case when liter box is jammed - this mode allows You to
move rakes left and right
Picture
Manual
LCD Screen view
Press SET
Clock
Use arrows to find option move-rak
Rakes movement
�--- -�
Press OK to pick this option
Rakes movement
�--- -�
Press arrows and move rakes left and
right
Rakes movement
�--- -�
20
10.2. Factory reset
Picture
To do
On LCD Screen
Press at the same time
SET, Arrow UP and OK
DON’T WORK EVERY TIME, PLEASE TRY
FEW TIMES
FACTORY RESET !
Press OK
Rakes will go to „home” and then
waste box
Serial ID
Press OK when rakes in the same
position like on pic
Press ok on position serv
Use arrows to set OVC on 1,25
mA
OVC Stop
Press OK and unplug liter box
from power source
Press OK and unplug liter
box from power source
Table of contents
Other Smart Kitty Pet Care Product manuals

Popular Pet Care Product manuals by other brands


Prevue Hendryx
Prevue Hendryx F030 quick start guide

SportDOG
SportDOG SPORTTRAINER SD-400E operating guide

Prevue Pet Products
Prevue Pet Products Southbeach Dometop 21006 quick start guide

Petsafe
Petsafe PFD00-16828 quick start guide

Oypla
Oypla 3815 user manual

Silverline
Silverline A-REPELLER KV300 manual


