Smart Meter iGlucose User manual

USER GUIDE - SHORT
SMART METER CORPORATION
368 New Hempstead Road, Suite 309, New City, NY 10956 1-844-IGLUCOS (1-844-445-8267)
www.iGlucose.com
IGLUCOSE
USER GUIDE SHORT
iGlucose®

USER GUIDE - SHORT
SMART METER CORPORATION
368 New Hempstead Road, Suite 309, New City, NY 10956 1-844-IGLUCOS (1-844-445-8267)
www.iGlucose.com
Table of Contents
iGlucose™ Equipment ............................................................................................................................... 3
iGlucose™ at a Glance........................................................................................................................... 3
iGlucose™ Functions ............................................................................................................................. 4
Performing Blood Tests............................................................................................................................. 5
Communicating your data ........................................................................................................................ 6
Select the Recipients of your Glucose Readings................................................................................... 6
Cleaning and Disinfecting..........................................................................................................................7
Disinfection Procedure..........................................................................................................................7
Storage and Handling............................................................................................................................ 7
USER GUIDE - SHORT
SMART METER CORPORATION
368 New Hempstead Road, Suite 309, New City, NY 10956 1-844-IGLUCOS (1-844-445-8267)
www.iGlucose.com
iGlucose™ Equipment
The iGlucose equipment consists of the following:
a. Included:
SGM-03 unit (the iGlucose device)
Charging cable
Rechargeable Li-ion battery
Wall charger and adapter
User guide
b. Optional (order on www.iglucose.com):
Carrying case
50/100 test strips
Check strip
Control solution (small bottle) Level I / Level II
Important: These products are intended for use together in order to get accurate blood glucose test
results. Do not use other test strips or control solutions with your device. Please make sure that all
products listed on the contents of the box are contained in the package before using this system. If you
find any imperfection in our products, please contact customer support at: 1-844-IGLUCOSE (1-844-445-
8267) Mon-Fri 9:00am –4:30pm Eastern Time.
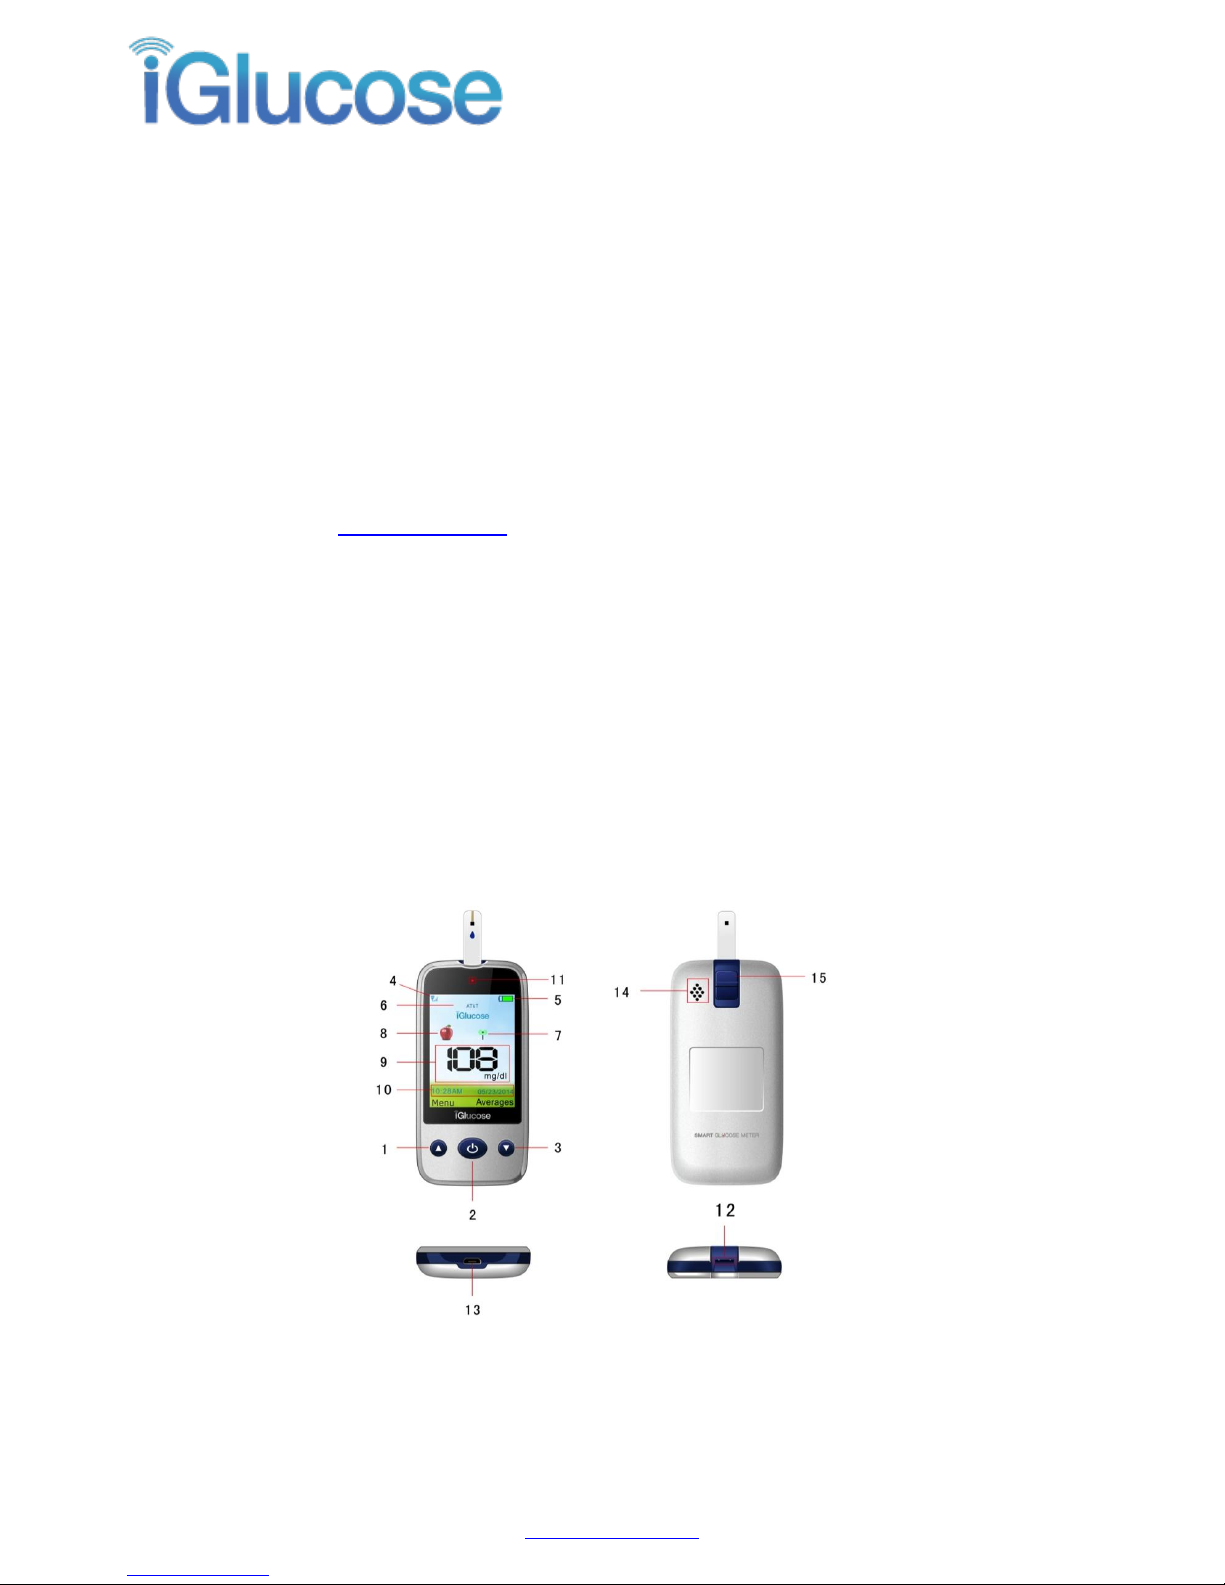
iGlucose™ at a Glance
Figure 1: Front and reverse views of the iGlucose device

USER GUIDE - SHORT
SMART METER CORPORATION
368 New Hempstead Road, Suite 309, New City, NY 10956 1-844-IGLUCOS (1-844-445-8267)
www.iGlucose.com
iGlucose™ Functions
Note: Several buttons perform different functions depending on the mode of use. The normal mode is
indicated first; where applicable, additional functions are indicated by the “Press” or “Press and hold” or
“In standby” mode.
#
Name
Function
1
Up button
Go up
Press: go to Main Menu
Press and hold: go to Information
2
Middle (‘home’) button
Enter
Press: change Test Mode
Press and hold: turn device on or off
3
Down button
Go down
In standby: go to Average
Press and hold: go to History
4
GSM signal strength
Indicates GSM signal strength
Signal strength is shown by number of bars (0-4); in standby mode, it is
zero
5
Battery level
Indicates battery level
6
Standby mode
Network name shows here in when GSM is on.
In standby: GSM is off
7
Sending signal
Signal blinks when data is being sent to server
8
Test mode
Icon indicates one of three test modes: Before Meal ( ), After Meal
( ) or Control Solution ( ).
9
Glucose value
Indicates the blood glucose value determined by the device following
testing
10
Time and date
Indicates the current time and date
11
Charging light
Indicates that the battery is charging
12
Strip slot
Test strip is inserted here
13
USB port
USB port for charging battery, connection to PC
14
Speaker
Sound comes from here
15
Strip ejector
Push button to eject test strip after test is completed

USER GUIDE - SHORT
SMART METER CORPORATION
368 New Hempstead Road, Suite 309, New City, NY 10956 1-844-IGLUCOS (1-844-445-8267)
www.iGlucose.com
Performing Blood Tests
To perform the blood test:
1. Wash your hands in warm water, using soap. Rinse and dry completely.
2. Select the appropriate test mode: “Before Meal” or “After Meal” in one of the following ways:
Using the menu:
a. Press the “up” (Menu) button on the device. The Menu appears.
b. Select the “Test Mode” option.
c. Scroll to the “Before Meal” or “After Meal” option as required.
d. Press the middle button. A confirmation message appears.
Using the middle button from the home screen (when no menu is selected):
a. Press the middle button on the device to toggle the Test Mode icon (#8 in Figure 1
above) on the display.
b. For “Before Meal” toggle to the whole apple icon; for “After Meal” toggle to the
partially eaten apple icon. Do not use the “Control Solution” setting (represented by the
solution bottle icon) for a blood test, as the result will not be calculated into averages.
Important: If the test is performed within two hours after a meal, use the “After Meal” setting;
otherwise, use the “Before Meal” setting.
3. Remove a new test strip from the vial. Be sure to replace the vial cap tightly after removing the test
strip.
4. Use a safety lancet or lancing device to prick your finger and draw a drop of blood. To avoid the
transmission of blood borne pathogens, use the lancing device once for a single patient only. Do not
share it with anyone else, including other family members.
5. Insert a test strip, arrow side facing up, into the strip slot of the device. A message “Strip inserted”
and then “Apply a drop of blood” appears. Check if the code number on the meter matches the code on
the vial. If the two numbers match, you may begin blood testing. Otherwise insert a new one. If the code
number still doesn’t match, please contact customer support.
6. Hold the device upright and apply a drop of blood to the top front of the test strip, where several
black stripes are visible.
7. The test result will show in about five seconds and a “Glucose Value”number appears on the screen.
8. After a few seconds, the sending signal icon blinks as the test result is transmitted to the online
database. A message “Successfully Recorded” appears.

USER GUIDE - SHORT
SMART METER CORPORATION
368 New Hempstead Road, Suite 309, New City, NY 10956 1-844-IGLUCOS (1-844-445-8267)
www.iGlucose.com
9. Use the strip ejector at the back on the device to remove the test strip. A message “Strip Removed”
appears. Carefully follow the provider’s instructions for the safe disposal of used lancets and strips.
Note: The testing range of the device is from 20 to 600 mg/dL. If ‘HI’ is displayed, your blood glucose
result may be higher than 600 mg/dL. If ‘LO’ is displayed, your blood glucose result may be lower than 20
mg/dL.
Communicating your data
Select the Recipients of your Glucose Readings
To select the recipients of your glucose readings:
1. Sign into your iGlucose account on www.iglucose.com.
2. The first time you will get a wizard which will lead you through the registration process
3. Click on the drop-down button next to your name. Select the “Data Recipients” option.
4. Click on the tab for the type of messaging option that you wish to use for the recipient: Emailed
Reports or Mobile Messaging.
For Emailed Reports recipients:
1. Enter the recipient’s name in the “Name” field and their email address in the “Email” field.
2. Select the frequency with which you would like the reports to be sent from the “Emailed
Reports” drop-down list.
3. Choose the Date and Time Format that you would like to appear on the report from the drop-
down list.
4. Indicate if the information is being shared with a “Healthcare Provider” from the drop-down list.
5. Press the “Add” button. The recipient will appear in the “Emailed Reports Recipients” list
webpage.
6. Repeat steps 1 –5 above to add additional recipients. You may add up to a total of 10 recipients.
a. If you wish to change a recipient’s details, click on the “Update” button next to their
details in the “Emailed Reports Recipients” list and make the desired changes.
b. If you wish to delete a recipient, click on the “Delete” button next to their details in the
“Emailed Reports Recipients” list.
For Mobile Messaging recipients:
1. Enter the recipient’s name in the “Name” field.
2. Select the country of the recipient’s mobile telephone from the drop down list and then fill in
the mobile phone number in the field that appears below.
3. From drop-down list, select the frequency with which you would like the reports to be sent.
4. Choose the Date and Time Format that you would like to appear on the report from the drop-
down list.
5. Press the “Add” button. The recipient will appear in the “Mobile Messaging” list on the
webpage.

USER GUIDE - SHORT
SMART METER CORPORATION
368 New Hempstead Road, Suite 309, New City, NY 10956 1-844-IGLUCOS (1-844-445-8267)
www.iGlucose.com
6. Repeat steps 1 –5 above to add additional recipients. You may add up to a total of 10 recipients.
a. If you wish to change a recipient’s details, click on the “Update” button next to their
details in the “Mobile Messaging” list and make the desired changes.
b. If you wish to delete a recipient, click on the “Delete” button next to their details in the
“Mobile Messaging” list.
Cleaning and Disinfecting
To mitigate the risk of blood borne pathogen transmission (e.g., viral hepatitis), the device must be
properly cleaned and disinfected.
Disinfection Procedure
To disinfect the device:
1. Take a moistened wipe out of the canister. Replace the cap and close the canister.
2. Put the moistened wipe on a smooth surface.
3. Make sure the meter stays wet for 1 min. Do not get disinfectant liquid into the test strip slot.
4. Throw away the used wipes. Do not reuse the wipes.
Storage and Handling
1. Keep your device free of dust or water. Protect it from extreme temperature and humidity.
2. Store the device and test strips between 50°F (10°C) and 104°F (40°C)
Other manuals for iGlucose
2
Table of contents
Other Smart Meter Blood Glucose Meter manuals


