Smart Meter iGlucose User manual
Owner’s Booklet


iGlucose®3
iGlucose® Blood Glucose Monitoring System
User Manual
iGlucose® is a trademark of Smart Meter LLC.
iGlucose Blood Glucose Monitoring System is manufactured by
Bionime Corporation, No. 100, Sec. 2, Daqing St., South Dist.,
Taichung City 40242, Taiwan (R.O.C)

4 iGlucose®
preface
Thank you for selecting the iGlucose® Blood Glucose Monitoring
System. This manual provides all the information you need to
operate this product for accurate test results. Please read this entire
manual before you start testing.
For people living with diabetes, it is important to regularly monitor
blood glucose levels to eectively reduce complications from the
disease. The easy-to-use iGlucose Monitoring System provides
accurate, reliable test results. It can be connected to web portals
by GSM technology to help you better manage your diabetes.
The iGlucose System is intended to be used for the quantitative
measurement of glucose (sugar) in fresh capillary whole blood
samples drawn from the fingertips. The iGlucose System is intended
to be used by a single person and should not be shared.
The iGlucose System is intended for self-testing outside the body
(in vitro diagnostic use) by people with diabetes at home as an aid to
monitor the eectiveness of diabetes control. The iGlucose System
should not be used for the diagnosis of, or screening for diabetes
or for neonatal use.
The iGlucose Blood Glucose Test Strips are for use with the iGlucose
Blood Glucose Meter to quantitatively measure glucose (sugar) in
fresh capillary whole blood samples drawn from the fingertips.
WARNING:
The device is not intended for use in multi-patient facilities such
as hospitals, physicians oces or long term care facilities. It has not
been cleared by FDA for use in these settings, including for routine
assisted testing or as part of glycemic control procedures. Use of
this device on multiple patients may lead to transmission of Human
Immunodeficiency Virus (HIV), Hepatitis C Virus (HCV), Hepatitis B

iGlucose®5
caution
• The iGlucose Blood Glucose Meter and iGlucose Lancing Device
are for single patient use. Do not use on multiple patients. Do not
share meter with anyone including other family members.
•
Do not use the lancing device for assisted blood draws by
healthcare providers or at healthcare provision sites and do not
share it with anyone else, even a family member.
•
Before using the iGlucose System to test your blood glucose,
please read all of the instructions.
•
Please perform a quality control test with control solution
regularly to make sure the test results are accurate. (See
“Performing a Quality Control Test”).
•
The iGlucose Meter can only be used with the iGlucose Blood
Glucose Test Strips. Other test strips should not be used under any
circumstances. The use of other test strips may give inaccurate
results.
Virus (HBV), or other blood borne pathogens. The iGlucose® Blood
Glucose Monitoring System is supported by Smart Meter, LLC. We
will make every eort to assist you. If you have any questions or
concerns, please contact the iGlucose Diabetes Customer Support
Center at 1-844-IGLUCOSE (1-844-445-8267) or email us at
support@ iglucose.com.
The iGlucose Monitoring System is manufactured by Bionime
Corporation, No. 100, Sec. 2, Daqing St., South Dist., Taichung City
40242, Taiwan (R.O.C).

6 iGlucose®
•
The iGlucose® Blood Glucose Monitoring System is intended
for in vitro diagnostic use only. The blood glucose test results
using fresh capillary whole blood samples from the fingertip are
calibrated to be equivalent to plasma samples.
• The iGlucose Monitoring System should not be used to screen
for or diagnose diabetes mellitus.
•
If the iGlucose Blood Glucose Meter and iGlucose Test Strips are
exposed to a substantial change in temperature, please wait 45
minutes before measurement.
• The iGlucose System is not for use on neonates.
•
All parts of the kit are considered biohazardous and can
potentially transmit infectious diseases, even after following the
cleaning and disinfecting procedures. Please refer to the section
“Cleaning and Disinfecting Procedures.”
• Users should wash their hands thoroughly with soap and water
before and after handling the meter, lancing device, or test strips.

iGlucose®7
limitations
•
This device is not for use on anyone in a hyperglycemic
hyperosmolar state, with or without ketosis.
• Not for use with critically ill patients.
•
Hands and fingers contaminated with sugar from foods or
beverages may cause falsely elevated results.
•
Inaccurate test results may be obtained at altitudes greater than
10,000 feet (3,048 meters) above sea level.
•
Hematocrit levels outside the 20-60% range may yield
inaccurate results.
•
High concentrations of Uric acid >9 mg/dL, Cholesterol >600 mg/
dL, and Ascorbic acid (Vitamin C) >5 mg/dL may interfere with the
glucose test causing inaccurate test results. Certain conditions
may cause your blood level of uric acid to rise. These conditions
include gout or kidney disease. This means that when the uric
acid concentration in your blood is greater than 9 mg/dL you may
get inaccurate and unreliable glucose results. Please check with
your doctor before using the iGlucose® Blood Glucose Monitoring
System.
• Do not perform the blood glucose test at temperatures below
50°F (10°C) or above 104°F (40°C ), nor below 10% or above 90%
relative humidity.
•
iGlucose Blood Glucose Test Strips are designed for use with
capillary whole blood samples. Do not use serum or plasma
samples.
• Not for screening or diagnosis of diabetes mellitus.
•
For over-the-counter use. Single patient use only. For in vitro
diagnostic use only.
• Not for use on neonates or the critically ill.
•

8 iGlucose®
Please see the following references for further information.
1. FDA Public Health Notification: Use of Fingerstick Devices on
More than One Person Poses Risk for Transmitting Bloodborne
Pathogens: Initial Communication” (2010) http://www.fda.gov/
MedicalDevices/Safety/AlertsandNotices/ucm224025.htm
2. CDC Clinical Reminder: Use of Fingerstick Devices on More than
One Person Poses Risk or Transmitting Bloodborne Pathogens”
(2010) http://www.cdc.gov/injectionsafety/Fingerstick-Devices-
BGM.html

iGlucose®9
table of contents
4
5
7
12
14
15
16
17
18
19
20
20
21
22
23
24
25
27
27
28
31
preface
Caution
limitations
the iGlucose blood glucose monitoring system
the iGlucose blood glucose meter
the iGlucose blood glucose meter icons
the iGlucose blood glucose test strip
turning the meter on / off
charging the battery
replacing the battery when needed
synchronizing the date and time automatically
setting the time and date manually
setting the format for the date or time
setting preferred meter sound volume
choosing a blood testing mode
getting ready for testing
preparing the lancing device
performing a blood glucose test
inserting the test strip
applying a blood sample
removing the used lancet

10 iGlucose®
32
33
35
35
36
37
38
39
39
44
45
45
46
47
52
53
56
57
58
58
58
59
60
61
removing the iGlucose blood glucose test strip
study results of typical iGlucose users
view window appearance
understanding test results and messages
about quality control testing
when should a quality control test be performed?
required items for quality control tests
performing a quality control test
inserting the test strip
understanding control test results
recalling test results
obtaining readings averages
obtaining test results history
caring for your meter
troubleshooting
display messages and problem-solving guide
specifications
warranty
customer service
expected Blood Glucose Values without Diabetes
component manufacturer information
Logbook
warranty card
emergency card

iGlucose®11
12 iGlucose®
the iGlucose blood glucose
monitoring system
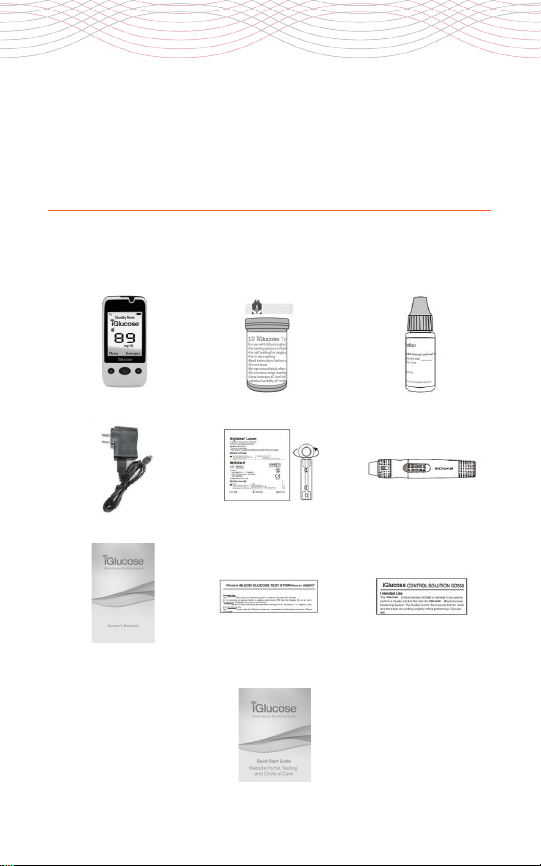
Your iGlucose® Blood Glucose Monitoring System consists of several
items. Please identify each item, learn its name and how it is used.
1
4
7
10 11
2
5
8
3
6
9
iGlucose®13
The iGlucose Blood Glucose Monitoring System consists of the
iGlucose Blood Glucose Meter, the iGlucose Test Strips as well as
Rightest® Control Solution. The iGlucose Meter is a cellular device.
When used with its corresponding iGlucose Test Strips, it measures
glucose in a small drop of fresh capillary whole blood (minimum 0.75
µL). The blood drop is placed on the test strip where it interacts with
chemicals to produce an electrical current which is read by the meter
and is converted to the corresponding glucose level in the sample.
The glucose result is then displayed on the meter within 5 seconds.
1. iGlucose® Blood Glucose Meter
2. iGlucose® Blood Glucose Test Strips
3. Rightest® Control Solution GC550
4. Meter Charger
5. Disposable Sterile Lancets (10 pcs)
6. Lancing Device
7. Owner´s Booklet
8. iGlucose® Blood Glucose Test Strip Package Insert
9. Rightest® Control Solution GC550 Package Insert
10. Quick Reference Guide - Meter, Test Strip and Lancing Device
11. Quick Reference Guide - Website Portal, Text Messages
and Circle of Care
14 iGlucose®
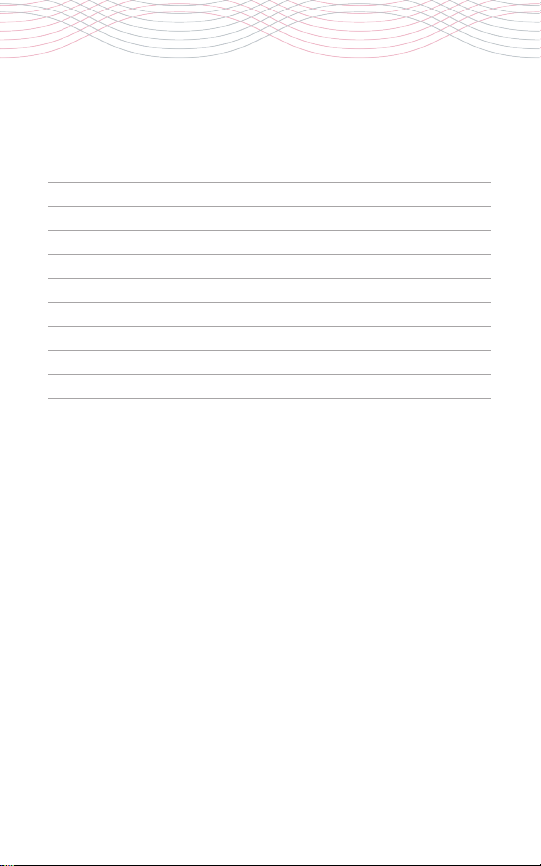
the iGlucose blood glucose
monitoring meter
Product name
Battery Cover
Meter Serial
Number
Up Button ( )
Home Button ( )
Display Window
Down Button ( )
Test Strip Port
Sim card
IMEI Number
iGlucose®15
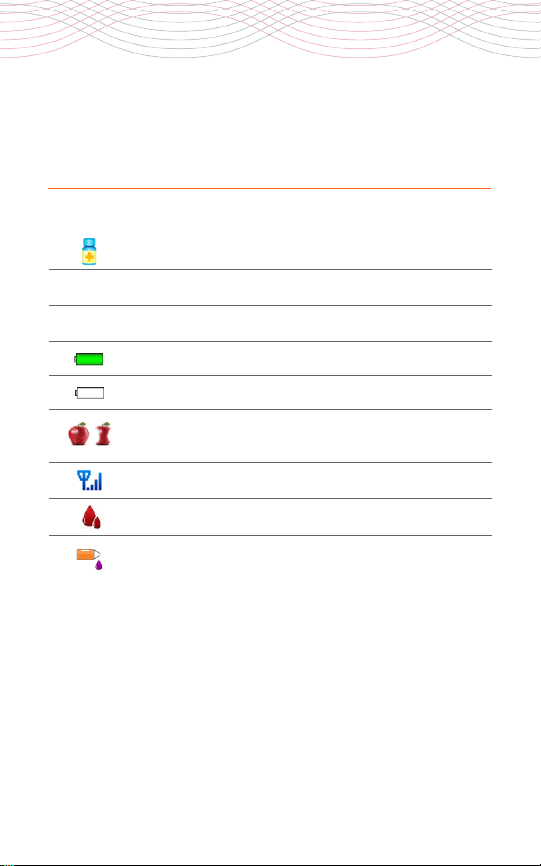
• Indicates a control solution test result
• Unit of test result
• Test result
• Battery fully charged
• Battery is low and must be recharged
• Indicates that the cellular network has connection
• Indicates when to apply a blood drop
• Indicates when to apply a control solution drop
• Indicates a meal marker. A full apple for “Before Meal”
and an eaten apple for “After Meal”
mg/dL
109 mg/dL
the iGlucose blood glucose meter icons

16 iGlucose®
caution
• The iGlucose® Blood Glucose Meter can only be used with the
iGlucose Blood Glucose Test Strips and the Rightest® Control
Solution GC550. The use of other test strips or control solutions
can lead to incorrect results.
•
Close the iGlucose Test Strips vial immediately after removing
a test strip.
•
Test strips should not be kept outside the capped vial. Strips
removed from the vial for practice purposes should not be used
for testing and should be discarded.
• Do not reuse iGlucose Test Strips.
• Do not use expired iGlucose Test Strips (See expiration date on
Test Strip vial.).
Sample Port
Apply a drop of blood or control solution here.
The test requires only 0.75µL of blood.
Hold Bar
Hold here to insert test
strip into strip port.
Noble Metal Electrodes
Electrochemical
sensor
View Window
Window will turn from yellow
to red when blood sample is applied.
Electrode Contacts
Sensing signal output terminals.
Indication Symbol
Insert strip with indication
symbol up and toward meter.
the iGlucose blood glucose test strip

iGlucose®17
auto code
turning the meter on / off
The iGlucose Blood Glucose Meter will automatically detect the
code number on the strip. You do not have to manually enter a code
number.
•
To power on the iGlucose Meter, press and hold the “Home”
button until the meter turns on. The display will light up. In the
next few seconds the meter will display “Searching” while the
date and time automatically synchronize. When done, a message
“Date & Time Synchronized” will appear and the meter will enter
“Standby Mode.”
•
When you open a new vial of iGlucose® Blood Glucose Test Strips,
record the date on the vial. Discard the vial of test strips after 3
months from opening.
•
Store the iGlucose Test Strips, between 39-86°F (or 4-30°C) and
in a location 10-90% relative humidity. Do not expose to direct
sunlight or heat.
•
Storage of strips near bleach as well as bleach containing
products will aect the results of the iGlucose Test Strips.
•
Do not perform testing immediately after moving from one
ambient temperature to another (e.g. after coming indoors from
the outside). Allow 45 minutes for the temperature of the meter
and the test strips to equilibrate. The need to wait 45 minutes is
required when for example, a meter is kept for a while in a car on a
hot afternoon and then brought into an air conditioned room for
testing or when a meter is kept outside on a snowy day and then
brought into a warm room.
•
For more information, please refer to the iGlucose Test Strips
Package Insert.
• The use of other test strips may cause strip error.
18 iGlucose®
meter battery charge
charging the battery
Your iGlucose Meter comes with an installed lithium rechargeable
battery. When fully charged this battery will provide power to
perform approximately 500 tests under normal use.
• Connect the meter charger to the mini usb port on the bottom
of the meter.
•
Plug the charger into a power outlet. When the unit begins to
charge, the screen illuminates, a blue light appears above the
screen, a charging battery icon appears on the screen along with
the message “Charging. Cannot Perform Glucose Test”. The blue
light remains on while charging continues. It may take 2-3 hours
to fully charge.
•
When charging is complete, the battery icon on the device screen
appears solid green.
•
Before using, unplug the charger from the power outlet and
from the meter.
• After turning the meter on, the iGlucose® Blood Glucose Meter
will remain lit for 90 seconds. After 90 seconds, it will go dark and
into “Standby Mode”. The meter can be awakened by pressing any
button or inserting a test strip.
• To power o the iGlucose Meter, make sure the screen is lit by
pressing any button and then press and hold the “Home” button
for 3 seconds.

iGlucose®19
replacing the battery when needed
caution
• Take the new battery out of its plastic bag.
• Open the back cover of the device by inserting your thumbnail
into the small groove on the side of the meter near the bottom of
the cover and lift the cover up.
•
Please follow the local regulations to properly recycle the
rechargeable battery.
•
There is risk of explosion if the battery is replaced by an
incorrect type.
• Remove the old battery.
•
Install the new battery inside the battery compartment so that
the small metal contacts on the bottom of the battery touch the
small metal pins in the battery compartment.
• Replace the back cover of the device and close tightly.
• Charge the battery following the instructions above.
20 iGlucose®
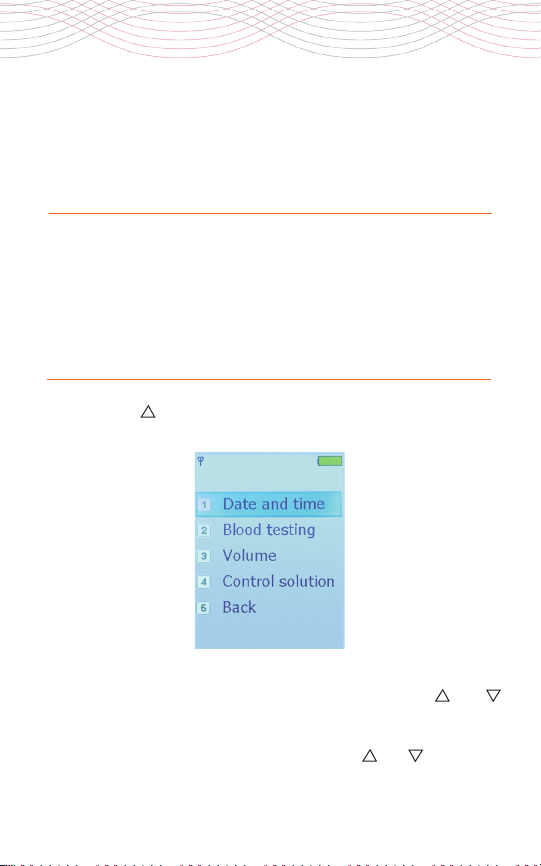
setting the date and time manually
synchronizing the date
and time automatically
1. Press the “ ” button on the device.
2.
Scroll to the “Date and time” option by using the “ ” or “ ”
button and press the “Home” button to select. The “Date and
time” menu appears.
3. Scroll to the “Set Date” option by using the “ ” or “ ” button and
The date and time are synchronized automatically when the
meter is turned on and when the message “Date and Time
Synchronized” appears.
Other manuals for iGlucose
2
Table of contents
Other Smart Meter Blood Glucose Meter manuals


