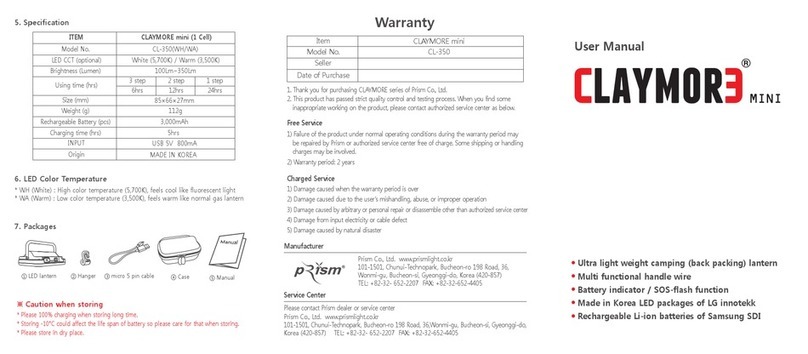
Smart Solar magicglobe User manual

magicglobemagicglobe
solar powered lightsolar powered light
operates at night
2007 smart solar ltd2007 smart solar ltd
rev. 66071025_1arev. 66071025_1a
www.smartsolar.comwww.smartsolar.com
If you have any problems, please contact Smart SolarIf you have any problems, please contact Smart Solar
before returning to the place of purchase.before returning to the place of purchase.
For immediate answers visit our websiteor immediate answers visit our website www.smartsolar.comwww.smartsolar.com
where you will find extensive trouble shooting, FAQs and support.where you will find extensive trouble shooting, FAQs and support.
usausa
tel :tel : +1 813 343 5775 Mon-Sat 9am-7pm (EST)
email:
email: [email protected]
uk
uk
tel :tel : +44 (0) 8448 009 163 Mon-Sat 9am-7pm (GMT)
email :
germany
germany
tel :tel : +49 (0) 180 5294365
(0,12 €pro Minute aus dem Festnetz der T-Com)
email :
smart solar ltd, Ruenhorst 24, 46395 Bocholt
france
france
teltel : +33 344 600 862
email
email : [email protected]
smart solar ltd, 14 rue du Beau Larris, 60260 Lamorlaye
europe
europe
email :email : [email protected]
australia
australia
tel :tel : +61 03 9512 0680
email :
asia/ pan pacific
asia/ pan pacific
email :email : [email protected]
www.smartsolar.comwww.smartsolar.com


ENGLISH
Contents
1. Introduction
2. Before you start
3. Overview
4. Components
5. Assembling and using your product
6. Cleaning and maintenance
7. Trouble shooting
8. Spare parts
9. Full 2 year warranty
Introduction
Thank you for purchasing a Magicglobe. These instructions contain
important information for using this product. Please keep them in a
safe place for future reference.
Before you start
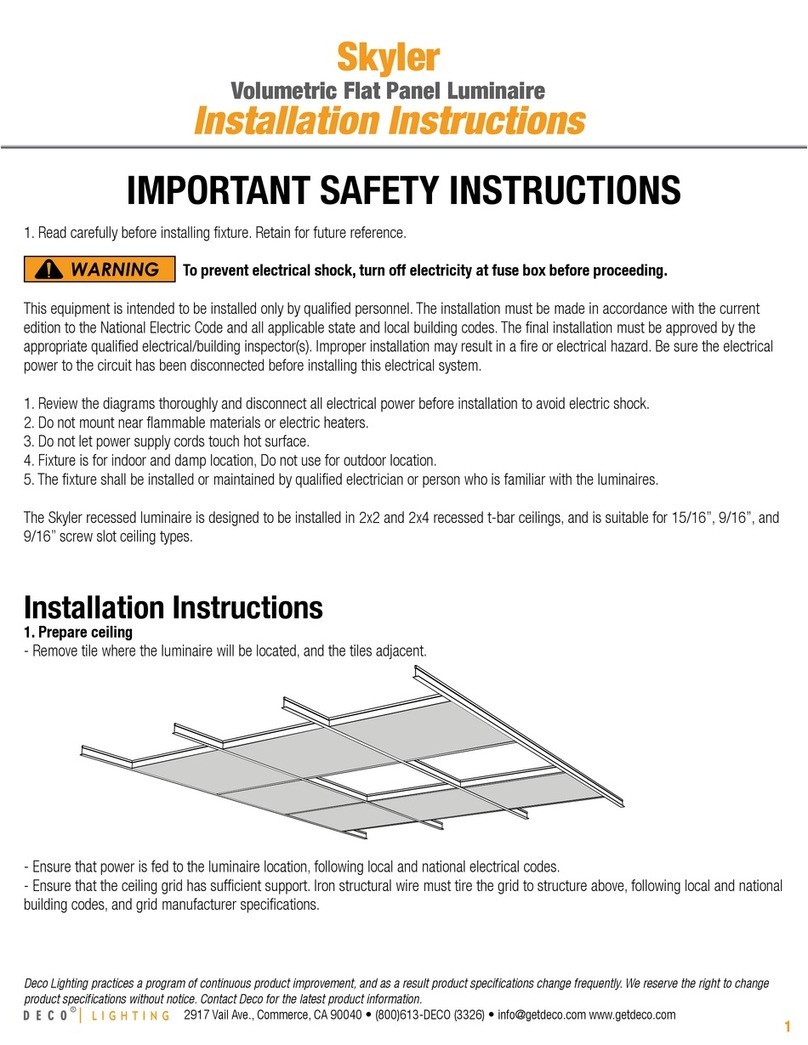
Decide on an appropriate outdoor location for your solar light. Ideally
this should be a place where the solar panel receives direct sunlight.
The solar module inside the magicglobe converts sunlight into
electricity, which is then stored in the integral rechargeable batteries.
The solar panel will charge the batteries when exposed to direct
sunlight. If the sun passes behind a cloud then the amount of
electricity produced by the panel will decrease.
The amount of electricity produced by the solar panel is proportional
to the strength of sunlight received. For optimum performance we
recommend that your solar light should be exposed to as much direct
sunlight as possible and away from shady areas e.g. under trees.
Overview
The Magicglobe provides accent lighting using a
super bright full color
LED
(Light Emitting Diodes). The light switches on automatically at
dusk and turns off at dawn or when the battery is fully discharged.
The Magicglobe can be operated in 3 modes:
In random color change mode: the light changes colour instantly
moving seamlessly from one colour to the next.
In single color mode: the light can be set to one color
In 1 minute color change mode: the light changes every minute
cycling through a spectrum of colours continuously.
Page 14 Page 3
PANEL PERFORMANCE
OPTIMUM POOR
CONDITION FUNCTIONALITY
POOR
MEDIUM
GOOD
MEDIUM
SEASONAL FUNCTIONALITY
WINTER SPRING
SUMMER AUTUMN
Magicglobe
Manuel d'instructions
Pièces de rechange
1. Battery: 2x 1.2 V AAA Ni-Mh 700mAh AAA 1.2 V 700M
2. Seal 339-SEAL
3. Mounting Kit MGMKIT
Garantie complète de 2 ans
Si au cours d’une période de 24 mois à partir de la date
d’achat, ce produit devient défectueux à la suite d’un défaut
des pièces ou de fabrication, Smart Solar le remplacera ou le
réparera sans frais supplémentaires.
La garantie ne s’applique pas pour :
Les dommages causés par un accident, un traitement
mauvais, une manipulation incorrecte, le gel ou l’usure
normale. Les produits qui ont été soumis à des réparations ou
à des modifications non autorisées perdent leur garantie.
Pour de plus amples renseignements, veuillez contacter le
centre de réparations le plus proche comme indiqué au verso
de ce manuel.
Des produits électriques de rebut devraient pas être débarassés
avec la perte de ménage. Veuillez, la où les équipements
existent, contacter vôtre autorité locale ou vôtre détaillant pour
conseil de réutilisation.
Smart Solar se réserve le droit de modifier n'importe quel produit
pour augmenter son performance et concept.

Page 4 Page 13
Monté sur cheville
Monté sur plate-forme
Assurez vous que le joint est
positionné correctement
Guides la ligne a travers la cheville
pour fixer le sachet de l’ancre.
Choisissez une location favorable:
Montez et visez la couvercle batterie plat (avec cheville) pour :
- fixer a une location choisie utilisant l’ensemble pour
plate-forme et ses vises.
- Fixer dans le sol en utilisant la cheville
- Flotter le Magicglobe sur l’eau. (fixes l’ancre a la cheville
pour éviter de flotter dans l’ombre)
Montez et visez la couvercle batterie plat pour :
- mettre sur une surface plat (sans fixage)
Remarque :
Il y a un joint dans le compartiment batterie. Le joint doit être
alignée correctement pour assurer que le joint est imperméable à
l’eau.
La Magicglobe est maintenant prête à l’emploi.
Remarque :
En première utilisation les batteries seront probablement pas être
totalement chargée et par conséquence la lampe marchera pas
longtemps.
Nettoyage et entretien
Nettoyez le Magicglobe uniquement en utilisant de léau.
Enlever / Changer les batteries :
Utilisez seulement des batteries rechargeable 1.2V AAA NiMh
Dévissez les 4 vises de la base du Magicglobe, retirez et changez
les batteries
(Changez toujours les deux batteries en même temps).
Éteignez la lampe par la procédure inverse.
Remarque :
Les batteries utilisées doivent être soigneusement éliminées en
tenant compte de l’environnement et NE doivent PAS être jetées
dans les poubelles de la maison.
Problèmes de fonctionnement
En cas de problèmes contactez Smart Solar avant de renvoyer
votre produit à l´endroit de l´achat s.v.p.
Pour des réponses immédiates visitez notre site Web
www.smartsolar.com ou vous trouverez une section de
dépannage étendue avec des questions fréquemment posées,
formes d´enquête par email instantanées et ou vous pouvez
passer des commandes de pièces de rechange.
La lumière ne s’allume pas dans l’obscurité.
1) Retirez une batterie – attendez 3 secondes, remplacez la batterie
et replacez dans un endroit sombre.
2) Une autre source de lumière (par exemple un lampadaire) simule
la lumière du jour et empêche la lumière de s’allumer
automatiquement. Éloignez la Lampe-bloc de la source de
lumière artificielle.
Pousser le bouton pour 1 seconde ou pendant 6 secondes (jusqu’à
la lampe change en bleu) me marche plus.
Il y a une erreur dans le programme. Enlevez 1 batterie
pendant 2 secondes pour réactiver le programme
La lampe s´allume pendant la nuit mes pas pour longtemps.
1) Les batteries sont usées. Changez les deux batteries en même
temps. (Usage régulière est a peu prêt 2 ans)
FRANÇAIS
Components
1 Light unit with integral solar module, batteries,
LED and flat battery lid
2 Screw fixing material
3 1x Spike battery lid with 1x ground spike +1x deck mount
4 Anchor sack
Assembling and Using Your Product
Unpack all components carefully. Please ensure that you check all
parts have been removed from the packaging.
Unscrew the 4 screws on the flat battery lid of the Magicglobe and
remove the plastic battery tab to activate the circuit.
Go into a dark place and choose your mode:
After you removed the battery tab, the light goes automatically into
RANDOM CHANGE COLOR MODE: the light changes colour
instantly moving seamlessly from one colour to the next.
To get to SINGLE COLOR CHANGE MODE:
when your favorite color appears, press the red button for 1 second
and release. The magic globe will turn to red color to confirm your
selection and then will turn to the color which you have selected and
will stay in this color until you want to change it again. To return to
random color change mode press again 1 second and green color
will confirm you selection.
To get to 1 MINUTE COLOR CHANGE MODE:
Press the red button until the magic globe will turn to blue color
(approx. 6 seconds) and then release the button. The light changes
every minute cycling through a spectrum of colours continuously. To
return to random color change mode press the red button until the
magic globe will turn to green color (approx. 6 seconds) and then
release the button.
Magicglobe
Instruction Manual
Unscrew the battey lid
Remove the plastic battery tab
Press button to select mode

Page 12 Page 5
Dévissez le couvercle batterie.
Enlevez l’étiquette en plastique
Poussez sur le bouton pour
selectioner le mode
Composants
1 Unité lampe avec module solaire intégré, batteries, LED et
couvercle batterie plat
2 Matériel de fixation
3 1x cheville-couvercle batterie avec 1x cheville de sol,
1xensemble de montage au plat-forme
4 Le sac d’ancrage
Assemblage et utilisation du produit
Déballez soigneusement tous les éléments. Choisissez une location
favorable et installez votre lampe en utilisant la matériel de fixation
ou les pieux à enfoncer.Dévissez les 4 vises du plat couvercle
batterie du Magicglobe et retirez l’étiquette en plastique pour activer
le circuit
Allez dans le noir et choisissez vôtre mode :
Après que vous avez retiré l’étiquette de la batterie la lampe se
met automatiquement dans le MODE CHANGE COULEUR
ALÉATOIRE : la lampe change parfaitement d’une couleur a
l’autre.
Pour aller en mode CHANGE COULEUR SIMPLE: quant vôtre
couleur favorite apparaît, poussez sur le bouton rouge pendant 1
seconde. Le Magicglobe deviendra rouge enfin de confirmer vôtre
sélection et après la couleur de vôtre chois va apparaître jusqu'à
vous décidez de changer la couleur. Pour retourner a change
couleur aléatoire poussez encore une fois pendant une seconde et
le couleur vert va apparaître pour confirmer vôtre sélection.
Pour aller en mode CHANGE COULEUR PAR MINUTE : poussez
le bouton rouge jusqu’a le Magicglobe devient bleu (environ 6
secondes) et relâchez le bouton. La lampe change toutes les
minutes constamment à travers un spectre de couleurs. Pour
retourner a change couleur aléatoire poussez sur le bouton rouge et
le Magicglobe va devenir vert (pendant environ 6 secondes) et
ensuite relâchez le bouton.
Magicglobe
Manuel d'instructions
Spike mounted
Deck mounted
Ensure the seal is positioned
correctly
Thread the line through the spike
to fix the anchor sack
ENGLISH
Decide on a suitable location:
Fit and screw the flat battery lid (with spike) for:
- fix to a chosen location using the deck mount with the screws
- fix into soil using the ground spike.
- float the Magicglobe on water (fix anchor to spike to prevent
floating into shade)
Fit and screw the flat battery lid for:
- place on a flat surface (without fixing)
Please Note:
There is a seal inside the battery compartment which must be
correctly aligned to ensure the seal is water-tight.
The Magicglobe is now ready to use.
Please note:
On first use the batteries may not be fully charged and therefore
the lights will not last long.
Cleaning and Maintenance
The Magicglobe body should be cleaned with water only.
Removing / Replacing the batteries:
Use only 1.2 V AAA Ni Mh rechargeable batteries.
Unscrew the 4 screw on the bottom of the Magicglobe, remove and
change batteries (Always change both batteries simultaineously).
Please note:
Please dispose of your used batteries according to local
government regulations and do NOT put into the domestic waste.
Trouble Shooting
If you have any problems please contact Smart Solar before
returning to the place of purchase. For immediate answers visit
our website www.smartsolar.com where you will find an
extensive trouble shooting section with frequently asked
questions, instant email enquiry forms and place spare part
orders.
Light does not switch on in darkness or does not show all
colors.
1) Remove one battery - wait 3 seconds, replace the battery and
place back in a dark location.
2) Another light source (eg. streetlight) simulates daylight and
prevents the light from switching on automatically or cause it to
switch off before changing through all colors. Position the light
away from the artificial light source.
Pressing the button either for 1 second or for 6 seconds (until
change to blue) does not work anymore
The program has an error. Take out 1 battery for 2 seconds in order
to reactivate the program again.
Light comes on in the night but does not last long
1) Batteries are flat. Change all 2 batteries simultaineously.
(Regular lifetime around 2 years)

FRANÇAIS
Page 6 Page 11
Magicglobe
Instruction Manual
Table des matières
1. Introduction
2. Avant vous commencez
3. En général
4. Composants
5. Assemblage et utilisation du produit
6. Nettoyage et entretien
7. Problèmes de fonctionnement
8. Pièces de rechange
9. Garantie complète de 2 ans
Introduction
Nous vous remercions d’avoir acheté le Magicglobe (la lampe solaire).
Ces instructions contient des informations importantes. Elles doivent
toujours accompagner ce produit si.
Avant vous commencez
Choisissez un endroit a l´extérieur approprié pour votre lampe solaire.
Idéalement à une location ou le panneau solaire est exposée à la
lumière solaire directe. Le module solaire, intégré dans le corps en
Magicglobe, convertira la lumière solaire en électricité et l´électricité
sera ensuite conservé dans les batteries intégralement
rechargeables.
Exposé à la lumière solaire directe, le panneau solaire fait functioner
la lampe. Si la soleil se cache derrière un nuage la quantité
d'électricité produit par le panneau diminuera et la pompe cessera de
fonctionner ou ralentira. Dès que le soleil réapparaîtra la quantité de
l'électricité augmentera immédiatement et la pompe commencera à
fonctionner.
La quantité d'électricité produite par le panneau solaire est
proportionnelle à la force de lumière du solaire reçue. Pour
functionement optimal nous recommandons que vôtre panneau
solaire est exposé à autant de lumière solaire directe que possible et
placé distant des secteurs ombreux comme par exemple en desous
des arbres.
En général
Le Magicglobe fournit de la lumière accentue utilisant une pleine
technologie de la couleur Diodes de Lumière (LED). La lampe
s´allume automatiquement au crépuscule et s´éteindra a l´aube ou si
les batteries sont vide. Le Magicglobe offre 3 mode de fonctionnement
Le mode change couleur aléatoire : la lumière change
instantanément de couleur passant sans interruption d’une couleur à
l’autre.
Le mode change couleur simple: la lumière peut être réglée à une
couleur
Le mode change couleur par ninute:la lumière change à chaque
minute passant sans arrêt d’une couleur du spectre à l’autre.
Spare parts
1 Battery : 2 x 1.2 V AAA Ni-Mh 700mAh AAA 1.2V 700M
2 Seal 339-SEAL
3 Mounting Kit MGMKIT
Full 2 year warranty
If within 24 months from the date of purchase this product fails
due to a defect in material or workmanship, Smart Solar will
replace or repair free of charge. Please report immediately if
there is any damage or missing pieces upon receipt of goods.
The warranty does not apply to:
Batteries, damage caused by accidents, abuse, poor handling,
frost or normal wear and tear. Products which have been subject
to unauthorized repair or modification.
For further information please contact your nearest customer
service centre detailed on the last page of this manual.
Waste electrical products should not be disposed of with
household waste. Please recycle where facilities exist. Check with
your local authority or retailer for recycling advice.
Smart Solar reserve the right to modify any product to enhance
its’ performance and design.
PERFORMANCE DU PANNEAU
PERFORMANCE/ MÉTÉO
PERFORMANCE/ SAISON
OPTIMUM FAIBLE
HIVER PRINTEMPS
AUTOMNEÉTÉ
FAIBLE MOYEN
MOYEN
BON

Page 10 Page 7
Magicglobe
Anleitung
Ersatzteile
1. Battery: 2x 1.2 V AAA Ni-Mh 700mAh AAA1.2V 700M
2. Seal 339-SEAL
3. Multibefestigungs-Kit MGMKIT
1 Jahre Garantie
Ab dem Zeitpunkt Ihres Erwerbes garantieren wir für 1 Jahre die
Funktionsfähigkeit Ihres Produktes. Im Falle eines Defektes wird
Smart Solar Ihnen diesen reparieren oder das Produkt ersetzen.
Die Garantie beinhaltet nicht:
Schäden, die durch einen Unfall verursacht wurden; Missbrauch;
Frost oder natürliche Abnutzung; Schäden, die durch
unberechtigten Eingriff verursacht worden oder durch sonstige
Modifikationen entstanden sind. Akkus/Batterien sind von der
Garantie ausgenommen.
Für weitere Informationen kontaktieren Sie bitte die Ihnen am nahe
liegendste Service-Adresse, die Sie auf der letzten Seite dieser
Bedienungsanleitung finden.
Elektroprodukte und Batterien müssen umweltgerecht entsorgt
werden und gehören nicht in den Hausmüll. Für weitere
Informationen kontaktieren Sie bitte Ihr lokales
Entsorgungsunternehmen.
Smart Solar behält sich das Recht vor unangekündigte
Änderungen vorzunehmen, solange diese zur Verbesserung des
Produkts beitragen.
Inhaltsverzeichnis
1. Einführung
2. Vor dem ersten Betrieb
3. Bestimmungsgemäße Verwendung
4. Bedienungselemente
5. Montage und Inbetriebnahme
6. Pflege und Wartung
7. Funktionsstörungen
8. Ersatzteile
9. 1 Jahr Garantie
Einführung
Sehr geehrter Kunde, wir bedanken uns für den Kauf des Magicglobe.
Diese Bedienungsanleitung bezieht sich nur auf das Magicglobe und
enthält wichtige Informationen bezüglich der erstmaligen Benutzung
dieses Produkts. Bitte verwahren Sie diese Anleitung sorgfältig auf.
Vor dem ersten Betrieb
Suchen Sie sich einen geeigneten Aufstellungsort aus. Idealerweise
sollte dieser Platz möglichst viel Sonne empfangen und keinem
Schatten ausgesetzt sein.
Das Solarmodul im Inneren des Magicglobe wandelt Sonnenlicht in
Strom um und lädt einen Akku. Das Solarmodul muss der direkten
Sonneneinstrahlung ausgesetzt sein. Wenn
eine Wolke die Sonne
bedeckt verliert das Solarmodul teilweise oder ganz seine Leistung
(abhängig von der verbleibenden Helligkeit). Sobald die Sonne wieder
scheint nimmt das Modul wieder seine volle Leistung auf.
Die Stromproduktion des Solarmoduls ist proportional abhängig von
der Intensität der Sonnenstrahlen sowie vom Winkel in der die
Sonnenstrahlen auftreffen. In jedem Fall sollte das Solarmodul keinem
Schatten ausgesetzt sein.
Bestimmungsgemäße Verwendung
Die Magicglobe produziert ambientes Licht. Bei Dunkelheit schaltet
sich automatisch die Leuchte ein und bei Tageslicht oder leeren Akkus
wieder aus. Die Beleuchtung wird von einer extra starken
Mehr-Farben-LED (Leuchtdiode) geliefert, die aber nur wenig Energie
benötigt. Es können 3 Farbprogramme gewählt werden:
1) ununterbrochener Farbwechsel 2) Farbwechsel pro Minute
3) Auswahl nur einer Farbe.
Hauptfarben sind gelb, magenta-flieder, rot, grün, mintblau,
orange-amber, blau, weiss, aquaweiss, violett
DEUTSCH
LEISTUNG DES MODULS
FUNKTIONS-BEDINGUNGEN
OPTIMAL GERING
GERING
GUT
MITTEL
MITTEL
SAISONALE FUNKTIONALITÄT
WINTER FRÜHLING
SOMMER HERBST

Magicglobe
Anleitung
Page 8 Page 9
DEUTSCH
Suchen Sie sich einen geeigneten Platz aus:
Schrauben Sie das Batteriefach mit dem Spieß auf für:
a) Schwimmend in einem Teich (Ankersack)
b) Auf der Erde stehend (mit Erdspieß)
c) Auf einer massiven Oberfläche (Befestigungsplatte)
Schrauben Sie das flache Batteriefach auf für:
Aufstellen auf einer flachen Oberfläche (z.B. Tisch)
Bitte beachten Sie:
Die Dichtung muss unbedingt in ihrer richtigen Position liegen,
bevor Sie das Batteriefach zuschrauben.
Bitte beachten Sie:
Beim ersten Gebrauch kann es sein das die Akkus nicht voll
geladen sind und die Lampe deswegen nur kurze Leuchtzeiten hat.
Pflege und Wartung
Das Magicglobe sollte nur mit etwas Wasser gereinigt werden.
Entfernen/Austauschen der Akkus:
Benutzen Sie nur AAA Ni-MH 1,2 V Akkus. Drehen Sie den Deckel
für das Batteriefach auf und tauschen Sie die 2 Akkus aus. Es
müssen immer alle beiden Akkus ausgetauscht werden.
Bitte beachten Sie:
Gebrauchte Akkus müssen umweltgerecht entsorgt werden und
gehören nicht in den Hausmüll.
Funktionsstörungen
Sollten Sie Probleme haben, dann wenden Sie sich bitte zuerst an
Smart Solar. Besuchen Sie unsere Internet Seite
www.smartsolar.com wo Sie sofort Antworten auf Ihre Fragen
finden sowie eine Service-email an uns absenden können. Sie
erhalten umgehend Unterstützung und können Ersatzteile
anfordern.
Das Licht blinkt:
1) Eine Fremdlichtquelle (z.B. Straßenlaterne oder Tageslicht)
simuliert Tageslicht und verhindert das starten des Computer Chips.
Platzieren Sie das Magicglobe an einem dunkleren Ort.
Das Programm reagiert nicht auf Druckknopf (weder 1 Sekunde
noch 6 Sekunden - wechselt nicht auf blau)
Das Programm hat eine Störung. Nehmen Sie einen Akku heraus.
Nach ca. 3 Sekunden den Akku wieder einlegen und dann den roten
Druckkopf drücken (entweder 1 Sekunde oder 6 Sekunden bis
Lampe auf Blau schaltet)
Das Licht schaltet sich nur kurz ein und blinkt obwohl das
Magicglobe an einem dunklen Ort platziert ist und ausreichend
Sonne erhält:
Akku ist schwach oder defekt. Austauschen der Akkus ist
erforderlich.
Bedienungselemente
1 Leuchteinheit mit integriertem Solarmodul,
Akkus, Leuchdiode und flacher Batterieabdeckung
2
Schraubenmaterial
3 Batterieabdeckung mit Spieß mit 1xErdspieß und 1xWand
und Bodenbefestigung
4 Anckersack
Montage und Inbetriebnahme
Packen Sie alle Teile sorgfältig aus. Stellen Sie sicher, daß Sie
alle Teile aus der Verpackung entnehmen.
Schrauben Sie am unteren Teil des Magicglobe den Deckel für das
Batteriefach auf und ziehen Sie das Plastikband an der Batterie
heraus.
Gehen Sie in einen dunklen Raum und wählen Sie Ihr
Programm: Nachdem das Plastikband entnommen wurde ist
automatisch das Programm ununterbrochener Farbenwechsel
eingestellt.
Wechsel zum Ein-Farb-Programm: Wenn Ihre gewünschte Farbe
erscheint, dann drücken Sie kurz den roten Druckknopf (1
Sekunde). Das Magicglobe wechselt kurz zur Bestätigung auf rot
und dann auf die von Ihnen gewählte Farbe. Das Magicglobe wird
nun nur noch in dieser Farbe leuchten. Um zum ununterbrochenen
Farbenwechsel zurückzukehren, drücken Sie kurz den roten
Druckknopf (1 Sekunde) Das Magicglobe wechselt kurz zur
Bestätigung auf grün und ist dann wieder im ununterbrochen
Farbenwechselprogramm.
Wechsel zum jede Minute Farbwechsel: Drücken Sie den roten
Druckknopf solange bis das Magicglobe auf die Farbe blau
wechselt (ca 6 Sekunden) und lassen Sie den Druckknopf dann los.
Das Magicglobe wechselt nun jede Minute seine Farbe. Um zum
ununterbrochenen Farbenwechsel zurückzukehren drücken Sie den
roten Druckknopf solange bis das Magicglobe auf die Farbe grün
wechselt (ca 6 Sekunden) und lassen Sie den Druckknopf dann los.
Das Magicglobe ist dann wieder im ununterbrochen
Farbenwechselprogramm.
Batterfach aufschrauben
Plastikband herausnehmen
Druckknopf für Programmwechsel
Spiess in der Erde
Auf massiver Oberfläche
Bitte die Dichtung korrect einlegen
Nylonfaden am Spieß befestigen
Table of contents
Other Smart Solar Lantern manuals
Popular Lantern manuals by other brands

Coopers of Stortford
Coopers of Stortford Welcome Globe Solar Light Instructions for use
Endon
Endon Drayton Bollard instruction manual
DS Produkte
DS Produkte SJ12112 instructions
CREE LIGHTING
CREE LIGHTING KBL Series installation instructions
MONTEAUX
MONTEAUX RS20180927-2H Use and care guide
olympia electronics
olympia electronics GR-490/WP manual
