SmartDisk PhotoBank User manual


Revision 1.0

INTRODUCTION.................................................................................... 1
CONTROLS, CONNECTORS AND INDICATORS ....................................... 1
Top Surface - Display ..................................................................... 1
Front Side Panel Area .................................................................... 3
Right Side Panel Area..................................................................... 3
Left Side Panel Area ....................................................................... 3
Back Side Panel Area ..................................................................... 4
CHARGING THE BATTERY..................................................................... 4
ABOUT THE HARD DISK........................................................................ 4
TURNING THE UNIT ON AND OFF ........................................................ 5
OPERATION............................................................................................ 5
COPYING MEMORY CARD CONTENTS TO THE HARD DRIVE................ 5
CONNECTING TO A COMPUTER............................................................. 6
Storing and Transferring Data via USB......................................... 7
Disconnecting PhotoBank from a PC or Mac Host ....................... 7
GETTING HELP..................................................................................... 8
WARRANTY TERMS ............................................................................ 9
RIGHTS .................................................................................................. 11
FCC COMPLIANCE............................................................................. 11
GUIDE DE L'UTILISATEUR....................................... 12
INTRODUCTION.................................................................................. 12
COMMANDES, CONNECTEURS ET INDICATEURS ................................. 12
Surface de haut– Affichage........................................................... 12
Zone du panneau latéral avant..................................................... 14

Zone du panneau latéral droit...................................................... 14
Panneau latéral gauche................................................................ 15
Zone du panneau latéral arrière................................................... 15
RECHARGE DE LA BATTERIE ............................................................... 15
À PROPOS DU DISQUE DUR.................................................................. 16
MISE SOUS TENSION ET HORS TENSION............................................... 16
FONCTIONNEMENT .......................................................................... 16
COPIE DU CONTENU DE LA CARTE MÉMOIRE SUR LE DISQUE DUR ..... 17
CONNEXION À UN ORDINATEUR.......................................................... 18
Archivage et transfert de données via le port USB ...................... 19
Déconnexion de PhotoBank d’un hôte PC ou Mac...................... 19
COMMENT OBTENIR DE L'AIDE................................................... 20
TERMES DE LA GARANTIE............................................................. 21
DROITS D'AUTEUR ............................................................................ 23
BENUTZERHANDBUCH.............................................. 24
EINFÜHRUNG ...................................................................................... 24
STEUERELEMENTE, ANSCHLÜSSE UND ANZEIGEN............................. 24
Display auf der Oberseite............................................................. 24
Vorderseite.................................................................................... 26
Rechte Seite................................................................................... 26
Linke Seite..................................................................................... 27
Rückseite ....................................................................................... 27
AKKU AUFLADEN................................................................................ 27
GRUNDLEGENDES ZUR FESTPLATTE................................................... 28
GERÄT EIN- UND AUSSCHALTEN......................................................... 28
BETRIEB................................................................................................ 29

INHALT DER SPEICHERKARTE AUF DAS FESTPLATTENLAUFWERK
KOPIEREN ............................................................................................ 29
ANSCHLUSS AN EINEN COMPUTER ..................................................... 30
Daten über USB speichern und übertragen ................................. 31
PhotoBank von einem PC- oder Mac-Host entfernen.................. 31
SO ERHALTEN SIE HILFE................................................................ 33
GARANTIEBEDINGUNGEN.............................................................. 33
URHEBERRECHTE............................................................................. 35
GUIDA PER L'UTENTE................................................ 36
INTRODUZIONE.................................................................................. 36
CONTROLLI, CONNETTORI E INDICATORI............................................ 36
Parte superiore-Display ............................................................... 36
Pannello laterale anteriore........................................................... 38
Pannello laterale destro................................................................ 38
Pannello laterale sinistro.............................................................. 39
Pannello laterale posteriore......................................................... 39
CARICAMENTO DELLA BATTERIA ....................................................... 39
INFORMAZIONI SUL DISCO RIGIDO ...................................................... 40
ACCENSIONE E SPEGNIMENTO DELL'UNITÀ ........................................ 40
FUNZIONAMENTO............................................................................. 41
COPIA DEL CONTENUTO DELLE MEMORY CARD SUL DISCO RIGIDO ... 41
COLLEGAMENTO A UN COMPUTER ..................................................... 42
Memorizzazione e trasferimento dei dati tramite USB ................ 43
Disconnessione di PhotoBank da un PC o da un host Mac......... 43
COME OTTENERE ASSISTENZA.................................................... 44
TERMINI DI GARANZIA ................................................................... 45

DIRITTI.................................................................................................. 46
MANUAL DEL USUARIO............................................. 47
INTRODUCCIÓN ................................................................................. 47
CONTROLES, CONECTORES E INDICADORES ....................................... 47
Superficie superior - Pantalla ...................................................... 47
Área del panel frontal................................................................... 49
Área del panel lateral derecho ..................................................... 49
Área del panel lateral izquierdo................................................... 50
Área del panel trasero .................................................................. 50
CARGA DE LA BATERÍA....................................................................... 50
SOBRE EL DISCO DURO........................................................................ 51
ENCENDIDO Y APAGADO DE LA UNIDAD............................................. 51
MANEJO ................................................................................................ 51
COPIA DE LOS CONTENIDOS DE LA TARJETA DE MEMORIA AL DISCO
DURO ................................................................................................... 52
CONEXIÓN A UN ORDENADOR............................................................. 53
Almacenamiento y transferencia de datos mediante USB............ 54
Desconexión de PhotoBank de un ordenador PC o Mac............. 54
OBTENCIÓN DE AYUDA................................................................... 55
TÉRMINOS DE LA GARANTÍA........................................................ 56
DERECHOS ........................................................................................... 58
HANDLEIDING .............................................................. 59
INLEIDING............................................................................................ 59

KNOPPEN, AANSLUITINGEN EN LAMPJES............................................ 59
Bovenoppervlak - Display............................................................. 59
Paneelgebied op de voorkant........................................................ 61
Paneelgebied op de rechterkant ................................................... 61
Paneelgebied aan de linkerkant.................................................... 62
Paneelgebied op de achterkant..................................................... 62
DE BATTERIJ VERVANGEN .................................................................. 62
DE VASTE SCHIJF................................................................................. 63
HET APPARAAT IN- OF UITSCHAKELEN............................................... 63
BEDIENING........................................................................................... 64
DE INHOUD VAN EEN GEHEUGENKAART NAAR DE VASTE SCHIJF
KOPIËREN ............................................................................................ 64
VERBINDING MAKEN MET EEN COMPUTER......................................... 65
Gegevens via USB opslaan en overdragen................................... 66
PhotoBank van een pc- of Mac-host loskoppelen......................... 66
HULP....................................................................................................... 67
GARANTIEBEPALINGEN ................................................................. 68
RECHTEN.............................................................................................. 70


1
Introduction
PhotoBank is an innovative handheld device that allows you to store and
manage your photo files from your digital camera. PhotoBank includes a
built-in battery, memory card reader slots, a high capacity hard drive,
status display, and a Hi-Speed USB interface. Once your unit is
connected properly to your computer running a recent operating system,
you will also be able to use it as you would any external hard drive for
performing data storage functions.
Before you begin to use PhotoBank for the first time, there are a few
important things to learn about your new product.
Controls, Connectors and Indicators
First familiarize yourself with the display, control keys, and the various
connectors on the unit.
Top Surface - Display
Along the top surface you will find the status display. The display shows
you the current status while the unit is powered on. See the figure below
for a description of the icons and information provided by the display.
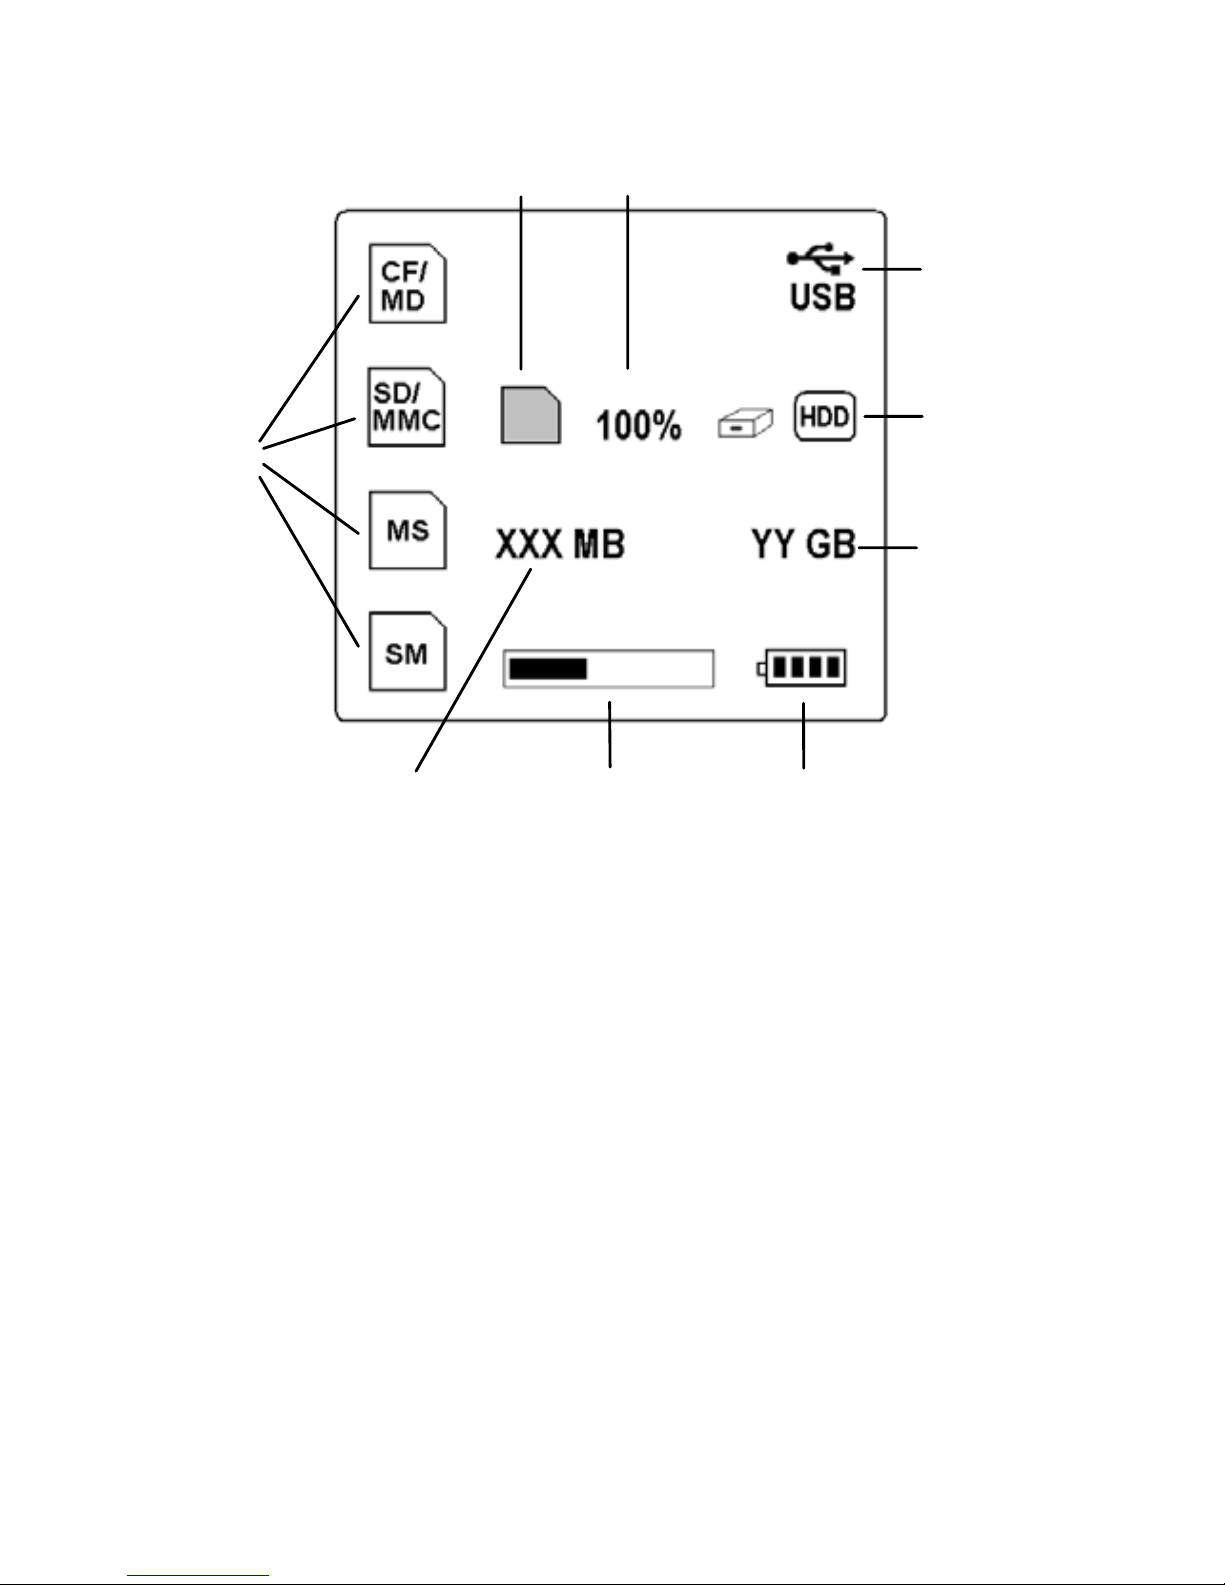
2
1. Memory Card Icons. When each type of card is inserted its
icon will be shown here.
2. Generic Memory Card Icon. This icon is displayed when any
type of card is inserted and detected.
3. Copy Function Progress Percentage. After the full contents of
the card have been successfully copied, the number will show
“100%” as your confirmation.
4. USB Icon. This icon will be displayed whenever you are
connected to a computer using the USB interface.
5. Hard Disk Drive Icon. This icon will display to confirm the
ready status of the internal disk drive.
6. Hard Disk Free Space. This is a two-digit readout of the
remaining hard disk free space.
7. Battery Charge Indicator. When you see only one or no bars,
you should recharge the battery.
8. Copy Function Progress Bar. This graph will fill from left to
right to indicate progression of the copy process.
1
2
9 8
5
6
4
7
3

3
9. Memory Card Data Size. This is a three-digit readout
indicating the amount of data to be copied. If your card
contains more than 1GB of data, then the display will show
only 999 MB, even though the full amount of your data will
be safely copied.
Front Side Panel Area
Along the front side panel of the unit you will find the USB connector for
connection to a computer, the DC input connector for connection to the
included AC Power Adapter, and the status LED. When the power
adapter is connected, the battery charge LED will be red while charging
and turn green when fully charged. The LED will also be red whenever
you are connected to a computer via the USB interface.
Right Side Panel Area
The right side panel area contains the memory card slot for your Smart
Media (SM) memory card.
Left Side Panel Area
The left side panel area contains the memory card slot for your Secure
Digital (SD), Multimedia Card (MMC), and Memory Stick (MS) and
Memory Stick Pro memory cards. Here you will also find the On/Off
button and the Copy button.

4
Back Side Panel Area
The back side panel area contains the memory card slot for your Compact
Flash (CF) and Microdrive (MD) memory cards.
Charging the Battery
PhotoBank uses a built-in lithium ion rechargeable battery to provide
power to the product when used remotely. When the battery is depleted it
will normally take up to 3 hours to recharge fully. Your new battery may
be only partially charged, so before using the unit with battery power you
must first charge the battery. Note that regardless of the state of the
battery, you can always operate the unit while the AC adapter is attached.
To charge the battery, plug the included AC adapter into a wall outlet,
and then plug the adapter’s DC plug into the DC input jack on the unit.
When the power adapter is connected, the battery charge LED will be red
while charging and will be green when fully charged.
About the Hard Disk
The PhotoBank internal hard drive comes pre-formatted from the factory
in FAT32 format.

5
Note: Capacity dependent on model. Your operating system
and PhotoBank display may report capacity as fewer
gigabytes. 1 GB = 1,000,000,000 bytes.
Your internal hard drive is a complex electronic storage system and
should be handled with care, as you might treat a sensitive portable
computer or other state-of-the-art consumer electronics product. Do not
subject it to shock, high temperatures, or strong magnetic fields.
Turning the unit ON and OFF
To turn the unit on, press the On/Off button. To turn the unit off, press
the On/Off again. PhotoBank will turn off automatically after 30 seconds
of inactivity. This is to conserve the internal battery power.
Operation
This section describes how to use the features of PhotoBank.
Copying Memory Card Contents to the Hard Drive
Copying the complete contents of your camera’s memory card to the
internal hard drive can be accomplished in a few easy steps.
1. Insert your card into the appropriate PhotoBank card slot.
2. Press the On/Off key to turn on the unit. Note that your card’s
icon will be shown on the display, and you can also see the
amount of data contained on your card.
3. Press the Copy key to begin copying data to the hard drive.
All the files from the card, including the folder structure on

6
the card, will be copied to a folder on the hard disk. Note that
most digital cameras store photos within one or more folders
on the memory card.
During the copy process, you can monitor the progress with the progress
bar on the display. The transfer process is complete when the percentage
of transferred files shown on display reaches 100%. After transfer, the
files on memory card will still remain on the card. If you want to use the
card for more pictures, you can use your camera to delete old files or to
reformat your card.
The destination folder is stored under a common master folder named
CARDS. Each destination folder is assigned a new name comprised of
the two-character abbreviation of your card type, followed by a 4-digit
sequence number. Since a new folder is created each time you press the
Copy button, PhotoBank will not overwrite previous files.
When file transferring is complete, you may press On/Off to turn off the
unit, or simply wait for 30 seconds for the unit to power down
automatically.
During file transfer process, PhotoBank will not respond to pressing the
On/Off button. This prevents accidental data corruption. If you want to
terminate a copy in progress, simply remove the card, and the display will
indicate a terminated copy process by showing an 'X' sign on the memory
card icon.
Connecting to a Computer
If you have copied photos from your memory card onto PhotoBank and
now want to transfer them to your computer, you can do so easily using
the USB interface.
Note: If your computer is running Windows 98 Second
Edition, you will need some additional software that you can
download from the SmartDisk web site. Refer to the Getting
Help section.

7
Connecting your unit to a USB Host device, such as a PC or Mac, is
extremely simple. Follow the steps below:
1. Connect the mini-B end of the included USB cable to the USB
connector on PhotoBank.
2. Attach the other end of the USB cable to an available USB
port on your PC, Mac, or hub.
3. Turn on PhotoBank.
The drive will mount automatically and a drive letter representing
PhotoBank hard disk will appear in My Computer (Windows) or a new
icon will appear on the desktop (Macintosh). Furthermore, three (3) more
drive letters will appear representing each of the three card reader slots.
The USB icon will appear on your PhotoBank display indicating that a
USB connection has been established.
Note: If you are using a USB 1.1 port on your Windows
computer, the following cautionary note may appear on your
display: Hi-Speed USB Device plugged into non-Hi-Speed
USB hub. This does not indicate a problem because
PhotoBank is compatible with both USB 1.1 and USB 2.0
ports. Simply close the message and proceed. However, in
this case PhotoBank will operate only at USB 1.1 speeds.
Storing and Transferring Data via USB
Once your drive and internal card readers are connected to a computer via
USB, they can be accessed and used like any other removable disk. You
can drag files to your unit’s icon to copy them, navigate to your unit in
Open or Save dialog boxes, or delete files stored on your unit. For
information on copying, opening, or deleting files, consult your
computer’s documentation.
Disconnecting PhotoBank from a PC or Mac Host
Your PhotoBank is hot-swappable; it can be connected and disconnected
without restarting your computer. To disconnect your drive at any time,

8
perform the following steps. You can also disconnect your hard drive at
any time while your computer is powered off.
Note: Please be careful to follow the correct procedure when
disconnecting your unit. Simply unplugging the unit without
first following the instructions below may result in damage
to your unit and/or loss of data.
For Windows Users:
1. If you have files located on your PhotoBank open in any
applications, close them.
2. Click the Unplug or Eject Hardware button in the System
Tray.
3. Select your PhotoBank drive from the menu that appears.
4. After a moment, Windows will display a message that your
hardware can be safely removed.
For Mac OS Users:
1. If you have files located on your PhotoBank open in any
applications, close them.
2. Locate the icon for your PhotoBank on the desktop, and drag
it to the trash.
Getting Help
If you are experiencing difficulty installing or using your SmartDisk
product, please visit the main SmartDisk Technical Support website at
www.SmartDisk.com. From this page you can access our library of user
documentation, read answers to frequently asked questions, and

9
download available software updates. Although most of our customers
find this content sufficient to put them back on the right track, this page
also lists ways in which you can contact the SmartDisk Technical
Support Team directly.
Please take this time to enroll to receive future information about your
SmartDisk product at www.SmartDisk.com/Registration.asp. This
enrollment is quick and easy and will assist us in providing the best
possible experience with this and future SmartDisk products.
Warranty Terms
SmartDisk Corporation warrants its products to be free of defects in material and
workmanship under normal use and service for a period of 1 year from the date of
purchase or 3 years from the date of manufacture, whichever occurs first. Products
purchased in European Union countries covered by Directive 1999/44/EC are
warranted for a period of 2 years from the date of purchase. SmartDisk's sole
obligation with respect to claims of non-conformance made within the warranty
period described above shall be, at its option, to repair or replace any item of
Equipment that SmartDisk, in its sole discretion, determines to be defective. The
Customer shall obtain a Return Merchandise Authorization (RMA) number from
SmartDisk prior to returning any Equipment to SmartDisk under this warranty by
contacting Technical Support (see www.SmartDisk.com). The Customer shall
prepay shipping charges for Equipment returned to SmartDisk for warranty service,
and SmartDisk shall pay freight charges for the return of the Equipment to the
Customer, excluding customs duties or taxes, if any. All returns require a dated
original proof of purchase and a letter explaining the problem. SmartDisk
Corporation will not be responsible for items returned without an RMA or
improperly packaged. Replacement Equipment shall be new or like new in
performance and shall be warranted for the remaining duration of the warranty term
of the non-conforming Equipment. SmartDisk Corporation will not be responsible
for recovery of customer data from returned products that incorporate data storage.
All replaced Equipment shall become the property of SmartDisk. Any claims of
defects not made within the warranty period shall be deemed waived by Customer.

10
SmartDisk's warranty obligations hereunder are expressly conditioned upon (i.) the
Products being properly installed, used and maintained at all times by Customer;
(ii.) the Products not being subject to unusual mechanical stress or unusual electrical
or environmental conditions or other acts of God; (iii.) the Products not being
subjected to misuse, accident or any unauthorized installation/deinstallation by
Customer or other third party; (iv.) the Products not being altered or modified in an
unauthorized manner, unless approved in writing or otherwise performed by
SmartDisk and (v.) Customer promptly installing all Product revisions that have
been released for such Products by SmartDisk throughout the warranty term.
SmartDisk does not warrant that the Products will operate in any specific
combination that may be selected for use by Customer or that the operation of the
Products will be uninterrupted or error free, or that all non-conformance or defects
will be remedied. Additionally, SmartDisk shall have no warranty obligations for
any failure of the Products to conform to the applicable product specifications
resulting from the combination of any Product(s) with hardware and/or software not
supplied by SmartDisk. If it is determined that any Product(s) reported as defective
or non-conforming by Customer during the warranty period is not defective or non-
conforming, SmartDisk may, at its option, charge Customer for any labor provided
and expenses incurred by SmartDisk in connection with such determination, at
SmartDisk's then current rates.
SmartDisk Corporation shall not be responsible for unauthorized sale or
misrepresentation by unauthorized third party resellers. SmartDisk warranties are
not transferable with ownership. Products purchased by auction, yard sale, flea
market or purchased as demo units may not be covered under SmartDisk’s
warranty.
THE WARRANTIES OF SMARTDISK AND REMEDIES OF CUSTOMER SET
FORTH IN THIS SECTION ARE EXCLUSIVE AND ARE GIVEN BY
SMARTDISK AND ACCEPTED BY CUSTOMER IN LIEU OF ANY AND ALL
OTHER WARRANTIES, WHETHER EXPRESSED OR IMPLIED, INCLUDING
WITHOUT LIMITATION, ALL WARRANTIES OF MERCHANTABILITY
AND FITNESS FOR A PARTICULAR PURPOSE, ALL SUCH OTHER
WARRANTIES BEING HEREBY EXPRESSLY AND UNEQUIVOCALLY
DISCLAIMED BY SMARTDISK AND WAIVED BY CUSTOMER.

11
Rights
Copyright ©2006 SmartDisk Corporation. No part of this document may be
reproduced in any form or by any means, for any purpose, without the express
written permission of SmartDisk Corporation. All rights reserved. All other brands
and product names referenced herein are property of their respective owners.
FCC Compliance
This equipment has been tested and found to comply with the limits for a Class B
digital device, pursuant to Part 15 of the FCC Rules. These limits are designed to
provide reasonable protection against harmful interference in a residential
installation. This equipment generates, uses and can radiate radio frequency energy
and, if not installed and used in accordance with the instructions, may cause harmful
interference to radio communications. However, there is no guarantee that
interference will not occur in a particular installation. If this equipment does cause
harmful interference to radio or television reception, which can be determined by
turning the equipment off and on, the user is encouraged to try to correct the
interference by one or more of the following measures:
• Reorient or relocate the receiving antenna.
• Increase the separation between the equipment and receiver.
• Connect the equipment into an outlet on a circuit different from that to
which the receiver is connected.
• Consult the dealer or an experienced radio/TV technician for help.

12
Guide de l'utilisateur
Introduction
PhotoBank est un dispositif portatif innovateur qui vous permet
d’archiver et de gérer vos fichiers photos à partir de votre appareil photo
numérique. PhotoBank comprend une batterie intégrée, des logements de
lecteurs de carte mémoire, un disque dur haute capacité, un écran d’état et
une interface USB haute vitesse. Une fois que l’unité est connectée
correctement à votre ordinateur tournant sous un système d’exploitation
récent, vous serez en mesure de l’utiliser comme vous utiliseriez un
disque dur interne pour l’exécution de fonctions d’archivage des données.
Avant d’utiliser PhotoBank pour la première fois, voici quelques
informations importantes à retenir à propos de votre nouveau produit.
Commandes, connecteurs et indicateurs
Familiarisez-vous d’abord avec l’affichage, les touches de commande et
les divers connecteurs sur l’unité.
Surface de haut– Affichage
Le long de la surface du haut, vous trouverez l’écran d’état. Cet écran
affiche l’état actuel lorsque l’unité est sous tension. Voyez la figure ci-
dessous pour une description des icônes et des informations fournies par
l’écran.
Table of contents
Languages:
Popular Card Reader manuals by other brands

LEI Extras
LEI Extras MMC/SD Card Reader installation instructions

BNP Paribas Fortis
BNP Paribas Fortis Card reader user guide

Zonet
Zonet ZUC2830L Quick installation guide

metraTec
metraTec QuasarMX Technical documentation

EverAccess
EverAccess ERS-871 instruction manual

AAT
AAT KDH-CADM-U24-II installation manual