SmartKat Sailing boat User manual

BENUTZERHANDBUCH
USER MANUAL
NAVODILA ZA UPORABO
Edition 03/09

smartkat USER MANUAL
Congratulations on the purchase of your smartkat – welcome to the club.
Before you start using your smartkat, there are some important things you should know about this
newly developed sailing boat. The smartkat has been designed to provide you with many hours of
fun and enjoyment, giving new meaning to the term ‘fun sailing’. In this manual we have tried to use
as few technical sailing terms as possible so that beginners and owners without previous sailing
experience can assemble and take the smartkat into operation easily. Our apologies if the simp-lified
explanations disturb our experienced sailing enthusiasts!
This user manual is an important document and it will help you to get the most out of your
smartkat.
The operation and use of the smartkat always takes place at your own risk and under your own
responsibility.
This user manual also includes a warranty card that must be filled out by the selling agent and
forwarded to your local smartkat importer.
Your copy of the warranty card must be presented if warranty be filled out by the selling agent and
forwarded to your local smartkat importer.
Your copy of the warranty card must be presented if warranty repairs are necessary in order to verify
the validity of the warranty. If the warranty card is not available, then other proof of the validity of
the warranty will be required.
A spare part or accessory does not have an accompanying warranty card and, in such cases, please
present a copy of your purchase receipt.
WARNING
To prevent accidents, read, understand and always strictly follow all safety rules and obey all the laws
and coastguard regulations applying to the area in which you are sailing your smartkat. Follow the
recommendations in this manual. You personally are always responsible for your actions.
Failure to follow the instructions in this manual will automatically
invalidate any warranty claims. Always wear a lifejacket which complies
with up-to-date regulations. Even though the smartkat can be handled
by sailing beginners after just a short training period, the smartkat
should never be sailed or taken into operation without comprehensive
sailing knowledge and experience. Stick rigorously to the laws applying
in the areas you are travelling in.
smartkat will not be held responsible in any way for damage of any kind which results from the
disregard of laws or which is caused by operating errors or lack of sailing knowledge or competence.

BEWARE OF OFFSHORE WINDS AND CURRENTS
SMARTKAT – SAILING CATAMARAN SPECIFICATIONS:
overall length:
4,30 m
Mast height:
4,80 m
overall width:
2,20 m
Sail area:
9,90 m2
Weight:
42,00 kg
Depth:
0,75 m
Person capacity:
4 / 2
Max. engine HP:
3 HP
Weight capacity:
320,00 kg
140,00 kg
Classification:
D
C
Minimum working pressure in the hulls 0,3 bar
Maximum pressure 0,35 bar

SMARTKAT – STANDARTEQUIPMENT:
2 inflatable hulls
1 mast
1 main sail
1 trampoline
1 tiller
1 jib *)
1 rudder
1 main beam
1 repair set for the hulls
1 centerboard
1 bowsprit
2 carrying bags
All necessary ropes and clamps for using the boat
*) jib respectively in performance version
GENERAL RECOMMENDATIONS
Before you begin to inflate the hulls, lay out your smartkat onto an area that is clean and
free of sharp objects and debris.
1. Inflate your smartkat using a general purpose air pump of the type you would use for inflating
air beds, swimming toys or small inflatable boats. Naturally you can also use an electric air pump.
How-ever, this must be adjusted so that it switches off automatically when the pressure reaches
0.3 bar. Because pumps of this type cannot usually achieve 0.3 bar, use a hand or foot pump to
raise the pressure until 0.3 bar is actually achieved in the hulls. Check this using the manometer
supplied.
DO NOT USE A COMPRESSOR OR OTHER TYPE OF HIGH PRESSURE PUMP UNDER ANY
CIRCUMSTANCES. IF YOU DO, YOU CAN DAMAGE THE HULLS.
Your smartkat is designed for an operating pressure of 0.3 bar.
If they are exposed to sunlight for any length of time, please check the pressure and
release air pressure as necessary.

01
02
CAUTION
Any use of a high pressure air pump or compressor,
independent of the type, or exceeding the operating pressure,
will automatically invalidate all warranties.
2. Each of the hulls is equipped with a safety valve.
3. Please note: the safety valve is a two-way safety valve and consists of
two main parts. The inner part with the threaded valve (safety screw)
and a covering cap. To open the valve fully, press the safety screw
inwards and turn it clockwise to the right until you feel the stop. To
pump up the hull, push the appropriate pump hose nozzle into the
opened valve. To close the valve, remove the pump hose and turn the
safety screw anticlockwise to the left until the screw slots in. After this
you can pump further against the closed valve with the hand pump
until you achieve the operating pressure of 0.3 bar – check this with the
manometer supplied. To release air from the hulls, open the valve cap,
press the safety screw inwards firmly and turn this clockwise to the
right until it slots in. The round covering cap makes the valve absolutely
airtight as long as it is screwed onto the valve tightly. The hulls should
never be fully pumped up until the smartkat is completely assembled.
l
4. You will find that the smartkat is much easier to assemble if you
initially inflate the hulls to about 30% of their volume. This is particular
recommended when assembling the smartkat for the first time (01).
5. Only pump up the hulls after completely assembling the trampoline –
see ‘Section 6d’ – and use the manometer supplied to check that you
achieve the final pressure of 0.3 bar.
6. To completely assemble the smartkat, please read and carry out
exactly the following instructions.
a) Unpack the two carrying bags and place the parts of the smartkat
onto a free area that is clean and free of pointed or sharp stones and
objects, laying the individual parts where they will be close to hand.
b) Ensure that all cables, ropes and wires are not tangled and are free of
knots or loops and not wrapped around any smartkat parts.
c) Unfold the two hulls and place them parallel to each other at a
distance of about 2 metres apart.
01

03
04/05
07
08
06
d) FIRST ASSEMBLY
Unfold the trampoline and push the front frame tube – the front frame tube
is recognised by it having a holder for the centreboard in the middle –
through the front tunnel on the trampoline (02). After this, push the right
side tube in the same way through the right trampo-line tunnel (the left
side of the trampoline is the one with the eyelets) – the side tubes can be
identified because they are cut slanting at the front (03). Take care that
the slanting ends of the two side tubes sit properly within the front frame
tube so that they are secured against twisting. These slant-cut ends belong
in the corner connections of the front frame tube, in the position specially
made in the front frame tube. Complete the whole frame by slotting the
rear frame tube onto both side tubes (04).
The rear frame tube can be identified by the round pipe in the centre
through which the rudder module passes.
Now position the finished, assembled frame over the trampoline in such a
way that the cut out round side at the front centre of the trampoline lies on
the front frame part (05). You can then start to attach the trampoline to
the frame, passing the fixing rope through the eyelets and finally pulling it
tight by using the clamp mounted on the frame (06).
Please start by passing the rope through the eyelets from the inside
towards the outside (07 + 09). You must probably – especially with a
new trampoline – repeatedly tighten the rope through the eyelets right
from the beginning in order to be able to reach the clamp on the frame
(07).
Please tension the rope evenly through all the eyelets and do not pull the
rope tightly through a single eyelet. Secure the rope behind the clamp with
a reef knot (08).

06
09
11
12
13
14
15
SECOND AND SUBSEQUENT ASSEMBLY
If you have taken the smartkat apart properly, you haven’t unlaced the
side frame tubes but have just loosened and perhaps unlaced the rear
frame tube so that you must only slot the side frame tubes into the front
frame tube and push on the rear frame tube. Now you can re-lace the
trampoline rope at the rear again and pull it tight. This saves you a lot of
assembling time.
e) After building the trampoline completely, turn it round again and slide
the inside and then the outside metal feet of the frame into the pockets on
the hulls. Take care that the sides of the hulls where the air valves are
situated are at the back and that the air valves point inwards. Do not use
force – the feet should slide easily into the pockets when you bend the
pockets up a bit. When all eight feet have slid into their pockets, you can
inflate the hulls fully. On new hulls, you will probably have to bend the
pockets up a little. After fixing all eight feet on the hulls, pump up both
hulls using the manometer supplied to check that the operating pressure
of 0.3 bar is achieved (10 - 15) .
10

10
16
17
18
19
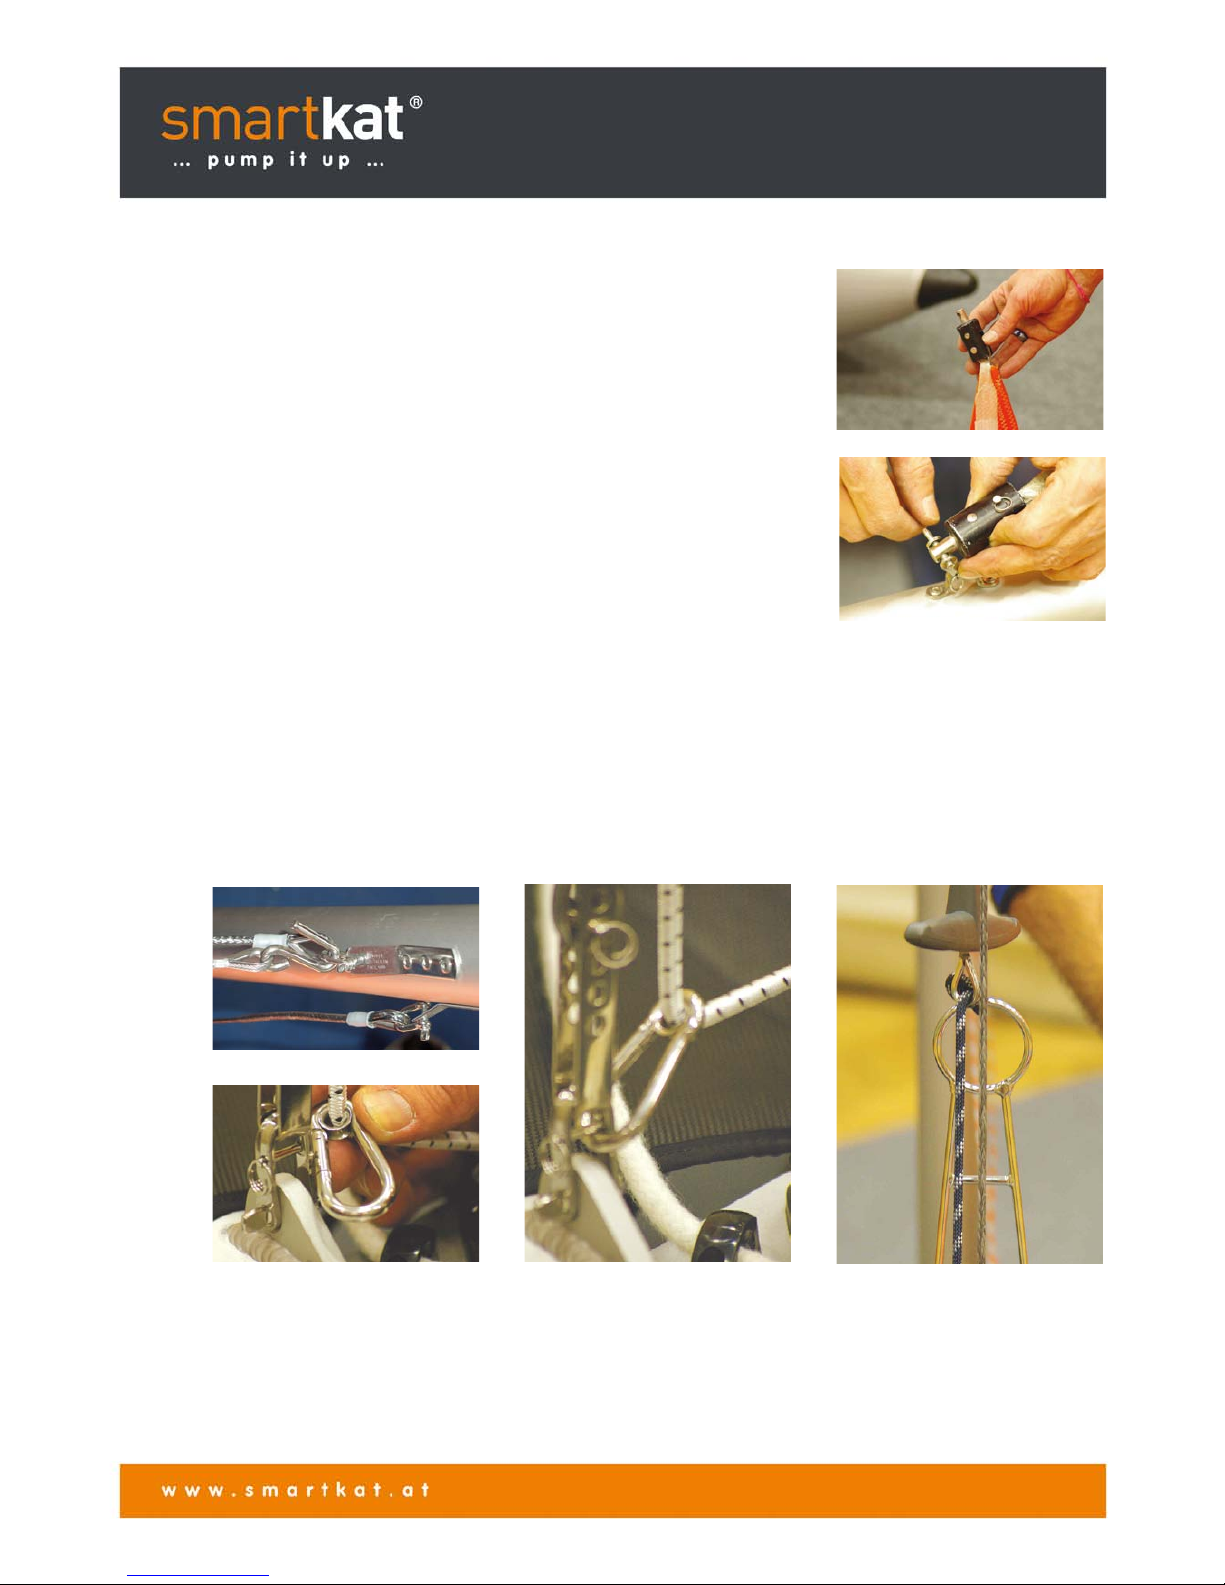
f) Fix the centreboard into the centreboard holder provided on the
trampoline frame (16). For lifting the centreboard, a reserve elastic rope
and a reserve lifting rope are included (17).
g) Fix the two shackles of the two side centreboard mountings into the
metal plates provided on the two side frames. You can feel the shackle
bolts slot automatically into place when you turn the shackle bolts
clockwise to the right (18 - 19).
16

21
20
22
23
24
26
25
27
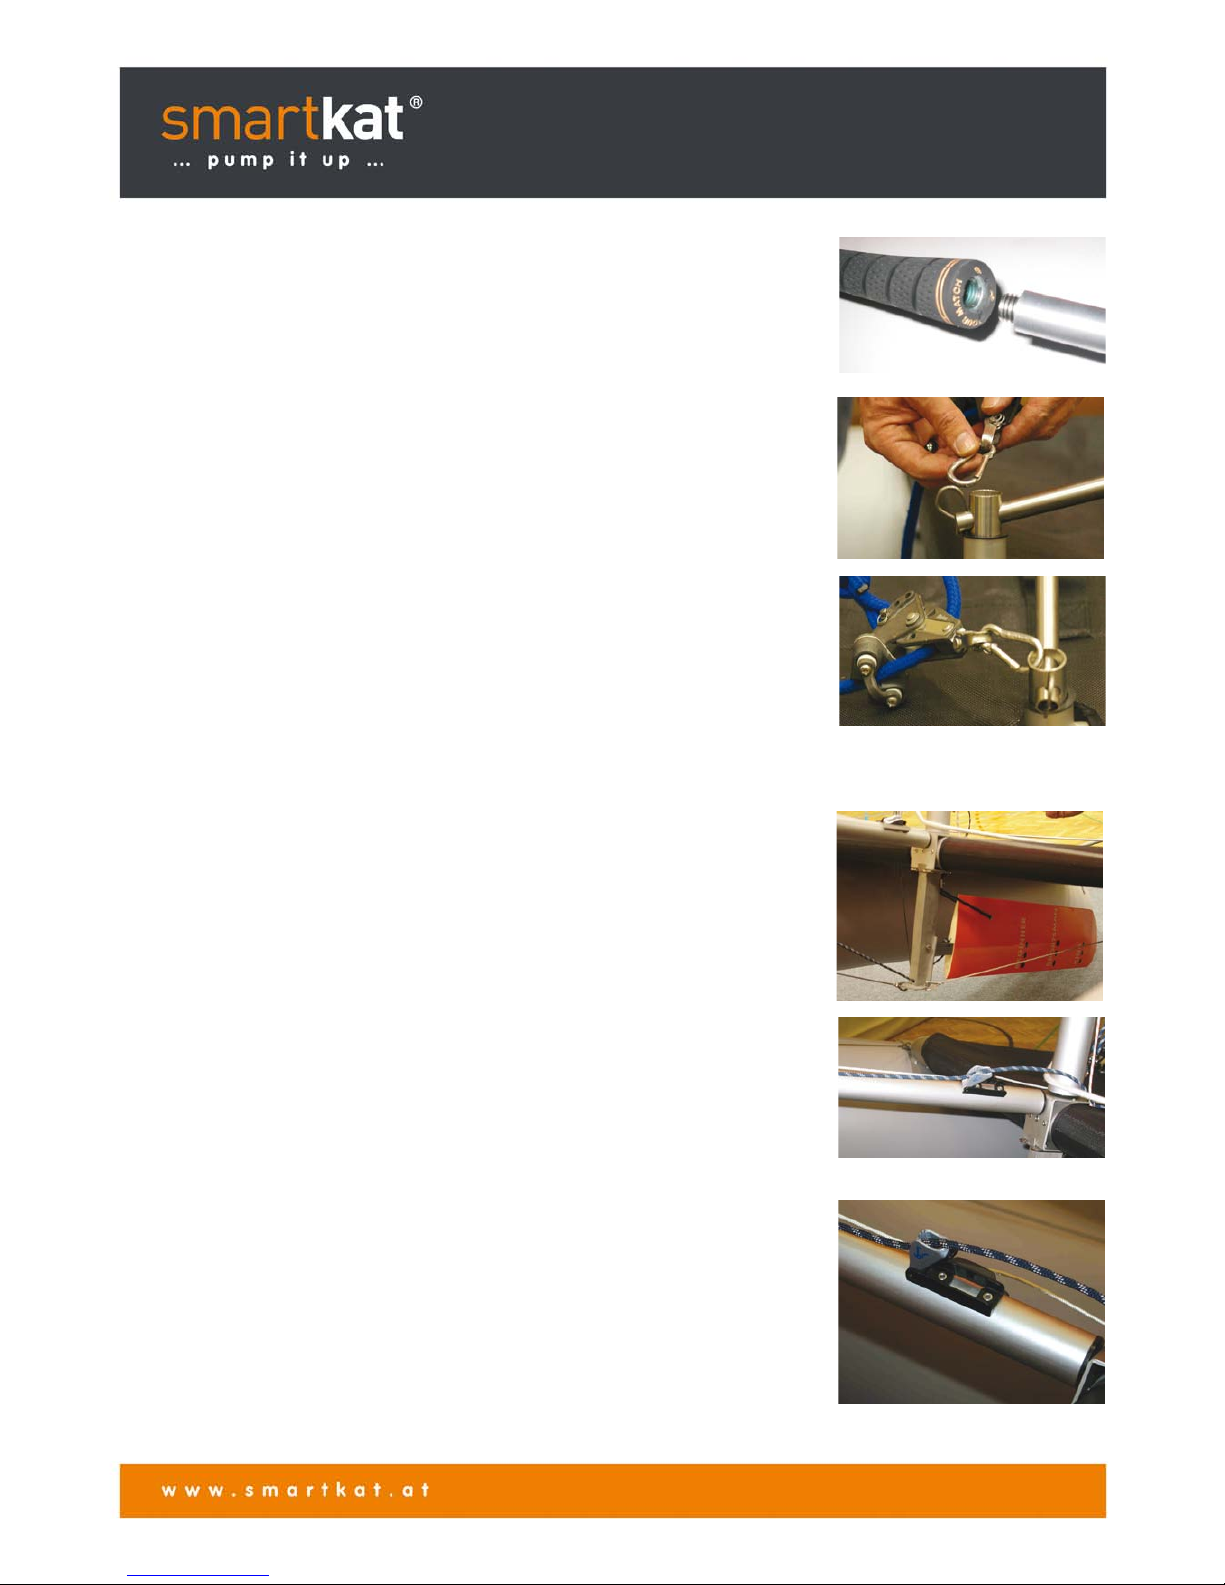
h) So that you can manipulate it easier, lay the bowsprit with its rear
end on the trampoline and the front end with the headsail roller on the
ground (20). Position the two bowsprit side fixing ropes by attaching the
karabiner (21) and secure this in the appropriate hole in the frame
plates left and right (22). After this, attach the front bowsprit cable
using the shackle in the front, underside plate of the bowsprit (23).
Again the shackle bolt must be turned clockwise until it snaps in. Now fix
the bowsprit by slotting it loosely into the holder provided in the middle
of the front frame tube (24). Both bowsprit side fixing ropes have to be
set up when assembling for the first time, these should be tightened
carefully until a light, equal tension on both sides exists. Then secure the
tensioning shackles using the locking nuts. Do not use any tools to reach
the tension, the force of your hand is tension enough.
CAUTION
The bowsprit is not fixed yet but can still slip out of its holder (24).
i) Now slot the three parts of the mast into each other, in such a way
that the mainsheet roller block for the mainsheet rope (rope which is
used to hoist the mainsheet) at the top of the mast looks backwards
(towards the ground when the mast is lying down). Make sure that the
ropes and cables are not twisted and can fall freely (25 - 27).
28
29
34
33
32
31
j) Unfold the headsail and fix the headsail with the furling fock swivel at
the front side of the mast top (right at the top of the mast) (28 - 29)
OPTIONAL TRAPEZE KIT
If you own a trapeze kit, now hang in the wire cables with the two hooks
in the screw shackles of the mast shroud (31).
When the mast is erected and fixed – see point ‘l’ – hang in both
karabiners with the elastic rope in the shackle for the left and the right
shroud tensioner (32 - 34).

35
36
38
39
37
k) Satisfy yourself that the two shrouds are not obstructed or twisted (of
course the same applies to the trapeze equipment as well if you have
installed it) and fix them to the two plates on both sides of the frame
using the shackles on the shroud ten-sioners (35 - 37).
TIP
Both shroud tensioners have been adjusted and fixed in the factory. On
very rigorous use of the smartkat it can become necessary to readjust these
shroud tensioners. However, only carry out this work when the
smartkat has been completely assembled.
Adjust the shroud tensioners that the mast does not lean even to the
right or left side.
For the best performance the mast should stay in a 5 – 10 degree
position to the back.
l) Stand the mast with the mast foot in the holder provided in the
middle of the front frame tube. (38 - 39).
Then hang the karabiner of the headsail tensioner (the rope with which
the headsail is set) in the loop on the headsail and pull the headsail luff
over the roller on the furler and secure the luff loosely over the clamp.

37
40
42
43
44
30
m) Now pull the luff tight through the clamp on the head sail. Pull the luff
very tight – you may have to use your other hand to hold the bowsprit in
a horizontal position or even press down more. Then secure the luff in
the clamp provided and fix the luff line by winding it around itself under
the clamp. By drawing the luff taut, the bowsprit and the mast should be
completely and properly tensioned.
The smartkat is now completely tensioned and has reached its final
stability (30 und 41).
n) Now take the two headsail ropes through the eyelet guides and to the
clamps left and right on the side frame members. (42).
o) Now roll out the mainsail and fix the mainsail line shackle in the upper
eyelet. (43)
Hoist the mainsail and, whilst doing so, use the hook-and-loop tapes to
secure the sail to the mast (44).
Don’t secure the tapes too tightly - the sail should be able to move
around the mast easily and make a good profile in the wind. Distance
between mast and main sail should be 30 mm at least.
The mainsail line should also be attached to the mast with the tapes.
After finishing setting the mainsail, secure the mainsail line in the clamp
provided on the lower third of the mast.
41

45
46
47
48
49
p) Mount the boom fork on the mast by full mainsail and fix the boom
kicker with the karabiner in the eyelet guide provided on the boom (45
- 47)
Pull the boom kicker to have the mast bended. This pre bending of the
mast brings a higher performance and stability of the mast. The main
sail should have the same distance to the mast over the whole length.
q) Now push the rudder from below into the holder provided on the rear
frame member, guide the tiller through the rudder mounting and fix this
with the spring cotter. The spring cotter is in the repair kit (packed in the
orange container) (48).
Position the spring cotter so that its lower end disappears into the
vertical tube of the rudder and is not
visible (49).
50
51
52
53
54
55
r) Optional tiller extension: if you have ordered the optionally available tiller
extension, then cut the PVC handgrip on the normal tiller off close to
halfway along the end knob. Doing this reveals a thread in which you can
screw the optional tiller extension. (50)
s) Now fix karabiner of the mainsail line block into the hole provided on
the rudder mounting (51 - 52).
t) Place, carry or push the smartkat into the water, at a suitable depth
of water push the rudder into a vertical position until the rudder blade
clicks in, centreboard kicker towards you and secure its line in the self-
releasing clamp provided on the bowsprit until the centreboard is
brought into an absolutely vertical position. This positioning procedure
and the secure hold of the clamp should be thoroughly checked once
again. It is imperative and only permissible to use the smartkat when
the centreboard is in an absolutely vertical position. By not maintaining
the vertical position of the centreboard when sailing, serious damage can
be caused to the centreboard mounting and the entire construction can
break in to pieces. We make you fully aware that failing to carry out this
stipulation will automatically invalidate every claim against the warranty
(53 - 55).
u) CAUTION: take good note of the applicable laws and regulations and
the need for good seamanship.
ENJOY YOUR smartkat.

56
57
IMPORTANT
Your smartkat is equipped with an automatic safety lifting device for
the rudder and the centreboard. If the depth of the water becomes less
than 80 cm or you run against an obstacle, the rudder and the
centreboard clap automatically into an upward position. CAUTION: in this
position the smartkat has limited manoeuvrability.
Nevertheless we must make you aware that this installation is an
emergency solution and it is your responsibility to ensure that the
centreboard and the rudder never touch or run against hard or sharp
shore formations or other sharp edged objects. When you want to
come ashore – even in a shallow coastal area – we recommend you to
release the rudder and centreboard by hand shortly before touching
ground so that both are clapped up in a horizontal position (56 - 57).
WARNING
Allowing the hulls to ground on stones or other hard or sharp materials
will automatically render all warranties void.
DISMANTLING
To dismantle the smartkat, please reverse the order used for assembly.
However, begin by opening the safety valves in the hulls first and letting
the air escape.
MAINTENANCE AND CLEANING
Clean and check the smartkat and all its parts carefully after each use.
To make dismantling easy, regularly clean and oil or grease the
connections. After use in salt water, rinse the smartkat thoroughly with
fresh water and satisfy yourself that all traces of sand and salt as well as
salt residues have been removed before you pack the smartkat away
for any length of time. Use a mild soapy solution for cleaning and rinse
thoroughly with fresh water afterwards. Do not use any aggressive
detergents or silicone-containing products. Before packing away for any
length of time the smartkat must be completely and thoroughly dried.
Packing it away in an incompletely dried condition can lead to fungal
growth and spoil the appearance of your smartkat.

STORAGE
If you want to store your smartkat for any length of time, keep it in a
clean and dry place that is not subject to large variations of temperature
or exposure to other damaging factors, whether it is stored in the bags
or not. You may store the smartkat completely assembled or with
deflated or inflated hulls.
CAUTION
During use water can enter the trampoline or the frame tubes and the
mast. This is normal and will not damage the smartkat in any way.
Whenever you take the smartkat out of the water for any length of
time, let the air out of the hulls and ensure that it can dry out completely
and thoroughly. Neither the hulls nor the frame parts nor the sails will be
negatively affected.
Damp storage can cause mildew and foul odour to develop which can
then only be removed with great difficulty.
For long term storage in the sun - especially in tropical or subtropical
regions, but also in the Mediterranean – you should protect your
smartkat with a breathable cover. Whatever you do, keep your
smartkat well protected from rodents.
REPAIR RECOMMENDATIONS FOR
PVC MATERIAL
For safety’s sake a repair set for the hulls is included (58). Assess
carefully the area to be repaired and remove anything which could
contaminate the material. Clean the area to be repaired and the patching
material thoroughly with a PVC cleaner and a grease solvent.
In order for the repair to be successful, the humidity level should not be
more than 60% and the ambient temperature should lie between +18°C
and +25°C. Avoid carrying out repairs in the rain or in direct sunlight.
Check that the hull is completely deflated and that it lies on a smooth,
clean and even surface.
58

Draw the shape of the patch exactly where it will be applied and cut a round patch out of the repair
material at least 5 cm larger than the damaged area. Clean the damaged area and the repair patch
very thoroughly to remove all traces of grease and other contaminants.
Apply a thin layers of glue to both the patch and the damaged area, allowing it to dry for about five to
ten minutes until the glue feels dry. Apply the patch to the repair site and press it on firmly.
Using a round object such as a spoon, press out the air bubbles which may have formed under the
patch, stroking from the centre to the edges with a circular motion.The repair should now be allowed
to dry for at least 24 hours.
WARNING
Carry out all repairs in a well ventilated area. Avoid inhaling or swallowing glue or cleaning
solvent vapours. Avoid direct contact with the skin and the eyes.
Keep all repair materials as well as glue, cleaning and glue solvents out of the reach of
children. Do not smoke while working. Avoid open fire and flames.
If you have any further questions or suggestions or need other information concerning your smartkat,
please contact your dealer or visit our homepage www.smartkat.at.

RECOMMENDED OPTIONAL EQUIPMENT AND SPARE PARTS
sma20
Upgrade Kit Basic – Performance
sma30
Trapezkit ( Without vest)
sma31
TILLER EXTENSIONROD
sma40
SUPPORT PLATE FOR ELECTRICAL ENGINE
sma50
MAIN SAIL
sma60
FORE SAIL
sma70
REPLACEMENT HULL
sma41
ELECTRICAL ENGINE WITH BUILT IN BATTERY TRAVEL 400
sma42
ELECTRICAL ENGINE WITH BUILT IN BATTERY TRAVEL 800
sma411
REPLACEMENT BATTERY FOR TRAVEL 400
sma421
REPLACEMENT BATTERY FOR TRAVEL 800
sma430
OPARE PROPELLER FOR TRAVEL
sma701
ELECTRICAL PUMP
SPARE PARTS
Generally speaking, all parts of your smartkat are available as spare parts (subject to any
construction modifications). When ordering spare parts, please
include the construction number of your smartkat with your order.

WARRANTY CONDITIONS
This is to certify that smartkat GmbH, Steyr, Austria, guarantees the product(s) indicated to be free
from defects in material and workmanship under the conditions and with the limitations specified in
this warranty.
This warranty does not apply in countries where a national warranty applies, or in countries where
smartkat is not represented.
In countries where an applicable nonrestrictable law in any particular respect provides a better right
to the customer than provided by this warranty, this warranty is void in that particular respect and the
laws applies. All customers are recommended to make themselves acquainted with the basic content
of such laws, if any.
smartkat reserves the right to make changes in the products manufactured and/or sold by
smartkat at any time without prior notice and without incurring any obligation to make the same or
similar changes in products previously manufactured or sold.
The warranty period starts on the date of delivery to the first owner/user. The date of delivery shall
be noted on the warranty card, which is to be completed with all the relevant information and
returned to the local smartkat importer. Remaining warranty is transferable to sub-sequent owners.
All components or parts replaced or repaired under warranty will receive the remaining warranty of
the original part or component. The warranty period is the minimum period which is indicated by
applicable nondiscretionary legislation, if such exists. In the event that such legislation does not exist
or prescribes a period shorter than the following, the warranty period will be as stated below.
Constructive parts, equipment and accessories:
24 months conditional on the use of the products for the private use and recreation of the
owner, in this respect no commercial use, such as chartering or renting is permissible.
To warrantee submitted hulls, sails, centreboard and rudder will be checked in any case
for excessive, false and not the intended purpose appropriate demand before a warranty
can be taken up by the buyer.
The warranty covers the cost of replacing defective parts or of having such parts repaired or of
obtaining equi-valent parts whichever is the lowest. A defective part or product in the sense of this
warranty is a part or product that is found to have an inherent defect which exists in it at the time of
delivery. (Transport costs for the replacement of defective parts overseas – outside continental
Europe – are not part of this warranty).
All warranty repairs must be carried out by an authorized smartkat importer or dealer during the
normal working hours. This applies abroad as well.
This warranty does not cover parts or products damaged during transportation, installation or repair or
through abnormal use, overload, carelessness, insufficient maintenance, normal wear, use of spare
parts other than smartkat parts, or through any type of incorrect installation, abuse, misuse, accident
or through neglect or failure to follow instructions in the user manual, maintenance instructions, or
installation instructions. The warranty is void if the user has taken abnormal risks or modifications have
been performed which in the judgement of smartkat have caused or enhanced the damage or if the
part or product has been used in violation of the law or for a clearly unintended purpose.

The warranty does not refer to damage to the construction, the hulls and/or sails as a result of their
combination with engines, or other products not approved by smartkat.
The warranty does not cover any incidental, consequential or related costs such as costs for travelling,
transport, extra costs due to the installation in making the products accessible, docking and cranes,
loss of use, loss of income, loss of time, loss of property, personal injury, or damages on other parts
or goods than the indicated products delivered by smartkat.
smartkat does not authorize anyone to assume for it any other responsibility in connection with the
sales of products than expressly described in this warranty
information.
As smartkat does not have any control over the installation, erection or use of its products, we
recommend the buyer to check and ensure that the product is installed/erected correctly, and carry
out a test of the complete erected smartkat before taking it into use. The correct
installation/erection is an absolute condition for the
validity of the limited warranty.
Before leaving the factory all products are thoroughly tested.
OBLIGATIONS OF THE OWNER
As owner of the smartkat, the operation, maintenance and care of your smartkat in accordance
with the
instructions and requirements listed in your user manual and this warranty and service information are
your responsibility.
As owner of the smartkat or one or more accessories it is your responsibility to report any defect in
the indicated product in writing to a smartkat importer, or dealer. Such a report must be made as
soon as possible and no later than fourteen (14) days from the date when the user first observed the
defect or ought to have observed it and consequently in no case later than fourteen (14) days after
the warranty period expired. The report must include at least a brief description of the defect.
The owner is recommended to secure some evidence of the date when the report was made, for
example a copy of the letter.
The owner must establish the eligibility of the warranty by showing any necessary documentation.
Technical and measurement changes as well as misprints in graphic or writing reserved.
Table of contents


