SmartLine SLW5 User manual

www.weathermatic.com
ADSLW5_revD
1
The SLW5 is a wireless weather station
operating on a 900 MHz bi-directional
frequency. Maximum range is 1500 feet
(457m) Line of Sight (LOS). The SLW5 is
operable with all SmartLine® models and
firmware versions. The SLW5 and SLHUB-
RF-5 are “pre-paired” or synched at the
factory for your convenience.
Before You Get Started
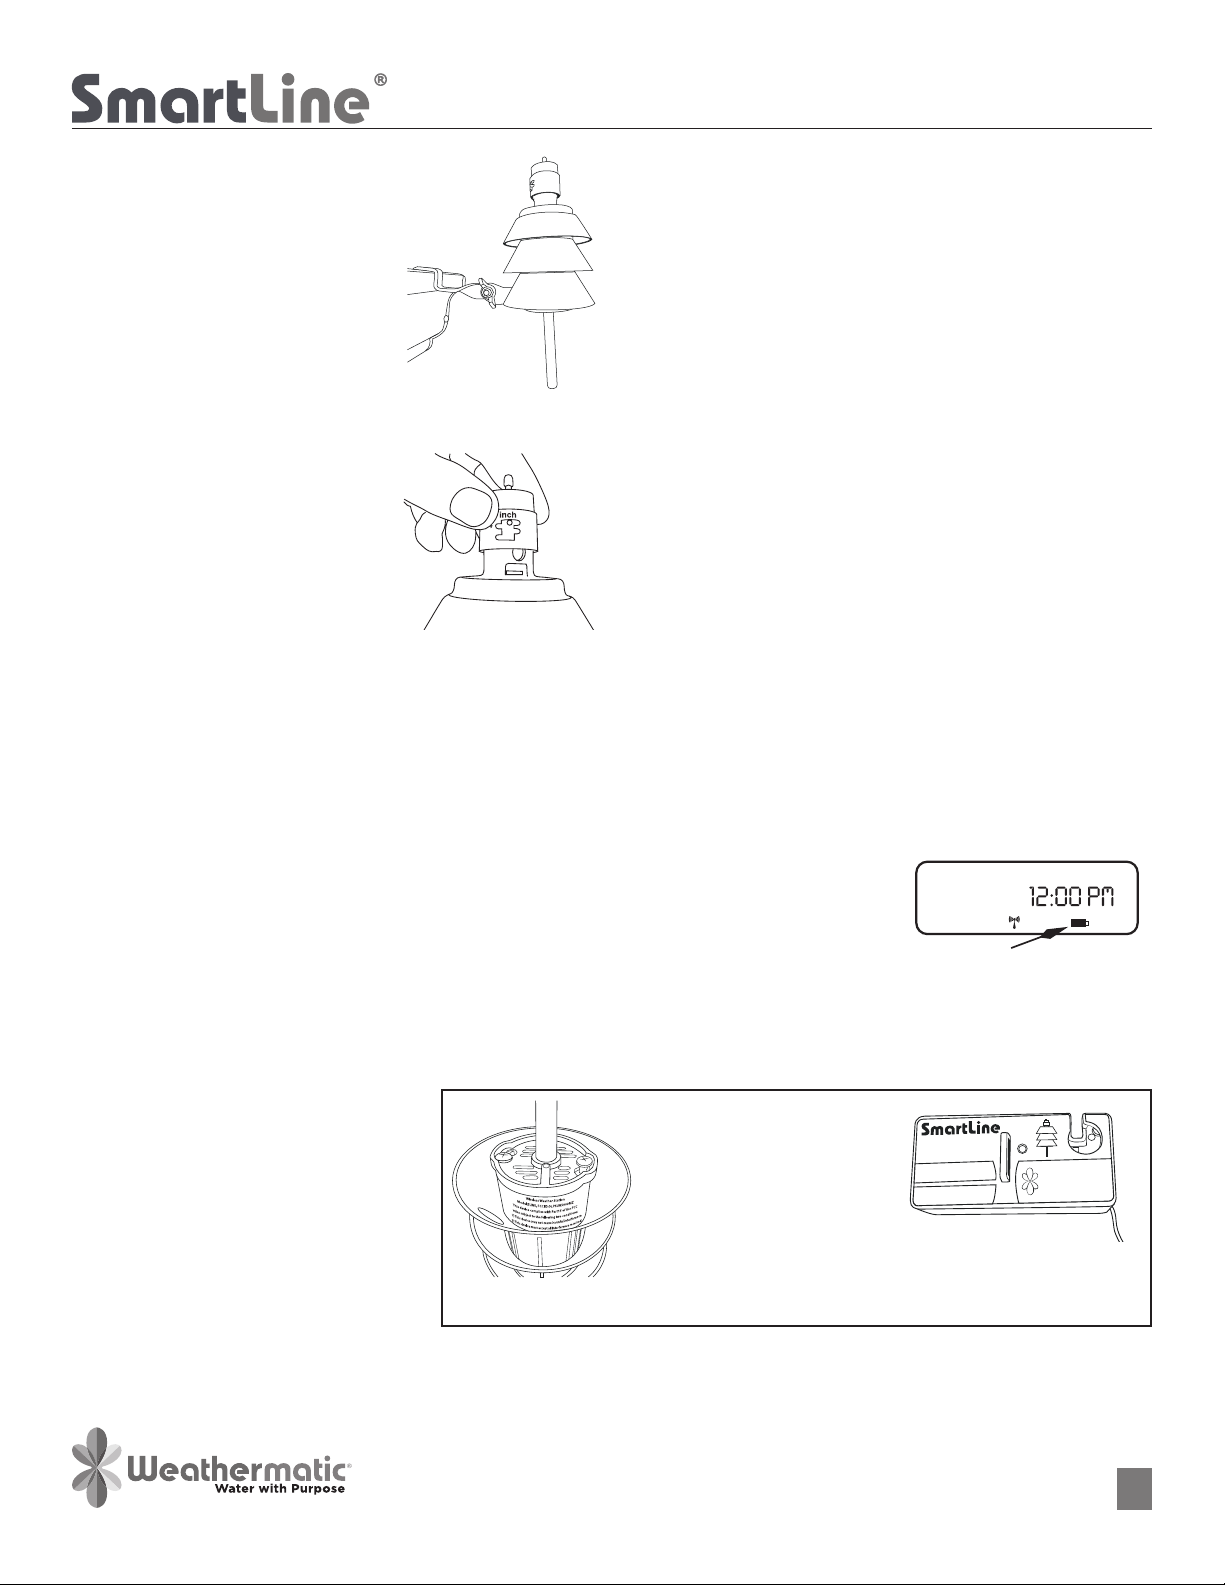
Loosen the screws to the bottom cover of
the SLW5. Rotate the cover in the keyholes
and remove. Install the two (2) AAA lithium
batteries provided.
NOTE: Pay attention to correct polarity when
installing the batteries. Incorrect installation may cause
damage to the product and/or performance.
Step 1: Install the SLHUB-RF-5
The SLHUB-RF-5 is the wireless
transceiver that communicates
with the SLW5. The SLHUB-
RF-5 is supplied with your
SLW5. To install in your
SmartLine® controller, open the
control panel on the SL1600
or the large front panel of the
SL4800. On the SL800, remove
and discard the hub cover panel from the back of the SL800
housing.
Insert the SLHUB-RF-5 into the mating pin connector holes. Be
careful not to bend the connecting pins. Secure the SLHUB-
RF-5 to the housing with the supplied flathead machine
screw. The RF antenna will hang down inside the SL1600 or
SL4800 housing. On the SL800, allow the RF antenna to hang
underneath the controller.
Make sure AC power is supplied to the SmartLine® controller
and then proceed to Step No. 2.
Step 2: Initializing SLW5 weather station
1. Program auto adjust settings in
controller.
2. While standing in front of
controllers, press the rain spindle
on the top of the SLW5 for 15
seconds; then watch the LED
which is visible through the
openings in the cover at the
bottom of the SLW5. You will see 4
blinks. All blinks should be Green.
At this time, put the controller into Auto Adjust mode on
controller.
NOTE: If the controller fails to hold in auto adjust mode, press
the auto adjust button and hold for instructions in display
related to issue that failed to allow controller to be placed in
auto adjust mode.
NOTE: The 4th (final blink) indicates the strength of the RF
communication. If the 4th blink is Red, you do not have a
satisfactory RF communication. Move the SLW5 to a dierent
mounting location and repeat the diagnostic procedure.
NOTE: The first diagnostic blink indicates the strength of
the 2 AAA lithium batteries in the SLW5. A Red signal would
indicate a need to replace the batteries. Capable life for the
lithium batteries is 10 years. If the 2nd and 3rd blinks are Red,
replacement of the weather station is required.
NOTE: A separate SLW5 weather station is required for each
SmartLine® controller that you are installing.
Step 3: Conduct communication range
Press the rain spindle for 15 seconds and go to the SmartLine®
controller. If you have RF communication, the antenna icon on
the SmartLine® display should be blinking.
NOTE: The blinking will continue for 5 minutes after any
communication from the SLW5. After 5 minutes, the antenna
icon will remain static until the next communication. Press the
Mode button and place the SmartLine® into the Auto Adjust
position. If the installation is successful, you will have a Green
light at Auto Adjust. If you see a message that “weather data
is needed” re-check the installation and/or the required data
input into the controller. Required data is zip code/latitude
and correct time and date. In addition, the operating panel on
and SL1600 or SL4800 must be closed so that AC is present.
You will get a communication error if the panel is showing NO
AC.
Step 4: Choosing a location and Mounting the SLW5
1. Decide on a good mounting location for your SLW5
wireless weather station. The mounting location should
be one that is not aected by a heat source such as an
air conditioner, hot roof, hot asphalt, etc. Mount in an area
with unobstructed airflow. Mounting is preferred in direct
sunlight with good air flow. Additionally, the location must
have open access to rainfall (cannot be covered by any
overhead obstruction such as trees, roofs, etc.). Mount
the SLW5 as close as possible to the controller. Obstacles
such as earth, hills, walls or other structures will reduce
the maximum operating range of the SLW5. Use the
diagnostic LED in the SLW5 to verify communication and
to check operating range at a specific location. Extreme
conditions may prevent wireless communication; in this
circumstance, use the SLW1 wired weather station.
TEST
AC1
SEN
SEN
COM
P/MV
Installed and connected
SLHUBRF Communication Hub
Rain Spindle
inch
1/2
3/4
1/41/8
SLW5 Wireless Weather Station
Installation Instructions
www.weathermatic.com
ADSLW5_revD
2
2. Attach mounting bracket to a
smooth surface using the two
mounting screws (supplied) or
attach to gutter using the wing
nut provided. You may choose
to remove the mounting bracket
from the bracket arm for easier
installation. Make sure the SLW5
is fixed in a vertical position.
Tighten all wing nuts to make sure
unit is held vertical.
Rain/Freeze Sensing Function
The SLW5 wireless weather station
provides rain and freeze sensing
functions to prevent watering
during periods of rain and freezing
weather. The rain override will pause
watering after a minimum of 1/4
inch (6.35mm) of rainfall is received,
based on the 1/4 inch (6.35mm)
factory rain sensor setting. Settings
can be changed incrementally up
to 3/4 inch (19mm). The SLW5
wireless weather station freeze sensing function will prevent
watering when the outside temperature drops below 37
degrees Fahrenheit (1.5 degrees Celsius) and allow watering
to resume when the temperature increases above 37 degrees
F (1.5 degrees Celsius). The Sensor LED will display RED
during rain or freeze periods. Additionally, after a rain event,
the SmartLine® controller will continue to pause watering
for 48 hours after the rain sensor has disengaged in order
to prevent over watering. During the 48-hour extended rain
delay, the sensor LED is ORANGE. In the event you choose to
end the 48-hour extended rain delay, press the Sensor button
twice and the sensor will return to a GREEN color and permit
watering. If the firmware version in your SmartLine® controller
has an SLW DLY function, you can adjust the factory default
setting of 48 hours delay to a period of 0–99 hours.
Troubleshooting and Maintenance
Each SLW5 and SLHUB-RF-5 are shipped together as a mated
pair with a factory set security code. Therefore if you ever
need replace an SLW5 always install the mating SLHUB-RF-5
that ships with the unit. After replacing both components,
you should reactivate the SLW5 using step 2 above to assure
communication.
The SLW5 wireless weather station is designed for years of
maintenance free operation. You will need to change the
two AAA lithium batteries after approximately 10 years of
operation. See instructions under Changing Lithium Batteries.
Changing Lithium Batteries
To change the SLW5 wireless weather station batteries:
1. Loosen the screws to the bottom cover on the SLW5.
Rotate the cover in the keyholes and remove
2. Replace the existing batteries with two (2) new AAA
lithium batteries.
NOTE: Pay attention to correct polarity when installing
the batteries. Incorrect installation may cause damage to
the product and/or performance.
3. Reactivate the SLW5 wireless weather station. See Step 2
above.
4. Return to the controller and push the MODE button to
place the controller back in the Auto Adjust position.
If the SLW5 wireless weather station and SmartLine®
controller are in communication, the Auto Adjust GREEN
LED will light and the antenna icon will appear in the
display.
Verify the remaining voltage in
the SLW5 battery at any time
by turning the dial to Advanced
Menu, Tests. Push Next to get
Outputs, then push DOWN
button to get SLW Battery.
Push Next to read the remaining
voltage. Note: The SLW Battery function is visible after you
have established communication with the SLW5.
PGM SUN MON TUE WED
FAULT NO AC
ZONE START
A
B
C
D
THU FRI SAT
Battery icon
1/2
3/4
1/8
Model: SLHUB-RF5
FCC ID: OLPSLHUBRF900MZ
These devices comply with Part 15 of
the FCC rules subject to the following
two conditions:
1. This device may not cause harmful
interference.
2. This device must accept all inter-
ference received, including inter-
ference that may cause undesired
operation.
Changes or modifications not expressly
approved by the party responsible for
compliance could void the user’s author-
ity to operate the equipment.
Model: SLW5
FCC ID: OLPSLW5900MZ
Help Desk: 888-484-3776
Monday – Friday 8:00 am – 5:00 pm CST
Online: support.weathermatic.com
Email: support@weathermatic.com
SLW5 Wireless Weather Station
Installation Instructions
weathermatic.com
Weathermatic
SLHUB-RF-5
Wireless Receiver Hub
Use with:
SLW5 Weather Station
FCC ID:
OLPSLHUBRF900MZ
Radiofrequency radiation exposure Information:
This equipment complies with FCC radiation exposure
limits set forth for an uncontrolled environment. This
equipment should be installed and operated with
minimum distance of 20 cm between the radiator and
your body. The OLPSLHUBRF900M transmitter can be
co-located and operating in conjunction with the WiFi/
BLE radio module with FCC ID: 2AC7Z-ESPWROOM32D
Module
Other SmartLine Weather Station manuals


