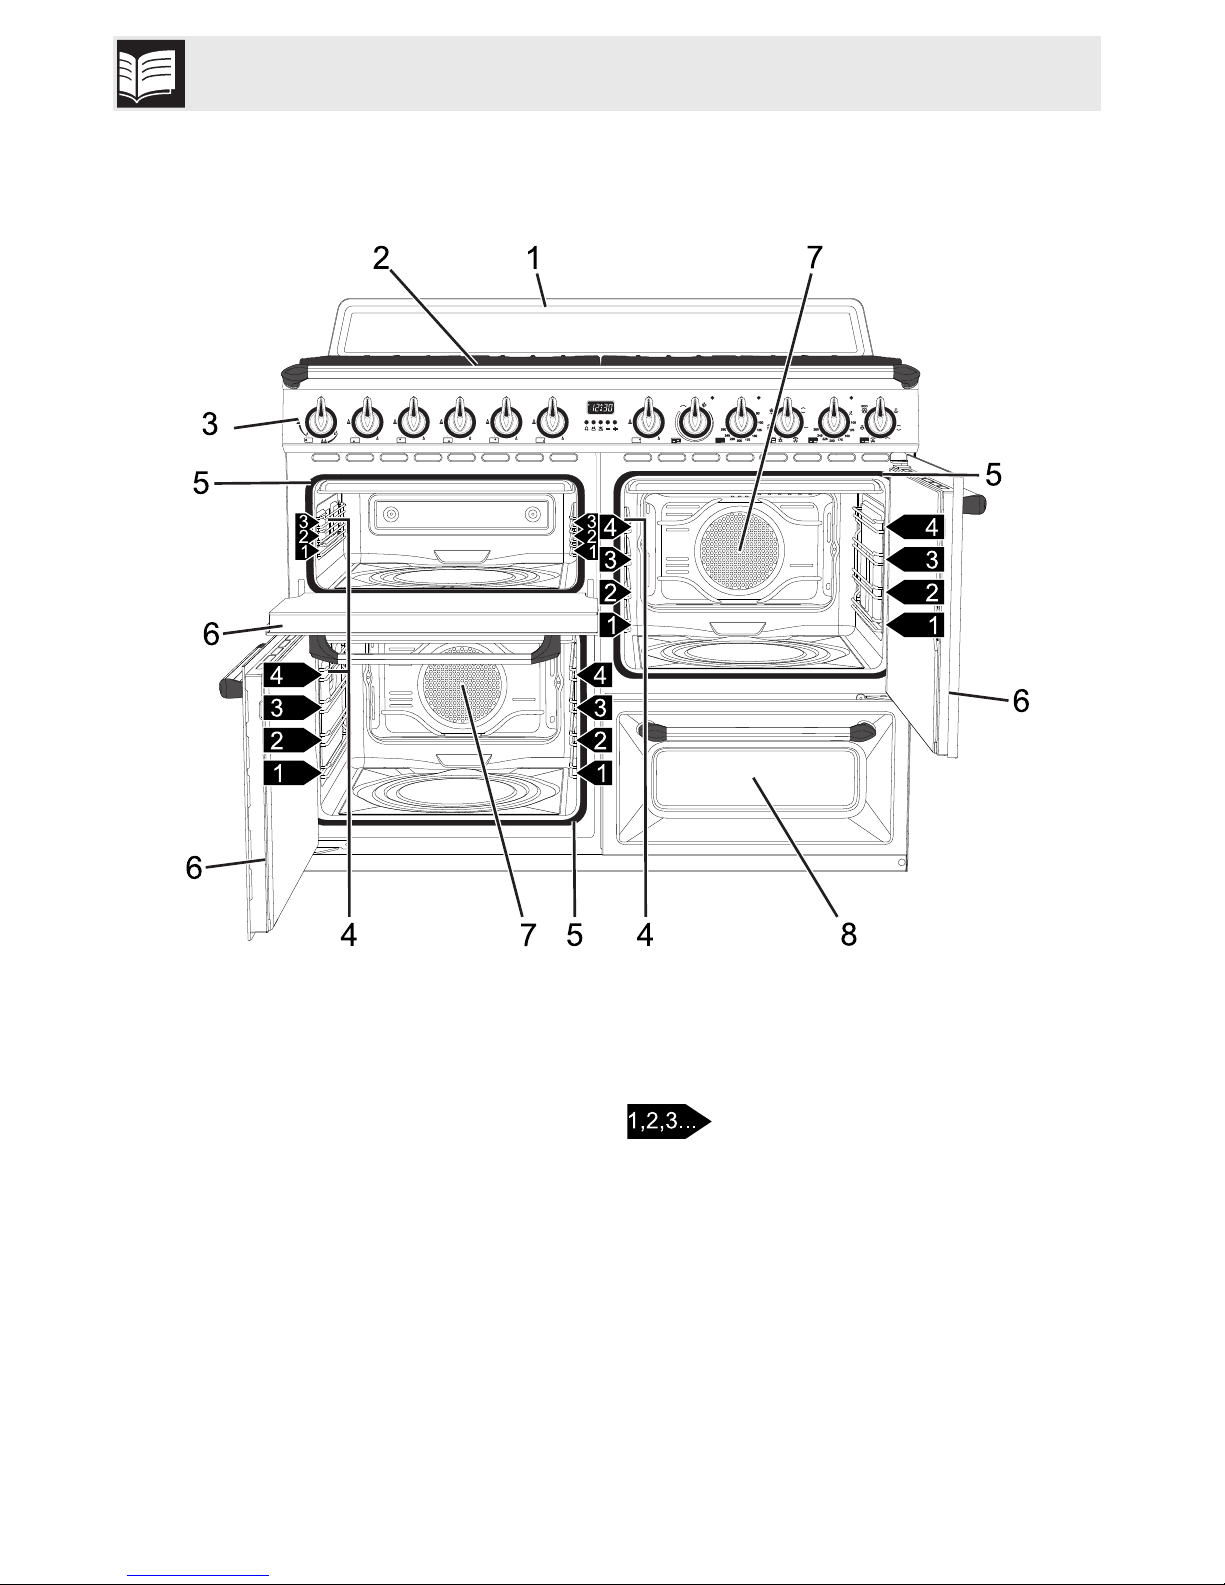
Smeg TR4110BL User manual

Contents
3
EN
1 Instructions 4
1.1 How to read the user manual 4
1.2 This user manual 4
1.3 Appliance purpose 4
1.4 General safety instructions 4
1.5 Manufacturer liability 5
1.6 Identification plate 5
1.7 Disposal 5
2 Description 6
2.1 General description 6
2.2 Cooking hob 7
2.3 Control panel 7
2.4 Other parts 9
2.5 Available accessories 9
3 Use 12
3.1 Instructions 12
3.2 First use 13
3.3 Using the accessories 13
3.4 Using the hob 14
3.5 Teppanyaki plate 15
3.6 Using the storage compartment 16
3.7 Using the ovens 16
3.8 Cooking advice 18
3.9 Programming clock 19
4 Cleaning and maintenance 23
4.1 Instructions 23
4.2 Cleaning the appliance 23
4.3 Removing the door of the auxiliary oven 24
4.4 Cleaning the door glazing 25
4.5 Removing the internal glass panels 25
4.6 Cleaning the inside of the oven 27
4.7 Vapor Clean: assisted oven cleaning 28
4.8 Extraordinary maintenance 30
5 Installation 31
5.1 Gas connection 31
5.2 Adaptation to different types of gas 34
5.3 Electrical connection 38
5.4 Positioning 39
We advise you to read this manual carefully, which contains all the instructions for
maintaining the appliance's aesthetic and functional qualities.
For further information on the product: www.smeg.com

Instructions
4
1 Instructions
1.1 How to read the user manual
This user manual uses the following reading
conventions:
1. Use instruction sequence.
• Single use instruction.
1.2 This user manual
This user manual is an integral part of the
appliance and must therefore be kept in its
entirety and in an accessible place for the
whole working life of the appliance.
1.3 Appliance purpose
This appliance is intended for cooking food
in the home environment. Every other use is
considered improper.
This appliance must not be used by people
(including children) of reduced physical
and mental capacity, or lacking in
experience in the use of electrical
appliances, unless they are supervised or
instructed by adults who are responsible for
their safety.
1.4 General safety instructions
For your safety and to avoid damage to the
appliance, always respect the general
safety instructions indicated below. In
general
• Have qualified personnel carry out
installation and assistance interventions
according to the standards in force.
• Read this user manual carefully before
using the appliance.
• Do not modify this appliance.
• Do not attempt to repair the appliance
yourself or without the intervention of a
qualified technician.
• If the power supply cable is damaged,
contact the technical assistance centre
immediately and they will replace it.
Instructions
General information on this user
manual, on safety and final
disposal.
Description
Description of the appliance and its
accessories.
Use
Information on the use of the
appliance and its accessories,
cooking advice.
Cleaning and maintenance
Information for proper cleaning and
maintenance of the appliance.
Installation
Information for the qualified
technician: installation, operation
and inspection.
Safety instructions
Information
Advice

Instructions
5
EN
For this appliance
• Do not obstruct ventilation openings and
heat dispersal slots.
• Do not insert pointed metal objects
(cutlery or utensils) into the slots in the
appliance.
• Do not rest any weight or sit on the open
door of the appliance.
• Take care that no objects are stuck in the
doors.
• Do not use the appliance to heat rooms
for any reason.
1.5 Manufacturer liability
The manufacturer declines all responsibility
for damage to persons or property caused
by:
• use of the appliance other than the one
envisaged,
• non-observance of the user manual
provisions,
• tampering with any part of the
appliance,
• use of non-original spare parts.
1.6 Identification plate
The identification plate bears the technical
data, serial number and brand name of the
appliance. Do not remove the identification
plate for any reason.
1.7 Disposal
This appliance must be disposed of
separately from other waste
(Directives 2002/95/EC, 2002/
96/EC, 2003/108/EC). The appliance
does not contain substances in quantities
sufficient to be considered hazardous to
health and the environment, in accordance
with current European directives.
To dispose of the appliance:
• Remove the doors and leave the
accessories (racks and trays) in their
normal working positions, so that
children cannot get stuck in the oven
compartment.
• Cut the power supply cable and remove
it along with the plug.
• Consign the appliance to the
appropriate selective collection centres
for electrical and electronic equipment
waste, or deliver it back to the retailer
when purchasing an equivalent product,
on a one for one basis.
Our appliances are packed in non-
polluting and recyclable materials.
• Consign the packing materials to the
appropriate selective collection centres.
Power voltage
Danger of electrocution
• Disconnect the main power supply.
• Disconnect the power cable from the
electrical system.
Plastic packaging
Danger of suffocation
• Do not leave the packaging or any part
of it unattended.
• Do not let children play with the
packaging plastic bags.

Description
6
2 Description
2.1 General description
1 Skirt
2 Cooking hob
3 Control panel
4 Oven light
5 Seal
6 Door
7 Fan
8 Storage compartment
Shelf for racks/trays support
frames

Description
7
EN
2.2 Cooking hob
AUX = Auxiliary
SR = Semi-rapid
R = Rapid
UR2 int. = Ultra rapid internal crown
UR2 ext. = Ultra rapid external crown
2.3 Control panel
Ultra rapid burner knob (1)
Useful for lighting and adjusting the ultra
rapid burner.
Press and turn the knob anti-clockwise to
the symbol to light the burner internal
crown. Turn the knob to the zone between
the maximum and minimum setting
to adjust the flame.
Press and turn the knob anti-clockwise to
the symbol to light the burner external
crown. Turn the knob to the zone between
the maximum and minimum setting
to adjust the flame.
Press and return the knob to the position
to turn off the burner.

Description
8
Hob burner knobs (2)
Useful for lighting and adjust the hob
burners.
Press and turn the knobs anti-clockwise to
the value to light the relative burners.
Turn the knobs to the zone between the
maximum and minimum setting to
adjust the flame.
Return the knobs to the position to turn
off the burners.
Programming clock (3)
Useful for displaying the current time, set
programmed cooking operations and
program the timer.
Auxiliary oven variable grill knob (4)
It turns on the light inside the oven or starts
the grill heating element to a temperature
ranging from a minimum of 50°C to a
maximum of 245°C.
Auxiliary oven variable grill indicator
light (5)
The indicator light comes on to indicate that
the auxiliary oven is heating up. It turns off
as soon as it reaches the set temperature. It
flashes regularly to indicate that the
temperature set inside the oven is kept
constant.
Lower multifunction oven temperature
knob (6)
This knob allows you to select the cooking
temperature.
Turn the knob clockwise to the required
value, between the minimum and maximum
settings.
Lower multifunction oven indicator light
(7)
The indicator light comes on to indicate that
the oven is heating up. It turns off as soon as
it reaches the set temperature. It flashes
regularly to indicate that the temperature set
inside the oven is kept constant.
Lower multifunction oven function knob
(8)
The oven's various functions are suitable for
different cooking modes. After selecting the
required function, set the cooking
temperature using the temperature knob.
Upper multifunction oven temperature
knob (9)
This knob allows you to select the cooking
temperature and the Vapor Clean
temperature.
Turn the knob clockwise to the required
value, between the minimum and maximum
settings.
Upper multifunction oven indicator light
(10)
The indicator light comes on to indicate that
the oven is heating up. It turns off as soon as
it reaches the set temperature. It flashes
regularly to indicate that the temperature set
inside the oven is kept constant.
Upper multifunction oven function knob
(11)
The oven's various functions are suitable for
different cooking modes. After selecting the
required function, set the cooking
temperature using the temperature knob.

Description
9
EN
2.4 Other parts
Oven shelves
The oven features shelves for positioning
trays and racks at different heights. The
insertion heights are indicated from the
bottom upwards (see 2.1 General
description).
Cooling fan
The fan cools the ovens and comes into
operation during cooking.
The fan causes a steady outflow of air that
exits from the rear of the appliance and
which may continue for a brief period of
time even after the appliance has been
turned off.
Internal light
The internal light of the ovens comes on
when any function is selected.
2.5 Available accessories
Rack
Useful for holding cooking containers.
Tray rack
To be placed over the top of the oven tray;
for cooking foods which may drip.
Some models are not provided
with all accessories.

Description
10
Oven tray
Useful for collecting fat from foods placed
on the rack above.
Deep tray
Useful for collecting fat from foods placed
on the rack above and for cooking pies,
pizzas and baked desserts.
Reduction pan stand
Useful when using small cookware.
WOK Reduction pan stand
Useful when using a wok.
Teppanyaki plate
Useful for cooking meat, fish and
vegetables directly on the plate without
adding fats or oils, staying true to the
tradition of Japanese cuisine that seeks to
exalt the natural flavours and aromas of
food ensuring light nourishment while
preserving all nutritional elements.

Description
11
EN
Scraper
Useful for cleaning the Teppanyaki plate.
Do not use on other surfaces.
The accessories intended to come
into contact with food are made of
materials that comply with the
provisions of current legislation.
Original and optional accessories
can be requested to Authorised
Assistance Centres. Use only
original accessories supplied by
the manufacturer.

Use
12
3 Use
3.1 Instructions
High temperature inside the oven
during use
Danger of burns
• Keep the oven door closed during
cooking.
• Protect your hands using heat resistant
gloves when moving food inside the
oven.
• Do not touch the heating elements inside
the oven.
• Do not pour water directly on very hot
trays.
• Do not allow children younger than 8
year old to come near the appliance
when in operation.
• If you need to move food or at the end
of cooking, open the door 5 cm for a
few seconds, let the steam come out,
then open it fully.
High temperature inside the
storage compartment
Danger of burns
• Do not open the storage compartment
when the oven is on and still hot.
• The items inside the storage
compartment could be very hot after
using the oven.
Improper use
Danger of burns
• Make sure that the flame-spreader
crowns are correctly positioned in their
housings with their respective burner
caps.
• Oils and fat could catch fire if
overheated. Be very careful.
High temperature inside the oven
during use
Danger of fire or explosion
• Do not spray any spray products near
the oven.
• Do not use or leave flammable materials
near the oven or the storage
compartment.
• Do not use plastic kitchenware or
containers when cooking food.
• Do not put sealed tins or containers in
the oven.
• Do not leave the oven unattended
during cooking operations where fats or
oils could be released.
• Remove from the oven compartment all
trays and racks not used during cooking.

Use
13
EN
3.2 First use
1. Remove any protective film from the
outside or inside of the appliance,
including accessories.
2. Remove any labels (apart from the
technical data plate) from the
accessories and from the cooking
compartments.
3. Remove all the accessories from the
appliance and clean them (see 4
Cleaning and maintenance).
4. Heat the empty ovens at the maximum
temperature to burn off any residues left
by the manufacturing process.
3.3 Using the accessories
Racks and trays
Racks and trays have to be inserted into the
side guides until they come to a complete
stop.
• The mechanical safety locks that prevent
the rack from being taken out
accidentally have to face downwards
and towards the oven back.
Improper use
Risk of damage to surfaces
• Do not cover the bottom of the oven with
aluminium or tin foil sheets.
• If you wish to use greaseproof paper,
place it so that it will not interfere with the
hot air circulation inside the oven.
• Do not place pans or trays directly on
the bottom of the cooking compartment.
• Do not use the open door to rest pans or
trays on the internal glass pane.
• Do not pour water directly on very hot
trays.
• Make sure that the flame-spreader
crowns are correctly positioned in their
housings with their respective burner
caps.
• The cooking vessels or griddle plates
should be placed inside the perimeter of
the hob.
• All pans must have smooth, flat bottoms.
• If any liquid does boil over or spill,
remove the excess from the hob.
Gently insert racks and trays into
the oven until they come to a stop.
Clean the trays before using them
for the first time to remove any
residues left by the manufacturing
process.

Use
14
Tray rack
The tray rack has to be inserted into the tray.
In this way fat can be collected separately
from the food which is being cooked.
Reduction pan stands
The reduction pan stands have to be
placed on the hob grids. Make sure they
are properly placed.
3.4 Using the hob
All the appliance's control and monitoring
devices are located together on the front
panel. The burner controlled by each knob
is shown next to the knob. The appliance is
equipped with an electronic ignition device.
Simply press the knob and turn it anti-
clockwise to the maximum flame symbol,
until the burner lights. If the burner does not
light in the first 15 seconds, turn the knob to
and wait 60 seconds before trying
again. After lighting, keep the knob pressed
down for a few seconds to allow the
thermocouple to heat up. The burner may
go out when the knob is released: in this
case, the thermocouple has not heated up
sufficiently. Wait a few moments and repeat
the operation. Keep the knob pressed in
longer.
In case of an accidental switching
off, a safety device will be tripped,
cutting off the gas supply, even if
the gas tap is open. Return the
knob to and wait at least 60
seconds before lighting it again.

Use
15
EN
Correct position for flame-spreader
crowns and burner caps
Before lighting the hob burners, make sure
that the flame-spreader crowns are
correctly positioned in their housings with
their respective burner caps. Make sure that
the holes in the flame-spreader crowns are
aligned with the igniters and thermocouples
(A).
Practical tips for using the hob
For better burner efficiency and to minimise
gas consumption, use pans with lids and of
suitable size for the burner, so that flames
do not reach up the sides of the pan. Once
the contents come to the boil, turn down the
flame far enough to ensure that the liquid
does not boil over.
3.5 Teppanyaki plate
Use the Teppanyaki plate on the pair of SR
burners on the right of the hob.
Cookware diameters:
• Auxiliary: 12 - 14 cm.
• Semi-rapid: 16 - 24 cm.
• Rapid: 18 - 26 cm.
• Ultra-rapid: 18 - 28 cm.
Improper use
Risk of damage to surfaces
• The plate must not be used for more than
60 minutes.
• The burners under the plate can be lit at
the same time to the maximum setting for
no more than 15 minutes. After this time
they should be set at the minimum
setting.
• After use, it is advisable to wait for at
least 15 minutes before removing the
accessory from the appliance.
The Teppanyaki plate should be
positioned in place of the rack.

Use
16
3.6 Using the storage compartment
The storage compartment is at the bottom
right of the cooker. It can be used to store
cookware or metallic objects necessary
when using the appliance.
3.7 Using the ovens
Switching on multifunction ovens
To switch on multifunction ovens:
1. Select the cooking function using the
function knob.
2. Select the temperature using the
temperature knob.
Opening and closing the doors of
multifunction ovens
Multifunction ovens are equipped with a
swing door. To open, pull the door handle
towards you. To close, push the doors until
you hear a mechanical "click".
Switching on the auxiliary oven
To switch the auxiliary oven:
• Select the temperature using the variable
grill knob. The temperature ranges
indicatively from a minimum of 50°C
and a maximum of 245°C.
Multifunction oven doors do not
block laterally when opening and
they might close. During use, pay
attention not to come into contact
with the internal glass pane to
prevent burns.
Over time the swing doors might
get difficult to open and close.
Grease the hinges.

Use
17
EN
Functions list
Static
As the heat comes from above and
below at the same time, this system
is particularly suitable for certain
types of food. Traditional cooking,
also known as static cooking, is
suitable for cooking just one dish at
a time. Perfect for all types of roasts,
bread and cakes and in any case
particularly suitable for fatty meats
such as goose and duck.
Bottom
The heat coming just from the
bottom allows you to complete the
cooking of foods that require a
higher bottom temperature, without
affecting their browning. Perfect for
cakes, pies, tarts and pizzas.
Fan-assisted grill
The air produced by the fan softens
the strong heatwave generated by
the grill, grilling perfectly even very
thick foods. Perfect for large cuts of
meat (e.g. shin of pork).
Fan-assisted static
The operation of the fan, combined
with traditional cooking, ensures
uniform cooking even with complex
recipes. Perfect for biscuits and
cakes, even when simultaneously
cooked on several levels. (For
multiple-level cooking, we
recommend using the 2nd and 4th
shelves.)
Fan-assisted bottom
The combination of the fan with just
the lower heating element allows
cooking to be completed more
rapidly. This system is
recommended for sterilising or for
finishing off the cooking of foods
which are already well-cooked on
the surface, but not inside, which
therefore need a little more heat.
Perfect for any type of food.
In pyrolytic models, the special
defrosting and proving functions are
brought together under the same
function.
Defrosting
Rapid defrosting is helped by
switching on the fan provided and
the top heating element that ensure
uniform distribution of low
temperature air inside the oven.
Grill
The heat coming from the grill
element gives perfect grilling results
above all for thin and medium
thickness meat and in combination
with the rotisserie (where present)
gives the food an even browning at
the end of cooking. Perfect for
sausages, ribs and bacon. This
function enables large quantities of
food, particularly meat, to be grilled
evenly.

Use
18
3.8 Cooking advice
General advice
• Use a fan-assisted function to achieve
uniform cooking at several levels.
• It is not possible to shorten cooking times
by increasing the temperature (the food
could be overcooked on the outside and
undercooked on the inside).
• Using more ovens at the same time might
affect the final cooking results.
Advice for cooking meat
• Cooking times vary according to the
thickness and quality of the food and to
consumer taste.
• Use a meat thermometer when roasting
meat, or simply press on the roast with a
spoon. If it is hard, it is ready; if not, it
needs another few minutes cooking.
Advice for cooking with the Grill and the
Fan-assisted grill
• Meat can be grilled even when it is put
into the cold oven or into the preheated
oven if you wish to change the effect of
the cooking.
• With the Fan-assisted grill function, we
recommend that you preheat the oven
before grilling.
• We recommend placing the food at the
centre of the rack.
• With the Grill function, we recommend
that you turn the temperature knob to the
maximum value near the symbol to
optimise cooking.
• Foods should be seasoned before
cooking. Foods should also be coated
with oil or melted butter before cooking.
• Use the oven tray on the first bottom shelf
to collect fluids produced by grilling.
• Grilling processes should never last more
than 60 minutes using multifunction
ovens, 30 minutes inside the auxiliary
oven.
Fan-assisted circular
The combination of the fan and the
circular element (incorporated in the
rear of the oven) allows you to cook
different foods on several levels, as
long as they need the same
temperatures and same type of
cooking. Hot air circulation ensures
instant and uniform distribution of
heat. It will be possible, for instance,
to cook fish, vegetables and biscuits
simultaneously (on different levels)
without mixing odours and flavours.

Use
19
EN
Advice for cooking desserts and biscuits
• Use preferably dark metal moulds: they
help to absorb the heat better.
• Temperature and cooking time depend
on the quality and consistency of the
dough.
• To check whether the dessert is cooked
right through: at the end of the cooking
time, put a toothpick into the highest point
of the dessert. If the dough does not stick
to the toothpick, the dessert is cooked.
• If the dessert collapses when it comes
out of the oven, on the next occasion
reduce the set temperature by about
10°C, selecting a longer cooking time if
necessary.
• While cooking desserts or vegetables,
excessive condensation may form on the
glass. In order to avoid this, open the
door very carefully a couple of times
while cooking.
Advice for defrosting and proving
• Place frozen foods without their
packaging in a lidless container on the
first shelf of the oven.
• Avoid overlapping the food.
• To defrost meat, use the rack placed on
the second level and a tray on the first
level. In this way, the liquid from the
defrosting food drains away from the
food.
• The most delicate parts can be covered
with aluminium foil.
• For successful proving, a container of
water should be placed in the bottom of
the oven.
To save energy
• Stop cooking a few minutes before the
time normally used. Cooking will
continue for the remaining minutes with
the heat which has accumulated inside
the oven.
• Reduce any opening of the door to a
minimum to avoid heat dispersal.
• Keep the inside of the appliance clean
at all times.
3.9 Programming clock
1 Timer key
2 Cooking time key
3 End of cooking key
4 Value decrease key
5 Value increase key
The programmer clock controls
exclusively the right multifunction
oven and has not any control on
the other ovens.

Use
20
Setting the time
On the first use, or after a power failure, the
digits will be flashing on the
appliance's display.
1. Press the and keys at the same
time. The dot between the hours and the
minutes flashes.
2. The time can be set using or .
Hold down the key to increase or
decrease rapidly.
3. Press the key or wait 5 seconds. The
dot between the hours and the minutes
stops flashing.
4. The symbol on the display indicates
that the appliance is ready to start
cooking.
Timed cooking
1. After selecting a cooking function and
temperature, press key . The display
will shows the digits and the
symbol displayed between the hours
and the minutes.
2. Use the key or to set the required
minutes.
3. Wait approx. 5 seconds without pressing
any key in order for the function to
activate. The current time and the
symbols and will appear on the
display.
4. At the end of cooking the heating
elements will be deactivated. On the
display, symbol turns off, symbol
flashes and the buzzer sounds.
5. To turn off the buzzer just press any key
of the programmer clock.
6. Press keys and at the same time
to reset the programmer clock.
Timed cooking is the function
which allows a cooking operation
to be started and then ended after
a specific length of time set by the
user.
It is not possible to set a cooking
time of more than 10 hours.
After the setting, to display the
cooking time left press the key.
To reset the set program, press
keys and at the same time
and switch off the oven manually.

Use
21
EN
Programmed cooking
1. Set the cooking time as described in the
previous point “Timed cooking”.
2. Press key. The sum of the current time
plus the pre-set cooking duration will
appear on the display.
3. Use the or key to set the required
minutes.
4. Wait approx. 5 seconds without pressing
any key in order for the function to
activate. The current time and the
symbols and will appear on the
display.
5. At the end of cooking the heating
elements will be deactivated. On the
display, symbol turns off, symbol
flashes and the buzzer sounds.
6. To turn off the buzzer just press any key
of the programmer clock.
7. Press keys and at the same time
to reset the programmer clock.
Timer
The timer can be activated at any time.
1. Press key. The display will shows the
digits and the indicator light
flashing between the hours and the
minutes.
2. Use the or key to set the required
minutes.
3. Wait approx. 5 seconds without pressing
any key to finish setting the timer. The
current time and the symbols and
appear on the display.
Adjusting the buzzer volume
The buzzer volume can be set to 3 different
levels. When the buzzer is in operation,
press to change the setting.
Deleting the set data
Press keys and at the same time to
reset the programs set.
Then switch off the oven manually if cooking
is in progress.
Programmed cooking is the
function which allows a cooking
operation to be started at a set
time and then ended after a
specific length of time set by the
user.
After the setting, to display the
cooking time left press the key.
To display the end of cooking time,
press the key.
The timer does not stop the
cooking but rather informs the user
when the set time has run out.
It is not possible to set a cooking
time of more than 24 hours.
After the timer has been
programmed, the display will go
back to showing the current time;
to display the remaining time, press
.

Use
22
Cooking information table
Food Weight (Kg) Function
Runner
position from
the bottom
Temperature
(°C) Time (minutes)
Lasagne 3 Static 1 or 2 220 - 230 40 - 50
Oven-baked pasta 2.5 Static 1 or 2 220 - 230 40
Roast veal 1 Circular 2 180 - 190 70 - 80
Pork loin 1 Circular 2 180 - 190 70 - 80
Pork shoulder 1 Fan-assisted static 2 180 - 190 90 - 100
Roast rabbit 1 Circular 2 180 - 190 70 - 80
Turkey breast 1 Fan-assisted static 2 180 - 190 110 - 120
Roast pork neck 1 Fan-assisted static 2 180 - 190 190 - 210
Roast chicken 1 Fan-assisted static 2 190 - 200 60 - 70
1st surface 2nd surface
Pork chops Fan-assisted grill 4 250 7 - 9 5 - 7
Pork fillet Grill 3 250 9 - 11 5 - 9
Beef fillet Grill 3 250 9 - 11 9 - 11
Liver slices Fan-assisted grill 4 250 2 - 3 2 - 3
Sausages Fan-assisted grill 3 250 7 - 9 5 - 6
Meatballs Grill 3 250 7 - 9 5 - 6
Salmon trout 0.7 Circular 2 160 - 170 35 - 40
Pizza Fan-assisted static 1 250 6 - 10
Bread Circular 1 190 - 200 25 - 30
Focaccia Fan-assisted static 1 180 - 190 15 - 20
Ring cake Circular 2 160 55 - 60
Fruit tart Circular 2 160 30 - 35
Short pastry Circular 1 or 2 160 - 170 20 - 25
Jam tarts Fan-assisted static 1 or 2 160 - 170 40 - 50
Paradise cake Circular/Static 2 170 50 - 60
Cream puffs Fan-assisted static 2 150 - 160 40 - 50
Light sponge cake Circular 2 150 - 160 45 - 50
Rice pudding Circular/Static 2 160 - 170 50 - 60
Brioches Circular 2 160 25 - 30
Short pastry biscuits Fan-assisted static 1-3 160 - 170 16 - 20
The times indicated in the table do not include preheating times and are provided as a
guide only.
This manual suits for next models
1
Table of contents
Other Smeg Cooker manuals

Smeg
Smeg LF66105SS User manual

Smeg
Smeg AS5601 User manual

Smeg
Smeg A31X-7 User manual

Smeg
Smeg FS61XNG8-1 User manual

Smeg
Smeg Classica C92IMAN9 User manual

Smeg
Smeg Classic CSA122X User manual

Smeg
Smeg SCB90MFX2 User manual

Smeg
Smeg SY92IPX9 User manual

Smeg
Smeg CS6CMXA User manual

Smeg
Smeg CS122-6 User manual