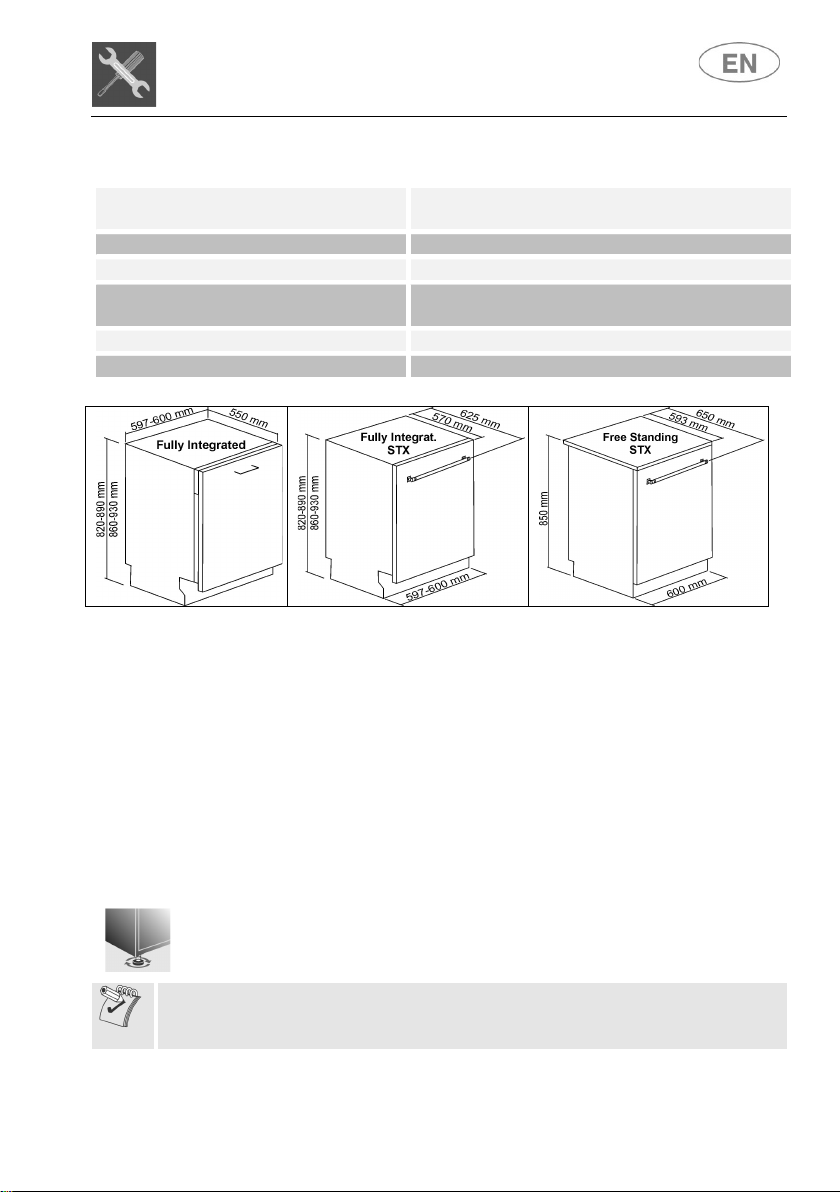
Smeg Classica DW9QSDXSA-1 User manual

Contents
1
1 General safety instructions _______________________________ 2
2. Installation ___________________________________________ 9
3. Product description ____________________________________ 12
4. Operating instructions __________________________________ 16
5. Cleaning and maintenance ______________________________ 17
6. Troubleshooting ______________________________________ 18
Thank you for choosing one of our products.
You are advised to read this manual carefully; it contains all the
information you need about the right conditions for the proper, safe use of
your dishwasher.
This manual contains only the basic information required to use the
appliance. The complete manual can be obtained from
www.smeg.com/download-manuals
by entering the product code shown on the plate attached to the inner right
hand edge of the dishwasher door.
The manual can be accessed quickly via the QR code using a device with
a QR reader application.

Warnings
2
TRANSLATION OF THE ORIGINAL
INSTRUCTIONS
1 General safety instructions
This manual is an integral part of the appliance; it
must always be kept intact together with the
dishwasher for future reference (even if sold). Before
using the appliance, carefully read all the
instructions contained in this manual.
This appliance is intended for indoor use in a
household environment and similar such as staff
kitchens of shops, offices and other workplaces,
institutions, and for the use by guests at hotels,
hostels, bed and breakfast and other residential
facilities. The appliance is designed and
manufactured to perform the following function:
washing and drying of dishes; any other use shall
be considered improper. The manufacturer
declines all responsibility for uses other than
those described above.
Do not use appliances which have been damaged
during transit! If in doubt, contact your dealer.
The appliance must be installed and connected in
accordance with the instructions provided by the
manufacturer. Installation must be performed by
qualified technicians in accordance with
applicable regulations.

Warnings
3
Never leave waste packaging unattended. Do not
allow children to play with packaging materials.
Separate waste packaging materials by type and
consign them to the nearest recycling centre.
The plate with the technical data, serial number and
marking is in a visible position on the inside edge of
the door. It must not be removed.
The appliance must be earthed in compliance with
electrical safety regulations. The manufacturer
declines all responsibility for damage to persons
or property resulting from failure to earth the
appliance or from a defective earth connection.
During the installation the appliance must be
disconnected from the network.
Do not install the appliance in a place subject to
freezing.
Do not install the appliance near equipment with
high irradiation temperature (e.g. gas burners,
fireplaces, etc.).
If the appliance is installed in a compartment above
or below another equipment (e.g. gas burners,
ovens, etc.), read carefully the instructions provided
by the manufacturer of the equipment. If the
instructions of the equipment do not contain
information, contact the manufacturer of the
equipment to ensure that the appliance can be
installed above or below it.

Warnings
4
Building-in the appliance underneath a hob is
absolutely forbidden. Installing a hob on top of free-
standing appliance is absolutely forbidden.
To ensure stability, install the appliance only under
continuous worktop, securely fixed to adjacent
cabinets. If the appliance is installed in a high
cabinet, both the appliance and the cabinet must be
adequately fixed.
If the appliance is not built-in and is therefore
accessible on one side, the door hinge area must be
covered for safety reason (injury hazard). The
covering fixtures are available as an accessory from
specialist dealers or the after-sales.
Check that the voltage and the frequency of the
mains match the ratings on the name plate of the
appliance.
The plug on the supply cord and the corresponding
socket outlet must be of the same type and meet the
regulations in force. Do not use adaptors or shunt
connections in order to avoid the possibility of
overheating or burning.
The plug of the appliance must be accessible after
installation. Never disconnect the plug by pulling on
the power supply lead.
If the appliance is provided with a plugless supply
cord, an omnipolar circuit breaker providing a full
disconnection in overvoltage protection class III
must be installed in an easily accessible position on
the supply lineile.

Warnings
5
The appliance must be connected to the water
supply by means of new hoses.
Briefly test the appliance after installation. Run a
wash cycle with a temperature of between 45 and
70°C with the dishwasher empty and using a specific
dishwasher detergent. (It is not sufficient to run a
soak cycle). If the dishwasher fails to operate
correctly, disconnect it from the electrical power
supply and call the nearest technical service centre.
Never attempt to repair the appliance yourself.
The dishwasher should only be used by adults. Use
by children aged from eight years and persons with
reduced physical, sensor or mental capabilities or
lack of experience and knowledge is only permitted
under the supervision of a person responsible for
their safety.
I Do not allow children to play with the appliance.
Keep children away from the dishwasher when the
door is open. Always check that the detergent
distributor is empty after completion of the wash
cycle.
Cleaning and regular maintenance of the appliance
by children is only permitted under the supervision
of a person responsible for their safety.
Some detergents are strongly alkaline. Avoid
contact with the skin and eyes. Detergents can be
extremely dangerous if swallowed. They contain
substances capable of causing permanent damage
to the mouth and throat, and even leading to

Warnings
6
suffocation. Observe all the safety instructions on
the packaging of these products.
Do not drink the water residues which may be
present on the dishes or appliance at the end of the
washing program.
Never place solvents such as alcohol or turpentine,
which are potentially explosive, inside the appliance.
Never load dishes soiled with ash, wax or paint.
Never leave the dishwasher door open; people
might trip over it. Leaning or sitting on the
dishwasher door when open may cause the
appliance to overturn and/or damage it.
Switch off the dishwasher after use to avoid wasting
electricity.
Knives and other kitchen equipment with sharp
edges must be placed in the basket with their tips
downwards, or horizontally in the top basket; take
care not to injure yourself on any sharp edges
protruding from the baskets.
The appliance satisfies all applicable safety
regulations governing electrical equipment. Any
technical checks should be conducted exclusively by
trained and authorised technicians: repairs
performed by unauthorised persons not only
void the warranty but may also put the user’s
safety at risk.
In the event of a fault, disconnect the dishwasher
from the electrical power supply and shut off the
water tap. In the event of damage to the supply cord,

Warnings
7
have it replaced by the manufacturer or an
authorised technical service centre.
Some components are live even with the on/off
button in the off position. Before performing any
maintenance work on the appliance, disconnect it
from the electrical power supply.
Do not clean the machine with a water jet machine,
high-pressure or steam cleaners.
Models with “acquastop” device
This device prevents flooding in case of water leak.
When the “acquastop” device is tripped, contact a
qualified technician to identify and repair the fault.
In these models the water intake hose contains a
solenoid valve. Do not cut the hose and do not
allow the solenoid valve to drop into water. In
case of damage to the water intake hose,
disconnect the appliance from the electrical and
water supply.
Warning: The device only works if the
dishwasher is connected to the mains.

Warnings
8
1.1 Declaration of conformity
The appliance complies with the essential requirements
of the following European directives:
- 2009/125/EC
- 2011/65/EU
- 2014/35/EU
- IEC/EN 62471, risk group 1, for models with
internal lighting.
IEC/EN 61770
1.2 Disposal
This appliance must be disposed of separately
from other waste (directives 2012/19/EC).
The appliance does not contain substances in quantities
sufficient to be considered hazardous to health and the
environment, in accordance with current European
directives:
To dispose of the appliance:
Cut the power cable,
make the lock unusable.
The manufacturer declines any liability for damage
or injury caused by failure to comply with the
instructions indicated above or as a result of
tampering with
even just one part of the appliance
and the use of non
-
original spare parts.

Installation
9
2. Installation
2.1 Technical characteristics
Water supply pressure min. 0,05 - max. 0,9 MPa (min. 0.5 – max. 9
bar)
Water supply temperature
max. 60°C
Capacity
12-13 standard place settings
Class of protection against
moisture
IPX0
Protection against electric shock
class I
Electrical data
see the data plate
Appliance dimensions (mm)
2.2 General Information
This appliance may be placed up against walls or other furniture units.
If the appliance is installed near a heat source, fit a special insulating panel to
prevent overheating and malfunction of the appliance.
To facilitate the installation procedure, the intake and drain hoses can be
positioned in any direction; make sure that the hoses are not kinked, crushed or
pulled too tightly.
A hole at least 8 cm in diameter is required to allow the power supply cable and
hoses to pass.
At the end of the installation, perform a short test of the appliance: open the water
tap and check that there are no leaks.
To install the dishwasher against the back wall, the hoses should be passed
through the lower area where there is a dedicated space for them.
Level the appliance on the floor using the appropriate Allen key to
regulate the adjustable feet. This operation is essential for ensuring
correct operation of the dishwasher.
Some models are equipped with only one adjustable foot at the rear, which
can be adjusted by turning the screw on the lower front part of the appliance.

Installation
10
Building-in a dishwasher underneath a hob is absolutely forbidden.
Moreover, dishwashers may not be installed directly touching appliances
which are not conventional built-in kitchen appliances (e.g. fireplaces,
stoves, etc.).
When installing the dishwasher in a compartment next to one or more other
appliances, it is essential to comply with all the recommendations provided by
the appliance’s manufacturer (minimum distances, installation procedures,
etc.).
For free-standing models only
- Installing a hob on top of a free-standing dishwasher is absolutely
forbidden.
- If the appliance is accessible from one side, the door hinge area has to be
covered for safety reasons (risk of injury). The covers are available as an
accessory and can be ordered through the Technical Assistance Service.
- The top surface of the dishwashers can be removed to
allow installation under a worktop. The
appropriate kit should be purchased from authorised dealers or via the
Technical Assistance Service. This must be carried out by authorised
personnel.
2.3 Water supply connection
CONNECTING TO THE WATER SUPPLY
Connect the intake hose to a cold water supply with ¾” gas
thread, inserting the filter A supplied with the dishwasher.
Take care to screw the hose firmly into place with your
hands and then complete by tightening about ¼ of a turn
with pliers.
In dishwashers equipped with the AQUASTOP device,
the filters is already fitted inside the threaded ring.
The dishwasher can also be connected to a hot water supply not exceeding
60°C. Supplying the appliance with hot water cuts down the washing time be
approximately 20 minutes, but slightly reduces its effectiveness. Make the
connection to the domestic hot water supply using the same procedure
described for connecting to the cold water supply.

Installation
11
DRAIN CONNECTION
Insert the dishwasher’s drain hose into a drain pipe
having a diameter of at least 4 cm, or alternatively, place
it inside the kitchen sink using the plastic support
provided, taking care not to crush or excessively bend
the hose. It is important to prevent the hose from coming
loose and falling. For this purpose, the plastic support is
equipped with a hole for tying it to the wall or water tap.
The free end should be positioned at a height of between
30 and 100 cm, and should never be submerged in
water.
If a horizontal drain extension hose is used (for a maximum 3 m), the drain hose can
be placed at a maximum height of.
85 cm
from the ground.
2.4 Electrical connection
Check that the voltage and the frequency of the mains match the ratings
on the name plate of the appliance positioned on the inner edge of the
door.
The plug on the supply cord and the corresponding socket outlet must be of the
same type and meet the regulations in force.
The plug must be accessible after installation.
Never disconnect the plug by pulling on the power supply lead.
After changing the supply cord, make sure that the bracket which secures the cord
is fixed securely in place.
Do not use adaptors or shunt connections in order to avoid the possibility of
overheating or burning.
The power cable must be replaced by the manufacturer or by an
Authorized Service Centre.

User instructions
12
3. Product description
3.1 Control panel
The panel shown is only a guideline example: the form of the lights and
buttons may vary depending on the model.
A PROGRAM INDICATOR LIGHTS
B PROGRAM SELECTION BUTTON
C SALT INDICATOR LIGHT
D RINSE AID INDICATOR LIGHT
E OPTIONS (according to the model purchased)
F DISPLAY (if present)
G DELAY TIMER BUTTON (if present)
H ON/OFF BUTTON
SETTING THE WASHING PROGRAM AND SWITCHING ON
After identifying the most suitable program with the aid of the programs
table:
Press the ON/OFF button (H) and wait for the PROGRAM
INDICATOR LIGHT (A) to illuminate;
Keep pressing the PROGRAM SELECTION button (B) until the
indicator light corresponding to the desired program illuminates;
select the option required (if any and if the model provides options);
close the door; after about 2" the program will start LIGHT will
flashing (indicating that the program is being executed).

User instructions
13
PROGRAMS TABLE
Program
Pre-wash
Wash
Rinse °C
Drying
(1) Duration (min)
Water consumption
(liters/cycle)
(1) Energy consumption
(KWh/cycle)
P1
SOAK
cold - - - - 15 3,8 0,02
P2
(**)
AUTO
SENSOR
When this cycle is selected, the dishwasher recognizes the type of soil
and automatically adjusts the washing parameters.
The program ends with a drying cycle.
P3
(*)
(**)
ECO
- 45°C cold 55(2)/
70 ● 190(2)/
150 9 0,734
P4
(**)
MIX 65°
cold 65°C cold 55(2)/
70 ● 150(2)/
110 12,5 1,35
P5
INTENSIVE 70°
hot 70°C 2 cold 70 ● 155 15,4 1,60
P6
EXPRESS 27’
P1
+
- 38°C - 50 - 27 6,7 0,70
P7
(**)
CRYSTAL 45°
P2
+
- 45°C 2 cold 55(2)/
70 ● 125(2)/
75 12,5 1,15
P8
(**)
SILENT
P3
+
- 55°C cold 55(2)/
65 ● 270(2)/
245 9,6 1,25
P9
FULL
EXPRESS 60’
P4
+
- 65°C cold 70 ● 60 9,6 1,40
P10
HYGIENE
99,9%
P5
+
hot 70°C 2 cold 75 ● 130 15,4 1,20

User instructions
14
Automatic door opening – Dry Assist
Automatic door opening is included in programs indicated with ** in the first column
(*) Standard program according to EN60436. The DRY ASSIST option (if the button
is present) must be active.
(1) Consumption and program duration are measured according
to EN 60436. The values may vary due to various factors, such as the inlet water
temperature and the number of dishes.
(2) With the dry assist option selected (default) / not selected.
Automatic door opening-Dry Assist
It activates automatically when a program that includes the function it is
selected (the light comes on).
It can be deactivated b pressing the button (the light turns off).
The program ends with a drying cycle that consists of a time during which the door is
closed, and a time during which the door is slightly open (just waiting, to assist drying).
The duration depends on the program and model.
Any intervention (opening / closing the door, switching off etc.) during this stage will
end the program early.
The program can be interrupted during the drying cycle and the dishwasher can
unloaded before the cycle has completely ended, which is indicated by a visual and/or
audible alarm (depending on the model), but best drying results may not be obtained.
The complete program ends only when indicated by a visual and/or audible
signal (depending on the model).
There must be sufficient space available for the door to open. The
door must not be forced open and closed before the wash cycle has
ended completely.
Notice for testing institutes
Testing institutes are provided with guidelines for comparative tests (e.g. according to
EN60436). request the guidelines by contacting us at the following
e-mail address: dishwasher@test-domestic-appliances.com
When making a request, please specify the model (MOD) and the serial number (S/N)
indicated on the plate on the side of the door.

User instructions
15
Description of the programs:
SOAK
Rinses dishes while waiting to be
washed.
EXPRESS 27’
Quick cycle for lightly soiled dishes,
washed immediately after use.
AUTO SENSOR
Normally soiled mixed loads such as
dishes and pans, even with dried-on
residues.
CRYSTAL 45°
Wine glasses and lightly soiled fine
china. Ideal when you require dazzlingly
clean glassware.
ECO
Cycle with the lowest water and energy
consumption, recommended for
normally soiled dishes, even with dried-
on residues.
SILENT
Normally soiled dishes, even with dried-
on residues. Ideal if you wish to run it
during the night.
MIX 65°
Normally soiled mixed loads such as
dishes and pans, even with dried-on
residues.
FULL EXPRESS 60’
Quick cycle for normally soiled mixed
loads such as dishes and pans, even
with dried-on residues. Dishes are
washed and dried in 60 minutes.
INTENSE 70°
Heavily soiled plates, pots and pans,
even with dried-on residues.
HYGIENE 99,9%
Intensive wash cycle for plates, pots,
pans, cutting boards, feeding bottles.
Ideal for baby dishes or if there are
allergy sufferers in the family.
NOTE: The Hygiene 99.9% program has been tested by an external laboratory (VDE)
without an option selected.
In order to be effective, the cycle should not be interrupted.
OPTIONS TABLE
Option
Description
1 SPECIAL
Creates additional programs.
2 DRY ASSIST
Allows the dishes to be dried perfectly even at low
rinse temperatures, with significant energy savings. It
starts automatically if the selected program is
compatible with it. If it is not required, press the
button to disable it.
3 ½ LOAD
FLEXY ZONE
Ideal if just a few dishes need to be washed, allowing
energy savings and a shorter wash cycle.
4 DELAY
Allows the wash cycles 1 or 3 to be delayed by up to
9, 12 or 24 hours depending on the models.
5 SELF CLEAN
Dishwasher cleaning cycle. Must be started with the
machine empty, without dishes.

User instructions
16
4. Operating instructions
After having installed the dishwasher, remove the basket retainers.
4.1 Adding the salt
The salt prevents the formation of scale
deposits.
Unscrew the cap of the salt container.
Only for the first time, fill the container
with a litre of water.
Pour salt (approx. 1 kg) into the container
using the funnel provided with the dishwasher.
Remove any salt residues before screwing the cap back on.
To regulate the water hardness setting, please refer to the complete
manual that can be found on the website.
- Only use regeneration salt specifically for domestic dishwashers.
- After having added the salt, run a wash cycle to remove any excess
salt.
4.2 Adding the rinse aid
The rinse aid helps to dry the dishes more quickly.
To add rinse aid:
Open the dispenser by pressing and lifting the tab
on the cover.
Top up again when the rinse aid indicator light
turns on.
Close the cover, a click indicates when it is closed.
Use a cloth to remove any spillage of rinse aid which might lead to the
formation of excess foam.
To regulate the amount of rinse aid, please refer to the complete manual that
can be found
on the website.
4.3 Adding the detergent
Open the detergent dispenser cover by lightly
pressing the button P.
Add the detergent or tablet.
Close the cover by sliding it until it stops,
indicated by a click.

User instructions
17
5. Cleaning and maintenance
Before carrying out any work, always unplug the appliance from the
electrical supply or switch off the omnipolar circuit breaker.
CLEANING THE WATER INTAKE FILTER
Close the water supply tap, unscrew the end of the water intake hose,
remove the filter A and clean it under running water. Put the filter A back
into its seat and carefully screw the water intake hose back on.
CLEANING THE SPRAY ARMS
Remove the spray arms and wash them with a jet of water. Put them back in their
seats, making sure that there is nothing to prevent them from rotating.
To remove the upper spray arm, unscrew locking ring R.
To remove the lower spray arm, simply lift it up, pulling by the
central part To remove the orbital spray arm assembly, take
hold of the longer arm and pull the orbital unit upward.
To remove and clean the planetarium sprayer follow the instructions provided.
CLEANING THE FILTER UNIT
Remove the planetarium spray arm (only for the models on which it is fitted)
Grip the tabs, turn them anticlockwise and lift upwards.
Push the central filter D from underneath to remove it from the micro-filter.
Separate the two parts that make up the plastic filter by pressing the body of the
filter in the zone indicated by the arrows.
ORBITAL
PLANETARIUM

User instructions
18
6. Troubleshooting
The dishwasher is capable of signalling a number of faults through the
simultaneous illumination of several indicator lights, with the following
meanings:
FAULT
DESCRIPTION
E1
Acquastop failure (some models only)
E2
Safety level
E3
Water heating fault
E4
Water temperature detection fault
E5
Water intake fault
E6
Water drainage fault
E7
Turbine flow-meter fault (some models only)
E8
Alternate washing system fault
E9
Water intake system fault
E11
Wash pump fault.
Light off
Light on
Light flashing
If an alarm occurs, the machine stops the current program and indicates the fault.
Alarms E1 and E11 require you to contact the technical assistance service.
Alarm E7 is displayed at the end of the cycle, which is anyway completed, as it
does not affect the operation of the dishwasher.
For all other alarms, proceed as follows: stop the current program, switch off the
dishwasher. Switch on and program the dishwasher again to start the new wash cycle.
If the malfunction persists, contact your authorised Service Centre and
provide it with the fault code.
The contact details of the Technical Assistance Department can be found
on the warranty certificate and the website
This manual suits for next models
36
Table of contents
Other Smeg Dishwasher manuals

Smeg
Smeg LVF649B User manual

Smeg
Smeg DF614BE User manual

Smeg
Smeg SA8605XTD User manual

Smeg
Smeg PL5222B User manual

Smeg
Smeg Dishwasher 85028 User manual

Smeg
Smeg STA6443NL User manual

Smeg
Smeg ST742 User manual

Smeg
Smeg Dishwasher DWI409C User manual

Smeg
Smeg LSAP6248X User manual

Smeg
Smeg CWG420D User manual

Smeg
Smeg Dishwasher DWD1E User manual

Smeg
Smeg KSB801 User manual

Smeg
Smeg DWAU315X User manual

Smeg
Smeg DS643 User manual

Smeg
Smeg VG61246 User manual

Smeg
Smeg KLS1256B User manual

Smeg
Smeg ST2FABPK User manual

Smeg
Smeg LVS375SX User manual

Smeg
Smeg PL8210X-1 User manual

Smeg
Smeg Dishwasher DF41-7 User manual