Smeg CWC600 User manual

PROFESSIONAL DISHWASHER

1Precautions for safety and use
2Technical data
3Installation and positioning
4INSTALLATION INSTRUCTIONS FOR THE
AFTER-SALES SERVICE
5Start-up
6Settings
7Malfunctions shown on the display (for the technician)
8INSTRUCTIONS FOR THE USER
9Choosing the program
10 Supplementary Functions
11 Maintenance and cleaning
12 Troubleshooting
13 Malfunctions shown on the display (for the user)
You are advised to read all the instructions in this manual carefully to become familiar with the right conditions
for the proper use of your dishwasher.
TECHNICAL INSTRUCTIONS:
These are intended for the qualified staff who are to install, commission and test the
appliance and carry out any servicing and repairs.
INSTRUCTIONS FOR THE USER:
These provide recommendations for use, a description of the controls and the correct
procedures for cleaning and maintaining the dishwasher.

2
1 Precautions for safety and use
THE DISHWASHER IS INTENDED ONLY FOR PROFESSIONAL USE BY TRAINED STAFF. IT IS
DESIGNED TO WASH TABLEWARE (PLATES, CUPS, BOWLS, OVEN DISHES AND CUTLERY) AND
SIMILAR ITEMS IN THE RESTAURANT AND INSTITUTIONAL CATERING SECTOR, AND COMPLIES WITH
THE INTERNATIONAL STANDARDS ON ELECTRICAL AND MECHANICAL SAFETY (CEI-EN-IEC 60335-2-
58/61770) AND ELECTROMAGNETIC COMPATIBILITY
(CEI-IEC-EN 55014-1/-2, 61000-3;4, 50366).
THE MANUFACTURER DECLINES ALL RESPONSIBILITY FOR INJURY OR DAMAGE CAUSED BY
FAILURE TO COMPLY WITH THE ABOVE REGULATIONS OR DERIVING FROM INCORRECT USE,
TAMPERING WITH EVEN JUST ONE PART OF THE APPLIANCE AND THE USE OF NON-ORIGINAL
SPARE PARTS.
THIS APPLIANCE IS TAGGED UNDER EUROPEAN DIRECTIVE 2002/96/EC ON WASTE ELECTRICAL AND
ELECTRONIC EQUIPMENT (WEE).
BY MAKING SURE THAT THIS PRODUCT IS DISPOSED OF CORRECTLY THE USER HELPS TO
PREVENT POTENTIAL DETRIMENTAL EFFECTS ON HEALTH AND THE ENVIRONMENT.
THE SYMBOL ON THE PRODUCT OR IN THE TECHNICAL DOCUMENTATION INDICATES THAT THIS
PRODUCT MUST NOT BE TREATED AS ORDINARY DOMESTIC WASTE BUT MUST BE CONSIGNED TO
THE SPECIAL COLLECTION POINT FOR THE RECYCLING OF ELECTRICAL AND ELECTRONIC
EQUIPMENT.
WHEN DECOMMISSIONING THE APPLIANCE COMPLY WITH THE LOCAL WASTE DISPOSAL
REGULATIONS.
FOR FURTHER INFORMATION ON THE TREATMENT, RECOVERY AND RECYCLING OF THIS
PRODUCT, CONTACT THE COMPETENT LOCAL OFFICE, THE DOMESTIC WASTE COLLECTION
SERVICE, OR THE SHOP WHERE THE PRODUCT WAS PURCHASED.
THIS MANUAL IS AN INTEGRAL PART OF THE DISHWASHER AND MUST ALWAYS BE
KEPT WITH THE APPLIANCE.
POSITIONING, CONNECTIONS, COMMISSIONING, TROUBLESHOOTING AND
REPLACEMENT OF THE POWER SUPPLY CABLE MUST BE CARRIED OUT BY SKILLED
STAFF.
THE APPLIANCE MUST BE IN COMPLIANCE WITH ELECTRICAL SYSTEM SAFETY
REGULATIONS.
NEVER PLACE SOLVENTS SUCH AS ALCOHOL OR TURPENTINE, WHICH MIGHT CAUSE
AN EXPLOSION, INSIDE THE APPLIANCE. NEVER LOAD DISHES DIRTY WITH ASH, WAX
OR PAINTS.
NEVER USE THE DISHWASHER OR ANY PART OF IT AS A LADDER, SUPPORT OR STAND
FOR PEOPLE, ANIMALS OR ANY OBJECT.
DO NOT DRINK ANY WATER LEFT IN THE DISHES OR DISHWASHER AT THE END OF THE
WASHING PROGRAM.
THE APPLIANCE IS NOT SUITABLE FOR USE BY JUVENILES OR PERSONS WITH
REDUCED PHYSICAL, SENSORIAL OR MENTAL CAPACITIES, OR THOSE WITHOUT THE
NECESSARY KNOWLEDGE AND EXPERIENCE. SUCH PERSONS MAY ONLY USE THE
APPLIANCE UNDER THE SUPERVISION OF A PERSON RESPONSIBLE FOR THEIR SAFETY.

3
2 Technical data
TECHNICAL DATA
Supply voltage V400V 3N ~
Frequency Hz 50
Max. power absorption at 400V 3N ~ kW 10.8
Boiler heating element power at 400V 3N ~ kW 9.0
Tank heating element power kW 1.8
Water intake pressure kPa (bar) 100-600 (1 ÷ 6)
Water intake temperature °C 15°C – 60°C
Water hardness °dF <15°dF
Rinse cycle water consumption I3.2
Boiler capacity I10
Tank capacity I22
Standard cycle duration with intake water at 50°C s60/90/150/variable
Degree of protection IPX 5
Net weight kg 120
Power supply cable type ◄HAR►H07RN-F
Fuse A 4
400V 3N ~
C S
C= Power Supply Cable. S= Master Switch
10,8 kW 5 x 4 32A
3 Installation and positioning
INSTALLATION and POSITIONING
Bring the dishwasher to the installation site, remove the packaging and check the appliance and components
for damage; any damage found must be reported to the transporter in writing.
The packaging components (plastic bags, expanded polystyrene, nails, etc.) must not be left within reach of
children and pets since they are potentially dangerous.
All packaging materials used are environment-friendly. They can be kept without constituting any hazard, or
may be disposed of at a specialist waste disposal centre.
The plastic components suitable for recycling are marked as follows:
PE polyethylene: external packaging film, bag containing the instructions, protective bags.
PP polypropylene: straps.
PS expanded polystyrene: corner guards, top of packaging.
Wooden and cardboard components can be disposed of in accordance with the relevant regulations.
When the product is decommissioned it must not be dumped in the environment; it must be disposed of in
accordance with the relevant regulations. All metal parts are in stainless steel and can be removed.
The plastic parts are marked with the symbol identifying the material used.
POSITIONING:
Caution: the indoor system and premises in which equipment for institutions is installed must
comply with the relevant regulations.
The manufacturer declines all liability for direct or indirect injury or damage deriving from failure to comply
with these regulations.
Before installation, check that there are no objects or materials in the vicinity which may be damaged by
steam or splashes of washing solution, or that any such items are suitably protected.
Place the dishwasher in the chosen point and remove the protective film.
Level the dishwasher (with the aid of a spirit level) on its adjustable feet to ensure that it is stable; all other
mounting solutions must be approved by the manufacturer.
The dishwasher must be secured to the adjoining work-tops by means of suitable fixtures.

4
C
P
SE
Q
LUCEUTILE
FRONTALE
RETRO
420
min1940 - max 2040min1940 -max 2040
760
40
74
797-892
min 140 - max 235min 140 -max 235
min1520 - max 1620min1520 -max 1620
760
824
716
734
C SOLENOID VALVE
Q EARTH TERMINAL
E ELECTRICITY SUPPLY CABLE
P PERISTALTIC HOSES
S ABLAUFSCHLAUCH

5
4 INSTALLATION INSTRUCTIONS FOR THE AFTER-SALES SERVICE
4.1 Water connection
Water supply and drain connection:
The water pipelines and electricity supply cable lead out of the bottom right-hand
corner of the appliance. Connect the water intake hose to a connector with ¾” gas
threaded fitting, fitting the filter Aprovided (in models with aquastop, the filter and ring-
nut form a single unit).
The connection to the water mains must only be made with new hoses; the use of old
or worn hoses is not permitted.
The dynamic intake pressure must be between 1 and 6 bar; if it is higher, installation of a pressure reducer is
recommended.
It is essential to fit a main stop tap on the water intake pipeline; the tap must be accessible after installation of
the appliance, so do not install it behind the dishwasher.
The stated cycle duration refers to appliances supplied with hot water at 50°C.
If the appliance is supplied with cold water, the cycle duration might increase depending on the intake water
temperature, since the dishwasher is fitted with the HTR system, which requires set temperature and pressure
for rinsing.
Drainage:
The dishwasher is fitted with a drain pump and can operate with drain
connections on the floor or wall.
Caution: make sure that the intake and drain hoses are not bent,
constricted or crushed after installation.
If the drain connection is to an outlet with valve, the maximum height of the drain is reduced to 600 mm.
In all cases, after installation check that the drain is fully functional by pumping out the tank completely (P0
cycle).

6
4.1 Electrical connection
The dishwasher and any additional equipment must be connected to the electrical system by
authorised, skilled staff, in accordance with the relevant regulations; also comply with the technical
instructions for the connection.
The total rated power is stated on the appliance’s technical data plate.
The electrical protection devices fitted for the dishwasher must serve this appliance only.
The user must have a master switch and a differential safety breaker, with rating suitable for the
machine’s characteristics, installed on the electricity supply line in accordance with the relevant
regulations.
These switches must be installed close to the dishwasher, be easily accessible after installation, and
provide complete disconnection from the electrical mains in overvoltage class III conditions.
5 FIRST START-UP
The electrical protection system must undergo a functional test before the appliance is put into operation.
The appliance must be installed and/or inspected by the qualified staff, who will start it up for the first time and
provide the relevant operating instructions.
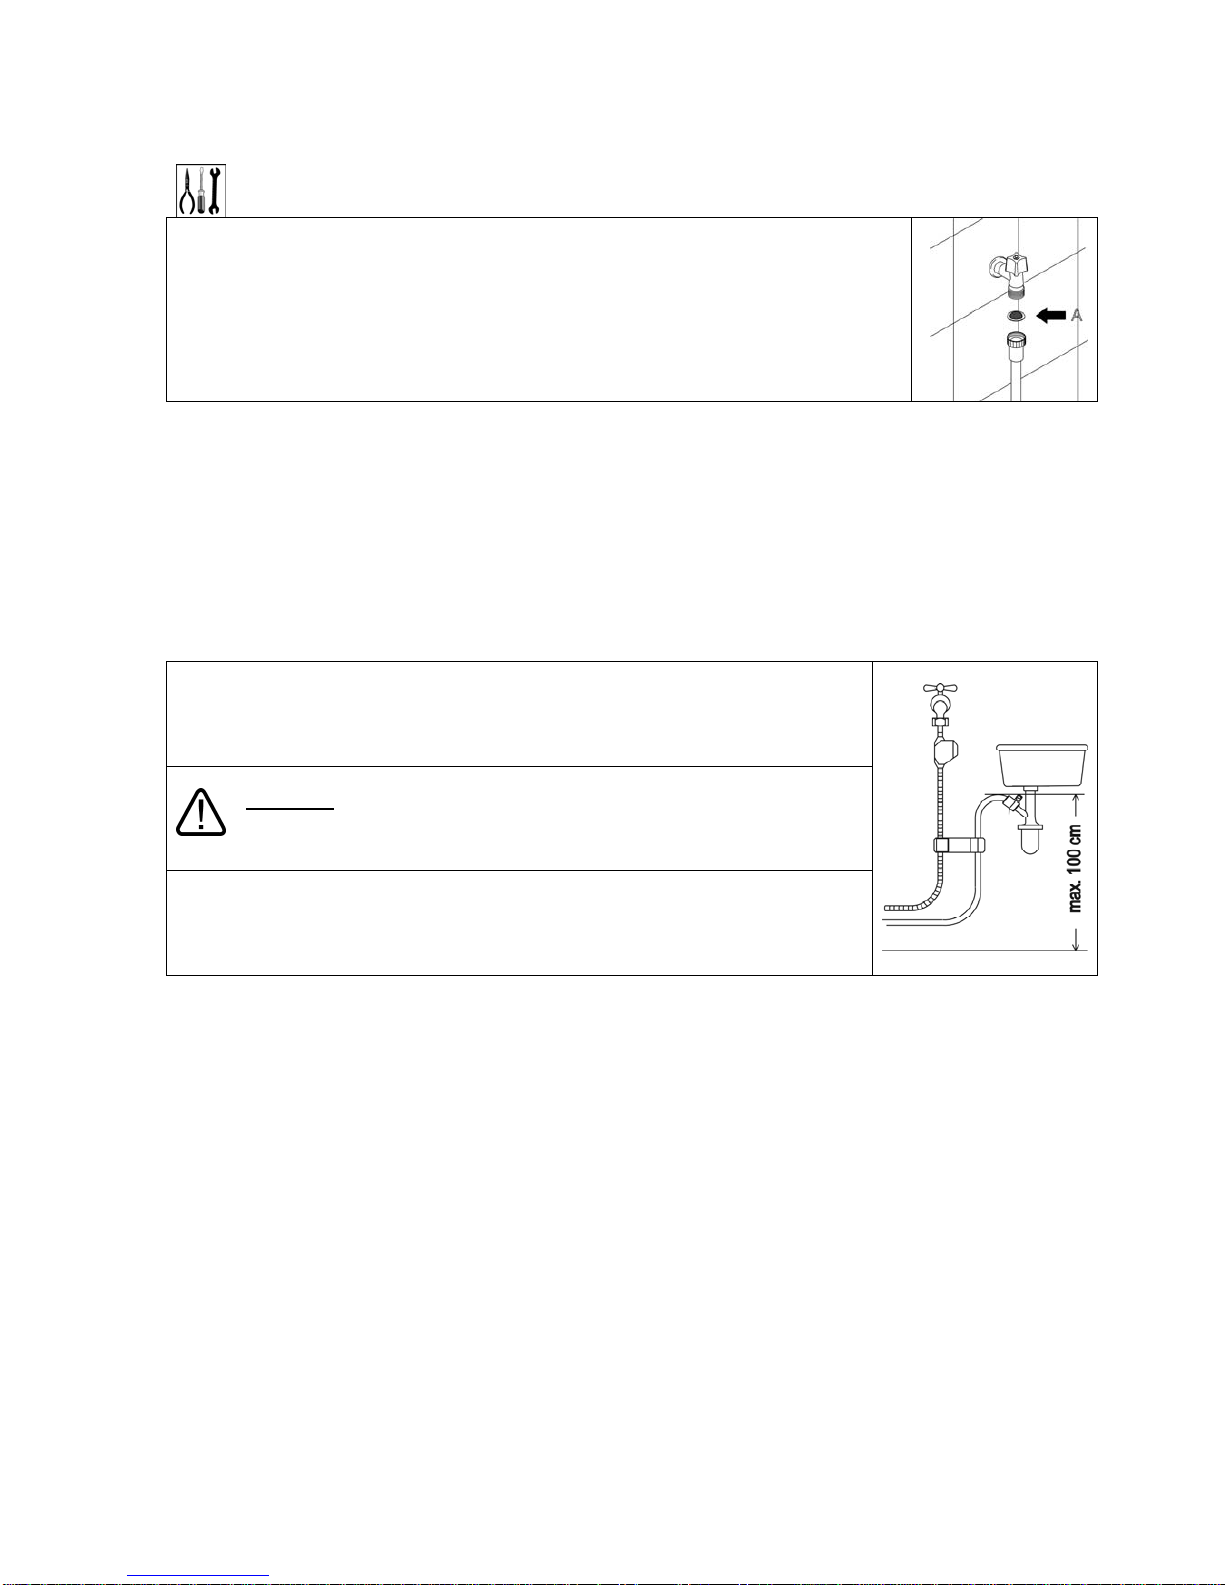
PREPARING FOR USE
Important:
The rinse aid dispenser is fitted on all models, the detergent dispenser only on some.
If both dispensers are present put the external detergent and rinse aid containers in
place and insert the respective intake hoses on the rear of the machine into them.
Red hose: detergent
blue hose: rinse aid
Before inserting the hoses into the containers, fit the weights (needed to ensure that
they always draw in liquid from the bottoms of the containers) and the filters onto their
ends as shown.
If the detergent dispenser is not factory-fitted, it can be by ordering the relative kit.
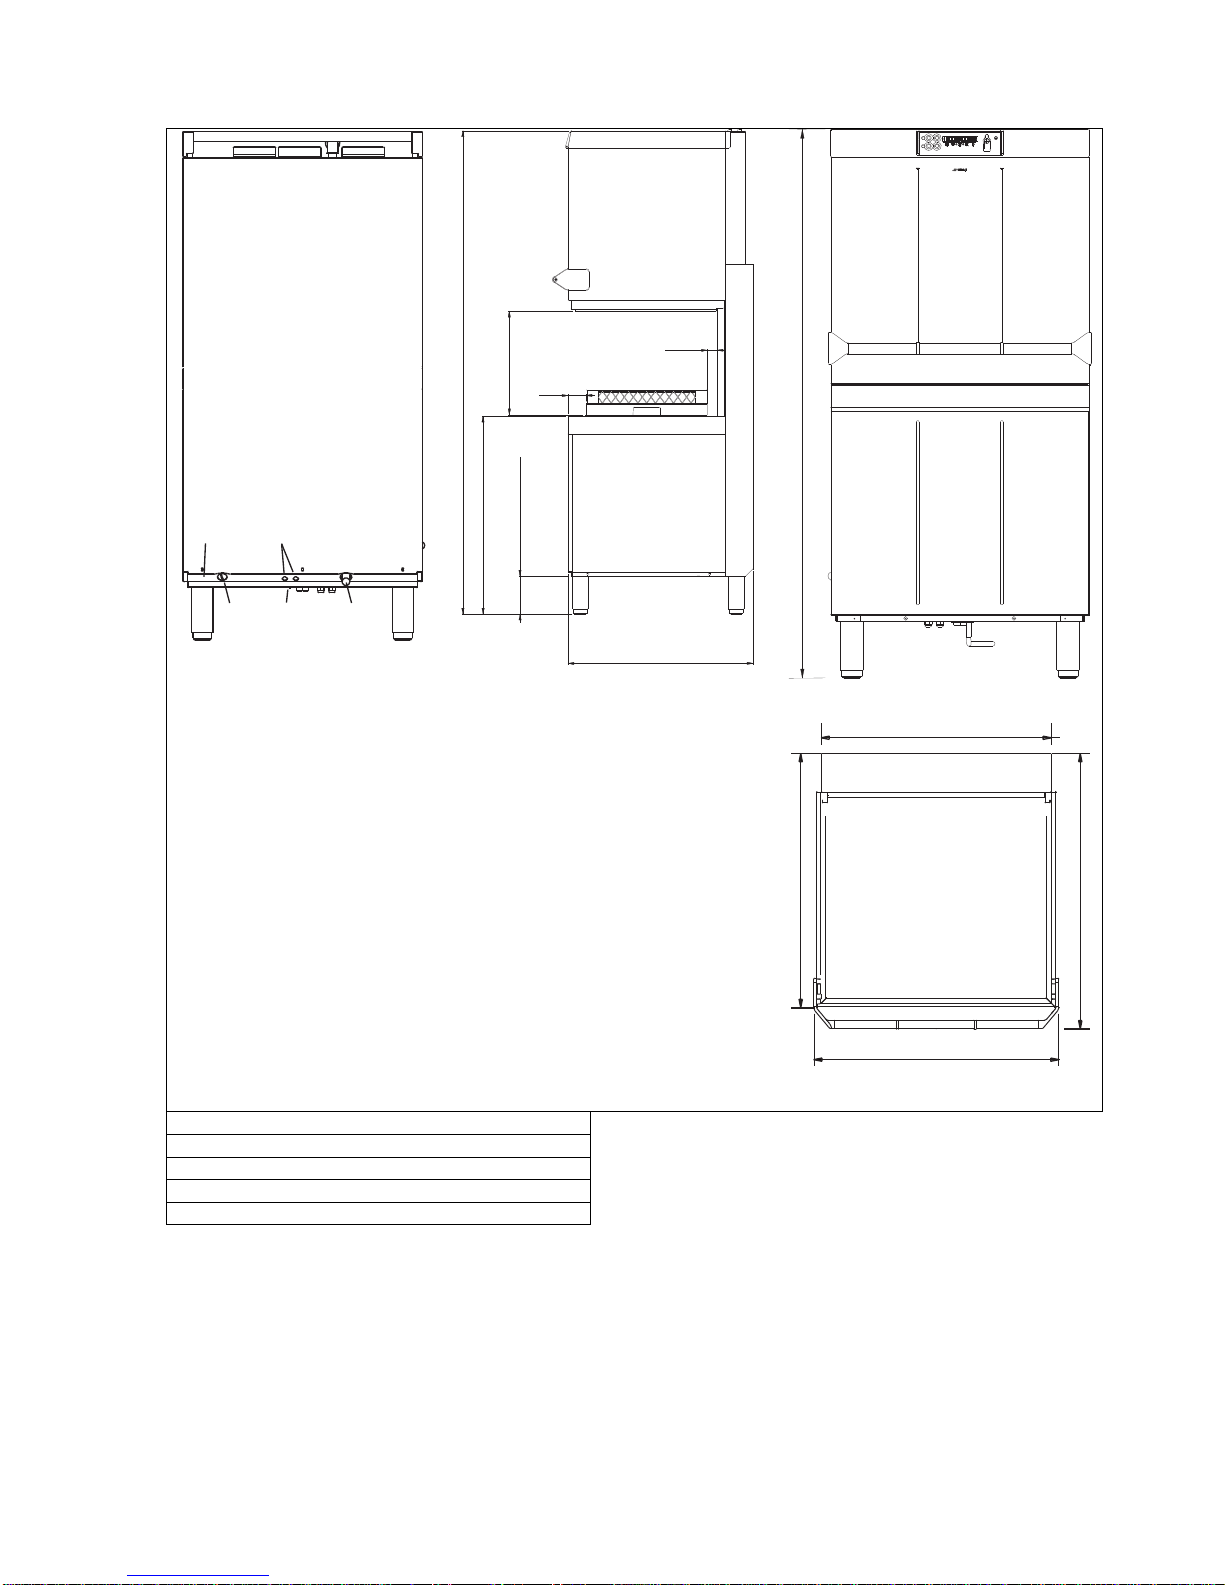
As an alternative an external dispenser can be fitted, making the electrical connection
by means of an H05 RN-F 2x0.5 mm electrical cable, which can be laid along the route shown in the
TECHNICAL DATA diagram and connected as shown in the wiring diagram supplied with the dishwasher.
The dispenser must operate on 230V/50 Hz with maximum power absorption of 15 W.
Connect to the detergent dispenser outside the dishwasher using the red hose mentioned above.
Warning !!!
The dishwasher is always powered up unless the master switch is turned off.
‐Connect the appliance to the user’s earth system. The terminal for the connection is in the bottom
right-hand corner of the appliance.
‐The earth wire (PE) is yellow-green in colour, the neutral wire (N) is blue and the live wires (L1, L2,
L3) are black, grey and brown.
In the event of single-phase connection (230V-1N~) the connection to the electrical mains must be made
using a cable with plug compliant with the relevant regulations..
IMPORTANT:
Whenever the type of detergent or rinse aid is changed, it is ABSOLUTELY ESSENTIAL to flush out the
peristaltic pumps by placing the external intake pipes in water for a few cycles.
Always use only products specifically recommended for use in a dishwasher.
The internal pipes of the detergent and rinse paid pumps should be replaced by the After-Sales Service
every 12 months or 15,000 wash cycles.
Failure to comply with this recommendation leads to forfeiture of the warranty entitlement on the
appliance’s water system.

7
6 SETTINGS
On first installation, a series of operations can be performed to allow the dishwasher to be customised to the user’s
needs. A short testing cycle can also be performed to verify operation of all the components. To perform these
operations, access “programming mode” as explained below
6.1 Dishwasher parameter modification procedure:
(ONLY ACCESSIBLE AFTER FILLING IS COMPLETE or WITH THE DOOR OPEN)
Indicator lights as follows: off; green; orange; flashing.
Access “programming mode” by pressing the on/off button for a few
seconds (UnLo 1:58 will appear on the display) with the appliance on (after the
filling and heating phase); at the “beep", release the button and press it
again quickly within 0.5 seconds. Keep pressing the button again to scroll
through all the modifiable parameters in the following order:
Rinse aid delivery amount
Detergent delivery amount
Rinsing temperature
Washing temperature
Start-on/start-off.
Set at “on” to start the cycle when the door is closed.
Set at “off” for cycle start after confirmation with the start button
Regeneration frequency, depending on water hardness (if softener is installed)
tStP on/off
“on” = minimum rinsing temperature as set, regardless of intake water
temperature; the cycle duration may be a few seconds longer than the nominal
length.
“off” = the minimum rinsing temperature might be a few degrees lower than
the setting if hot intake water is not used.
SETTINGS
During start-up, the functions/parameters listed below must be set or adjusted:

8
Detergent pump operating minutes display.
Rinse aid pump operating minutes display.
Energy consumption (kW) display
The Pc option indicates the total kW consumed since installation of the
dishwasher or since the latest reset.
Customisation of duration of program P4.
N.B.: the machine must be set on “P4”, see “6.7 Setting program P4
duration”.
Displaying the cycle count
When scrolling through the appliance parameters the item “tc 88888” , the total
count of the cycles the dishwasher has performed since installation, will be
found.
This parameter cannot be modified or reset unless the software is
reprogrammed.
SETTING THE MODEL (for After-Sales Service only)
In the event of replacement of the circuit board (used on several models)
scroll through to the last modifiable parameter option to select the
appropriate model, “PRF400”, “PRF500”, “CAPOTE”. This operation
must be carried out with the tank empty and door open.
Indicator lights as follows: off; green; orange; flashing.
6.1.1 Setting up rinse aid delivery
RINSE AID
Delivery time
(s) Delivery
quantity (c.c.)
0 0,0
Modify the value of the parameter
by pressing .
6 0,6
12 1,2
18 1,8
24 2,4
30 * 3,0
26 3,6
* default value (factory preset)
48 4,2

9
6.1.2 Setting up detergent delivery
DETERGENT
Delivery time
(s) Delivery
quantity (c.c.)
0 0,0
Modify the value of the parameter
by pressing .
4 1,4
8 2,8
12 * 4,3
16 5,7
20 7,1
* default value (factory preset)
24 8,5
6.1.3 Rinsing temperature setup
Modify the value of the parameter by pressing .
6.1.4 Washing temperature setup
Modify the value of the parameter by pressing .
(Default value: 56 °C)
Min. 52°C – max. 62°C
Indicator lights as follows: off; green; orange; flashing.
6.1.5 Autostart function
Modify the parameter (ON/OFF) by pressing .
Set at “on” to start the cycle when the door is closed.
Set at “off” for cycle start after confirmation with the start button
6.1.6 tStP (minimum rinsing temperature) function
Modify the parameter (ON/OFF) by pressing .
Set at “on” for minimum rinsing temperature as set.
Set as “off” to accept minimum rinsing temperature a few degrees lower than the setting if hot intake water is not
used.

10
6.1.7 Detergent pump
To reset, press for 3 seconds.
Display (also reset when needed)
6.1.8 Rinse aid pump
To reset, press for 3 seconds.
Display (also reset when needed)
6.1.9 Energy consumption – Display and reset
To reset, press for 3 seconds.
6.1.10 Customisation of duration of program P4
The duration of program P4 can be customised from 5 to 20 minutes using the appliance parameter modification
procedure, but the dishwasher must be set on program P4.
After setting program P4 access the programming
procedure and scroll through to “ınF” (last parameter to
appear) then press the button to modify the duration
of the cycle (from 5 to 20 minutes)
After a few seconds without the user pressing any
buttons, the display will return to the normal operating
status and the modifications will be saved.
6.1.11 Setting the Model (for After-Sales Service only)
Modify by pressing .

11
6.2 Starting the peristaltic pumps – rapid filling of detergent and rinse aid delivery circuit
Perform after the parameter modification procedure explained in the previous point.
Indicator lights as follows: off; green; orange; flashing.
With the dishwasher powered up, access “programming mode” by pressing the
on/off button for a few seconds; at the “beep”, release the button and press it
again quickly within 0.5 seconds.
The peristaltic pumps continue to operate until the same buttons are pressed
again. The rinse aid and detergent symbol lights remain on as long as work is
in progress; bear in mind that the rinse aid peristaltic pump fills the circuit in
about 7 minutes, while for the detergent it only takes 2 minutes.
7 MALFUNCTIONS SHOWN ON THE DISPLAY
The dishwasher is able to identify a number of malfunctions and show them on the display.
If the problem persists after the dishwasher has been switched off and back on, proceed as described below:
Err04 Tank temperature probe malfunction
Tank temperature probe disconnected or not working
Err05 Tank water filling malfunction
Check dynamic pressure in intake system, inspect water
intake filter and clean if necessary.
If the problem persists:
- tank pressure switch has failed (continuous empty
reading)
- leak from pipe connected to air trap
- valve vent exhaust pipe blocked
Err06 Water pump-out malfunction
Inspect the filters for dirt and that the drain hose is not
blocked, bent or crushed.
Check that the drain pump is not blocked by dirt by
removing the insert on the sump (from inside the tank)
If the problem persists:
‐with the tank empty: tank pressure switch defect
(the contact is locked on full)
‐with tank full: drain pump has failed
Err09 Tank water level too high
- with tank full:
see above (water pump-out malfunction)
- with tank empty:
safety pressure defect (the contact
is locked on full)
Err23 Boiler heating malfunction (does not heat
up)
-circuit board relay failure,
- contactor failure.
- boiler safety thermostat failure,
- boiler temperature probe faulty or incorrectly positioned
- water continues to enter the tank due to tank pressure
switch defect
Err24 Boiler temperature probe malfunction boiler temperature probe disconnected or not working
Err25 Boiler water filling malfunction
Check that the water intake tap is on and the dynamic
pressure in the intake system, inspect the water intake
filter and clean if necessary.
If the problem persists:
- boiler pressure switch has failed (continuous empty

12
reading)
- pipe leaking/disconnected
Err26 Boiler emptying malfunction - check that rinsing spray arm nozzles are clean
- boiler pressure switch has failed (continuous full reading)
- rinsing pump not working
Err27 Boiler emptying malfunction – with tank full Boiler pressure switch has failed (continuous full reading)
Err28 Boiler heating malfunction (overheating) -circuit board relay failure, or
- contactor failure
8 INSTRUCTIONS FOR THE USER
8.1 Control panel
On-off button
Program selection button
Start CONFIRM/PAUSE button
Total emptying button (tank and boiler)
Additional function selection button
L1 Main power on light
L2 Intake/standby cycle in progress light (orange/green)
L3 Pump-out in progress light
No rinse-aid symbol (if a system for monitoring outside the dishwasher is provided)
Tank heating element on symbol
No salt symbol (if softener is fitted)
Boiler element on symbol
No detergent symbol (if a system for monitoring outside the dishwasher is provided)

13
8.2 Before washing
Use only detergents and rinse aids for industrial dishwashers.
Do not use detergents intended for hand washing.
We recommend the use of Smeg products, specially developed for this dishwasher.
Check:
Turn on the mains
water tap (user) The level of detergent and
rinse aid in the containers. That the filters are in place,
the spray arms rotate, and
there are no foreign bodies in
the dishwasher.
Switch on the master
switch (user): the
word “OFF” appears
on the display.
8.3 FIRST USE EACH DAY (tank and boiler empty)
Indicator lights as follows: off; green; orange; flashing.
Display shows Actions and what happens
With the door closed:
Press and hold it down
the dishwasher fills the tank after the water in the boiler
has heated up; light L2 shows orange and the boiler
heating element symbol appears on the display.
Wait for P1 to appear and LED L1 to change from
orange to green;
the tank heating element comes on until the set
temperature is reached. The duration of this stage may
vary depending on the mains water temperature and on
the single-phase connection.
Press the button to display the tank (left) and boiler
(right) temperatures.
Load the dishes
Select the program required by pressing .
Confirm the program start by pressing and holding it
down for 1 second (light L2 changes from green to
orange).
When topping up the tanks, take care not to swap the products; this might damage the dishwasher and
cause malfunctions.
Do not mix different detergents; this would damage the dispenser device.
Industrial dishwasher detergents may cause serious irritations. Comply carefully with the instructions provided by
the detergent producer on the pack.

14
Cycle in progress, the time left until the end of the cycle
is displayed. If the door is opened “CLOSE” flashes and
the program stops; when it is closed again the program
restarts from the beginning.
At the end of the program “End” flashes
Unload the dishes
When the door is closed again, the last program is repeated.
8.4 Program change
With the door closed, to change to a fresh program
instead of repeating the last one, press the button.
The programs available are displayed (light L2 changes
from orange to green).
If a program has already started, hold down to
interrupt it.
change the program by pressing .
Confirm the program start by pressing and holding it
down for 1 second (light L2 changes back to orange).
N.B.:
During heating of the water in the boiler, the tank heating element and boiler heating element symbols
may appear on the display.
Filter presence sensor (on some models only)
The filter is fitted with a sensor which checks that it is properly fitted; if it is not in the correct position, the word
“FiLter” appears on the display.

15
9 CHOOSING THE PROGRAM
PROGRAM TYPE OF DIRT DURATION (*)
P1 Glasses and plates with light dirtAbout 60”.
P1 +
glass optionGlass, plastic trays, pre-washed platesAbout 50”.
P2 Glasses, cups and plates with light dirtAbout 90”.
P2 +
glass optionNormal cycle for glass.About 75”.
P3 Very dirty dishes and cutleryAbout 150”.
P3 + sanitisation
optionCycle for sanitising plates and glasses.About 5’.
P4 Depending on the duration set. As required from 3 to 15'.
(*)
The cycle duration stated above refers to three-phase appliances supplied with hot water at 50°C.
If the appliance is supplied with cold water, the cycle duration might increase depending on the intake
water temperature, since the dishwasher is fitted with the HTR system, which requires set temperature and
pressure for rinsing.
10 SUPPLEMENTARY FUNCTIONS
Indicator lights as follows: off; green; orange; flashing.
To select a supplementary function, when the program required is shown on the display (P1, P2, P3 or P4)
press the button. Only one supplementary function can be selected for each program.
10.1 Selecting the “glassware” function (available in P1-P2)
Reduces the program’s rinsing temperature and duration
Select the program required
(7.4 OPERATION)
Hold down to select the glassware function then
to confirm the program start.

16
10.2 Selecting the “extra rinse” function (available in P1-P2-P3-P4)
Extends the duration of the rinse
Select the program required
(7.4 OPERATION)
Hold down to select the extra rinse function then
to confirm the program start.
10.3 Selecting the “sanitisation” function (only available in P3)
Increases the washing and rinsing temperature and the program duration
Select the program required
(7.4 OPERATION)
Press to select the sanitisation function then to
confirm the program start.
N.B.:
‐the supplementary function remains selected until the program is changed or the dishwasher is switched off
by pressing the button.
‐During the selected program, the display alternates between showing the supplementary function and the
duration.
LOADING THE DISHES
Plates
The basket is able to take
12 soup plates or 18 dinner plates.
Remove solid residues (bones, fruit
peel, stones, etc.) and soak plates with
dried residues of cheese, egg, etc. in
water before loading in the dishwasher.
Glasses
Load glasses upside down.
Cutlery
Use the special basket(s). Load cutlery loose, preferably with the handle at the bottom, taking care not to injure
yourself with fork prongs or knife blades.

17
TOTAL PUMP-OUT AT THE END OF THE DAY
The dishwasher is able to perform an automatic cleaning cycle at the end of the day.
Press the button; “UnLo” and the duration appear
on the display.
Confirm by pressing ; light L2 turns orange.
At the end of the pump-out, the appliance sets in
“OFF” status.
After a total pump-out the filters should be cleaned as described above.
Never switch the dishwasher off with water in the tank; pump out first.
11 MAINTENANCE AND CLEANING
Although no particular scheduled maintenance is required, users are advised to have the dishwasher checked by a
specialist technician twice a year.
N.B.: the manufacturer accepts no liability for wilful damage or damage deriving from carelessness, neglect, failure
to comply with instructions, regulations and standards or incorrect connections.
11.1 Daily cleaning
The dishwasher has IPX4 protection, but the use of direct water jets for cleaning is forbidden.
Cleaning the filter during the day
In case of particularly heavy-duty working conditions, the filter should be cleaned every 30-40 cycles, keeping the
machine in operating conditions; to do this, carry out the “partial tank pump-out” routine (program “P0”).
Press the button, and hold it down, until “P0” and
the duration of 1’ appear on the display.
Confirm by pressing ; light L2 turns orange.
At the end of the pump-out the word “End” flashes on
the display. The display returns to showing “P1”. Close
the door again to start filling the tank prior to
performance of a new wash cycle.

18
Remove the filters A, B, C (simply lift them out as shown
here), taking care that no large residues fall into the sump
underneath. Clean them to remove residues and rinse
with plenty of water, then put them correctly back in
place; do not use sharp or pointed tools.
Clean away any limescale deposits to prevent excessive
build-ups;
‐If possible, leave the door ajar when not in use;
‐Clean surfaces thoroughly and often with a damp
cloth; use neutral, non-abrasive detergents which
do not use chlorine compounds, which corrode
and damage stainless steel.
A
B
C
Do not use the products mentioned above even when cleaning the floor underneath or in the vicinity of the
dishwasher, to ensure that fumes or drops cannot damage the steel surfaces.
IMPORTANT: The dishwasher automatically performs program “P0” at the start of the day if water has been
left in the tank and has dropped below the temperature of 40°C
11.2 Periodic checks
Remove the top and bottom spray arms by unscrewing the central screw and unscrew the caps from the ends of
the rinsing arms as shown. Do not unscrew the nozzles.
Clean the holes and nozzles under a jet of clean running water; do not use tools which might cause damage.
Reassemble the spray arms with care.
Clean the outside of the appliance with a damp cloth and neutral soap, rinsing and drying thoroughly.
11.3 Lengthy periods out of use
If the dishwasher is to be out of use for a fairly long period of time, the detergent and rinse aid dispenser
devices must be emptied to prevent crystallisation and damage to the pumps: Remove the intake hoses
from the detergent and rinse aid containers and place them in a container of clean water, then perform a few wash
cycles followed by a complete pump-out.
Finally, turn off the master switch, close the water intake valve and leave the door ajar until the interior is
completely dry. The detergent and rinse aid intake hoses must be put back into the containers when the
dishwasher is returned to service, taking care not to swap them over (red hose = detergent, blue hose = rinse
aid).

19
12 TROUBLESHOOTING
PROBLEM
POSSIBLE CAUSE
POSSIBLE REMEDY
LIGHT S1 DOES NOT COME ON Mains power failure Check electrical mains connection.
The dishwasher has not yet
finished filling.
Wait for the word FILL to go out.
WASHING PROGRAM DOES
NOT START The word CLOSE remains on the
display
If the word CLOSE remains on the
display even with the door closed, call
the after-sales service.
Spray arm washing holes blocked
by dirt or limescale Remove spray arms and clean them
(10.2 Periodic checks)
Filter fouledSee “Cleaning the filter during the day”
Too little or unsuitable detergent
or rinse aid Check type and quantity of detergent.
Detergent intake blocked
Check that the detergent intake pipe
underneath the filter is unobstructed (T
in photo).
No or not enough detergent or
rinse aid being supplied: detergent
or rinse aid not being taken from
the relative container.
Pipe inside detergent and/or rinse aid
peristaltic pump worn or broke, have it
replaced by the After-Sales Service.
Plates/glasses badly arranged Arrange plates/glasses correctly.
Low washing temperature Check temperature shown on the
display, call the after-sales service if
less than 50°
POOR WASHING RESULTS
Inappropriate cycle set Increase washing duration, especially
if dishes are very dirty or dirt has dried
on.
INADEQUATE RINSING Spray arm nozzles fouled
Limescale in boiler
Check that nozzles are clean, and
ensure that the softener is working
properly (if installed).
STAINS ON GLASSES AND
CUTLERY
Rinse aid unsuitable or not being
delivered correctly.
Water hardness above 12°dF or
large amounts of dissolved salts
Check container of rinse aid and
whether type is suitable for the mains
water- If the problem persists, contact
the after-sales service.
WATER IN TANK AFTER PUMP-
OUT Drain hose incorrectly positioned
or partially obstructed.
Check that the dishwasher drain hose
and rain are unobstructed and the
drain is not too high up; see
connection diagram.
This manual suits for next models
3
Table of contents
Other Smeg Dishwasher manuals

Smeg
Smeg A454BA Operation instructions

Smeg
Smeg SNZ414IS User manual

Smeg
Smeg ST0904 User manual

Smeg
Smeg LSP653B User manual

Smeg
Smeg STL 825 User manual

Smeg
Smeg Classica DW9QSDXSA-1 User manual

Smeg
Smeg KLS51B User manual

Smeg
Smeg STX1-5 User manual

Smeg
Smeg PLA6147G User manual

Smeg
Smeg ST112-2 User manual