Smeg LS19-3 User manual

INSTRUCTION MANUAL
G
GU
UI
ID
DE
EF
FO
OR
RU
US
SI
IN
NG
GT
TH
HE
ED
DI
IS
SH
HW
WA
AS
SH
HE
ER
RA
AN
ND
DT
TH
HE
EW
WA
AS
SH
HI
IN
NG
GP
PR
RO
OG
GR
RA
AM
MS
S

Contents
17
1. Description of the controls ________________________________ 18
2. Troubleshooting ________________________________________ 28
Thank you for choosing one of our products.
You are advised to read this manual carefully; it contains all the
information you need about the right conditions for the proper, safe use
of your dishwasher.
The individual sections are laid out to provide you with a step-by-step
guide to all your appliance's functions; the texts are easy to understand
and are complete with detailed illustrations.
This user-friendly manual will provide answers to all your questions
about use of the dishwasher.
For any other information about use and maintenance of the dishwasher,
read the enclosed manual carefully.
USER INSTRUCTIONS: useful information is provided for the use of the
washing programs and all the dishwasher's functions.

User instructions
18
1. Description of the controls
1.1 Front panel
All the dishwasher's controls and indicators are located on the front
panel. Programming and option selection are only possible with the door
closed.
1 WASHING PROGRAM SELECTOR
2 ON/OFF SELECTOR
3 START/PAUSE BUTTON
4 PROGRAM DELAY BUTTON
5 ½ LOAD WASH BUTTON
6 "3/1" OPTION BUTTON
7 START/PAUSE LIGHT
8 INFORMATION DISPLAY
9 ½ LOAD WASH LIGHT
10 "3/1" OPTION LIGHT
11 SALT WARNING LIGHT
12 RINSE AID WARNING LIGHT
13 RECESSED DOOR HANDLE
1.2 Information display
The dishwasher is equipped with a practical DISPLAY
which provides information on the programmed dishwasher
functions.
SWITCHING ON
To switch on the dishwasher turn the ON/OFF switch (2) in the direction
shown by the arrow.

User instructions
19
SETTING THE WASHING PROGRAM
To select the most suitable washing program, refer to the table below
which indicates the recommended washing according to dish type and
the degree of soiling. Once the most suitable washing program has been
selected using the table provided, turn the WASHING PROGRAM
SELECTOR (1) to set the program required, placing it against the
identification symbol or nummer.
QUANTITY
DETERGENT
PROGRAM INFORMATION
DISPLAY
PROGRAM
SELECTOR
DISHES TYPE
AND DEGREE OF SOILING
GRAMS
SOAK P1
DISHES, POTS AND PANS
AWAITING COMPLETION OF THE LOAD
_
DISH WARMER P2
DISHES REQUIRING RINSING AND
WARMING BEFORE TAKING TO TABLE
_
QUICK P3
SLIGHTLY SOILED DELICATE DISHES
25
LIGHT P4
WASH IMMEDIATELY AFTER USE
FOR DISHES WITH LIGHT DIRT
25
ECO P5
NORMALLY SOILED DISHES,
POTS AND PANS WITH DRIED-ON RESIDUE
35
BIO
(*) EN 50242 P6
SLIGHTLY SOILED DISHES,
POTS AND PANS WITH DRIED-ON RESIDUE
35
AUTO 40-50 P7
DISHES WASHED IMMEDIATELY AFTER USE
35
AUTO 60-70 P8
NORMALLY SOILED DISHES,
INCLUDING DRIED-ON RESIDUE
35
STRONG and FAST P9
DISHES WITH NORMAL DIRT
WHICH HAS NOT DRIED
35
SUPER P10
HEAVILY SOILED DISHES,
POTS AND PANS WITH DRIED-ON RESIDUE
10 - 25
Only run the soak program with half loads.
The HALF LOAD option (5) - "3/1" (6) is available for all programs except the soak program.
(*) Reference program as EN 50242 standard.
(-) Not present.

User instructions
20
PROGRAM
PROGRAM SEQUENCE
DURATION
CONSUMPTION
INFORMATION
DISPLAY
PRE-
WASH
WASH
COLD
RINSE
HOT
RINSE
DRYING
MINUTES
(2)
WATER
LITRES (1)
POWER
Kwh (2)
SOAK
P1
COLD _ 1 _ NO 15' 6 0,01
DISH WARMER
P2
_ _ _ 68°C YES 40' 3,5 0,70
QUICK
P3
_ 38°C 1 58°C NO 45' 13 0,85
LIGHT
P4
_ 45°C 1 68°C YES 70’ 12 1,00
ECO
P5
_ 55°C 1 68°C YES 125’ 14 1,25
BIO
(*) EN 50242
P6
COLD 50°C 1 62°C YES 180' 15 1,08
AUTO 40-50
P7
COLD 55°C 1 68°C YES (**) (**) (**)
AUTO 60-70
P8
COLD 65°C 1 70°C YES (**) (**) (**)
STRONG and FAST
P9
_ 65°C 1 70°C NO 60' 10 1,20
SUPER
P10
45°C 70°C 2 70°C YES 110' 20 1,70
Only run the soak program with half loads.
The HALF LOAD option (5) - "3/1" (6) is available for all programs except the soak program.
(*) Reference program as EN 50242 standard.
(**) When the "AUTO 40-50" or "AUTO 60-70" program is selected, the dishwasher recognises
the type of dirt and automatically adapts the washing parameters and washing stages as
appropriate.
(-) Not present.
(1) Average power consumption with the softener set on level 2.
(2) The cycle duration and power consumption may vary according to the water and room
temperatures, and the type and amount of dishes.
The washing cycle will not take place if the dishwasher door is left open
or not properly closed.

User instructions
21
TABLE FOR CERTIFICATION BODIES
Reference standard EN 50242
Reference program (*) Selector on P6
Load 14 place-settings
Type of detergent B
Amount of detergent 35 g
Rinse aid setting 5/6
LOWER BASKET UPPER BASKET
The upper basket must be set in the low position.
1.3 Washing programs
The dishwasher is equipped with a control panel and an INFORMATION
DISPLAY (8), described in chapter "1. Description of the controls", from
which it is possible to carry out all the power switch-on, switch-off and
programming operations.
Before starting a washing program make sure that:
•The water supply tap is open.
•The correct amount of detergent has been added to the
dispenser.
•The baskets have been correctly loaded.
•The spray arms are able to rotate freely and without
obstruction.
•The dishwasher door is securely closed.

User instructions
22
CANCELLING THE CURRENT PROGRAM
To annul the current program, press the START/PAUSE button (3) for a
few seconds, until the beep of confirmation is heard.
At this point, to end the program, press the HALF LOAD (5) and
START/PAUSE (3) buttons simultaneously.
"P0" appears on the INFORMATION DISPLAY (8) and the dishwasher
will automatically switch to the end of the cycle, displaying the word
"End" when done.
CHANGING THE PROGRAM
To change the program, press and hold down the START/PAUSE button
(3) for a few seconds, then select the new program as described
previously in the instructions; press the START/PAUSE button (3) again,
holding it down for a few seconds.

User instructions
23
HALF-LOAD FUNCTION (available in all programs except the soak
program)
This function is recommended for loads of up to 7 place-settings, and
cuts down on the use of water and electricity. It can be selected using
the HALF LOAD button (5) and there are three different options:
1) pressing the button just once selects the top basket (confirmed by
the Usymbol in the top of the display);
2) pressing the button a second time selects the bottom basket
(confirmed by the Usymbol in the bottom of the display);
3) pressing the button a third time reverts to the full load function.
After selecting the washing program, select one of the three load options
illustrated above: the symbol of the chosen basket will appear on the
INFORMATION DISPLAY (8).The INFORMATION DISPLAY (8) will
revert to showing the selected program.
It is possible to place a cutlery basket inside the basket selected for the
HALF LOAD program; the other basket must remain empty.
WARNING: do not load dishes and cutlery into the non-selected
basket, because the water spray will only reach the selected basket.

User instructions
24
DELAYING THE PROGRAM (available in all programs except the
soak program)
The PROGRAM DELAY button (4) can be pressed to delay the start of
the washing program by up to 12 hours. This means that the dishwasher
can be operated at the time of day of your choice.
Press the PROGRAM DELAY button (4) again; the INFORMATION
DISPLAY (8) will show the number of hours of delay with which the
appliance will start.
The INFORMATION DISPLAY (8) shows the set washing program
duration in hours and minutes.
After setting the delay, start the program: press the START/PAUSE
button (3) for a few seconds, until the START/PAUSE light (7) starts
flashing.
The appliance will prewash the dishes, after which the "program delay"
set previously will come into effect.
To cancel the program delay once the wash has started, proceed as
follows:
•press the START/PAUSE button (3) for a few seconds, until the
START/PAUSE light (7) stops flashing;
•press the PROGRAM DELAY button (4) several times until the
program delay returns to zero (the scheduled duration of the
program set appears);
•press the START/PAUSE button (3) to start the program.
N.B.: It is not possible to select the “delay program” when the program
have already began.

User instructions
25
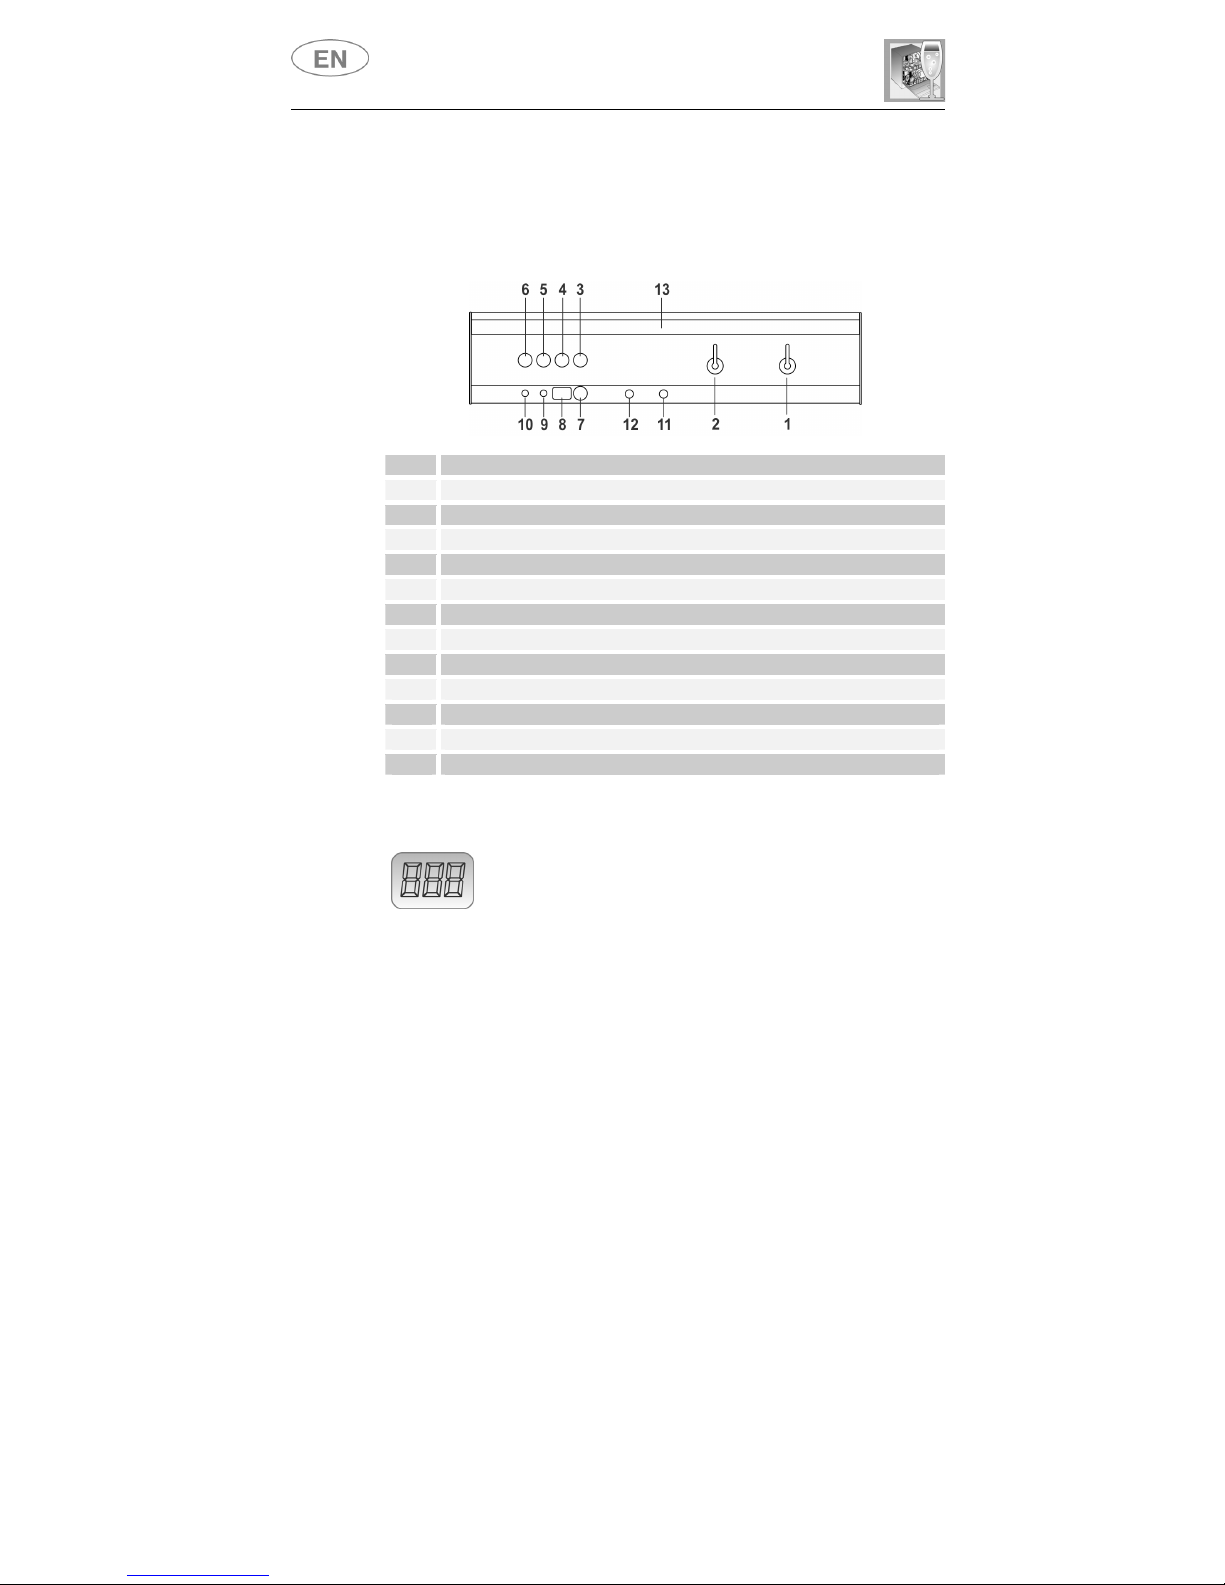
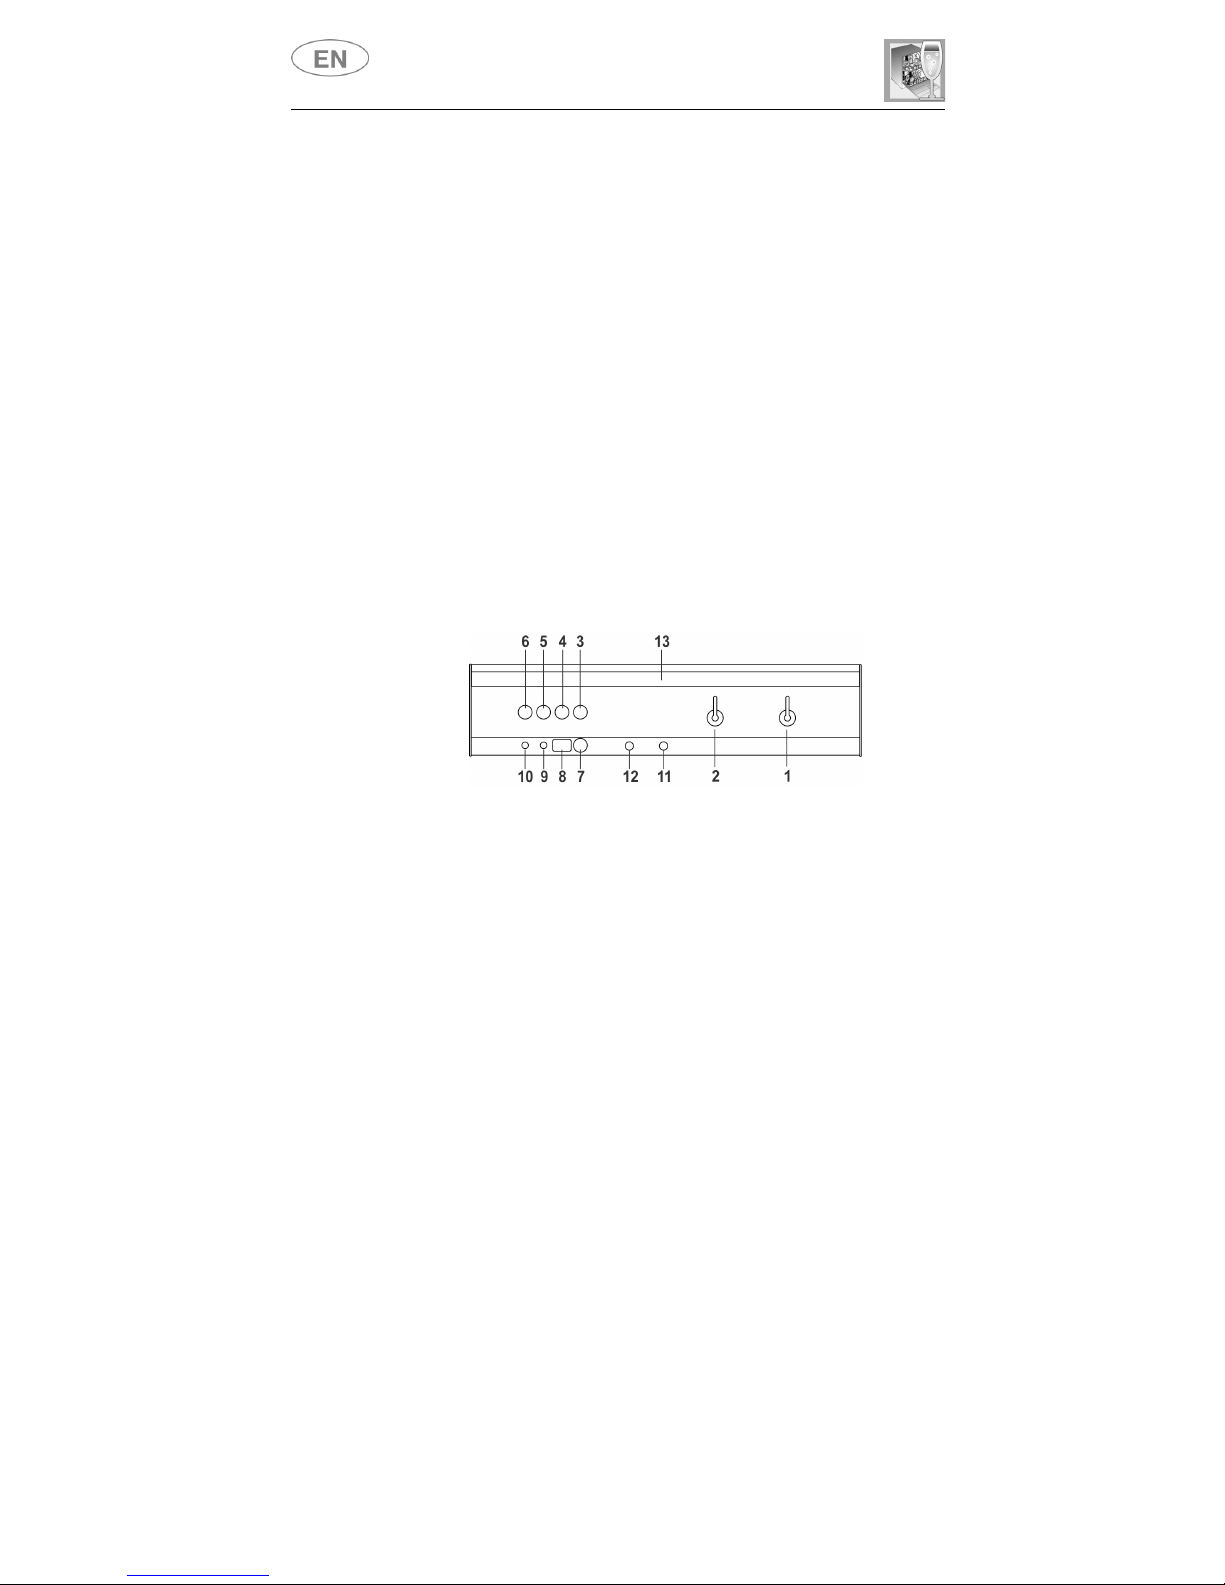
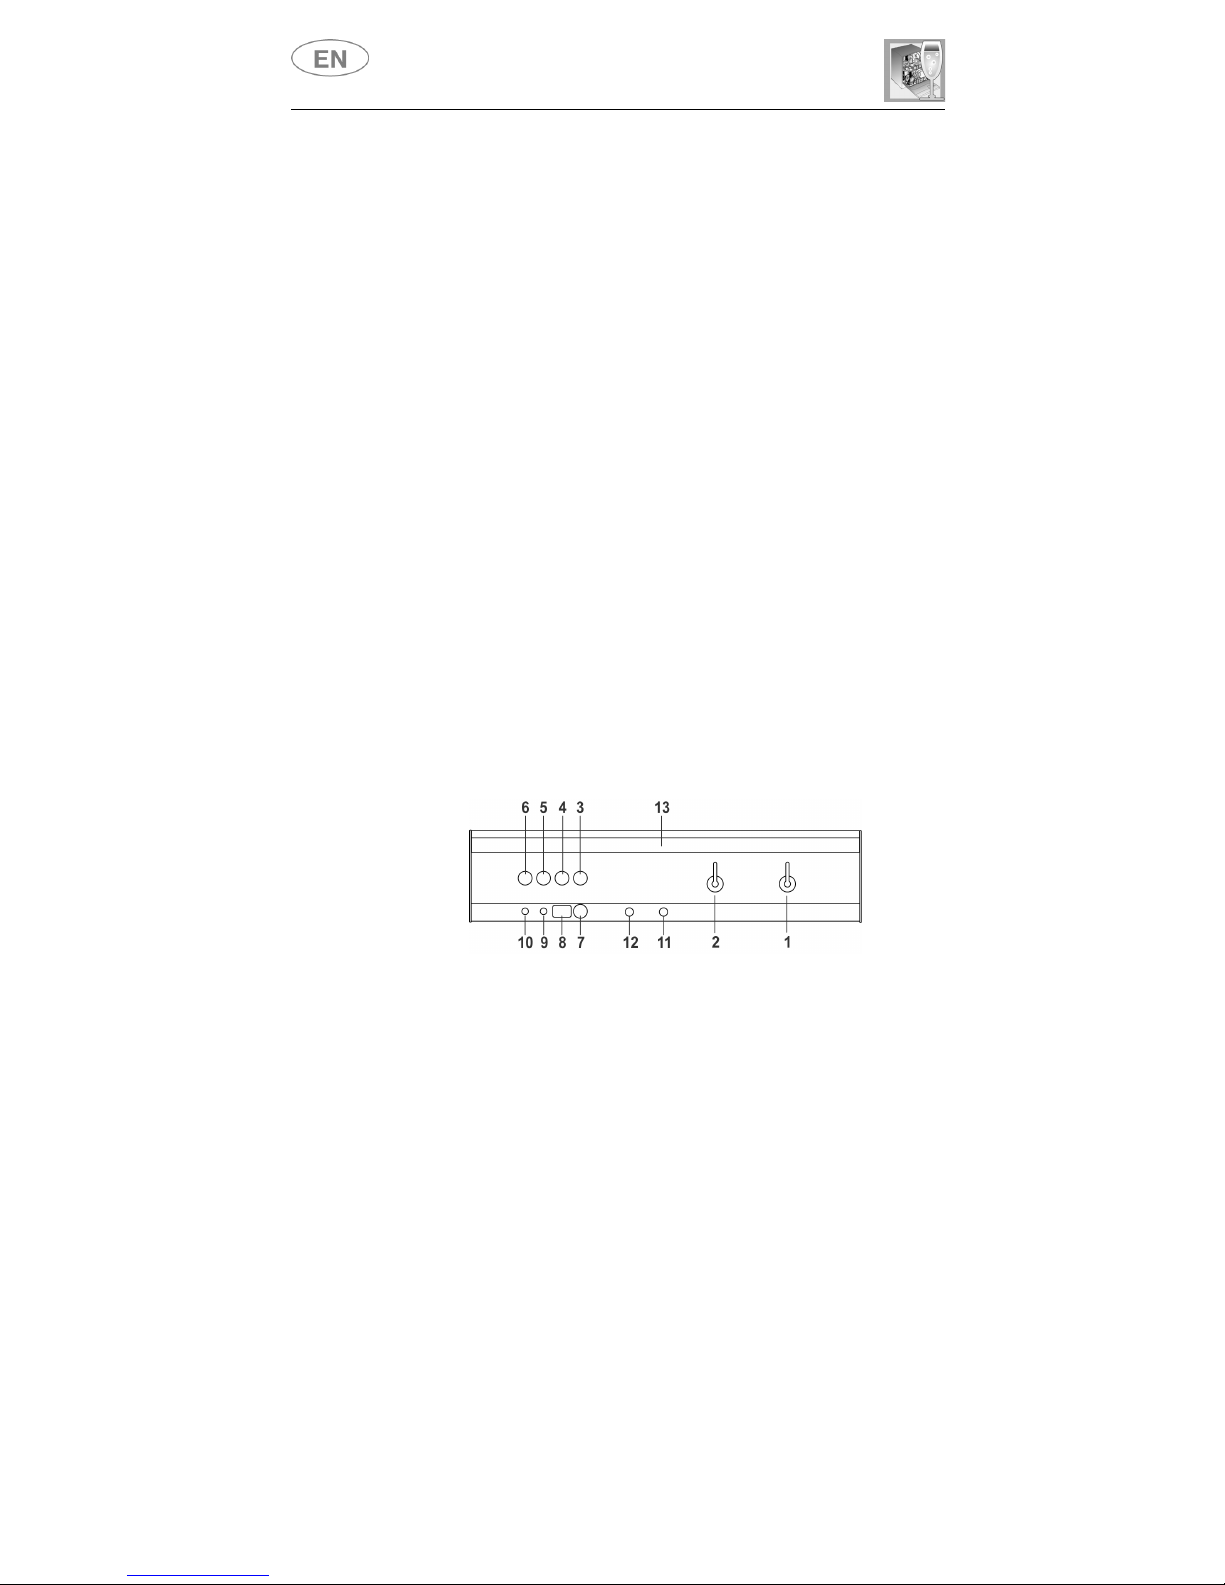
"3/1" OPTION BUTTON (available in all programs except the soak
program)
By pressing the button (6) you activate the "3/1" option, confirmed when
the relative light comes on. This option has been studied for the use of
dishwashing powder or tablets with integrated substances in place of
regenerating salt or rinse-aid known on the market as “3 in 1” or “triple
action” products; in this case the dishwasher will use the product in an
optimal way avoiding salt and rinse-aid consumption, which could
already be found in the dishwasher.
Note: When selecting the "3/1" button, it is normal that the salt and
rinse-aid lights remain on, if their containers are empty.
If the water hardness has been set on a value above H3, and the 3/1
option is activated, the INFORMATION DISPLAY (8) flashes, warning
of a setting error, because these products are not suitable for use with
very hard water. This does not prevent the use of the option, but the
washing results might not be of the best.
TO SAVE ON ENERGY! … AND PROTECT THE ENVIRONMENT
•Always try to run the dishwasher fully loaded.
•Do not wash the dishes in running water.
•Use the washing program that is most appropriate for each type of
load.
•Do not carry out any preliminary rinsing.
•If available, connect the dishwasher to a hot water supply up to
60°C.
TO CUT DOWN ON DETERGENT CONSUMPTION! … AND PROTECT
THE ENVIRONMENT
The phosphates contained in dishwasher detergents are harmful to the
environment. To avoid using excessive amounts of detergent and to
save on electricity, observe the following:
•separate the more delicate items from dishes that are more
resistant to aggressive detergents and high temperatures;
•do not pour the detergent directly on the dishes.

User instructions
26
ADJUSTING THE WATER SOFTENING SYSTEM (available in all
programs except the soak program)
The dishwasher is equipped with an electronic device for adjusting the
water softening setting according to the hardness of the water. To adjust
the water softening setting, proceed as follows:
•Keep the PROGRAM DELAY button (4) pressed for a few seconds,
until H3 appears on the INFORMATION DISPLAY (8).
•The PROGRAM DELAY button (4) can be pressed again to select
the most suitable hardness value (H1, H2…H5). Refer to the "Water
Hardness Table" to select the value.
•Press any key to exit the programming mode, or wait a few seconds.
WATER HARDNESS TABLE
WATER HARDNESS
German Degrees (°dH) French Degrees (°dF) SETTING
0 - 4 0 - 7 .h 0
5 - 15 8 - 25 .h 1
16 - 23 26 - 40 .h 2
24 - 31 41 - 60 .h 3
32 - 47 61 - 80 .h 4
48 - 58 81 - 100 .h 5
Contact your local water board for information on the hardness of your
water supply.

User instructions
27
STARTING THE DISHWASHER
After correctly carrying out all the preceding operations, to start the
dishwasher simply press the START/PAUSE button (3) for a few
seconds, until the start cycle acoustic device sounds.
The INFORMATION DISPLAY (8) will show the duration of the program
in minutes. The duration time is only approximate, because it depends
on the washing conditions (quantity of dishes, water temperature, etc.),
and is also continually updated as the washing program progresses.
The INFORMATION DISPLAY (8) shows the estimated duration of the
washing program.
If it is necessary to open dishwasher door during the washing cycle,
there will be a 1-minute delay before the program can be resumed.
After correctly closing the door, press the START/PAUSE button (3)
again. This operation may negatively affective the progress of the
washing cycle.
END OF CYCLE
The beeper sounds briefly and the word "End" appears on the
INFORMATION DISPLAY (8) to indicate the end of the program.
Before setting a new washing program, the door must first be opened,
then reclosed, or the START/PAUSE button (3) pressed to “reset” the
display and stop the flashing.
To switch off the dishwasher turn the ON/OFF switch (2) anticlockwise
back to the vertical position.
REMOVING THE DISHES
At the end of the washing program, wait at least 20 minutes before
removing the dishes, to allow them to cool down. To prevent any water
droplets on the upper basket from falling on the dishes in the lower
basket, it is advisable to unload the lower basket first, and then the
upper basket.

User instructions
28
2. Troubleshooting
The dishwasher is equipped with a self-diagnostics system that is
capable of detecting and signalling a number of possible faults.
In the event of a fault or malfunction, before calling the After-sales
service centre, we suggest that you first consult the troubleshooting
guide below.
If the problem persists even after implementing the recommended
solutions, call the After-sales service centre after having carried out the
following:
•making a note of the message displayed by the self-diagnostics
system;
•unplug the power cord from the socket;
•shut off the water supply tap.
TABLE OF FAULTS DETECTED BY THE SELF-DIAGNOSTICS SYSTEM
FAULT DESCRIPTION
E1
The dishwasher’s AQUASTOP anti-flooding system has been
activated (only for models equipped with the device).
To disable the AQUASTOP: switch off the dishwasher and then
switch it back on again.
The triggering of the AQUASTOP device indicates the presence of a
water leak; immediately after resetting the dishwasher it is therefore
necessary to call the authorised After-sales service centre.
E2
The system for limiting the water level in the dishwasher has
been triggered.
To reset the appliance, reprogram the wash by opening and closing
the door and then pressing the START/PAUSE button (3) again.
If the problem persists, call the authorised technical service centre.
E3
The dishwasher fails to heat the water.
To reset the appliance, open and close the door.
To determine the cause of this problem call the authorised technical
service centre.

User instructions
29
FAULT DESCRIPTION
E5
The dishwasher fails to draw water.
Check that:
•the water supply tap is open;
•the filter in the water intake hose is not clogged;
•the water intake hose is not kinked or bent;
Turn the dishwasher off and then on again, then press the
START/PAUSE button (3) again. If the problem is resolved the
washing program will resume from where it was halted.
If the fault persists, call the authorised technical service centre.
E6
The dishwasher fails to drain.
Check that:
•the flexible drain hose is not kinked or obstructed;
•the water drain pipe is not obstructed;
•the dishwasher filter is not clogged;
Turn the dishwasher off and then on again, and then press the
START/PAUSE button (3) again. If the problem is resolved, the
washing program will resume from where it was halted.
Otherwise, if the fault persists, call the authorised technical service
centre.
In the event of error codes not included in this table, call the Technical
Service Centre.

INSTRUCTION MANUAL
W
WA
AR
RN
NI
IN
NG
GS
S
A
AN
ND
D
R
RE
EC
CO
OM
MM
ME
EN
ND
DA
AT
TI
IO
ON
NS
S,
,
G
GU
UI
ID
DE
E
F
FO
OR
R
T
TH
HE
E
U
US
SE
E
O
OF
F
B
BA
AS
SK
KE
ET
TS
S
A
AN
ND
D
F
FO
OR
R
C
CL
LE
EA
AN
NI
IN
NG
G
D
DI
IS
SH
HW
WA
AS
SH
HE
ER
RS
S

Contents
1. Safety and operating instructions __________________________28
2. Installation and hook-up _________________________________31
3. Operating instructions ___________________________________35
4. Cleaning and maintenance _______________________________47
Thank you for choosing one of our products.
You are advised to read this manual carefully; it contains all the
information you need about the right conditions for the proper, safe use
of your dishwasher.
The individual sections are laid out to provide you with a step-by-step
guide to all your appliance's functions; the texts are easy to understand
and are complete with detailed illustrations.
Following the cleaning instructions provided here will keep your
dishwasher's performance at peak levels in the long term.
This user-friendly manual will provide answers to all your questions
about use of the dishwasher.
INSTALLATION INSTRUCTIONS: these are intended for the qualified
technician who must carry out the installation, hook-up and testing of
the appliance.
USER INSTRUCTIONS: useful advice is provided for the use of baskets,
spray arms, containers and filters.

Safety instructions
1. Safety and operating instructions
THIS MANUAL FORMS AN INTEGRAL PART OF THE APPLIANCE: IT MUST
ALWAYS BE KEPT INTACT TOGETHER WITH THE DISHWASHER. BEFORE
USING THE APPLIANCE, CAREFULLY READ ALL THE INSTRUCTIONS
CONTAINED IN THIS MANUAL.
INSTALLATION MUST BE PERFORMED BY A QUALIFIED TECHNICIAN, IN
COMPLIANCE WITH THE REGULATIONS IN FORCE. THIS APPLIANCE IS
INTENDED FOR DOMESTIC USE, AND COMPLIES WITH THE EEC
DIRECTIVES 72/23, 89/336 (INCLUDING 92/31) CURRENTLY IN FORCE,
INCLUDING THE PREVENTION AND ELIMINATION OF RADIO FREQUENCY
INTERFERENCE.
THE APPLIANCE IS DESIGNED FOR THE FOLLOWING PURPOSE: WASHING
AND DRYING OF DISHES; ANY OTHER USE SHALL BE CONSIDERED
IMPROPER. THE MANUFACTURER DECLINES ALL RESPONSIBILITY FOR
USES OTHER THAN THOSE DESCRIBED ABOVE.
THE NAME PLATE FEATURING THE TECHNICAL DATA, SERIAL NUMBER
AND MARKINGS IS VISIBLY POSITIONED ON THE INNER EDGE OF THE
DOOR. THE NAME PLATE ON THE INNER EDGE OF THE DOOR MUST
NEVER BE REMOVED.
DO NOT LEAVE THE DISCARDED PACKAGING MATERIALS UNSUPERVISED
WITHIN THE HOME. SEPARATE THE VARIOUS MATERIALS WHICH MAKE
UP THE PACKAGING AND TAKE THEM TO THE NEAREST SORTED WASTE
COLLECTION CENTRE.
THE APPLIANCE MUST BE PROVIDED WITH AN EARTH CONNECTION IN
ACCORDANCE WITH THE ELECTRICAL SAFETY REGULATIONS IN FORCE.
THE MANUFACTURER DECLINES ALL RESPONSIBILITY FOR DAMAGE TO
PERSONS OR PROPERTY RESULTING FROM THE FAILURE TO EARTH THE
APPLIANCE OR FROM A DEFECTIVE EARTH CONNECTION.
IF THE APPLIANCE IS INSTALLED ON A CARPETED OR COVERED FLOOR,
ENSURE THAT THE OPENINGS ON ITS UNDERSIDE ARE NOT
OBSTRUCTED.
ALWAYS SWITCH OFF THE DISHWASHER AFTER EACH USE TO AVOID
WASTING ELECTRICITY.
OBSOLETE APPLIANCES MUST BE RENDERED UNUSABLE. CUT OFF THE
MAINS POWER CORD AFTER UNPLUGGING IT FROM THE WALL OUTLET,
AND MAKE SAFE ANY COMPONENTS WHICH MIGHT BE DANGEROUS FOR
CHILDREN (LOCKS, DOORS, ETC.).

Safety instructions
THIS APPLIANCE IS MARKED ACCORDING TO THE EUROPEAN DIRECTIVE
2002/96/EC ON WASTE ELECTRICAL AND ELECTRONIC EQUIPMENT
(WEEE). BY ENSURING THIS PRODUCT IS DISPOSED OF CORRECTLY,
YOU WILL HELP PREVENT POTENTIAL NEGATIVE CONSEQUENCES FOR
THE ENVIRONMENT AND HUMAN HEALTH, WHICH COULD OTHERWISE BE
CAUSED BY INAPPROPRIATE WASTE HANDLING OF THIS PRODUCT.
THE SYMBOL ON THE PRODUCT, OR ON THE DOCUMENTS
ACCOMPANYING THE PRODUCT, INDICATES THAT THIS APPLIANCE MAY
NOT BE TREATED AS HOUSEHOLD WASTE. INSTEAD IT SHALL BE
HANDED OVER TO THE APPLICABLE COLLECTION POINT FOR THE
RECYCLING OF ELECTRICAL AND ELECTRONIC EQUIPMENT.
DISPOSAL MUST BE CARRIED OUT IN ACCORDANCE WITH LOCAL
ENVIRONMENTAL REGULATIONS FOR WASTE DISPOSAL. FOR MORE
DETAILED INFORMATION ABOUT TREATMENT, RECOVERY AND
RECYCLING OF THIS PRODUCT, PLEASE CONTACT YOUR LOCAL CITY
OFFICE, YOUR HOUSEHOLD WASTE DISPOSAL SERVICE OR THE SHOP
WHERE YOU PURCHASED THE PRODUCT.
IN THE EVENT OF A FAULT, DISCONNECT THE DISHWASHER FROM THE
ELECTRICAL POWER SUPPLY AND SHUT OFF THE WATER TAP.
DO NOT USE APPLIANCES WHICH HAVE BEEN DAMAGED DURING
TRANSIT! IF IN DOUBT, CONSULT YOUR DEALER.
THE APPLIANCE MUST BE INSTALLED AND CONNECTED IN ACCORDANCE
WITH THE INSTRUCTIONS PROVIDED BY THE MANUFACTURER OR BY A
QUALIFIED TECHNICIAN.
THE APPLIANCE IS INTENDED FOR USE BY ADULTS. DO NOT ALLOW
CHILDREN TO COME NEAR OR PLAY WITH THE DISHWASHER. KEEP
CHILDREN AWAY FROM DETERGENTS AND FROM THE OPEN
DISHWASHER DOOR. THE PACKAGING MATERIALS (PLASTIC BAGS,
POLYSTYRENE, METAL BARS, ETC.) MUST NOT BE LEFT WITHIN THE
REACH OF CHILDREN.
KEEP CHILDREN AWAY FROM THE OPEN DISHWASHER. THE APPLIANCE
MAY CONTAIN RESIDUES OF DETERGENT WHICH CAN CAUSE
IRREVERSIBLE DAMAGE TO THE EYES, MOUTH, AND THROAT, AS WELL
AS POSSIBLE DEATH BY SUFFOCATION.
DO NOT INTRODUCE SOLVENTS SUCH AS ALCOHOL OR TURPENTINE
WHICH MAY CAUSE AN EXPLOSION.
DO NOT LOAD DISHES THAT ARE SOILED WITH ASH, WAX OR PAINTS.
LEANING OR SITTING ON THE DISHWASHER DOOR WHEN OPEN MAY
CAUSE THE APPLIANCE TO OVERTURN, PUTING PEOPLE AT RISK.
NEVER LEAVE THE DISHWASHER DOOR OPEN; PEOPLE MIGHT TRIP
OVER IT.

Safety instructions
DO NOT UNDER ANY CIRCUMSTANCES TOUCH THE HEATING ELEMENT
IMMEDIATELY AFTER THE END OF A WASHING PROGRAM.
OVER TIME, THE DISHWASHER HEATING ELEMENTS MAY CHANGE
COLOUR, IN PART OR OVERALL. THIS IS PERFECTLY NORMAL AND DOES
NOT IN ANY WAY AFFECT THE OPERATION OF THE APPLIANCE.
DO NOT DRINK THE WATER RESIDUES WHICH MAY BE PRESENT INSIDE
THE DISHES OR DISHWASHER AT THE END OF THE WASHING PROGRAM
AND BEFORE THE DRYING CYCLE.
KNIVES OR OTHER SHARP-ENDED COOKING UTENSILS MUST BE PLACED
IN THE CUTLERY BASKET BLADE-DOWN, OR LAID HORIZONTAL IN THE
TOP BASKET. TAKE CARE NOT TO CUT YOURSELF AND ENSURE THAT
THEY DO NOT PROJECT FROM THE BASKET.
AQUASTOP MODELS
THE AQUASTOP DEVICE PREVENTS FLOODING IN THE EVENT OF A
WATER LEAK. WHEN THE AQUASTOP DEVICE IS TRIPPED, CALL IN A
QUALIFIED TECHNICIAN TO IDENTIFY AND REPAIR THE FAULT.
IN MODELS EQUIPPED WITH THE AQUSTOP DEVICE, THERE IS A
SOLENOID VALVE INSIDE THE WATER INTAKE HOSE. DO NOT CUT THE
HOSE AND DO NOT ALLOW THE SOLENOID VALVE TO DROP INTO
WATER. IN THE EVENT OF DAMAGE TO THE WATER INTAKE HOSE,
DISCONNECT THE APPLIANCE FROM THE ELECTRICAL POWER SUPPLY
AND FROM THE WATER SUPPLY.
IMMEDIATELY AFTER INSTALLING THE DISHWASHER, PERFORM A QUICK
TEST OF THE APPLIANCE FOLLOWING THE INSTRUCTIONS BELOW. IF
THE DISHWASHER FAILS TO OPERATE CORRECTLY, DISCONNECT IT
FROM THE ELECTRICAL POWER SUPPLY AND CALL THE NEAREST
TECHNICAL SERVICE CENTRE. DO NOT ATTEMPT TO REPAIR THE
APPLIANCE.
THE DISHWASHER MEETS ALL THE REQUIREMENTS SET OUT BY THE
REGULATIONS IN FORCE CONCERNING SAFETY AND ELECTRICAL
EQUIPMENT. ANY TECHNICAL CHECKS SHOULD BE CONDUCTED
EXCLUSIVELY BY A TRAINED AND AUTHORISED TECHNICIAN: REPAIRS
CARRIED OUT BY UNAUTHORISED PERSONS WILL INVALIDATE THE
WARRANTY, AS WELL AS POSING A POTENTIAL HAZARD TO THE USER.
The manufacturer declines all responsibility for damage to persons or property
resulting from failure to observe the above precautions, from tampering with
even a single component of the appliance, or from the use of non original
spare parts.

Installation instructions
2. Installation and hook-up
Remove the polystyrene basket retainers.
Position the appliance in the desired place of installation. The back or
sides of the dishwasher may be placed up against walls or other
furniture units. If the dishwasher is installed near a heat source, fit the
special insulating panel to prevent overheating and malfunction of the
appliance. To ensure stability, install integrated or built-under
dishwashers only under continuous worktops, and screw them to the
adjacent units. To facilitate the installation procedure, the intake and
drain hoses can be positioned in any direction; make sure that the hoses
are not kinked, crushed or pulled too tightly. Make sure to tighten the
locking ring-nut once the pipes have been placed in the direction
required. A hole at least 8 cm in diameter is required to allow the power
supply cable and pipes to pass.
Level the appliance on the floor using its adjustable feet. This operation
is essential for ensuring correct operation of the dishwasher.
Building-in a dishwasher underneath a ceramic hob is absolutely
forbidden.
A dishwasher can be built-in underneath a conventional hob provided
there is no break in the kitchen worktop, and the dishwasher and hob
are installed and secured correctly, so that no hazards are
generated.
For free-standing models only
-Installing a hob on top of a free-standing dishwasher is absolutely
forbidden.
-If the appliance is not built-in and is therefore accessible on one
side, the door hinge area must be covered for safety reasons (injury
hazard). The covering fixtures are available as an accessory from
specialist dealers or the After-Sales Service.
-To build in the dishwasher, the special kit must be purchased from
authorised dealers or the After-Sales Service.
Some models are equipped with only one adjustable foot at the rear,
which can be adjusted by turning the screw on the lower front part of the
appliance.
This manual suits for next models
2
Table of contents
Other Smeg Dishwasher manuals

Smeg
Smeg IG40521W2 User manual

Smeg
Smeg LSP367X User manual

Smeg
Smeg STL324BQLLW User manual

Smeg
Smeg PL965 Operation instructions

Smeg
Smeg LS647XNL2 User manual

Smeg
Smeg DF345CQSX User manual

Smeg
Smeg CWG410D User manual

Smeg
Smeg ST4108 User manual

Smeg
Smeg GM287-120 User manual

Smeg
Smeg Dishwasher SA682X User manual