Smeg PLA68XU User manual

INSTRUCTION MANUAL
G
GU
UI
ID
DE
E
F
FO
OR
R
U
US
SI
IN
NG
G
T
TH
HE
E
D
DI
IS
SH
HW
WA
AS
SH
HE
ER
R
A
AN
ND
D
T
TH
HE
E
W
WA
AS
SH
HI
IN
NG
G
P
PR
RO
OG
GR
RA
AM
MS
S

Rev 0.0 1
CONTENTS EN
Contents
1 INTRODUCTION ........................................................................................ 3
2 DESCRIPTION AND USE OF THE CONTROLS.......................................... 5
2.1 Front panel................................................................................................. 5
2.2 Setting the washing program and switching on and off............................... 6
2.2.1 Switching on .............................................................................................. 8
2.2.2 Selecting and starting the program............................................................. 8
2.2.3 End of program .......................................................................................... 9
2.2.4 Interrupting a program................................................................................ 9
2.2.5 Changing the current program ................................................................... 9
2.2.6 Canceling the current program ................................................................. 10
2.2.7 Options .................................................................................................... 10
2.2.8 Switching off ............................................................................................ 12
2.3 Additional functions.................................................................................. 12
2.3.1 Adjusting the water softener..................................................................... 12
3 ENERGY SAVING AND ENVIRONMENTAL RESPECT.............................. 14
3.1 Reducing the consumption of detergent and respecting the environment.14
4 REMOVING THE DISHES......................................................................... 15
5 TROUBLESHOOTING .............................................................................. 16

2 Rev 0.0
EN

Rev 0.0 3
INTRODUCTION EN
1 INTRODUCTION
Thank you for choosing one of our products. To use this dishwasher
correctly and safely, please read this manual carefully. The manual is
divided into sections giving you a step-by-step guide to all your ap-
pliance’s functions. The texts are easy to understand and are com-
plete with detailed illustrations. This user-friendly manual will provide
answers to all your questions about use of the dishwasher.
Before using this dishwasher, carefully read chapter 2 “Use and
safety warnings” of the attached general manual.
For any other information about use and maintenance of the dish-
washer, read the enclosed general manual carefully.
This manual comprises the following sections:
INTRODUCTION: general information about the manual.
USER INSTRUCTIONS: advice on using the washing programs and
information about all the dishwasher functions.
Nomenclature of figures and tables:
The progressive number of each figure is shown in the bottom right-
hand corner of the relative box. An example of a progressive number
is “Fig. 4-01”, where the first number (4) indicates the section to
which the figure belongs, while the second number (01) indicates
the progressive number of the figure in section 4 (Fig. 4-01 is the
first figure in section 4). The tables are numbered in the same way,
bearing in mind that “Tab.” is used instead of “Fig.” (e.g.: Tab. 4-01
is the first table in section 4). If a table occupies more than one page,
a letter is added after the progressive number (e.g.: “Tab. 4-01a”,
Tab. 4-01b”).

4 Rev 0.0
INTRODUCTION
EN
Symbols used in this manual (see tab. 1-01)
DANGER. This symbol highlights information and warnings which, if not
observed, may compromise personal safety or damage the appliance.
This symbol highlights general information and warnings.
Tab. 1-01

Rev 0.0 5
USER INSTRUCTIONS EN
2 DESCRIPTION AND USE OF THE CONTROLS
2.1 Front panel
All the dishwasher controls are grouped on the front panel (see fig. 2-01).
A brief description (see tab. 2-01) of the various elements on the front panel is
given below.
5
1326
789 10 4
1On/Off button
2Start/Pause button
3Program selection button
4Program indicator lights
5Sanitation indicator light
6Program delay button
7Program delay indicator lights
8No salt indicator light
9No rinse-aid indicator light
10 Recessed door handle
Tab. 2-01
Fig. 2-01

6 Rev 0.0
USER INSTRUCTIONS
EN
2.2 Setting the washing program and switching
on and off
The dishwasher is equipped with a control panel (see fig. 2-02) which is used
to program the appliance and switch it on and off.
5
132
6
789 4
To select the most suitable program for the dishes to wash, consult the fol-
lowing tables which specify the most appropriate type of washing sequence
depending on the kind of dishes and how dirty they are (see tab. 2-02).
Fig. 2-02

Rev 0.0 7
USER INSTRUCTIONS EN
PROGRAM NUMBER
AND SYMBOL
DISHES AND
CUTLERY
PROGRAM
SEQUENCE
TIME CONSUMPTION
MINUTES
(1)
WATER POWER
KWh (1)
RINSE
PANS AND
DISHES
WAITING
FOR THE
LOAD TO BE
COMPLETED
Cold pre-wash. 16’ 6.5 l
1.64 gal. 0.03
CRISTAL SLIGHTLY
DIRTY DISHES
Wash at 45°C
(113°F).
Cold rinse.
Rinse at 69°C
(156.2°F).
Dry.
66’ 13.7 l
3.62 gal. 0.6
NORMAL
SLIGHTLY
DIRTY PANS
AND DISHES
BUT WITH
DRIED-ON
RESIDUE
Wash at 50°C
(122°F).
Rinse at 68°C
(154.4°F).
Dry.
110’ 14 l
3.67 gal. 0.8
DAILY
WASH
DIRTY PANS
AND DISHES
WITH DRIED-
ON RESIDUE
Cold pre-wash.
Wash at 65°C
(149°F).
Cold rinse.
Rinse at 69°C
(156.2°F).
Dry.
100’ 18.2 l
4.8 gal. 0.85
EXTREME
WASH
ETL
SANITATION
LISTED
VERY DIRTY
PANS AND
DISHES WITH
DRIED-ON
RESIDUE
Pre-wash at
45°C (113°F).
Wash at 70°C
(158°F).
2 cold rinses.
Rinse at 70°C
(158°F).
Dry.
117’ 22 l
5.8 gal. 0.98
Tab. 2-02
(1) The cycle times listed in the use and care manual are based on normal soil loads and 120°F
(49°C) incoming water and will vary based on your actual conditions.
- Only “EXTREME WASH” program conform to NSF std 184 and is certified by INTERTEK with the
ETL SANITATION LISTED.
- When the “Sanitized” light shine it means that the dishwasher and its contents have been sani-
tized according to the requirements of the National Sanitation Foundation (NSF).

8 Rev 0.0
USER INSTRUCTIONS
EN
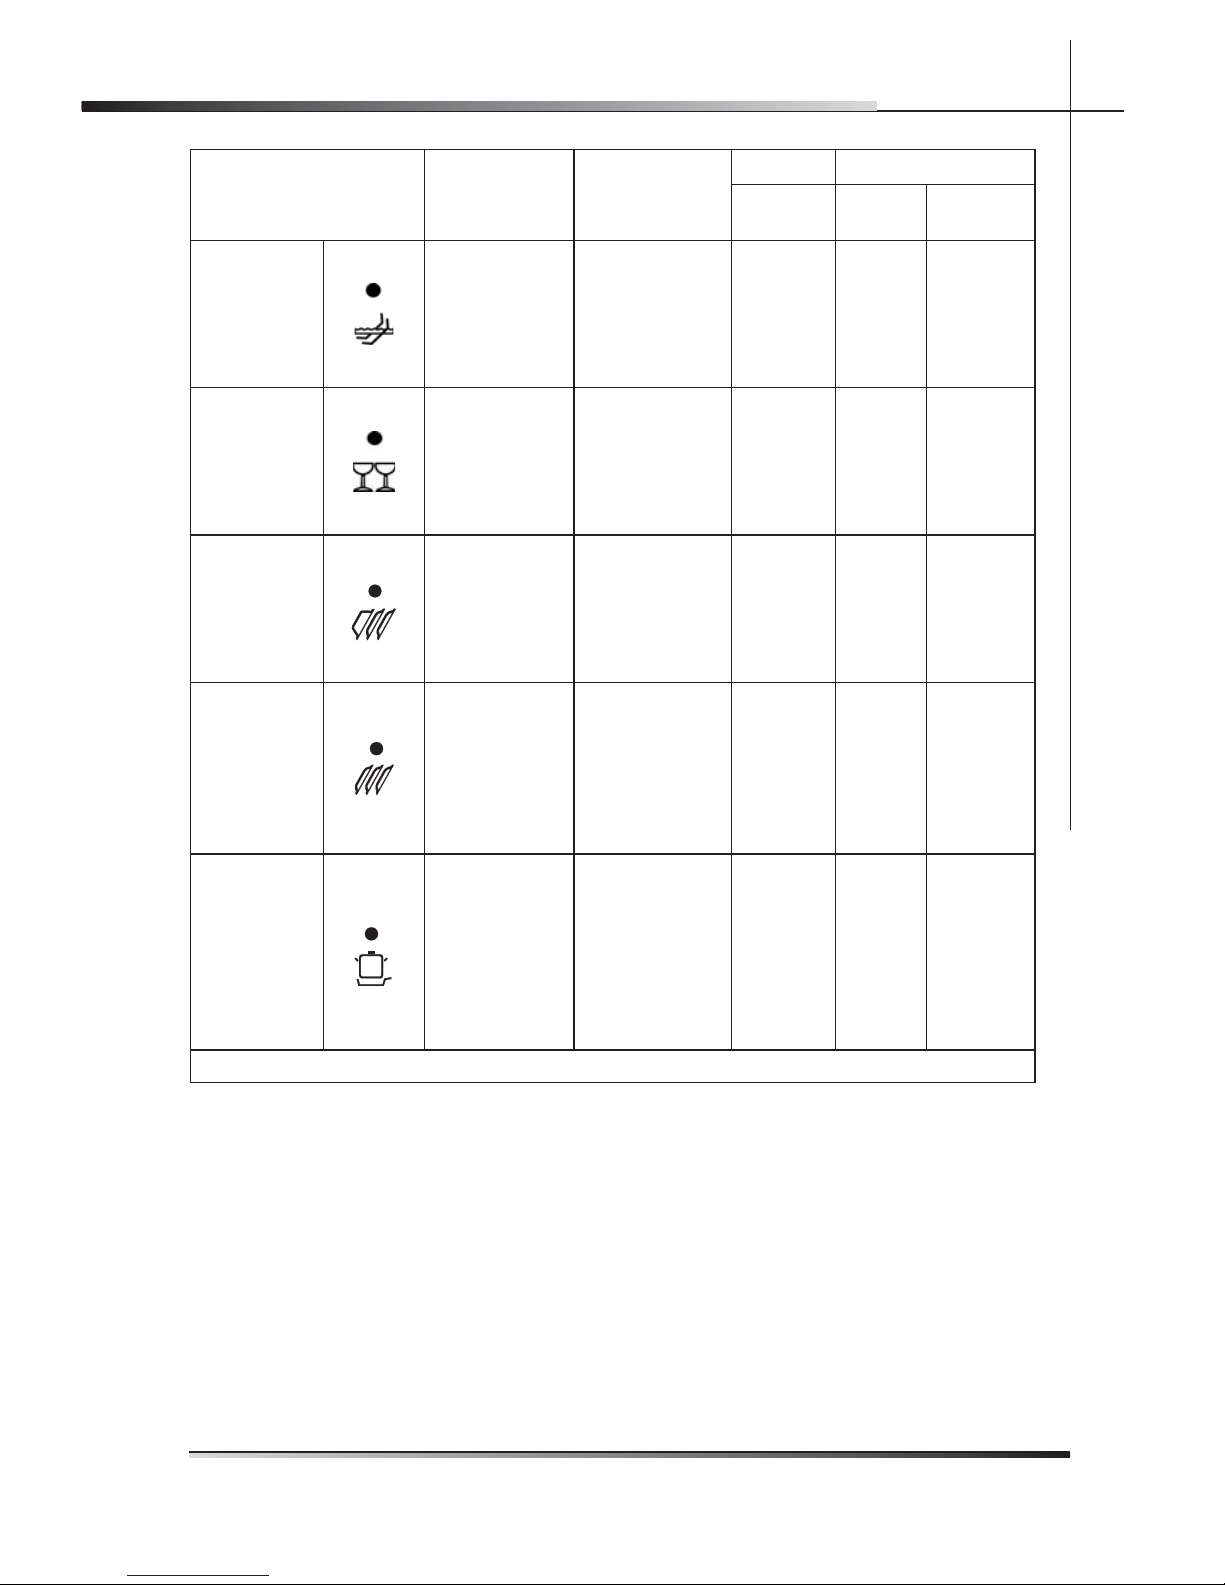
Only run a soak program with half loads.
After using the above table to choose the most suitable washing cycle, pro-
gram the appliance.
Before starting a washing program, make sure that:
The water supply tap is open.
There is regenerating salt in the water softener tank (to add
salt, see the instructions in the general manual).
The correct amount of detergent has been added to the dis-
penser (to add detergent, see the instructions in the general
manual).
The spray arms are able to rotate freely and without obstruc-
tion.
The racks have been correctly loaded (see the instructions in
the general manual).
The dishwasher door is securely closed.
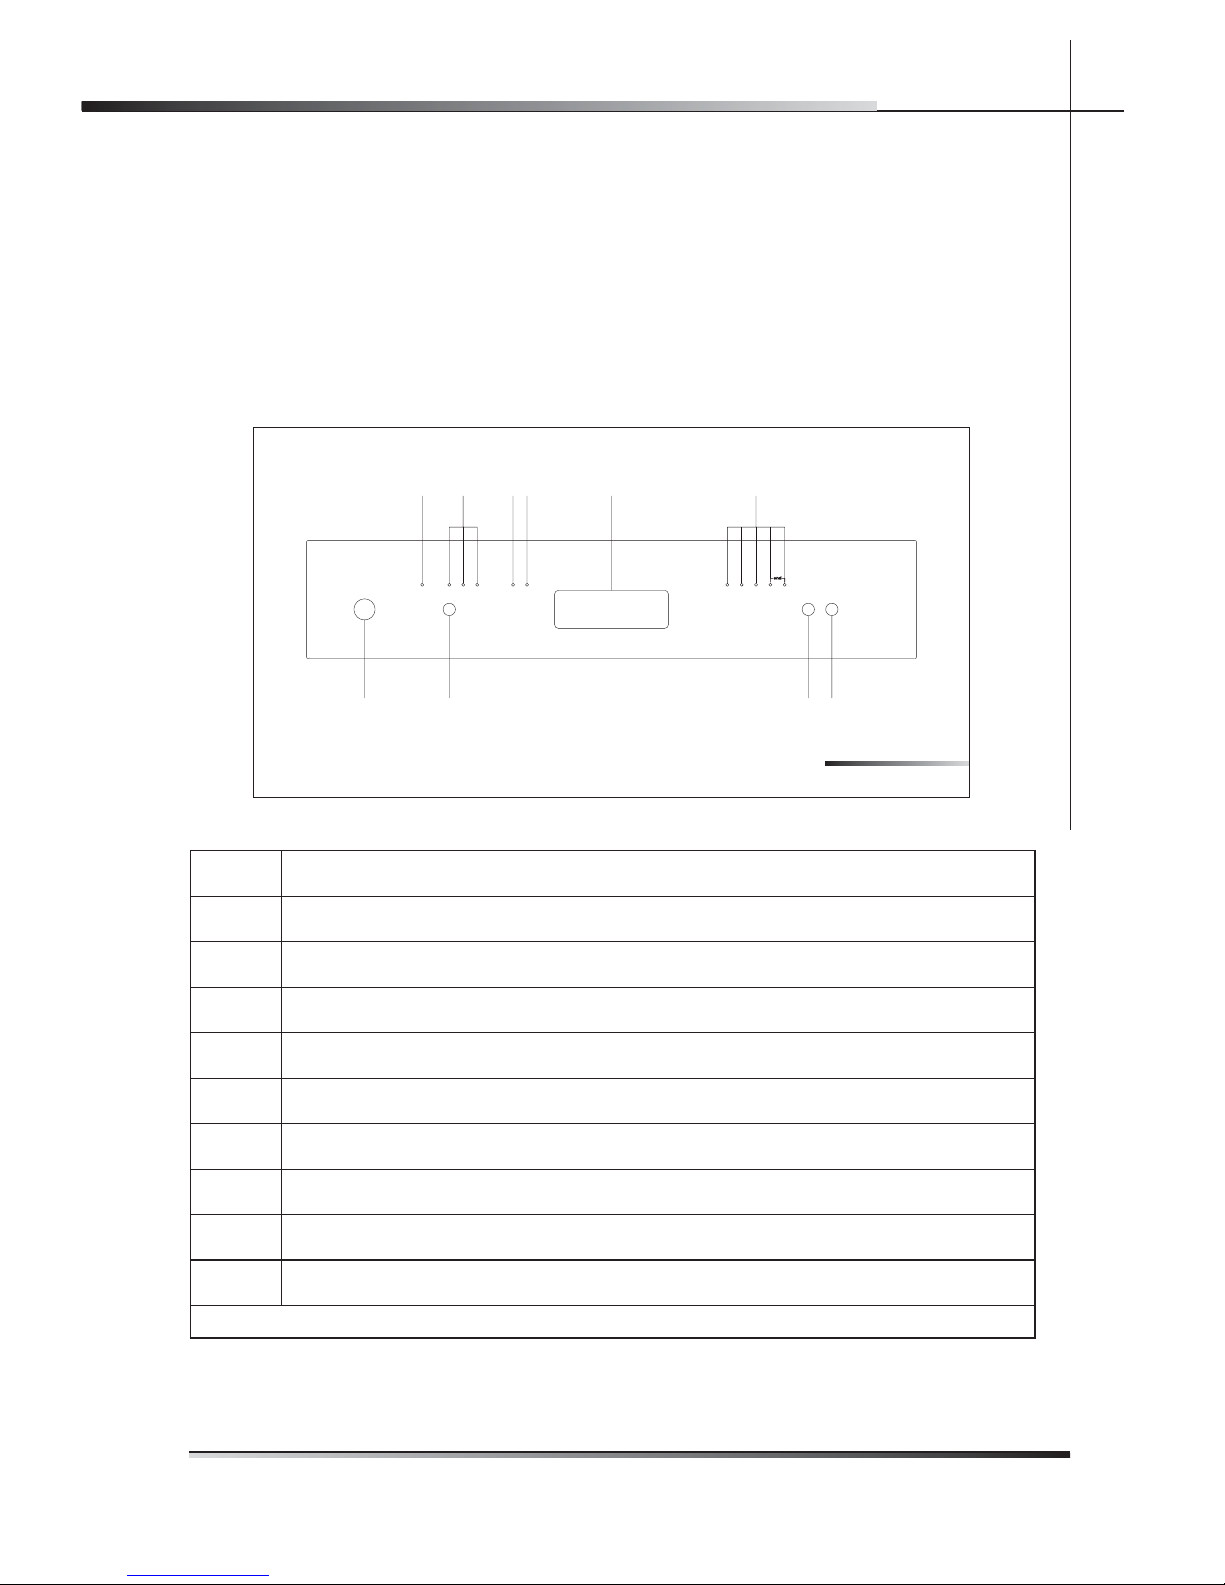
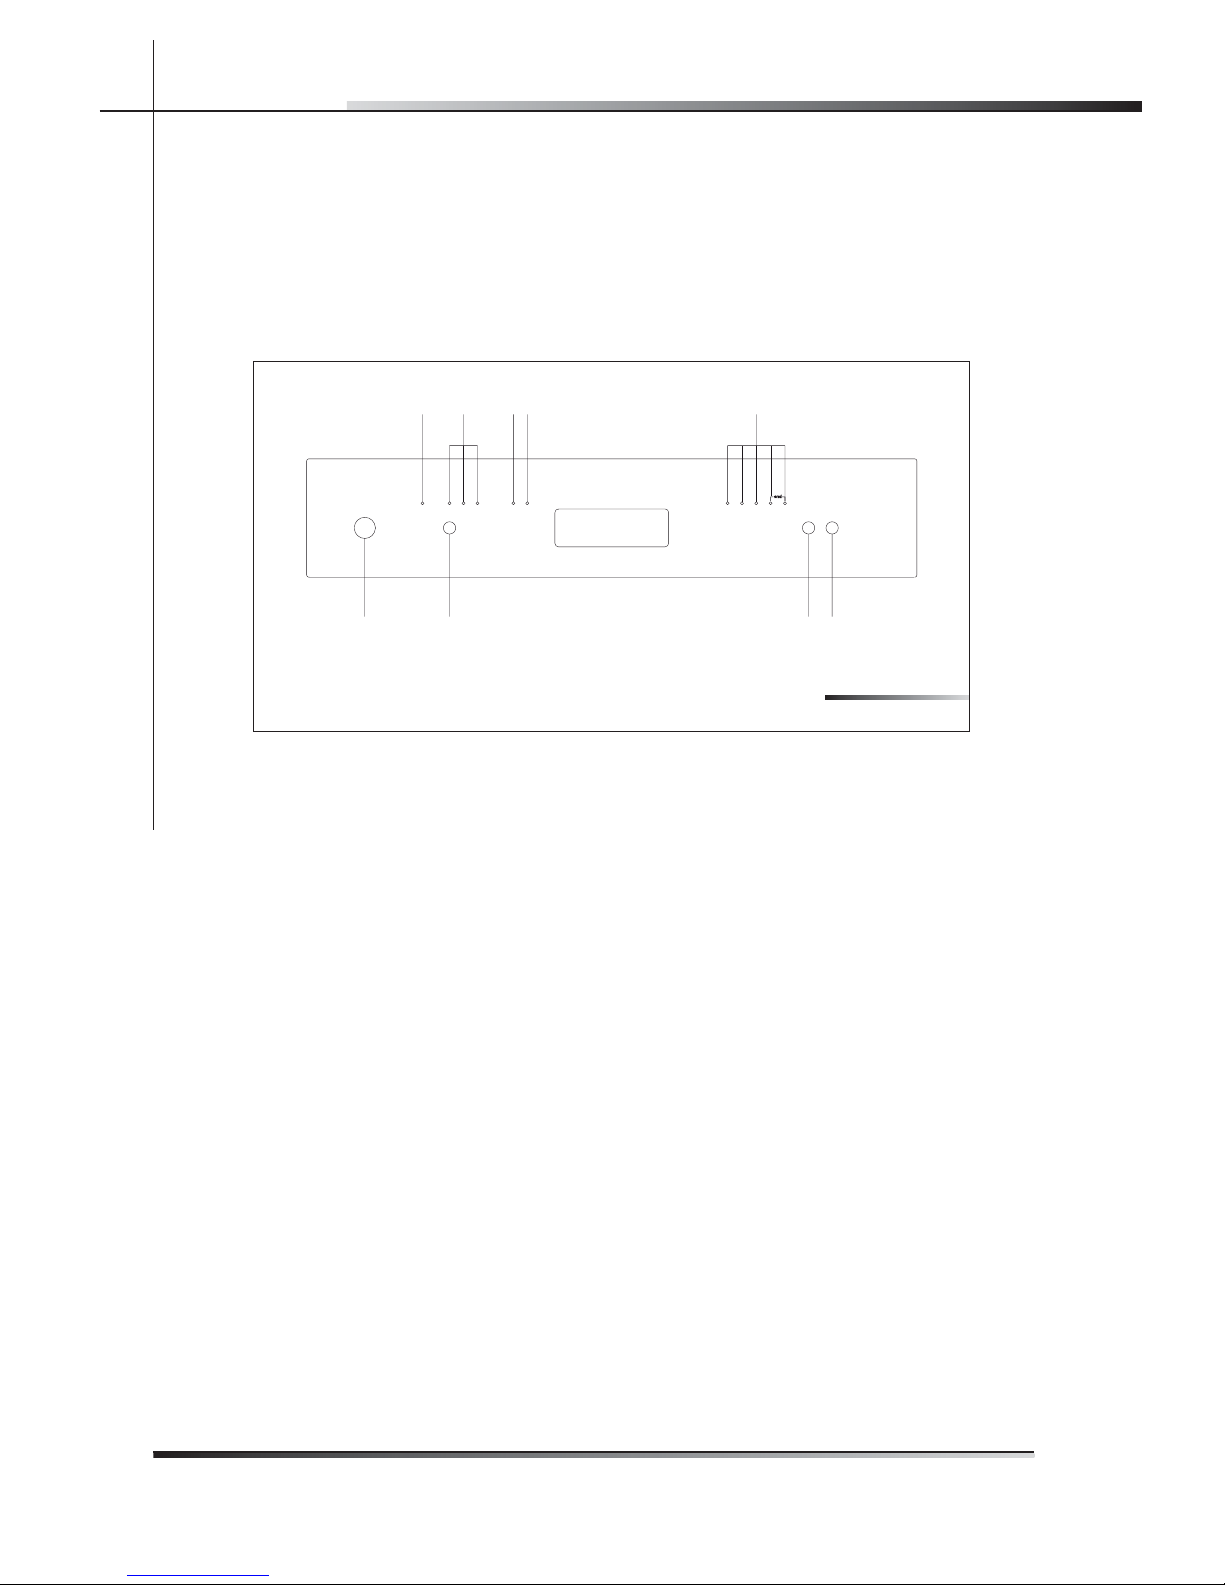
2.2.1 Switching on
Press on/off (ref. 1 fig. 2-02) to start the dishwasher; the indicator lights show
the “status” of the dishwasher.
2.2.2 Selecting and starting the program
Programming operations can only be performed with the door clo-
sed. With the door open, the program indicator lights (ref. 4 fig. 2-
02) remain off.
Press the program selection button (ref. 3 fig. 2-02) several times until the
indicator light corresponding to the required program turns on (ref. 4 fig. 2-
02);
if necessary, press the relative buttons to select the complementary func-
tions you wish to use (e.g. “Programming delay”);
to start the dishwasher, press the start/pause button (ref. 2 fig. 2-02) for a
few seconds until the indicator light of the selected program starts flashing
(confirmation beep);
Program status is indicated by the indicator light flashing throughout the
cycle.
If the door of the dishwasher has not been closed or has been incor-
rectly closed, the washing cycle will not begin.
•
•
•
•
•
•
•
•
•
•

Rev 0.0 9
USER INSTRUCTIONS EN
If you open the door while the appliance is working, you must close
it and start the program again by pressing start/pause (ref. 2 fig.
2-02). The program will resume from where it was interrupted.
If the temperature in the tray exceeds 50°C (122°F), the program will
resume after about 30 seconds.
2.2.3 End of program
The end of the program is signaled by a short beep. Additionally, the indica-
tor light of the “daily wash” and “extreme wash” programmes (marked “end”)
flashes.
2.2.4 Interrupting a program
To interrupt the current program:
press the start/pause button (ref. 2 fig. 2-02); the indicator light of the cur-
rent program remains on (confirmation beep); at this point, start the cycle by
pressing start/pause (ref. 2 fig. 2-02), or change or cancel the program.
2.2.5 Changing the current program
To change the current program:
interrupt it (see para 2.2.4 “Interrupting a program”);
select a new program (see para 2.2.2 “Selecting and stating a program”).
•
•
•

10 Rev 0.0
USER INSTRUCTIONS
EN
Fig. 2-03
2.2.6 Canceling the current program
To cancel the program press start/pause (ref. 2 fig. 2-02) until it stops (indica-
tor light on and beep). Press start/pause (ref. 2 fig. 2-02) once again and hold
it down until the indicator lights of programs four and five (ref. pr. 4, pr. 5 fig.
2-03, marked “end”) light up.
The water in the tray is drained and the program terminates at the point where
it was stopped.
45
2.2.7 Options
PROGRAM DELAY
The “Program delay” function delays the beginning of the washing program
by 3, 6 or 9 hours from the moment in which programming takes place. This
makes it possible to use the dishwasher at a certain time of day.
Before programming a delay, select the required washing program (see para
2.2 “Setting the washing program and switching on and off”).
Select the delay by pressing the program delay button (ref. 6 fig. 2-02) in se-
quence, depending on the delay you wish to set; the corresponding indicator
light will shine (ref. 7 fig. 2-02).
The dishwasher will perform a pre-wash cycle, after which the preset “pro-
gram delay” will commence (the indicator light (ref. 7 fig. 2-02) corresponding
to the time remaining before the program starts and the indicator light (ref. 4 fig.
2-02) indicating the set program, start flashing).

Rev 0.0 11
USER INSTRUCTIONS EN
To cancel or change the delay of a program once it has begun:
press the start/pause button (ref. 2 fig. 2-02) for a few seconds until the
program delay indicator light (ref. 6 fig. 2-02) and the set program indicator
light (ref. 4 fig. 2-02) stop flashing and remain lit; press the delay program
button (ref. 6 fig. 2-02) to modify or cancel the set delay (indicator lights 3,
5, 8 fig. 2-02 off);
press the start/pause button (ref. 2 fig. 2-02) to start the program. If a
delay is set, the program delay indicator light (ref. 7 fig. 2-02) and the set
program indicator light (ref. 4 fig. 2-02) begin flashing; if the program delay
is cancelled, only the program indicator light (ref. 4 fig. 2-02) flashes to show
that it has started.
To enter the delay when the program has already begun, proceed as
follows.
If the program to run is the same as the current one:
press start/pause (ref. 2 fig. 2-02) and hold it down for a few seconds until
the indicator lights of programs four and five (ref. pr. 4, pr. 5 fig. 2-03, marked
“end”) light up;
cancel the current program (see section 2.2.6 “Canceling the current pro-
gram”) and wait for the cycle to finish;
select the program once again;
select the required delay;
press the start/pause button (ref. 2 fig. 2-02) to start the program.
If the program to run is different from the current one:
press start/pause (ref. 2 fig. 2-02) and hold it down for a few seconds until
the indicator lights of programs four and five (ref. pr. 4, pr. 5 fig. 2-03, marked
“end”) light up;
change program;
select the required delay;
press the start/pause button (ref. 2 fig. 2-02) to start the program. The
dishwasher will drain and continue with the required delay and the new pro-
gram.
•
•
•
•
•
•
•
•
•
•
•

12 Rev 0.0
USER INSTRUCTIONS
EN
Fig. 2-04
2.2.8 Switching off
At the end of the program, the dishwasher emits a short beep and the indica-
tor lights of the fourth and fifth program (ref. pr. 4, pr. 5 fig. 2-04) flash.
Press the on/off button (ref. 1 fig. 2-02) to switch off the dishwasher.
45
2.3 Additional functions
2.3.1 Adjusting the water softener
The dishwasher is fitted with an water softener which can be adjusted accor-
ding to the hardness of the water.
Depending on the model involved, the adjustment switch can be:
inside the plastic ring nut on the right-hand side (ref. A fig. 2-05) inside the
dishwasher;
inside the water softener, just under the cover (ref. B fig. 2-05).
Both can be adjusted to 6positions.
•
•

Rev 0.0 13
USER INSTRUCTIONS EN
A
B
Water hardness table (see tab. 2-03)
WATER HARDNESS
SETTING
German degrees (°D) French degrees (°F) American degrees
grains/gallon
0 - 4 0 - 7 0 - 4.5 N° 1 NO SALT
5 - 15 8 - 25 4.6 - 14.5 NR. 1
16 - 23 26 - 40 14.6 - 23.5 NR. 2
24 - 31 41 - 60 23.6 - 35 NR. 3
32 - 47 61 - 80 35.1 - 46.5 NR. 4
48 - 58 81 - 100 46.6 - 58.5 NR. 5
Tab. 2-03
Contact your local water board for information on the hardness of your water
supply.
Fig. 2-05

14 Rev 0.0
USER INSTRUCTIONS
EN
3 ENERGY SAVING AND ENVIRONMENTAL
RESPECT
Always try to run the dishwasher fully loaded.
Do not wash the dishes under a running tap.
Use the most suitable washing program for each type of load.
Do not pre-rinse.
If available, connect the dishwasher to a hot water system with a tempera-
ture of up to 60°C (140°F).
3.1 Reducing the consumption of detergent
and respecting the environment
The phosphates contained in dishwasher detergents are harmful to the envi-
ronment. To avoid using excessive amounts of detergent and to save on elec-
tricity:
Separate the more delicate items from those that are more resistant to ag-
gressive detergents and high temperatures;
Do not pour the detergent directly onto the dishes.
•
•
•
•
•
•
•

Rev 0.0 15
USER INSTRUCTIONS EN
4 REMOVING THE DISHES
At the end of the washing program, wait at least 20 minute before
removing the dishes in order to allow them to cool. To prevent any
water droplets on the upper rack from falling onto the dishes in the
lower rack, empty the lower rack first and then the upper one.

16 Rev 0.0
USER INSTRUCTIONS
EN
5 TROUBLESHOOTING
The dishwasher can signal a number of malfunctions by turning on various
indicator lights, as described below (see following table):
FAULT DESCRIPTION
E1
Acquastop failure
The anti-flooding system has tripped. Activates
in case of water leaks. Contact the technical
assistance service.
E2
Safety level
The system limiting the water level in the dishwasher
has tripped. Interrupt the current program and
switch off the dishwasher. Switch it back on again,
program a new cycle and press start. If the problem
persists, contact the technical assistance service.
E3
Water heating malfunction
The water is not heated or is incorrectly heated.
Repeat the washing program; if the problem
persists, contact the technical assistance service.
E4
Water temperature monitoring malfunction
Interrupt the current program and switch off the
dishwasher. Switch it back on again, program a
new cycle and press start. If the problem persists,
contact the technical assistance service.
E5
Water intake malfunction
The appliance does not take in water or does so
incorrectly. Make sure the water connections are
correct, that the water supply tap is open and that
the filter is not clogged. If the problem persists,
contact the technical assistance service.
E6
Water pump-out malfunction
The appliance does not pump out the water or
does so incorrectly. Make sure the drain hose is not
kinked or crushed and that the siphon and filters
are not clogged. If the problem persists, contact
the technical assistance service.
Tab. 4-01a

Rev 0.0 17
USER INSTRUCTIONS EN
FAULT DESCRIPTION
E7
Turbine flow-regulator malfunction
The appliance is unable to precisely measure the
quantity of incoming water. Interrupt the current
program and switch off the dishwasher. Switch it
back on again, program a new cycle and press
start. If the problem persists, contact the technical
assistance service.
E8
Alternate washing system malfunction
Interrupt the current program and switch off the
dishwasher. Switch it back on again, program a
new cycle and press start. If the problem persists,
contact the technical assistance service.
E9 Water intake system malfunction
Contact the technical assistance service.
Tab. 4-01b
Light off Light on Light flashing
If an alarm situation occurs, the dishwasher interrupts the current program and
signals the fault.
Alarms E1, E2, E3, E4, E8, E9 immediately terminate the current program.
Alarms E5, E6 interrupt the current program and, after the problem has been
eliminated, resume the cycle.
Alarm E7 is displayed at the end of the cycle which, however, is completed
given that it does not jeopardize dishwasher operation.
To “reset” an alarm:
open or close the door, or switch the appliance on and back off again. At this
point, the dishwasher can be programmed again.
If the fault persists, contact the Authorized Technical Assistance Ser-
vice.
•
•
•
•

Rev 0.0 1
CONTENTS EN
Contents
1 INTRODUCTION ........................................................................................ 3
2 IMPORTANT SAFETY INSTRUCTION......................................................... 5
3 INSTALLATION AND HOOK-UP ............................................................... 12
4 OPERATING INSTRUCTIONS .................................................................. 15
4.1 Using the water softening system............................................................. 16
4.2 Using the rinse-aid and detergent dispensers........................................... 18
4.2.1 Adding the rinse-aid ................................................................................. 19
4.2.2 Adjusting the rinse-aid dispenser system.................................................. 19
4.2.3 Adding the detergent ............................................................................... 20
4.3 General warnings and recommendations ................................................. 22
4.4 Using the racks ........................................................................................ 24
4.4.1 Lower rack ............................................................................................... 25
4.4.2 Cutlery basket .......................................................................................... 27
4.4.3 Upper rack ............................................................................................... 29
5 CLEANING AND USER-MAINTENANCE .................................................. 34
5.1 General warnings and recommendations for correct maintenance............ 34
5.2 Cleaning the water intake filter.................................................................. 35
5.3 Cleaning the spray arms........................................................................... 35
5.4 Cleaning the filter unit............................................................................... 37
5.5 Maintenance warnings and advice ........................................................... 38
5.6 Troubleshooting minor problems .............................................................. 39
6 TECHNICAL DATA ................................................................................... 41

2 Rev 0.0
EN
Table of contents
Other Smeg Dishwasher manuals