Smeg SW260 User manual

1
Translation of the original Instructions
SMEG thanks you for choosing one of
its products.
Read all the instructions in this manual carefully to familiarise yourself with the most
suitable conditions for proper use of your dishwasher.
This manual is an integral part of the appliance and must always be kept in good condition
near the appliance. Read all the information contained in this manual carefully before
using the appliance. Installation must be performed by qualified technicians in accordance
with applicable regulations. This appliance is intended for professional use and complies
with the machinery directive 2006/42/EC, the international electrical and mechanical
safety standards (CEI-EN-IEC 60335-2-58/61770) and the electromagnetic compatibility
standard (CEI-IEC-EN 55014-1/-2, 61000-3;4, 50366).The appliance has been
manufactured to wash dishes (plates, cups, bowls, oven dishes, glasses, cutlery) and
similar items for the food and mass catering sectors; any other use is considered improper.
The manufacturer shall bear no liability for uses other than those stated above.
1PRODUCT IDENTIFICATION AND SAFETY AND OPERATING WARNINGS
1.1. Brand and model (or type)
Professional dishwasher
Brand: Smeg
Model: SW260/262/264
Edition (revision) of user manual
19 390 5043 09
19/11/2018
Manual Rev.
Date
1.2. Name and address of manufacturer/distributor
Smeg S.p.A.
Via Leonardo da Vinci 4, 42016 Guastalla (RE), Italy –Tel. +39 0522 8211 - Fax + 39 0522 821453
website: www.smegfoodservice.com, email : [email protected]
Info:
INFORMATION AND SUPPORT FOR SMEG PROFESSIONAL DISHWASHER PRODUCTS
Our Sales Department staff will be able to provide you with information about prices and special offers.
Our After-Sales Department will be able to provide you with guidance on keeping your appliance operating
correctly and put you in touch with your nearest authorised Service Centre. Our entire product range can be
viewed at the website above.

2
1.3. Declaration of conformity with product standards
This appliance is marked in compliance with European Directive 2002/96/EC on waste electrical and electronic
equipment (WEEE). Make sure that this product is disposed of correctly in order to safeguard public health and
the environment. Decommission the appliance in compliance with local waste management regulations. For
further information on the processing, disposal and recycling of this product, contact the local authority,
domestic waste collection service or your Smeg reseller. The appliance must be earthed in compliance with
electrical safety regulations
The manufacturer shall bear no liability for any injury or damage cause by failure to comply with the instruction
given in this manual, improper use, tampering with even a single part of the appliance, or the use of non-original
spare parts.
2SYMBOLS
This symbol indicates that you must read the instructions contained in the manual carefully.
This symbol is placed next to information relevant for the safety of persons and the
appliance itself.
This symbol is placed on some parts enclosing hazardous live components, indicating a risk
of electric shock.
This symbol is placed by the terminal for the connection of the system's equipotential
earthing system.
This symbol is placed next to important information. Carefully read the instructions given
and follow the behavioural rules and operations outlined therein.
This symbol is placed next to technical instructions and information aimed at qualified
personnel who must perform installation, commissioning, testing and any extraordinary
maintenance operations.
The presence of this symbol indicates that the appliance must be consigned to a disposal
centre for recycling at the end of its life, in compliance with regulations in the country of
use. Contact a specialised centre for disposal.
Transport and unpacking requirement
This symbol indicates a hot surface hazard

3
3PRODUCT SPECIFICATIONS
3.1 Application, general functions and intended use
Dishwasher intended exclusively for professional use, must be used by authorised and trained staff.
Designed for washing tableware (plates, cups, bowls, oven dishes and cutlery) and similar catering items, and
complies with international electrical and mechanical safety standards.
Certain models may operate at very high temperature for heat disinfection, but MAY NOT be used for medical
sterilisation purposes.
3.2 Dimensions, weight and handling instructions - Dimensions in mm.
INSTALLATION AND POSITIONING
Take the dishwasher to the installation site, remove the packaging and check the appliance and components for
damage; any damage found must be reported to the transport company in writing.
Disposal instructions for the packaging materials are given elsewhere in this manual.
When the product is decommissioned it must not be dumped, but rather disposed of in accordance with
applicable regulations. All metal parts are stainless steel and can be removed. The plastic parts are marked with
a symbol identifying the material used, where applicable.
WARNING
Any adjustments, maintenance, etc. must be performed with the appliance disconnected from the electricity
supply.
The appliance may be ordered with a built-in top, if necessary. The product is 30 mm lower than indicated.
The appliance weighs between 65 and 75 kg, depending on the selected version and options.
fig. 1 –Diagram, overall dimensions and clearances
BUILT-UNDER INSTALLATION
fig. 2 –Diagram, built-under

4
IMPORTANT Models equipped with condensers must be supplied with cold water within the
specified temperature range if the condenser itself is to work properly; water hardness must be
< 40°f (21°dh)
BACK PANEL CONNECTIONS
ID
Description
A
Hot water supply hose (red collar)
B
Cold water supply hose (blue collar)
C
Power supply cable
D
Steam condenser drain hose (where applicable)
E
Dishwasher drain hose
F
Peristaltic pump P1 dip tube and P1 tank detergent sensor cable (OPTIONAL)
G
Peristaltic pump P2 dip tube and P2 tank detergent sensor cable (OPTIONAL)
H
Equipotential earthing system.
H
fig. 3 –Diagram, back panel connections and hookup.
The dishwasher is supplied without a power plug, with a cable fitted with pre-isolated terminals.
The electrical hookup to the power supply must use an industrial type plug.
Supplying and installing the plug are the responsibility of the user.
The plug must be rated for the power cable and the electrical specifications of the H07RN-F dishwasher.
CIRCUIT BREAKER
Each appliance must be fitted with a CIRCUIT BREAKER to act as a master switch.
Characteristics of the circuit breaker:
a) Multi-pole: must disconnect all live wires;
b) Easily accessible by the user;
c) Easy to operate (no tools required);
d) Located nearby the appliance
e) Clearly marked as master switch for the appliance. The appliance is equipped with surge
protection. However, it is advisable to install the following in the electrical cabinet: a dedicated

5
protection device (e.g. MCB or fuses on each phase, rated for the electrical specifications given
above).
3.3 Technical characteristics (power, plumbing)
Electrical connections (see technical data plate)
Abbreviations used for the electrical connections.
Three phase/single phase version models:
POWER SUPPLY
SPECIFICATIONS
CIRCUIT BREAKER
POWER CABLE
400V 3N~ / 50Hz / 12A / 7000W
3P+N, 16A, 230/400V, 6kA
5 x 2.5mm²
230V 3~ / 50Hz / 19A / 7000W
3P, 20A, 230/400V, 6kA
4 x 2.5mm²
230V 1N~ / 50Hz / 16A / 3500W
1P+N, 20A, 230/400V, 6kA
3 x 2.5mm²
230V 1N~ / 50Hz / 12A / 2800W
1P+N, 16A, 230/400V, 4.5kA
3 x 2.5mm²
Models: SWT262 M/ SW262M (single phase versions)
POWER SUPPLY
SPECIFICATIONS
CIRCUIT BREAKER
POWER CABLE
230V 3~ / 50Hz / 30A / 7000W
1P+N, 32A, 230/400V, 6kA
3 x 6mm²
Plumbing connections
Abbreviations used for the plumbing connections.
ABBREVIATION
Type: FILL/DRAIN
WATER TYPE
CW
FILL CYCLE
Cold water hose –CW –Temperature >5°C <30°C
DW
FILL CYCLE
Hot water hose –DW –Max. temperature 60°C
d
DRAIN
Dishwasher drain hose –d
cd
DRAIN
Steam condenser drain hose - cd (where applicable)
FILL CYCLE - WATER SUPPLY FITTINGS
The dishwasher has two water supply hoses, one for the mains water supply and one for hot water.
The hoses are designed for connection to 3/4’’ BSPP threaded fittings.
Use the supplied filter, A in the figure, when connecting the end of the fill hose.
Fig. 4 –Fit the provided filters when connecting the hose
POSITION OF FILL WATER
The fill taps must be located next to the appliance, in an easily accessible position. With reference to the
following figure, the recommended dimensions are:
N.B.: to prevent blockages and damage, if the water line is new or has not been used for a long time, make sure
that the water is pure and clear before making the hookup.

6
CAUTION –MAINS WATER HARDNESS
Let check from a certified service technician the main water hardness.
Only if the hardness of the mains water is known can the Smeg technician set the dishwasher's
parameters for the integrated water softener.
You should run regular checks (e.g. once or twice a year) of the mains water quality to ensure that
the initial values are maintained and adjust the dishwasher's settings if necessary.
DW: HOT WATER –this connection is optional but highly recommended; if hot water is available, using it reduces
the dishwasher cycle times to a minimum
CAUTION –NO HOT WATER
If no hot water supply is available, connect the hose to the cold water intake
3.4 Drain hose connections
The dishwasher has one or more drain hoses, depending on the model.
Rubber terminal for 21mm (1/2”) hose clamp.
The drain hoses are indicated as:
d - dishwasher drain hose –d (drain tank)
cd - steam condenser drain hose –cd (condenser drain)
See the summary table and diagram below.
Fig. 5 –Diagram, the drain connections may be made on the right or left of the appliance,
while accounting for the maximum clearance from the product

7
No. DRAIN HOSES
Dimension “I”
Distance of drain from side of
appliance [cm]
DRAIN TYPE AND DIMENSION “H” ABOVE
GROUND LEVEL [cm]
Type
Hmin
Hmax
1
50
d
65
80
2
50
d
65
80
cd
65
80
Fig. 6 –Drain connection. Drain connections –65 cm < H < 80 cm. Dimension “X”: use only original drain hoses and the supplied tube bend guides. The
dimension “X” between the drain fitting and the highest point of the hose must not exceed 20cm: X < 20cm.
WARNING
The drain connection must comply with international regulations: our company shall bear no
liability should improper use of the dishwasher result in environmental pollution.
General instructions for installing the drain
Make sure to use a drain trap. When installing the drain connection, take the following precautions:
Since the drain water temperature can be as high as 95°C (models with heat disinfection), the end of the
drain hose must be fixed permanently to the hose fitting, using the hose clamps provided.
The drain hose must not have any tight bends or constrictions.
The end of the drain hose must be at a height above the surface supporting the dishwasher which complies
with specifications.
It must not be submerged in water.
The internal diameter of the drain pipe must be no less than 40 mm.
We recommend using a drain pipe of 50 mm diameter.
Do not install extensions to the drain hose supplied with the appliance in order to avoid back water flowing
into the washing tank

8
3.5 Noise
Sound pressure level: LpA <70 dB (A)
3.6 Ingress protection (IP) rating
The dishwasher is IPX1 rated
3.7 Environmental conditions (storage and operating)
Use: indoor use
Altitude: up to 1,000 m above sea level
Room temperature: 10°C - 35°C
Max. relative humidity: 80% for temperatures up to 31°C, decreasing linearly to 50% at 35°C.
Storage: between 0°C and 40°C, relative humidity < 80%, decreasing linearly to 50% at 40°C.
3.8 Safety precautions and instructions
The plate with the technical data, serial number and marking is in a visible position on the inside
edge of the door. Never remove this data plate.
Never leave waste packaging unattended. Separate waste packaging materials by type and consign
them to the nearest recycling centre.
The appliance must be earthed in compliance with electrical safety regulations. The manufacturer
shall bear no liability for injury or damage deriving from a lack of earthing or defective earth
connection.
If the appliance is installed on flooring with a covering, make sure that the bottom openings are
not obstructed.
Once no longer in use, the appliance must be rendered unusable. Cut the power cable after pulling
the power plug out of the mains socket. Disable/render harmless any parts which may be hazardous
for children (locks, doors, etc.).
This appliance is marked in compliance with European Directive 2002/96/EC on waste electrical
and electronic equipment (WEEE). Make sure that it is disposed of correctly to protect the
environment and human health. The symbol on the product or technical documentation
indicates that the product is not to be treated as ordinary domestic waste but must be delivered
to an authorised sorted waste management and recycling facility for electrical and electronic
equipment. Decommission the appliance in compliance with local waste management regulations.
For further information on the processing, disposal and recycling of this product, contact the local
authority, domestic waste collection service, or your Smeg reseller.
Do not use appliances which have been damaged during transport. If you have any doubts, contact
your reseller. The appliance must be used and connected in accordance with the manufacturer's
instructions, or by qualified personnel.

9
This dishwasher may only be used by adults. Use by persons with disabilities mental and/or physical
is only permitted under the supervision of a person responsible for their safety. Keep children away
from detergents and packaging materials (plastic bags, polystyrene, etc.), and never allow them to
approach or play with the dishwasher, since it might contain detergent residues capable of causing
permanent damage to the eyes, mouth and throat, and even leading to suffocation.
Never place solvents such as alcohol or turpentine, which are potentially explosive, inside the
appliance. Never load dishes soiled with ash, wax or paint.
Leaning or sitting on the open door of the dishwasher can tip it over, putting people in danger.
Never leave the dishwasher door open; people might trip over it.
Do not drink any water remaining in the dishes or dishwasher after a washing program.
Knives and other kitchen equipment with sharp edges must be placed in the basket with their tips
downwards, or horizontally in the top basket; take care not to injure yourself on any sharp edges
protruding from the baskets.
Models with aquastop.
The aquastop device prevents flooding in the event of water leaks. Once the aquastop device has
tripped, you must contact a qualified technician to troubleshoot the problem.
Immediately after installation, test the appliance as specified later in this manual. If the appliance
does not operate, disconnect it from its power supply and contact your local service centre. Never
attempt to repair the appliance yourself.
The appliance satisfies all applicable safety regulations governing electrical equipment. Any
technical checks are to be performed only by specialised and authorised technical staff: repairs
performed by unauthorised persons will not only void the warranty but may be hazardous to the
user.
Replace any faulty parts only with original spare parts. The manufacturer is not liable in any way for
damage resulting from the use of unauthorised spare parts.
The manufacturer shall bear no responsibility for damage or injury caused by failure to comply with the above
regulations or due to tampering with even just one part of the appliance, and/or from the use of non-original spare
parts.

10
4PREPARING THE APPLIANCE FOR USE
4.1 Removing the packaging and inspecting
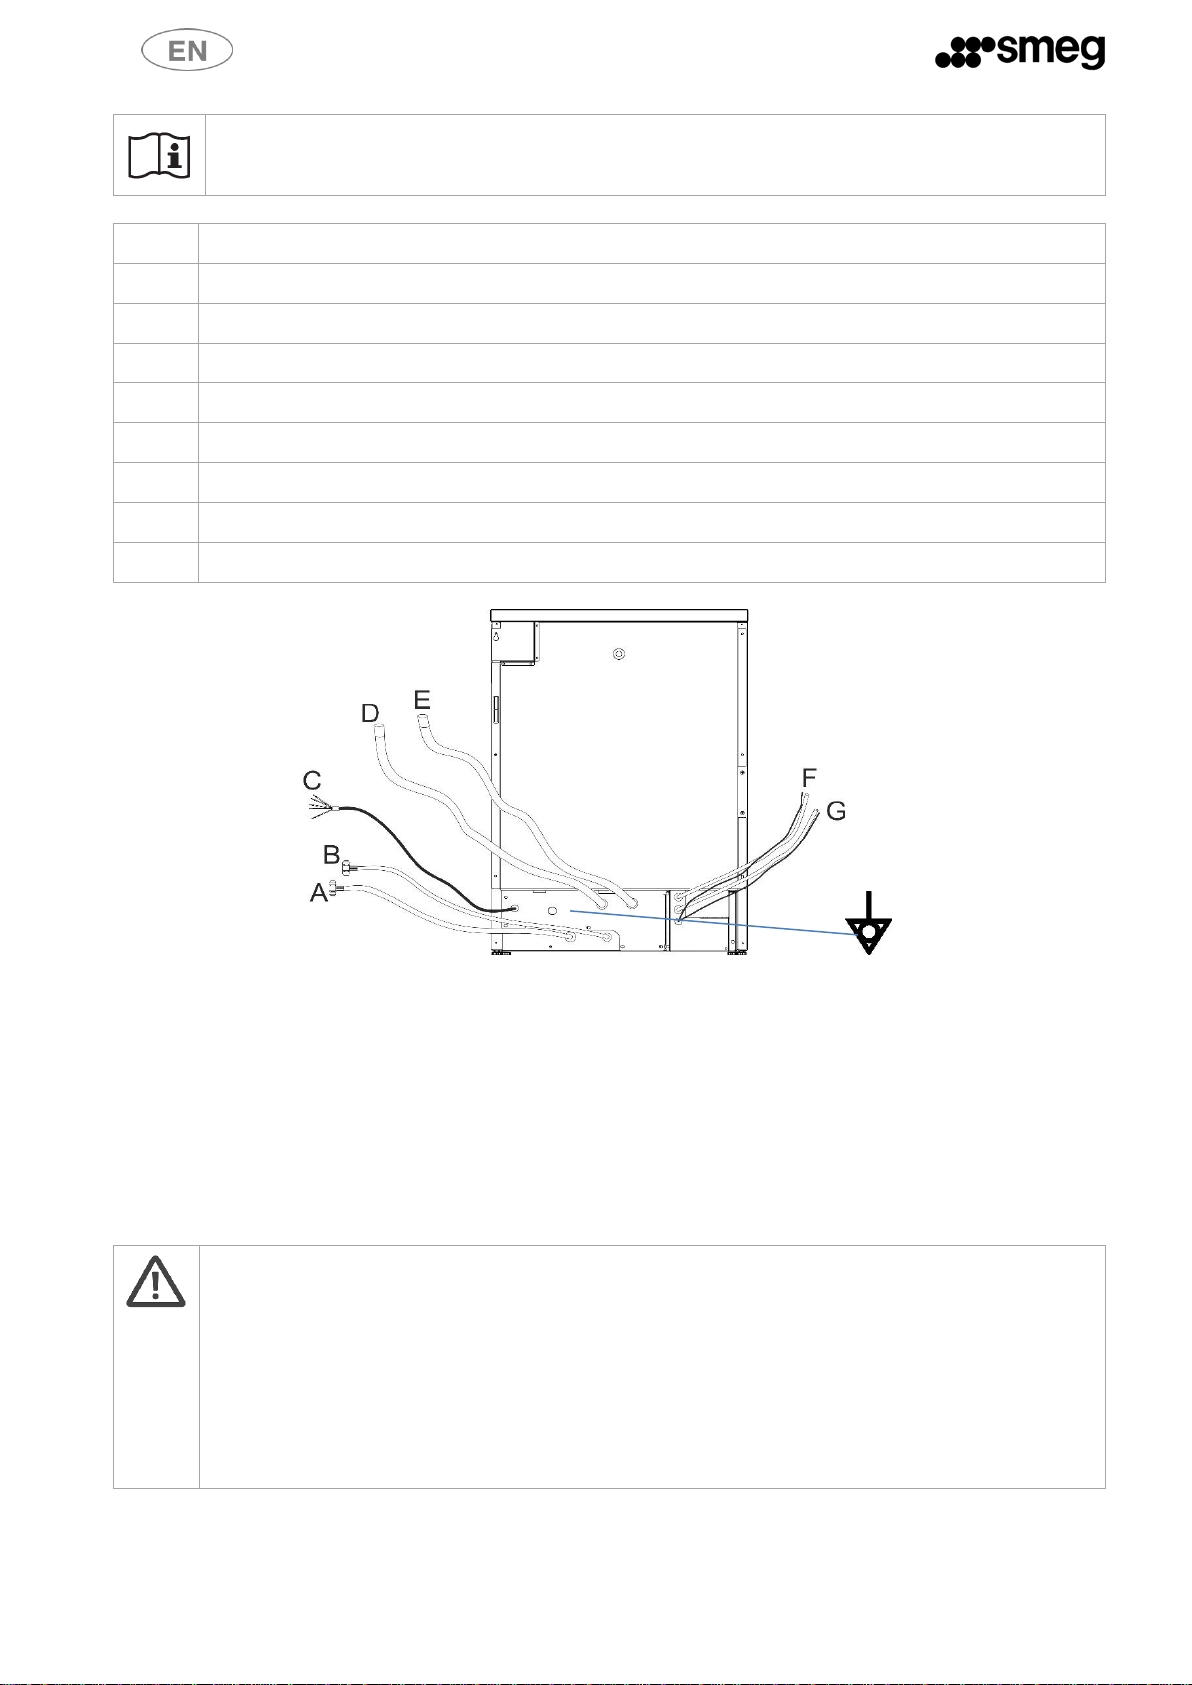
After removing the packaging (straps, cardboard, wooden base and PVC cover), check the condition of the
appliance; the filling and drain hoses, power cable, and metal parts must all be securely fastened.
4.2 Disposing of the packaging material
The packaging components (plastic bags, expanded polystyrene, nails, etc.) must not be left within reach of
children and pets since they are potentially dangerous. All packaging materials used are environment-friendly.
They can be kept without constituting any hazard, or may be disposed of at a specialist waste disposal centre.
Plastic components suitable for recycling are marked as follows: PE (polyethylene): external packaging film, bag
containing the instructions, protective bags. PP (polypropylene): straps. PS (expanded polystyrene): protective
corners, cover. Wooden and cardboard components can be disposed of in accordance with applicable
regulations.
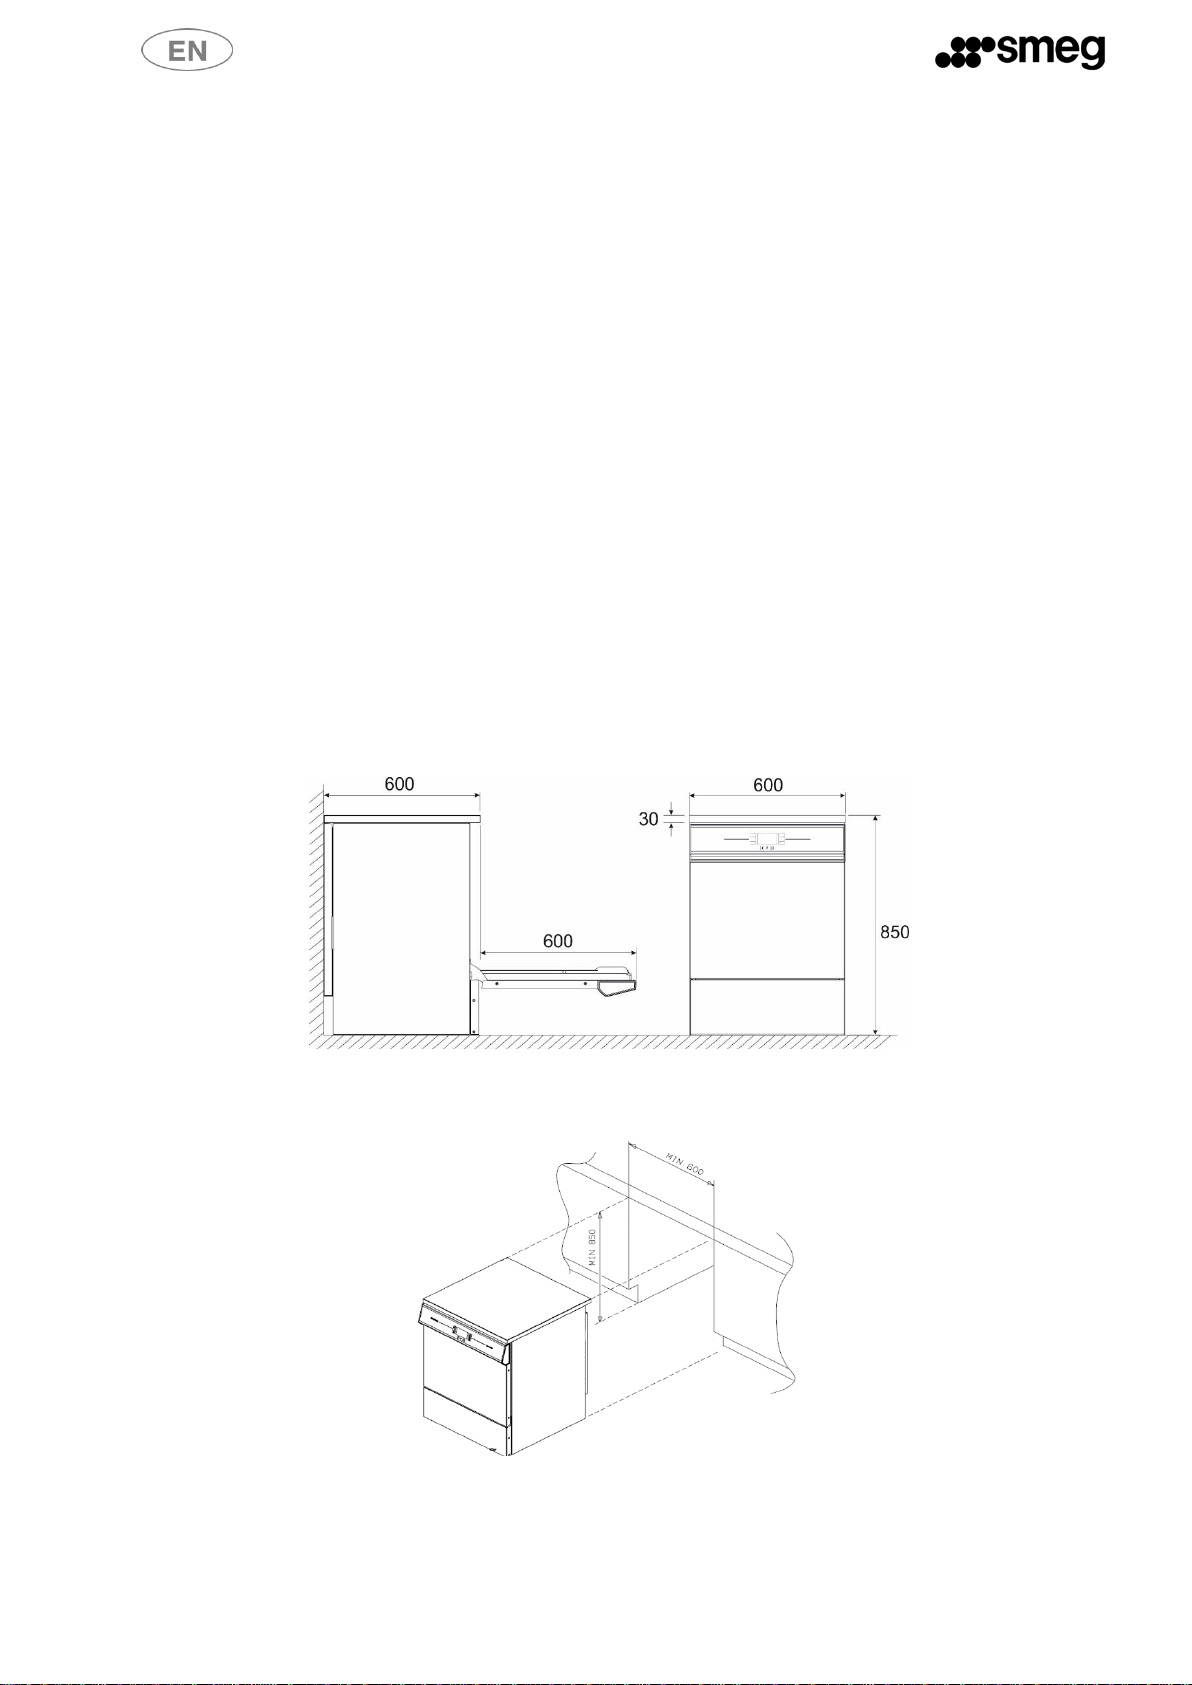
4.3 Installing the appliance
The dishwasher must be installed by an qualified technician. Do not install a dishwasher which has been
damaged during transport. Do not install the dishwasher near to sources of heat (e.g. gas burners, stoves,
fireplaces, etc.) since they may damage it. When installing the dishwasher in a compartment adjacent to one or
more other appliances, it is essential to comply with all the recommendations provided by the appliance’s
manufacturer (clearances, installation procedures, etc.). If the dishwasher is installed in a raised position, make
sure that the carcase and dishwasher are fixed correctly and do not constitute a hazard. Do not install the
dishwasher in areas subject to freezing temperatures or at risk of explosion. Use only furniture units for
professional use in the vicinity of the dishwasher. Any other types of furniture may be damaged. Immediately
after installation, test the appliance as described later in this manual. If the appliance does not operate,
disconnect it from the mains and contact your local service centre. Never attempt to repair the appliance
yourself.
4.4 Preliminary settings and adjustments
The electrical protection system must undergo a functional test before the appliance is put into operation. The
appliance must be installed and/or inspected by qualified staff, who will start it up for the first time and provide
the relevant operating instructions.
Opening the door
The door opening procedure is given here to facilitate access to the interior of the machine.
The remaining controls are covered in the following sections.
The machine is equipped with an automatic door lock.
Do not force the door open, rather proceed as follows:
Connect the machine to the electricity supply.
Hold the button marked On/Off down for 2 seconds to turn the machine on.
Press the Open door button: the machine will beep when the signal is received; release the button and
the door will open automatically a moment later.
DOOR OPEN BUTTONS
On/Off
Open door
Manual door release
In the event of a malfunction or power failure, the door can be opened manually by using a screwdriver in the
opening mechanism; take care not to damage the dishwasher during this procedure.
1. This can only be done with the machine in stand-by, not while a cycle is running.

11
2. Caution: before opening the machine manually, disconnect it from the electricity supply.
3. Insert the screwdriver into the bottom central hole in the control panel, as shown below.
4. Push the pin upwards until the mechanism releases.
Fig. 7 –Diagram, manually releasing the lock in an emergency.
4.5 Operator and technician qualifications
The appliance may only be installed, serviced or repaired by a technician authorised by the Manufacturer.
Repairs performed by unauthorised persons not only void the warranty but may be hazardous to the user.
Only use original Smeg spare parts when replacing components.
4.6 Precautions before use
First start-up
The electrical protection system must undergo a functional test before the appliance is put into operation. The
appliance must be installed and/or inspected by qualified personnel, who will start it up for the first time and
provide the relevant operating instructions.
Preparing for use (important)
If the optional detergent and rinse aid dispensers are present, put the external detergent and rinse aid
containers in place and insert the respective intake hoses on the rear of the appliance into them.
Red hose: detergent, white hose: rinse aid.
N.B.: prime the pumps as instructed below.
4.7 Precautions when the appliance is not in use
If the dishwasher is not being used
If you intend to leave the dishwasher out of use for a long time, proceed as follows.
This is particularly advisable if the machine is not to be used for more than 24 hours.
•Run an empty PREWASH cycle.
•Disconnect the machine from the mains.
•Leave the door slightly open in order to prevent the formation of unpleasant odours inside the wash
chamber.
•Close the water supply taps.
Using the appliance after a period of disuse
If the appliance has not been used for a long time, proceed as indicated par. 7

12
5OPERATING INFORMATION AND INSTRUCTIONS
5.1 Precautions for safe use
After performing the installation procedure described above, remember that the dishwasher is intended for
professional use only and may only be used by authorised personnel.
DANGER - HOT SURFACES
The dishwasher can run heat disinfection cycles at water temperatures up to 93°C. Water may
remain in the wash chamber in the event of a malfunction –avoid contact with the skin due to the
danger of scalding and irritation due to the toxicity of the chemical products. Never touch the
heating elements in the wash chamber. Contact authorised Smeg technical staff in the event of a
malfunction.
5.2 Using the water softener
The quantity of carbonates in the water (which indicates its hardness) leaves whitish marks on dry dishes and
dishes also tend to lose their shine over time. To avoid this problem, the dishwasher is equipped with an
automatic water softener which removes the hard water substances from the water with the aid of regenerating
salt.
Fig. 8 –The salt container is accessible with the door open; filling the water softener container with salt.
When using water of medium hardness, the salt container should be refilled after approximately 20 wash cycles.
The salt container can hold approximately 1 kg of salt granules.
The container is situated at the bottom of the dishwasher.
Remove the lower basket and undo the salt container cap by turning it anticlockwise and pour in the salt
using the funnel supplied. Do not allow salt to spill into the interior of the dishwasher. Remove any salt residue
around the salt cap hole, and tank surface, run a pre-wash cycle or clean the tank surface with water after cap
is lock again.
ATTENTION
The first time the dishwasher is used, a litre of water must be poured into the tank with the
salt. Each time the salt container is refilled, make sure that the cap is securely closed. The
mixture of water and detergent must not get into the salt tank, as this would impair operation
of the regeneration system. In this case warranty cover will be forfeited.
Use only granular salt for dishwashers.
Do not use table salt, since it contains insoluble substances which can compromise the
operation of the softener system over time.
The salt container should be refilled before starting a wash program. This way, the excess
saline solution will be immediately removed by the water; prolonged presence of salt water
inside the wash chamber may lead to corrosion. Run a prewash cycle to achieve the same
result, if necessary.

13
IMPORTANT
The appliance can only work if there is salt in the water softener. The wash program cannot be
started if the indicator light is on.
5.3 Using detergent and rinse aid
The machine is equipped with a device for dosing the detergent and rinse aid, mounted inside the door. Except
for the prewash cycle, you must fill the dispenser with the proper amount of detergent before each wash.
WARNING: If optional peristaltic pumps P1 and P2 are installed, do not use the door dispenser since it is
disabled electrically (the hatch remains shut at all times)
Open the cover of the detergent dispenser with the lever. Now fill with detergent and close again carefully.
To fill up the rinse aid, remove the cap and fill to the level shown by the indicator (D).
MAX
MIN
Fig. 9 –Powder detergent and rinse aid dispenser, accessible with the door open.
During the wash cycle, the dispenser will open automatically.
Make sure to use good quality detergent for best results. Keep the detergent packages closed and in a dry place
to prevent lumps forming, as these can compromise the wash.
IMPORTANT!
Use powder detergent and not detergent tablets for short cycles
WARNING:
Always keep the detergent safety sheets to hand so that they can be easily consulted by the
operator if needed.
Ingesting or inhaling the detergents can damage the nose, mouth or throat. If detergent inhalation
or swallowing occurs, seek medical attention immediately.
Correct use of the peristaltic pumps –OPTIONAL
WARNING
The peristaltic pumps must be installed by a technician authorised by an authorised Smeg
technician.
After installation, they must be enabled (see SET-UP)
In this case, do not use the door dispenser; the machine must be hooked up to the detergent (red hose) and
rinse aid (transparent hose) containers.
After the containers have been opened, they must not be kept for too long since the detergent loses its
effectiveness and can form clumps which could compromise the wash cycle.
P

14
During the installation and when replacing a completely empty container of fluid, run the service
program (Prg.8) to load the fluid. The hose running from the container to the pump must be primed
to ensure that the product is correctly dosed in subsequent wash cycles.
Whenever the type of detergent or rinse aid is changed, it is ABSOLUTELY ESSENTIAL to flush out
the peristaltic pumps by placing the external intake pipes in water for a few cycles.
Always use only products specifically recommended for use in a dishwasher.
Failure to comply with this recommendation will lead to forfeiture of the warranty entitlement on
the appliance’s water system.
Tank level sensors - OPTIONAL
The machine can be equipped with level sensors in the detergent and rinse aid intake hoses.
WARNING
The level sensors must be connected electrically to the terminal block on the inside of the rear strut
(there is a sensor connection for each peristaltic pump).
This procedure must be done by an authorised Smeg technician.
fig. 10 –Configuration with LEVEL SENSOR: Detergent intake nozzle with integrated level sensor. The intake nozzle is fitted with a filter; make sure this is
always properly located to prevent lumps being drawn up.
ATTENTION
If the level sensors are not present, check the container level regularly so as not to run cycles
without detergent or rinse aid.
WARNING
It is essential that the label on the intake hose match the type of chemical product in use.
Connection errors, which lead to the mixture of diverse chemical products in the intake circuit, can
irreparably damage the circuit and void the warranty for the parts in question (peristaltic pumps,
detergent intake and supply circuit)
The intake hose is supplied with an intake filter. The filter is secured to the hose with a light
friction fit. Make sure the filter is present and properly located to ensure that the detergent
intake system can operate properly.

15
Check from time to time that the silicone hose is properly secured to the intake pipe, and that
there are no leaks. Use suitable means (such as cable ties) to secure the silicone hose to the
stainless steel pipe.
5.4 Description of controls and wash programs
Controls
All the dishwasher's controls are located on the front panel.
SWT262 CONTROL PANEL
SWT260/260M CONTROL PANEL
SWT260X/264X CONTROL PANEL
CONTROL PANEL SYMBOLS
SYMBOL
MEANING
SYMBOL
MEANING
On/Off
Drain
Auto open
(where applicable)
Repeat
(where applicable)
Dry
(where applicable)
Additional Prewash
(where applicable)
Open door
Start/Pause
Select

16
Detailed description
BUTTONS
DESCRIPTION
On/Off
This button is enabled both with the door open and closed.
It turns the interface on/off, thus allowing the dishwasher to be operated.
Brief press: shows the remaining cycle time
Hold the button down for 2 seconds to turn on or off.
Once on, the dishwasher displays the program ID (e.g. “Pr 03”).
When the interface is switched off, the display reads “OFF”.
When the door is open the display shows four dashes and the other buttons are disabled.
If the dishwasher is switched off with water still in the wash chamber, “OFF” flashes; at the
end of the phase it is displayed steadily.
The dishwasher is still powered even with the interface turned off.
Auto Open –open door at end of cycle
This button sets the door open function - see below for restrictions when running a heat
disinfection cycle.
It is not enabled if the prewash and service cycles are selected.
It is an alternative to the Repeat function.
There is no need to press the button for every cycle; it remains set once pressed
Dry –drying (ONLY MODELS with dryer)
This button is used to set the drying function and is only active in programs which use this
option –see programs table.
It is an alternative to the Repeat function.
There is no need to press the button for every cycle; it remains set once pressed
Additional prewash (where applicable)
This button is used to set an additional cold prewash at the beginning of each cycle.
There is NO need to press the button for every cycle; it remains active once pressed.
Start/Pause
Starts a new cycle or pauses the current one.
When the cycle starts or pauses, a double beep will sound. This button can also be used to
confirm a dishwasher parameter during configuration (hold down for 2 seconds).
Drain
Once a wash cycle has terminated, pressing this button drains the water, runs a regeneration
cycle (where required) and automatically turns the dishwasher off.
Confirm with the start/pause button; the display will read “UnLo” (Unload).
With automatic regeneration, “OFF” and “R” will flash until the end of the phase.
Repeat (where applicable)
Pressing this button reuses the water from the most recent rinse for the next cycle's
wash to speed up operation, in programs which have this option. This function is not
available if you have selected drying or automatic open at end of cycle.
Open door

17
BUTTONS
DESCRIPTION
The door opens automatically with an electric lock, and is only possible under certain
conditions.
Simply press the button; the door will open when it is released.
Select
Press the > button to move to the next program or < for the previous one; the selection
cycles from last to first and vice-versa depending on direction; the selected program is
displayed with “Pr” and the program number.
Hold down the button to scroll through the programs quickly.
5.5 Indicator LEDs –Meaning
Fig. 11 –In the display area of the control panel: central digit area and indicator LEDs around the perimeter
LED symbol
ON THE
DISPLAY
Meaning
No detergent (only if the level sensor is installed in the container)
No rinse aid (only if the level sensor is installed in the container)
No salt: Indicates that you should add salt. This is necessary in order for the
appliance to work –the wash program cannot be started if the indicator light
is on.
Regeneration: indicates that the resin is almost exhausted; run a regeneration
cycle. There are two ways to regenerate the resin:
a) Push the ON/OFF button to switch off the appliance, OFF will flash on the
display until the regeneration cycle has completed (about 5 minutes).
b) Push the Drain button (See 5.4.2) and wait until the appliance has finished
fully draining and regenerating (about 8 minutes). During regeneration, “OFF”
and “R” flash on the display.
During the regeneration phase the LED will flash - Duration of phase: approx.
6 minutes
Selected function: indicates that the corresponding function is selected,
depending on the model:
Left: automatic open door or dry
Right: repeat or additional prewash.
Start/Pause: wash cycle enabled/disabled.

18
1 : 16
If the dishwasher is stopped
The value gives the nominal cycle duration. The time LED also turns on. The
duration is approximate, depending on load, intake water temperature and
electrical connection.
If the cycle is in progress: Remaining cycle time
The selected cycle includes a final heat disinfection step –see table of
programs –only on models with this option.
Flashing during the thermodisifection phase
Alarm
The dishwasher has encountered a fault - caused by a malfunction or unusual
condition. The displays shows the a numerical code for the alarm. In the
alarms table in this manual, each code is given alongside components which
may have caused the event as an aid to troubleshooting.
Record all alarms and inform technical service accordingly in case of need.
tECH
The machine has exceeded the set number of hours of operation since
installation or its last service: contact technical service for routine
maintenance.
Press Start/Pause to ignore the warning and continue using the machine.
Perform scheduled maintenance as soon as possible to keep the machine in
good working order.
5.6 Loading tableware
Example loads
Bottom basket
Top basket
Fig. 12 –Example loads

19
5.7 Height adjustment of the upper basket
Adjustment procedure
The upper basket’s height can be adjusted so that larger dishware can be placed in the lower basket.
1) Remove the basket.
2) Open the retaining clip on both rails (see
white circle).
3) Remove it and reposition it by inserting the
upper wheels in the rail
(see white circle).
4) Close the retaining clip on both rails.
Upper basket low position Upper basket high position

20
5.8 Selecting the washing program
Selecting the washing program
Select the program available, referring to the models and versions in the next point,
depending on the type of soiling and the amount of tableware loaded into the baskets
To run a program:
1. If the dishwasher is off, switch it on by pressing the On/Off button (hold down for 2 seconds).
2. Close the door by pressing it in until it clicks closed. The buttons are only enabled when the door is
closed.
3. Select the required program with the selection buttons.
4. You can now view the nominal program duration by pressing the ON/OFF button.
5. Press the Start/Pause button to start the cycle
6. The start of the cycle is confirmed by two beeps.
7. Once the program has terminated, the display reads “End” alternating with the code of the program just
run.
NOTE - DISPLAY CONTENTS WITH CYCLE RUNNING
While the cycle is running, the following appear on the display 5 second intervals, in this order:
- Code of current program, e.g. P3
- Time remaining e.g.: 26
- Tank temperature e.g.: 55°C
Only for models with dryer:
During the drying phase the displayed temperature is that of the air entering the tank; this
temperature is only in the air duct and not uniform in the tank
NOTE –PROGRAM RUN TIMES
The run times displayed on the control panel are approximate; the temperature and pressure of
the water supply, as well as the tableware load, will affect the actual duration
The times provided refer to the machine operating with a 400 V three-phase electricity supply
and 55°C hot water supply, with no load.
If the peristaltic kit is installed, the cycle time is extended by at least one minute.
This does not include the times of the initial resin washing phases
If necessary, a resin regeneration cycle is run at the end of each program and a resin wash at the
start of the next, to ensure that the softener system works properly.
If the Repeat function is selected, these cycles do not run automatically, but must be selected by
the operator when the warning message displays on the control panel (R).
The resin regeneration and wash procedures are not included in the theoretical cycle time shown
initially on the display.
If the Repeat function is enabled, leave the door ajar after unloading the dishes if the appliance is
not to be reused immediately; if it will not be used for some time, perform a drain cycle before
reusing it to prevent foaming.
Other manuals for SW260
1
This manual suits for next models
7
Table of contents
Other Smeg Dishwasher manuals

Smeg
Smeg DWI614 User manual

Smeg
Smeg DF1255W User manual

Smeg
Smeg STX13OL User manual

Smeg
Smeg Dishwasher KEX705 User manual

Smeg
Smeg 19 590 0355 01 User manual

Smeg
Smeg DI453 User manual

Smeg
Smeg 3LBS955 User manual

Smeg
Smeg DWAU6314X2 User manual

Smeg
Smeg Dishwasher DWD1E User manual

Smeg
Smeg LSA6047X User manual