Smeg UW6070D Series Reference manual

Lava-oggetti
Serie UW6070D –UW6070DPS
UW60132D - UW60132DPS
Lave-utensils Série UW6070D - UW6070DPS - UW60132D -
UW60132DPS
Warewashers Range UW6070D - UW6070DPS - UW60132D -
UW60132DPS
Universal-Spülmaschinen Serie UW6070D - UW6070DPS -
UW60132D - UW60132DPS
Lava-objetos Serie UW6070D - UW6070DPS - UW60132D -
UW60132DPS
Котломойки Серии UW6070D - UW6070DPS - UW60132D -
UW60132DPS

1

2
MISURE D'INGOMBRO
DIMENSIONS / OVERALL DIMENSIONS / ABMESSUNGEN /
DIMENCIONES / ВНЕШНИЕ РАЗМЕРЫ
UW6070D
UW6070DPS
D =
SCARICO 1½", VIDANGE 1½", DRAIN 1½"; ABFLUSS 1½"; DESAGÜE 1½"; СЛИВ 1½"
C =
CARICAMENTO ACQUA ¾" GAS; CHARGEMENT EAU ¾" GAZ; WATER INLET ¾" GAS; ZUFLUSS ¾" GAS; CARGA AGUA ¾" GAS;
НАБОР ВОДЫ ¾" GAS
E =
ALLACCIAMENTO ELETTRICO; BRANCHEMENT ELECTRIQUE; ELECTRIC CONNECTION; ELEKTRISCHER ANSCHLUSS;
CONEXION ELECTRICA; ЭЛЕКТРИЧЕСКОЕ ПОДКЛЮЧЕНИЕ

3
MISURE D'INGOMBRO
DIMENSIONS / OVERALL DIMENSIONS / ABMESSUNGEN /
DIMENCIONES / ВНЕШНИЕ РАЗМЕРЫ
UW60132D
UW60132DPS
D =
SCARICO 1½", VIDANGE 1½", DRAIN 1½"; ABFLUSS 1½"; DESAGÜE 1½"; СЛИВ 1½"
C =
CARICAMENTO ACQUA ¾" GAS; CHARGEMENT EAU ¾" GAZ; WATER INLET ¾" GAS; ZUFLUSS ¾" GAS; CARGA AGUA ¾" GAS;
НАБОР ВОДЫ ¾" GAS
E =
ALLACCIAMENTO ELETTRICO; BRANCHEMENT ELECTRIQUE; ELECTRIC CONNECTION; ELEKTRISCHER ANSCHLUSS;
CONEXION ELECTRICA; ЭЛЕКТРИЧЕСКОЕ ПОДКЛЮЧЕНИЕ

4
CARATTERISTICHE TECNICHE / CARACTÉRISTIQUES TECHNIQUES /
TECHNICAL FEATURES / TECHNISCHE DATEN / CARACTERISTICAS
TECNICAS / ТЕХНИЧЕСКИЕ ХАРАКТЕРИСТИКИ
UW6070D
UW6070DPS
UW60132D
UW60132DPS
PRODUZIONE ORARIA (CESTI) / DÉBIT PANIERS-H /
BASKETS PER HOUR / KÖRBE PRO STUNDE / RENDIMIENTO HORARIO /
ЧАСОВАЯ ПРОИЗ-СТЬ (КОРЗИНКИ)
30/15
30/15
ALIMENTAZIONE ELETTRICA / ALIMENTATION ÉLECTRIQUE / ELECTRIC
FEEDING / ELEKTRISCHER ANSCHLUSS / ALIMENTACION ELECTRICA /
ЭЛЕКТРОПИТАНИЕ
230 3/50
4003N/50
230 3/50
4003N/50
POTENZA MAX ASSORBITA / PUISSANCE TOTALE /
TOTAL POWER / GESAMTANSCHLUSSWERT / POTENCIA MAXIMA /
МАКС.ПОТРЕБЛЯЕМАЯ МОЩНОСТЬ
12.7 kW
18.6 kW
RESISTENZA BOILER / RÉSISTANCE BOILER / BOILER HEATING ELEMENT
/ BOILERHEIZUNG / RESISTENCIA CALDERIN / НАГРЕВАТЕЛЬ БОЙЛЕРА
9 kW
12 kW
RESISTENZA VASCA / RÉSISTANCE CUVE / TANK HEATING ELEMENT /
TANKHEIZUNG / RESISTENCIA CUBA / НАГРЕВАТЕЛЬ ЕМКОСТИ
4.5 kW
6 kW
POTENZA POMPA LAVAGGIO VENTILATA / PUISSANCE POMPE DE
LAVAGE VENTILÉE / VENTILATED WASH PUMP / GELÜFTETE
WASCHPUMPE / POTENCIA BOMBA DE LAVADO VENTILADA /
МОЩНОСТЬ НАСОСА МОЙКИ ВЕНТ.
2.2 + 1.5 kW
3 x 2.2 kW
PORTATA POMPA DI LAVAGGIO / DÉBIT POMPE DE LAVAGE / WASH
PUMP DELIVERY / FÖRDERMENGE PUMPE /
CAUDAL BOMBA DE LAVADO / ПРОИЗ-СТЬ НАСОСА МОЙКИ
1500 l/min
2400 l/min
POTENZA POMPA DI RISCIACQUO / POMPE DE RINÇAGE /
RINSE PUMP / NACHSPÜLPUMPE / BOMBA DE ACLARADO / ПРОИЗ-СТЬ
НАСОСА ОПОЛАСКИВАНИЯ
0.3 kW
0.6 kW
CAPACITÀ VASCA / CAPACITÉ CUVE /TANK CAPACITY
TANKINHALT / CAPACIDAD CUBA / ОБЪЕМ ЕМКОСТИ
70 l
130 l
CAPACITÀ BOILER / CAPACITÉ BOILER / BOILER CAPACITY /
BOILERINHALT / CAPACIDAD CALDERIN / ОБЪЕМ БОЙЛЕРА
17 l
17 l
PRESSIONE ACQUA DI RISCIACQUO / PRESSION EAU DE RINÇAGE / RINSE
WATER PRESSURE / NACHSPÜLWASSERDRUCK / PRESION AGUA DE
ACLARADO / ДАВЛЕНИЕ ВОДЫ ПРИ ОПОЛАСКИВАНИИ
1 4 bar
1 4 bar
DUREZZA DELL'ACQUA / DURETÉ EAU / WATER HARDNESS /
WASSERHÄRTE / DUREZA DE AGUA / ЖЕСТКОСТЬ ВОДЫ
8 14 °F
8 14 °F
TEMPERATURA MAX ACQUA IN INGRESSO / TEMPERATURE MAX EAU
REMPLISSAGE / MAX. TEMPERATURE OF WATER SUPPLY / MAX
TEMPERATUR ZUFLUSSWASSER / TEMPERATURA MAXIMA ENTRADA
AGUA / МАКС.ТЕМПЕРАТУРА ВОДЫ НА ВХОДЕ
50 °C
50 °C
CONSUMO ACQUA PER CICLO / QUANTITÉ EAU PAR CYCLE / WATER
CONSUMPTION PER CYCLE / WASSERVERBRAUCH PRO ZYKLUS /
CONSUMO AGUA POR CICLO / ПОТРЕБЛЕНИЕ ВОДЫ ЗА ЦИКЛ
6 l
7.5 l
CICLO DI LAVORO / CYCLE DE LAVAGE / WASH CYCLE /
SPÜLPROGRAMM / CICLO DE LAVADO / ЦИКЛ РАБОТЫ
2 - 4 min +
2 - 4 min +
CESTO BASE / PANIER BASE / BASIC BASKET / GRUNDKORB / CESTO
BASE / КОРЗИНКА БАЗА
1
1
DIMENSIONI CESTO / DIMENSIONS PANIER / DIMENSIONS OF BASKET /
KORBABMESSUNGEN / DIMENCIONES CESTA / РАЗМЕРЫ КОРЗИНКИ
600 x 700
600 x 1320
CESTO INOX / PANIER INOX / STAINLESS-STEEL RACK /
KORB AUS STAHL / CESTA EN ACERO / КОРЗИНОК ИЗ НЕРЖАВЕЙКИ
1
1
DIMENSIONI CESTO INOX / DIMENSIONS PANIER / RACK DIMENSIONS /
KORBABMESSUNGEN / DIMENCIONES CESTA / РАЗМЕРЫ КОРЗИНКИ ИЗ
НЕРЖАВЕЙКИ
570 x 570
570 x 570
CESTO PORTA MESTOLI / PORTE LOUCHES / LADLE RACK /
KORB FÜR KOCHLÖFFEL / PORTA CAZOS / КОРЗИНОК ДЛЯ ПОЛОВНИКОВ
1
/
CESTO TEGLIE 9 SPAZI / PANIER 9 PLATEAUX / RACK 9 TRAYS /
KORB 9 BLECHE / CESTA 9 BANDEJAS / КОРЗИНОК ДЛЯ ПРОТИВНЕЙ С9
ДЕЛЕНИЯМИ
1
/
CESTO TEGLIE 5 SPAZI / PANIER 5 PLATEAUX / RACK 5 TRAYS /
KORB 5 BLECHE / CESTA 5 BANDEJAS / КОРЗИНОК ДЛЯ ПРОТИВНЕЙ С5
ДЕЛЕНИЯМИ
/
1

5
CARATTERISTICHE TECNICHE / CARACTÉRISTIQUES TECHNIQUES /
TECHNICAL FEATURES / TECHNISCHE DATEN / CARACTERISTICAS
TECNICAS / ТЕХНИЧЕСКИЕ ХАРАКТЕРИСТИКИ
UW6070D
UW6070DPS
UW60132D
UW60132DPS
PESO NETTO / POIDS NET / NET WEIGHT / NETTOGEWICHT / PESO NETO /
ВЕС НЕТТО
230 kg
315 kg
PESO LORDO / POIDS TOTAL / TOTAL WEIGHT / BRUTTOGEWICHT / PESO
BRUTO / ВЕС БРУТТО
275 kg
350 kg
EMISSIONE ACUSTICA (secondo DIN 45635) / NIVEAU ACOUSTIQUE (selon
DIN 45635) / NOISE LEVEL (according to DIN 45635) /
ARBEITSPLATZBEZOGENER EMISSIONSWERT (laut DIN 45635) / NIVEL
RUIDO ( acuerdo DIN 45635) / ШУМНОСТЬ (согласно DIN45635)
<70 dB (A)

22
WARE WASHERS
RANGE UW6070D –UW6070DPS - UW60132D -
UW60132DPS
INSTALLATION, USE
AND MAINTENANCE

23
WARNINGS
The appliance is to be used for washing baking trays, ice cream basins, baking tins, saucepans
and kitchen utensils.
Read the instructions carefully before installation, use and maintenance of the appliance.
The installation has to be performed by qualified personnel following the manufacturer's
instructions given in the provided manual.
The appliance should only be used by trained personnel.
In the event of breakdown or malfunction, switch off the appliance and seek help exclusively
from an authorized technical assistance centre.
The manufacturer declines any liability for damages to persons or things caused by the non-
compliance with the instructions of this manual, by non-correct use, by the alteration of any
part of the appliance and by the use of non-original spare parts.
INSTALLATION
Noise level <70 dB (A)
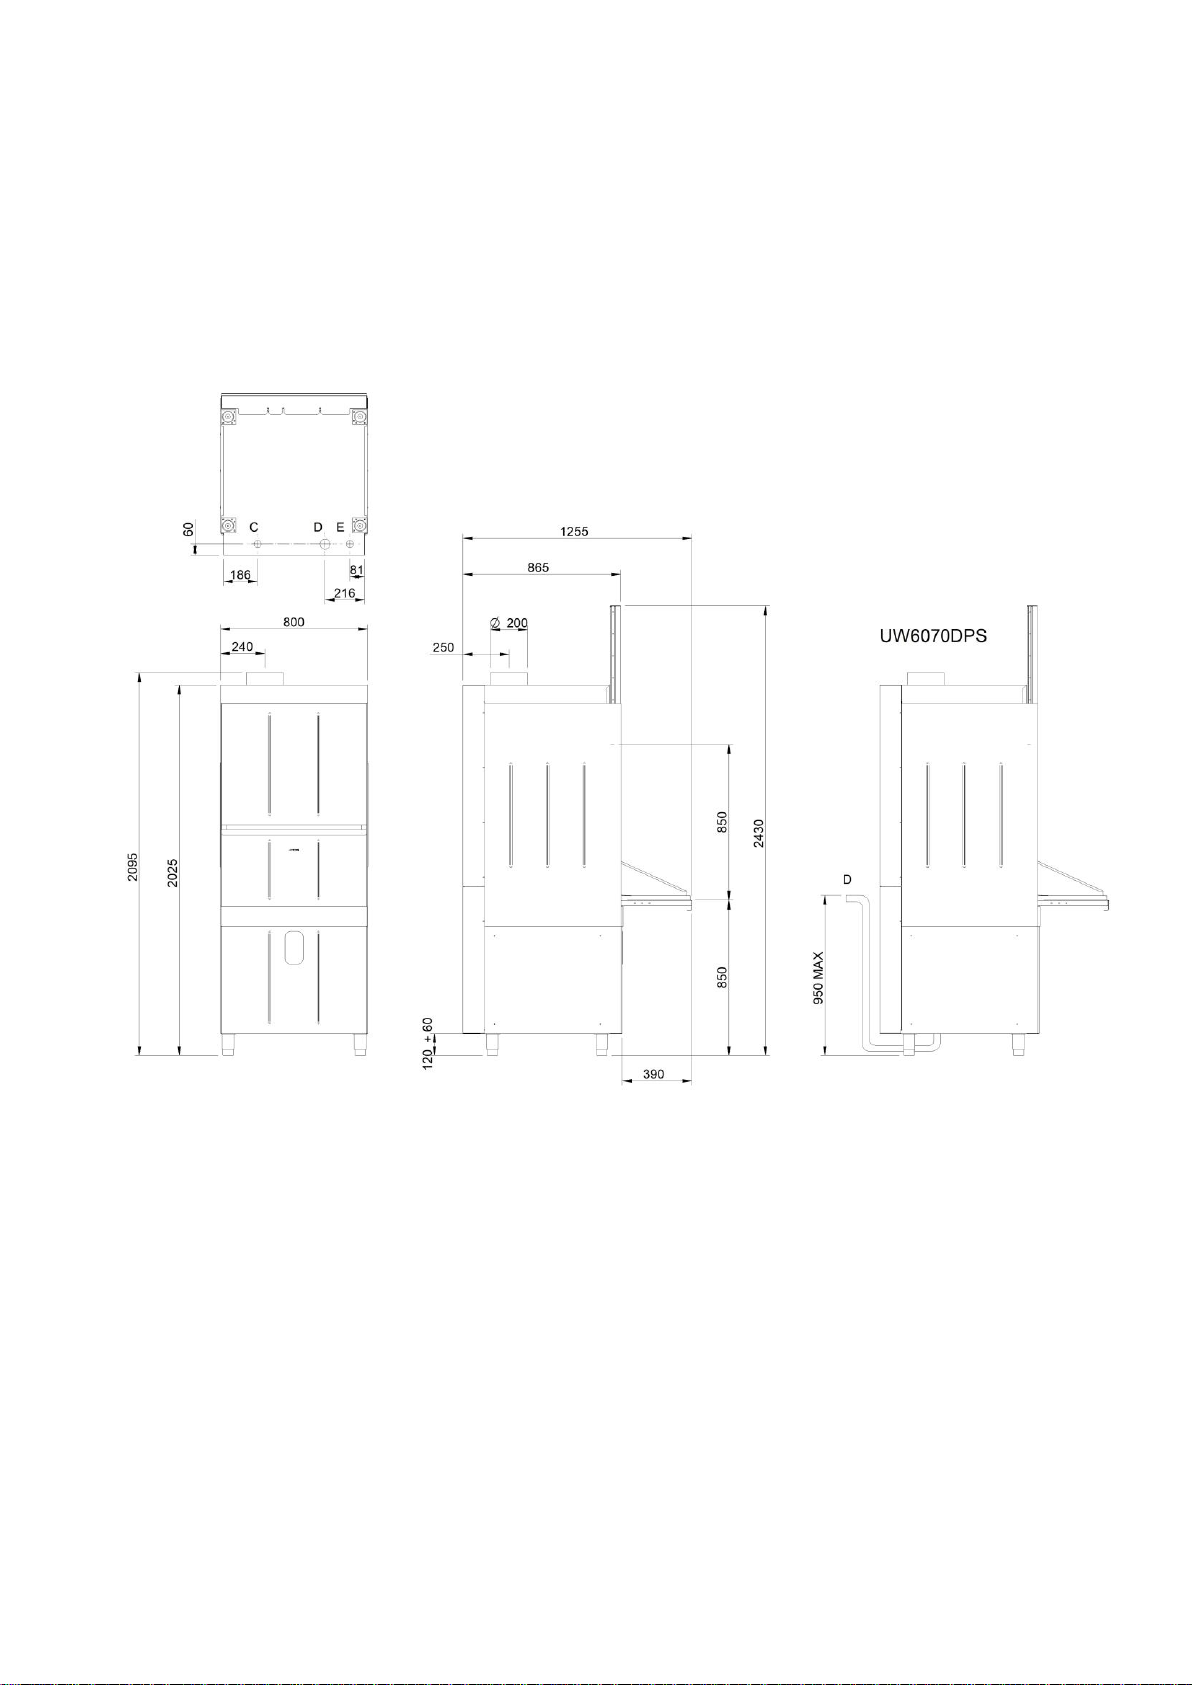
WATER CONNECTION
The appliance installation requires the connection of hydraulic flexible pipes, supplied together with
the appliance and in particular:
3/4" water supply hose GAS;
Ø1½ " drain hose.
Except for models with built-in drain pump, connect the drain hose of the appliance to a suitable
drain waste system, through a siphon on the floor near the appliance itself. Connect the filling pipe
with a 3/4" GAS water supply protected by an interception valve.
Before proceeding with the water connection, check the following conditions:
The water supply pressure, measured with open valve, has to vary between 1 and 4 bars. If the
water supply pressure is lower than 1 bar, install a booster pump with delivery of 30 litres/min; if
it is higher than 4 bars, a pressure reducer set at 4 bars maximum has to be installed.
The water hardness has to be between 8° and 14° F (0,8 - 1,4 mmol/l). If the water is harder,
install a water softener suitable for the water quantity used by the appliance containing 16 litres
of resin at least.
WARNING: If the appliance works continuously with short cycles, it is necessary to connect
the appliance to hot water at 50° C.
ELECTRIC CONNECTION
The machine is not supplied with a plug: it has to be connected to the electric mains only by
qualified personnel through a main switch with circuit breaker on the wall, suitable for the
maximum power installed, in order to have the possibility to exclude the appliance from the electric
mains during the preliminary operations or the maintenance. When not in use, it is highly
recommended to always disconnect the appliance from the electric mains.
The appliance has to be connected also to a equipotential system of compensation through a screw,
placed on the lower part of the appliance back and marked .
The appliance is conceived to work under the following specifications:
400 V (3N) 50 Hz
230 V (3N) 50 Hz

24
The manufacturer's arrangement matches the first specification (that is: 400V, 3-phases, with
neutral); the other can be achieved following the provided wiring diagram. In particular, as for the
upper washing pump (1,5 kW) of the models UW6070D and UW6070DPS, in order to pass to 230
V three-phased, simply interpose the spacing block between the pump connector and the wiring
connector. The spacing block is always supplied with all the models and it is placed near the cables
of the washing pump, fixed with a clamp.
WARNING: While electrically connecting appliances working with 3-phase alternating current,
check the rotating direction of the pump motor.
WARNING: We highly recommend that the appliance is properly earthed.
The manufacturer assumes no liability for damage resulting from not observing this safety rule.
The manufacturer also assumes no liability for damage resulting from faulty electric connection.
USE
PRELIMINARY STEPS
Before starting the appliance, perform the following operations:
Check that the filling and draining hoses supplied with the appliance are connected to the water
mains.
The appliance is provided with a built-in rinse aid dispenser and a built-in a detergent dispenser.
Connect the dispensers to their relevant containers through the intake pipes on the back of the
appliance. The black pipe is for detergent, while the transparent pipe is for rinse aid product. Use
only low-density products; otherwise the dispensers may be obstructed or break. It is highly
recommended to use industrial chimicals only. Avoid foaming products.
If present, check the right positioning of the detergent probe, because using the dispenser dry can
damage or break the device.
Check the right positioning of the pump intake filters and of the surface filters.
Shut the door and, if it presents, open the external water valve.

25
WATER FILLING AND HEATING
Picture 1
A Boiler thermometer
B Lamp “boiler heating”
C Tank thermometer
D Lamp “tank heating”
E Main switch
F Lamp “machine on”
G Selector short / long / continuous cycle
H Lamp “short cycle”
I Lamp “long cycle”
L Lamp “continuous cycle”
M Start switch / switch “tank draining”
N Lamp “tank draining”
With reference to picture 1, the appliance is switched on by pushing the main switch (E); at the
same time the warning lamp (F) lights on.
The appliance automatically fills water into the tank up to the set level and it switches on the boiler
and tank heating elements. The lighting of the lamps (B) and (D) shows that the heating elements
both in the boiler and in the tank are working. When the right temperatures are achieved, the lamps
(B) and (D) switch off, so to show that the appliance is ready for starting the washing cycle. Check
that the boiler thermometer (A) and the tank thermometer (C) are at the pre-set temperatures.
ATTENTION! During the installation, when the Break Tank is empty, switch on the appliance
and keep the door open, so that the Break Tank fills up before putting the kitchenware into the
appliance.
N.B. The internal thermostats are set by the manufacturer at the following temperatures:
boiler water temperature: 78 °C;
tank water temperature: 60 °C.
A
B
C
D
E
F
G
H
I
L
M
N

26
WASHING CYCLE
Open the door of the appliance.
Remove all the solid remainders from the kitchen utensils, empty pots and saucepans, and soften
any encrustations with specific products. Then, place the kitchenware in the baskets.
Place ice cream basins, pots, pans, buckets, saucepans and other kitchenware in the basket with
their concave part downwards. Place ladles and similar kitchen utensils in their suitable
container provided as standard equipment. Do not place one item on the other.
Place baking trays and tins into their suitable stainless steel baskets with their dirty part
downwards. A number of different racks for trays are available according to the tray
dimensions.
Slide the basket into the appliance and close its door.
Select the washing cycle:
When switched on, the appliance automatically sets itself to work according to the short
washing cycle, suitable for washing not very dirty kitchenware. This cycle is shown by the
lighting of the lamp (H).
In order to select the long washing cycle, push the selector (G); this operation is shown by
the turning off of the lamp (H) and the lighting of the lamp (I).
In order to select the continuous washing cycle, suitable for washing kitchenware
particularly dirty and encrusted, push the selector (G); this operation is shown by the turning
off of the lamp (I) and the lighting of the lamp (L).
In order to select the short washing cycle, push again selector (G); this operation is shown
by the turning off of the lamp (L) and by the lighting of the lamp (H).
It is not possible to pass from short to long washing cycle or vice versa if the washing cycle
has already started.
After selecting the washing cycle, push the START button (M). The appliance automatically
starts the washing and then the rinsing cycle according to the cycle selected –as shown by the
lamp (H), (I) or (L) blinking –starting also the rinse aid dispenser. Between the washing and
the rinsing cycle the appliance makes a dripping pause. When the cycle is finished, the lamp
(H), (I) or (L) stops blinking and stays on.
On demand, it is available a device called “THERMOLOCK”, which lengthens the washing
cycle until when the water in the boiler achieves the pre-set right temperature.
If the continuous washing cycle has been selected, it is necessary to push the button (G) in order
to stop washing and pass to the rinsing cycle.
In order to start the following cycle, repeat all the operations.
To switch off the appliance, make sure that it has finished its working cycle and then push the
main switch (E). This operation is shown by the turning off of the lamp (F). When the appliance
is switched on again, it will perform the last washing cycle performed.
MODELS WITH BUILT-IN DRAIN PUMP UW6070DPS UW60132DPS
In the versions with built-in drain pump, the drain pump starts working under the following
conditions.
When the filling solenoid valve is working and, in pre-set models only, when the rinsing pump is
working. This is the normal working condition of the drain pump, which eliminates the
exceeding water in the tank through the overflow pipe during the filling or rinsing phases. This
operation is signaled by the turning on of the lamp (N).
When the machine is switched off through the main switch (E) and you push the button “tank
draining” (M). Fist of all, remove the overflow pipe, so that water can be completely drained
from the washing tank. This operation is signaled by the turning on of the lamp (N) and it can be
carried out with the door open. It takes 5 minutes to drain water from the tank; when the draining
comes to its end, the lamp (N) turns off. The tank draining can be stopped by pushing the button
“tank draining”(M). If you push the button again, the tank draining begins again. In order to

27
have the dishwasher ready for new working cycles, put the overflow pipe back into its place,
close the door, and switch on the machine through the main switch (E). The dishwasher fills
water into the tank automatically up to the set level and it switches on the boiler and tank heating
elements.
ADJUSTING DETERGENT AND RINSE AID PRODUCTS
It is possible to adjust the concentration of detergent and rinse aid products by acting on the trimmer
of the relevant dosing device, which is grey for detergent and blue for rinse aid product.
Trimmers are set by the manufacturer in their middle position, which grants good results in most
cases. Particularly hard water or different kind of chemicals may require trimmer adjustments. For
higher detergent and rinse aid product concentration turn the trimmer of their relevant dosing device
clockwise; for lower concentration turn it anticlockwise.
Detergent: The dispenser pours about 2.5 g of product per each motor rotation.
Trimmer in minimum position (i.e. completely anticlockwise) = no detergent pouring
Trimmer in maximum position (i.e. completely clockwise) = 20 rotations/minute
Trimmer in middle position (i.e. as set by the manufacturer) = 10 rotations/minute
Rinse aid product: The dosing device pours about 1 g of product every 10 seconds of dosing.
Trimmer in minimum position (i.e. completely anticlockwise) = no product pouring
Trimmer in maximum position (i.e. completely clockwise) = 30-seconds dosing
Trimmer in middle position (i.e. as set by the manufacturer) = 15-seconds dosing
In order to adjust the concentration of detergent and/or the rinse aid product, remove the appliance
lower front panel (the right panel in case of the model UW60132D). Turn the trimmer of relevant
dosing device clockwise or anticlockwise with a small slotted screwdriver.
SAFETY SYSTEMS
The opening of the door stops every operation of the appliance, except for the heating of the
water in the boiler and in the tank. The closing of the door re-starts any interrupted operation.
The level switch checks the water level in the tank automatically and it enables the appliance to
work only when the heating elements are below the water level both in the boiler and in the
tank.
The washing pumps are provided with a thermal control, which stops its working in case of
thermal overload.
An overflow pipe drains the exceeding water that has been brought in during the rinsing cycle
and it enables a continuous change of water in the tank. It also avoids the water overflowing in
case of bad working of the pressure switch.
The appliance is equipped with an overflow pipe in the small tank of the Break Tank, too, so
that the possibly exceeding water is drained into the wash tank.
Power supplies are protected against any accident through a transformer.
It is highly recommended to turn off the tap of filling water when the appliance is not working.
WARNING MESSAGES
If the boiler thermometer (A) or the tank thermometer (C) displays the letter “E”, this is an
indication that the thermometer probe is switched off or out of order. If this is the case, make sure
that the probe is properly connected to the control panel. It might be necessary to replace the probe.
MAINTENANCE
Before any cleaning or performing any maintenance always disconnect the appliance from the
power supply.

28
SHOWER (pre-set models only)
To use the shower perform the following operations:
Turn the tap in the position "open";
Take the shower from its place and turn it where necessary.
When not in use, we highly recommend turning the tap in the position “close” in order to
protect the shower membrane.
DRAINING AND CLEANING
Switch off the appliance by pushing the main switch (E); this operation is shown by the turning
off of the lamp (F).
Push the START switch (M). The valve for automatic draining opens; the lamp (N) switches on
and the tank starts draining water. This operation can be performed with the door open.
The draining of the tank lasts 5 minutes and the lamp (N) switches off when finished. The
draining can be stopped by pushing the START switch (M). If the switch is pushed again, the
draining starts from the beginning.
Clean the internal part of the tank, removing the solids on its bottom.
Check the openings of the washing arms carefully and clean them if they are obstructed.
Remove the surface basket and cassette filters and the pumps intake filters. Clean them carefully
using a non-metallic brush.
Drain the water from the tank and clean the tank several times per day, in particular when the
water in the tank is very dirty.
After tank draining and cleaning, put the filters back into their place.
In order to have the appliance ready for new working cycles, close the door and switch on the
appliance through the main switch (E). The appliance fills water into the tank automatically up to
the set level and it switches on both the boiler and tank heating elements..
STAINLESS STEEL PARTS CLEANING
Clean all the stainless steel parts accurately by using soaped water or common degreasing products.
Do not use abrasive powders or iron wool.
When cleaning, avoid direct or high-pressure water sprays on the appliance: this might
damage electric appliances.
PERIODIC MAINTENANCE
Periodically check the openings of the rinse jets and remove any possible blockages.
When necessary, descale and disinfect the tank by using products normally available on the market.
This operation is particularly recommended for the good working of the heating elements.
It is possible to clean the washing arms simply by removing the plastic plugs placed at their ends.
The plugs present a bayonet coupling and they can be easily removed by turning them anti-
clockwise, as shown on the plug itself.
Remove the feeding pipe from the solenoid valves and check their intake filter.
If the appliance is not being used for a long time, we highly recommend emptying the pump scroll
completely through its plug, even if the pumps installed are self-emptying. We recommend also
emptying the boilers and wiping all stainless steel surfaces with a cloth soaked in Vaseline oil, so to
provide them with a protective film.

29
Information for electrical and electronic devices used in EU countries
According to EU directives, devices marked with the following symbol may not be disposed of together with
normal household waste.
To dispose of your used device, please use the locally available differentiated collection system or consult your retailer
when you buy an equivalent product.
By actively using the provided collection systems, you are contributing to the reuse, recycling and enhancement of
electrical or electronic devices and protecting the environment and health.
Abusive product disposal is punishable by law in accordance with current legislation.
The packaging materials (plastic bags, polystyrene, cardboard, etc.) have to be collected according to the type of
material (e.g. cardboard, wood, plastic materials, etc.) and be disposed of in compliance with the norms in force.
This manual suits for next models
3
Table of contents
Other Smeg Dishwasher manuals

Smeg
Smeg DI607 User manual

Smeg
Smeg LSA1257BE User manual

Smeg
Smeg STA613 User manual

Smeg
Smeg Dishwasher VG612462 User manual

Smeg
Smeg STL324BQLLW User manual

Smeg
Smeg HTY511DSUK User manual

Smeg
Smeg DI612CA User manual

Smeg
Smeg DDW119.1 User manual

Smeg
Smeg DWAI152XT User manual

Smeg
Smeg PGV4501 User manual