Smeg FA350X User manual

MANUALE D’USO
INSTRUCTION MANUAL
NOTICE D’UTILISATION
GEBRAUCHSANWEISUNG
GEBRUIKSAANWIJZING
MANUAL DE USO
MANUAL DE UTILIZAÇ
ÃO
IT
GB
FR
DE
NL
ES
PT
FRIGORIFERO
REFRIGERATOR
RÉFRIGÉRATEUR
KÜHLSCHRANK
KOELKAST
FRIGORIFICO
FRIGORIFICO
5300029949

4
GR
45
6
2
1
3
7
8
A
9
2 3
1
A
B
1-9
10
11
12
13
14
10
15
16
22
23
25
17
18
19
21
20
98765432
1

6
GR
16 11
17
5
GR
12 13
1514
B
A
220-240V max. 15W, E14
11
11
10

it Indice
Avvertenze per lo smaltimento e la sicurezza 4, 5
Norme 5
Considerare la temperatura ambiente 5
Installazione dell'apparecchio 6
Conoscere l'apparecchio 7–9
Inserimento e selezione della temperatura 10
Disinserire, mettere fuori servizio l’apparecchio 11
Sistemazione degli alimenti 11, 12
Congelare e conservare 13–15
Pulizia 15
Consigli per il risparmio energetico 16
Avvertenze sui rumori di funzionamento 16
Eliminare da soli piccoli guasti 17, 18
Servizio assistenza clienti 18
en Index
Disposal and safety information 19, 20
Regulations 20
Observe ambient temperature 20
Installation 21
Getting to know your appliance 22–24
Switching ON and setting temperatures 25
Switching OFF and longer periods of disuse 26
Food arrangement 26, 27
Freezing and storing 28, 29
Cleaning 30
Power saving tips 30
Information about operating noises 31
Minor problems and how to rectify them yourself 31, 32
Customer Service 33
fr Sommaire
Mise au rebut, conseils de sécurité et consignes 34
Dispositions générales 35
Contrôler la température ambiante 35
Installation de l'appareil 36
Faire la connaissance de l’appareil 37–39
Mise en service et sélection de la température 40
Coupure et mise hors service de l’appareil 41
Rangement des aliments 41, 42
Congélation et stockage 43–45
Nettoyage 45
Economies d'énergie 46
Remarques sur les bruits de fonctionnement 46
Réparer soi-même les petites pannes 47, 48
Service après-vente 48
de Inhaltsverzeichnis
Hinweise zur Entsorgung und Sicherheit 49, 50
Bestimmungen 50
Umgebungstemperatur beachten 50
Gerät aufstellen 51
Gerät kennenlernen 52–54
Einschalten und Temperaturwahl 55
Ausschalten, Gerät stillegen 56
Lebensmittel einordnen 56, 57
Gefrieren und Lagern 58, 59
Reinigen 60
Energiespartips 60
Hinweise zu Betriebsgeräuschen 61
Kleine Störungen selbst beheben 61, 62
Kundendienst 63
nl Inhoud
Afvoeren van de verpakking en van
uw oude apparaat, veiligheidsvoorschriften
64, 65
Bepalingen 65
Let op de omgevingstemperatuur 65
Plaatsing van het apparaat 66
Kennismaking met het apparaat 67–69
Inschakelen en temperatuurkeuze 70
Uitschakelen en buiten werking stellen
van het apparaat 71
Levensmiddelen inruimen 71, 72
Invriezen en opslaan 73–75
Schoonmaken 75
Tips om energie te besparen 76
Aanwijzingen bij bedrijfsgeluiden 76
Kleine storingen zelf verhelpen 77–78
Servicedienst 78
es Indice
Consejos para la eliminación y el desguace
del embalaje de los aparatos usados 79
Advertencias de seguridad 79, 80
Normativas 80
Prestar atención a la temperatura del entorno 80
Instalación y montaje de la unidad 81
Familiarizándose con la unidad 82–84
Conexión del aparato a la red eléctrica /
Seleccionar la temperatura 85
Desconexión y paro del aparato 86
Colocación de alimentos 86, 87
Congelar y guardar los alimentos 88–90
Limpieza de la unidad 90
Consejos para ahorrar energía 91
Advertencias sobre los ruidos
de funcionamiento del aparato 91
Pequeñas averías de fácil solución 92, 93
Servicio de Asistencia Técnica 93
pt Índice
Indicações sobre reciclagem e segurança 94, 95
Determinações 95
Ter em atenção a temperatura ambiente 95
Instalação do aparelho 96
Familiarização com o aparelho 97–99
Ligação e selecção de temperatura 100
Desligar e desactivar o aparelho 101
Arrumação dos alimentos 101, 102
Congelação e conservação 103–105
Limpeza 105
Conselhos para poupar energia 106
Indicações sobre ruídos de funcionamento 106
Eliminação de pequenas anomalias 107, 108
Assistência Técnica 108

19
GB
Disposal and safety information
Notes on disposal
Old appliances still have some residual
value. An environment-friendly method
of disposal will ensure that valuable raw
materials can be recovered and used again.
Unplug your old appliance, cut through the
mains cable and throw away cable and plug
together.
Remove the door lock so that children at
play cannot become trapped inside and risk
suffocation.
The refrigerant used in fridge/freezers and
the gases in the insulation material require
special disposal procedures. Ensure that
none of the pipes on the back of the
appliance are damaged prior to disposal.
Your new appliance was protected by
adequate packaging while it was on its way
to you. All materials used for this purpose
are environment-friendly and suitable for
recycling. Please contribute to protecting the
environment by disposing of the packaging
appropriately.
Do not allow children to play with any
parts of the packaging. There is a risk of
suffocation by the cardboard boxes and
plastic wrapping.
Up-to-date information concerning options
for disposing of your old appliance and the
packaging from the new one can be obtained
from your retailer or local council office.
Safety information
Before starting the appliance for the first
time, you should read the information
contained in the operating and installation
instructions carefully. This information is vital
for the installation, operation and servicing
of the appliance.
Keep the operating and installation
instructions in a safe place and remember to
hand them over to any subsequent owner.
The manufacturer shall not be liable if the
following instructions are not observed:
lNever start up an appliance showing any
signs of damage. If in doubt, consult your
dealer.
lInstallation and connection of the
appliance must be carried out according
to the installation instructions. Supply
conditions and data must coincide with
the data on the rating plate.
lDo not under any circumstances use
a steam cleaner on this appliance. The
steam could come into contact with live
parts of the appliance and cause a short-
circuit or electric shock.
lElectrical safety of the appliance is only
guaranteed if the household earthing
system has been installed in compliance
with regulations.
lDisconnect appliance from the mains in
case of malfunction and when cleaning or
servicing the appliance. Either withdraw
the plug or turn off at the fuse. Pull the
plug itself and not the cable.
lRepairs and maintenance of the appliance
should only be performed by a qualified
technician. Incorrect repairs carried out
by someone unqualified are a potential
source of danger that may have critical
consequences for the user of the
appliance.
lBottles containing high-proof alcoholic
drinks should be properly sealed and
stored standing up.
Products that make use of a flammable
propellant gas (e.g. whipped cream
sprays, aerosols) and explosive
substances should not be stored inside
this appliance – explosion hazard!
lLiquids in bottles and cans, in particular
carbonated drinks, should never be stored
in the freezer as the bottles and cans will
burst.
lDo not cover or block the vents or grilles
of your appliance.
lDo not use the base panel, pull-out parts,
doors etc. to stand or lean on.

21
GB
20
GB
Installation
Siting
A dry and adequately ventilated room is the
best location for installing the appliance.
Remember that the appliance should not be
exposed to direct sunlight, nor should it be
close to a direct source of heat such as a
cooker, radiator, etc. Where installation close
to a heat source is unavoidable, ensure
that a suitable insulating panel is used or
maintain the following minimum clearances
between the appliance and the heat source:
3 cm clearance (electric cookers)
30 cm clearance (oil or coal-fired stoves).
If the appliance is placed next to another
refrigerator or freezer, keep a minimum 2 cm
clearance at the side in order to prevent
condensation.
The appliance must be stable and level. To
compensate for an uneven floor, use the two
height-adjustable feet at the front of the
appliance (Fig. G).
Two castors at the rear of the appliance
facilitate installation into a recess.
Electrical connection
Only connect appliances to a 220–240 V/
50 Hz a.c. supply by means of a safety
socket installed in accordance with
regulations.
Make sure that the socket is protected by
a 10 amp fuse or higher.
With appliances destined for non-European
countries, check the rating plate to make
sure that supply voltage and type of current
indicated coincide with the values of your
power supply. The rating plate is located at
the bottom left of the refrigerator (Figure F).
In the event that the mains cable needs to
be replaced, this must only be carried out by
a service technician of the manufacturer.
Warning! NEVER connect the appliance to
electronic energy saver plugs (e.g. Sava
plug) or to power inverters which convert
the direct current to 230 V alternating
current (e.g. solar equipment, power
supplies on ships).
Ventilation
Figure 3
The warm air generated at the back of
the appliance must be allowed to escape
unhindered. Otherwise the refrigerating
machine will have to work harder which in
turn increases energy consumption. For this
reason, never cover up the vents and grilles.
After shipping ...
Before switching on for the first time, allow
the appliance to set vertically for
approximately 1/2 hour.
lDo not allow children to play with this
appliance.
lIf the appliance is fitted with a lock, keep
the key in a safe place out of the reach of
children.
lNever put ice cubes or ice lollies straight
from the freezer into your mouth. (The low
temperature may cause “freezer burns”.)
lNever touch any frozen food if your hands
are wet, as they may stick to it.
This unit contains the coolant
isobutane (R 600a), a natural
gas which is very
environmentally friendly but
also combustible. When transporting and
installing the unit care must be taken to
ensure that none of the refrigeration
circuit components become damaged. In
the event of damage avoid naked flames
or ignition sources and ventilate the room
in which the unit is placed for a few
minutes.
Warning - Do not use mechanical devices
or other artificial means to accelerate the
defrosting process, other than those
recommended dy the manufacturer.
Regulations
The appliance is suitable for refrigerating
and freezing food, and making ice cubes.
It is designed for domestic use.
If using the appliance for commercial
purposes, please observe the statutory
regulations applicable for the trade sector in
question.
The appliance adheres to current German
regulations for the prevention of accidents
caused by refrigerating equipment (VBG 20).
This product meets all the relevant safety
regulations applicable to electrical appliances.
The refrigerating circuit has been leak-tested.
Disposal and safety information
Observe ambient
temperature
Depending on the “climatic category” (see
rating plate), the appliance can be operated
at the following ambient temperatures.
(The rating plate can be found inside the
appliance at the bottom left-hand side,
Fig. F).
Climatic Ambient temperature
category from ... to
SN +10 °C to 32 °C
N +16 °C to 32 °C
ST +18 °C to 38 °C
T +18 °C to 43 °C
If the temperature drops below the ambient-
temperature range, the refrigerator compart-
ment will become too cold. If the temperature
exceeds the ambient-temperature range, the
freezer compartment will become too warm.
If the ambient temperature drops below the
set temperature in the refrigerator, the latter
will drop to the ambient temperature.
At ambient temperatures below +10 °C,
functional irregularities may occur during
automatic defrosting of the refrigerator
interior.
As a contribution to environmental
protection, we use recycled paper.

23
GB
22
GB
Getting to know your appliance
The fully automatic NO FROST system
ensures that ice does form inside the
freezer section. There is no longer any
need for defrosting.
How it works:
The food is frozen by a flow of cold air.
The evaporator in the NO FROST system
cools the air inside the appliance. The cold
air is circulated by a fan. A second fan
provides for air circulation in the refrigerator
compartment.The moisture in the air
condenses on the evaporator which is
defrosted fully automatically whenever
necessary.
The thawed water is directed to the
refrigerating unit where it evaporates. The
freezer section and the frozen food inside
are kept free from ice.
Description of control
functions
Figure 2
1 button
Appliance main switch, serves for
switching on and off the entire appliance.
2 button
Serves for switching off the warning
buzzer.
The warning buzzer sounds if the freezer
temperature is too warm, i.e. if the
frozen-food is in danger (display 9flashes
simultaneously).
There are occasions when the warning
buzzer may sound without the frozen-
food being in any danger:
- when you start up the appliance
- when placing fresh food in the freezer
without switching on fast freezing
- and if the freezer compartment door is
open too long.
Once the warning buzzer has been
switched off, the "acoustic warning"
automatically returns to stand-by, if the
freezer compartment has reached its
operating temperature again.
3 "super" button
Serves to switch fast-freeze on and off.
Operation is indicated via display 8,
"super". The fast freezing serves for
freezing of large quantities of fresh food
and should be switched on up to 24
hours before placing the fresh food in
the freezer compartment.
The refrigerating unit operates continually
after being switched on, a very low
temperature is achieved in the freezer
compartment.
4 "Freezer" button
Serves to indicate the current freezer
compartment temperature on display 9
(see description 9b).
5 "Cooler" button
Serves to indicate the current refrigerator
compartment temperature on display 9
(see description 9a).
6 Temperature selection button for
freezer compartment or refrigerator
compartment
a) (The temperature in the refrigerator
compartment is adjustable from 2 0C to
8 0C). Press the "cooler" button and
then the 0C button. The selected
temperature is displayed for 5 seconds
on display 9.
Press the selection button again or
hold it pressed until the desired
temperature is displayed. (The
selection temperature is displayed in
continuous sequence from 8 0C to 2 0C.
After 2 0C is displayed, 8 0C appears
again).
b) (The temperature in the freezer
compartment is adjustable from –16 0C
to –26 0C). To select the desired
temperature in the freezer
compartment, press the "freezer"
button and then press the 0C button .
The selection temperature is displayed
for 5 seconds on display 9.
Press the selection button again or
hold it pressed until the desired
temperature is displayed. (The
Getting to know your appliance
Before reading on, please unfold the pages
at the back of this manual featuring the
illustrations.
These operating instructions apply to
various models. It is possible that some
details of the illustrations do not coincide
exactly with the particular characteristics
of your appliance.
General view
Figure 1
1-9 Control panel
10 Air vent opening
11 Interior light
12 Multiflow system
(cold air distributor)
13 Shelf
14* Drawer for yoghurt cartons
15 Vegetable bin
16* "Chiller" compartment
17 Egg rack
18 Butter and cheese compartment
19 Tray for small cans, tubes
20 Bottle keeper
21 Bottle shelf
22 Freezer tray
23 Frozen-food container
A Fridge section
B Freezer section
* Not on all models
Control panel
(Quick guide)
Figure 2
1 button
Appliance main switch for on/off
2 button ("alarm off" switch)
a) For switching off the warning buzzer.
b) For displaying the warmest
temperature which has prevailed in the
freezer compartment (only if display 9
flashes).
3 “super” button
For maximum freezing capacity.
4 “Freezer” button
Serves to display the current freezer
compartment temperature.
5 “Cooler” button
Serves to display the current refrigerator
compartment temperature.
6 Temperature selection button for
freezer compartment or refrigerator
compartment
0C = colder, warmer
7 “alarm” display
Only illuminates if the alarm function is
activated.
8 “super” display
Only illuminates if the "super" button is
pressed.
9 Display for
a) Current refrigerator or freezer
compartment temperature
b) "Warmest temperature"
c) Selected temperature for
refrigerator compartment
d) Selected temperature for freezer
compartment

25
GB
24
GB
Getting to know your appliance
selection temperature is displayed in
continuous sequence from –16 0C to –26
0C. After –26 0C is displayed, –16 0C
appears again).
7 "alarm" display
This illuminates only if the alarm
function is activated. This occurs if it is
too warm in the freezer compartment,
endangering the frozen-food. It goes out
when the operating temperature of the
freezer compartment is reached again.
8 "super" display
This illuminates if the "super" button 3
is pressed and thus fast-freezing is
switched on.
It goes out again if the "super" button is
pressed again to switch it off.
It goes out automatically at the earliest,
52 hours after switching fast-freezing on.
9 Multi-function display
Displays various temperatures.
a) Current refrigerator compartment
temperature
The prevailing temperature in the
refrigerator compartment is displayed
after pressing the "cooler" button.
b) Current freezer compartment
temperature
The prevailing temperature in the
freezer compartment is displayed after
pressing the "freezer" button.
c) Freezer compartment temperature
too warm
The current temperature in the freezer
compartment is displayed if display 9
flashes.
This means that the freezer
compartment is or was in the past, too
warm, caused by a power failure or a
fault. After pressing the button, the
warmest temperature which has
prevailed in the freezer compartment is
displayed for 5 seconds on display 9
(not flashing).
Afterward, this value is cancelled.
Then display 9displays the current
temperature in the freezer
compartment without flashing.
d) Selection temperature for the
refrigerator compartment
The selected temperature is displayed
for 5 seconds after pressing first the
"cooler" button and then the 0C
button. Afterward, the display changes
to the current temperature in the
refrigerator compartment.
e) Selection temperature for the
freezer compartment
The selection temperature is displayed
for 5 seconds after pressing first the
"freezer" button and then the 0C
button . Afterward, the display changes
to the current temperature in the
freezer compartment.
Switching ON and setting temperatures
Fig. 2
lPut the plug in the socket.
lPress the appliance main switch 1.
The warning buzzer sounds, display 9
flashes.
lPress button 2.
Warning buzzer is muted and the
"memory" function is activated.
lSet the temperature for the freezer
compartment.
To do this, press first the "freezer"
button and then press the 0Cbutton.
Press the 0Cbutton repeatedly or press
and hold until the desired temperature is
displayed (continuous sequence, after
–26 0C, –16 0C appears again).We
recommend setting the temperature of
the freezer compartment at –20 0C.
lSet the temperature for the refrigerator
compartment.
To do this, press first the "cooler" button
5 and then press the 0C button. Press the
0C button repeatedly or press and hold
until the desired temperature is displayed
(continuous sequence, after 8 0C, 2 0C
appears again). We recommend setting
the temperature of the refrigerator
compartment at +4 0C.
The temperature setting can also only be
corrected slowly.
Note
lThe temperature in the refrigerator
compartment may fluctuate because:
– The appliance door is opened frequently
– Large quantities of fresh food are placed
in the refrigerator compartment and/or
freezer compartment
– The ambient temperature changes
– The temperature-selector setting for the
freezer compartment changes or
"super" freeze has been activated.
lIf no temperature is displayed when
starting the appliance, it is still too warm
in the refrigerator or freezer compartment.
lTo prevent condensation in the area of
the door seal, the sides of the housing
are partially heated.

27
GB
26
GB
Food arrangementFood arrangement
When loading the food,
note the following:
lAllow warm food and beverages to cool
down before storing inside the appliance.
lEnsure that food is well wrapped or
covered before it is stored. This will pre-
vent food from dehydrating, deteriorating
in colour or losing in taste and will help
maintain freshness. It will also prevent
cross-flavouring. Vegetables, fruit and
salad need not be wrapped provided they
are stored in the vegetable bins of the
refrigerator.
lNever let any oil or grease come into
contact with plastic fittings or the door
seal as these materials easily become
porous.
lNever store any explosive substances
inside the appliance. High-proof alcohol
should only be stored upright in tightly
sealed containers.
Danger of explosion!
lGlass bottles containing liquid that can
freeze should never be stored in the
freezer as the glass bursts when the
contents freeze.
Example of food
arrangement
Fig. 1
Refrigerator compartment (A)
Bread, cakes and pastries, ready-made
meals and dairy products, from top to
bottom on the shelves (13).
* Cheese, sausages and yoghurt in the
drawer (14).
Fruit, vegetables and salads in the
vegetable container (15).
Butter and cheese in the compartment (18).
Small bottles and cans on the shelf (19).
Large bottles on the bottle shelf (21).
Switching OFF
Press the main switch, Figure 2/1. The
whole appliance is then switched off.
Longer periods of disuse
If the appliance is not going to be used for
a longer period of time:
Press the main switch, Figure 2/1, clean
the appliance and leave the doors open.
* not on all models
Switching OFF and longer
periods of disuse
Freezer compartment (B)
Use the freezer tray (22) to store small
frozen goods and make ice cubes.
Use the top frozen goods containers (23)
to store frozen foods.
Interior fittings
The shelves in the refrigerator compartment
can be re-arranged when the door is opened
at a 90° angle. Pull the shelf forwards, lower,
pull out and re-insert in the desired position.
(Fig. 4).
* Bottle rack
Bottles can be placed and stacked securely in
the recesses (Fig. 5).
The underside of the bottle rack is smooth.
If space is required for other food, the bottle
rack can be inverted (Fig. 6).
To store tall products, the front half of the
bottle rack can be placed in the groove
underneath and pushed back (Fig. 7).
* "Chiller" compartment (Fig. A)
Pull the base of the compartment forwards,
the flap opens.
The temperature in this compartment is
lower than in the refrigerator compartment.
The temperature may therefore drop below
0 °C. Ideal for storing fish, meat and
sausage.
But not suitable for lettuce, vegetables
and cold-sensitive produce.
The small drawer can be taken out to
facilitate insertion and removal of food.
(Figure 9).
The egg racks inserted into the door shelves
can be folded up to enable tubes, small tins,
etc. to be stacked in their place.
The bottle rack is provided with a retainer to
prevent bottles from falling over when the
door is opened or closed, (Figure 0).
All trays, racks and containers attached
to the door can be removed for cleaning
purposes.
To remove, simply lift them up, (Fig. 8/A).
* not on all models

29
GB
28
GB
be up to 2.5 kg. Smaller portions freeze
through more quickly and the quality is
thereby maintained better when defrosting
and preparing the food.
It is important to seal food airtight before
freezing to prevent it from losing its taste
or dehydrating.
Suitable wrapping materials:
plastic foil, polyethylene tubular film,
aluminium foil and freezing containers.
These items are available from any dealer.
Unsuitable wrapping materials:
wrapping paper, greaseproof paper, cello-
phane, bin bags or used carrier bags.
Place food in the wrapping, press out any
air and seal it airtight.
Suitable sealing materials:
rubber bands, plastic clips, string, freezer
tape or similar. Polyethylene tubular film and
bags may be heat-sealed using a special
sealing iron or press.
Before placing in the freezer, each
package should be clearly labelled
with the contents and date of freezing.
Maximum freezing
capacity
Foodstuffs should be frozen right through
as quickly as possible. Only in this way it
is possible to retain vitamins, nutrients,
appearance and taste. You should therefore
never exceed your appliance's maximum
freezing capacity.
Within 24 h a max 12 kg of food for 70 cm
and 9 kg for 60 cm width appliances, can
be
frozen at once in the upper compartments.
Food that is already frozen should never
come into contact with fresh food about
to be frozen.
Allow hot food and drinks to cool down
to room temperature before placing in the
freezer.
Freezing and storingFreezing and storing
Note the following when
buying frozen food
lInspect packaging: it should not be
damaged in any way.
lMake sure the “Best before ...” date has
not expired.
lCheck thermometer of the vendor's
freezer. It should read –18 °C or colder.
lEnsure that the frozen foods are the last
items to be bought. Wrap in several layers
of newspaper or place in a thermo-
insulated bag and take home at once.
Store frozen products in the freezer with-
out delay.
Freezing at home
If freezing at home, use only foodstuffs which
are absolutely fresh and in perfect condition.
Foodstuffs that freeze well
Meat, cold slices and sausage, poultry and
game, fish, vegetables, aromatic herbs, fruit,
bread and pastries, pizza, precooked meals,
leftovers, egg yolks and whites.
Foodstuffs not suitable for freezing
Whole eggs in their shells, soured cream
and mayonnaise, lettuces, radishes,
horseradish and onions.
Blanching vegetables and fruit
It is advisable to blanch vegetables and fruit
before freezing in order to preserve colour,
flavour, aroma and vitamin C.
(To blanch, bring a large saucepan of water
to a fast boil and completely immerse fruit or
vegetables briefly. Most book stores offer a
wide selection of literature on freezing which
will also deal with blanching.)
Wrapping food
Pack the food in portions suitable for your
household.
Vegetable and fruit portions should be no
heavier than 1 kg, while meat portions can
Fast freezing
If frozen food is already being stored in the
freezer, you should switch on fast freeze
several hours before putting in fresh food
to freeze.
Normally, it will suffice to switch on fast
freeze 4–6 hours ahead. If you are planning
to make full use of maximum freezing
capacity, switch on 24 hours in advance.
Smaller quantities of food (up to 2 kg) can
be frozen without the fast freeze facility. To
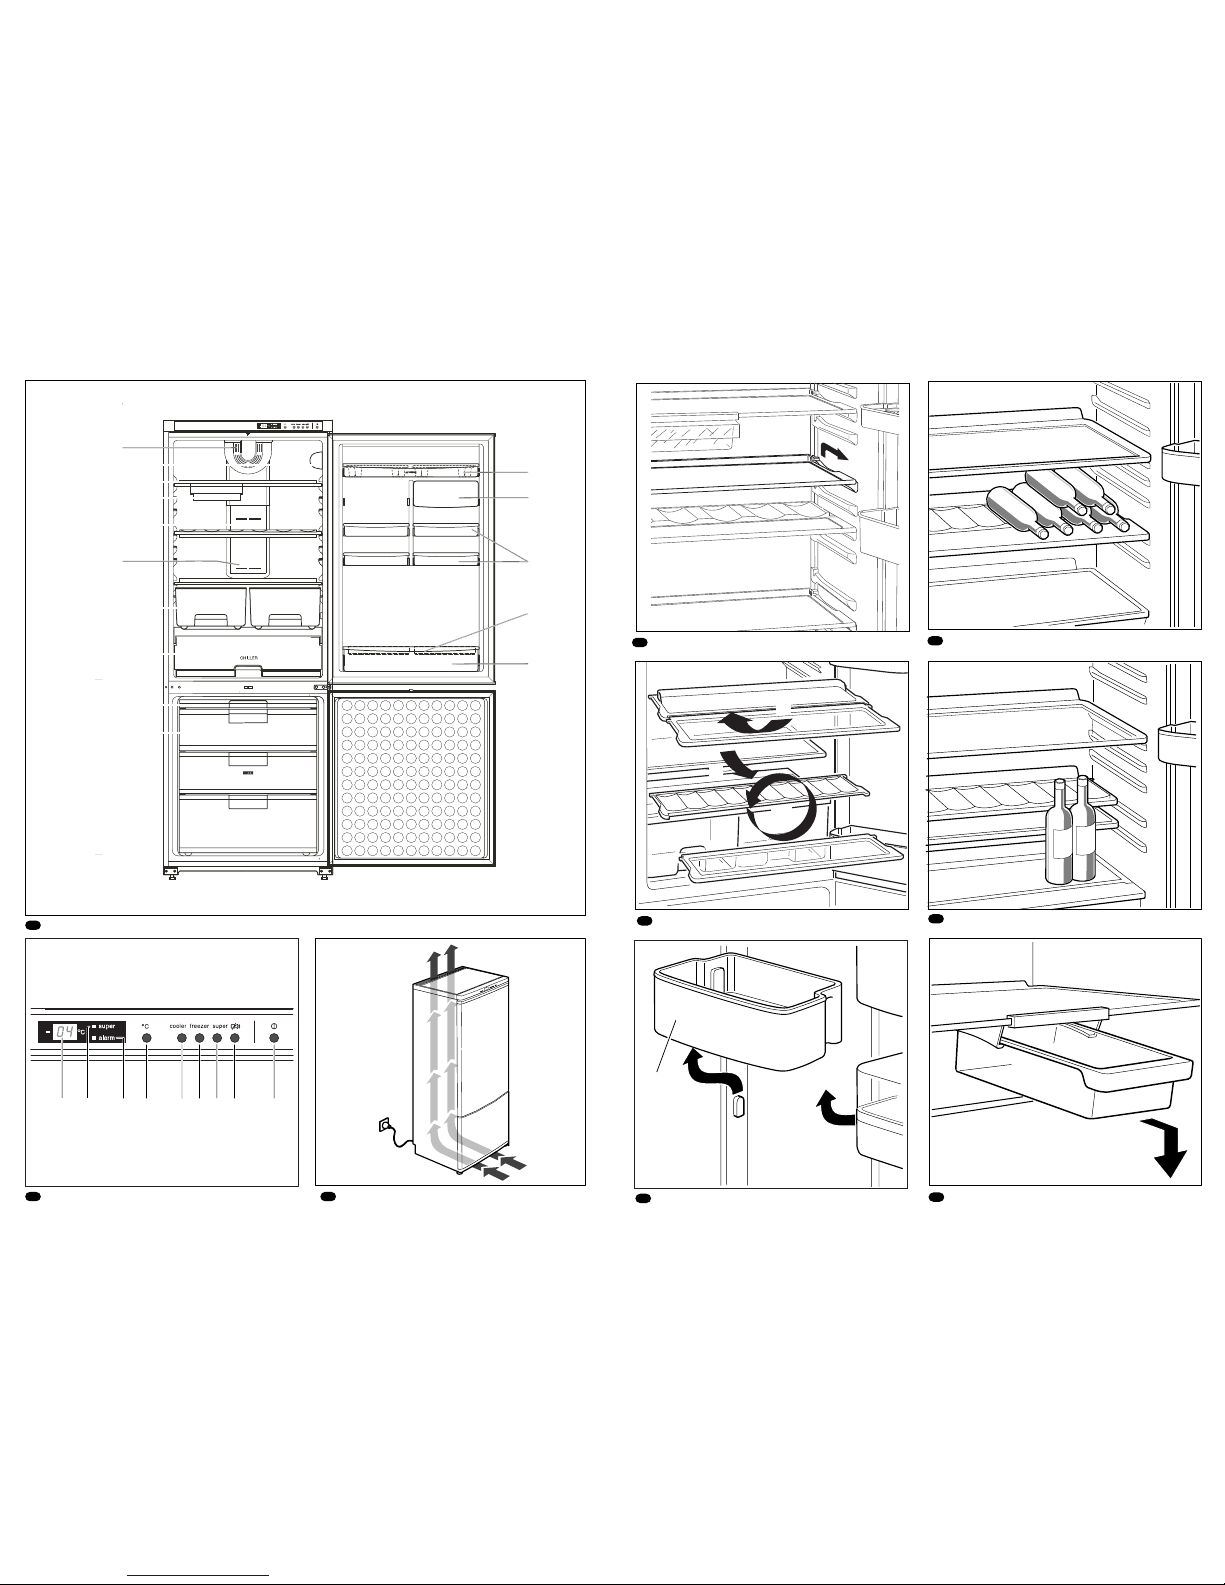
switch on "super" freeze, simply press the
"super" freeze button, (Fig. 2/3).
The "super" indicator lights up to show that
the fast freeze function is operating.
After switching on, a very low temperature is
achieved in the freezer compartment. Fast-
freezing switches off automatically
approximately 52 hours after being
switched on.
Storage of food
Make sure that all the frozen goods
containers are pushed in as far as they will go.
This is important so that the air inside the
freezer can circulate properly.
* Freezer tray
Fig. D
The freezer tray is suitable for storing ice
cube trays and for freezing individual berries,
pieces of fruit, herbs and vegetables.
To freeze individual items of food, distribute
the produce uniformly on the freezer tray
and leave to freeze for approx. 10–12 hours.
Then transfer the produce into freezer bags
or containers.
To thaw, spread out the individual items of
food.
Thawing frozen food
Depending on the nature of the food and
the preparation or cooking method you are
going to employ, you may choose one of
the following thawing methods:
at room temperature,
in the refrigerator,
in an electric oven,
fan-assisted or not,
in the microwave oven.
Food that has been partially or completely
defrosted can be refrozen provided that
these items are stored at temperatures
below +3 °C and for no longer than one day
where meat and fish is involved, or no longer
than 3 days for other items.
Otherwise, provided that taste, smell and
appearance remain unchanged, you can
boil, fry or process the food further into
a ready-made dish and then refreeze.
Observe that in this case the admissible
shelf-life will be shorter than normal.
Making ice-cubes
Fill the ice-cube tray three-quarters full with
water and place it in the freezer.
Twist the tray slightly to remove the ice-cubes.
* not on all models

31
GB
30
GB
Cleaning
Before cleaning, you should always
unplug the appliance and/or switch off
or disengage the household fuse.
Do not use a steam cleaner. The hot
steam could damage the surface of the
appliance or the electrical components
– electric shock hazard!
Ensure that cleaning water does not get
into the control panel or any of the lights.
Lukewarm water with a little mildly
disinfectant detergent such as washing-up
liquid is ideal for cleaning the entire
appliance, except the door seal. Never use
cleaning agents containing abrasives, acids,
chemical solvents or polishers.
Simply clean the door seal with clear water
and dry thoroughly afterwards.
If possible, the heat exchanger (black grid)
at the back of the appliance should be
cleaned with a brush or vacuum cleaner
every two years. This will maintain the full
efficiency of the appliance and helps to save
electricity.
lInstall the appliance in a cool, dry room with
adequate ventilation. Ensure that it is not
exposed to direct sunlight and never put it
near a direct source of heat (radiator, etc.).
lNever block any vents or grilles on the
appliance.
lAllow warm food to cool down before
placing in the appliance.
lPut frozen food in the refrigerator to thaw.
You can then use the low temperatures
of the frozen products to cool food in the
refrigerator.
lDo not keep the door of the appliance
open for too long when loading or taking
out food.
The shorter the time that the door is
opened, the less ice will form on the
freezer grids.
lClean the heat exchanger (black grid) at
the back of the appliance every two years.
Power saving tips Information about
operating noises
Operating noises
In order to maintain the pre-set temperature
at a constant level, the appliance compressor
switches on from time to time.
The noises that can be heard while it is
running are perfectly normal.
The noise reduces automatically when the
appliance reaches its operating temperature.
The humming noise is emitted by the motor
(compressor). When the motor switches ON,
the noise may briefly increase in volume.
The bubbling, gurgling or whirring noise is
emitted by the refrigerant as it flows through
the pipes.
The clicking noise can always be heard
when the thermostat switches ON/OFF the
motor.
Cracking sounds may occur if ...
- the automatic defrosting is operating.
- the appliance is cooling down or
warming up (material expansion).
A multi-zone or No-Frost appliance may
cause a low hissing noise emitted by the
air flow inside the appliance.
If these noises are excessively loud, the
causes are probably not serious and are
usually very easy to eliminate.
The appliance is not level
Please level the appliance with the aid of
a spirit level. Use the height-adjustable feet
or place packing under the feet.
The appliance is not free-standing
Please move the appliance away from
kitchen units or other appliances.
Drawers, baskets or shelves are loose or
stick
Please check the detachable components
and, if required, refit them.
Bottles and/or receptacles are touching
each other
Please move bottles and/or receptacles
away from each other.
Minor problems and how
to rectify them yourself
Customer service should NOT be
contacted for every fault. Most faults
are minor. Therefore, before you call
customer service, please check whether
you can eliminate the fault yourself based
on the following information.
A technician who is called out to rectify
a minor fault will charge the customer, even
if the appliance is still under guarantee.
If the display (Fig. 2/9) does not
illuminate:
check that the power is ON, that the plug is
correctly inserted in the socket and that the
appliance is switched ON.
If "E1" (flashing), (Fig. 2/9) is displayed
while starting the appliance:
A high temperature prevails in the
refrigerator compartment. The current
temperature of the refrigerator compartment
is displayed a few minutes after starting the
appliance.
If "E2" (flashing), (Fig. 2/9) is displayed
while starting the appliance:
A high temperature prevails in the freezer
compartment. The current temperature of
the freezer compartment is displayed a few
minutes after starting the appliance.
If the refrigerator-compartment light does
not function:
– The light bulb is defective. Pull out
the mains plug and remove the cover
(Fig. E/A). Replace the defective light bulb
with a light bulb of the same type
(max. 15 W, 230 V, E14 holder).
– The light switch is sticking (Fig. E/B).
Check whether it can be moved. If not,
please call customer service.
If the display (Fig. 2/9) flashes but the
acoustic signal is not emitted:
the freezer compartment was too warm due
to a power failure or a fault.

33
GB
Customer Service
Rating plate
Fig. F
If you consult Customer Services, please
quote the specific model of the product, as
well as the relevant production number,
which can be found on the characteristic
grey sticker (in the refridgerator
compartment, bottom left) next to the
vegetable container).
The product model can be found on the
sticker at the top, the production number at
the bottom, left (next to the instruction
"Made in Italy").
The address and telephone number of
Customer Services can be found in the list
of Customer Service Centres, that is to say
in the telephone list for your area.
32
GB
After pressing the button, the warmest
temperature which has prevailed in the
freezer compartment is displayed for 5
seconds on display 9(not flashing).
If a temperature greater than +3 °C is
displayed, check the frozen food.
If flavour, odour and appearance have
changed, make a ready-made meal out of
the food and refreeze.
No longer store the frozen produce for the
max. storage period.
If the display flashes, (Fig. 2/9) and the
warning buzzer sounds following
prolonged operation of the appliance:
Fault, it is still too warm in the freezer
compartment! The warmest temperature of
the freezer compartment is displayed. To
switch off the warning buzzer, press the
button . The warmest temperature
reached is then displayed.
Possible causes of the fault:
– The clearance at the top of the appliance
or in the base is blocked,
– The freezer-compartment door has not
been closed correctly,
– Fresh food was frozen without Fast freeze,
– Too much fresh food was frozen at once,
– High ambient temperature.
After eliminating the fault, press the
button the display stops flashing when the
freezer compartment has reached its
operating temperature again.
If the freezer section door has been kept
open for a long time and the temperature
inside now no longer reaches the pre-set
level,
so much ice has formed on the evaporator
(source of cold temperature) that it cannot
be defrosted by the fully automatic
defrosting system. In this case take the
frozen goods out of the freezer, wrap them
well to keep them cold and store them
somewhere cool.
Minor problems and how to rectify them yourself
Switch off the appliance and open the
freezer section door. After about 12 hours
the ice on the cooling system will have
thawed. Switch the appliance on again and
put the frozen goods back inside.
If you are not able to rectify the problem
with the help of the suggestions listed here,
please call Customer Service.
Do not open the door more often than
necessary, so that the cold temperature
inside is retained for as long as possible.
Do not take any further action, especially
with regard to the electrical parts of the
appliance.
This manual suits for next models
9
Table of contents
Other Smeg Refrigerator manuals

Smeg
Smeg RI360RX User manual

Smeg
Smeg FT41DXE User manual

Smeg
Smeg FR155SE/1 Setup guide

Smeg
Smeg FAB10HRBL5AU User manual

Smeg
Smeg FD32FS User manual

Smeg
Smeg SBS63XDE User manual

Smeg
Smeg APCR305 Parts list manual

Smeg
Smeg Refrigerator-freezers User manual

Smeg
Smeg S4C122E User manual

Smeg
Smeg CR312A User manual