manuals.online logo
Brands
  1. Home
  2. •
  3. Brands
  4. •
  5. Smeg
  6. •
  7. Washer Dryer
  8. •
  9. Smeg WDI12C1 User manual

Smeg WDI12C1 User manual

1
WASHER DRYER
INSTRUCTIONS MANUAL EN
2
EN
Contents
1. The new washing system 3
2. Safety warnings 4
3. Insta ation instructions 7
4. Description of contro s 14
5. Washing instructions 18
6. Drying instructions 24
7. C eaning and maintenance 26
8. Troub eshooting 28
9. Contro pane symbo s 30
This app iance is marked according to the European directive 2002/96/EC on Waste E ectrica and E ectronic Equipment
WEEE).
By ensuring this product is disposed of correct y, you wi he p prevent potentia negative consequences for the
environment and human hea th, which cou d otherwise be caused by inappropriate waste hand ing of this product.
The symbo on the product, or on the documents accompanying the product, indicates that this app iance may not
be treated as househo d waste. Instead it sha be handed over to the app icab e co ection point for the recyc ing of
e ectrica and e ectronic equipment.
Disposa must be carried out in accordance with oca environmenta regu ations for waste disposa .
For more detai ed information about treatment, recovery and recyc ing of this product, p ease contact your oca city
office, your househo d waste disposa service or the shop where you purchased the product.
EN
3
1. THE NEW WASHING SYSTEM
This new washer dryer is the outcome of years of research.
The eading-edge design and the qua ity of the production processes used to
manufacture this product ensure it wi give you many years of exce ent service.
Its concept satisfies a current and future washing and drying requirements.
Its low water, power and detergent consu ption help protect the environ ent
and reduce running costs to a ini u .
Water and power consu ption has been reduced in all progra es.
These resu ts were achieved by means of a special washing syste va id for a
programmes and a fabrics.
The drum is fitted with three externa vanes that keep the water constant y circu ating,
thereby offering intensive and uniform washing whi st consuming ess water.
This ensures your aundry is washed and treated with utmost care.
The new washing syste is so effective that nor ally dirty laundry can even be
cleaned without a pre-wash cycle.
Washing times have a so been reduced.
Pre-washing is on y recommended for very dirty aundry.
P ease read the operating instructions with care in order to take fu advantage of a
the features offered by this washer dryer.
Warning!
Please read all the instructions contained in this manual in order to understand how
to operate this appliance correctly and safely.
This manual is divided into paragraphs which provide a step-by-step description of
all the functions of the appliance. The instructions are easy to understand and are
accompanied by detailed illustrations.
This manual provides a quic and easy reference for answering all your questions
concerning the use of your new washer dryer.
Keep this manual near the machine for future consultation.
When selling or moving the appliance, ma e sure this manual remains with the
machine.
EN
4
2. SAFETY WARNINGS
Attention!
These warnings are given for safety reasons.
Please read the carefully before installing and using the appliance.
This manua forms an integra part of the app iance and must therefore be kept intact together with the
machine. Before using the app iance, carefu y read a the instructions contained in this manua .
Insta ation must be performed by a qua ified technician in comp iance with the regu ations in force. It
has been designed for domestic use and comp ies with EEC Directives 72/23, 89/336 (inc uding 92/31
and 93/68) current y in force. The app iance is designed for the fo owing purpose: washing and drying
inen or fabrics dec ared by their manufacturers to be suitab e for machine washing by means of an
appropriate symbo . Any other use sha be considered improper. The anufacturer declines all
responsibility for uses other than those described above.
The name p ate featuring the technica data, seria number and markings is visib y positioned on the
inner edge of the door. This na e plate ust never be re oved.
Do not eaving discarded packaging materia s unsupervised within the home. Separate the various
packaging materia s and take them to the nearest sorted waste co ection centre.
The electrical and plu bing work require to install the appliance ay only be perfor ed by
qualified technicians.
The app iance must be provided with an earth connection in accordance with the e ectrica safety
regu ations in force. The anufacturer declines all responsibility for da age to persons or
property resulting fro failure to earth the appliance or fro a defective earth connection.
If the app iance is not connected to the e ectrica power supp y by means of a p ug, it is necessary to
insta an iso ation switch with a contact opening gap of at east 3 mm.
The p ug on the power cord and the corresponding socket must be of the same type and must conform
to the regu ations in force. Check that the vo tage and frequency of the e ectrica power supp y match
the ratings on the name p ate. Avoid using adaptors or shunt connections. Never unp ug the app iance
by pu ing the power cord.
The achine is only disconnected fro the electrical power supply if the plug has been
re oved fro the socket or if the general switch has been turned off. After installation, the
plug ust re ain accessible.
The app iance must a ways be connected to the water supp y with new hoses (supp ied with the
app iance). O d hoses must never be reused.
Make sure the app iance does not ie on the power cord.
Before use, make sure the tub assemb y has been re eased (see instructions).
If the tub assemb y has not been re eased, it may damage the app iance or adjacent furniture or
app iances during the spin cyc e.
The washer dryer must never be used in vehic es, on ships or p anes, or in specia environmenta
conditions such as exp osive or corrosive (powder, vapour and gas) atmospheres or near exp osive
and/or corrosive iquids.
Do not insta the washer dryer in areas subject to frosting. Frozen pipes may burst under pressure.
Make sure that the drain hose is securely attached to the basin and cannot ove.
If it is not secure y fitted, the repu sive force of the water may detach it from the basin and cause
flooding.
When attaching the hose to the basin, ake sure the water drains away rapidly and does not fill
the basin up.
Do not over oad the app iance.
Never use detergents containing so vents or chemica s.
These ay da age the achine and for poisonous fu es.
They ay also catch fire and explode.
EN
5
Do not wash petro -soaked garments in the washer dryer. Make sure there are no inf ammab e items
(e.g.: ighters, matches, etc.) in pockets before washing.
If vo ati e f uids have been used to c ean garments, make sure that the substances have been removed
before oading them in the washing machine.
Before oading garments for washing, make sure the pockets are empty, the buttons secure y fixed and
the zips c osed.
Do not wash frayed or torn garments.
The g ass of the door wi heat up considerab y when washing at e evated temperatures.
Make sure all the water has drained away before you open the door.
If water is present, on y open the door after draining it. If in doubt, read the instructions manua .
The water in the achine is not drinkable!
Swa owing washing machine detergents can cause esions in your mouth and throat.
Before removing aundry from the washer dryer, ake sure the dru has stopped oving.
A ways switch off the app iance after use to avoid wasting e ectricity.
Leave the door ajar between one wash and the next in order to keep the gasket in good condition.
Prolonged inactivity.
If the machine is eft inactive for a ong period: disconnect the machine from the e ectricity and water
supp ies and eave the door ajar to prevent bad sme s from forming.
In the event of a fau t, never atte pt to repair the achine yourself. Disconnect the app iance from
the e ectrica power supp y and shut off the water tap. Then ca a qua ified technician. Repairs ay
only be perfor ed by qualified technicians.
Repairs performed by unqua ified peop e may be hazardous for users.
Obsolete appliances ust be rendered unusable: ake sure that the door cannot be closed (to
prevent children fro getting trapped inside while playing and risking their lives) and cut off
the power cord after unplugging it.
The appliance ust then be taken to a sorted waste collection centre.
This appliance is intended for use by adults.
Do not a ow chi dren to tamper with the contro s or p ay with the washer dryer.
Do not allow children to approach the appliance while it is working.
Keep children away fro the appliance.
Sma anima s or chi dren may get inside the washer dryer.
A ways check the inside of the drum before use and do not allow children to play with the
appliance.
Packaging materia s (p astic bags, po ystyrene, meta profi es, etc.) must not be eft within reach of
chi dren.
Keep chi dren away from the machine when the door or detergent tray is open; the app iance may
contain residues of detergent which can cause irreversib e damage to the eyes, mouth and throat, as
we as possib e death by suffocation.
I portant !
This app iance is easy to use.
In order to obtain the best resu ts, however, read this manua with care and fo ow a the instructions
before starting.
The manua gives instructions and usefu advice on how to insta , use and service the app iance
correct y.
The manufacture declines all responsibility for damage to persons or property resu ting
from fai ure to observe the above precautions, from tampering with even just a sing e
component of the app iance, or from the use of unorigina spare parts.
EN
6
For Great Britain only
Warning: this app iance must be earthed.
Fuse rep acement
If the mains ead of this app iance is fitted with a
BS 1363A 13a p fused p ug, to change a fuse in
this type of p ug use an A.S.T.A. approved fuse to
BS 1362 type and proceed as fo ows:
1. Remove the fuse cover (A) and fuse (B)
2. Fit rep acement 13A fuse into fuse cover
3. Refit both into p ug
I portant:
The fuse cover must be refitted when changing a
fuse and if the fuse cover is ost the p ug must not
be used unti a correct rep acement is fitted.
Correct rep acement are identified by the co our
insert or the co our embossed in words on the
base of the p ug.
Rep acement fuse covers are avai ab e from your
oca e ectrica store.
If the app iance is provided with a p ug ess supp y cord:
• It is necessary to insta in the fixed wiring an a -po e disconnection device having a gap
between contacts of at east 3,5mm. After insta ation the disconnection device has to be easy
to reach.
• The connection to the mains must be carried out by a qua ified technician in accordance to the
scheme shown be ow and the regu ations in force
L = brown
N = b ue
= ye ow-green
• In the event of damage to the supp y cord, it has to be rep aced by the manufacturer or an
authorized technica service center in order to avoid any risk.
EN
7
3. INSTALLATION INSTRUCTIONS
Important !
The appliance ust be installed by a specialised technician according to current regulations.
This washer dryer is very heavy. Take care when lifting it.
3.1 UNPACKING
The inside of the machine comprises a moving assemb y which is b ocked for transport purposes by the screws
(A) ocated at the rear of the washer dryer.
1. Re ease the assemb y by removing these screws with a 13 mm wrench.
2. Remove the screws (A) and re ative spacers (B) from the back of the washer dryer.
3. To prevent water from entering the machine or peop e from touching ive components with their fingers, close
the four holes left open by the screws with the supplied plastic plugs (C).
Attention!
• Do not turn the machine upside down and do not p ace it on its side.
• Keep a the components used to b ock the drum assemb y as they wi be needed if you decide to move the
app iance in future.
3.2 POSITIONING AND LEVELLING
1. P ace the app iance in the
chosen position.
2. Carefu y eve the machine in
a directions using a spirit
eve and adjusting the height
of the feet if necessary. After
adjusting the machine, ock
the feet with the re ative ock
nuts.
The water in et and drain hoses can be turned to the right or eft depending on insta ation requirements.
Attention!
• Carry out this operation carefully to prevent the washing achine fro vibrating, generating noise or
oving during operation.
• If the appliance is installed on a carpeted floor, ensure that the openings on its underside are not
obstructed.
• Make sure the washing machine does not touch wa s, furniture, etc., whi e it is working.
• The app iance must not be insta ed behind a ockab e door, or s iding door, or a door with hinge on the
opposite side to the tumb e dryer
EN
8
3.3 ADDITIONAL IMPORTANT INSTALLATION INSTRUCTIONS
1. Carefu y read the insta ation instructions in point 3 on page 6 of the washer dryer insta ation manua .
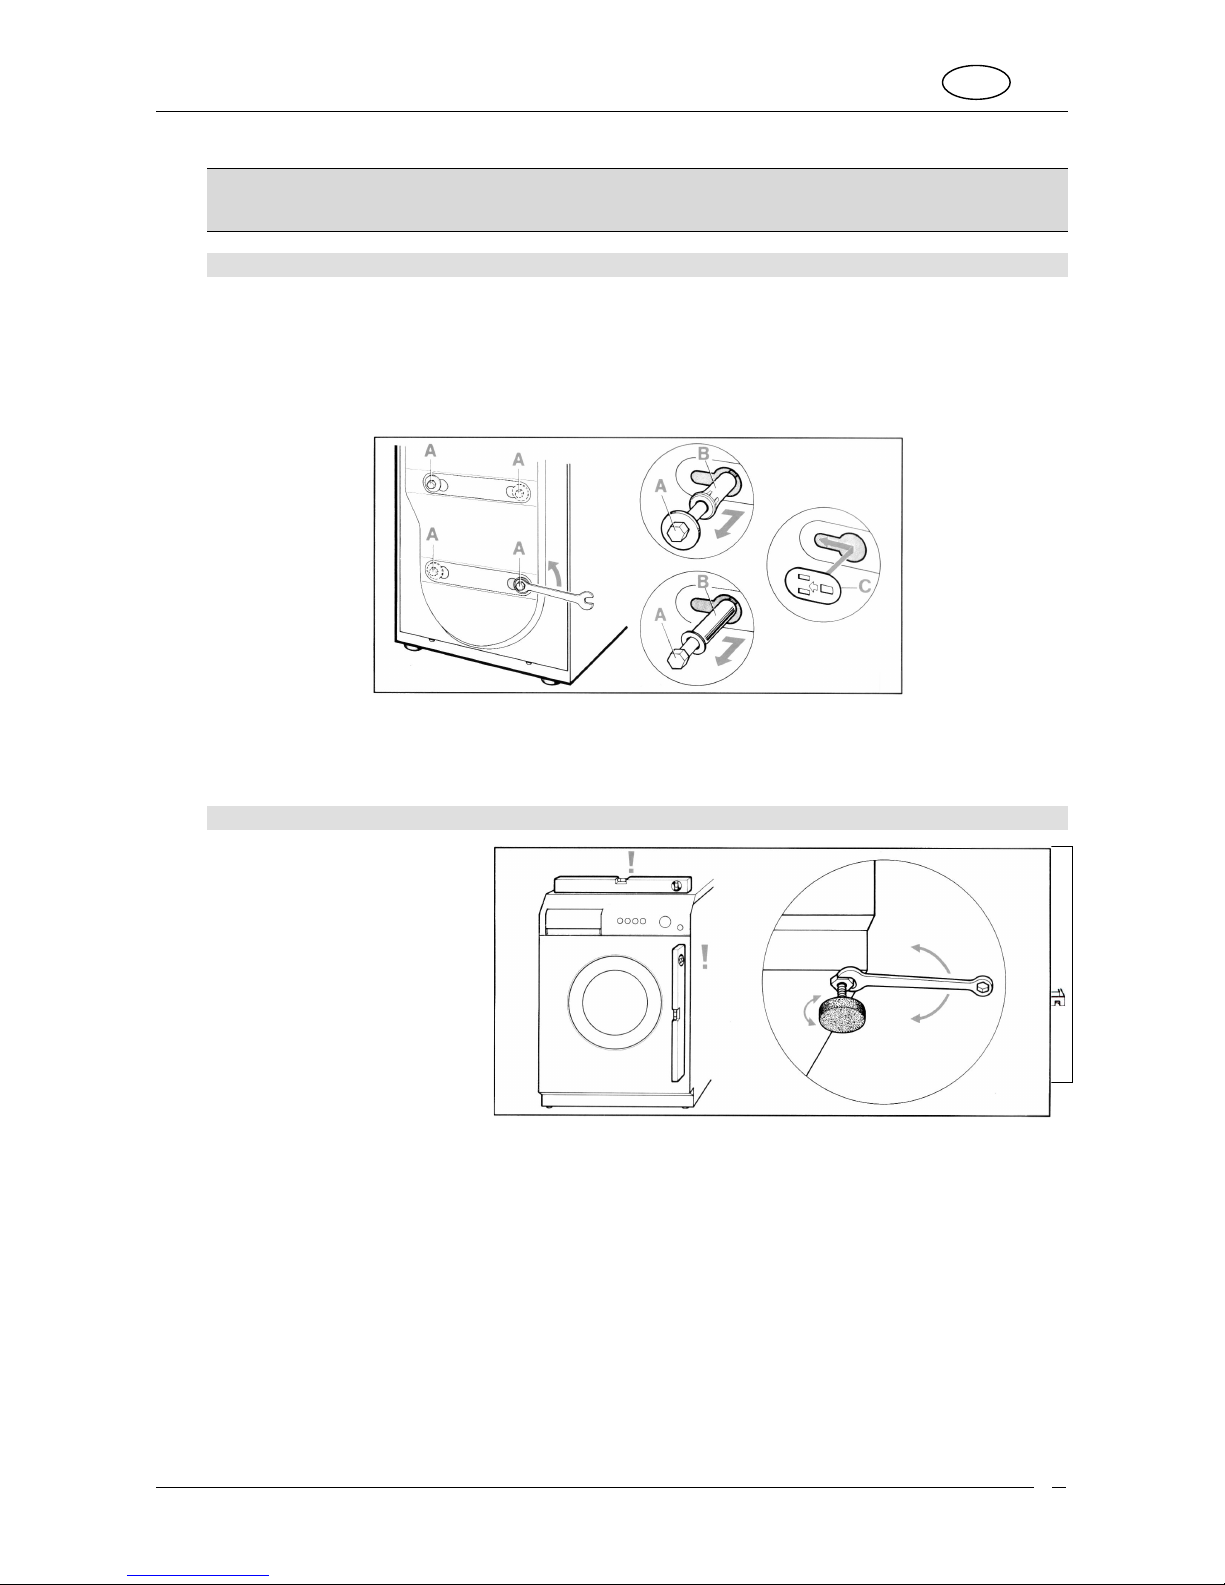
2. After the initia instructions have been adhered to. I.e. removing transit bo ts and fitting the adjustab e feet etc.
Using a spirit eve , make sure that the washer dryer is comp ete y eve and the overa height of the egs,
inc uding the rubber foot and the ocking nuts, is no greater than 25mm maximum.
3. When insta ing the washer dryer you must ensure that the eg ocking nuts are firm y tightened.
Under no circumstances shou d the washer dryer be insta ed with the front egs higher than the rear. If
attention is required in eve ing the furniture door then we wou d advise fitting the “push-push” catch and the
rubber furniture door buffer. It is important to note that any other insta ation other than one of a eve nature
cou d induce vibration or excessive movement of the washer dryer, especia y on the spin cyc e.
4. The machine shou d be insta ed direct y onto a c ean, sound and eve f oor, and as ow as possib e. P ease
note this machine shou d not be insta ed on carpets, foam-backed f ooring, aminate and parquet f oors. If,
however, for cosmetic purposes the machine height needs to be raised, it must not be done so by raising the
height of the egs, but via an additiona baseboard.
As a manufacture we do not recommend or specify any particu ar means by which to raise the washer dryer,
but have found that dense board, between 18mm and 40mm in thickness, grip-fixed and screwed to the f oor
and capab e of supporting the weight of the washer dryer without distortion, and cut to the dimensions of the
machine base appears to be good insta ation practice.
P ease note that any materia that has a shiny or a s ippery finish shou d not be used.
5. F oating f oors. As more apartments are being bui t with f oating f oors, additiona care must be taken when
insta ing the washer dryers. The current f ooring specifications state that additiona bracing must be insta ed
in areas direct y be ow e ectric storage heaters and door thresho ds. It is important to note that whi st some
e ectric storage heaters have a weight of 80kgs, washer dryers, when oaded, have a combined weight in
excess of 90kgs and the osci ating nature of any oaded washer dryer wi de iver varying stresses and
oadings on to the adjacent f oor area.
However because f oating f ooring manufacturers current specifications do not state that additiona bracing is
required in the f oor area be ow heavy domestic app iances the f ooring area be ow washer dryers is genera y
on y supported in one direction and not two as is the case with e ectric storage heaters. Therefore in order to
provide the house purchaser with additiona peace of mind, and to prevent any unnecessary vibration and
osci ation in the kitchen area we wou d advise house bui ders to consider fitting additiona f oor bracing at the
time of f oor insta ation to a simi ar specification to that which is required for the insta ation of e ectric storage
heaters.
6. The idea base surface for any heavy domestic app iance to stand on is one of so id concrete, as any minor
eak from the domestic water supp y wi not adverse y effect the area adjacent to the washer dryer, as any
eak onto a f oating and/or wood aminate f oor cou d cause extensive water damage.
P ease note that as these machines are water tested prior to eaving our factory a sma amount of residua
water wi be present in the hoses, therefore care must be taken to prevent any minor water spi age during
insta ation. P ease a so ensure that the water feed hose are correct y fitted and tightened, both at the mains
and the machine connectors.
7. P ease ensure that insta ation is carried out in accordance to the above insta ation instructions. As fai ure to
do so cou d inva idate the guarantee.
3.4 WATER SUPPLY CONNECTION
1. Check that in et pressure ies between the fo owing va ues: 50-900kPa. For higher
pressures, insta a pressure reducer.
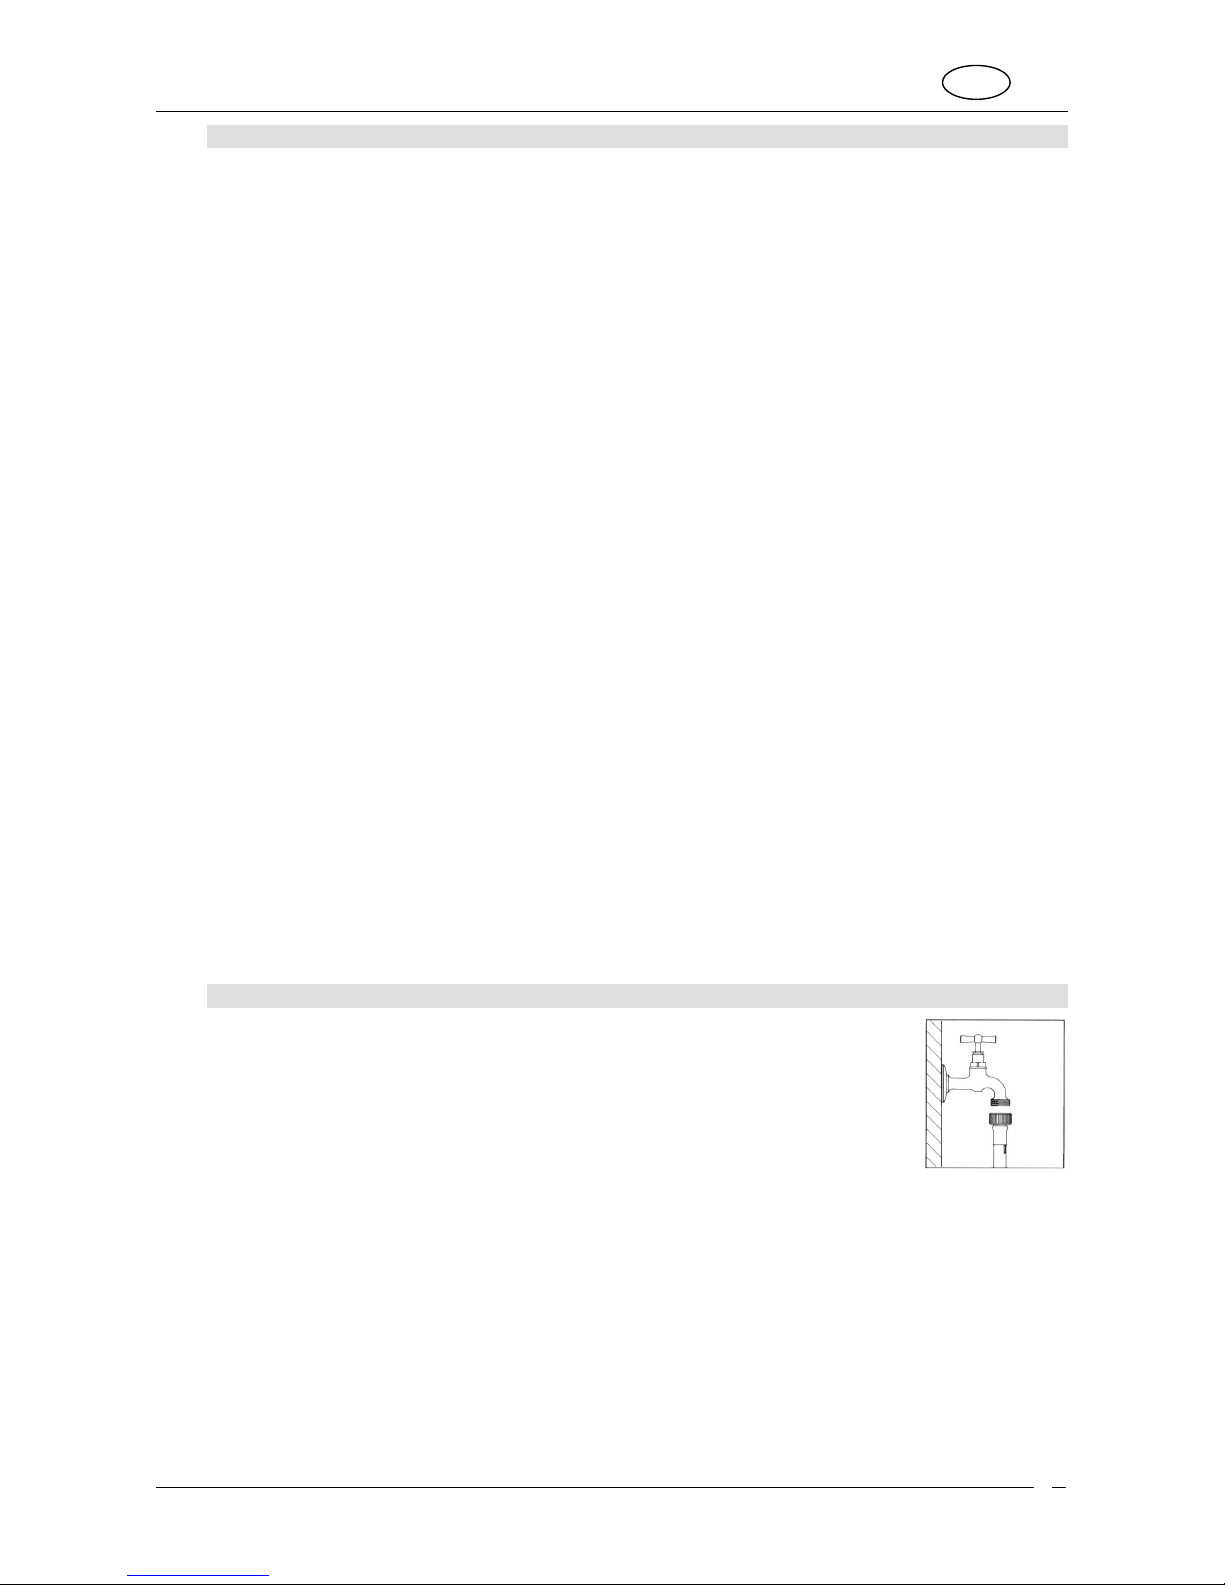
2. Connect the cold water in et hose (light blue ring nut) to the co d water tap with a ¾
gas thread, taking care to screw it firm y into p ace in order to prevent eaks. The water
in et hose must not be bent or crushed and must not be rep aced or cut.
3. If a hot water in et is used, in et water temperature must not exceed 60°C and the
hose with the red ring nut must be connected to the hot water tap.
Attention!
• If the water pipe is new or has not been used for a ong time, et a certain amount of water run before
attaching the in et hose. This stops any deposits of sand and other impurities from c ogging the fi ters used
by the machine to protect the water in et va ves.
• The new hose-set supp ied with the app iance are to be used and the o d hose-set shou d not be reused
EN
9
3.5 DRAIN CONNECTION
1. Insert the end of the drain hose into a drain pipe having an interna diameter of at east 4 cm and a height
ranging between 50 and 90 cm, or attach it (using the re ative curved p astic profi e) to a basin or bath tub.
2. A ways check that the end of the drain hose is secure y attached in order to prevent the repu sive force of the
water from moving it out of position.
Attention!
• Do not bend or obstruct the hose as this wi reduce the f ow of water.
• Any extensions to the drain hose must not exceed 1 metre, they must have the same interna diameter and
must not be obstructed in any way.
• In no case may the end of the drain hose be submerged in water.
3.6 ELECTRICAL CONNECTION
Before fitting the p ug into the socket, make sure that:
1. Input vo tage matches that indicated on the name p ate attached to the inner edge of the door.
2. The contactor, pressure re ief va ves, power ine and socket are capab e of withstanding the maximum
rated power input indicated on the name p ate.
3. The socket is compatib e with the p ug supp ied with the machine without the need to fit mu tip e sockets,
adaptors or extension eads that cou d cause overheating or burning.
If the socket does not correspond to the supp ied p ug, rep ace the socket with one of a suitab e type.
Attention
• The p ug must be accessib e after insta ation.
• The appliance ust be earthed. P ug the machine into a socket fitted with an efficient earth connection.
The anufacturer declines all responsibility for da age to persons or property resulting fro
failure to earth the appliance or fro a defective earth connection. Correct electrical
connections guarantee axi u safety.
• This app iance comp ies with EEC directive 89/336 of 3.5.89 (modified by EEC directive 92/31) re ative to the
e imination of radio interference.
• If the power cord is damaged, on y rep ace it with an origina spare part avai ab e from our service
department.
• Do not insert/re ove the plug fro the socket if your hands are wet.
• Re ove the plug fro the socket by gripping the plug and not the cord.
EN
10
3.7 FITTING THE FURNITURE DOORS
Once the washer dryer has been correct y insta ed and commissioned, the furniture door can be fitted fo owing
the dimensions on the temp ate and the instruction enc osed in the washer dryer packaging.
P ease note that on y furniture doors of a thickness between 16mm and 21mm are compatib e with this washer
dryer.
I portant – The achine co plies with the current safety provisions governing electrical equip ent. It
ust be installed by a specialised technician in co pliance with the current standards in order to prevent
it fro beco ing a potential danger for the user.
3.7.1 How to fit the furniture door
The furniture door that covers the front can be hinged on either the eft side or right side.
For pratica reasons, it is advisab e to maintain the same opening direction as the g ass door (with hinges app ied
to the eft-hand side).
The app iance has hinge supports on the eft-hand side, whi st the push-push c osing system is mounted on the
upper right-hand part.
If the magnetic c osing mechanism is required or it is necessary to change the side, see the i ustration be ow.
I portant! Ensure that the appliance is disconnected fro electricity supply before installing the furniture
door (during which all hinging and closing echanis s ust be re oved fro the front) on to the washer
dryer).
Warning – To hinge the pane on the right-hand side (opening direction opposite to that of the g ass door),
comp ete y remove the hinge supports (D), the c osing hook (B) or the magnet (A) from the front part of the
machine and fit them to the opposite side.
A parts fitted to the front of the washing dryer must be correct y remounted (no ho e must be eft open). This wi
prevent users from touching ive parts of the app iance.
Our co pany declines all responsibility for da age caused by failure or negligence in co plying with
these safety provisions.
EN
11
3.7.2 Use of the furniture door fixing te plate
Proceed in the fo owing way when app ying the wooden pane to the washing dryer:
1. When fitting the furniture door uti ising the door temp ate you wi need to make sure that the bottom and
the top of the furniture door wi ine up with the adjacent cabinet furniture doors.
2. The fina positioning of the furniture door hinges wi be dictated to by the height or the p inth p us any
additiona base-board used in conjunction with raising the height of the washer dryer for cosmetic
purposes
3. Ca cu ate the height of the p inth: Measure the height of the kitchen baseboard: the height of the wooden
pane is obtained by first estab ishing the height of the kitchen baseboard.
E.g.: for a 100 mm high baseboard, the maximum height of the pane is 720 mm. If the height of the
baseboard must be increased, the height of the wooden pane must be reduced.
4. P ace the temp ate of the inner side of the pane and match the height of the baseboard with the ower
edge of the pane using the graduated sca e. Make sure the temp ate is horizonta y centred with
reference to the vertica ines marked at the ends.
5. After p acing the temp ate in the correct position, trace the positions of the fo owing ho es, pushing in
with the tip of your penci :
• ho es for the hinges and hinge screws
• ho es for fixing the meta p ate (if the magnetic ock is used), or the hook for the push-pu ock
(fig. A - B)
3.7.3 Applying the panel ele ents and fixing the panel
1. Dri ho es in the furniture door for the hinges and the c osing hook, using a pedesta mounted dri and a
suitab e 35mm furniture dri bit, dri 4 number 13mm deep ho es into the furniture door (Care must be
taken not to exceed 13mm or the door fascia cou d be damaged). P ease note that if the magnetic door
catch is required then a sma pi ot ho e is a that is needed (2mm).
2. The 13 mm depth of the 2 mm ho es, for fixing the hinges and a meta p ate for the magnet ock, on y
app ies to the solid wood pane . For the chipboard panel, simp y dri the upper coating
3. Screw the two hinges to the pane (see below)
4. Mount the hook for the push-pu ock or the meta p ate for the magnet ock on the side opposite the
hinges (sell below).
EN
12
5. Fix the pane to the washing machine fo owing the instructions shown be ow
3.7.4 Adjusting the hinges
If, after app ying the pane to the washing machine, it is s ight y inc ined or off-centre with respect to the front of the
machine, correct its position by adjusting the mobi e part of the hinges (see above).
3.7.5 Recessing the appliance
Push the washing machine into its recess. Turn the feet to horizonta y, eve the machine if necessary and ock
the counter nut with the re ative check nut. To prevent vibrations from the machine from being transmitted to the
surrounding furniture, check that the sides and top of the app iance are unab e to touch the furniture itse f. There
ust be a space of at least 2 all around. The rear part of the machine must a so remain some distance
away from the back wa . If the recessing cavity is higher than 820mm the opening between the f oor and sides of
the machine (when this is insta ed at the end of a ine of furniture), must be comp ete y c osed in comp iance with
the re ative safety provisions.
The covering must make it impossib e for users to touch ive parts of the e ectrica system and must require too s
in order to be removed.
Our company dec ines a responsibi ity for damages caused by fai uresto comp y with these safety provisions.
EN
13
3.7.6 Fitting the plinth
The base p inth for kitchen furniture must be removab e in the area in front of the washer dryer to a ow access for
routine maintenance of the drain pump if it becomes c ogged with buttons, fasteners, or simi ar objects, and for our
engineers to be ab e to remove the washer dryer for service.
P ease note: our engineers wi not remove p inths that have been fixed into position by g ues or mastics, or where
remova cou d cause third-party damage.
If a p inth is fitted direct y onto the washer dryer then it must be done so with four screws inserted into the four
pre-set ho es
Application of the plinth to the furniture ust not involve eli ination or odification of the washing
achine plinth. Owing to safety reasons, this ay not be re oved. It ust absolutely re ain intact and
fixed to the washing achine.
EN
14
4. DESCRIPTION OF CONTROLS
4.1 CONTROL PANEL
A the commands and contro s of the app iance are assemb ed together on the front pane .
Description of controls
A Open door button
B ON-OFF and progra e selection knob
C Delay ti er shown on disp ay LED – (only for odels with this option)
D Ti e re aining shown on disp ay LED
E Spin speed shown on disp ay LED
F Drying progra e for nor al gar ents shown on disp ay LED
G Drying progra e for delicates shown on disp ay LED
H Disp ay
I Select spin speed and drying ti e for delicates button
L Drying progra e button and drying ti e
M Options button – for odels with delay ti er: selection of ti e delay
N Options buttons
O Start-Pause button
P Ti ed drying shown on disp ay LED
R Button activation and Start-Pause shown on LED
EN
15
A
Open door button
Press the button to open the door. Chapter 5 – Washing
instructions – exp ains how the door works and how to use it.
B
ON-OFF and washing and
drying progra e
selection knob
This knob ets you:
• switch the machine on and off by moving it in either
direction from the OFF position (knob indicator
vertica )
• se ect washing te peratures within the various
fabric sectors by turning it in both directions
• se ect the drying progra e
The knob does not rotate whi e the programme is running.
The programme is e ectronica y contro ed by the machine.
C
Delay ti er shown on
display LED – (on y for
mode s with this option)
This LED indicates that the disp ay is showing the time
se ected for the de ay timer.
D
Ti e re aining shown on
display LED
This LED indicates that the disp ay is showing the tota
duration of the se ected programme before the programme
starts, and the time remaining whi e the programme is
running.
E
Spin speed shown on
display LED
This LED indicates that the disp ay is showing the maximum
spin speed for the se ected programme. It stays on whi e spin
speed is being se ected with the re ative button.
F
D
rying progra e for
nor al gar ents shown on
display LED
This LED indicates the se ection of the norma drying
programme (drying te perature 90°C – for resistant
ite s, cottons).
G
Drying progra e for
delicates shown on display
LED
This LED indicates the se ection of the de icate drying
programme (drying te perature 60°C – for synthetics,
delicates).
H
Display
The disp ay shows the fo owing information:
1. ti e re aining for the se ected programme, given
in hours/minutes.
2. delayed start (for mode s featuring this option).
Given in hours/minutes. When the time remaining
before the programme starts is ess than 60 minutes,
this information is given in minutes/seconds.
3. spin speed
4. drying ti es given in hours/minutes
5. cycle pause - f ashing STOP
6. end of cycle - END
7. error codes
EN
16
I
Select spin speed and
drying ti e for delicates
button
Press the button repeated y to se ect the required spin
speed. The fo owing spin speeds are avai ab e:
• 0000: spin disab ed and stop with tub fu . The
machine does not perform the fina spin and ends the
washing programme with water in the tub. To drain
the water, see the exp anations shown in paragraph
5.13
• from 600 rpm to the maximum speed indicated for
the mode : for cotton and co oured programmes,
speed increases by 100 rpm starting from 600 rpm
up to the maximum speed indicated for the mode
• from 600 to 900 rpm: for synthetics, de icates and
woo ens programmes, speed increases by 100 rpm
starting from 600 rpm up to 900 rpm.
A so, se ect the de icates drying programme (see G).
L
Drying progra e button
and drying ti e
Press the button repeated y to se ect the drying programme.
As regards the drying time, it ranges from 2:00 hours down to
0:00 hours.
M
N
Options buttons
The options that may be avai ab e on the washer dryer are
shown be ow.
Quick wash Button
This button reduces the overa duration of the washing cyc e. This
option is used to wash sma oads or ess dirty washing in ess time.
The b each stage is skipped when the Quick Wash button is
pressed (for mode s with b each function).
(M)
Select delayed start
button
– (on y for
mode s with this option)
Press the button repeated y to se ect the required time from
that moment to start the washing/drying programme se ected.
The va ue set by the machine is 0 hours 0 minutes and, using
the button, this va ue can be increased by 60 mins up to 12
hours and by 120 mins for the next 12 hours, up to 24 hours.
Increase water button
This washer dryer is programmed to use a certain quantity of water
and consume a certain amount of power considered to be sufficient
for a norma washing cyc e.
Only press this button for specific require ents, e.g.: for very
de icate fabrics (curtains or woo ).
The water eve for washing and rinsing rises and power
consu ption for heating increases.
Easy-iron button
This option reduces creasing on garments at the end of the
programme. The machine performs a more de icate spin cyc e and
moves the garments at the end of the programme. Spin speed for
a programmes is 600 rpm.
EN
17
Economy cycle button
-
e
Press this button for cottons programmes, the achine will
perfor an extended wash at 35°C (biological step) thereby
offering good washing perfor ance co bined with power
saving.
The achine then continues the cycle at the selected
te perature.
.B.:
Press the econo y cycle button to obtain a maximum washing
temperature of 60° C and the e imination of the pre wash cyc e.
Extra Rinse button
In areas with soft water or to improve rinsing, press this button
(optiona for intensive programmes) to enab e the extra rinse
function (about 20% more water).
Delicates button
Press this button to reduce movement of the drum and,
consequent y, of the washing. Suitab e for particu ar y de icate
garments (shirts, si k, curtains, etc.)
Half load button
1/2
If the machine is used with a sma er amount of washing than that
indicated in the “Programme Chart”, press this button to save water,
detergent and e ectricity.
This option shou d not be used for synthetics or woo ens.
The reco ended doses of detergents should be reduced in
proportion to the load.
O
“Start/Pause” button
Press this button to start the se ected washing programme.
During washing, press the “Start/Pause” button for about 3
seconds to pause the washing cyc e. During the pause, the
“Time remaining” Led f ashes and STOP appears on the
disp ay. To resume the washing cyc e from where it eft off,
simp y press the “Start/Pause” button again.
P
Ti ed drying shown on
display LED
This LED indicates that drying is carried out with the se ected
drying time.
R
Button activation shown on
LED
This LED indicates that the corresponding buttons have been
pressed.
EN
18
4.2 DETERGENT TRAY
This is ocated to the eft of the contro pane . Pu it out to
open.
The tray comprises four compartments which are marked as
fo ows
“1”: pre-wash detergent
“2”: main wash detergent
“” or “3”: fabric softener, starch, etc. (treatment products).
Compartment “4” is used for b each. If there is a cover marked
, this means that b each cannot be used with this mode of
machine. If b each can be used with the machine, there is no
cover.
5. WASHING INSTRUCTIONS
5.1 PREPARING THE WASHING
1. Separate the washing according to the type and co ourfastness of the fabrics.
2. Wash whites and co oureds separate y. Wash new co oured garments separate y for the first time. A abe is
norma y app ied to garments giving information on how to c ean them. A brief description of these abe s is
shown be ow.
WASHING BLEACHING
Machine wash at max. 90°C
Machine wash at max. 60°C
B eaching a owed
Do not b each
IRONING
Machine wash at max. 40°C
Machine wash at max. 30°C
Hot iron
Warm iron
Coo iron
Do not iron
DRY CLEANING
Machine wash, de icate cyc e
at max. 60°C
Machine wash, de icate cyc e
at max. 40°C
Machine wash, de icate cyc e
at max. 30°C
Any so vent
Any so vent
except
trich oroethy ene
Petro eum
so vent and
R113
Do not dry c ean
DRYING
Hand wash
Do not wash
High
temperature
Less than 60°C
Do not tumb e dry
Attention!
• Do not wash unhemmed or torn garments as they may fray.
• Foreign bodies may damage garments or machine components. Therefore, empty a pockets and turn them
inside out, remove ro ers from curtains or put them in a string bag.
• Put very sma artic es (be ts, handkerchiefs, socks, bras with stiffeners, etc.) into a white canvas bag. C ose
push buttons and zips and sew on dang ing buttons.
• Modern detergents and correct washing temperatures are genera y sufficient to remove stains from fabrics.
However, some stubborn stains, such as grass, fruit, egg, b ood, rust and biro, shou d be pre-treated before
washing. Depending on the type of fabric, any stain re overs can be found in the shops. Stains
should always be cleaned or diluted i ediately as the older they get, the ore difficult they are to
re ove.
• Gar ents ay be da aged if fabric care sy bols are not observed.
Wool – On y pure woo , identified by or with the abe <<shrink-proof machine washab e and dryab e>> can
be machine washed with the specific programme, other types of woo shou d be hand-washed or dry-c eaned.
EN
19
5.2 OPENING THE DOOR
The machine is fitted with a safety device that prevents the door from opening whi e it is working.
1. Before opening the door, wait 1 or 2 inutes after the progra e ends (“End” LED on) to a ow the
safety device to disengage.
2. Make sure there is no water in the tub and that the dru is not oving. Open the door by pressing the
“Open door” button on the front pane and pu ing it open.
Attention!
• If the washing programme is interrupted, you wi have to wait from 3 to 15 minutes, depending on the
temperature of the water, before the door opens.
Attention!
The water ay still be boiling if the washing cycle was perfor ed at high te peratures.
If there is still water inside the dru , do not open the door!
5.3 PREPARING THE WASHING
Where possib e, save electricity by washing full loads divided by type of fabric. Introduce oose washing and
a ternate arge items with sma ones. For the first few times, weigh the oads of washing and then re y on your
judgement. Average weights of common garments are shown be ow:
5.4 LOADING THE WASHING
1. Open the door and oad the washing taking care to distribute it uniform y, oose y and not packed into the
drum; a ternate arge items with sma ones if possib e.
2. The washer dryer described in this manua can be loaded with up to 5kg of washing. Heavier oads wi
ead to unsatisfactory washing resu ts and may cause the machine to work incorrect y.
3. To save energy, wash full loads divided by type of fabric, according to the quantities indicated in the
“Programmes chart” supp ied with this manua .
4. C ose the door by pressing it against the body of the app iance unti you hear a c ick. Make sure no
garments have got caught between the door and the rubber gasket.
Attention!
• If the door is not c osed proper y, a safety device prevents the washer dryer from working.
• Do not use ore than the reco ended a ount of detergent: too uch ay deteriorate washing
results.
5.5 ADDING DETERGENT AND ADDITIVES
Fo ow the instructions shown in the “Programme Chart” provided
together with the manua and add detergent and any additives to the
re ative compartment before starting the programme.
Pour the pre-wash powder detergent into the compartment marked
“1”.
Pour main wash detergent into compartment “2”. Machine accessories
inc ude a red insert “A” that can be p aced inside compartment “2” to
a ow iquid detergent to be used. The additives are automatica y
introduced into the tub during fina rinsing.
Pour iquid additives such as starch and fabric softener into “3”,
marked with .
If b each can be used with the machine (no cover marked with ) add b each to compartment “4” if you wish.
The level of the liquids ust not exceed the axi u li it, otherwise the trays wi be emptied too soon.
Before pouring thick additives into the tray, di ute them with a itt e water to prevent them from obstructing the trap.
On y use foam-contro ed detergent suitab e for use in washer dryers.
Deter ine the quantity of detergent according to the hardness of the water, and the type, quantity and
dirtiness of the washing.
This wi a ow you to obtain the required effect using as itt e detergent as possib e.
Detergent packs indicate the quantities to use according to 4 eve s of hardness and for norma y dirty oads of 4-5
kg.
Ask your oca water board to te you how hard your water is.
EN
20
Water hardness
Hardness level French degree fH German degree dH
Soft Up to 15° Up to 8°
Moderate y hard 15° - 25° 8° - 14°
Hard 25° - 40° 14° - 22°
Very hard Over 40° Over 22°
5.6 DOSING POWDER DETERGENTS
Nor ally dirty washing
1. Choose a programme without prewash.
2. Pour the tota quantity of detergent indicated on the packs into compartment “2” of the detergent tray.
Very dirty washing
1. Choose a programme with prewash.
2. Add ¼ of the recommended quantity of detergent into compartment “1” of the detergent tray and ¾ of the
detergent into compartment “2”.
Attention!
• If there are no dosage indications for de icate synthetics, add from ½ to 2/3 of the recommended quantity for
resistant cottons.
• For the woo programme, on y use neutra detergents for woo ens.
• Base your doses according to the detergent manufacturer's recommendations.
5.7 DOSING LIQUID DETERGENTS
1. Pour the recommended dose into the batcher supp ied with the iquid detergent and p ace it inside the drum;
otherwise, pour it into compartment “2” of the detergent tray after fitting the re ative red insert “A” (see
paragraph 5.5).
2. The sca e on the red insert wi he p you to use the right quantity of iquid detergent.
Attention!
• Liquid detergents can be used according to the manufacturer's recommended dose only for the ain
washing cycle, that is, in all progra es without prewash.
• When compartment “2” is used for powder detergent, the red insert “A” must be removed.
5.8 SCALE-REMOVERS
Sca e-removers can be introduced into compartments “1” and “2” according to the manufacturer's indications.
First, add the detergent and then the sca e-remover.
5.9 SWITCHING ON THE MACHINE AND SELECTING THE WASHING PROGRAMME
To switch on the machine and se ect programmes, proceed as fo ows:
1. Turn the programme knob in either direction.
2. Se ect the washing temperature, within the sectors marked on the front pane by the fo owing words:
• Cotton, coloureds
• Wool
• Synthetics, delicates
The washer dryer has the fo owing basic washing progra es which, by adjusting the temperature and
using the various button functions, a ow a wide range of programmes to be set for a requirements.

Other Smeg Washer Dryer manuals

Smeg WDF12C User manual

Smeg

Smeg WDF12C User manual

Smeg WDI73121 User manual

Smeg

Smeg WDI73121 User manual

Smeg LSTA147HK User manual

Smeg

Smeg LSTA147HK User manual

Smeg SWD1600 User manual

Smeg

Smeg SWD1600 User manual

Smeg LSTA127 User manual

Smeg

Smeg LSTA127 User manual

Smeg LSIA127 User manual

Smeg

Smeg LSIA127 User manual

Smeg Washer-Dryer User manual

Smeg

Smeg Washer-Dryer User manual

Smeg WDF147XS User manual

Smeg

Smeg WDF147XS User manual

Smeg SAWD612 User manual

Smeg

Smeg SAWD612 User manual

Smeg WDN064SLDUK User manual

Smeg

Smeg WDN064SLDUK User manual

Smeg LSTA147S User manual

Smeg

Smeg LSTA147S User manual

Smeg WDF147-2 User manual

Smeg

Smeg WDF147-2 User manual

Smeg STA161S User manual

Smeg

Smeg STA161S User manual

Smeg LSTA146S User manual

Smeg

Smeg LSTA146S User manual

Smeg WDI14C7-2 User manual

Smeg

Smeg WDI14C7-2 User manual

Smeg WDF14C7-2 User manual

Smeg

Smeg WDF14C7-2 User manual

Smeg WDI14C7 User manual

Smeg

Smeg WDI14C7 User manual

Smeg WDF12C7 User manual

Smeg

Smeg WDF12C7 User manual

Smeg WDN854SLDIN User manual

Smeg

Smeg WDN854SLDIN User manual

Smeg WDF6127-1 User manual

Smeg

Smeg WDF6127-1 User manual

Smeg STA161S User manual

Smeg

Smeg STA161S User manual

Smeg WDN064SLDIN User manual

Smeg

Smeg WDN064SLDIN User manual

Smeg WDF147X-2 User manual

Smeg

Smeg WDF147X-2 User manual

Smeg LSTA147SSA User manual

Smeg

Smeg LSTA147SSA User manual

Popular Washer Dryer manuals by other brands

Hoover HD 485AMBB/1-S manual

Hoover

Hoover HD 485AMBB/1-S manual

Ariston MARGHERITA AWD 10 Instructions for installation and use

Ariston

Ariston MARGHERITA AWD 10 Instructions for installation and use

Whirlpool WGT4027EW installation instructions

Whirlpool

Whirlpool WGT4027EW installation instructions

Kenmore 417.93702201 Repair parts list

Kenmore

Kenmore 417.93702201 Repair parts list

Splendide AWD 129 Training guide

Splendide

Splendide AWD 129 Training guide

Electrolux EW 1231 W Installation and instruction manual

Electrolux

Electrolux EW 1231 W Installation and instruction manual

LG WM3987HW User and installation guide

LG

LG WM3987HW User and installation guide

Indesit WIDL 86 manual

Indesit

Indesit WIDL 86 manual

Electrolux Zanussi ZWD 1270 W Instruction booklet

Electrolux

Electrolux Zanussi ZWD 1270 W Instruction booklet

AEG LAVAMAT L 16850 user manual

AEG

AEG LAVAMAT L 16850 user manual

Haier HM501 Mode d'emploi

Haier

Haier HM501 Mode d'emploi

Kenmore 110.98752 Use and care guide

Kenmore

Kenmore 110.98752 Use and care guide

Amica AWDI914GJ operating instructions

Amica

Amica AWDI914GJ operating instructions

Toshiba TWD-BH90W4M owner's manual

Toshiba

Toshiba TWD-BH90W4M owner's manual

GE GUD27GSSJ1WW installation instructions

GE

GE GUD27GSSJ1WW installation instructions

Maytag MGT3800TW - 27" Gas Laundry Center installation instructions

Maytag

Maytag MGT3800TW - 27" Gas Laundry Center installation instructions

Beko WDIY854310 user manual

Beko

Beko WDIY854310 user manual

Splendide WD2100 Installation Instructions and Use & Care Guide

Splendide

Splendide WD2100 Installation Instructions and Use & Care Guide

manuals.online logo
manuals.online logoBrands
  • About & Mission
  • Contact us
  • Privacy Policy
  • Terms and Conditions

Copyright 2025 Manuals.Online. All Rights Reserved.