Smeg S58TL-2 Product guide

I
E
461304539 16/05/02 Litograf s.r.l. Jesi
UK
F
Istruzioni per l'uso e l'installazione
Instrucciones para el uso
Notice d'utilisation
User's book
S 58 TL - 2
smeg

CONTENTS
1 WARNINGS
2 DESCRIPTION OF THE MACHINE AND TECHNICAL CHARACTERISTICS
3 INSTALLATION
4 STAIN REMOVAL
5 OPERATING INSTRUCTIONS
6 CONTROL PANEL
7 - 8 PROGRAMTABLES
9 MAINTENANCE
10 IF THE MACHINE DOES NOT WORK
11-12 ILLUSTRATIONS

WARNINGS
It is extremely important that this instruction manual be kept with the equipment it relates to, for future consultation.
If the equipment is sold on to another user, ensure that the instruction manual is handed over with it, so that
the new owner can familiarise himself with the method of operation and the precautions to be taken. The same
thing applies when the apparatus is left as a fixture in a house that has been sold to a new owner. The following
warnings are given for safety reasons. They must be read carefully before installation or before use of the
equipment.
-The equipment must only be used as a domestic wasching machine, any other use will be considered improper
and therefore dangerus.
-Do not touch the machine with wet hands or feet.
-Do not allow unsupervised children to operate the machine.
-The machine must only be opened on completion of the wasching cycle.
-Schuld the need occur, switch off the machine by pressing knob (P) or by pressing and releasing the stop
pushbutton if fitted.
-If the machine is located on a carpet floor, ensure that there is a circulation of air between the feet and the
carpet.
-Take care that the machine does not rest on the power supply cable.
-Do not overload the machine with washing. Follow the instructions given in this manual.
-The machine is heavy; always take care when moving it.
-Before use, remove the packing and lock screws. If this is not done might result in serious damage both to the
product and to the environment. See the instructions.
- Only wash garments that are suitable for machine washing. In case of doubt, contact the manufacturer of the
garment, or follow the indications given on the label.
- Objects such as coins, safety pins, nails, screws, stones or other objects of a certain consistency or with a cutting
edge can cause considerable damage, and must not be put into the machine.
- Garments that are soaked in petroleum products should not be machine washed. If volatile substances are used
to remove stains, ensure that these substances have completely evaporated from the garment before putting it into
the machine.
-Never attempt to repair the machine by yourself. Repairs carried out by inexperienced person can cause damage
or serious malfunction. Always contact your nearest authorised Techinical Service Centre. Make sure that you are
always supplied with original spare parts.
1
For maintenance work,
disconnect the machine
from the power supply.
The machine cannot be
opened until three minutes
after the cycle has finished
or the machine has been
switched off.
Do not pull the power feed
cable or the equipment to
remove the plug from the
power socket.
After use, it is advisable to
disconnect the machine
from the power supply and
close the water supply tap
Do not expose the
machine to atmospheric
agents.
Do not remove or insert
the plug in the socket
with wet hands.
The machine must be
connected to a power
supply with an efficient
earth connection,
according to the law.
It is good practice to avoid
the use of adapters,
extension leads and
multiple sockets.
3'

WELCOME!
Congratulations on your choice!
Please read the following instructions cerefully for easy and safe use of the machine's many functions.
Then see just how satisfied you will be.
DESCRIPTION OF THE MACHINE
The washing machine is a domestic appliance that can wash any type of material.
The machine is constructed from panels treated and painted such that its aesthetic quality remains unaltered in
time.
The motor and all moving parts have been designed and manufactured to guarante silent operation.
The stainless steel drum is large and well mounted for a better quality wash and longer life.
The control panel ensures easy selection of all the wash cycles desired.
Its excellent stability is the result of extensive research by the designers ino the equilibrium of masses in moviment.
TECHNICAL CHARACTERISTICS
Dimensions :
width 40cm - height 85cm - depht 60cm
Water pressure :
0,5N/cm2- minimum - 10N/cm2- maximum
Max. washing load:
5Kg- Cotton, linen - 2Kg - Synthetic fabrics, delicate fabrics 1Kg - Wool
Weight:
Approx.82 Kg
Absorbed power:
Check the rating plate inside the washing machine's water filter hatch or on the back
of the machine.
Electrical connection:
Check the rating plate inside the washing machine's water filter hatch or on the back
of the machine.
2

INSTALLATION
Warning:
Installation must be carried out by qualified personnel and according to the manufacturer's instructions. Incorrect
installation may cause damage or injury to persons.
The machine can be installed anywhere, providing that the ambient temperature is not les than 3°C and that the
cables and pipes at the rear of the machine are not crushed.
Unpacking:
Transport the machine to near its installation place and remove the external packing (Fig.1). If the integrity of the
machine is in doubt, do not use it. Seek advice from qualified personnel.
During transport, the machin's rocker group is locked in place by 4 plastic spacers with screws. Before starting
up the machine, loosen the screws with a suitable key and remove the screws and the plastic spacers
(Fig. 2). Put the screws and spacers aside for use in case of future transport.
N.B. If the plastic spacers fall into the machine, open the side panel by loosening the three screews indicated with
V in figure 2, remove the spacers and replace the panel.
*Lift the machine and remove the base (Fig.3A).
*Tilt the machine and extract the two inner polystyrene corner elements( if foreseen) by pulling the two cardboard
tabs E-F. Extract tab E first, then tab F (Fig.3B).
Setting in place:
Move the machine with care until it is close to the connection points.
WHEN REQUIRED, to facilitate movement use the transporter wheel. To activate this, move the lever on the bottom
left hand side to the opposite side. Once the machine has been moved, return the lever to its original position (Fig.
4).
To enable the machine to operate correctly it must be set on a level.
This can be done by adjusting the screw feet (Fig. 5) on the base of the unit (2 feet for machines with rear wheels,
4 feet for machines with no wheels).
Once the machine has been set level, lock the screw feet by tightening the nut on the base of the machine using a
spanner.
Electrical connection:
Check that the voltage written on the technical data plate on the inside of the door filter corresponds to the mains
supply voltage. The counter, pressure relief valve, supply lines and power connection have all been designed for
the maximum load requested (Fig.6).
insert the plug in the socket, ensuring that it is fitted with an earth (Fig.7).
If the electrical socket in which the plug of the machine is inserted is unsuitable, have the socket replaced by qualified
personnel. It is good practice to avoid the use of adapters, extension leads and multiple sockets.
Water connection:
Turn on the tap and allow a good quantity of water to flow until it is clear and free from impurities. This procedure
is especially applicable in the case of new water systems or those that have remained unused for some time. Connect
the water supply hose to the tap, inserting the filter provided, and hand tighten (Fig.8).
Check that the other end of the hose is tight on the inlet (Fig.9).
Position the discharge hose at a minimum height of 60 cm, though not more than 90 cm, from the ground (Fig.10).
N.B. To prevent siphoning, do not hermetically seal the machine's discharge hose.
If the water system does not have a discharge system, use the special "U" fitting to hook the hose over the edge
of a washbasin and tie it to the tap (Fig.11). Remember that the hoses must not be squashed when manoeuvring
the machine against the wall.
3

STAIN REMOVAL
Not all stains can be removed by a machine wasching.
The following instructions describe the treatment to be given to material prior to being loaded in the machine, in
order to avoid an unsuccessful wash and the formation of residual discolouring.
- Wax: Remove the wax with a non-cutting edge in order to remove as much as possible, then place a sheet of
paper between an iron and the stained item.
- Ball point and felt tip pens: Reduce the stain with the aid of a soft cloth soaked in colourless 90°alcohol. Be
careful not to spread the stain.
- Damp marks and mildew: After having checked that the item is colourfast on a non-visible part, put it to soak
in water with added bleach. Otherwise, place the item in 10% oxygenated water and leave for 10- 15 minutes.
- Ironing marks: If the fabric is slightly marked, use the procedure described for mildew.
- Rust: Use an anti-rust product following the manufacturer's instructions.
- Chewing gum: Dilute using acetone and remove with a clean cloth.
- Paint: Do not wait for the paint to dry. Treat immediately with the solvent indicated on the paint container (water,
turps, trichloroethylene), wash with soap and water, then rinse.
- Lipstick: Dab with ether if the item is wool or cotton, or with trichloroethylene if it is silk.
- Nail varnish: Place the stained part of the item on a sheet of absorbent paper, then wet the other side of the
item with acetone. Ensure that the sheet of absorbent paper is changed frequently. Continue until the stain has
completely disappeared.
- Metal stains: Apply lemon juice until the stain has completely or almost disappeared.
- Grease or tar: Spread some fresh butter on the stain, leave for a while then dab with oil of turpentine.
- Grass: Soap delicately, treat with diluite bleach. For woollens, 90°alcohol can give good results.
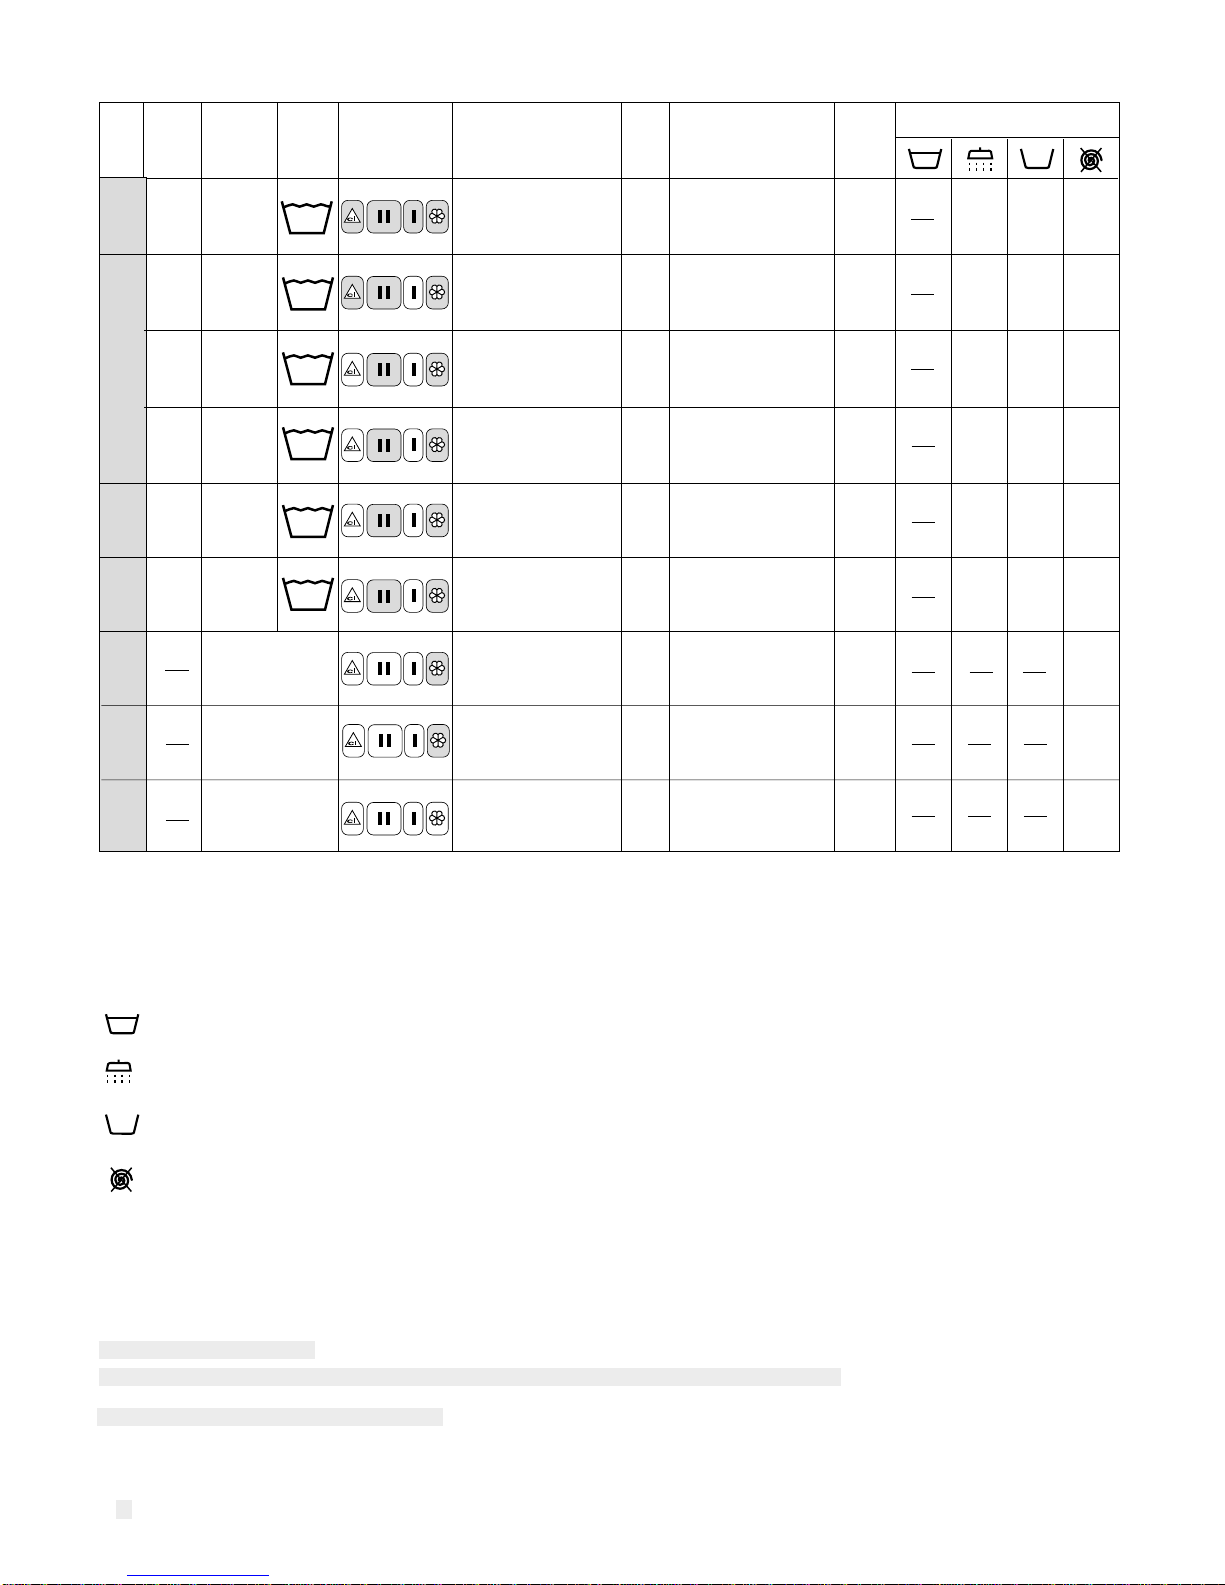
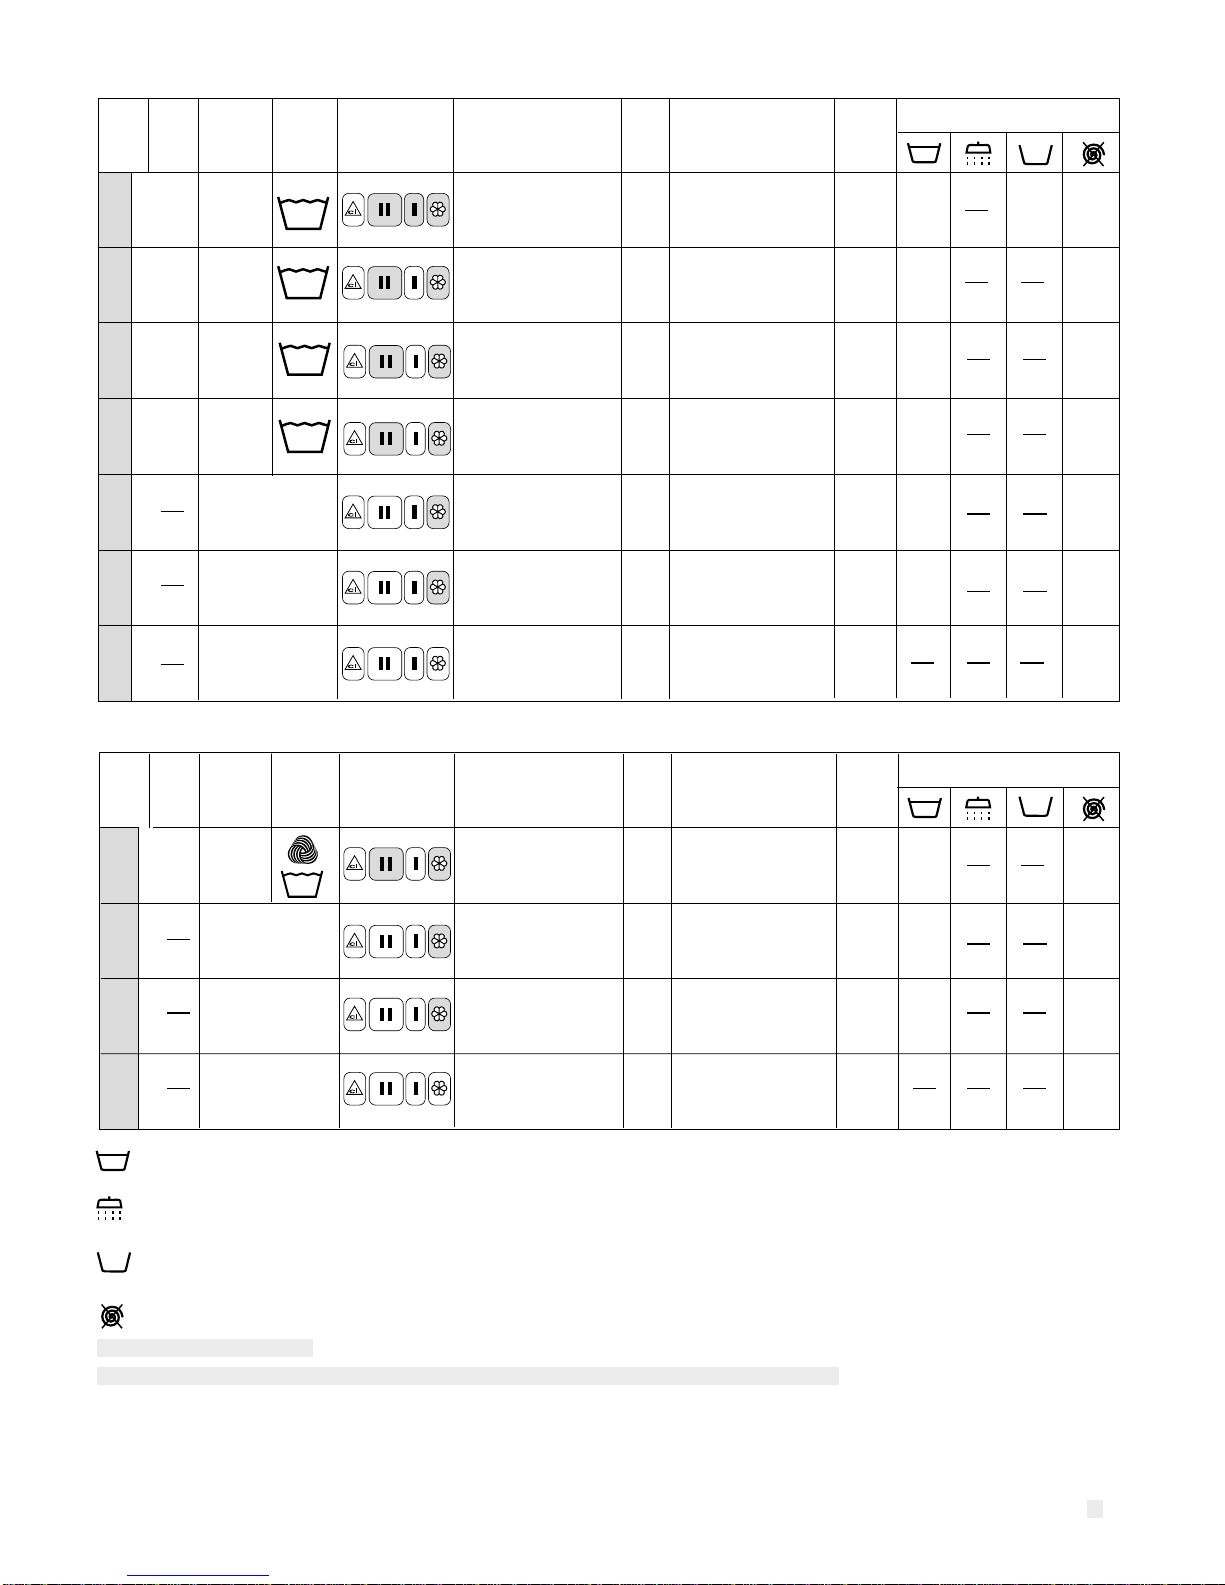
DESCRIPTION OF WASHING SYMBOLS
Before putting the material in the machine, examine the clothing label in order to select the correct washing
programme.
The table illustrated below may be of help.
Resistent material
Delicate fabric
The item may be washed at 95°C
he item must be hand washed
Dry clean only
Can be bleached in cold water
Must not be bleached
Can be ironed at 200°C max
Do not iron
Can be dry cleaned
using any solvent
Must not be dry cleaned
Can only be dry cleaned using:
perchloride, lighter, fuel, pure alcohol,
R111 and R113
Can only be dry cleaned using:
aviation fuel, pure alcohol,
and R113
Dry flat
Can be hung to dry
Dry on clothes hanger
Can be dried in a clothes
drier at normal temperature
Can be dried in a clothes
drier at reduced temperature
Must not be machine dried
The item may be washed at 60°C
The item may be washed at 40°C
The item may be washed at 30°C
Can be ironed at 150°C max
Can be ironed at 100°C max
4
9595
6060
4040
3030
cl
A
P
F

5
OPRRATING INSTRUCTIONS
Important: To do first wash without clothes to check the functions. This will clean the drum.
For each wash ensure that:
- The water supply connections are secure, the tap is turned on (Fig12) and the discharge hose is positioned
correctly (Fig. 10-11).
- The programme selector (P) is in the stop position (STOP).
- Then, with dry hands, insert the plug in the power socket (Fig.7).
- Sort the washing into fabric types.
- Check that there are no objects in the pockets of the clothing to wash which may damage the fabric, washing
machine or filter.
- Open the top cover by lifting it (Fig. 13).
- To open the basket hatch, push the red button to disconnect, holding both doors of the hatch with one hand
(Fig. 15).
- Insert the washing. To ensure that the load is evenly balanced when spinning, if possible wash garments of
different sizes but the same type of material in the same load.
Incorrect distribution of the load may mean that the washing machine is unbalanced when spinning.
Close the basket hatch, ensuring that it connects properly, then close the tub cover (if there is one) and load
the detergent as follows:
-* Place detergent for the pre-wash cycle in the compartment marked “I”
-* Place detergent for the wash cycle in the compartment marked “II”
IMPORTANT: If powdered detergent is used, the green flap inside tray “II” must be in an upward position,
for liquid detergent the flap must be pushed down (Fig. 16-B).
-* Softener, bluing or perfume must be placed in the compartment marked “ ”.
-* Bleach must be placed in the compartment marked " ".
N.B. Remember to pull the green flap up when using powdered detergent. When filling with detergent it is
important that each product be placed in its own compartment and does not overflow.
If the detergent spills into the softener compartment, the rinse will be sudsy and laundry could have white spots.
If softener spills in the detergent compartment, washing will be less effective.
CAUTION:
Always use a non-foaming detergent suitable for automatic washing machines.
Ensure that you measure out the correct amount of detergent, following the indications given by the Manufacturer
on the pack.:
- too much detergent might cause excessive foaming and reduce the performance of your washing machine
- too little detergent might result in unsatisfactory results
- Close the top lid, select a suitable program and the correct temperature on the basis of the
program list.
cl

6
P
esclusione
centrifuga
mezzo
carico
risciacquo
aggiuntivo
arresto in
ammollo
1
01
01
01
0
500
580
600
650
700
725
750
800
ESSORAGE
40°
50°
60°
70°
80°
90°
Froid
30°
FIG.22
T
ON
OFF
FIG.23
FIG.21
FIG.17 FIG.18 FIG.19 FIG.20
CHOOSING THE PROGRAM AND SELECTING FUNCTIONS SELECTING FUNCTIONS:
- STOP WITHOUT DRAINING BUTTON: This option is only valid for synthetic fabrics. When the stop without draining
button (Fig.17) is select (button in position 1), the machine will stop automatically at the start of final rinse, and the
washing will be left to soack without becoming creased. To complete the program press the stop without draining
button again in position 0(Fig.17).
- ADDITIONAL RINSE BUTTON: Select this button to give an additional rinse cycle (can only be used with the more
energetic washing cycles). Use if the water in your area is very soft or if the garments being washed belong to
someone who is allergic to detergents. The machine made this function when the button is in position 1(Fig.18).
- HALF LOAD BUTTON: If the load weighs 2.5 Kg of less, select the half load button. This reduces the amount of water
used when washing. The machine made this function when the button is in position 1(Fig. 19).
- NO SPIN BUTTON: Select the no spin button (Fig. 20) if required. When selected, the machine will complete the
washing cycle without spinning. This is ideal for drip-dry garments.If the button is in position 1the machine complete
the washing cycle without spinning, if the button is in position 0the machine made the spin.
- SPIN SPEED SELECTOR KNOB: Set the spin speed to the required value by turning the knob (V) (Fig. 21) . This
function can only be used with energetic washing cycles, as the spin speed for delicate cycles is automatically set to
low speed (550 rpm).
STARTING THE MACHINE:
1) Set the program you want by turning the Thermostat knob (T)(Fig. 22) and the Program knob (P)(Fig. 23). CAUTION!
Never turn the program knob (P) in an anti-clockwise direction (Fig. 23).
2) To start the machine, pull the program knob (P)(Fig. 23); the indicator light will turn on.
If you accidentally turn the knob further than intended, stop the program by pushing the program knob (P) in again
(Fig. 23) . Turn the program knob in a clockwise direction until it reaches the desired position, then repeat operation
number 2.
Although this is not recommended, it is possible for articles that have been left out of the load at the start of the
program to be added to the load during the main wash.
In this case, proceed as follows:
Press the program knob (P)(Fig. 23) .
Wait for approximately 3 minutes until the safety device unlocks. Open the top cover, open the plastic tub cover
using the handle provided (only in machines with a double door), and finally open the washing basket hatch by
pressing the red button. Insert the garments to be added to the load.
Close the basket hatch (making sure that it connects properly), the tub cover (if there is one) and the top cover. To
re-start the machine, repeat operation number 2 above.
3) At the end of the washing program the machine will stop automatically on one of the STOP reference points on
the program knob (P).
- At this point, press the program knob (P) (Fig. 23).
- Wait 3 minutes until the top cover unlocks.
- Open the top cover, open the tub cover (if there is one), open the basket hatch by pressing the red button, and
take out the washing.
N.B.: After washing, it is good practice to disconnect the machine from the electric power supply, ensuring that
your hands are dry before doing so (Fig. 7), and to turn off the water supply tap (Fig.24).

7
1/2
Knob
(P)*
Care
label
symbol
Examples and degree
of soiling Quan-
tity in
kg Program
description
Use of supplementary
buttons
Sheets, white and solid
colour tablecloths, towels,
underwear;
heavy soil
INTENSIVE PROGRAMS FOR COTTON FABRICS
Prewash, main wash,
rinses, softener,
empty and final spin
As
requi-
red
As
requi-
red
As
requi-
red
Whitener,
scented
softener
Rinses, softener,
empty and final spin
Knob
(T)**
Softener, empty
and final spin
Dispenser
compart-
ment Spin
speed
Program-
me
90
Very dirty
washing
with
pre-wash
To rinse or refresh
articles fabrics that
have not been
used for some time
To soften, starch,
perfume or blue articles
in resistant fabrics
800***
*** FOR ENERGETIC WASH PROGRAMS ONLY
The spin speed indicated in the table is obtained by setting the knob to position 800 .
If a different spin speed is required, set the knob or button to the speed desired before starting the washing cycle.
For synthetic and wool cycles the spin speed is automatically reduced to 550 rpm.
Main wash,
rinses, softener,
empty and final spin
As
requi-
red
As
requi-
red
As
requi-
red
90
Up to
5
Sheets, white and solid
colour tablecloths, towels,
underwear;
heavy soil
Up to
5
Up to
5
Up to
5
As
requi-
red
As
requi-
red
As
requi-
red
1
2
3
4
5
* Position of programmer knob
** Position of adjustable thermostat knob. Is possible to obtained a cold wash with the knob in position °C
6
7
60
40
Resistent
colours
Delicate
colours
Very dirty
washing
without
pre-wash
Rinses
Up to
5
Up to
5
Short wash,
rinses, softener,
empty and final spin
Short wash,
rinses, softener,
empty and final spin
Quick wash for table
linen and other resistant
fabrics with fast colours
Quick wash for articles
in cotton,linen or jute
with colours that may run.
90°
90°
60°
40°
As
requi-
red
As
requi-
red
As
requi-
red
As
requi-
red
As
requi-
red
As
requi-
red
60°
40°
60
40
Main wash,
rinses, softener,
empty and final spin
Main wash,
rinses, softener,
empty and final spin
As
requi-
red
As
requi-
red
As
requi-
red
As
requi-
red
As
requi-
red
As
requi-
red
Up to
5
Up to
5
Up to
5
Normal
dirty
washing
Light dirty
washing
Sheets, white and solid
colour tablecloths, towels,
underwear;
normal soil
Sheets, white and solid
colour tablecloths, towels,
underwear;
light soil
1/
Empty
and final spin Empty
and final spin
800***
800***
800***
800***
800***
800***
800***
800***
Empty
and final spin
Arresto in ammollo
Risciacquo aggiuntivo
Mezzo carico
Esclusione centrifuga

8
* Position of programmer knob
** Position of adjustable thermostat knob. Is possible to obtained a cold wash with the knob in position °C
GENTLE ACTION PROGRAMS FOR WOOL
Delicate
prewash
GENTLE ACTION PROGRAMS FOR SYNTHETICS
Delicate fabrics, very
soiled with any kind of
stain
Prewash, main wash,
rinses, softener,
empty and final spin
Synthetics
For colored
synthetic fabrics Main wash,
rinses, softener,
empty and final spin
Pure
wool
35°
**
Machine washable
wool
High water level wash,
rinses, softener, empty
and final spin
Program-
me
Dispenser
compart-
ment
Use of supplementary
buttons
Knob
(P)*
Examples and
degree
of soiling
Quan-
tity in
kg Program
description
Dispenser
compart-
ment
Knob
(T)**
Final short
spin Delicate
spin
Final spin
Program-
me
Use of supplementary
buttons
Knob
(P)*
Care
label
symbol
Examples and
degree
of soiling
Quan-
tity in
kg
Program
description
Knob
(T)**
16
17
Spin
speed
550
550
60
60
35
550
Maxi
mum
2,5
Maxi
mum
1
As
requi-
red
As
requi-
red
As
requi-
red
Rinses
To rinse or refresh
articles fabrics that
have not been
used for some time
Rinses, softener,
empty and final spin
To soften, starch,
perfume or blue
articles in resistant
fabrics
Softener, empty
and final spin
Special
treatments
Final short
spin Delicate
spin
Final spin
As
requi-
red
As
requi-
red
Maxi
mum
1
Care
label
symbol
Spin
speed
9
10
11
12
13
14
50
Mix
fabrics
60°
60°
50°
Quick wash for
colored synthetic
fabrics little dirty
Main wash,
rinses, softener,
empty and final spin
As
requi-
red
As
requi-
red
As
requi-
red
As
requi-
red
As
requi-
red
As
requi-
red
As
requi-
red
To soften, starch,
perfume or blue
articles in resistant
fabrics
Softener, empty
and final spin
Special
treatments 550
Maxi
mum
1
18
As
requi-
red
As
requi-
red
As
requi-
red
As
requi-
red
As
requi-
red
As
requi-
red
As
requi-
red
40
Delicate
synthetics
40°
For colored synthetic
fabrics that may run
Main wash,
rinses, softener,
empty and final spin
8
Maxi
mum
2,5
Maxi
mum
2,5
Maxi
mum
2,5
Maxi
mum
2,5
Maxi
mum
2,5
Maxi
mum
2,5
550
550
550
550
550
550
1/2
1/2
1/2
15
Maxi
mum
1
Rinses
To rinse or refresh
articles fabrics that
have not been
used for some time
Rinses, softener,
empty and final spin
As
requi-
red
As
requi-
red
550
Arresto in ammollo
Risciacquo aggiuntivo
Mezzo carico
Esclusione centrifuga

9
MAINTENANCE
I
NTRODUCTION
Our wash-drier is a machine thet does not need any particular or complicated maintenance operations,
in that it has been designed for a long working life. Nevertheless, some attention is recommended.
Before carryng out the following operations, ensure that the machine is disconnected from the the
electricity supply (Fig.7) and the water is turned off (Fig.12).
HOW TO CLEAN THE WASHING MACHINE
Use a damp cloth to clean the outside of the unit. Do not use abrasive products.
When the washing cycle has been completed, leave the cover open for a little while to allow the rubber
parts to dry.
Periodically clean any residual detergent from the trays, using a damp sponge.
Remove the filters from their holders and rinse them under running water.
INSPECTION HATCH
It is possible to recover objects that accidentally fall between the basket and the tub by removing the
plastic beater on the opposite side of the basket from the basket hatch itself (see Fig. 25).

10
IF THE MACHINE DOES NOT WORK
Before contacting the technical service department, check that the following operations have been carried out in
full; this will save both time and money.
The machine does not work (indicator off)
Ensure that:
1) The mains power supply has not failed
2) The plug is properly inserted into the socket
3) The program dial (P) has been pulled out or the
ON/OFF button, if present, has been pressed.
4) The top cover is closed
5) Consult a technician
The machine does not work (indicator on)
Ensure that:
1) The program dial (P) is turned to the selected program.
2) See the indications for “the machine does not fill
with water”
The machine does not fill with water
Ensure that:
1) The water supply is working properly.
2) The tap is turned on
3) There are no bends or constrictions in the water pipe
4) With the power supply turned off, clean the inlet
filter between the tap and the water pipe
5) Consult a technician
The machine loads and drains water continually
Ensure that:
1) The drainage pipe is at the correct height (60-90
cm)
2) The drainage pipe outlet is not submerged in water
3) Consult a technician
The machine does not drain or spin
Ensure that:
1) The drainage pipe is correctly positioned
2) There are no bends or obstructions in the drainage
pipe
3) The amount of detergent used was not excessive
4) The detergent tray is not blocked
5) The detergent used is of the right type for an automatic
washing machine
The top cover does not open
1) Wait for 3 minutes after the program has finished
The machine vibrates or is particularly noisy
Ensure that:
1) Large articles (sheets, tablecloths, etc.) are properly
opened out
2) The washing machine is correctly resting on its feet
3) The four screws and spacers fitted as packing have
been removed
There is too much foam
Ensure that:
1) You have not used too much detergent or a detergent
of the wrong type
The washing is not properly spun
Ensure that:
1) The garments were evenly distributed in the basket
2) You have selected the correct spin speed
The machine stops while washing
Ensure that:
1) The mains power supply is working
There are remains of detergent in the trays
Ensure that:
1) The water tap is open properly
2) The inlet filter between the tap and the water pipe is
clean
The washing does not come out properly cleaned
Ensure that:
1) You have not overloaded the basket
2) You have used the right amount of detergent
3) You have selected the correct washing program
The washing fades or shrinks
Ensure that:
1) You have selected the right program
2) You have selected the right temperature
Try running the machine again to see whether you have managed to solve the problem. If the problem recurs,
contact the technical service centre, specifying:
1) The type of problem
2) The model of machine
3) The serial number of the machine, which is indicated on the plate inside the filter hatch (Fig.26).
Other manuals for S58TL-2
1
This manual suits for next models
1
Table of contents
Other Smeg Washer manuals

Smeg
Smeg LBP3T84PIT User manual

Smeg
Smeg Washing Machine K85 User manual

Smeg
Smeg WHT710EIT User manual

Smeg
Smeg SW106 User manual

Smeg
Smeg LST127 User manual

Smeg
Smeg Washing Machine K600.2 User guide

Smeg
Smeg WHT1114LSIT User manual

Smeg
Smeg WHT812EIT User manual

Smeg
Smeg WHT914LSUK User manual

Smeg
Smeg GW2050H-F Instruction Manual