Smith Corona Freedom III User manual

Freedom III Tri-Connect Wireless Headset
User Manual
Multi-Connectivity
Telephone - PC - Bluetooth
INTRODUCTION
Base & Headset Telephone cord Power Adapter
USB cord included with PC version only
Assemble headband
- Clip the headband on the headset. And rotate the microphone boom arm to your
required position.
Included with your purchase:

Positioning a Headset Microphone
Holding the headset, rotate the headband to bring the boom close to your mouth.
Place the microphone element to the side of your mouth to avoid noise from
breathing.
Keep the microphone element about an inch from the side of your mouth, but not
touching it.
Make sure the front of the microphone points toward your mouth.
Position the headset consistently every time you use it.
Earpiece Speaker Volume adjustment
To change the earpiece speaker volume:
tilt the volume switch to the ‘+’ sign to increase volume and tilt the switch to the ‘-’ sign
to decrease volume. And pressing the switch can mute and unmute microphone sound.
Base Station (Front & Left side)
Bluetooth Connection Button
PC/Tel Selection
Microphone Mute – Press to mute microphone sound on the headset
Microphone Volume – After connection, you may adjust the volume level for the best
microphone volume
Compatibility Switch – Selecti 1 or 2 until a dial tone can be heard via the telephone
connection
USB Port – For the PC connection using the USB cable
External Ring ON/OFF – The external ring alert sound on/off switch for PC incoming
calls with you use softphones
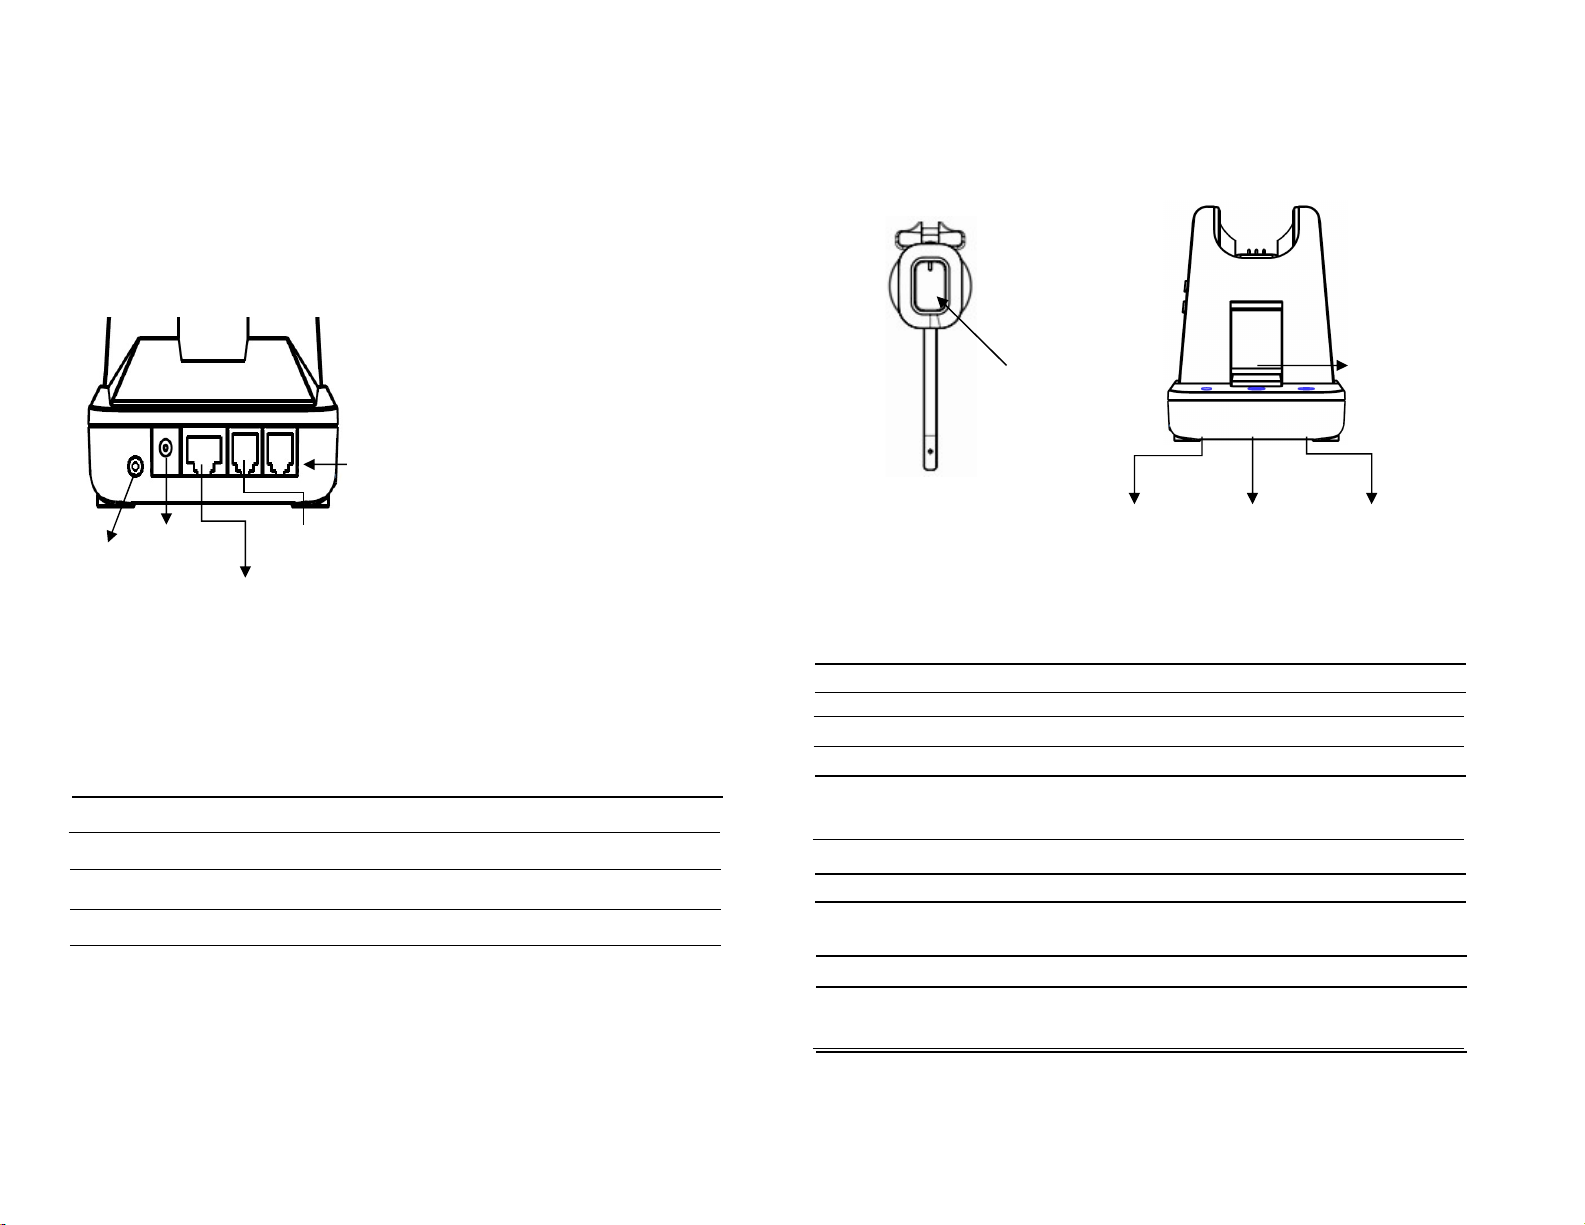
Base Station (Back side)
BusyLight Jack Connect BusyLight plug to the jack
DC Jack Connect Power Adapter to DC Jack
AUX port Connection for Handset Lifter or EHS Adaptor(optional extra)
Telephone Port Connect telephone cord to the headset port or handset port
Handset Port Plug Handset cord from the phone to Handset port
Handset port
BusyLight
Jack AUX port
Telephone port
DC Jack
Visual Indicator
Charging Status LED Indicator (Headset) Visual Window(Base)
Charging Red LED : ‘ON’ White
Full Charged Blue LED: ‘ON’ White
Low Battery Blinking in White
Incoming Call Blinking in Green
Event LED Indicator (Base station)
Touch Microphone Button Mute Icon Mute: ‘ON’ Unmute: ’OFF’
Touch PC/TEL Button PC/TEL Icon TEL: ‘OFF’ PC: ‘ON’
Touch Bluetooth Button Pairing mode: Blinking
Connected: ‘ON’ Disconnected: ‘OFF’
Headset Hook Off Visual Window Green Light
Event LED Indicator (Headset)
Hook Off BLUE double blinking per 3 seconds
Visual
Window
Bluetooth PC/TEL Microphone
Button Button Mute button
Headset
LED

Audio Indicator
Event Sound Effect
Speaker /Microphone volume Beep Sound ‘UP’ - High tone, ’DOWN’ – Low Tone
Max/Min Speaker volume Double beep
Max/Min microphone volume Double beep
Microphone mute/unmute Mute : beep Unmute : Double beep
Mute reminder Beep in every 5 sec
Hook Off / On Hook Off : Double beep(High tone),
Hook On : Double beep(Low tone)
Setting up the Base
Operating Instructions
- Plug the Power Adapter DC Jack into the back of the Base Station.
(See Note 1 below)
- Press the Hook On/Off button to make a call
- Select compatibility switch ‘1’ or ‘2’ position until you can hear the dial tone
- Adjust earpiece speaker and microphone volume to match your required sound level.
- Press the Hook On/Off button to end a call
Note 1 : Factory default setup : Pairing between Base station and Headset
- Place the headset on the cradle
- Plug the power adapter into the base unit
i. Pairing process is automatically started.
ii. Visual Window (Base) is blinking: Now, Base station is on pairing mode.
- Press the ‘mute button’ of the headset until LED of the headset is blinking.
: Headset enters to pairing mode
- If pairing is completed, beep sound can be heard and Visual Window (Base) light on
base station and light on headset will be turned off.
Connecting To a PC
Plug the USB cable to the port on the left side of base unit.
Connect the USB cable to any free USB port on the PC.
The Freedom III is optimized for Skype for Business and supports Skype, Avaya One-X
agent, Cisco Jabber, Bria(X-Lite) and 3CX softphones with SoftLink program.
Note : SoftLink is a PC/Mac software that can make enable USB devices to
have Remote Call Control over various softphones.

Bluetooth Usage (Only for Voice Connection)
On the base top case, the Bluetooth button can be found. When this button is pressed,
the blue LED is blinking, and the base station is on Bluetooth pairing mode.
To make pairing with smartphone, PC,
or any other Bluetooth host device, you should put
other Bluetooth device is on pairing mode, too.
On other Bluetooth device finds “DW-780B(xxxx)” .
Select it to finish the Bluetooth pairing.
After finishing pairing, “DW-780B(xxxx)” should be selected on other Bluetooth devices’
paired list.
During idle, the Blue LED will be blinking when the Bluetooth call is coming. And ring
beep can be heard on headset’s earpiece speaker.
To take a call, press the hook button on the headset and then Bluetooth call connection
can be done.
When a Bluetooth call is taken, the blue LED is blinking with different period. To finish a
call, press the hook button on headset.
After finishing, the blue LED will be turned off and previous mode LED will be turned on.
When user makes a Bluetooth call on smartphone,
1. the blue LED on base station will be blinking with different period.
2. PC/Tel LED on base station will be blinking.
3. Call processing beep can be heard on headset’s earpiece speaker.
After other party takes a call, Bluetooth call is automatically connected.
Bluetooth Button
Additional Accessories
Freedom Handset Lifter
The Freedom Handset Lifter remotely lifts the desk phone handset
To make or answer a call.
Electronic Hook Switch (EHS) Adapter
EHS Adapter enables an incoming call to be answered or ended by using the On/Off
EHS is only compatible with designated telephone systems. To determine which
telephones are compatible with the EHS, please refer to EHS guide or contact your
sales representative. Please also refer to your telephone’s user manual for
clarification

Trouble Shooting
1. Cannot hear a dial tone.
☞ Check the PC/TEL button. TEL Mode: PC/TEL indicator – ‘OFF’
☞ Please check the cable connection between Base Unit and Phone.
☞ Check that the power adapter is plugged in and has power
☞ Please check the compatibility switch. Adjust compatibility switch until you can
hear the dial tone.
2. Microphone volume (TX) is low / dead.
☞ Make sure that the microphone (TX) mute function is turned off.
☞ Check the position of the boom arm and make sure that the microphone is
placed as close as possible to your mouth (approx. 2 fingers distance).
☞ Adjust the microphone (TX) volume on the side of base station.
3. Buzzing sound on the headset
☞ Telephone may not be fully immune to the radio transmission between your
headset and base. To overcome this problem, move the base unit to at least
12 inches(30 cm) away from the telephone.
4. Headset echoes
☞ Adjust the telephone’s volume. If necessary, adjust your microphone volume on
the headset to a lower setting.
5. EHS does not work with telephone
☞ Make sure the telephone is compatible with the wireless headset. Refer to the
EHS guide.
6. Headset was working, but it has stopped.
☞ Headset may need pairing to the base again. Refer to the ‘Note 1’ on
‘Operating Instruction’
☞ Headset battery may be dead. Return the headset to the cradle on the base unit
for charging.
Table of contents
Other Smith Corona Headset manuals


