Smithco 43-001-A Bunker Rake Quick start guide

PARTS & SERVICE
MANUAL
Diesel Super Star X-treme
Model 43-001-A Bunker Rake
Starting Serial #14001 November, 2005
SMITHCOPRODUCTSUPPORT
1-800-891-9435
HwySS and PoplarAvenue,CameronWI54822
E-mail:[email protected]

Introduction Service Diagrams Parts Accessories Reference
CONTENTS
Introduction ........................................... 1-3
Introduction.............................................. 1
SafePractices......................................... 2
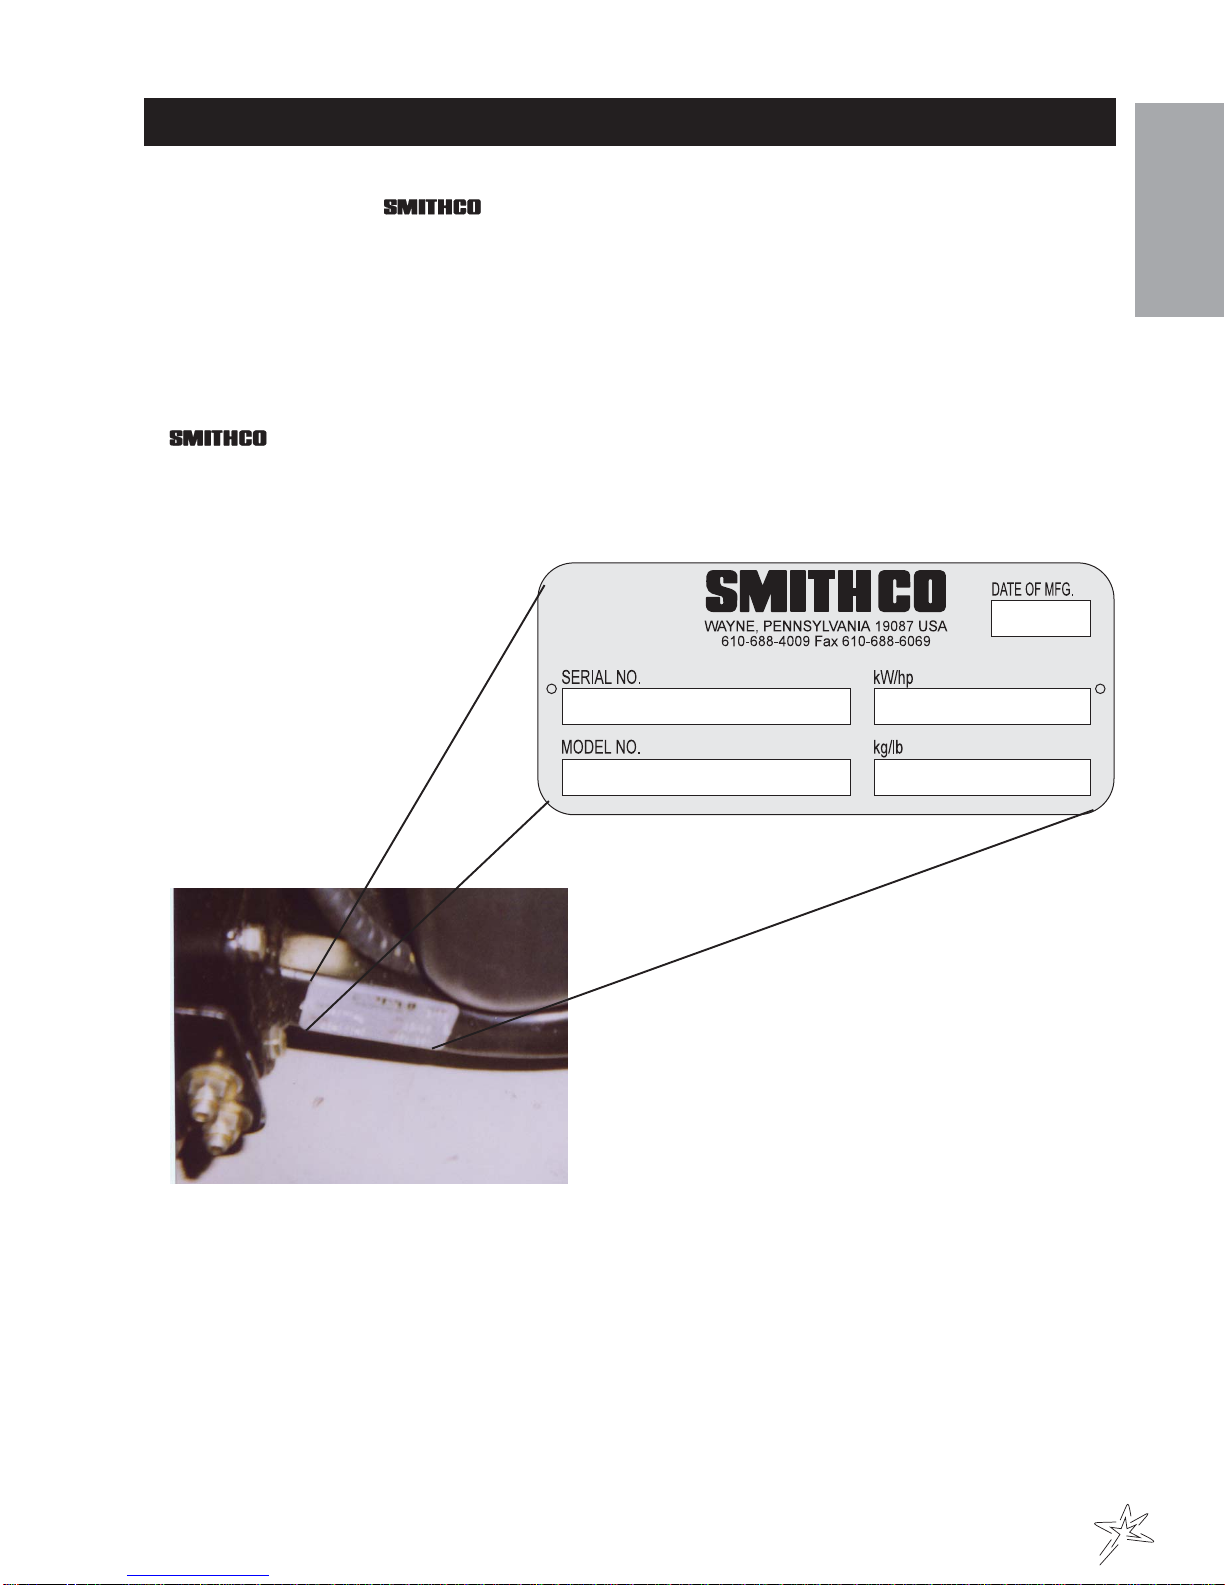
Specifications .......................................... 3
OptionalEquipment ................................. 3
Service..................................................4-11
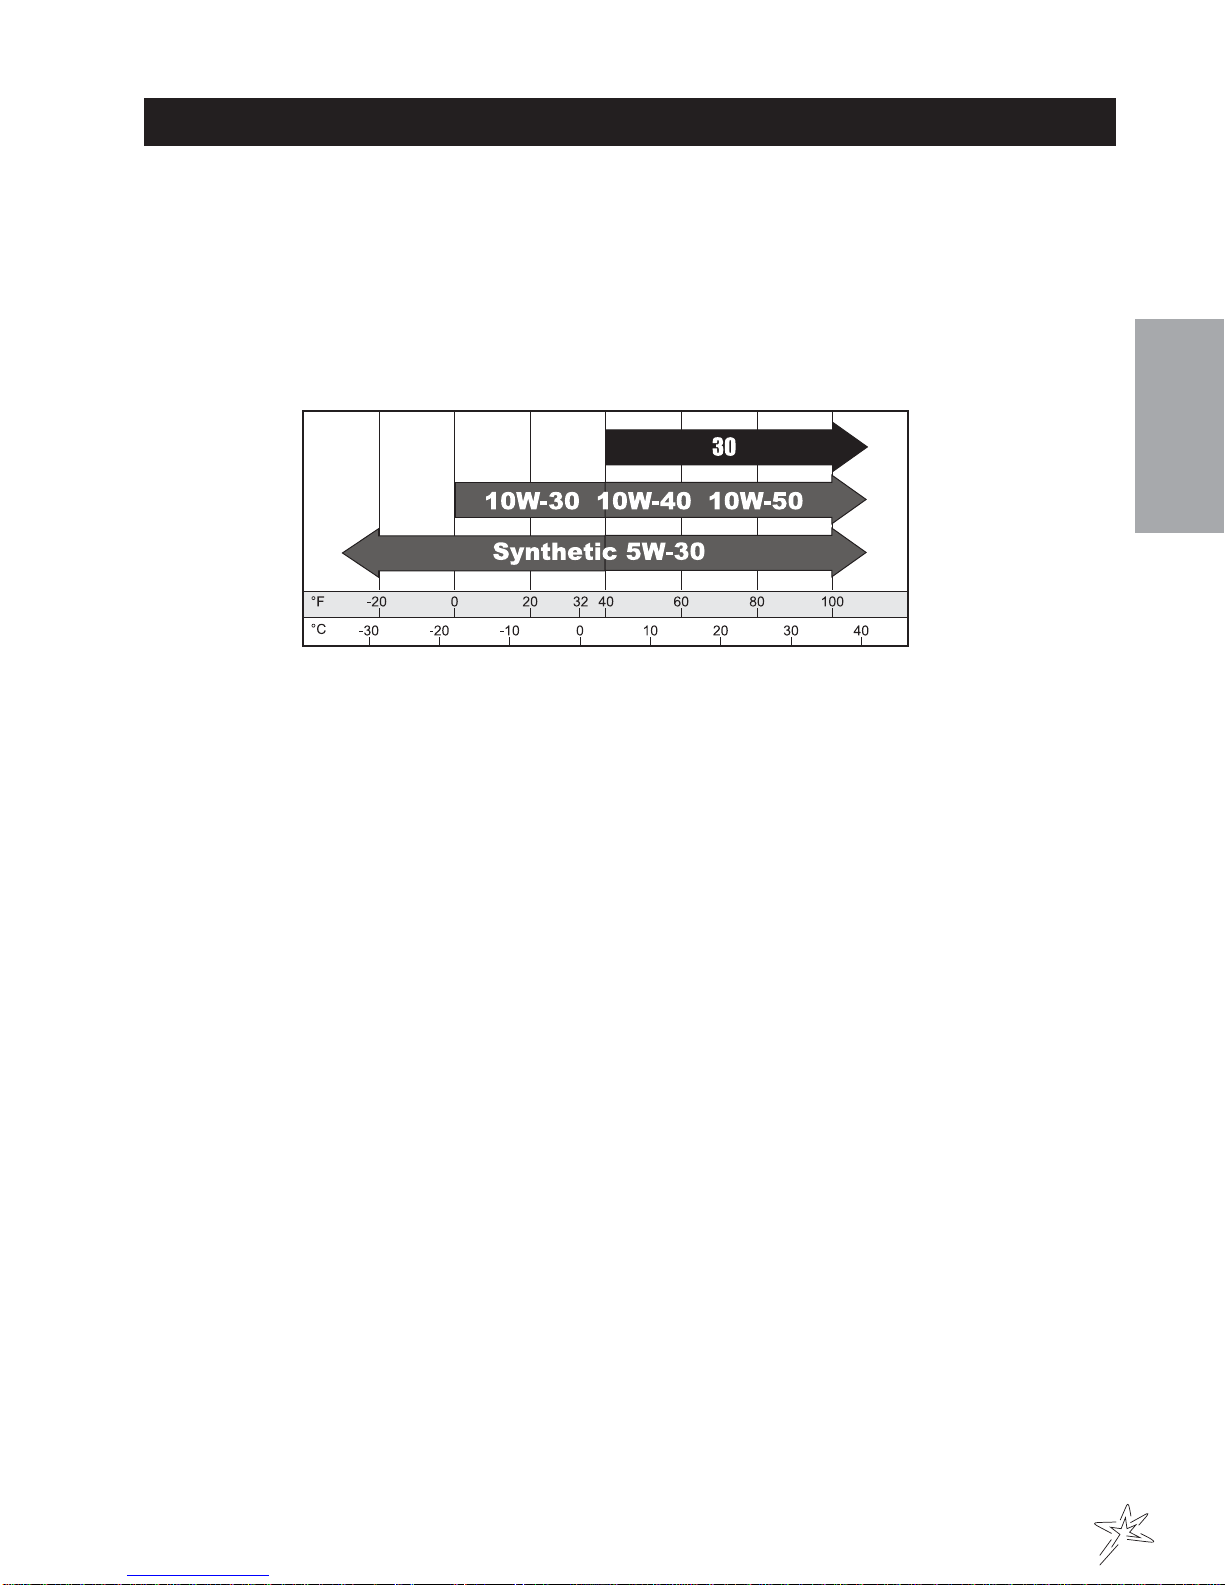
Maintenance......................................... 4-6
ServiceChart ........................................... 7
End User'sServiceChart ......................... 8
Adjustments ........................................9-11
Storage...................................................11
Diagrams.............................................12-15
WiringDiagram..................................12-13
HydraulicDiagram .............................14-15
Parts ....................................................16-39
MainFrame .......................................16-17
FrontFork .........................................18-19
Linkage .............................................20-23
GasTank...........................................24-25
OilTank .............................................26-27
Engine...............................................28-29
RearAxle ..........................................30-31
RakeLift............................................32-33
13-7292-BankHydraulicValve ..........34-35
76-238Front Wheel Motor .................36-37
42-002 RearWheel Motor ..................38-39
Accessories .......................................40-103
43-003HydraulicSand Plow..............40-43
42-011 SandPlow(Steel&Aluminum) ....... 44-45
42-13660"Aluminum Sand Plow.......46-47
42-223AdjustableDisc Edger............48-49
42-008SandCultivator.......................50-51
42-340SandCultivator w/SpringTine 52-53
42-341 Sand Cultivatore w/ Castor Wheels 54-55
42-010ConstructionLevelingBlade ...56-57
43-004 GraderBlade Kit ...................58-59
42-178Infield Scarifier(vertical blades) ... 60-63
42-179Infield Scarifier(chisel blades) ..... 64-67
42-285 Scarifier w/ VerticalBlades ...68-71
42-02684"(213cm)Stainless Rake.......72-75
42-128 72"(183cm) Stainless Rake.....76-79
13-438 Rakewith FinishingBlades ....80-81
13-606Rake withLexanBlades ........82-83
13-684Sand RakeBrush Kit .............84-85
13-298FanRake ...............................86-87
13-319 Fan Rake Kit.........................86-87
26-007ProfessionalField Finisher .....88-89
42-185Drag MatKit ..........................88-89
43-002 FlexAction Field Finisher w/ Brush
.........................................................90-93
26-008 Flex Action Field Finisher......94-97
43-043Finishing BrushKitfor26-008 ........
.........................................................98-99
42-582GreenStar Spiker............... 100-101
42-586GreenStar Main Frame...... 102-103
Reference ........................................ 104-106
Decal List .............................................105
QuickReference...................................106
Warranty................. Inside Back Cover

1
Introduction
Informationneededwhenordering replacementparts:
1. ModelNumberof machine
2. SerialNumberof machine
3. Nameand PartNumberofpart
4. Quantityof parts
INTRODUCTION
Thankyou forpurchasinga product.
Readthis manualand allother manualspertainingto theDiesel SuperStarcarefully asthey have safety, operat-
ing, assembly and maintenance instructions. Failure to do so could result in personal injury or equipment dam-
age.
Keepmanuals inasafe placeafteroperator andmaintenancepersonnel havereadthem. Rightandleft sidesare
fromthe operator’s seat,facingforward.
All machineshave aSerialNumberand ModelNumber.Both numbers areneededwhen ordering
parts. The serial number plate on the Super Star is located on the rear axle. Refer to engine manual for place-
mentof engineserialnumber.
For easy access record your Serial and Model numbers here.

2
Introduction
SAFEPRACTICES
1. It is your responsibility to read this manual and all publications associated with this machine (engine,
accessoriesand attachments).
2. Neverallow anyonetooperate orservicethe machineorits attachmentswithoutproper trainingand
instructions.Never allowminorsto operateanyequipment.
3. Learnthe properuseof themachine, the locationand purposeofall thecontrols and gaugesbefore you
operatethe equipment.Workingwith unfamiliarequipment can leadto accidents.
4. Wear all the necessary protective clothing and personal safety devises to protect your head, eyes, ears,
hands and feet. Operate the machine only in daylight or in good artificial light.
5. Inspectthe area wheretheequipment will beused.Beware of overheadobstructionsand underground
obstacles. Stay alert for hidden hazards.
6. Neveroperate equipmentthatis notin perfect workingorder orwithoutdecals, guards,shields,or other
protectivedevices in place.
7. Never disconnect or bypass any switch.
8. Carbonmonoxide intheexhaust fumes canbefatal wheninhaled,never operateamachinewithout proper
ventilation.
9. Fuel is highly flammable, handle with care.
10. Keep engine clean.Allow theengine to coolbefore storingandalways removethe ignitionkey.
11. Afterengine hasstarted, machinemustnot move.If movementis evident,theneutral mechanismis not
adjustedcorrectly.Shut engineoffand readjustso themachine does notmove whenin neutralposition.
13. Never use yourhands tosearch foroilleaks. Hydraulicfluid underpressurecan penetratethe skinand
cause serious injury.
14. This machine demandsyour attention.To prevent lossof controlortipping ofthevehicle:
A. Use extra caution in backing up the vehicle. Ensure area is clear.
B. Do not stop or start suddenly on any slope.
C. Reduce speed on slopes and in sharp turns. Use caution when changing directions on slopes.
D. Stay alert for holes in the terrain and other hidden hazards.
15. Before leavingoperator’spositionfor any reason:
A.Disengage alldrives.
B. Lower all attachments to the ground.
C.Shut engineoffandremove theignitionkey.
16. Keephands, feetand clothingawayfrom movingparts. Wait forall movementtostop beforeyou clean,
adjustor servicethemachine.
17. Keep the areaof operationclearof allbystanders.
18. Nevercarry passengers.
19. Stopengine beforemaking repairs/adjustmentsor checking/addingoilto thecrankcase.
20. Use parts and materials supplied by SMITHCO only. Do not modify any function or part.
These machines are intended for professional maintenance on golf courses, sports turf, and any other
area maintained turf and related trails, paths and lots. No guaranty as to the suitability for any task is
expressed or implied.
SPECIFICATIONS

3
Introduction
SPECIFICATIONS DIESELSUPERSTAR
WEIGHTSANDDIMENSIONS
Length 68" (1.7 m)
Width 60" (1.5 m)
Height 50" (1.2 m)
Wheel Base 44" (1.1 m)
Weight 1010 lbs. ( 458 kg)
SOUNDLEVEL (EAR PROTECTION REQUIRED)
AtEar Level 103 dB
At 3ft (.914 m) 101 dB
At 30 ft (9.14 m) 93 dB
ENGINE
Make Briggsand Stratton Diesel
Model# 432447
Type /Spec# 0205
Horsepower 18 hp (113.42 kW)
Fuel Diesel40 OctaneMinimum
CoolingSystem LiquidCooled
LubricationSystem Full Pressure
Alternator 16 amp
WHEELS&TIRE Three: 22 X 11 - 10.0 Knobby Tires 5 psi (.35 bar)
Front tire fluid filled to 80 lbs. total 45.5 pints of windshield washer fluid or
equivalent.
Speed
ForwardSpeed 0 to 11 m.p.h. (0-18 kph)
ReverseSpeed 0 to 5 m.p.h. (0-8 kph)
BATTERY AutomotiveType45-12Volt
BCIGroup Size 45
ColdCrankingAmps 480
GroundTerminalPolarity Negative(-)
MaximumLength 9" (23 cm)
Maximum Width 5.38" (14 cm)
MaximumHeight 9" (23 cm)
FLUIDCAPACITY
CrankcaseOil See Engine Manual
Fuel 20 quarts (18.93liters)
HydraulicFluid 20 quarts(18.93liters)
Gradeof Hydraulic Fluid SAE 10W-40API Service SJ or higher Motor Oil
OPTIONAL EQUIPMENT
42-794 Trap Rake Ball Mount Kit 43-043 Brush Kit for 26-008
13-319 Fan Rake Kit 13-298 Fan Rake Attachment
42-011 Front Mounted Manual Plow 42-285 Scarifier w/ Vertical BLades
43-003 Hydraulic Sand Plow 42-582 Spiker (needs 42-586 main frame)
42-136 Front Mounted 60" Manual Plow 26-007 Professional Infield Finisher
43-002 Flex Action Field Finisher with Brush 26-008 Flex Action Field Finisher
42-178 Infield Scarifier (w/ Straight Blades & Castor Wheels) 42-185 Drag Mat Kit
42-179 Infield Scarifier (w/ Chisel Blades & Castor Wheels) 42-188 Drag Mat Carrier (only)
42-008 Sand Cultivator 42-223 Edger Kit
42-010 Construction Leveling Blade 42-315 Light Kit
13-438 Rake Assembly with Finishing Blades 42-750 Razor Edger Kit
13-684 Brush Kit (for 13-438 and 13-606) 42-569 RBS Mount Kit for Super Star
42-210 Grader Blade Kit 42-550 Greens Star Roller, Brush, Spiker
42-128 Stainless Steel Tournament Rake 72" System with Main Frame
42-026 Stainless Steel Tournament Rake 84"

4
Service
MAINTENANCE
Before servicing or making adjustments to machine, stop engine and remove key from ignition.
Use all procedures and parts prescribed by the manufacturer's. Read the engine manual.
LUBRICATION
UseNo. 2Generalpurpose LithiumBaseGrease andlubricateevery 100hours.TheDiesel SuperStarhasfour
grease fittings. One is located on the foot pedal. One located on te steering cyclinder and two on the rake lift.
REMOTEAIRCLEANER
1. Unclip the two clips, remove the cover and pull out the element.
2. To service, clean by tapping gently on flat surface. Do not oil. Replace if very dirty or damaged.
3. Cleanout theinsideof thebodyand cover.
4. Place the element into the body and put the cover back on.
TOWING
When it is necessary to move the Super Star without engine running, bypass valve built into hydrostatic pump
must be "open" by turning it counterclockwise. The valve is located on the right side of the pump.An "open"
valveallows fluidtopassthrough thewheelsfreely. Whennormal,driven, operation isdesired,valve shouldbe
"closed by turning it clockwise. Failure to "close" the valve with engine running means no power to wheels. The
machine can be moved for a short distance with the engine off, but we do not recommend this as a standard
procedure. When towing do not tow the machine faster than 2-3 MPH (3-5 km/h) because the drive system may
be damaged. The tires may lock up if the machine is towed too fast. If this occurs, stop towing the machine. If
the machine must be moved a considerable distance, transport it on a truck or trailer.

5
Service
MAINTENANCE
TIREPRESSURE
Cautionmust beused wheninflatinga lowtire torecommended pressure. Overinflating cancause tires to
explode.Tires shouldbe5 psi (0.35bar). Improperinflationwill reducetirelife considerably.
ENGINE
Changeand addoil accordingto chartbelow.Do notoverfill. Usea high qualitydetergent oilclassified "ForSer-
vice SJ or higher" SAE 30 oil. Use no special additives with recommended oils. Do not mix oil with gasoline.
SAEVISCOSITYGRADES
Starting Temperature Range Anticipated Before Next Oil Change
Use of multi-viscosity oils (10W-30, etc.) above 40° F (4° C) will result in high oil consumption and possible
enginedamage. Checkoil levelmore frequentlyif usingthese typesof oils.
SAE 30 oil, if used below 40° F (4° C), will result in hard starting and possible engine bore damage due to inad-
equatelubrication.
HYDRAULICOIL
1. Use SAE 10W-40API Service SJ or higher motor oil.
2. Forproper warranty, changeoilevery 500hoursor annually,which everisfirst andchangefilter after the
first20 hours,thenat 100hours,then every250 hours thereafter.
3. The oil level should be 2" to 21/2" from top of tank when fluid is cold. Do not overfill.
4. After changing oil and/or filter, run the machine for a few minutes. Check oil level and for leaks.
5. Always use caution when filling hydraulic oil tank or checking level to keep system free of contaminants.
Checkand servicemore frequentlywhenoperating inextremelycold, hotor dustyconditions.
6. If natural color of fluid is black or smells burnt, it is possible that an overheating problem exists.
7. If fluid becomes milky, water contamination may be a problem.
8. Ifeither oftheabove conditionshappen,change oiland filterimmediatelyafter fluidiscool andfind cause.
Take fluid level readings when system is cold.
9. In extreme temperatures you can use straight weight oil. We recommend SAE 30WAPI Service SJ or
higherwhen hot(above90°F(33°C)) andSAE10WAPIService SJorhigherwhen cold(below32°F (0°C)
ambient temperature. Use either motor oil or hydraulic oil, but do not mix.
10. Oil being added to the system must be the same as what is already in the tank. Mark tank fill area as to
which type you put in.

6
Service
MAINTENANCE
WHEELMOUNTINGPROCEDURE
1. Turn machineoff andremovekey.
2. Block one of the other wheels.
3. Loosennuts slightlyonwheel toberemoved.
4. Jackup machinebeingcareful nottodamage undersideofmachine.
5. Removenuts.Removewheel.
5. Place new wheel on hub lining up bolt holes.
6. Torque nuts to64-74ft/lb(87-100 Nm)usinga crosspattern.Re-torqueafterfirst 10hoursand every200
hoursthereafter.
7. Lowermachine togroundand removeblocksand jack.
BATTERY
Batteries normally produce explosive gases which can cause personal injury. Do not allow flames, sparks or any
ignited object to come near the battery. When charging or working near battery, always shield your eyes and
alwaysprovideproperventilation.
Batterycable shouldbedisconnected beforeusing "FastCharge".
Charge battery at 15 amps for 10 minutes or 7 amps for 30 minutes. Do not exceed the recommended charging
rate.If electrolytestarts boilingover, decrease charging.
Alwaysremove grounded(-) battery clampfirst andreplaceit last.Avoidhazards by:
1. Fillingbatteries inwell-ventilatedareas.
2. Weareye protection andrubbergloves.
3. Avoidbreathing fumeswhenelectrolyteis added.
4. Avoidspilling ordrippingelectrolyte.
Battery Electrolyte is an acidic solution and should be handled with care. If electrolyte is
splashed on any part of your body, flush all contact areas immediately with liberal amounts
of water. Get medical attention immediately.
JUMPSTARTING
Use of booster battery and jumper cables. Particular care should be used when connecting a
booster battery. Use proper polarity in order to prevent sparks.
Tojump start (negativegroundedbattery):
1. Shield eyes.
2. Connect ends of one cable to positive (+) terminals of each battery, first (A) then (B).
3. Connectone endofother cabletonegative (-)terminalof "good"battery(C).
4. Connectother endof cable (D)to engineblock on
unitbeing started(NOTtonegative (-)terminalof
battery)
Toprevent damagetoother electrical components on
unit being started, make certain that engine is at idle
speedbefore disconnectingjumpercables.

7
Service
SERVICECHART
Before servicing or making adjustments to the machine, stop engine, set park break, block
wheels and remove key from ignition.
Follow all procedures and ONLY use parts prescribed by the manufacturer. Read the engine
manual before maintenance.
C=Check or Clean at specified intervals
R=Replace at specified intervals
* Tire pressure: 5 psi (0.35 bar)
† Replace hydraulic filters after the first 20, 100, and every 250 there after.
§ Torque tire nuts after the first 10 hours and every 200 hours there after (64 to 74 ft/lb (87-100 Nm))
¤ Change Oil and Filter after first 8 hours.
£ Change oil every 25 hours when operating under heavy load or in high ambient temperatures.
‡ Clean more often under dusty conditions or when airborne debris is present , replace air cleaner parts, if very dirty.
Thesuggested maintenancechecklistis notofferedas areplacementfor themanufacturer’sengine manualbut
asa supplement.You mustadhereto theguidelinesestablishedby themanufacturerfor warrantycoverage.In
adverseconditions suchasdirt, mudorextreme temperatures,maintenanceshould bemorefrequent.
Daily
As Required
100 Hours
200 Hours
250 Hours
300 Hours
400 Hours
Every 500 Hours/Yearly
¤£ Engine Oil C R R R R R R R
¤ Engine Oil Filter R R R R R
Engine for Leaks and Loose Parts C C C C C C
‡ Air Cleaner (Paper Element) R C C C C R
Spark Plugs C R
Valve Clearance C
Idle Speed C C
Air Cooling System C C C C C C
Hoses C C C
* Tire Pressure C C C C C C
Visual Inspection of Tires C C C C C C
Fuel Level C C
Fuel Filter R R
Hydraulic Oil C C C C C R
† Hydraulic Oil Filter R R
Hydraulic System for Leaks and Loose Parts C C C C C C
Battery Electrolyte Level C C C C C
Clean Battery Terminals C C
§ Torque Lug Nuts C C C
Lubricate C C C C C

8
Service
ENDUSER’SSERVICECHART
C=Check or Clean at specified intervals
R=Replace at specified intervals
* Tire pressure: 5 psi (0.35 bar)
† Replace hydraulic filters after the first 20, 100, and every 250 there after.
§ Torque tire nuts after the first 10 hours and every 200 hours there after (64 to 74 ft/lb (87-100 Nm))
¤ Change Oil and Filter after first 8 hours.
£ Change oil every 25 hours when operating under heavy load or in high ambient temperatures.
‡ Clean more often under dusty conditions or when airborne debris is present , replace air cleaner parts, if very dirty.
Daily
As Required
100 Hours
200 Hours
250 Hours
300 Hours
400 Hours
Every 500 Hours/Yearly
¤£ Engine Oil
¤ Engine Oil Filter
Engine for Leaks and Loose Parts
‡ Air Cleaner (Paper Element)
Spark Plugs
Vavle Clearance
Idle Speed
Air Cooling System
Hoses
* Tire Pressure
Visual Inspection of Tires
Fuel Level
Fuel Filter
Hydraulic Oil
† Hydraulic Oil Filter
Hydraulic System for Leaks and Loose Parts
Battery Electrolyte Level
Clean Battery Terminals
§ Torque Lug Nuts
Lubricate

9
Service
ADJUSTMENTS
RAKELIFTCYLINDER
Completelylower RakeLift.Remove cotterpin(A) andclevispin
(B). Place attachment lift arms (C) at 1/16" above cross member
(D) on Rake Lift. Loosen jam nut (E).Twist cylinder extension (F)
so clevis pin end of cylinder extension lines up with holes in at-
tachment lift arm. Replace clevis and cotter pins. Tighten jam nut.
Raiseand lowerRakeLift tocheck for properclearance.
When the rear rake attachment is lowered while
the machine is in forward motion, the forward
speed of the machine will slow drastically.
Operator should be prepared for a rapid change
in speed.
SPEEDBOSS
Speed Boss allows the machine to operate at a proper speed while raking sand traps on golf courses.This
speed boss has been factory set at an average speed of 3-4 m.p.h. (5-6.5 kph). The Speed Boss will only limit
the speed while the rake is lowered into the operating
position. The speed setting may be adjusted by turn-
ing the Ball Joint (A) counterclockwise to make the
machine operate slower or turn clockwise to go faster.
Tighten jam nut. Check to make sure nothing is bind-
ing and test drive to check desired speed.
For RBS System, Spiker and Grader Box remove the
speed boss arm and the speed boss rod from machine
so it does not interfer with other operations.
WHEEL‘CREEP’ADJUSTMENT
‘Creep’is whenengineis runningandhydrostatic
transmission is in neutral, but due to inadequate align-
ment,wheels stillmove.Do thefollowingprocedures to
stop this motion.
1. Liftup andsupport machineso all wheelsare off
theground andcanturn freely.
2. On the side of the pump there is a creep arm
inside a centering arm. Loosen bolt on the creep arm.
3. With engine running adjust the creep arm up or down in slot so centering arm centers on the swash arm.
4. Tighten all fasteners and test by using foot pedal linkage to see that the "creep" is removed.
5. Turnengineoff and lowermachine.

10
Service
ADJUSTMENTS
(CONTINUED)
PARKBRAKE
The park brake is located on the right hand side of the machine
andoperates abrakeonthe rightrearwheel. Pushleverforward
to engage and pull back to disengage.
To adjust turn the knob on the end of the handle. For further
adjustment you may turn the yokes (A) clockwise to tighten
and counter clockwise to loosen.
TOADJUSTFOOTPEDALTHROTTLECABLE
1. Jackup unitso thatall drivewheelare offthe ground.
(Use jack stands)
2. Start the engine, make certain that the hand throttle
is in the idle position (1200 engine RPM).
3. Engine speed must increase as soon as the foot
pedal begins to move in either direction.At the full
forwardposition, theengineRPM mustbe 3600RPM
±100.
4. Minor adjustment can be made by backing out
(unscrewing)(RefA) until youreachfull engineRPM
withthe footpedalfully depressedinthe forward
position. Be sure to recheck after the nuts are fully
tightened.
5. Major adjustment needs to be made at (Ref B) by
pulling the slack out of the cable. Loosen the screw in the wire block that is clamped onto the end of the
cable and sliding it up to the cable block that is through the throttle plate. Do not let the throttle plate
moveto increaseidlespeed. Tightenthe screw.
6. Test run to determine that there is no binding and that engine idle speed is 1200 RPM and that it is 3600
RPMat fullforwardposition ofthe foot pedal.

11
Service
STORAGE
Whenstoring, removethekey fromthekey switchto avoid unauthorizedpersons fromoperatingmachine.
1. Beforestoring cleanmachinethoroughly.
2. Check bolts and nuts, tighten as necessary.
3. Makeall repairsthatare neededandremove anydebris.
4. Remove the battery, adjust the electrolyte level and recharge it. Store the battery in a dry, dark place.
5. Store in a clean and dry area, but NOTnear a stove, furnace or water heater which uses a pilot light or any
device that can create a spark.
6. Enginesstored over30days needtobe protectedordrained offuelto preventgumfrom formingina fuel
system or on essential carburetor parts. Check the engine manual and follow the instructions for the
storageof theengine.

12
Diagrams
WIRINGDRAWING
Color Code Chart
Bl Blue
Br Brown
Y Yellow
Grn Green
O Orange
R Red
B Black
P Purple
W White

13
Diagrams
WIRINGPARTSLIST
REF # PART # DESCRIPTION QUANTITY
1 13-488 Ignition Switch (B & S# 496603) 1
76-310 Key Set (comes with 13-488) 1
2 17-171 Glow Plug (comes with engine)1
3 50-359 GlowPlug IndicatorLight 1
4 8975 Breaker 1
8977 BreakerBoot
5 After Fire Solenoid (on engine) 1
6 14-272 Seat Switch 1
7 Starter (on engine)
8 Battery (not included)
9 13-491 Oil Sender (on engine B & S# 491657) 1
10 50-359 Oil PressureWarningLight 1
11 50-359 WaterTempatureLight 1
12 Dynamo Alternator (comes with engine) 1
13 Temp Sender (comes with engine)
14 12-017 Hour Meter 1
15 8935 Bus Bar 1
16 22-054 Ground BatteryCableBlack 1
17 22-055 Battery CableRed 1
43-073 Wire Harness (includes all wire colors with *) 1

14
Diagrams
HYDRAULICDRAWING

15
Diagrams
HYDRAULICPARTSLIST
REF # PART # DESCRIPTION QUANTITY
1 34-105 Cooler 1
2 43-034 HydraulicHose -32" 1
3 43-033 HydraulicHose -48" 1
4 43-029 HydraulicHose -24" 1
5 43-035 Hydraulic Hose - 20" 1
6 34-103 Orbitol 1
7 43-036 HydraulicHose -55" 1
8 10-135 AttachmentLift Cylinder 1
18-154 RodEnd 1
HNJ-58-18 JamNut 5/8-18 1
9 42-047 HydraulicHose -32" 2
10 42-048 Hydraulic Hose- 14" 2
11 13-729 2-BankValve 1
12 42-045 Hydraulic Hose- 41" 1
13 76-238 Front WheelMotor 1
14 75-714 SteeringCylinder 1
15 43-071 Hydraulic Hose - 691/2"1
16 42-261 1/2" HydraulicTube271/2"2
17 42-002 Rear WheelMotor 2
18 43-074 Hydraulic Hose- 18" 1
19 43-070 Hydraulic Hose- 98" 1
20 8832-12 3/4" Suction Hose - 12 1
18-222 HoseClamp 2
21 23-006 Oil Filter 1
23-031 ReplacementFilter only
22 42-787 Hydraulic Hose-361/2"1
23 8832-49 3/4" Suction Hose - 49" 1
18-222 HoseClamp 2
24 42-005 OilTank 1
13-586 FillerBreather 1
25 42-045 Hydraulic Hose- 41" 1
26 13-357 Rake Cylinder 1
42-040 Yoke End 1
HNJ-34-16 Jam Nut 3/4- 16 2
27 42-304 1/2" HydraulicTube27" 2
PumpDisplacement .913in3/rev ChargePump Displacement .33in3/rev
PumpInput Speed (upto) 3600rpm Max. Inlet Vacuum 5 in. Hg
Max.Operating Pressure 2500peakpsi Max. Case Pressure 25 psi
ImplementSetting 700-1000psi Relief Valve Pressure(setat) 2500psi
13-729HydraulicValve(2bank) 900 psi

16
Parts
MAINFRAMEDRAWING

17
Parts
MAIN PARTSCOMMONLIST
REF# PART# DESCRIPTION QUANTITY
1 43-087 FootPedal 1
2 42-780 Floor Panel (fiberglass) 1
3 42-767 RightFloor Mat 1
42-768 LeftFloor Mat 1
4 12-017 HourMeter 1
5 27-055 Hinge 2
6 43-060 MainFrame 1
7 43-058 TireandWheel 3
42-161-02 Tire 22 x 11 - 10 Knobby Type 3
43-058-01 Wheel 3
8839 Windshield WasherFluid orEquivalent 43.5 pints
(Front tire and wheel are fluid filled to 80 lbs. Total)
60-268 Lug Bolt 15
8 60-106 ParkBrakeLever 1
9 42-006 FuelTank 1
77-179 Cap 1
10 42-778 ValveHandle 2
11 42-772 Seat Panel 1
8803-17 Trim w/ Black Lace 1
12 14-269 Adjustable Low Back Seat 1
13 42-030 RakeHolder 1
14 43-080 Seat Panel (fiberglass) 1
15 42-005 OilTank 1
13-586 FillerBreather 1
16 13-718 SteeringWheel 1
17 76-364 90° Black Boot (comes with 76-362) 1
76-362 Tilt Steering Mechanism 1
18 42-782 Console (fiberglass) 1
19 42-781 Nose Cone (fiberglass) 1
HSTP-14-20-100 Phillips Machine Screw 1/4- 20 x 1 6
HNTL-14-20 Lock Nut 1/4- 20 6
20 42-786 Plastic CupHolder 1

18
Parts
FRONTFORKDRAWING
Table of contents
Other Smithco Lawn Mower manuals