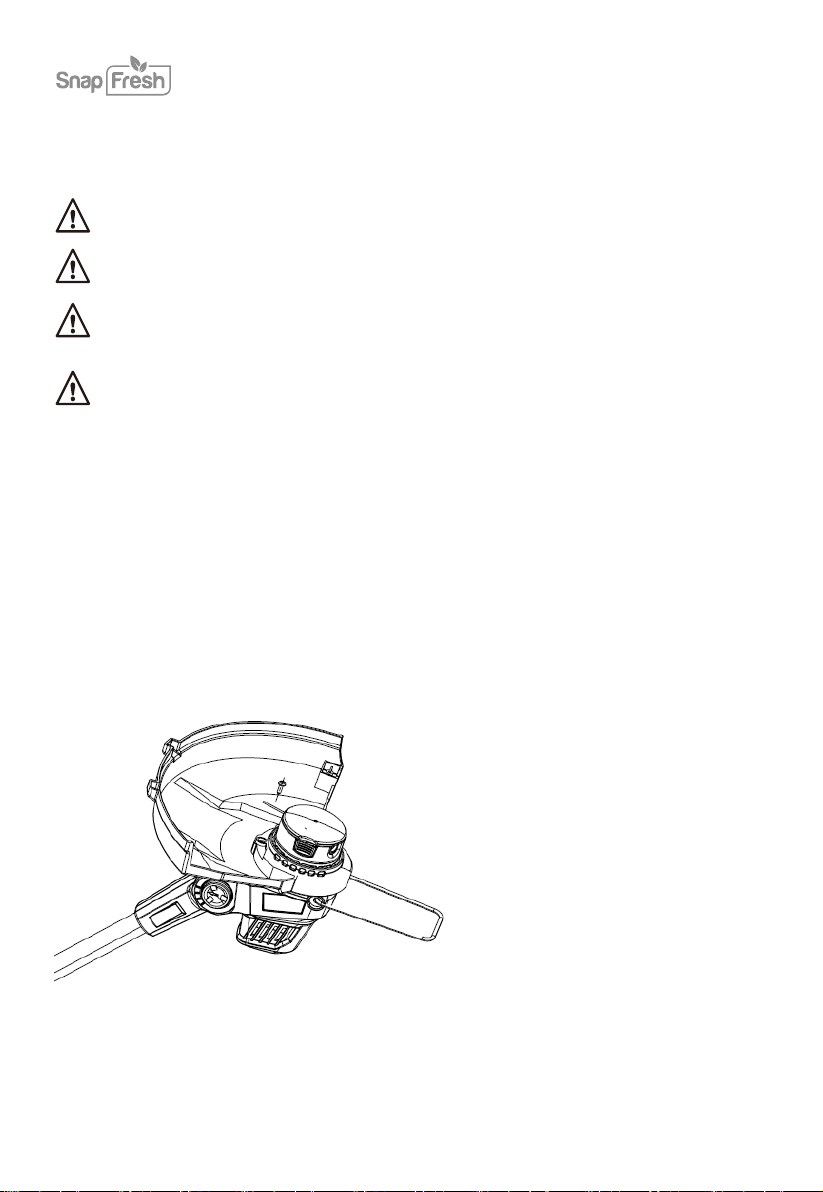
Snap Fresh BBT-ZE20ST User manual

Read all safety rules and instructions carefully before operating this tool.
User Manual
+1 833 635 0955
20V CORDLESS STRING TRIMMER
BBT-ZE20ST

CONTENTS
Contents .................................................................................................................................................................................. 2
.................................................................................................................................................................
......................................................................................................................................................... 9
4-8
........................................................................................................................................................................ 10-16
............................................................................................................................................................................. 16-17
.............................................................................................................................................................................
................................................................................................................................................................................
18
19
Maintenance
Warranty
Assembly
Machine information
Safety warnings
........................................................................................................................................................................................ 3
Symbols
Battery
2

Observe caution and safety notes.
Caution - electric shock!
Danger to life.
No-load speed.
AC Voltage.
Wear hearing protection,
dust protection mask, protective
glasses and protective gloves,
heavy footwear.
Keep children away from electrical
power tools.
Check that the device, mains
lead and plug are in good
condition.
Safety class II.
Dispose of packaging and appliance
in an environmentally friendly way!
Protect the battery from
temperatures above 50 ° C.
SYMBOLS
3
n0
V~
Read the user manual.
The cutting diameter is 300mm.
Guaranteed sound power level 93dB.
Charge and store only at
temperatures between 3° C and 40° C.
Do not throw it into the water. Charge
the battery fully before storage.
0
Protect the battery from heat and re.
Protect the battery from water and
moisture.
The following symbols are used in the user manual or on the product:
260mm
300
93
dB

SAFETY WARNINGS
GENERAL POWER TOOL SAFETY WARNINGS
WARNING! Read all safety warnings and all instructions. Failure to follow the warnings and
instructions may result in electric shock, re or serious injury.
Save all warnings and instructions for future reference.
The term “power tool” in the warnings refers to your mains-operated (corded) power tool or
battery-operated (cordless) power tool.
1) Work area safety
.
.
.
.
.
.
.
.
.
Keep the work area clean and well lit. Cluttered or dark areas invite accidents.
Do not operate power tools in explosive atmospheres, such as in the presence of ammable
liquids, gases or dust. Power tools create sparks which may ignite the dust or fumes.
Keep children and bystanders away while operating a power tool. Distractions can cause you to
lose control.
2) Electrical safety
Power tool plugs must match the outlet. Never modify the plug in any way. Do not use any
adapter plugs with earthed (grounded) power tools. Unmodied plugs and matching outlets
will reduce the risk of electric shock.
Avoid body contact with earthed or grounded surfaces, such as pipes, radiators, ranges and
refrigerators. There is an increased risk of electric shock if your body is earthed or grounded.
Do not expose power tools to rain or wet conditions. Water entering a power tool will increase
the risk of electric shock.
Do not abuse the cord. Never use the cord for carrying, pulling or unplugging the power tool.
Keep cord away from heat, oil, sharp edges or moving parts. Damaged or entangled cords
increase the risk of electric shock.
When operating a power tool outdoors, use an extension cord suitable for outdoor use. Use of
a cord suitable for outdoor use reduces the risk of electric shock.
If operating a power tool in a damp location is unavoidable, use a residual current device (RCD)
protected supply. The use of an RCD reduces the risk of electric shock.
4

5
.
.
3) Personal safety
Stay alert, watch what you are doing and use common sense when operating a power tool. Do not
use a power tool while you are tired or under the inuence of drugs, alcohol or medication.
A moment of inattention while operating power tools may result in serious personal injury.
Use personal protective equipment. Always wear eye protection
.
Protective equipment such as
dust mask, non-skid safety shoes, hard hat, or hearing protection used for appropriate conditions
will reduce personal injuries.
.
.
.
.
.
Prevent unintentional starting. Ensure the switch is in the o-position before connecting to power
source or battery pack, picking up or carrying the tool. Carrying power tools with your nger
on the switch or energizing power tools that have the switch on invites accidents.
Remove any adjusting key or wrench before turning the power tool on. A wrench or a key left
attached to a rotating part of the power tool may result in personal injury.
Do not overreach. Keep proper footing and balance at all times. This enables better control of the
power tool in unexpected situations.
Dress properly. Do not wear loose clothing or jewelry. Keep your hair, clothing and gloves away
from moving parts. Loose clothes, The jewelry or long hair can be caught in moving parts.
If devices are provided for the connection of dust extraction and collection facilities, ensure these
are connected and properly used. The use of dust-collection can reduce dust, related hazards.
.
.
.
.
.
.
.
4) Power tool use and care
Do not force the power tool. Use the correct power tool for your application. The correct power
tool will do the job better and safer at the rate for which it was designed.
Do not use the power tool if the switch does not turn it on and o. Any power tool that cannot be
controlled with the switch is dangerous and must be repaired.
Disconnect the plug from the power source and/or the battery pack from the power tool before
making any adjustments, changing accessories, or storing power tools. Such preventive safety
measures reduce the risk of starting the power tool accidentally.
Store idle power tools out of the reach of children and do not allow persons unfamiliar with the
power tool or these instructions to operate the power tool. Power tools are dangerous in the
hands of untrained users.
Maintain power tools. Check for misalignment or binding of moving parts, breakage of parts and
any other condition that may aect the power tool’s operation. If damaged, have the power tool
repaired before use. Many accidents are caused by poorly maintained power tools.
Keep cutting tools sharp andclean. Properly maintained cutting tools with sharp cutting edges are
less likely to bind and are easier to control.
The use of the power tool, accessories and tool bits, etc. in accordance with these instructions,
taking into account the working conditions and the work to be performed. Use of the power tool
for operations dierent from those intended could result in a hazardous situation.

SAFETY WARNINGS FOR STRING TRIMMER OPERATIONS
•
•
Read all safety warnings and all instructions. Failure to follow the warnings and
instructions may result in electric shock, re or serious injury.
•
Improper handling of the string trimmer can lead to injury.
•
Check the string trimmer before use for any damage.
•
Never use the string trimmer with damaged or missing protective cover.Note that after you
switch o the string trimmer, the cutting head and string continue rotating for a few seconds.
after a few seconds. Wait until the cutter stops completely before you transport, maintain or
store the string trimmer.
6
.
.
.
5) Battery tool use and care
Recharge only with the charger specied by the manufacturer. A charger that is suitable for one
type of battery pack may create a risk of re when used with another battery pack.
Only use power tools with specically designated battery packs. Use of any other battery packs
may create a risk of injury and re.
When the battery pack is not in use, keep it away from other metal objects, like paper clips, coins,
keys, nails, screws or other small metal objects that can make a connection from one terminal to
another. Shorting the battery terminals together may cause burns or a
re.
.
Under abusive conditions, liquid may be ejected
from the battery; avoid contact. If contact
accidentally occurs, ush with water. If liquid contacts eyes, additionally seek medical help.
Liquid ejected from the battery may cause irritation or burns.
6) Service
Have your power tool serviced by a qualied repair person using only identical replacement
parts. This will ensure that the safety of the power tool is maintained.
WARNING!
.
.
.
Do not use a battery pack or tool that is damaged or modied. Damaged or modied batteries
may exhibit unpredictable behaviour resulting in re, explosion or risk of injury.
Do not expose a battery pack or tool to
re or excessive temperature. Exposure to
re or
temperature above 130 °C may cause explosion. NOTE The temperature „130 °C“ can be replaced
by the temperature „265 °F“.
Follow all charging instructions and do not charge the battery pack or tool outside the
temperature range speci
ed in the instructions. Charging improperly or at temperatures outside
the speci
ed range may damage the battery and increase the risk of
re.
•
Never service damaged battery packs. Service of battery packs should only be performed by the
manufacturer or authorized service providers.

If under extreme conditions any electrolyte should escape from the battery, it's essential to
avoid contact with skin. If electrolyte does come into contact with your skin, rinse it o with
water. In the event of electrolyte contact with your eyes, it's essential to consult a doctor.
•
Keep all parts of the body away from the string. Do not remove cut material or hold material to
be cut when string are moving. Make sure the switch is o when clearing jammed material.
A moment of inattention while operating the string trimmer may result in serious personal injury.
•
Carry the string trimmer by the handles, with the string stopped. Proper handling of the string
trimmer will reduce possible personal injury from the cutter string.
•
Do not expose to rain. Do not cut wet grass.
•
Improper handling of the string trimmer can lead to damage to the string trimmer.
•
Do not attempt to cut hard objects.
•
Use the edging guide to avoid unnecessary wear on the cutter head and tool.
7
•
•
•
Before the use of the charger and the battery pack, read the instruction manual for it carefully.
During the charging process, the current used should correspond to the current of the battery
charger.
Never let moisture, rain or splashed water reach the charging location. The ambient temperature
must not be less than 0ºC nor exceed 40ºC when charging. Do not use or store string trimmer or
batteries in temperatures in excess of 49ºC.
•
Battery packs which are defective or damaged, or can no longer be re-charged, must be
disposed of as hazardous waste. Hand them over at a special collection point. Never harm our
environment. Do not throw unusable battery packs away into the domestic waste, into re or
into water.
•
If the electrical cable is damaged, it may only be replaced by the supplier or by his repair
workshop. Have repairs carried out only by an authorized specialist only.
•
Use only battery packs that have been produced by the original manufacturer. Use only the
charger supplied with your string trimmer.
•
Always keep the surface of the charger free from dust and dirt.
•
Insert the battery pack into the charger. Follow the guidelines provided concerning polarity.
•
Always remove the battery pack before working on the string trimmer.
•
When the battery pack is outside the string trimmer, cover the contacts to avoid short circuits
(e.g. from tools or metal surfaces)
•
Do not throw battery packs into water or re, risk of explosion!
BATTERY PACK AND CHARGER SAFETY INSTRUCTIONS
NOTE! - Risk of damage!

•
Protect the battery pack from impacts, and don’t attempt to open it.
•
Never discharge the battery pack completely, and recharge occasionally if not used for a
prolonged period.
Wear hearing protection while operating the power tool.
Wear eye protection while operating the power tool.
Use a dust mask or respirator for applications that generate dust.
Wear foot protection while operating the power tool.
It is recommended that the charger is always supplied via a residual current device with a
rated current of 30mA or less.
8
Charge only BBT-DC20A and BBT-DC40A type rechargeable battery packs with the charger.
Other types of batteries may burst causing personal injury and damage.

MACHINE INFORMATION
Technical Specications
9
Model No. BBT- ZE20ST
Rated voltage 20V
No load speed
Model Number BBT-DC20A
Battery type Lithium-ion
Voltage 20V
Capacity 2.0 Ah
Recommended charger BBT-YFT20V
Weight 0.3 kg
Model Number BBT-YFT20V
Charger input 100-120V~60Hz 65W
Charger output 21V 2.5A
Charging time 2Ah battery 60 minutes
Charging time 4Ah battery 120 minutes
Recommended batteries
BBT-DC20A, BBT-DC40A
Weight 0.36 kg
Only use the following batteries of the SnapFresh
power 20V battery platform. Using any other
batteries could cause serious injury or damage the tool.
BBT-DC20A 20V, 2Ah Lithium-ion
BBT-DC40A 20V, 4Ah Lithium-ion
The following charger can be used to charge these batteries.
BBT-YFT20V Quick charger
7800 rpm
Cutting Head Auto Feed
Cutting Line Diameter 1.6mm
Cutting Swath Diameter 300mm/12inch
The batteries of the SnapFresh power 20V battery platform are interchangeable with all the
SnapFresh power 20V battery platform tools.
1)
2)
10
Assembly Safety
ASSEMBLY
CAUTION - This guide is meant to serve as a quick reference for operating your SNAPFRESH
machine. We always advise reading the manual in full before operation.
NOTE - Images may vary depending on model.
NOTE - The machine can be supplied with some parts already assembled. Prior to assembly,
check all items have been received.
WARNING - Remove the battery pack before cleaning or maintaining the tool, tting the guard
or before making any adjustments to the tool, especially around the string head. Remove the
battery pack before transporting or storing the tool.
The guard is an essential part of the tool and ALWAYS must be used. Otherwise damage to the
trimmer and injury to the operator may occur. The guard is not tted to the trimmer when it is
delivered to you to avoid damage in transit.
Step 1 : Fitting The Guard
To t the guard, align the opening in the guard with the underside of the trimmer head as shown.
Tighten the screw to x the guard in place.
11
1)
2)
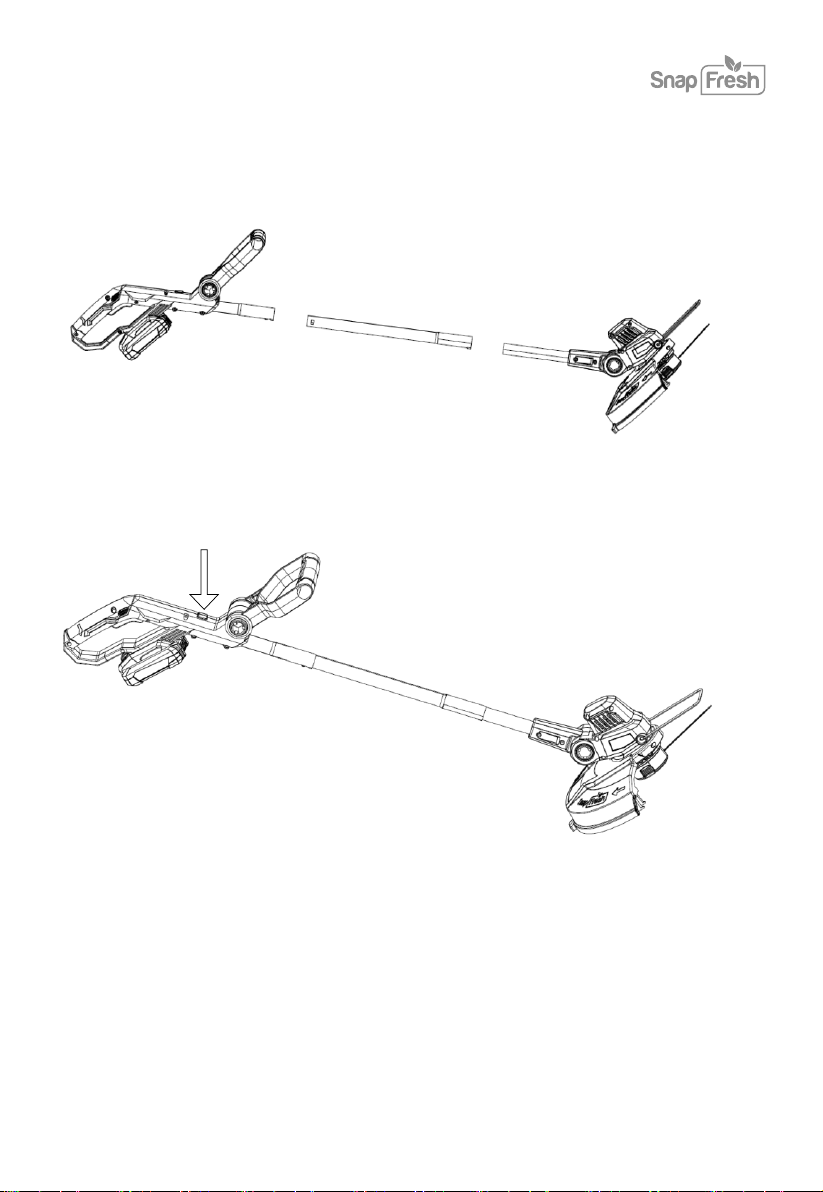
Insert the lower tube into the upper tube.
Step 2 : Shaft Assembly
Rotate the sheath and tighten it to the edging mode or trimming mode by pressing the unlock
button

Rewinding The Spool
.
.
The spool is supplied with the line pre-wound. The twisted line is 1.65mm (0.065”) in diameter,
which gives good cutting performance and reduced noise. Follow the instructions below to rewind
new line onto the spool.
To remove the string head, press and hold the shaft lock button and unscrew the head
anti-clockwise.
Cut a piece of nylon line 1.65mm (0.065”) in diameter maximum 4m long (you may nd it easier to
practice with a shorter line length at rst). Find the centre of the line and loop it onto the notch in
the centre ange of the spool. Wind the line around the spool, in the direction indicated by the
arrow on the spool, keeping each end of the line in its own channel. Keep the line tight as you wind
so that the line coils smoothly onto the spool.
Wrap the line around the spool leaving about 20cm line exposed on each side.
12
Trimmer Line
Step 1
Step 2

.
.
Keep the line tight and clip the lines into the notches in the bottom ange of the spool to hold the
line in place while you t the spool into the housing. The smaller end of the spring goes into the
top of the spool.
Then put the spool and spring into the housing leaving the ends of the line protruding from the cut
outs on each side.
.Slide into place. Do the same on both sides.
.Position the cover in place as shown and press the cover onto the housing until the clips snap
into place.
.Pull on both ends of the line to free them from the notches in the spool.
.To replace the spool, press on the spool lock button and screw the head clockwise onto the shaft
and hand tighten.
13
Step 3

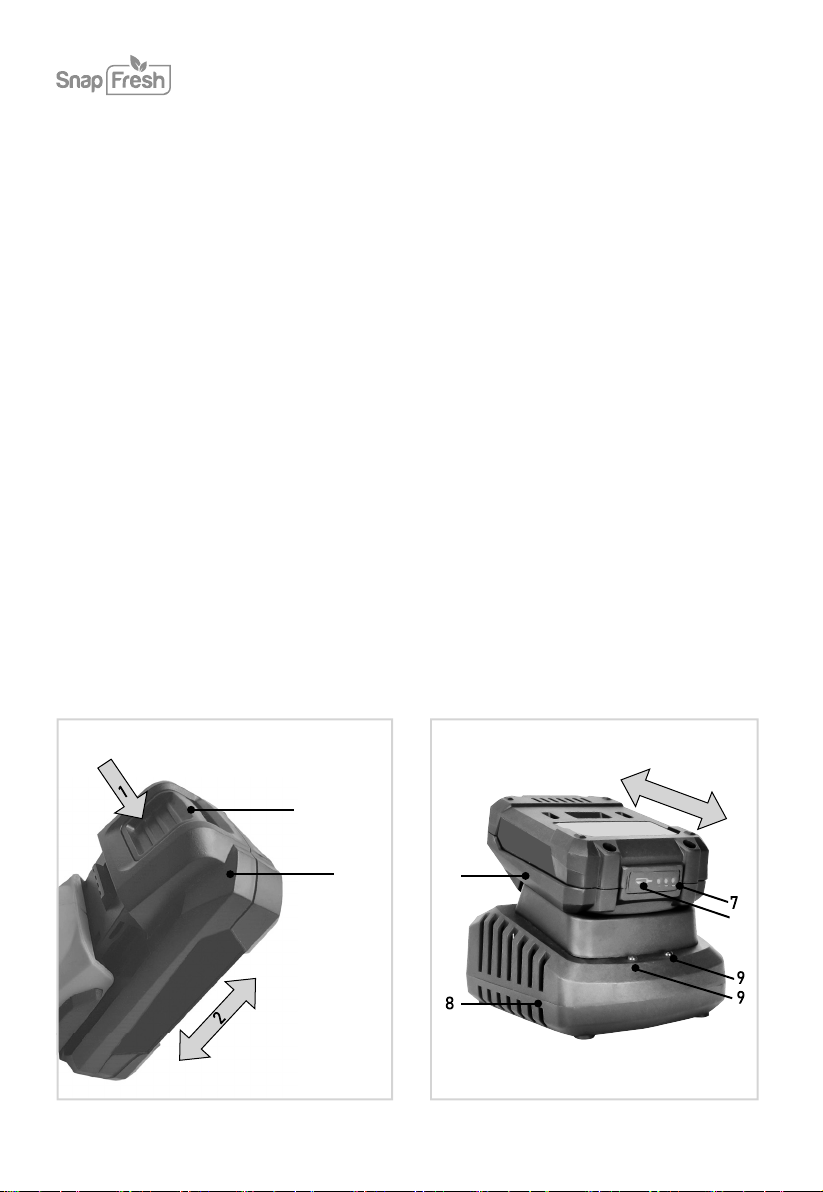
To insert the battery, slide it into the battery cradle on the top of the line trimmer, aligning the ribs
in the cradle with the slots in the battery until it latches into place. Check that the battery is
securely locked into place.
To remove the battery, press and hold the latch on the rear of the battery pack and slide the battery
away from the trimmer.
Fitting Battery
Removing Battery
14
Fitting And Removal Of Battery
Fitting / Removing Battery
DANGER - Before operating this tool, ensure that the guard is tted to the head of the
machine. Never use the machine without the guard.
NOTE - The battery is not fully charged at the time of purchase. Before using the grass
trimmer for the rst time, you must charge the battery.
DANGER - The battery should always be removed whenever you are not using the tool and
especially when you are adjusting or transporting the tool to avoid accidental operation.
To switch the trimmer on, press and hold the safety switch (2) and hold the trigger switch (3) on
the handle.
To switch the trimmer o, release the trigger switch (3). Be aware that the spool will continue to
rotate for a short while.
15
Switching On
Switching O
Starting / Stopping
1
2
3
4
5
During use, the line will become worn, or may break o if it strikes a stone or a similar hard object.
To increase the length of the line, switch on the trimmer and while it is running tap the head of the
trimmer against the ground. When the button on the trimmer head is bumped against the ground,
centrifugal force will extend the line. Excess line will be cut o by the cutting blade.
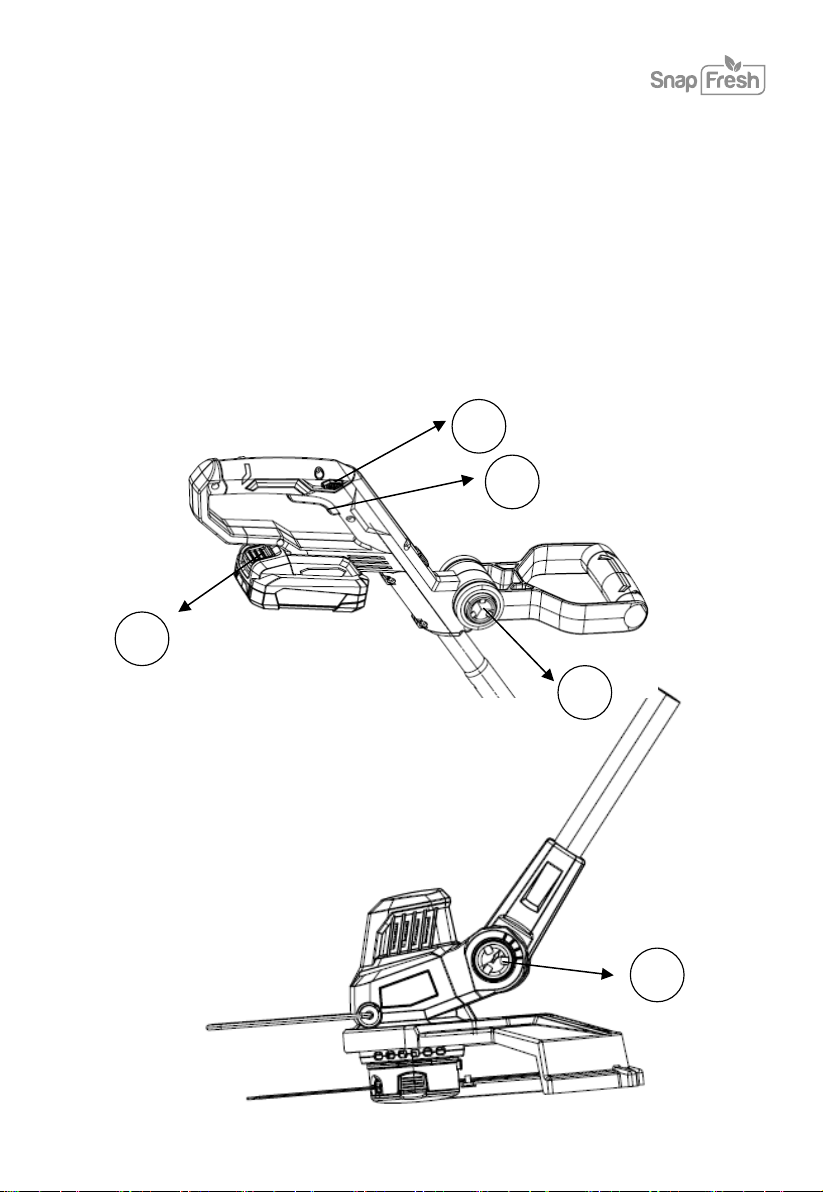
The auxiliary handle is angle adjustable. To assemble the handle, press the unlock button(4)
on both side and assemble the handle with the machine. To adjust the angle of the handle, press
the unlock button(4)and adjust the handle to the ideable angle of work. To remove the handle,
press the unlock button (4)and take the handle o from the machine.
16
Adjusting The Line Length
Height Adjustable Handle
The angle of the trimmer head can be set to dierent working positions.
Press the “PUSH” button(5)with one hand and rotate the trimmer head to the required position.
Release the “PUSH” button(5)and the head will lock into place. There are 4 preset lock positions.
Setting The Trimmer Head Angle
1
10 10
10
Using The Grass Trimmer
BATTERY

17
•
To check the battery charge status, push the button (6) on battery shortly.
•
The battery has 3 lights indicating the charge level, the more lights that burn, the more charge
the battery has left.
•
When the lights are not burning it means the battery is empty and must be charged immediately.
•
Take the battery (2) from the machine.
•
Turn the battery (2) to upside down position and slide it onto the charger (8) as shown in Fig. D.
•
Push the battery until it is fully pushed into the slot.
•
Plug the charger plug into an electrical outlet and wait for a while. The LED indicators (10)
charger (13) will lighten up and show the charger status.
•
Fully charging the 2Ah battery may take up to 60 minutes.
•
Fully charging the4 Ah battery may up to 120 minutes.
After the battery is fully charged remove the charger plug from the outlet and remove the battery
from the charger.
The LED indicators (9) will lighten up and show the charger status.
Red LED Status
O
O
O
On
On
O No power
Standby mode:
-No battery is
inserted or,
-Battery inserted
but charging has
nished
Battery charging in
progress
Green LED status Charger status
Checking the battery charging status
Charging the battery with the charger
Before any work on the power tool, remove the battery.
The battery must be charged before rst use.
When the machine is not being used over a longer period of time it is best to store the battery
in charged condition.

18
MAINTENANCE
Attention! Always remove the battery before carrying out any work on the machine.
To clean the tool, use a dry or moist, but not wet towel. Many cleaning agents contain chemical
substances which may cause damage to the plastic parts of the tool. Do not use any strong or
ammable cleaners such as petrol, paint thinner, turpentine or similar cleaning agents. Always
keep air ventilation holes free of dust deposits to prevent overheating. Wear a dust mask and
use a soft brush to clean the ventilation holes.
Servicing this tool must be done by a qualied person only. Service or maintenance performed
by unqualied personnel could result in a risk of injury.
If the tool does not work properly, return the tool to a service facility for repair.
If the electrical cable is damaged, it may only be replaced by the supplier or by his repair
workshop.
Battery disposal:
This symbol indicates that the batteries supplied with this product must not be treated as
general household waste. To remove them safely, you must bring them to your retailer or
discard them in special containers provided for the community. At the end of the device's
life, remember to remove the batteries.

19
WARRANTY
Ningbo Winbay Technology Co.,Ltd. (Hereinafter referred to as Babytec) warrants this product
against defects in materials and/or workmanship under normal use for a period of ONE (1) YEAR
from the date of purchase by the original purchaser (’Warranty Period’).
The following circumstances are excluded from this guarantee:
•
Repairs and or alterations have been made or attempted to the machine by unauthorized service
centers;
•
Normal wear and tear;
•
The tool has been abused, misused or improperly maintained;
•
Non-original spare parts have been used.
(Monday - Friday 9 a.m. - 5 p.m. EST /6 a.m. - 2 p.m. PST)
+1 833 635 0955
If a defect arises and a valid claim is received within the Warranty Period, at its option, Babytec
will either 1) repair the defect at no charge, using new or refurbished replacement parts, or 2)
replace the product with a new product that is at least functionally equivalent to the original
product, or provide a store credit in the amount of the purchase price of the original product.
A replacement product or part, including a part installed in accordance with instructions product
by Babytec, assumes the remaining warranty of the original product. When a product or part is
exchanged, any replacement item becomes your property and the replaced item becomes
Babytec’s property. When a store credit is given, the original product must be returned to Babytec
and becomes Babytec’s property. To obtain warranty service, e-mail Babytec Warranty Service at
nature of the problem.
Allrightsreservedby Ningbo Winbay Technology Co.,Ltd.
https://snapfresh.afterservice.vip
Scan here to contact us
[24Hrs Online]

Table of contents
Other Snap Fresh Trimmer manuals


