Snap-loc E-TRACK SINGLES User manual

FOR QUESTIONS, MISSING PARTS OR WARRANTY,
CONTACT SNAP-LOC NOT STORE OF PURCHASE.
FOR QUESTIONS, MISSING PARTS OR WARRANTEE,
CONTACT SNAP-LOC BEFORE STORE OF PURCHASE:
CARE AND MAINTENANCE
“SNAP-LOC E-TRACK SINGLES” AND ACCESSORIES
There are a lot of great accessories available with the Snap-Loc
System of products that are not written about here. Contact
Snap-Loc or visit www.snaploc.com for more detailed information.
1. “Snap-Loc E-Track Singles” strap anchors are rated at 3000 lb. Break
Strength (1361 kg.) and 1000 lb. Working Load (454 kg.).
2. “Snap-Loc E-Track Singles” can be used most anywhere. However it
is your responsibility to determine suitability for any particular use.
3. “Snap-Loc E-Track Singles” are only as strong as stated when what
they are fastened to is equally as strong.
4. Most Snap-Loc Accessories have the weight rating stamped into
them, but if not, contact Snap-Loc for details.
5. If unsure of how to use or care for any of our products contact
6. Chips, color fading and minor surface rust may happen. If “Snap-Loc
E-Track Singles” and accessories still work safely, keep using them.
If you feel at any time the structural integrity of the part has been
compromised discontinue use and replace with new parts.
SNAP-LOC STRAPS
Straps tend to get destroyed faster than most other components.
Here are some ways to help prevent that.
1. Make sure nothing touches the E-Fitting release lever as this may
cause strap to come loose.
2. E-Straps with Cam are quick to use and less prone to scratching cargo
and hold very snug.
3. E-Straps with Ratchet can hold cargo very tight but do not overtighten
or damage may occur to anchor points.
4. After periods of use the Ratchet mechanism may not spin well. Apply
a very small amount of WD-40 lubricant just on the mechanical metal
and avoid lubricant contact with the surface.
5. Do not expose straps to sharp edges, acids, chemicals, vibrations and
things that may cause damage to fabric webbing.
6. Secure left over strap end to keep it from getting caught on wheels
and other objects especially when in motion.
7. Replace worn out or damaged straps. Visit www.snaploc.com
8. Color fading may happen. If strap still works safely, keep using it.
9. Stow away in a dry place away from direct sunlight.
CHOOSING LOCATIONS AND FASTENING METHODS FOR “SNAP-LOC E-TRACK SINGLES”
Most discover so many new uses for “Snap-Loc E-Track Single” that the installation choices are almost endless. If you have any questions about
1. Chose a location to install “Snap-Loc E-Track Singles” that is not too close to gas lines, electrical or other hazards. Not recommended for use in
submerged water or ice.
2. When using on moving objects, vehicles and trailers Dynamic G-Forces in acceleration, reduction of speed and wind resistance will increase
working load weight factors.
3. Always use 5/16” inch thick fasteners sold by Snap-Loc or call us for various applications and other fastener recommendations. Using fasteners
not supplied by Snap-Loc may void warranty and claims.
4. Routinely inspect all components for any signs of structural corrosion and replace as needed.
INSTALLATION
If product becomes damaged or structurally unsafe immediately discontinue use. For questions or return
1. Snap-Loc guarantees our products to be free from defects in material and workmanship for a period of 90 days from date you received the product.
2. No returns will be accepted without pre-approved authorization.
3. No returns will be accepted more than 30 days after authorization to return has been issued.
4. During the warranty period Snap-Loc will at its own discretion repair, replace parts or replace in whole products found to be defective in
material or workmanship. Installation labor on replacement parts excluded.
5. Pre-approved return shipping will be paid for by Snap-Loc if in the continental United States. Some restrictions apply.
6. Here are some things not covered under warranty; exceeding weight limit, misuse, accident, alteration, improper installation, over tightening,
scratching, chipping, discoloring, minor plastic cracks that don’t aect usability, use in extreme freezing weather or extreme heat, water
submersion, exposure to corrosive chemicals, unauthorized repair and other similar negligence.
7. Snap-Loc will not be liable for direct or indirect consequential damages whatsoever.
8. The literature included with this product has been written for your safety. If you do not accept the terms and conditions herein do not use
this product and return it within 7 days after purchase. By keeping this product you are agreeing to our warranty terms and conditions.
9. This manual was created June 2019 please check www.snaploc.com for updates thereafter.
WARRANTY

“SNAP-LOC E-TRACK SINGLES” INSTALLATION INTO METAL SHEETING WITH ALLEN SCREWS OR CARRIAGE BOLTS
A. Chose locations for installing “Snap-Loc E-Track Singles” that are not too close to gas lines, electrical or other hazards and mark the
center of screw holes.
B. Drill holes using a 3/8″ inch metal drill bit.
C. If using Snap-Loc 5/16″ inch Allen Screws, use a 3/16″ inch Allen wrench or socket to hold screw from spinning.
D. If using Snap-Loc 5/16″ inch Carriage Bolts, t the screws square neck into the “Snap-Loc E-Track Singles” square holes.
E. Install the washer then the nut with the round edge facing outward and tighten all the way with a 1/2″ inch wrench or socket wrench.
“SNAP-LOC E-TRACK SINGLES” INSTALLATION INTO WOOD FRAMING WITH LAG SCREWS
H. Chose locations for installing “Snap-Loc E-Track Singles” that are not too close to gas lines, electrical or other hazards and mark
the center of screw holes.
I. If using Snap-Loc 5/16″ inch wood Lag Screws, use a 1/8″ inch drill bit to pilot holes the length of the screw.
J. Use a 7/16″ inch socket on a drill to drill screw into wood framing until tight. Do not overtighten.
“SNAP-LOC E-TRACK SINGLES” INSTALLATION INTO THICK METAL WITH DRILL AND TAP
K. Chose locations for installing “Snap-Loc E-Track Singles” that are not too close to gas lines, electrical or other hazards and mark
the center of screw holes.
L. If using Snap-Loc 5/16″ inch Allen Screws, make sure metal is 3/16″ inch or thicker and use a G size drill bit to pilot a hole to the
length of the screw. Using a 5/16-18″ thread count tap, tap the threads into the hole.
M. Use a 3/16″ inch Allen wrench or socket to install screw until tight.
N. If additional holding strength is desired, install washer then the nut with the round edge facing outward and tighten all the way with a
1/2″ inch wrench or socket wrench.
“SNAP-LOC E-TRACK SINGLES” INSTALLATION INTO METAL FRAMING WITH SELF-DRILLING SCREWS
F. Chose locations for installing “Snap-Loc E-Track Singles” that are not too close to gas lines, electrical or other hazards and mark the
center of screw holes.
G. If using Snap-Loc 5/16″ inch Self-Drilling Screws, use a 1/2″ inch socket on a drill to drill screw through metal until tight.
If metal is dicult to drill through use a 1/4″ inch drill bit to pilot hole. Do not overtighten.
A B C
FG
HI
KLN
DE
M
J

“SNAP-LOC E-TRACK SINGLES” INSTALLATION WITH WELDING
O. Chose locations for installing “Snap-Loc E-Track Singles” that are not too close to gas lines, electrical or other hazards.
P. W e l d a l l t h e w a y a r o u n d o n b o t h s i d e s a s s h o w n t o a c h i e v e f u l l w o r k i n g l o a d l i m i t .
HOW TO USE
CONNECTING E-STRAPS AND ACCESSORIES TO “SNAP-LOC E-TRACK SINGLES”
All Snap-Loc items are engineered to coordinate with industry standard E-Track and E-Track accessories.
However, we recommend always using Snap-Loc products with other Snap-Loc products for a guaranteed t.
Q. Pull back on the E-Fitting leaver and insert into the “Snap-Loc E-Track Single” as shown.
R. Insert other end of E-Fitting fully into the “Snap-Loc E-Track Single” as shown.
S. Release leaver and jiggle until securely clicked in place.
T. To re mo ve p ul l ba ck l ev er o n E- Fi ttin g a n d di se ngag e .
E-STRAP WITH CAM
Z. Push down on Cam buckle lever to adjust strap length in and out of Cam until it ts over cargo.
AA. Connect both ends of strap securely to the “Snap-Loc E-Track Single” (reference Connecting E-Straps and Accessories to
“Snap-Loc E-Track Singles”).
BB. After connected to the “Snap-Loc E-Track Single” pull on loose loop end of strap until rmly snug against cargo.
CC. Use Hook & Loop fastener (a.k.a. Velcro) to secure excess end of strap to keep it from getting caught on wheels and other
objects especially when in motion.
DD. To loosen strap push down on Cam buckle lever and pull on strap until loose.
E-STRAP WITH RATCHET
U. Feed end of strap through Ratchet as shown and pull through until loosely snug around cargo.
V. Connect both ends of strap securely to the “Snap-Loc E-Track Single” (reference Connecting E-Straps and Accessories to
“Snap-Loc E-Track Singles”).
W. Begin moving ratchet handle up and down until there is a minimum of two full revolutions of strap wrapped around the center
pivot. If less than two full revolutions of strap the ratchet will not hold properly.
X. Use Hook & Loop fastener (a.k.a. Velcro) to secure excess end of strap to keep it from getting caught on wheels and other
objects especially when in motion.
Y. To loosen pull back on the Ratchet release lever, open handle 180 degrees and pull on strap until loose.
AA BB CC DD
V W X Y
R S T
P
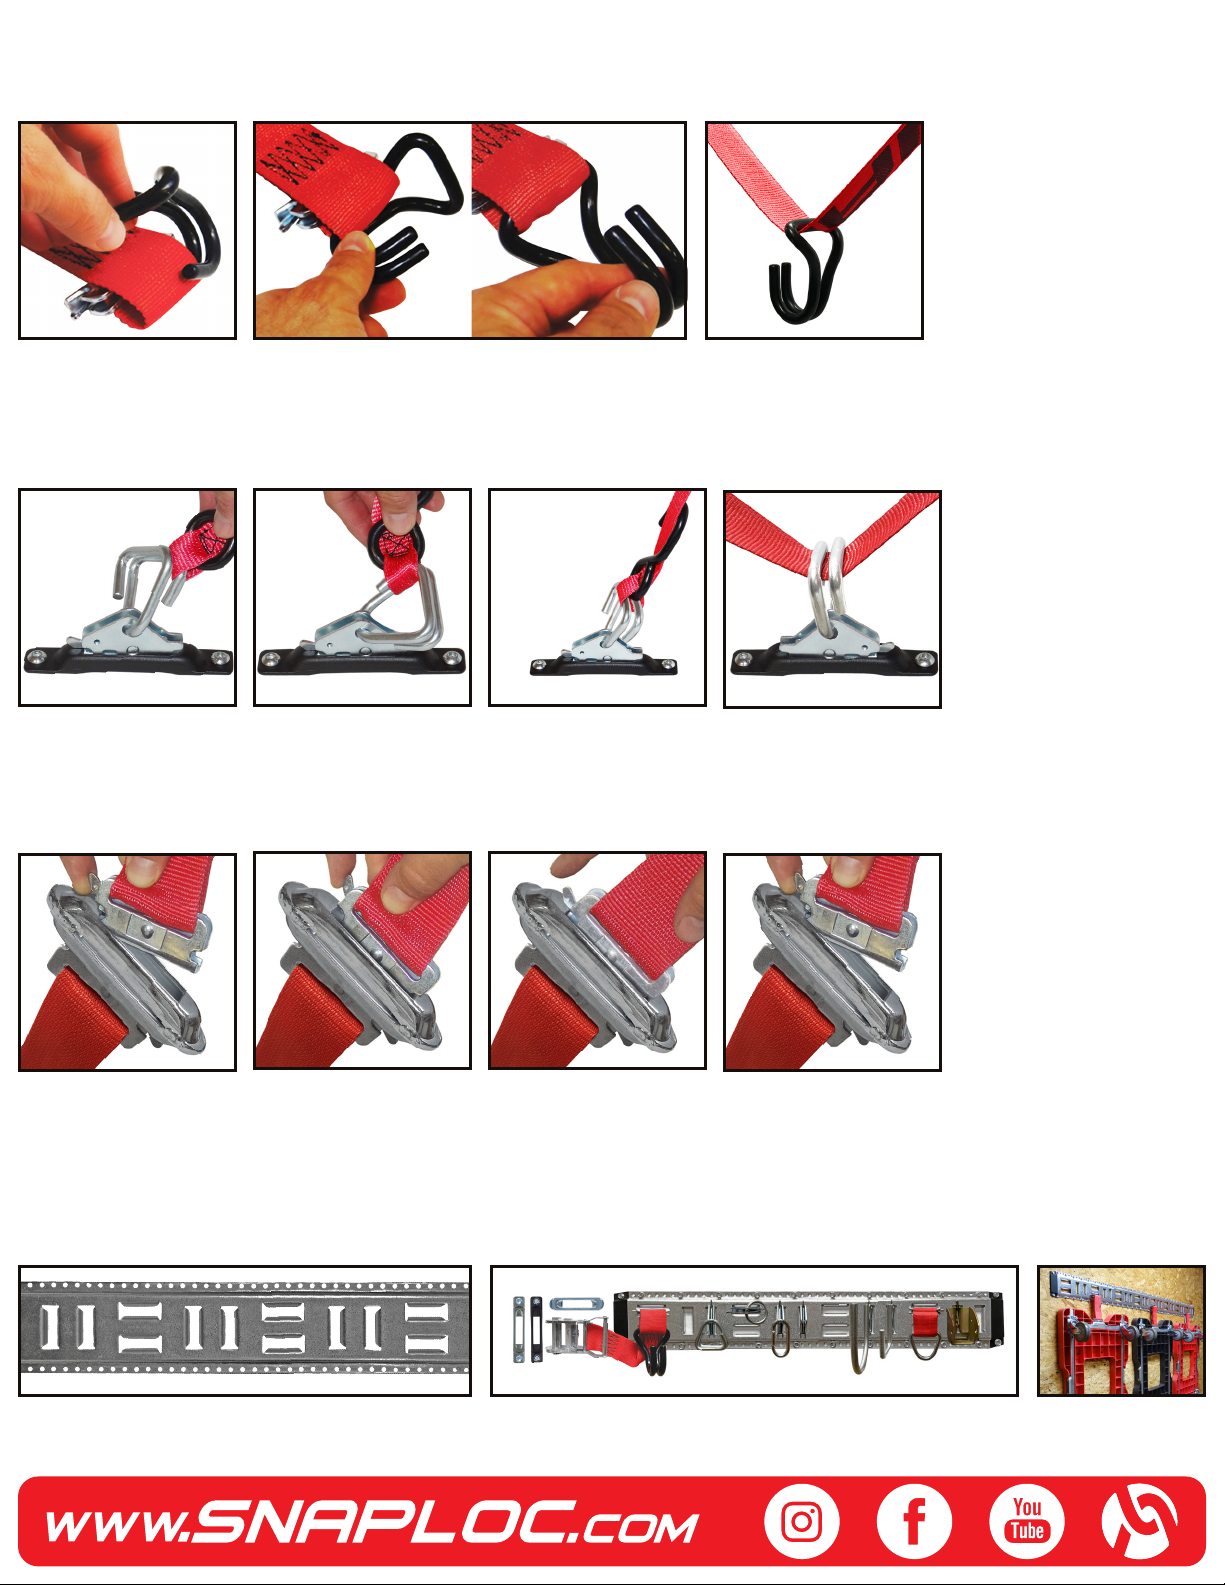
HOOK-RING ADAPTER
HH. Bend hook on strap back and insert sewn loop end of strap over one end of Adapter.
II. Slide to other side and slip sewn loop end over other end of Adapter.
JJ. Position strap in center of Adapter as shown and tuck hook around strap out of the way as shown.
KK. Adapter can also be installed over strap at any location for adjustable anchoring.
HH II JJ KK
STRAP LINK E-STRAP CONNECTOR
LL. Pull back on the E-Fitting leaver and insert into Link as shown.
MM. Insert other end of E-Fitting fully into the Link as shown.
NN. Release leaver and jiggle until securely clicked in place.
OO. To remove pull back lever on E-Fitting and disengage.
LL MM NN OO
STRAP HOOK ON E-STRAPS
EE. Move E-Fitting out of the way and slip split section of Hook onto the loop at end of strap.
FF. Pull Hook through strap loop all the way until in place as shown.
GG. Hook can also be installed over strap at any location for adjustable anchoring.
EE FF GG
STRAP LINK E-STRAP CONNECTOR
Installation recommendations for “Snap-Loc E-Track Singles” can also be applied to “Snap-Loc Ultimate E-Track” but make sure to
use our 1/4” inch diameter screws (5/16” inch screws will not t). Here are some features of the “Snap-Loc Ultimate E-Track”: 100%
Made in USA! Horizontal and Vertical slots reduce wear and tear on straps. Faster, Safer and Easier to install with optimal 32” length.
Fits more applications with less cutting and less waste. Lines up with 16” inch on center stud walls. No extra drilling with 3x more
screw holes. Industrial grade 12-gauge USA galvanized steel for interior and exterior use. Fits all industry standard logistic E-Track
accessories and has a 4,400 lb. Break Strength (1,467 lb. WLL). Patent Pending.
This manual suits for next models
2
Table of contents


