Snow Beast 45SB User manual

When you call the help-line you will need to have the following informaon:
Date of Purchase: _______________________
Locaon of Purchase: _______________________
Serial # - Snow Blower: _______________________
*Serial number is located on the engine block below the starter.
Snow blower and engine life are
extended greatly by performing
frequent lubricaons, oil changes and
regular maintenance. To protect your
investment perform roune
maintenance.
DO NOT RETURN THIS SNOW BLOWER TO THE
STORE!
Need Help?
Parts, Service, and Technical Assistance call:
(919)-550-3221
Monday-Friday 8:00AM-5PM EST
Snow Blower by
Owner’s Manual
This manual contains important safety instrucons for the gasoline engine powered
snow blower models: 30SB, 36SB, 45SB
READ SAFETY WARNINGS AND OPERATING INSTRUCTIONS CAREFULLY.
SAVE THIS MANUAL.
2
30SB, 36SB, 45SB
Rev Nov2014
Snow BEAST
Copyright© 2012 by GXi Outdoor Power, LLC. All rights reserved.
No part of this publicaon can be reproduced or distributed without prior wrien permission of GXi Outdoor Power,
LLC Clayton, NC 27520 USA.
DEK is a registered trademark of GXi Outdoor Power, LLC
GXi Outdoor Power, LLC reserves the right to disconnue or change specicaons or design at any me without noce
and without incurring any obligaon whatsoever.
The informaon and specicaons included in this publicaon were in eect at the me of approval for prinng.
This manual contains important safety instrucons for Snow Blowers
READ SAFETY WARNINGS AND OPERATING INSTRUCTIONS CAREFULLY
SAVE THESE INSTRUCTIONS.
This owner’s manual is considered a permanent part of the snow blower and should remain
with the snow blower if resold.
3
30SB, 36SB, 45SB
Rev Nov2014
Snow BEAST
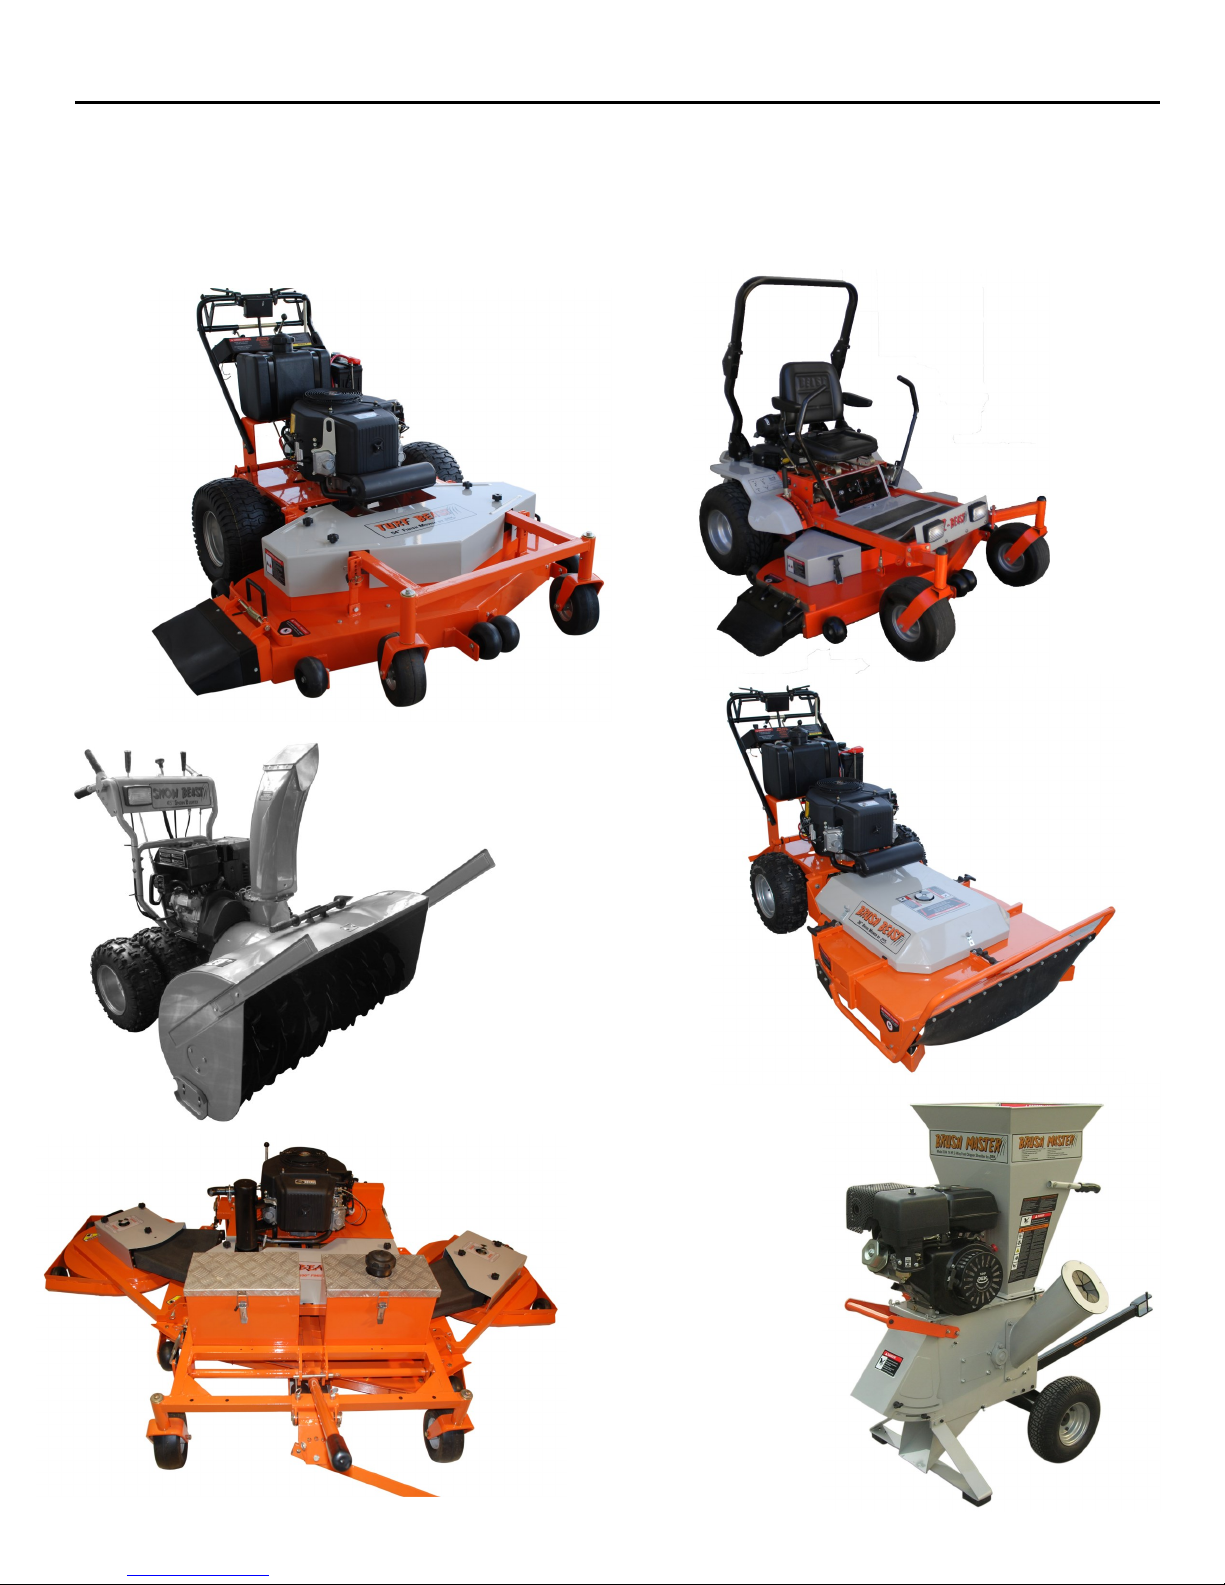
BEAST SERIES
Check out our other great products at
www.beastpowerequipment.com
Turf Beast
36” & 54” Walk Behind
Finish Mower
Brush Master
Chipper/Shredder
with 2-Way Feed
100” Tow Behind Mower
The Beast
36” Brush Mower
Brush Beast
36” & 45” Snow Blower
Snow Beast
54” & 62” Zero-Turn
Riding Mower
Z-Beast

4
30SB, 36SB, 45SB
Rev Nov2014
Snow BEAST
Contents
Safety Informaon and Warnings ............................................................... 1
Preparaon Safety Precauons ...................................................................2
Operaon Safety Precauons ......................................................................3
Safety Decals ............................................................................................... 5
Product Specicaons .................................................................................6
Control Panel and Snow Blower Components ............................................ 7
Missing Parts Request Form.........................................................................8
Assembly Instrucons .................................................................................9
Operang Instrucons
Starng the Engine.............................................................................. 14
Operang Instrucons.........................................................................15
Avoiding Impeller Freeze-Up ...............................................................19
General Maintenance ..........................................................................20
Maintenance Schedule ........................................................................21
Service Adjustments
Adjusng Augers/Impeller Cable .........................................................22
Adjust/Check Drive Cable ....................................................................22
Adjusng Shi Rods .............................................................................22
Vercal Service Posion ......................................................................23
Inspecon and Replacement of Transmission Belt..............................24
Inspecon and Replacement of Impeller Belt .....................................25
Adjusng Discharge Chute Deector...................................................26
Changing Fricon Wheel......................................................................26
Replacing Headlight Bulb.....................................................................26
Transmission System Adjustments ......................................................27
Storage Instrucons ...................................................................................28
Troubleshoong .........................................................................................29
Replacement Parts .....................................................................................31
Limited Warranty and Service................................................................... 36
About the BEAST Snow Blower Manual
Congratulaons on the purchase of your new BEAST commercial snow blower. We at GXi Outdoor Power are condent
that this snow blower will provide excellent performance, outstanding quality, and great durability when operated and
maintained as directed in this manual.
1. This manual contains assembly, operang, safety, adjustment, maintenance, and troubleshoong instrucons.
BEFORE OPERATING YOUR SNOW BLOWER, CAREFULLY READ THIS MANUAL IN ITS ENTIRITY.
2. This owner’s manual is considered a permanent part of the snow blower. It must be available to all operators
and/or person(s) servicing the snow blower. Should the snow blower be resold, this manual must remain with
the snow blower.
3. All informaon, illustraons, and specicaons contained in this manual were in eect at the me of the
publicaon. GXi Outdoor Power reserves the right to add, delete or modify specicaons and/or designs
without noce.
4. If you ever have quesons in regards to the operaon, maintenance or safety of your snow blower, please
contact GXi Parts & Service, LLC at 1-919-550-3221.
1
30SB, 36SB, 45SB
Rev Nov2014
Snow BEAST
Safety Informaon
Emission Control System Informaon
The U.S. and California Clean Air Acts
EPA and California regulaons require all
manufacturers to furnish wrien instrucons
describing the operaon and maintenance of
emission control systems. The following
instrucons and procedures must be followed in
order to keep the emissions from your engine
within the emission standards. Maintenance,
replacement, or repair of the emission control
devices and systems may be performed by any
engine repair establishment or individual, using
parts that are ‘‘cered’’ to EPA standards.
Safety Label Locaons
Safety labels are located on your snow blower to
warn you of potenal hazards. Read them carefully.
If a label comes o or becomes hard to read,
contact GXi Parts and Service, LLC for a
replacement.
Operator Responsibility
It is the owner’s responsibility that all operators
and mechanics must be trained and read this
manual before operang the snow blower as well
as being physically able individuals. They should be
instructed about safe operang and mechanical
procedures. If they can not read or understand
English, it is the owner’s responsibility to explain all
safety operang instrucons. The owner or
operator is responsible for accidents or injuries
occurring to themselves, other people or property.
Potenal misfortunate incidents can be prevented
by the owner/user.
Safety Informaon and Warnings
Snow Blower Inspecon
For your safety, inspect the snow blower before each
use. Before you begin your inspecon, be sure the
following condions are met: the snow blower should
be on a level surface, with the ignion switch o, the
key removed, and the augers disengaged. Also,
disconnect the spark plug wires from the spark plugs
and ground them against the engine to prevent
inadvertent starng.
WARNING
WARNING! Do not use your BEAST snow blower to carry
passengers. Keep bystanders, helpers, pets and children
at a safe distance from the machine while it is in
operaon. Inspect the area where the equipment is to be
used and remove all objects such as rocks, toys, and wires
which can be thrown by the machine causing serious
injury or death.
Wear appropriate clothing including hard hat, safety
glasses and hearing protecon. Long hair, loose clothing
or jewelry may get tangled in moving parts.
WARNING
Training
1. Read, understand, and follow all instrucons on
the machine and manual(s) before aempng to
assemble and operate.
2. Operator must be familiar with all controls, their
operaons, and how to stop the engine and
disengage the controls quickly.
3. Never allow children to operate this machine.
4. Never allow adults to operate this machine
without proper instrucon.
5. Exercise cauon to avoid slipping or falling,
especially when operang the machine in reverse.
6. Keep area of operaon clear at all mes.
2
30SB, 36SB, 45SB
Rev Nov2014
Snow BEAST Preparaon Safety Precauons
Preparaon—Safety Precauons
1. Inspect the area where the equipment is to be
used and remove all objects such as rocks,
mats, and wire which can be thrown by the
machine causing serious injury or death.
2. Disengage all clutches and shi to neutral
before starng the engine.
3. Disengage all control levers before starng
the engine.
4. Use extension cords and receptacles as
specied by the manufacturer for all units
with electric drive motors or electric starng
motors.
5. Use a grounded three-wire extension cord
when using the electric start opon.
6. People, pets, and most importantly children
must not be near the area being cleared. Do
not operate the snow blower in their
presence.
7. Never operate snow blower with damaged
guards, shields or covers.
8. All users of the snow blower must be alert and
pay aenon to safety alerts, symbols, and
safety signs.
9. Be sure to inspect snow blower before each
use.
10. Check the controls and shields to make sure
that they are funconing properly before
operang. Do not operate if any are damaged
or missing.
11. Never aempt to make any adjustments to the
snow blower while it is running.
12. Adjust the collector housing height to clear
gravel or crushed rock surfaces.
13. Wear appropriate clothing including hard hat,
safety glasses and hearing protecon. Long
hair, loose clothing or jewelry may get tangled
in moving parts.
14. Do not operate without wearing adequate
winter clothing. Wear footwear that will
improve foong on slippery surfaces.
15. Allow snow blower to adjust to outdoor
temperature before starng the engine.
DANGER: GASOLINE IS HIGHLY FLAMMABLE AND
EXPLOSIVE. Do not add fuel while the engine is
running or is hot. Keep open ames, sparks, and heat
away from the fuel and store fuel in containers
specically designed for that purpose. ADD FUEL
OUTDOORS ONLY. IF THE FUEL IS SPILLED, DO NOT
START THE ENGINE. Manually push the snow blower
away from the spill and wipe up immediately.
DANGER
Gasoline and other fuels—Safety Precauons
Use extra care when handling gasoline and other
fuels as they are ammable and vapors can explode.
1. Only use gasoline approved containers for storage
and keep out of reach from children.
2. Do not ll fuel tank completely full. Overlling
may result in fuel leakage. Leave a reasonable
amount of space for fuel to expand.
3. If fuel is spilled, do not start the engine. Move the
snow blower away from the area, wipe up the spill
thoroughly and wait unl fuel vapors have
evaporated before starng engine.
4. Keep the nozzle in contact with the rim on the fuel
tank or container opening at all mes, unl
refueling is complete. Do not use nozzle lock-open
device.
5. Do not ll gasoline containers or equipment inside
a vehicle or on a truck/trailer bed.
6. Always place gasoline containers on the ground
away from your vehicles prior to lling.
7. Never remove gas cap or add fuel when engine is
running or the engine is hot.
8. Avoid prolonged breathing of gasoline vapors.
9. Never refuel or drain the machine indoors.
10. Keep face away from nozzle and gas tank
opening.
11. Keep gas and other fuels away from skin and
eyes. If fuel is spilled on clothing, change clothing
immediately.
12. Never use the mouth to siphon gas.
13. Never refuel the snow blower unl all moving
parts on the snow blower have stopped.
14. Never smoke when handling fuels and stay away
from an open ame where fumes can be ignited

3
30SB, 36SB, 45SB
Rev Nov2014
Snow BEAST Operaon Safety Precauons
Equipment Operaon—Safety Precauons
1. Do not operate the engine in a conned space
where dangerous carbon monoxide fumes can
collect. Carbon monoxide is odorless,
tasteless, and can be fatal.
2. Never operate the snow blower without good
visibility or light.
3. Exercise extreme cauon when operang on
or crossing gravel drives, walks, or roads. Stay
alert for hidden hazards or trac.
4. Never operate the snow blower with defecve
guards or shields, or without the safety
devices securely mounted in place and
funconing properly.
5. Be aware of discharge and never direct
discharge of material toward people or areas
where property damage can occur. Keep
children and others away.
6. Do not change the governor sengs or over
speed the engine.
7. Do not overload the machine capacity by
aempng to clear snow at too fast a rate.
8. Always stop the engine when you leave the
snow blower, even for a moment.
9. To help reduce re hazard, keep the engine
and the area around the engine free of grass,
leaves or any other type of foreign material.
10. Beware of any sharp edges. For safety always
wear gloves when performing augers/impeller
maintenance acvies
11. If lightning is seen or thunder is heard in the
operators vicinity, do not operate machine.
Instead nd shelter, as lightning may cause
injury/death.
12. Aer striking a foreign object, stop the engine,
remove the wire from the spark plug,
thoroughly inspect the snow blower for any
damage, and repair the damage before
restarng and operang the snow blower.
13. If machine starts to vibrate or funcon
abnormally, stop the engine immediately and
check for cause. Vibraon is generally a
warning of trouble.
14. Keep hands and feet away from augers/
impeller . This product is capable of
amputang hands and feet.
15. Be alert and slow down when making turns.
Also look le, right, and behind before
changing direcons and reversing to be sure
there is a clear path.
16. Never operate snow blower at high transport
speeds on slippery surfaces.
17. Never operate snow blower under the
inuence of alcohol and drugs.
18. Use care when loading or unloading the
machine into a trailer or truck.
19. Use care when approaching blind corners,
shrubs, trees, or other objects that may
obstruct vision.
20. Always disengage power to augers when not in
use or transported.
21. Never listen to music with headphones/
earphones while operang the snow blower.
22. Use extreme cauon when operang on
slopes.
23. Never touch a hot engine or muer.
24. Use cauon when operang on gravel
surfaces.
25. Only use aachments and accessories that are
approved by BEAST.
26. When starng the engine pull the cord slowly
unl some resistance is felt before using full
force.
27. Always have a good grip on the handles and
never run while operang the snow blower.
28. Stop the engine whenever you leave the
operang posion, before unclogging the
augers/impeller or discharge chute, and when
making any repairs, adjustments or
inspecons.
29. When cleaning, repairing or inspecng the
snow blower, stop the engine and make
certain the augers/impeller and all moving
parts have stopped. Disconnect the spark plug
wire and keep the wire away from the plug to

4
30SB, 36SB, 45SB
Rev Nov2014
Snow BEAST Operaon Safety Precauons
Before aempng to use your snow blower,
make sure you are familiar with all of the
components and have read the manual.
Need Help?
Parts, Service
and Technical Assistance call:
(919)-550-3221
Monday-Friday 8AM-5PM EST
www.beastpowerequipment.com
DANGER: Do not bypass, modify, alter or
disconnect the safety system. Make sure that
the safety interlock system is fully operaonal
each me before operang the machine.
Before seng up your BEAST snow blower,
disconnect the spark plug wires from the
spark plugs and ground them against the
engine to prevent inadvertent starng. This
step should be taken as a precauon
whenever you are working on this machine.
IMPORTANT! The snow blower belts are adjusted
to ensure the augers/impeller stop turning within
ve (5) seconds of releasing the impeller control
lever. If you are making any belt adjustments
whatsoever, for your safety and the safety of
others around you, you must ensure the belts are
re-adjusted to achieve this design specicaon.
GASOLINE IS HIGHLY FLAMMABLE AND
EXPLOSIVE. FUEL LEAKS, A LOOSE FUEL TANK,
OR A LOOSE FUEL VALVE CAN LEAD TO
SEVERE INJURY OR DEATH. DO NOT OPERATE
THIS SNOW BLOWER IF ANY COMPONENT OF
THE FUEL SYSTEM IS LOOSE OR LEAKS
GASOLINE!
Clearing A Clogged Chute—Safety Precauons
1. SHUT THE ENGINE OFF!
2. Wait at least 10 seconds to be sure the augers
have stopped rotang.
3. Remove and ground the spark plug when
clearing the blockage.
4. Always use a cleanout tool and never your
hands.
Check engine oil level before each use. Maintain
oil level between run marks on the dipsck, and
change oil according to the maintenance
schedule to maximize product life.
Do NOT over-prime the engine. Pressing the
primer bulb more than 3x could result in ooding
the carburetor making the engine hard to start or
cause fuel to leak from the carburetor inlet.
5
30SB, 36SB, 45SB
Rev Nov2014
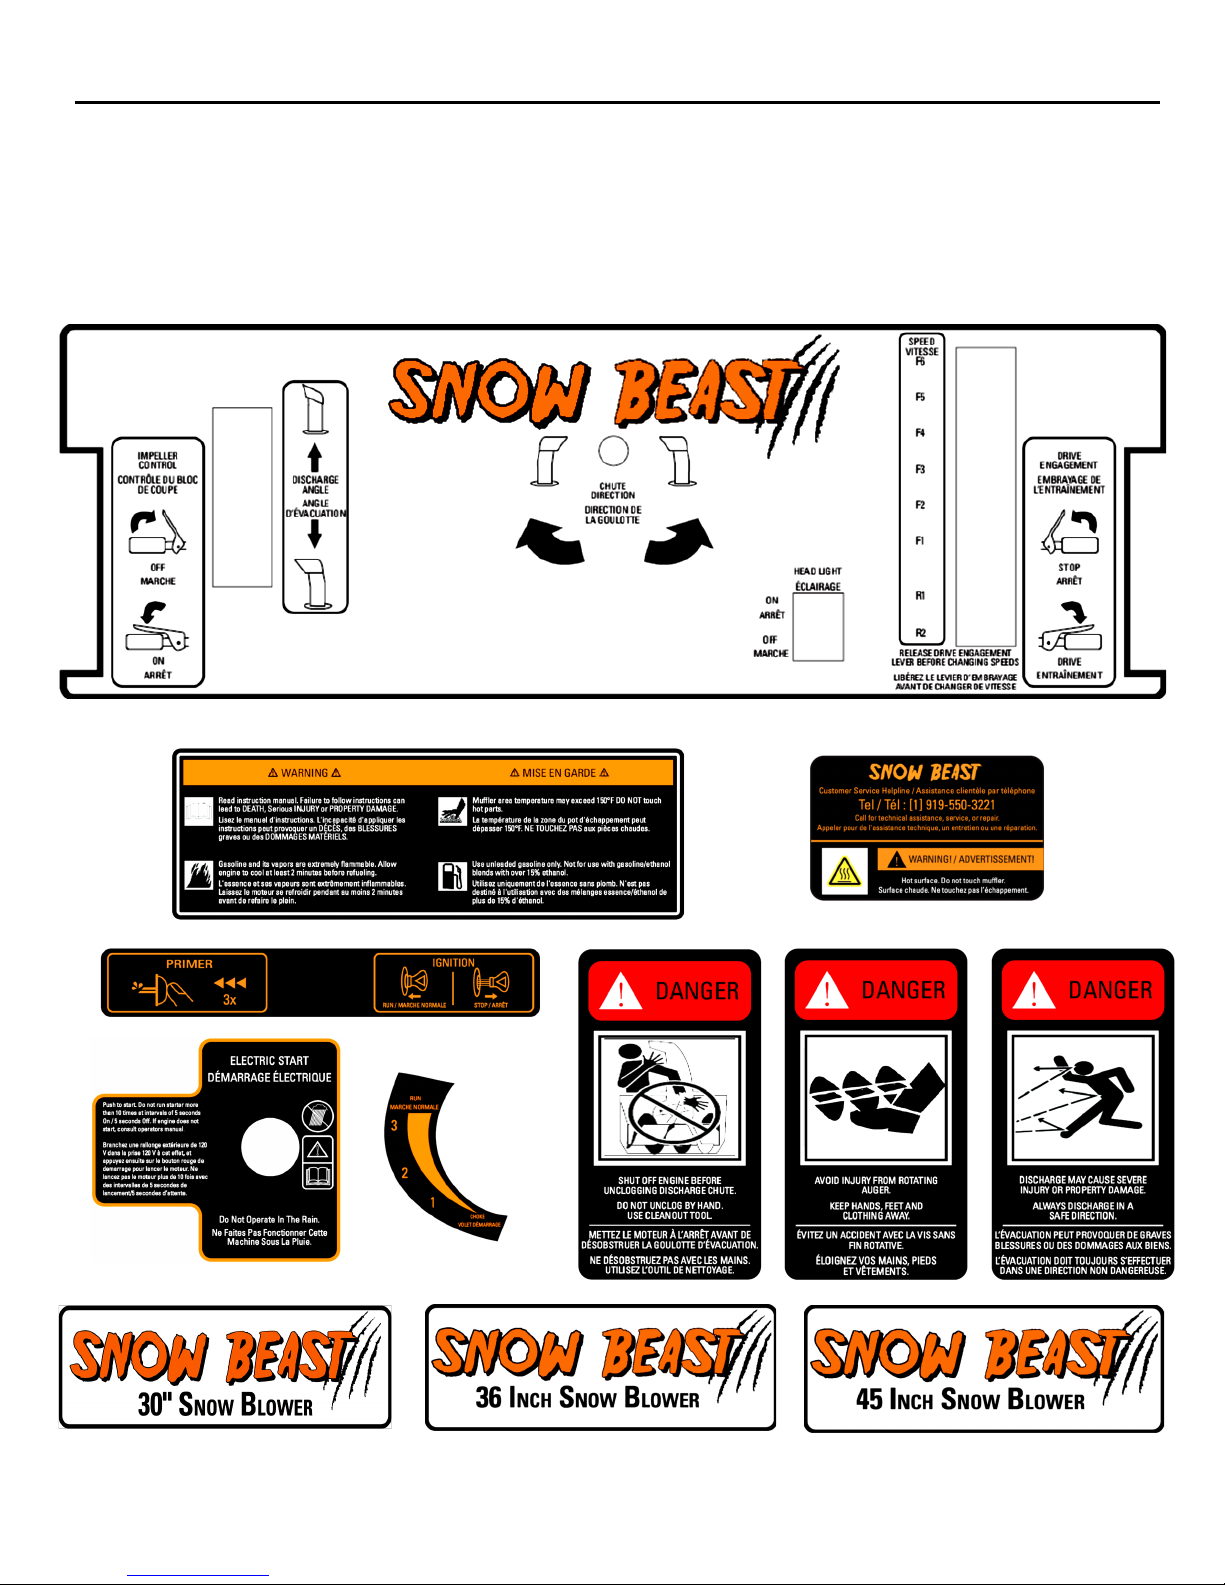
Snow BEAST Safety Decals
Safety Decal Idencaon
The labels shown below are located on your snow blower to warn you of potenal hazards and provide you with
important safety informaon. If these decals become dicult to read or are missing from the snow blower, please
contact GXi Parts & Service, LLC at (919)-550-3221 or www.beastpowerequipment.com for a replacement.
6
30SB, 36SB, 45SB
Rev Nov2014
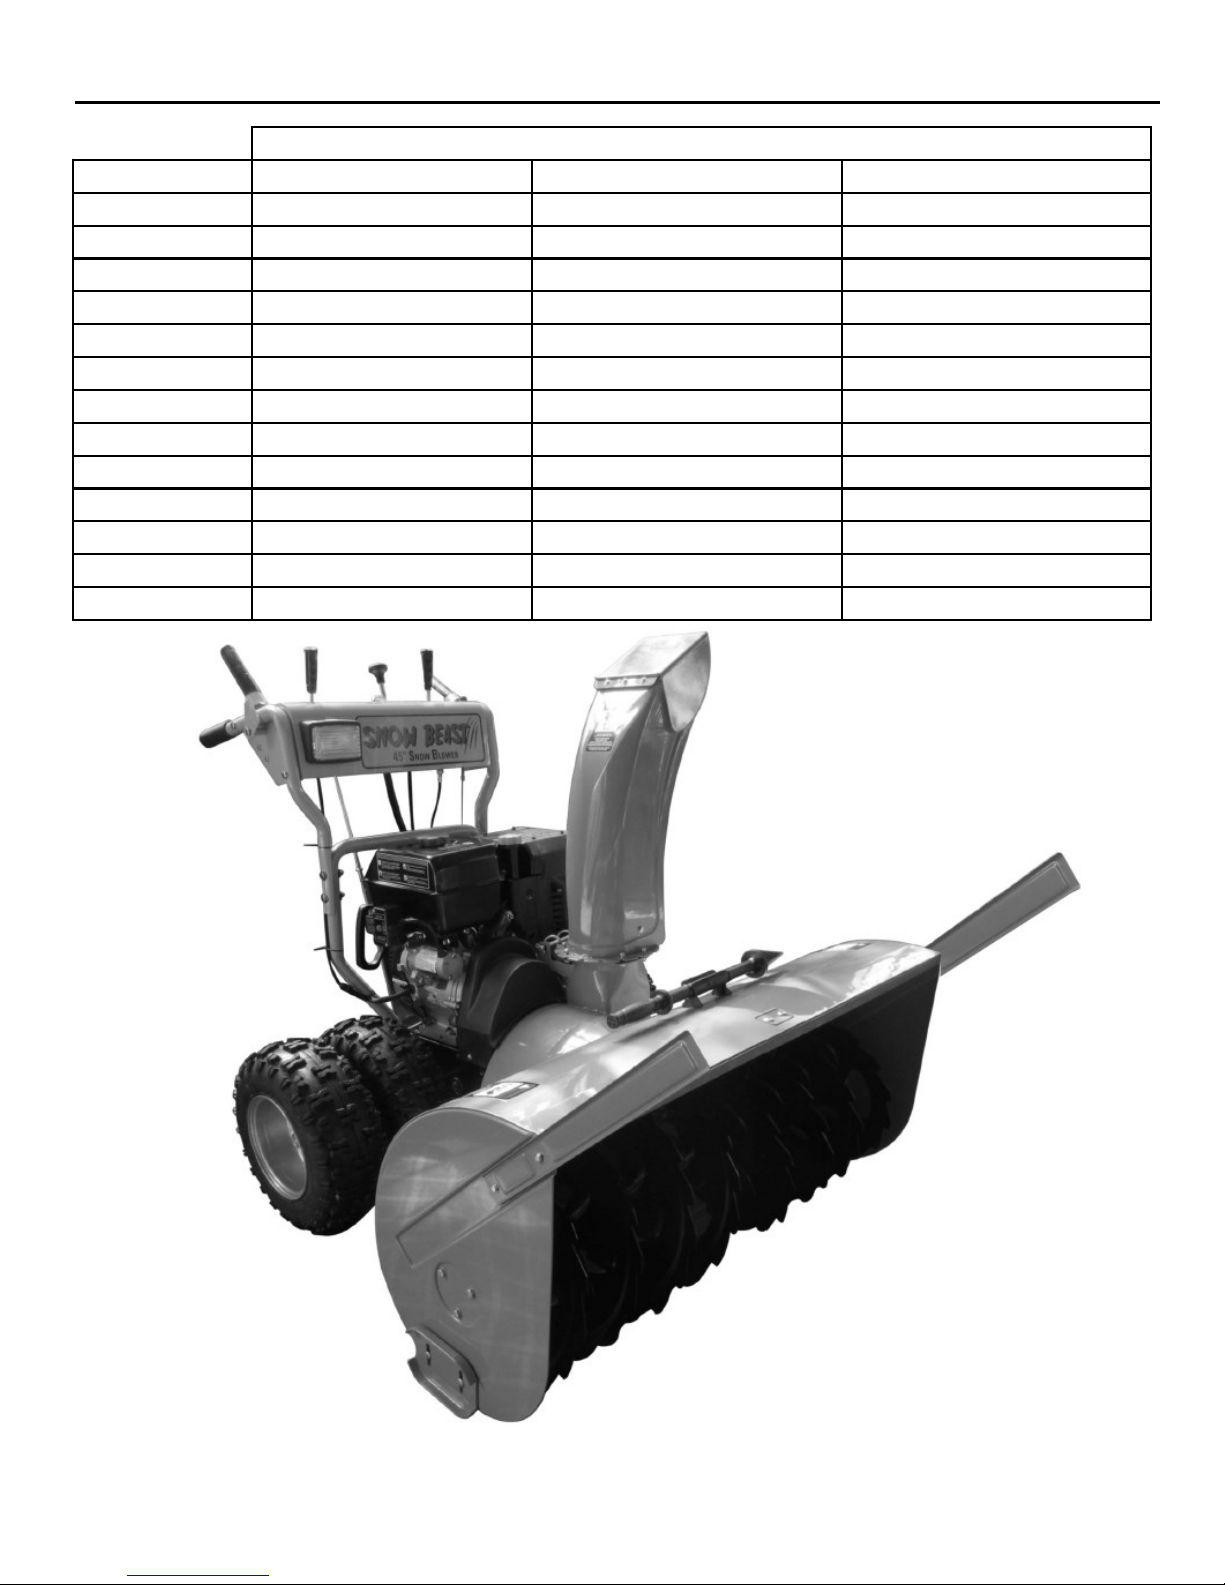
Snow BEAST Product Specicaons
* Product Specicaons may
change without noce.
Feature 30SB 36SB 45SB
Product Type Snow blower Snow blower Snow blower
Clearing Path 30” 36” 45”
Engine 302cc 420cc 420cc
Torque 15.9ft.lbs 20.7 ft.lbs 20.7ft.lbs
EngineStart 120VElectric Start andrecoil 120VElectric Start andRecoil 120VElectric Start andRecoil
SpeedControl 6fwd, 2rev 6fwd, 2rev 6fwd, 2rev
Deck Type All Steel All Steel All Steel
Dischargedistance 40’ 40’ 40’
Impeller 16” 2 Stage 16” 2 Stage 16” 2 Stage
Auger 16” serrated 16” serrated 16” serrated
DischargeChute 6” 6” 6”
Fuel/Capacity Unleadedgasoline/1.32GAL Unleadedgasoline/1.32GAL Unleadedgasoline/1.32GAL
Chutecontrol Crank Crank Crank
Models
7
30SB, 36SB, 45SB
Rev Nov2014
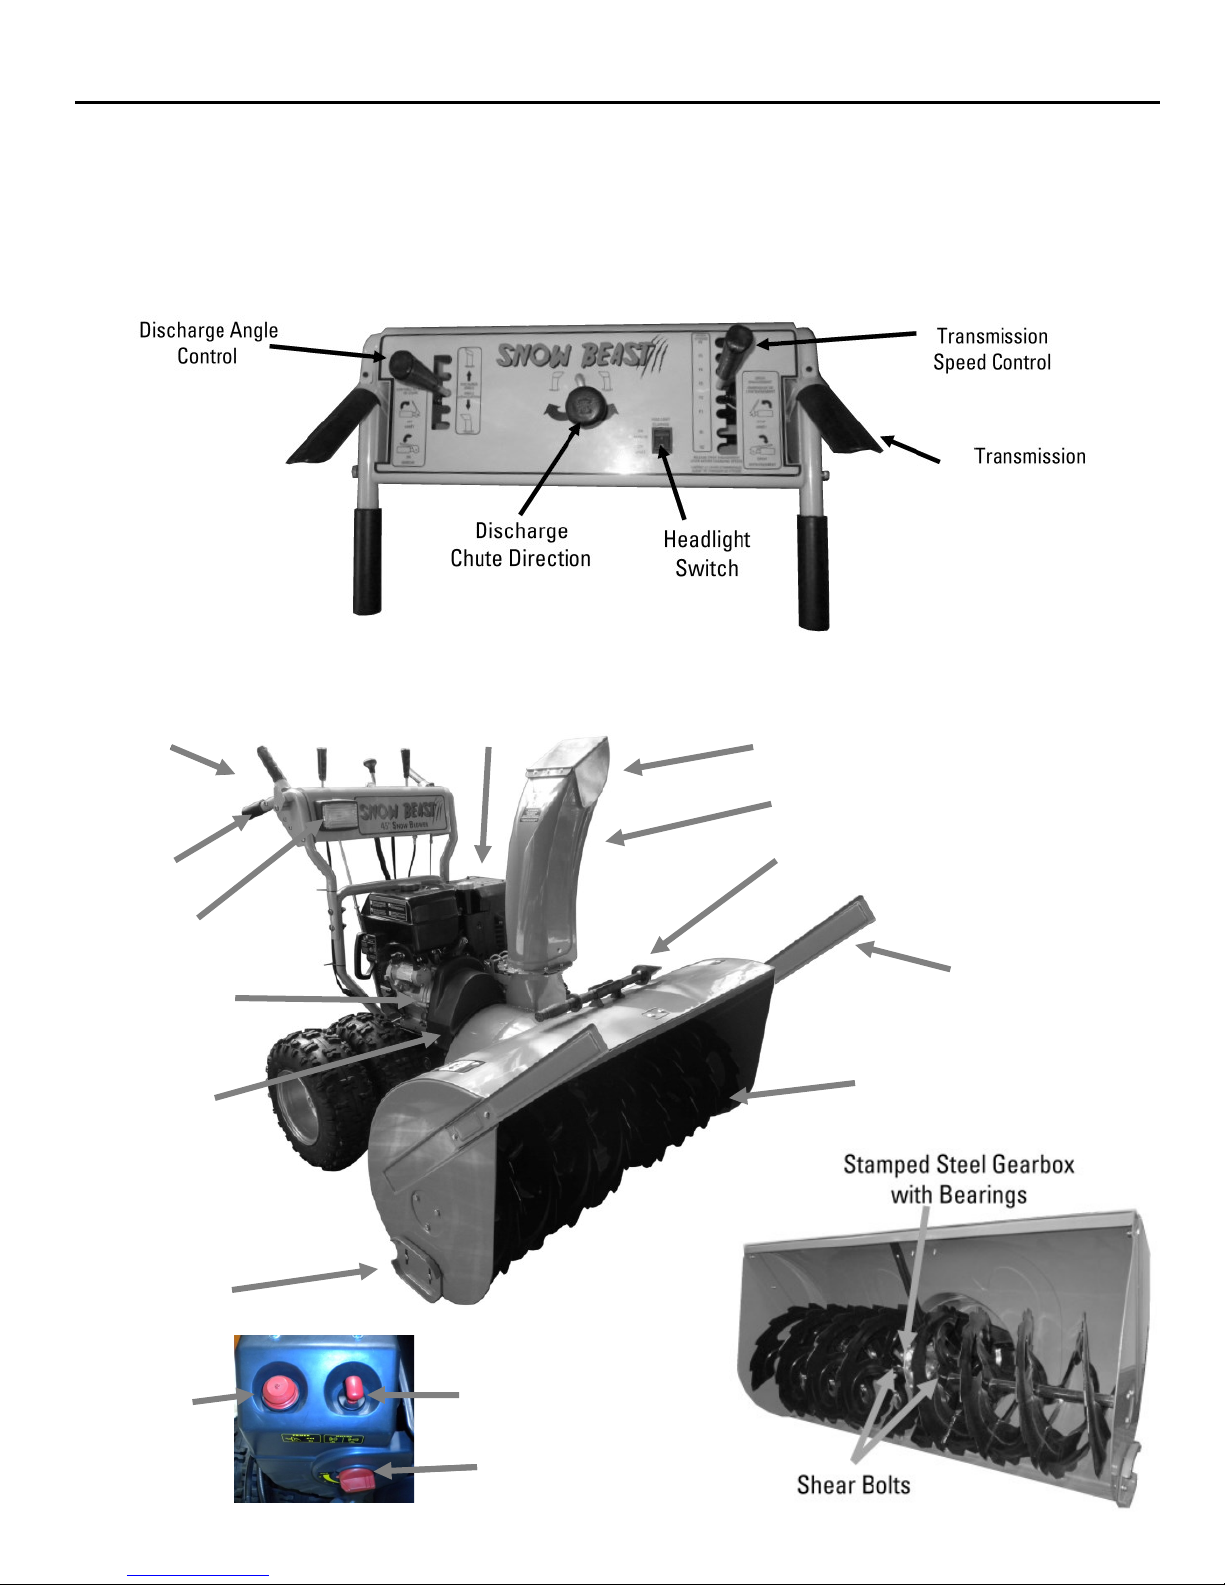
Snow BEAST Control Panel and Snow Blower Components
Discharge Chute
Dri Cuers
Collectors/Impeller
Adjustable
Skid Shoes
Belt Cover
Muer—HOT!
Safety Key
Choke
Discharge Deector
Control Panel
Handle Bar
Headlight
Snow Blower Component Idencaon
(Some components may appear dierent than shown, depending on the model.)
Primer
Do NOT Over-Prime
Serial #
Stamped on En-
Throughout this manual, instrucons are given on the operaon of your STANELY snow blower. We recommend that while
going through this manual, you have your snow blower available for quick and easy access in order to orient yourself with
the controls, maintenance and orientaon of dierent parts. Please read through the manual before operang.
Control Panel
Below is a diagram of the control panel. Please take the me to familiarize yourself with the snow blower controls.
Cleanout Tool
8
30SB, 36SB, 45SB
Rev Nov2014
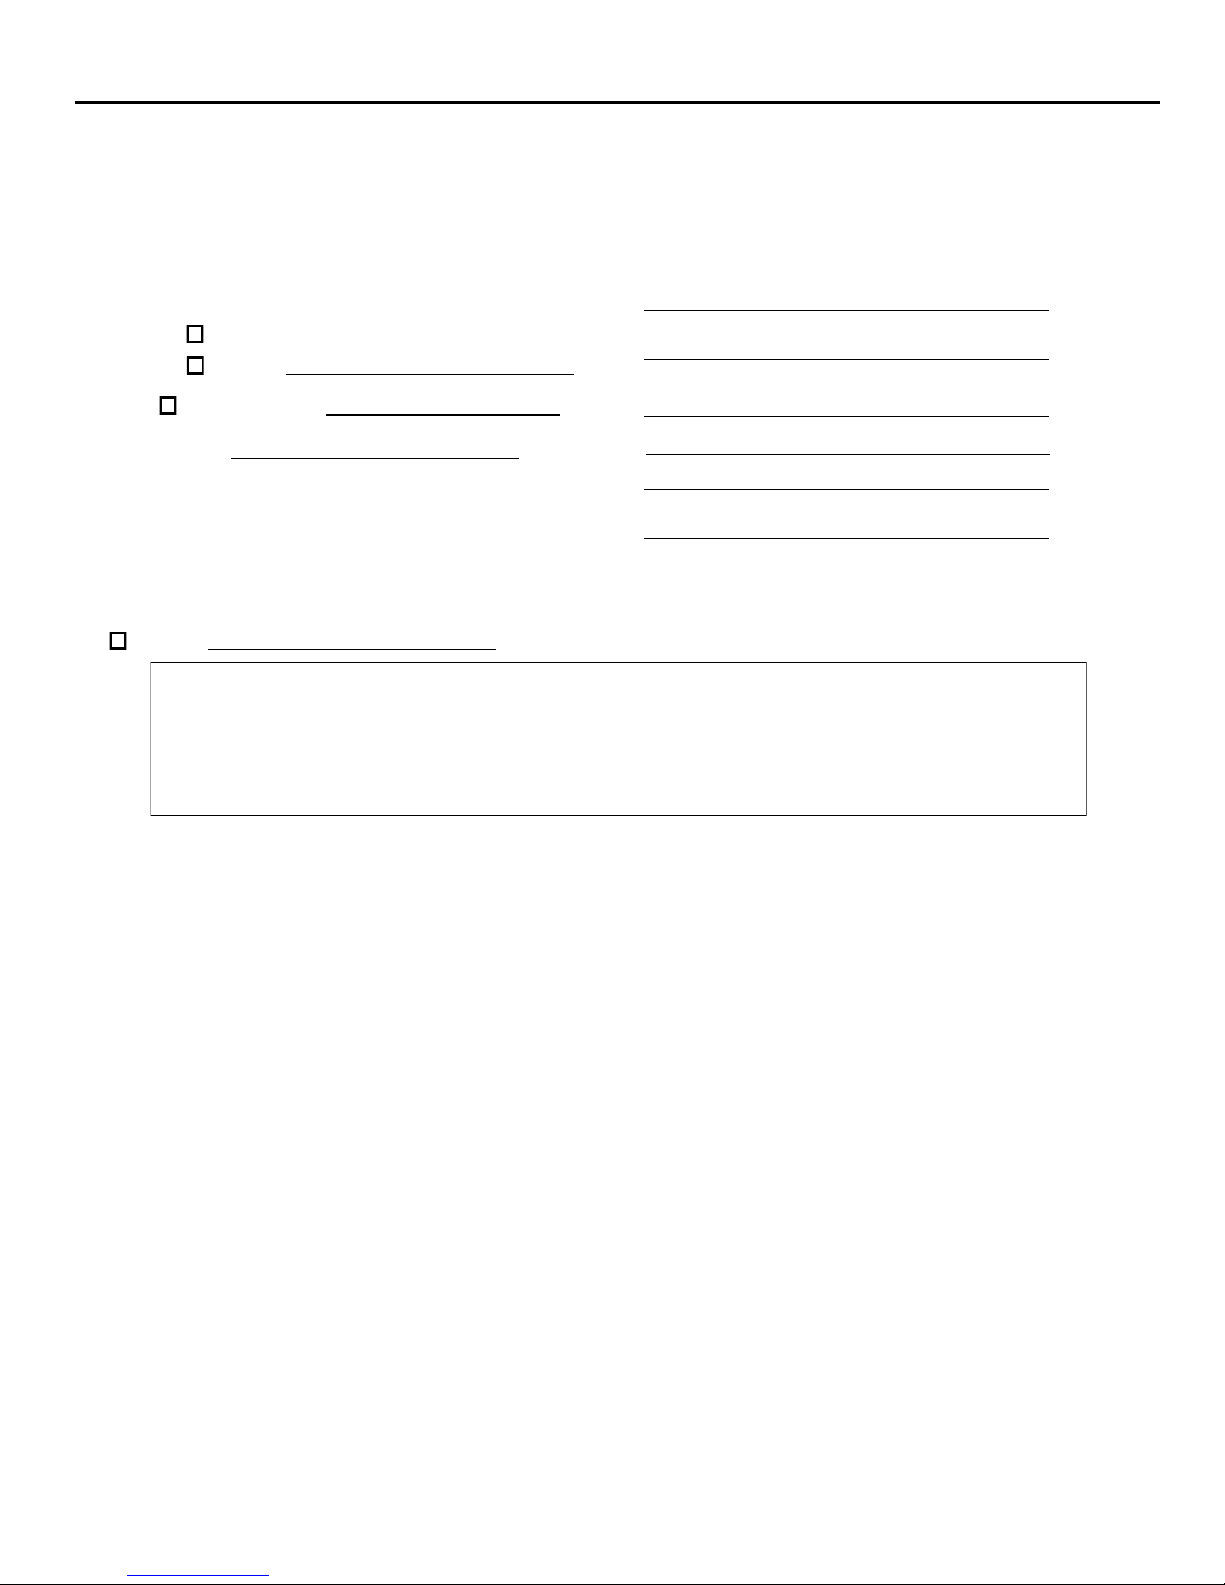
Snow BEAST Missing Parts Request Form
Name
Phone
Email
Address
IMPORTANT: Please include your receipt. Without a receipt, your
order will be delayed. You may also email us at:
customerservice@gxioutdoorpower.com
Fax: (919)-550-3277
If emailing, please scan in your proof of purchase.
Please refer to pages 31-35 for a detailed parts lisng and descripon. This will
expedite the process of geng parts idened correctly for shipment.
Comments:
Please indicate the part that you are
Hardware bag
Model #:
Other
Serial #:
Date of purchase
9
30SB, 36SB, 45SB
Rev Nov2014
Snow BEAST Assembly Instrucons
Step 1: Control Panel Handles
1. Align the two holes on each side of the control panel
handles over the lower handle frame.
2. Insert the bolts through the handlebar holes and frame
holes. Secure in place with hardware provided. Insert
bolts from the inside.
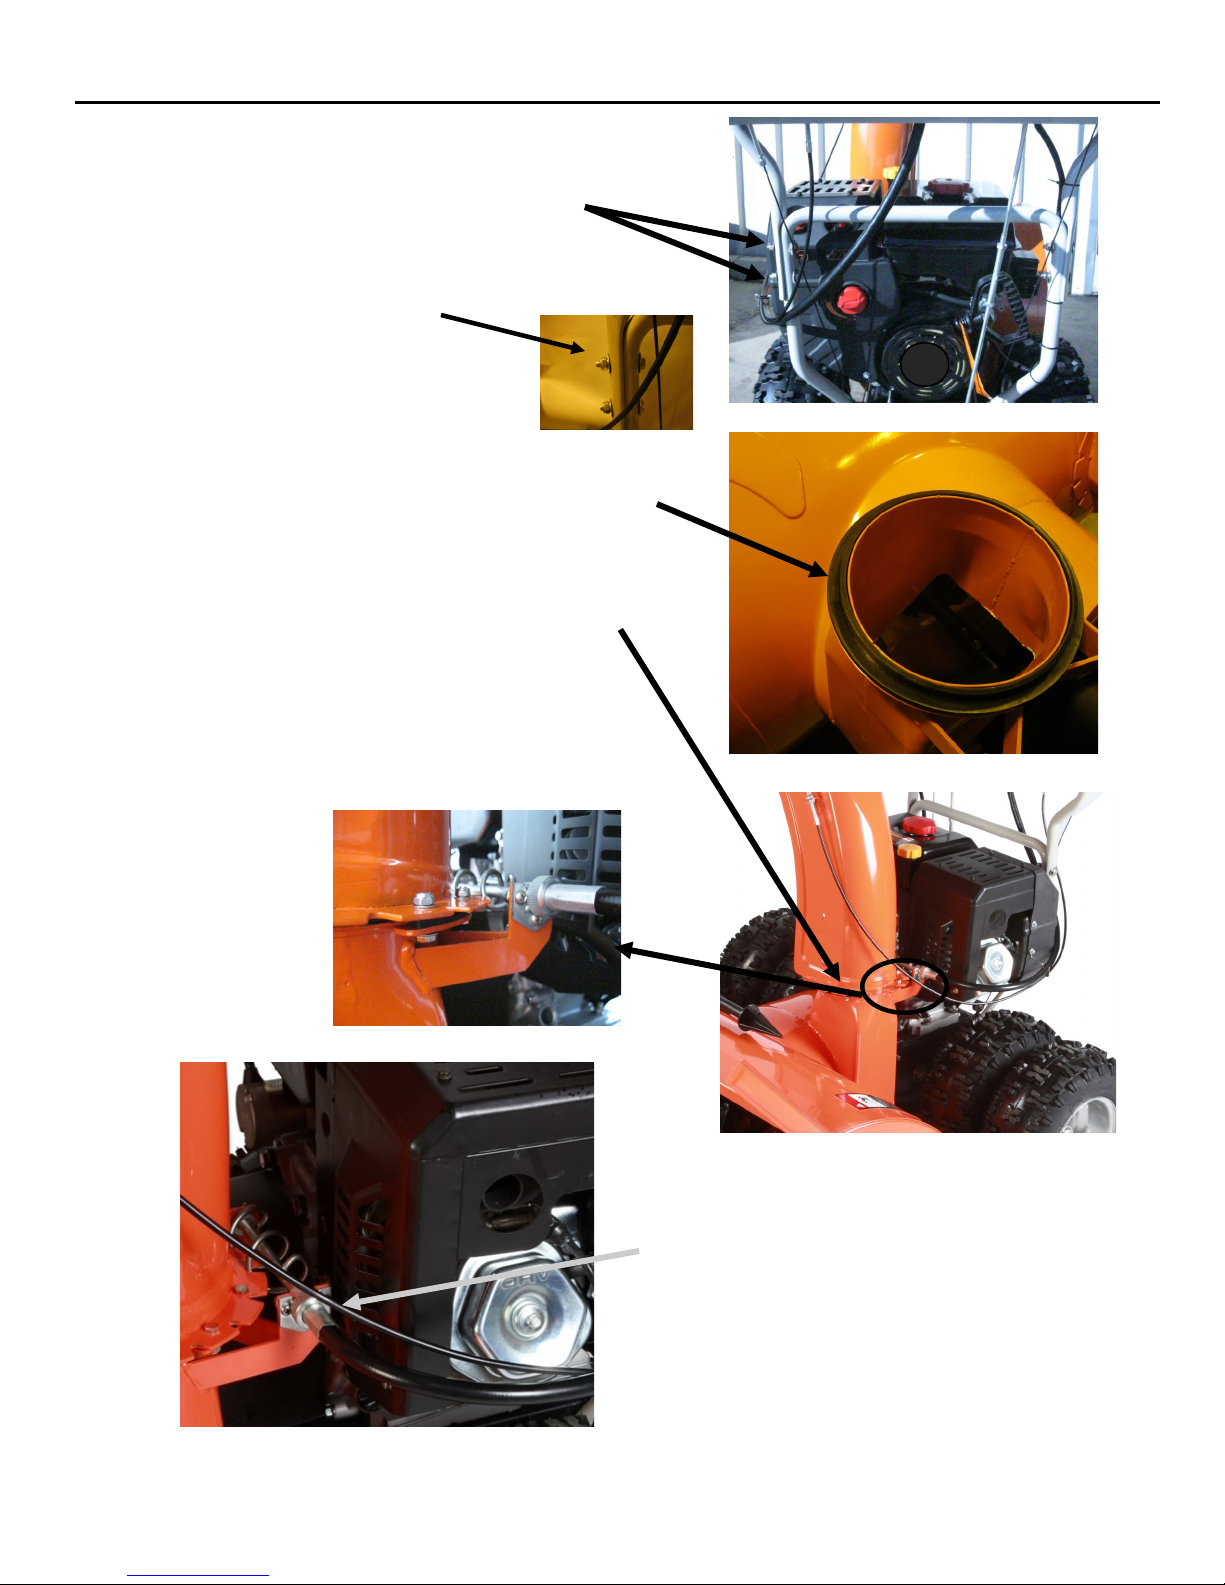
Step 3: Chute Rotaon Cable
Aach the cable coming from the middle of the
control panel by screwing the cable end onto the
crank secon.
See next page for specic instrucons regarding
this assembly.
Need Help With Assembly?
1-919-550-3221
Step 2: Direconal Discharge Chute
1. Fit the black plasc round spacer onto impeller
housing before installing chute. Apply light coat of
grease onto spacer.
2. Install the bolts for the retainer brackets with the
plasc spacer between the chute and the steel
retaining tabs.
DO NOT OVERTIGHTEN. If the bracket is too ght the
chute will not move properly. Ensure there is enough
space between the impeller housing and the bracket on all
sides so that the chute rotates smoothly.
10
30SB, 36SB, 45SB
Rev Nov2014
Snow BEAST
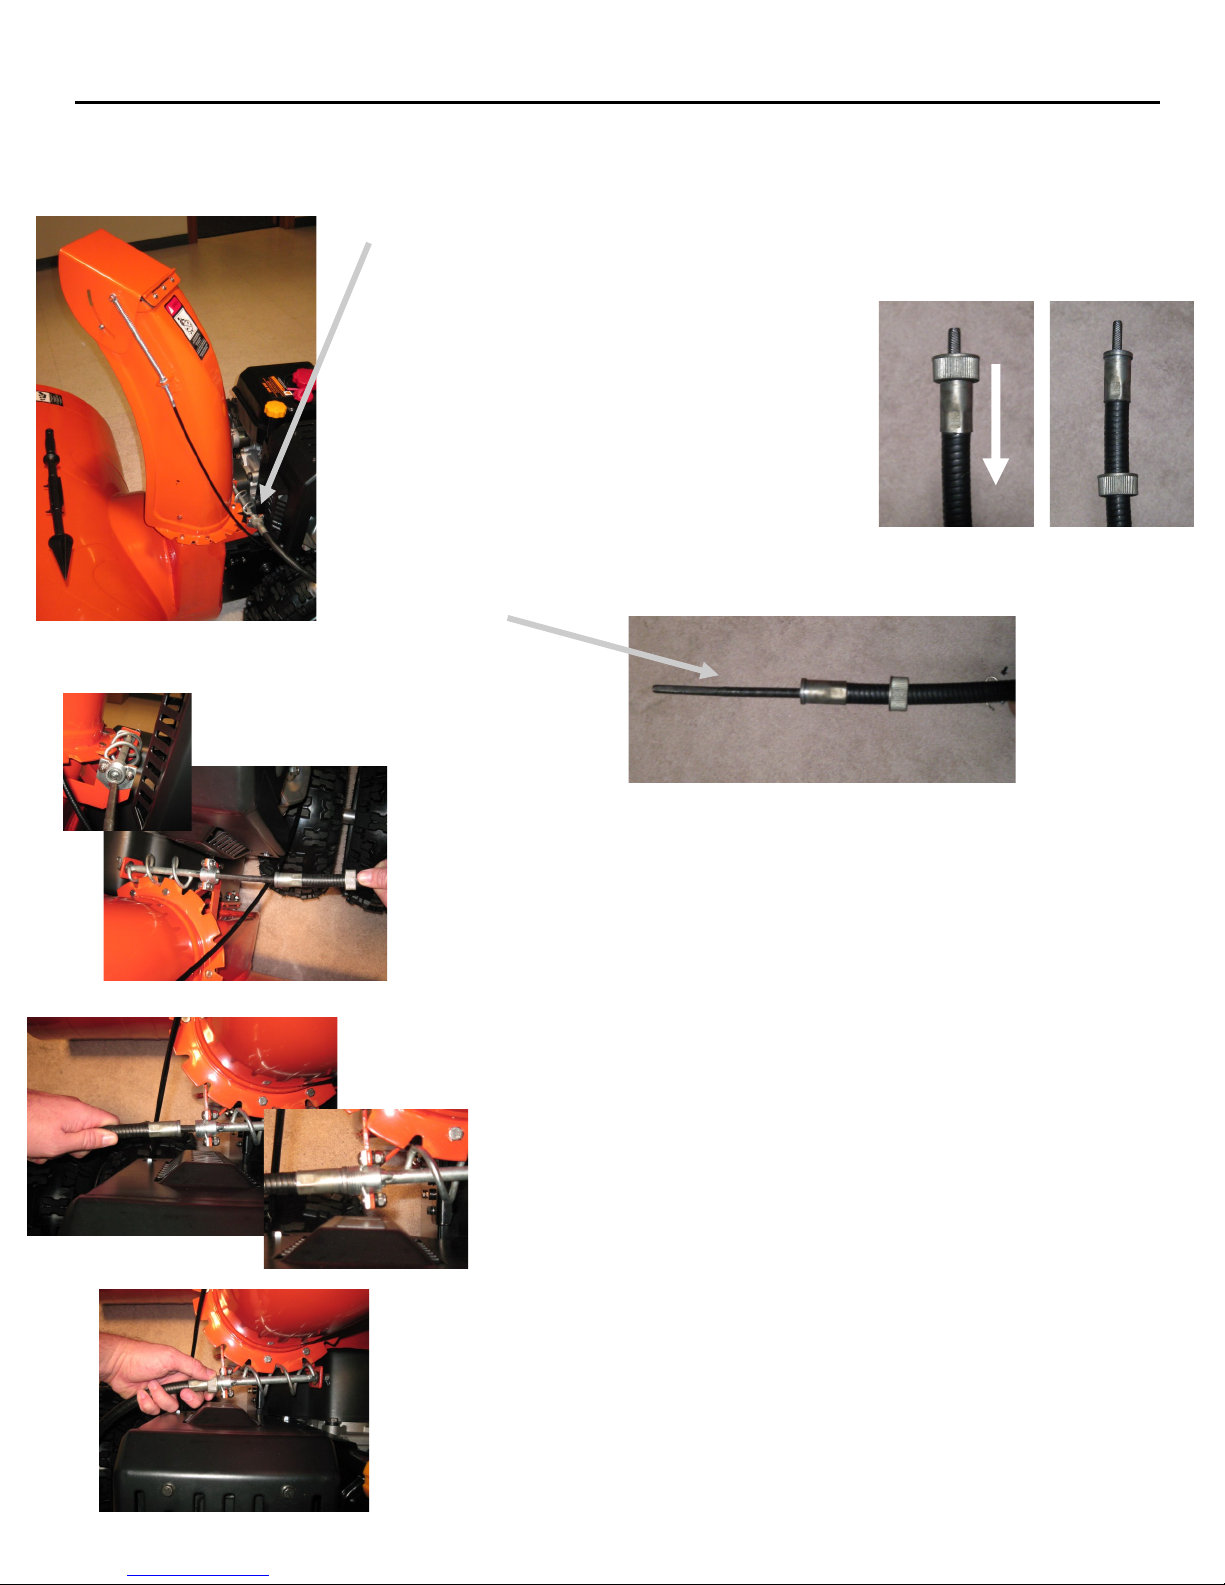
1. Locate the connecon: The chute rotaon cable connecon is located at
the base of the discharge chute between the engine and the discharge chute.
2. Slide the threaded end of the connector down
the cable in order to easily see the end of the cable
connecon. The center secon should be about
3/4” to 1” beyond the end of the cable.
NOTE: There is nothing wrong if the end of the cen-
ter secon of the cable protrudes more than about
3/4” to 1” beyond the end of the cable.
The center secon can be easily pushed back into
the cable.
3. Align the center secon with the cable chute rotator. The end
of the center secon is square and requires proper alignment in
order to correctly connect to the machine.
4. Press the cable toward the chute rotator screw. The end of
the cable should touch the end of the chute rotator.
If the surfaces do not contact, connue to apply pressure and
slowly rotate the discharge chute direcon handle on the control
panel so the center of the cable aligns itself on both ends.
5. Slide the threaded end from Step 2 toward the chute rotator,
and thread the end onto the chute rotator.
IMPORTANT: Finger ghten rmly. Inspect before each use to make certain
the connecon doesn’t loosen during operaon of the machine.
Step 3: Chute Rotaon Cable (connued)
Assembly Instrucons
Need Help With Assembly?
(919)-550-3221
11
30SB, 36SB, 45SB
Rev Nov2014
Snow BEAST
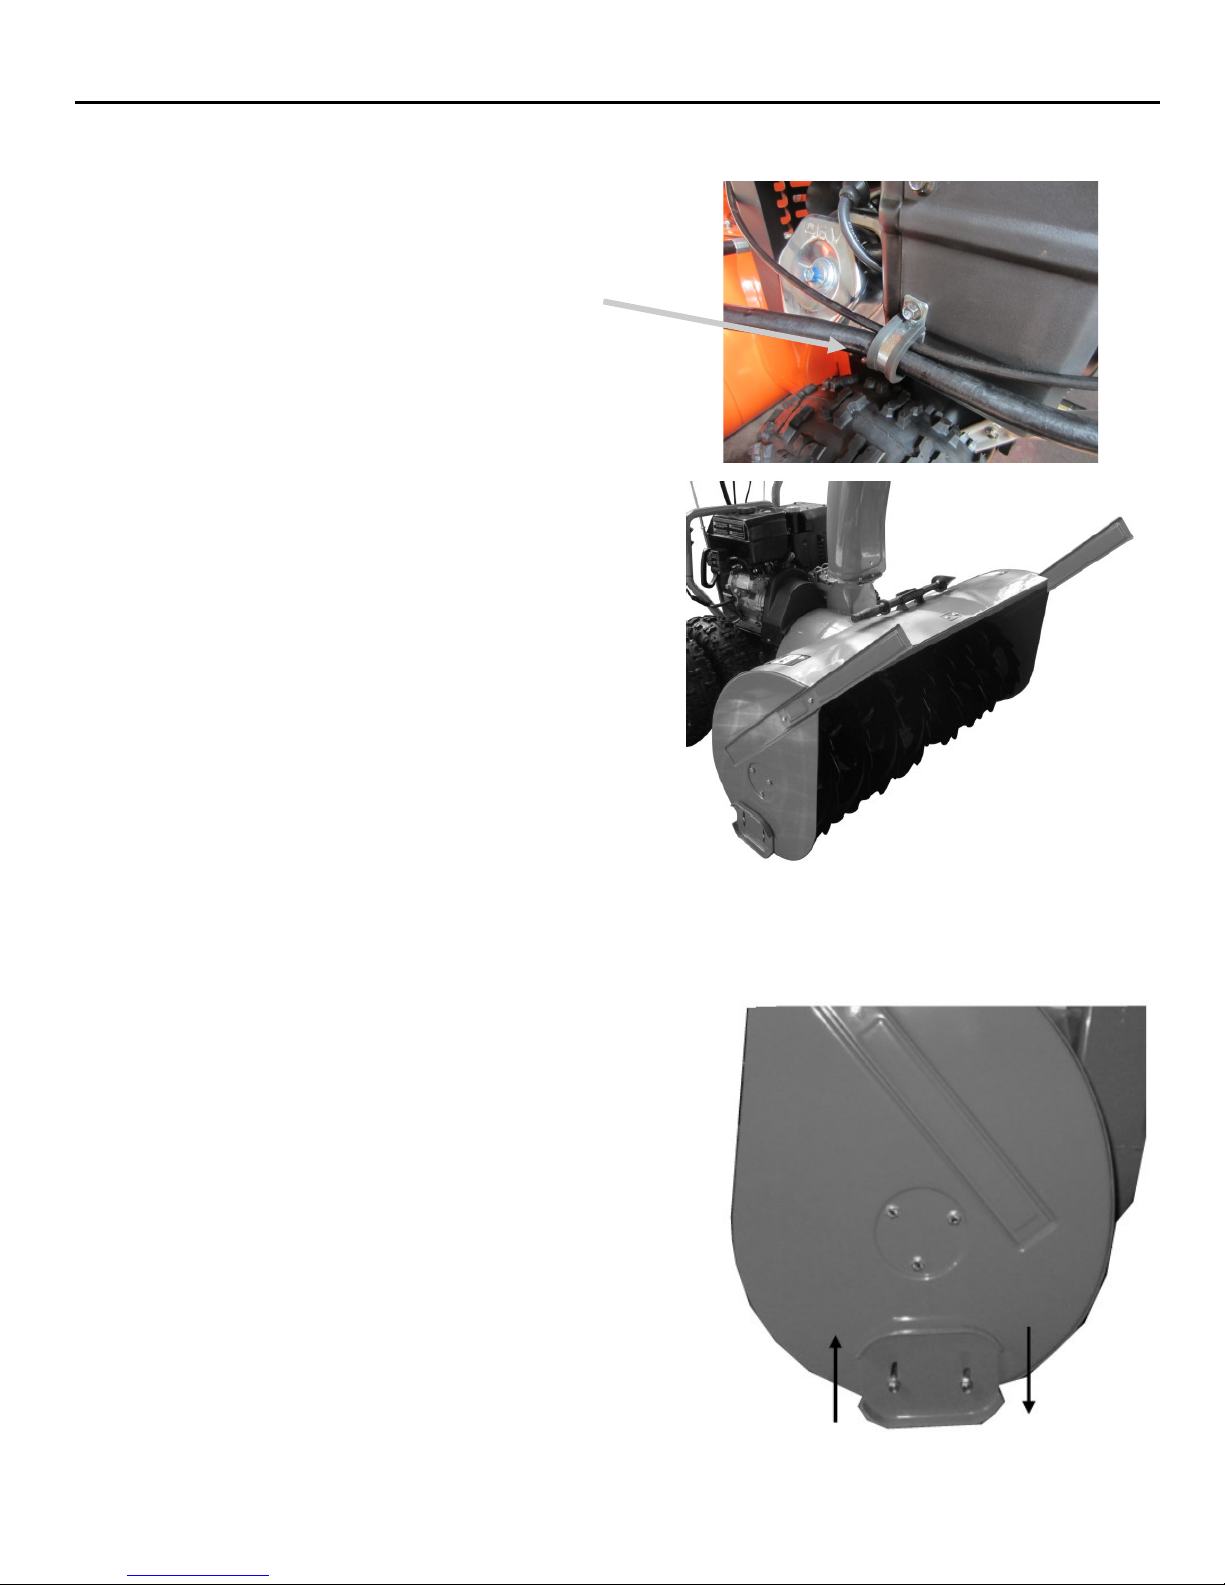
Step 4: Chute Direcon Control Cable Support
With the rubber lined strap removed, put the
chute direcon control cable and the chute
deector cable into the opening, and press the
strap together aligning the hole for the bolt.
Secure strap to side of the engine.
NOTE: Rotate discharge chute and ensure there is
no binding of any cables and there is enough slack
in the deector cable for full rotaon.
Need Help With Assembly?
(919)-550-3221
Step 5: Dri Cuers (if desired)
1. The dri cuers are aached to the main hous-
ing in the stored posion.
2. Remove the two bolts on each dri cuer.
3. Reaach the dri cuers in the operang posi-
on.
4. Replace bolts and secure ghtly.
Step 6: Skid Shoes
1. Skid shoes are stored in the hardware bag for shipping.
2. Remove from hardware bag, and install skid shoes using the
provided fasteners
3. Insert the fasteners so the at head of the carriage bolt is
toward the inside of the main housing.
CAUTION: Check the skids to ensure that the auger does not
contact the paved or gravel surface. Adjust skids as necessary to
make up for wear on the snow blower.
Posion skid shoes so that the scraper blade is elevated at least
1/4” from the ground. This allows easier maneuvering and
prevents drag on the snow blower when encountering unseen
imperfecons on the surface to be cleaned.
1. Check the re pressure to ensure the res are properly
inated.
2. Move skid shoes up and down to the desired posion based
on the surface texture.
If the surface is rougher adjust the skid shoes lower which
increases the auger ground clearance.
If the surfaces is smoother adjust the skid shoes higher
(decrease ground clearance). Firmly ghten the nuts that
secure both skids to the auger sides.

12
30SB, 36SB, 45SB
Rev Nov2014
Snow BEAST Assembly Instrucons
Step 7: Auger and Transmission Control Cables
Control cables are preset at the factory, but may require addional adjustment for opmal operaon. Control
cables require periodic inspecon and maintenance to maintain opmal performance.
1. Locate the black cable on the right side (standing from the operator posion) of the snow blower. Ensure the
cable is properly seated in the plasc guide pulley at the rear of the chassis.
2. Aach the cable to the threaded end under the drive control handle. The cable adjustment tube with Z rod may
need to be aached to the boom of the handle.
3. Screw clockwise to secure unl all threads are engaged in the adjustment tube. Tighten lock nuts when correct
tension is achieved.
4. The drive and impeller cables will be at correct tension when the cables are properly aached to the handles
and the cable has a 1 inch deecon to either side when pushed with a nger as shown.
Repeat the same process for the Auger/Impeller engagement cable on the le side of the snow blower.
Correct amount of
deecon shown
Need Help With Assembly?
(919)-550-3221
Transmission
Control Cable
Auger/Impeller
Control Cable

13
30SB, 36SB, 45SB
Rev Nov2014
Snow BEAST
High Mark
Step 10: Filling Oil and Gasoline
1. Fill the engine with SAE 5W-30 engine oil. Fill the engine with 1.2 to 1.5 quarts of oil. Fill up to the full level mark
on the dip sck. Do not overll.
When checking oil, remove dipsck, wipe completely clean, insert dipsck into dipsck tube on the engine (do
NOT screw dipsck down), remove dipsck and observe oil level (detail below).
Keep oil level at the high run mark for longest engine life.
2. Check that the fuel inlet screen is clean and ll the tank to the proper level leaving adequate space for fuel to
DANGER: GASOLINE IS HIGHLY FLAMMABLE AND
EXPLOSIVE. Do not add fuel while the engine is
running or is hot. Keep open ames, sparks, and heat
away from the fuel and store fuel in containers
specically designed for that purpose. ADD FUEL
OUTDOORS ONLY. IF THE FUEL IS SPILLED, DO NOT
START THE ENGINE. Manually push the snow blower
away from the spill and wipe up immediately.
DANGER
Step 9: Headlight
1. Connect snow blower headlight wire plug to the
headlight bulb.
2. Connect the headlight bezel to the control panel.
A. Tilt headlight assembly and align tabs on the
top of the headlight bezel with the notches in
the control panel. Insert the notches into the
panel.
B. Tilt headlight assembly down while gently
squeezing the headlight bezel and push
Assembly Instrucons
Need Help With Assembly?
(919)-550-3221
GASOLINE IS HIGHLY FLAMMABLE AND
EXPLOSIVE. FUEL LEAKS, A LOOSE FUEL TANK,
OR A LOOSE FUEL VALVE CAN LEAD TO
SEVERE INJURY OR DEATH. DO NOT OPERATE
THIS SNOW BLOWER IF ANY COMPONENT OF
THE FUEL SYSTEM IS LOOSE OR LEAKS
GASOLINE!
Check engine oil level before each use. Maintain
oil level between run marks on the dipsck, and
change oil according to the maintenance
schedule to maximize product life.
Low Mark

14
30SB, 36SB, 45SB
Rev Nov2014
Snow BEAST Starng the Engine
DANGER: Exhaust contains poisonous carbon
monoxide, a colorless and odorless gas. Breathing
exhaust can cause loss of consciousness and may lead
to death. Do not operate the engine in a conned
space where dangerous carbon monoxide fumes can
collect.
Starng the Engine Using the Recoil Start
NOTE: Be sure to add fresh unleaded gasoline and leave
a gap for expansion and ll the engine with SAE5-W30
motor oil (1.2—1.5 quarts) before starng your snow
blower. Check engine oil before each use.
1. Make sure the safety key is fully inserted in order
for the engine to start. Remove the key when the
snow blower is not in use.
2. Firmly push the primer to force the fuel directly
into the engine’s carburetor. Push two to three
mes depending on the temperature. Note: Do not
press the primer bulb more than 5 mes. Fuel may
leak from the carburetor with over priming.
3. Make sure the choke is set in the CHOKE 1 posion
(choke more in colder temperatures).
4. Pull the recoil to start the engine.
5. Aer the engine is started, slowly turn the choke up
one level at a me as the engine warms up unl it is
at the maximum level or “RUN LEVEL.”
Before aempng to use your snow blower, make sure you
are familiar with all of the components and have read the
manual.
DANGER
Starng the Engine using the
Electric Start
1. Use a safe, non damaged
power cord to plug into the electric start outlet.
2. Make sure the safety key is fully inserted in order
for the engine to start. Remove the key when the
snow blower is not in use.
3. Firmly push the primer to force the fuel directly
into the engine’s carburetor. Push two to three
mes depending on the temperature. Note: Do not
press the primer bulb more than 5 mes. Fuel may
leak from the carburetor with over priming.
4. Make sure the choke is set in the CHOKE posion
(choke more in colder temperatures).
5. Press the electric start buon. Note: Do not engage
starter more than 10 seconds each me.
6. Aer the engine is started, slowly turn the choke up
one level at a me as the engine warms up unl it is
at the maximum level or “RUN LEVEL.”
7. Unplug the extension cord before operang the
Thoroughly inspect the area where you plan to use the
snow blower. Look for items such as stones, scks ,
wire, and other foreign objects. If struck by the snow
blower, these and other objects may become
projecles that could lead to serious injury or death.
Clear area of all debris. Keep people and pets at a safe
distance.
WARNING
WARNING
WARNING! The electric starter is designed to
operate on 120 volt AC household current. Use only a
UL-listed, 16 gauge extension cord for outdoor use that is
no longer than 50 feet (15 meters).
To prevent damaging the electric
starter wait 20 seconds between
every electric start aempt and
never use electric start in the rain.
Do NOT over-prime the engine. Pressing the
primer bulb more than 3x could result in ooding
the carburetor making the engine hard to start or
cause fuel to leak from the carburetor inlet.
Safety Key
Choke
Primer
Do NOT
Over-Prime

15
30SB, 36SB, 45SB
Rev Nov2014
Snow BEAST Operang Instrucons
Transmission Control
Your snow blower is equipped with an easily
adjustable transmission control, which can be
adjusted for forward and reverse speed.
There are six forward and two reverse speeds.
To change the speed, pull the handle out to the right
and move the handle to the desired speed.
IMPORTANT! The snow blower belts are adjusted to ensure the augers stop turning within ve (5) seconds of
releasing the impeller control lever. If you are making any belt adjustments whatsoever, for your safety and the
safety of others around you, you must ensure the belts are re-adjusted to achieve this design specicaon.
To Stop Engine
To stop the engine, pull the safety key up unl the engine
and augers/impeller stops running. For safety, it is
recommended that you remove the key when not using
the snow blower.
WARNING
WARNING! Do not operate the snow blow-
er with defecve guards, shields, or without
the safety devices securely in place.
Engage Transmission Drive
To engage the transmission drive squeeze the right lever to
the hand grip.
To disengage, let go of the right lever.
Engage Augers/Impeller Control
To engage the augers/impeller drive, squeeze the le
lever to the handgrip.
To disengage release the le lever.
DO NOT shi speeds while
the transmission is engaged.
Come to a complete stop
and disengage the transmis-
sion handle before changing
speed or switching from
forward to reverse.
WARNING

16
30SB, 36SB, 45SB
Rev Nov2014
Snow BEAST Operang Instrucons
Engage Transmission Drive
To engage the transmission drive squeeze the right lever to
the hand grip.
To disengage, release the right lever.
Engage Impeller/ Collector Control
To engage the impeller/collector drive, squeeze the
le lever to the handgrip.
To disengage release the le lever.
Control Interlock Feature—One Hand Free Operaon
The snow blower is equipped with a control interlock feature to allow the operator one hand free to change the
direcon of the discharge or adjust the discharge deector without stopping the forward progress of the machine.
The interlock feature allows the operator’s le hand to be free during use aer both handles are fully engaged into the
operang posion. The fee hand can then rotate the discharge chute or adjust the discharge deector angle.
In order to stop the impeller / collector assembly and the transmission system, BOTH handles must be released.
The impeller control handle can be fully engaged, and the transmission lever can be engaged and disengaged without
releasing the impeller control handle (free to engage or disengage at any me). This allows the impeller / collector
assembly to connue to discharge snow while stopping to change speeds or allow the snow blower to clear the impeller
and collector housing of snow and ice when encountering heavy snowfalls.
WARNING
The operator of the snow blower should become familiar with this feature in a clear open area away from vehicles,
homes, and away from public streets or areas with trac.
Make certain that the operator is accustomed to all controls and the interlock feature before blowing snow.
If there are any quesons regarding the control interlock feature of this snow blower please call:
GXi Customer Service at (919)-550-3221
This manual suits for next models
2
Table of contents


