Snow Devil WSE2013 User manual

WSE2013 090612
Model / Modèle
:
SAVE THIS MANUAL
You will need this manual for safety instructions, operating procedures, and warranty.
Put it and the original sales invoice in a safe, dry place for future reference.
CONSERVEZ CE GUIDE
Vous aurez besoin de ce guide pour les instructions de sécurité, les procédures d’utilisation et la garantie.
Conservez-le dans un endroit sûr et sec pour référence future.
QUESTIONS? 1-866-393-3968
Our Customer Service staff are ready to provide
assistance. If a part is damaged or missing, replacement
parts can be shipped from our facility.
For immediate help with assembly, or for additional
product information, call our North American toll-free
number: 1-866-393-3968.C
Notre personnel du service à la clientèle sera prêt à
fournir assistance. Si une pièce est endommagée ou
manquante, des remplacements seront expédiés de notre
usine.
Pour de l’aide immédiate avec l’assemblage, ou pour des
informations additionnelles sur le produit, appeller notre
numéro sans frais nord-américain : 1-866-393-3968.C
WSE2013
20 inch
Electric Snowthrower
Instruction Manual (p.2)
Soufeuse électrique 20po
Manuel d’instruction (p.19)

WSE2013 090612
Model / Modèle
:
SAVE THIS MANUAL
You will need this manual for safety instructions, operating procedures, and warranty.
Put it and the original sales invoice in a safe, dry place for future reference.
CONSERVEZ CE GUIDE
Vous aurez besoin de ce guide pour les instructions de sécurité, les procédures d’utilisation et la garantie.
Conservez-le dans un endroit sûr et sec pour référence future.
QUESTIONS? 1-866-393-3968
Our Customer Service staff are ready to provide
assistance. If a part is damaged or missing, replacement
parts can be shipped from our facility.
For immediate help with assembly, or for additional
product information, call our North American toll-free
number: 1-866-393-3968.C
Notre personnel du service à la clientèle sera prêt à
fournir assistance. Si une pièce est endommagée ou
manquante, des remplacements seront expédiés de notre
usine.
Pour de l’aide immédiate avec l’assemblage, ou pour des
informations additionnelles sur le produit, appeller notre
numéro sans frais nord-américain : 1-866-393-3968.C
WSE2013
THANK YOU FOR PURCHASING A
SNOW DEVIL!
zThis snowthrower is designed to be light and
manoeuvrable and to make quick work of clearing
shallow layers of mostly dry or powder snow.
zPlease remember to use the right tool for the job at
hand. Avoid overtaxing your snowthrower.
zDo not use it for thick, heavy (wet) snow.
zDo not use it to clear snow over 23 cm (9 inches)
deep. In heavy snowfalls, clear before the snow
builds too high for this machine’s intake.
zThe WSE2013 is not intended to clear the snow
deposits created by large municipal or commercial
snowplows, which contain heavy compacted,
frozen lumps of snow and ice, and could damage
the machine.
zIf you have any questions or problems with
your Snow Devil snowthrower including set-up
difculties, broken or missing parts, etc.), do not
return with it to the store. Please call our toll-
free service line at 1-866-393-3968 to speak to a
technician.
MERCI D’ACHETER UN SNOW
DEVIL !
zCe chasse-neige est conçu pour être léger et
manoeuvrable et pour effectuer un travail rapide de
dégagement de couches peu profondes de neige
sèche ou en poudre.
zRappelez-vous svp d’utiliser le bon outil pour le
travail à faire. Évitez de surcharger votre chasse-
neige.
zNe l’employez pas pour de la neige épaisse et
(humide) lourde.
zNe l’employez pas pour dégager la neige de plus
de 23 cm (9 pouces) d’épais. Utiliser cette machine
avant qu’il n’y aille trop épais de neige.
zLe WSE2013 n’est pas concu pour dégager les
dépôts de neige créés par les grands chasse-neige
municipaux ou commerciaux, qui contiennent les
morceaux de glace et de la neige compactée,
congelées et lourde, ceci pourrait endommager la
machine.
zSi vous avez n’importe quels problèmes avec
votre chasse-neige Snow Devil comprenant des
pièces cassées ou absentes ou des difcultés
d’installation, etc. ne retournez pas avec l’outil au
magasin. Veuillez appeler notre ligne de service au
1-866-393-3968 pour parler à un technicien.

090612 3
ENGLISH
TABLE OF CONTENTS
Important Safe Operating Practices .............................................................. p.3
Specications ................................................................................................ p.7
Functional Description................................................................................... p.8
Assembly Instructions ................................................................................... p.8
Operating Procedures ................................................................................... p.9
Maintenance.................................................................................................. p.12
Warranty........................................................................................................ p.14
Parts List ....................................................................................................... p.15
Schematic Drawing ....................................................................................... p.16
IMPORTANT: Read, understand and follow all instructions on the machine and
in the manual before attempting to assemble and operate. Keep this manual in a
safe place for future and regular reference and for ordering replacement parts.
WARNING: This symbol points out important safety instructions which, if not
followed could endanger the personal safety and /or property and others. Read
and follow all instructions in this manual before attempting to operate this
machine. Failure to comply with these instructions may result in personal injury
When you see this symbol—heed its warning.
DANGER: This machine was built to be operated according to the rules for safe
operation in this manual. As with any type of power equipment, carelessness
or error on the part of the operator can result in serious injury .This machine
is capable of amputating hands and feet and of throwing objects. Failure to
observe the following safety instructions could result in serious injury or death .
To use this tool properly, you must observe the safety regulations, the assembly
instructions and the operating instructions to be found in this manual. All persons
who use and service the machine must be informed about its potential hazards
and must be acquainted with this manual. Children should be supervised at all
times if they are in the area in which the tool is being used. It is also imperative that
you observe the accident prevention regulations in force in your area. The same
applies for general rules of occupational health and safety.
WARNING: When using electrical equipment, basic safety precautions, including
the following, should always be followed to reduce the risk of serious personal
injury and/or damage to the unit. Failure to follow all instructions listed below
may result in electric shock, re and/or serious personal injury. Read all these
warnings and instructions before operating this product. Save this Instruction
Manual for future reference.
ELECTRICAL SAFETY
1. Electrical plugs must match the outlet. Never modify the plug in any way. Do
not use any adapter plugs with earthed (grounded) power tools. Unmodied
plugs and matching outlets will reduce risk of electric shock.
2. Avoid body contact with earthed or grounded surfaces such as pipes, radiators,
ranges, and refrigerators. There is an increased risk of electric shock if your
body is earthed or grounded.
3. Do not expose electrical equipment to rain or wet conditions. Water entering a
power tool will increase the risk of electric shock.
4. Do not abuse the cord. Never use the cord for carrying, pulling or unplugging
the tool. Keep cord away from heat, oil, sharp edges or moving parts. Damaged
or entangled cords increase the risk of electric shock.
IMPORTANT SAFE OPERATING PRACTICES
!
!
!
!

4 WSE2013
ENGLISH
IMPORTANT SAFE OPERATING PRACTICES
5. When operating electrical equipment outdoors, use an extension cord suitable
for outdoor use. Use of a cord suitable for outdoor use reduces the risk of
electric shock.
6. Keep the plug clear of water.
PERSONAL SAFETY
1. Stay alert, watch what you are doing and use common sense when operating
power equipment. Do not use power equipment while you are tired or under
the inuence of drugs, alcohol, or medication. A moment of inattention while
operating power equipment may result in serious personal injury.
2. Use safety equipment. Always wear eye protection. Safety equipment such as
a dust mask, non-skid safety shoes, hard hat, or hearing protection used for
appropriate conditions will reduce personal injuries.
3. Avoid accidental starting. Ensure the switch is in the off-position before
plugging in. Plugging in electrical equipment with the switch on invites
accidents.
4. Remove any adjusting keys or wrenches before turning the tool on. A wrench or
a key that is left attached to a rotating part may result in personal injury.
5. Do not overreach. Keep proper footing and balance at all times. This enables
better control of the equipment in unexpected situations.
6. Dress properly. Do not wear loose clothing or jewellery. Keep your hair,
clothing, and gloves away from moving parts. Loose clothes, jewellery or long
hair can be caught in moving parts.
7. Keep children and visitors away. Visitors should wear safety glasses and
be kept a safe distance from work area. Do not let visitors contact tool or
extension cord.
8. Always wear safety glasses. Everyday eyeglasses have only impact resistance
lenses. They are not safety glasses.
9. Keep hands, face and feet at a distance from all moving parts. Do not touch or
try to stop the machine when they are rotating. Do not operate without guards
in place.
PREPARATION
1. Thoroughly inspect the area where the equipment is to be used. Remove all
foreign objects such as doormats, newspapers, sleds, boards, wires, and other
items, which could be tripped over or thrown by the auger/impeller.
2. Always wear safety glasses or eye shields to protect your eyes during
operation and while performing adjustments or repairs. Thrown objects which
ricochet can cause serious injury to the eyes.
3. Do not operate without wearing adequate winter outer garments. Do not wear
jewelery, long scarves or other loose clothing which could become entangled in
moving parts. Wear footwear which will improve footing on slippery surfaces.
4. Use a grounded three-wire extension cord and receptacle for all units with
electric motors.
5. Never attempt to make any adjustments while the motor is running, except
where specically recommended in the operator’s manual.
6. Keep work area clean and well lit. Cluttered and dark areas invite accidents.
7. Do not operate electrical equipment in explosive atmospheres, such as in the
presence of ammable liquids, gases, or dust. Power tools create sparks which
may ignite the dust or fumes.
8. Plan your snow-throwing pattern to avoid discharge towards windows, walls,
cars, etc., thus avoiding possible property damage or personal inquiry caused
by a ricochet.
9. Allow the motor and machine to adjust to outdoor temperature before starting
to clear snow.

090612 5
ENGLISH
IMPORTANT SAFE OPERATING PRACTICES
OPERATION
1. Do not put hands or feet near rotating parts, in the auger housing, or the chute
assembly. Contact with the rotating parts can amputate hands and feet.
2. Never operate with a missing or damaged chute assembly. Keep all safety
devices in place and working.
3. Do not operate machine while under the inuence of alcohol or drugs.
4. Exercise extreme caution when operating on or crossing a gravel surface.
5. Stay alert for hidden hazards or trafc.
6. Exercise caution when changing direction and while operating on slopes.
7. Never direct discharge at children, bystanders, and pets nor allow anyone in
front of the machine.
8. Do not overload machine capacity by attempting to clear snow at too fast a
rate, or by using it to clear thick, heavy snow, or snow over 23 cm (9”) deep.
9. Never operate this machine without good visibility or light. Always be sure of
your footing and keep a rm hold on the handle. Walk. Never run.
10. Disengage power when transporting or not in use.
11. Never operate machine at high speeds on slippery surfaces. Look down and
behind and use care when in reverse.
12. If the machine should start to vibrate abnormally, stop the motor, and
disconnect the power cable. Inspect thoroughly for damage.
13. Stop the motor before you leave the operator’s position (behind the handles).
Wait until the auger comes to a complete stop before unclogging the chute
assembly or making any adjustments.
14. Never put your hand in the discharge or collector openings. Always use a
clean-out tool to unclog the discharge opening. Do not unclog chute assembly
while the motor is running. Shut off the motor and remain behind handles until
all moving parts have stopped before unclogging.
15. Use right tool. Don’t force small tool or attachment to do the job of a heavy duty
tool. Don’t use tool for purpose not intended.
16. Do not force unit. It will do the job better and with less likelihood of injury at a
rate for which it was designed.
17. Use only attachments and accessories approved by the manufacturer (e.g.
wheel weights, tire chains, cabs etc.). If situations occur which are not covered
in this manual, use care and good judgment. Contact us at 1-866-393-3968 for
advice.
MAINTENANCE AND STORAGE
1. Never tamper with safety devices. Check their proper operation regularly. Refer
to the maintenance and adjustment sections of this manual.
2. Before cleaning, repairing, or inspecting the machine, stop the motor. Wait until
the auger comes to a complete stop. Disconnect the power cable to prevent
unintended starting.
3. Check bolts and screws for proper tightness at frequent intervals to keep the
machine in safe working condition. Also, visually inspect machine for any
damage.
4. Snowthrower shave plates and skid shoes are subject to wear and damage.
For your safety protection, frequently check all components and replace with
original equipment manufacturer’s (OEM) parts only. Use of parts which do not
meet the original equipment specications may lead to improper performance
and compromise safety!
5. The rst time you use the machine or after replacing some parts, you should
perform a test run and ensure no abnormal conditions exist to avoid any
potential damages or incidents.
6. Maintain or replace safety and instruction labels, as necessary.
7. Prior to storing, run machine a few minutes to clear snow from machine and
prevent freeze up of auger.
8. Always refer to the operator’s manual for proper instructions regarding off-
season storage.
9. When replacing any parts, strictly observe the instructions and procedures
described in this manual.

6 WSE2013
ENGLISH
10. Special care should be paid to any rubber parts, since these parts may
increase the engine load and decrease its mechanical power if damaged.
11. When you examine, service clean the machine or replace parts, you must
turn off the power switch and disconnect the power cable. Any such operation
should be performed after revolving part inside the machine stops completely.
ADDITIONAL SAFETY RULES
1. Know your tool. Read owner’s manual carefully. Learn its applications and
limitations as well as the specic potential hazards related to this tool.
2. Use for snow removal only.
3. Be familiar with all controls and their proper operation. Know how to stop the
machine and disengage them quickly.
4. Never allow children under 14 years of age to operate this machine. Children
14 years old and over should read and understand the operating instructions
and safety rules in this manual and should be trained and supervised by a
parent.
5. Never allow anyone to operate this machine without proper instruction.
6. Thrown objects can cause serious personal injury. Plan your snow-throwing
pattern to avoid discharge of material toward roads, bystanders and the like.
7. Keep bystanders, helpers, pets and children at least 25 metres (75 feet) from
the machine while it is in operation. Stop machine if anyone enters the area.
Be aware that the normal noise of the machine when turned on may make it
difcult for you to hear approaching people.
8. Exercise caution to avoid slipping or falling, especially when operating in
reverse.
9. All guards and safety attachments must be installed properly before using the
unit.
10. Inspect the unit before use. Ensure the parts are installed correctly and secure.
11. Clear the area to be plowed before each use. Remove all objects such as
rocks, broken glass, nails, wire, or string which can be thrown or become
entangled in this tool.
12. Keep the area of operation clear of all persons, particularly children and pets.
13. The machine should be stored carefully and safely in a dry environment when
not used, far from the reach of children, or in a place that is locked.
14. Please do not use the machine in any purposes other than it is designed for,
otherwise, it may cause mechanical defaults or serious damage or injuries.
15. Special care should be drawn to the following issues when using this machine:
operation methods, procedures, surroundings, and environment states, etc.
16. In case of following conditions, turn off the machine and pull out the power plug
when: not in use
being repaired
replacing parts
being cleaned and checked
any other conditions in which dangerous factors exist.
17. If you nd the main power cable or the extension cable damaged, pull out the
plug from the socket and disconnect the power immediately. Repair the cable
for replace it if necessary.
18. Never pull the snow thrower by cord or yank it to disconnect from receptacle.
19. Do not use hands to unclog chute. Stop motor before removing debris.
20. Do not walk in front of running machine. Do not direct discharge at bystander.
21. When using the machine the user must keep correct postures. Heels should be
placed rmly on the ground, while the hands hold the handles rmly.
22. Before using the machine, the user should have a careful inspection of the
main machine. Carefully check the different parts of the machine before
starting, solving any problem immediately. If you nd any abnormal condition,
please don’t use the machine before repairing.
23. Do not move or transport the machine when the plug is connected into the
power socket and the switch is turned on.
24. When using the machine, respect local laws and regulations regarding noise
control and environmental protection. To avoid noise disturbance to others,
carefully decide operation time and consider the surrounding conditions.
IMPORTANT SAFE OPERATING PRACTICES

090612 7
ENGLISH
25. When the machine is running, keep your hands, feet or head away from the
revolving parts or the snow exit of the machine.
26. If you drop or bump the machine, check the main housing and parts for any
damages or cracks.
27. When stepping backwards, be cautious about any obstacles beneath your feet
or behind you to avoid falling.
28. When using the machine, if you notice the machine running in an unstable
state or hear abnormal sound from the motor, stop the machine and disconnect
the power immediately and contact your original distributor.
29. Do not store the machine while connected to the power source. It may cause
damage and injury.
30. Keep hands away from moving parts. Shut off motor and disconnect from
power before unclogging discharge chute. Be aware that even when stopped,
the auger may be jammed by a piece of ice or other object and may be under
considerable tension, which could release at any moment, causing severe
injury.
31. Safety decals and instructions are easily visible to the operator and are located
near areas of potential danger. Lost or damaged decals should be replaced.
WARNING: Avoid overtaxing your snowthrower by using it for thick, heavy (wet)
snow or to clear snow over 23 cm (9 inches) deep.
WARNING: Restrict the use of this power machine to persons who read,
understand and follow the warnings and instructions in this manual and on the
machine.
WARNING: The warnings, cautions, and instructions detailed in this manual
cannot cover all possible conditions and situations that occur. It must be
understood by the operator that COMMON SENSE AND CAUTION ARE
FACTORS that cannot be built into this product, but MUST BE SUPPLIED BY
THE OPERATOR.
WARNING: DO NOT OPERATE machine until it has been assembled and set
up according to the instructions in “ASSEMBLY INSTRUCTIONS”. Read and
follow all safety rules within this Instruction Manual. Failure to do may result in
serious personal injury.
SPECIFICATIONS
Rated voltage 120V ~ 60 Hz
Current 13 Amps
Rotation speed 2100 rpm
Clearing depth 22.9 cm (9")
Clearing path width 49.8 cm (19.6")
Max. throw 5 - 6 m (16 - 20 ft.)
Max. clearing capacity 200 m2/hr (≈2153 sq. ft.)
Weight 15.1 kg (33.3 lb.)
IMPORTANT SAFE OPERATING PRACTICES
!
!
!
!
8 WSE2013
ENGLISH
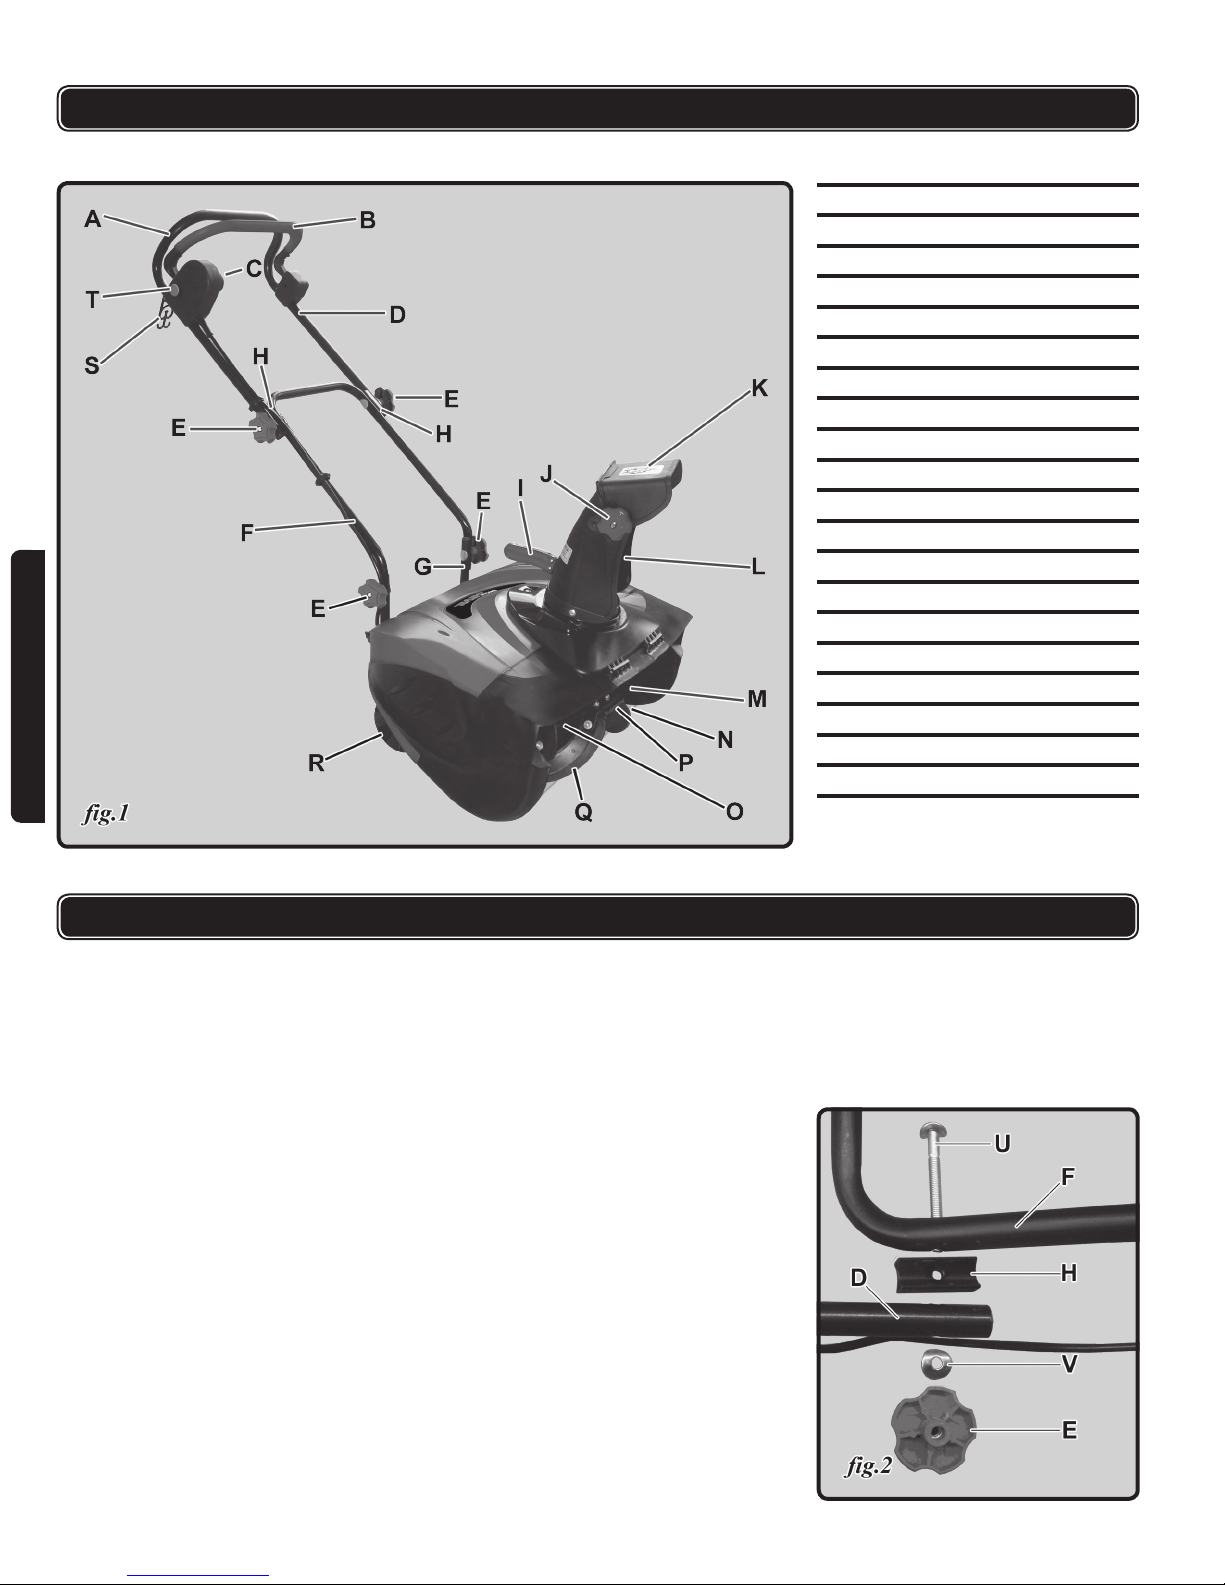
FUNCTIONAL DESCRIPTION
KNOW YOUR SNOWTHROWER
ASSEMBLY INSTRUCTIONS
UNPACKING
1. Remove the snow thrower and all other items from box.
2. Check all items for shipping damage. If you nd any damage or any parts are
missing, promptly inform the dealer where you bought the snow thrower.
3. Upper chute and lower chute are packed together.
4. The snow thrower must be fully assembled before the operation. To assemble
the snow thrower, follow the instructions below.
HANDLE ASSEMBLY
1. Loosen and remove the four sets of joint-xing T-bolts (U, g.2), washers (V,
g.2), knobs (E, g.2), and 2 connectors (H, g.2) to separate the upper handle
(D, g.2) from the middle handle (F, g.2).
2. Hold the upper handle so that the screw holes align with the holes on the
middle handle.
A Hand grip
B Safety cut-out bar
C Switch housing socket
D Handle upper section
E Handle knobs
F Handle mid section
G Handle lower section
H Handle connector
I Chute directional control
JChute deector knob
KChute deector
L Chute
M Auger assembly
N Scraper
O Auger shaft
P Paddle auger rubber
Q Spiral auger rubber
R Wheel
S Cord attachment hanger
T Start switch

090612 9
ENGLISH
3. Insert the T-bolt into the hole in the inner handle section, add the connector, the
outer handle section (g.3), and the washer.
4. Use the knob to secure the connection (g.4). Do this on both sides to connect
the handle upper and mid section. The T-bolts should be inserted from inside
the handle of the unit so that the knobs are fastened to the outside of the
handle.
5. Follow same instructions to assemble the middle handle to the lower handle.
NOTE: Do not over-tighten the joint-xing knobs.
6. Locate the three cable clips. Secure the power cord to the handle of the unit by
clipping them onto the handle at evenly spaced intervals.
DISCHARGE CHUTE ASSEMBLY
1. Lift the chute deector so that it snaps and locks securely onto the discharge
chute.
2. Raise or lower the chute deector to the desired height of the snow stream and
tighten the chute deector knobs.
NOTE: Do not overtighten the chute deector knobs.
OPERATING PROCEDURES
NOTE:
Before using this machine, make sure that the power source you will use
complies with the specications detailed in this manual.
Before inserting the plug into the socket, verify that the snowthrower’s auger
shaft and rubber plates are rmly secured with screws, and that the rubber
plates are facing the correct direction.
Check that the rotor turns freely.
ASSEMBLY INSTRUCTIONS
10 WSE2013
ENGLISH
OPERATING PROCEDURES
!
!
EXTENSION CORD
1. For safe and efcient use of you snowthrower, use only a UL- or CSA-rated
extension cord recommended for outdoor use. Refer to the extension cord
chart that follows.
Extension Cords
Max. Cord Length 15 m (50 ft.) 30.5 m (100 ft.) 46 m (150 ft.)
Wire Gauge 14 ga. 12 ga. 10 ga.
WARNING: Electric shock may cause SEVERE INJURY or DEATH. Heed these
warnings:
Do not allow any part of snowthrower to make contact with water while
powered on. If the appliance becomes wet while turned off, wipe dry before
starting.
Use only a UL- or CSA-rated extension cord for outdoor, all-weather use. Do
not use an extension cord over 46 metres (150 feet)
Do not touch the appliance or its plug with wet hands or while standing in
water. Wearing rubber boots offers some protection.
2. To prevent the extension cord from disconnecting during use, tie the female
end of the extension cord into a loose overhand knot on the top right side
of the middle frame or loop it through the cord attachment hanger (S, g.1)
before connecting to the male plug in the switch housing socket (C, g.1) of the
snowthrower.
3. Note that the snowthrower has a polarized male plug, with one prong in the
switch housing socket slightly longer and wider than the other. The extension
cord female end should be likewise polarized, so that the extension cord ts
snugly into the switch housing socket.
WARNING: Damaged electrical cords present risk of re, electrical shock, and
serious bodily injury. Before operating the snowthrower, carefully examine the
electrical cord. If the cord is damaged, do not use the snowthrower. Replace or
repair the damaged cord immediately.
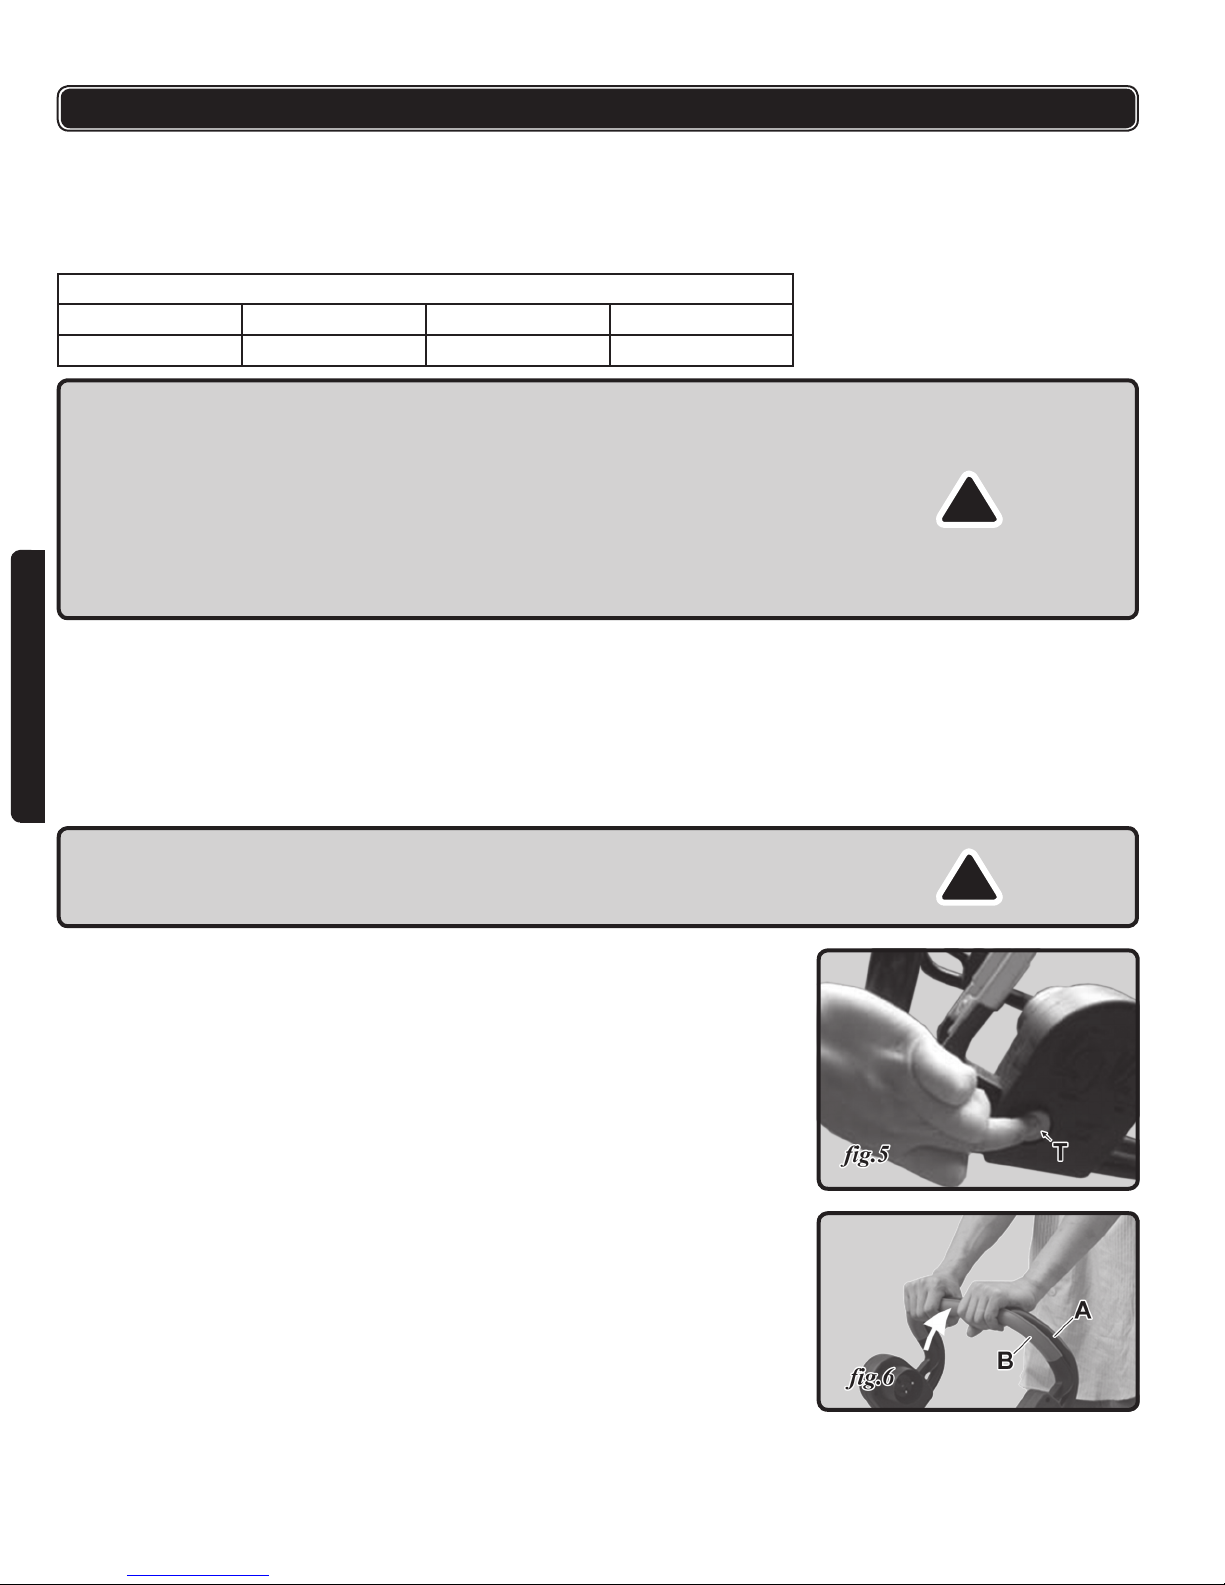
SWITCHING ON AND OFF
1. To start your snowthrower, rst press the start switch button (T, g.5) on the
side of the switch housing.
2. Pull the safety cut-out bar (B, g.6) toward you and hold it and the hand grip
(A, g.6) rmly with both hands. The machine will start. The machine can only
be started by pressing the switch button rst, followed by squeezing the safety
cut-out bar. Reverse operation cannot start the machine.
3. To turn the power off, release your grip on the safety cut-out bar.

090612 11
ENGLISH
OPERATING PROCEDURES
!
!
MOVING THE MACHINE AND PLOWING SNOW
WARNING: Foreign objects, such as rocks, broken glass, nails, wire, or string,
can be picked up and thrown by the snowthrower, causing serious personal
injury.
1. Remove all foreign objects from the area to be plowed before operating the
snowthrower. Keep the area of operation free of foreign objects that can
become thrown by the rotor blades. Perform a thorough inspection of the
area since some objects may be hidden from view by surrounding snow. If the
snowthrower hit an obstruction or picks up a foreign object during use, stop
the snowthrower, disconnect the extension cord, remove the obstruction, and
inspect the unit for damaged part before restarting and operating the unit.
2. Keep children, pets and bystanders away from the area of operation. Be aware
that the normal noise of the machine when turned on may make it difcult for
you to hear approaching people.
3. When moving the snowthrower, use the wheels as the pivot point. Slightly tilt
the snowthrower on this pivot point to move it forward or backward.
4. Start your clearing path near the electrical outlet and work outward, throwing
snow in a back and forth motion. To clear in the opposite direction, step over
the cord and pivot the snowthrower on its wheels. Make sure to overlap
clearing paths.
5. Take note of the wind direction. If possible, move in the same direction as the
wind so that the snow is not thrown against the wind (and thus back into your
face and onto the just-cleared path.)
6. While moving the snowthrower, do not pull on the power cable violently or
roughly.
7. Do not push the snowthrower with excessive force. Push the machine gently
and evenly in accordance with the unit’s throw rate.
8. Do not apply additional man-made load to the motor since this may cause
motor damage.
9. Some parts of the snowthrower may freeze under extreme temperature
conditions. Do not attempt to operate the snowthrower with frozen parts. If the
parts freeze while the snowthrower is in use, stop the snowthrower, unplug the
extension cord, and inspect for frozen parts. Free all parts before restarting or
operating the snowthrower. Never force controls that have frozen.
10. Working on pebbles, gravel or unpaved surfaces—To avoid throwing loose
surface material along with the snow, push down on the handle to tilt the unit,
raising the scraper at the base of the unit above the pebbles or gravel.
WARNING: Avoid overtaxing your snowthrower by using it for thick, heavy (wet)
snow or to clear snow over 23 cm (9 inches) deep.
CHANGING THROW DIRECTION AND HEIGHT
WARNING: Never direct the snow discharge chute at the operator, at
bystanders, at vehicles or at nearby windows. The discharged snow and foreign
objects accidentally picked up by the snowthrower can cause serious damage
and personal injury. Always orient the discharge chute in the opposite direction
from where you, bystanders, surrounding vehicles, or windows are located.
1. The discharge chute (L, g.1) can be adjusted through180 degrees by rotating
the chute directional control (I, g.1). Rotate the handle clockwise to move the
discharge chute to the left; counterclockwise to move the chute to the right.
2. The chute deector (K, g.1) on the top of the discharge chute controls the
height of the snowstream. Loosen both chute deector knobs (J, g.1) to raise
or lower the deector to the desired height of snow you wish to throw. Tighten
the knobs to secure the deector.
NOTE: Do not over-tighten the chute deector knobs.
!

12 WSE2013
ENGLISH
!
MAINTENANCE
WARNING: Make sure to turn off the switch and disconnect the extension cord
before performing any maintenance task on your snowthrower.
LIFETIME LUBRICATION
Lubrication is not necessary an may damage the unit. The snowthrower is
lubricated for lifetime use at the factory before shipment.
GENERAL MAINTENANCE
1. Do not attempt to repair the machine unless you have the proper tools and
instructions for disassembly and repair of the machine.
2. Check the shear bolts and other bolts at frequent intervals for proper tightness
to ensure that the equipment is in safe working condition.
3. After each snow removal season, run the snowthrower for a few minutes to
prevent the collector/impeller from freezing. Shut off the motor, wait for all
revolving parts to stop completely, and wipe residual ice and snow off the unit.
Rotate the chute direction handle several times to remove any excess snow.
REPLACING THE RUBBER PLATES
NOTE: When replacing worn rubber plates, pay close attention to carefully
distinguish between the coarse and smooth side of the plates. Place the coarse
side inside and the smooth side outside.
1. Detach the worn rubber plate by removing the two sets of nuts, bolts, and
washers used to secure it.
2. Install the new rubber plate so that the coarse side faces inward and the
smooth side faces outward.
3. Insert the bolt with the small at washer into the corresponding holes on each
end of the rubber plate. Use the large at washer and locknut to secure the bolt
on each end. Install the other rubber plate in the same way.

090612 13
ENGLISH
MAINTENANCE
REPLACING THE SCRAPER
The scraper is located at the base of the snowthrower beneath the rotor housing.
1. Detach the worn scraper from the snowthrower by removing the 3 screws that
hold it in place (g.10).
2. Install the new scraper (g.11) and fasten it securely to the snowthrower with 3
screws (g.12).
REPLACING THE DRIVE BELT
NOTE: Determine the left and right sides of the snowthrower by standing behind
the unit in the normal operating position.
1. Remove the screws from the left panel of the snowthrower.
2. Lift the belt tensioner and roll the belt off the big pulley (g.13).
3. Replace the belt by following instructions in reverse order (g.14).

14 WSE2013
ENGLISH
MAINTENANCE
STORAGE
1. Allow the unit to cool and clean the unit before storing or transporting. Be sure
to secure the unit while transporting.
2. Disconnect the extension cord from the snowthrower.
3. Inspect the extension cord closely for signs of wear or damage. Replace it if it
is worn or damaged.
4. Inspect the snowthrower carefully for worn, loose, or damaged parts. Check
connections and screws and tighten if necessary.
5. Store the unit, along with the disconnected extension cord, in a locked, dry
place our of the reach of children to prevent unauthorized use or damage.
Cover loosely with a tarp for added protection.
WARNING: Repairs should be made by an authorized repair centre. Opening
this tool could invalidate your warranty.
NOTE: With regard to the warranty, the following are deemed consumable parts:
cotter pins, shear pins, shave plate, auger belt, skid shoes, etc., and thus not
covered.
NOTE: In case your tool does not function correctly (broken, missing parts, etc.),
do not return it to the store. Please call our toll-free service line at 1-866-393-
3968 to speak to a technician.
WARRANTY
All products distributed by Airco Hong Kong Ltd. are warranted against
manufacturers’ faults and defects for a period of one year from the date of
purchase by the end user. The Company will REPAIR OR REPLACE, AT ITS OWN
OPTION, merchandise deemed by the company to be defective, provided that
is has not been misused, abused, altered, or repaired by anyone other than an
authorized repair centre. Retain proof of purchase.
This warranty does not extend to parts deemed consumables, such as brad and
staple gun driver blades, grinding discs, electric motor brushes, welding contact
tips, etc. All warranty claims must have prior authorization and must be shipped
prepaid to an authorized repair depot, accompanied by a copy of the invoice
specifying the date that the item was sold to the end user.
!

090612 15
ENGLISH
PARTS LIST
Please refer to the schematic drawing on the pages following.
NO. DESCRIPTION QTY.
1 Screw 3
2 Left switch bracket 1
3 Switch lever 2
4 Spring 2
5 Right switch bracket 1
6 Screw 5
7 Switch socket housing 1
8 Plug pin 1
9 Screw 2
10 Screw 2
11 Switch bar 1
12 Switch 1
13 Switch button 1
14 Switch button spring 1
15 Cable protector 1
16 Cable clip 3
17 Chute direction handle 1
18 Screw 2
19 Nut 2
20 Knob 2
21 Pin 1
22 Upper chute 1
23 Bolt 2
24 Main chute 1
25 Rivet 3
26 Washer 3
27 Lower Chute 1
28 Screw 1
28A Washer 1
29 Rubber stopper 1
30 Chute base cover 1
31 Steel ball 1
32 Spring 1
33 Bafe 1
34 Screw 3
35 Chute retention plate 2
36 Screw 3
37 Screw 3
38 Side cover (right) 1
39 Bolt 3
40 Bearing seat 2
41 Bearing 2
42 Auger xing plate 2
43 Welded auger assy. 1
44 Auger rubber (left) 2
45 Auger rubber (right) 2
NO. DESCRIPTION QTY.
46 Snow scraping rubber (small) 2
47 Washer 12
48 Bolt 4
49 Bolt 8
50 Nut 12
51 Washer 8
52 Screw 3
53 Scraper 1
54 Bolt 3
54A Spring washer 6
55 Big pulley separator 1
56 Big pulley 1
57 Nut 1
58 Left guard 1
58A Screw 4
58B Right guard 1
59 Housing 1
60 Belt 1
61 Left side cover 1
62 Washer 3
63 Screw 3
64 Gear cover 1
65 Oil gasket 1
66 Screw 1
67 Washer 2
68 Screw 3
69 Spring 1
70 Screw 1
71 Motor bracket 1
72 Screw 2
73 Support vent 1
74 Overload protector 1
75 Screw 1
76 Screw 6
77 Inner chute deector 1
78 Carbon brush cover 2
79 Brush holder 2
80 Carbon brush 2
81 Clamp 2
82 Screw 4
83 Motor mount rear 1
84 Vibration dampers 4
85 Motor clamp 1
86 Screw 4
87 Label 1
88 Back cover 1
NO. DESCRIPTION QTY.
89 Cable anchor 1
90 Screw 6
91 Screw 6
92 Washer 3
93 Stator 1
94 Plunger 1
95 Bearing 608Z 1
96 Rotor 1
97 Motor mount front 1
98 Bearing 6001Z 1
99 Screw 2
99A Washer 2
99B M4 washer 2
100 Small gear 1
100A Washer 1
101 Screw 4
102 Nut 1
103 Screw 4
104 Bearing 6201Z 1
105 Ring 1
106 Large gear 1
107 Woodruff key 1
108 Output shaft 1
109 Bearing 1
110 Small pulley separator 1
110A Small pulley 1
111 Belt tension support 1
112 Washer 8
113 Screw 8
114 Bearing 1
115 Belt tensioner 1
116 Washer 1
117 Screw 1
118 Ring 2
119 Axle cover 2
120 External circlip 2
121 Axle 1
122 Screw 2
123 Wheel bracket (left) 1
124 Wheel bracket (right) 1
125 Screw 4
126 Nut 4
127 Washer 1
128 Wheel 2
129 Handle tubing lower section 1
130 T-bolt 2

16 WSE2013
FRANÇAIS
ENGLISH
SCHEMATIC DRAWING / SCHÉMA
090612 17
NO. DESCRIPTION QTY.
131 Screw 2
132 Handle tubing middle section 1
133 Rubber tube cap 4
134 T-bolt 2
135 Washer 4
136 Knob 4
137 Connection block 2
138 Handle tubing upper section 1
139 Switched cable 1
140 Cable tie 2
141 Extension anchor 1

090612 17
FRANÇAIS ENGLISH
SCHÉMA / SCHEMATIC DRAWING
NO. DESCRIPTION QTÉ.
1 Vis 3
2 Support gauche du commutateur 1
3 Levier du commutateur 2
4 Ressort 2
5 Support droite du commutateur 1
6 Vis 5
7 Logement d'interrupteur et
connexion électrique
1
8 Goupille de prise 1
9 Vis 2
10 Vis 2
11 Barre du commutateur 1
12 Commutateur 1

18 WSE2013
FRANÇAIS
LISTE DES PIÈCES
Veuillez consulter le schéma aux pages précédentes.
NO. DESCRIPTION QTÉ.
13 Interrupteur presse-bouton 1
14 Ressort de presse-bouton 1
15 Garde-câble 1
16 Serre-câble 3
17 Poignée à diriger la chute à neige 1
18 Vis 2
19 Écrou 2
20 Bouton 2
21 Goupille 1
22 Chute à neige supérieure 1
23 Boulon 2
24 Chute à neige principale 1
25 Rivet 3
26 Rondelle 3
27 Chute à neige inférieure 1
28 Vis 1
28A Rondelle 1
29 Bouchon en caoutchouc 1
30 Base de la chute à neige 1
31 Bille en acier 1
32 Ressort 1
33 Déecteur 1
34 Vis 3
35 Plaque à retinue pour la chute à
neige
2
36 Vis 3
37 Vis 3
38 Couvercle droite 1
39 Boulon 3
40 Support de palier 2
41 Roulement à billes 2
42 Plaque-support pour la tarière 2
43 Ensemble soudé de tarière 1
44 Plaque en caoutchouc (gauche) 2
45 Plaque en caoutchouc (droite) 2
46 Plaque en caoutchouc (petite) 2
47 Rondelle 12
48 Boulon 4
49 Boulon 8
50 Écrou 12
51 Rondelle 8
52 Vis 3
53 Plaque grattoir de neige 1
54 Couvercle gauche 3
54A Rondelle de ressort 6
55 Rondelle de la poulie grande 1
56 Poulie grande 1
NO. DESCRIPTION QTÉ.
57 Écrou 1
58 Patin gauche 1
58A Vis 4
58B Patin droite 1
59 Carter avant 1
60 Courroie 1
61 Couvercle gauche 1
62 Rondelle 3
63 Vis 3
64 Couverture d'engrenage 1
65 Joint statique 1
66 Vis 1
67 Rondelle 2
68 Vis 3
69 Ressort 1
70 Vis 1
71 Support de moteur 1
72 Vis 2
73 Support et conduit de ventilation 1
74 Dispositif de sécurité contre les
surcharges
1
75 Vis 1
76 Vis 6
77 Deecteur interne de chute à
neige
1
78 Couvercle de balai 2
79 Porte-balais 2
80 Balai de carbone 2
81 Pince 2
82 Vis 4
83 Support arrière du moteur 1
84 Amortisseurs de vibration 4
85 Support supérieure du moteur 1
86 Vis 4
87 Plaque signalétique 1
88 Couvercle arrière 1
89 Serre-câble 1
90 Vis 6
91 Vis 6
92 Rondelle 3
93 Stator 1
94 Butoir 1
95 Roulement à billes 608Z 1
96 Rotor 1
97 Support avant du moteur 1
98 Roulement à billes 6001Z 1
NO. DESCRIPTION QTÉ.
99 Vis 2
99A Rondelle 2
99B Rondelle M4 2
100 Engrenage petite 1
100A Rondelle 1
101 Vis 4
102 Écrou 1
103 Vis 4
104 Roulement à billes 6201Z 1
105 Anneau 1
106 Engrenage grande 1
107 Clavette-disque 1
108 Arbre de sortie 1
109 Roulement à billes 1
110 Rondelle 1
110A Poulie petite 1
111 Support de galet tendeur 1
112 Rondelle 8
113 Vis 8
114 Roulement à billes 1
115 Galet tendeur de courroie 1
116 Rondelle 1
117 Vis 1
118 Écrou capuchon 2
119 Anneau élastique 2
120 Douille 2
121 Axe 1
122 Vis 2
123 Support de roue (gauche) 1
124 Support de roue (droite) 1
125 Vis 4
126 Écrou 4
127 Rondelle 1
128 Roue 2
129 Poignée inférieure 1
130 Boulon en T 2
131 Vis 2
132 Poignée mitoyenne 1
133 Bouchon en caoutchouc 4
134 Boulon en T 2
135 Rondelle 4
136 Bouton 4
137 Connection block 2
138 Poignée supérieure 1
139 Câble commuté 1
140 Courroie d'attache 2
141 Attache-câble 1

090612 19
FRANÇAIS
!
TABLE DES MATIÈRES
Schéma ......................................................................................................... p.16
Liste des pièces............................................................................................. p.18
Opérations sécuritaires importantes.............................................................. p.19
Description fonctionnelle ............................................................................... p.24
Caractéristiques techniques.......................................................................... p.24
Consignes d’assemblage .............................................................................. p.25
Utilisation....................................................................................................... p.26
Entretien ........................................................................................................ p.29
Garantie......................................................................................................... p.31
IMPORTANT : Lisez, comprenez et suivez toutes les instructions sur cette unité
et dans les manuels avant d’essayer d’assembler et/ou opérer celle-ci. Gardez
ce manuel dans un endroit sûr pour référence future et pour la commande de
pièces de rechange.
AVERTISSEMENT : Ce symbole précise les instructions de sécurité importantes
qui, si non suivi pourraient mettre en danger la sécurité et/ou la propriété des
autres. Lisez et suivez toutes les instructions dans ce manuel avant d’opérer
cette machine. Ne pas se conformer à ces instructions peut avoir comme
conséquence de sérieuses blessures. Quand vous voyez le ce symbole -
observez son avertissement.
DANGER : Cette unité a été construite pour fonctionner selon les règles de
sécurité de ce manuel. Comme avec n’importe quel type d’unité à essence,
l’inattention ou l’erreur de la part de l’opérateur peut avoir comme conséquence
des dommages sérieux. Cette machine est capable d’amputer des mains et
des pieds et de projeter des objets. Ne pas observer les instructions de sécurité
suivantes peut avoir comme conséquence des blessures sérieuses et/ou la
mort.
Pour employer cet outil comme il se doit, vous devez respecter les règlements de
sécurité, les directives d’assemblage et les consignes d’utilisation que renferme le
présent manuel. Quiconque se sert de cet outil ou en fait l’entretien doit connaître
les risques éventuels liés à sa manipulation et avoir pris connaissance de ce
manuel. Les enfants et les personnes atteintes d’incapacité ne doivent pas utiliser
cet outil. On doit en tout temps surveiller les enfants qui se trouvent dans l’aire
d’utilisation de l’outil. Vous êtes également tenu d’observer les règlements de
prévention des accidents en vigueur dans votre région. Cela vaut également pour
les règles générales en matière de santé et sécurité au travail.
AVERTISSEMENT : Certaines consignes de sécurité de base doivent toujours
être respectées lors de l’utilisation d’un appareil à essence an de réduire les
risques de blessure ou de dommage. Avant d’employer ce produit, lisez tous
les avertissements et instructions. Conservez ce manuel d’instructions pour
référence future.
SÉCURITÉ ÉLECTRIQUE
1. Les prises électriques doivent être assorties à la che. Ne modiez jamais la
prise de quelque façon que ce soit. N’utilisez aucune prise d’adapteur avec des
outils électriques nécessitant une mises à la terre. Les prises non modiées et
les sorties assorties réduiront le risque de décharge électrique.
2. Évitez le contact du corps avec les surfaces mises à la terre telles que des
tuyaux, des radiateurs, des cuisinières, et des réfrigérateurs. Il y a un plus
grand risque de décharge électrique si votre corps est mis à la terre.
OPÉRATIONS SÉCURITAIRES IMPORTANTES
!
!
!

20 WSE2013
FRANÇAIS
3. N’exposez pas l’appareillage électrique à la pluie ou à des conditions humides.
L’eau entrant dans un outil augmentera le risque de décharge électrique.
4. Ne maltraitez pas le cordon d’alimentation. N’employez jamais le cordon
pour porter, tirer ou débrancher l’outil. Gardez le cordon loin de la chaleur, du
pétrole, des bords pointus ou des pièces mobiles. Un cordon endommagé
augmente les risques de choc électrique.
5. En actionnant l’outil électrique dehors, employez une corde d’extension
appropriée pour l’usage extérieur. L’utilisation d’une corde appropriée pour
l’usage extérieur réduit le risque de décharge électrique.
6. Gardez la prise hors de l’eau.
SÉCURITÉ PERSONNELLE
1. Restez l’alerte, regardez ce que vous faites et employez le bon sens en
utilisant la machine. N’utilisez pas la machine si vous êtes fatigué ou
sous l’inuence des drogues, de l’alcool, ou de médicament. Un moment
d’inattention tandis que la machine fonctionne peut avoir comme conséquence
des blessures sérieuses.
2. Utilisez l’équipement de sûreté. Portez toujours une protection occulaire.
L’équipement de sûreté tel qu’un masque de poussière, des chaussures de
sûreté antidérapantes, un casque antichoc, ou une protection d’audition utilisée
pour des conditions appropriées réduira des dommages corporels.
3. Évitez les départs accidentel. Assurez-vous que le commutateur est à la
position OFF avant de brancher l’outil. Le branchement de l’outillage électrique
avec le commutateur à ON favorise les accidents.
4. Enlevez toutes les clefs ou outils d’ajustement avant de mettre l’outil en
marche. Une clé ou un outil qui est laissée attachée à une pièce en rotation
peut avoir comme conséquence des blessures.
5. Ne vous étirez pas. Gardez la pose et l’équilibre appropriés à tout moment.
Ceci permet une meilleure commande de l’équipement dans des situations
inattendues.
6. Habillez-vous correctement. Ne portez pas de vêtements lâches ou de bijoux.
Gardez vos cheveux, vêtements, et gants attachés et loin de pièces mobiles.
Des vêtements lâches, les bijoux ou les longs cheveux peuvent être attrapés
par des pièces mobiles.
7. Maintenez les enfants et les spectateurs loin. Des spectateurs devraient
porter des verres de sûreté et être gardés une distance sécuritaire de la zone
de manoeuvre. Ne laissez pas les spectateurs toucher l’outil ou la corde
d’extension.
8. Portez toujours des verres de sûreté. Les lunettes journalières ont seulement
des verres qui résistent à l’impact. Elles ne sont pas des verres de sûreté.
9. Gardez les mains, le visage et les pieds à une bonne distance de toutes les
pièces mobiles. Ne touchez pas ou n’essayez pas d’arrêter la machine quand
elle tourne. N’utilisez pas sans gardes en place.
PRÉPARATION
1. Inspectez complètement le secteur où l’équipement qui doit être employé.
Enlevez tout les tapis de porte, journaux, traîneaux, ls, et d’autres objets
étrangers, qui pourraient entrainer une chute ou être projetés par la soufeuse.
2. Utilisez toujours les verres de sécurité ou pour protéger vos yeux lors du
fonctionnement et tout en exécutant des ajustements ou réparations. Tout
objets projetés directement ou par ricochet peut causer des dommages sérieux
aux yeux.
3. N’utilisez pas sans porter des vêtements d’hiver. Ne portez pas de bijoux,
longues écharpes ou l’autre vêtement lâche qui pourrait s’empêtrer dans les
pièces mobiles. Portez des bottes qui amélioreront la marche sur les surfaces
glissantes.
4. Employez une corde d’extension avec mise-à-terre pour toutes les unités avec
moteur électrique.
5. N’essayez jamais de faire des ajustements tandis que le moteur tourne, sauf là
où spéciquement recommandé dans le manuel de l’opérateur.
OPÉRATIONS SÉCURITAIRES IMPORTANTES
Table of contents
Languages:
Other Snow Devil Snow Blower manuals


