SnowEx 6800LT User manual

SNOWPLOW
SNOWPLOW
OWNER'S MANUAL
OWNER'S MANUAL
Original Instructions
March 1, 2020
Lit. No. 72448, Rev. 02
This manual supersedes all editions with an earlier date.
CAUTION
Read this document before operating or servicing snowplow.

Lit. No. 72448, Rev. 02 4 March 1, 2020
SNOWPLOW OWNER DATA SHEET
Register your snowplow online at www.snowexproducts.com
Owner Name: ________________________________________________________________________
Date Purchased: ______________________________________________________________________
Dealer Name: ___________________________________________ Phone: ______________________
Dealer Address: ______________________________________________________________________
Vehicle Model/Year: ___________________________________________________________________
Snowplow Model/Year: _________________________________________________________________
Snowplow Type/Size: ___________________________________________ Weight: ___________ lb/kg
Ballast: No ___ Yes ___ Amount____________lb/kg
Hydraulic Unit Serial Number: ____________________________________________________________
Blade Serial Number (see label on back of blade): ____________________________________________

Lit. No. 72448, Rev. 02 5 March 1, 2020
TABLE OF CONTENTS
Preface ..................................................................7
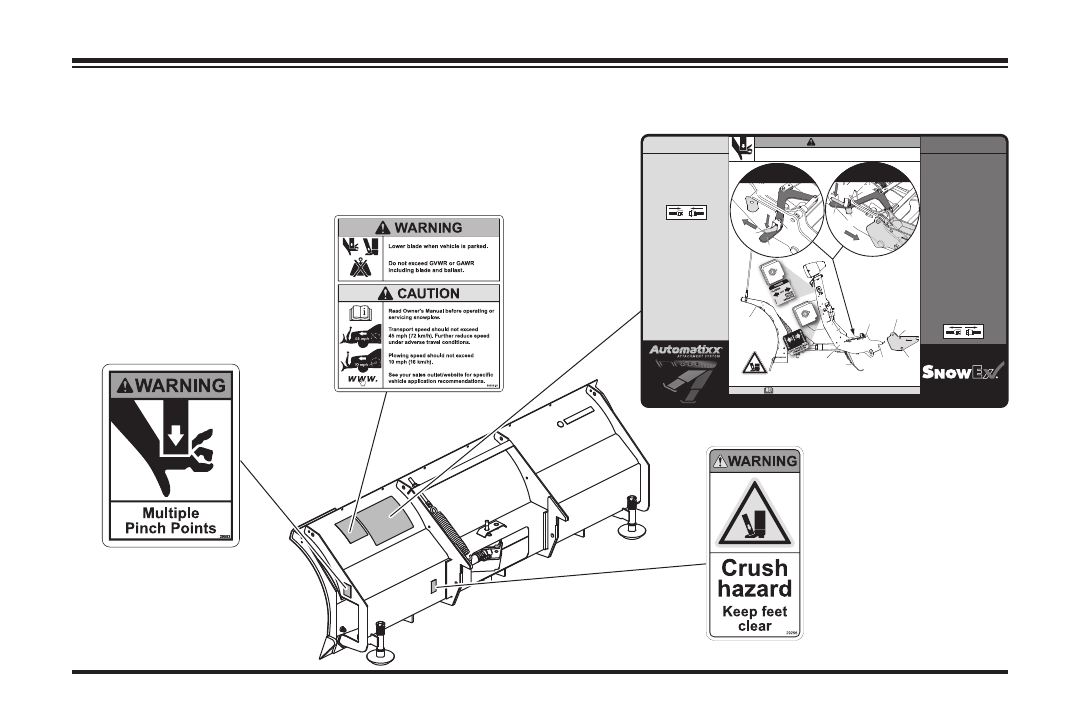
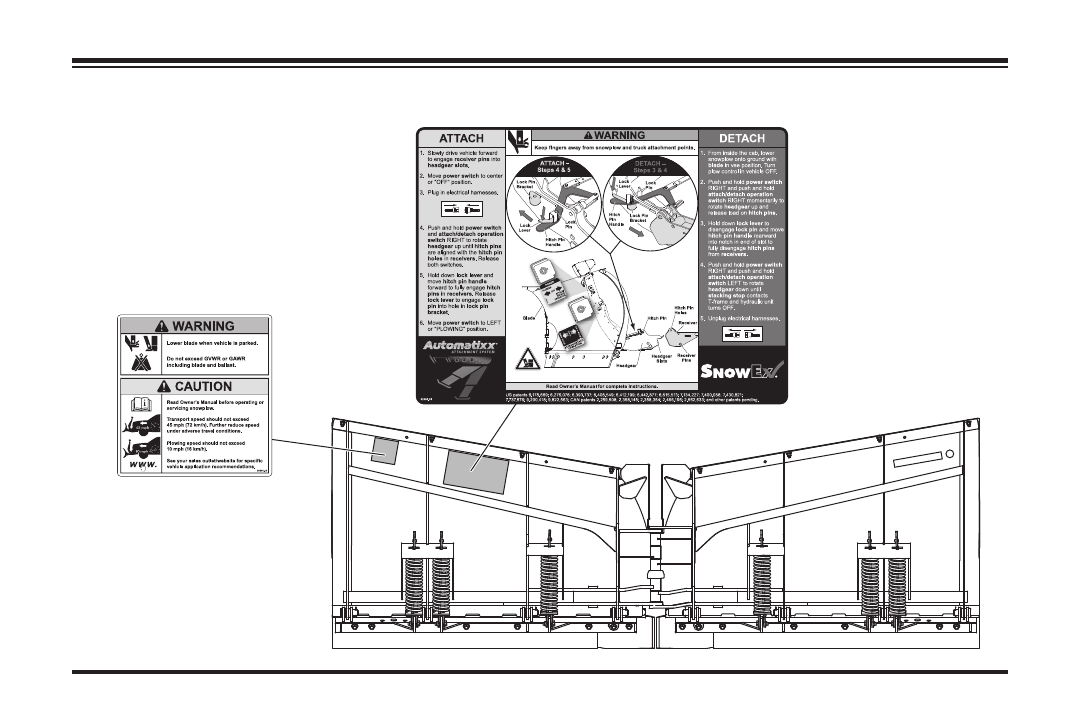
Safety ....................................................................8
Vehicle Application Information...........................16
Ballast Requirements .......................................17
Getting to Know Your Snowplow .........................18
Automatixx®System.........................................18
Blades ..............................................................19
6800LT and 7200LT......................................19
7600RD and 8000RD ...................................19
HD.................................................................19
POWER PLOW™ .........................................20
RDV™...........................................................20
SPEEDWING™.............................................21
HDV™...........................................................21
A-Frame/T-Frame, Quadrant, and Headgear . 22
SPEEDWING, POWER PLOW, and
Straight Blade Snowplows ......................... 22
HDV and RDV Snowplow ............................ 22
Snowplow Weights...........................................23
Mount Kits ........................................................23
Snowplow Headlamps......................................24
STORM SEEKER™ Headlamps...................24
STORM SEEKER™ LED Headlamps
with EdgeView™ Technology ......................24
Hydraulic System .............................................25
System Capacity...........................................27
Pump Motor Specifications ...........................27
Cab Controls ................................................... 29
Straight Blade & SPEEDWING Snowplows . 30
POWER PLOW HDV & RDV Snowplows .....31
Accessories.........................................................32
Attaching Snowplow to Vehicle .......................... 34
Operating Your Snowplow.................................. 38
Straight Blade & SPEEDWING Controls......... 38
POWER GRIP™ Hand-Held Control ........... 38
Joystick Control............................................ 40
POWER PLOW, HDV & RDV Controls ........... 44
POWER GRIP Hand-Held Control .............. 44
Joystick Control............................................ 48
FLEET FLEX Electrical System ................... 53
SECURITY GUARD™ System ................. 54
Smooth Stop/Soft Stop ............................. 58
One-Touch FLOAT.................................... 59

Lit. No. 72448, Rev. 02 6 March 1, 2020
Operating Your Snowplow, continued
SPEEDWING™ Blade Positions................60
POWER PLOW™ Blade Positions...................62
HDV™ and RDV™ Blade Positions ................ 64
Snowplow Headlamp Check ............................67
Hydraulic System ............................................ 68
Blade Drop Speed Adjustment........................ 68
Transporting Snowplow....................................70
Driving and Plowing on Snow and Ice .............71
Plowing Snow...................................................72
General Instructions......................................73
Hard Packed Snow .......................................73
Deep Snow ...................................................73
Clearing Driveways .......................................74
Clearing Parking Lots ...................................75
Parking with Snowplow Attached.....................75
Towing a Disabled or Stuck Vehicle.................75
Detaching Snowplow from Vehicle
and Storage .......................................................76
Maintenance........................................................81
Maintenance Videos ........................................81
Preseason Check.............................................81
Postseason Maintenance.................................82
Aiming Headlamp Beams................................ 83
Changing Blade-Edge Illumination Mode ....... 85
Maintenance and Adjustment.......................... 86
Angle Ram Adjustment – RDV Blades ...........87
Greasing Pivot Pin Hinge ................................ 88
Hydraulic System ............................................ 89
Fluid Level.................................................... 89
Annual Fluid Change ................................... 90
Hose or Fitting Replacement ....................... 92
Installing Hydraulic Fittings and Hoses........ 93
Fuse Replacement .......................................... 94
Snowplow Vehicle Battery Best Practices ...... 94
Vehicle............................................................. 95
Recycle ........................................................... 95
Blade Finish .................................................... 95
Emergency Parts/Tools................................... 96
Troubleshooting............................................... 96
APPENDIX
CabCommand Hand-Held Control & Joystick
Control – Timeout Table .................................97
TABLE OF CONTENTS

Lit. No. 72448, Rev. 02 7 March 1, 2020
PREFACE
This manual has been prepared to acquaint
you with the safety information, operation, and
maintenance of your new SnowEx®snowplow.
Please read this manual carefully and follow all
recommendations.
Before installing a snowplow, make sure that your
vehicle is equipped with all the vehicle manufacturer's
and our required options for plowing. This will
help ensure profitable and trouble-free operation
of your snowplow. Keep this manual accessible.
It is a handy reference in case minor service is
required.
Your SnowEx snowplow hydraulic unit and blade
both have a serial number. Record these serial
numbers on the Snowplow Owner Data Sheet at
the front of this manual for future reference.
When service is necessary, bring your snowplow
to your local SnowEx outlet. They know your
snowplow best and are interested in your
complete satisfaction.
The illustrations found in this manual represent
typical components. They may not exactly match
your specific installation.
Most of the information in this Owner's Manual
applies to all Automatixx®applications. Differences
among straight blade, POWER PLOW™,
SPEEDWING™, HDV™, or RDV™ applications
are called out in the text or under separate
headings, as applicable.

Lit. No. 72448, Rev. 02 8 March 1, 2020
WARNING/CAUTION & INSTRUCTION
LABELS
Become familiar with and inform users about the
warning/caution and serial number labels on the
back of the blade and the instruction label on the
headgear.
NOTE: If labels are missing or cannot be read,
see your sales outlet.
SAFETY
SAFETY DEFINITIONS
NOTE: Indicates a situation or action that can
lead to damage to your snowplow and vehicle
or other property. Other useful information
can also be described.
WARNING
Indicates a potentially hazardous situation
that, if not avoided, could result in death
or serious personal injury.
CAUTION
Indicates a potentially hazardous situation
that, if not avoided, may result in minor
or moderate injury. It may also be used to
alert against unsafe practices.

Lit. No. 72448, Rev. 02 9 March 1, 2020
POWER PLOW &
SPEEDWING Blades
Only (both sides)
Multiple Pinch
Points Label
SAFETY
Instruction Labels – POWER PLOW™,
SPEEDWING™, RDV™, and Straight Blades
ATTACH DETACH
1. Slowly drive vehicle forward
to engage receiver pins into
headgear slots.
2. Move power switch to
center or "OFF" position.
3. Plug in electrical harnesses.
4. Push and hold power switch
and attach/detach
operation switch RIGHT to
rotate headgear up until
hitch pins are aligned with
the hitch pin holes on
receivers. Release both
switches.
5. Hold down lock lever and
move hitch pin handle
forward to fully engage hitch
pins in receivers. Release
lock lever to engage lock
pin into hole in lock pin
bracket.
6. Move power switch to LEFT
or "PLOWING" position.
1. From inside the cab, lower
snowplow onto ground with
blade straight. Turn plow
control in vehicle OFF.
2. Push and hold power switch
RIGHT and push and hold
attach/detach operation
switch RIGHT momentarily
to rotate headgear up and
release load on hitch pins.
3. Hold down lock lever to
disengage lock pin and
move hitch pin handle
rearward into notch in end of
slot to fully disengage hitch
pins from receivers.
4. Push and hold power switch
RIGHT and push and hold
attach/detach operation
switch LEFT to rotate
headgear down until stand
contacts ground and
hydraulic unit turns OFF.
5. Unplug electrical harnesses.
52203 .05
US patents 6, 276,076; 6,393,737; 6,408,549; 6,412,19 9; 6 ,4 42, 87 7; 6, 615, 513; 7,134 ,2 27; 7,4 00 ,0 58;
7,4 3 0 , 8 21 ; 7,7 3 7, 57 6 ; C A N pa t e n ts 2, 2 5 9, 5 0 8 ; 2 ,3 5 8 ,1 4 5; 2 , 3 5 8 , 35 4; 2 , 4 6 6 ,19 5 ; a nd o t h e r p at e n t s pe n d i n g.
Keep fingers away from snowplow and truck attachment points.
WARNING
Read Owner's Manu al for complete instructions.
DETACH –
Steps 3 & 4
ATTAC H –
Steps 4 & 5
Receiver
Receiver
Pins
Headgear
Stand
Hitch Pin
Headgear
Slots
Hitch Pin
Holes
Lock
Lever
Lock
Lever
Hitch Pin
Handle
Hitch
Pin
Handle
Lock Pin
Bracket
Lock
Pin
Lock
Pin
Blade
Lock Pin
Bracket
Attach/Detach Label
Warning/Caution Label
Foot Crush
Hazard Label

Lit. No. 72448, Rev. 02 10 March 1, 2020
SAFETY
Warning/Caution Label
Instruction Labels – HDV™ Blades
Attach/Detach
Label

Lit. No. 72448, Rev. 02 11 March 1, 2020
SAFETY
Code Definition
YY 2-Digit Year
MM 2-Digit Month
DD 2-Digit Day
LL 2-Digit Location Code
XXXX 4-Digit Sequential Number
ZZZZZZ 5- or 6-Digit Blade Assembly PN
YYMMDDLLXXXXZZZZZ
ZZZZZ
zzzzz YYMMDDLLXXXXZZZZZ
Serial Number Label

Lit. No. 72448, Rev. 02 12 March 1, 2020
SAFETY
SAFETY PRECAUTIONS
Improper installation and operation could cause
personal injury and/or equipment and property
damage. Read and understand labels and the
Owner's Manual before installing, operating, or
making adjustments.
WARNING
Lower the blade when the vehicle is
parked. Temperature changes could
change hydraulic pressure, causing the
blade to drop unexpectedly or damaging
hydraulic components. Failure to do this
could result in serious personal injury.
WARNING
Remove blade assembly before placing
vehicle on hoist.
CAUTION
Read Owner's Manual before operating or
servicing snowplow.
WARNING
Do not exceed GVWR or
GAWR including the blade
and ballast. The rating label
is found on the driver-side
vehicle door cornerpost.
CAUTION
Plowing speed should not exceed 10 mph
(16 km/h).
CAUTION
See your SnowEx®outlet for application
recommendations.
CAUTION
Transport speed should not exceed
45 mph (72 km/h). Further reduce speed
under adverse travel conditions.

Lit. No. 72448, Rev. 02 13 March 1, 2020
HYDRAULIC SAFETY
• Always inspect hydraulic components and
hoses before using. Replace any damaged or
worn parts immediately.
• If you suspect a hose leak, DO NOT use your
hand to locate it. Use a piece of cardboard
or wood.
FUSES
The SnowEx®electrical and hydraulic systems
contain several automotive-style fuses. If a
problem should occur and fuse replacement
is necessary, the replacement fuse must be
of the same type and amperage rating as the
WARNING
Hydraulic fluid under pressure can
cause skin injection injury. If you
are injured by hydraulic fluid, get
medical attention immediately.
SAFETY
original. Installing a fuse with a higher rating can
damage the system and could start a fire. Fuse
Replacement, including fuse ratings, is located in
the Maintenance section of this Owner's Manual.
PERSONAL SAFETY
• Remove the ignition key and put the vehicle
in PARK or in gear to prevent others from
starting the vehicle during installation or
service.
• Wear only snug-fitting clothing while working
on your vehicle or snowplow.
• Do not wear jewelry or a necktie, and secure
long hair.
• Wear safety goggles to protect your eyes from
battery acid, gasoline, dirt, and dust.
• Avoid touching hot surfaces such as the
engine, radiator, hoses, and exhaust pipes.
• Always have a fire extinguisher rated BC
handy, for flammable liquids and electrical fires.

Lit. No. 72448, Rev. 02 14 March 1, 2020
SAFETY
FIRE AND EXPLOSION
Be careful when using gasoline. Do not use
gasoline to clean parts. Store only in approved
containers away from sources of heat or flame.
CELL PHONES
A driver's first responsibility is the safe operation
of the vehicle. The most important thing you can
do to prevent a crash is to avoid distractions and
pay attention to the road. Wait until it is safe to
operate Mobile Communication Equipment such
as cell phones, text messaging devices, pagers,
or two-way radios.
VENTILATION
WARNING
Gasoline is highly flammable and gasoline
vapor is explosive. Never smoke while
working on vehicle. Keep all open flames
away from gasoline tank and lines. Wipe
up any spilled gasoline immediately.
WARNING
Vehicle exhaust contains lethal fumes.
Breathing these fumes, even in low
concentrations, can cause death. Never
operate a vehicle in an enclosed area
without venting exhaust to the outside.

Lit. No. 72448, Rev. 02 15 March 1, 2020
BATTERY SAFETY
SAFETY
NOISE
Airborne noise emission during use is below
70 dB(A) for the snowplow operator.
VIBRATION
Operating snowplow vibration does not exceed
2.5 m/s2to the hand-arm or 0.5 m/s2to the
whole body.
CAUTION
Batteries normally produce explosive
gases, which can cause personal injury.
Therefore, do not allow flames, sparks, or
lit tobacco to come near the battery. When
charging or working near a battery, always
cover your face and protect your eyes,
and also provide ventilation.
• Batteries contain sulfuric acid, which
burns skin, eyes, and clothing.
• Disconnect the battery before removing
or replacing any electrical components.

Lit. No. 72448, Rev. 02 16 March 1, 2020
Vehicle application recommendations are based
on the following:
• The vehicle with the snowplow installed must
comply with applicable Federal Motor Vehicle
Safety Standards (FMVSS).
• The vehicle with the snowplow installed
must comply with the vehicle manufacturer's
stated gross vehicle and axle weight ratings
(found on the driver-side door cornerpost
of the vehicle) and the front and rear weight
distribution ratio. In some cases, rear ballast
may be required to comply with these
requirements. See "Ballast Requirements" in
this section.
VEHICLE APPLICATION INFORMATION
CAUTION
See your SnowEx®outlet/website
for specific vehicle application
recommendations before installation. The
Power Match selection system has specific
vehicle and snowplow requirements.
• SnowEx Power Match selection system
is based on available vehicle capacity for
snowplow equipment on a representative
vehicle equipped with options commonly
used for plowing and with 300 lb of front seat
occupant weight.
• Weights of front seat occupants can be
adjusted above 300 lb, but vehicle with
snowplow must not exceed vehicle GVWR
or GAWR.
• In some cases there may be additional
limitations and requirements.
• Installation, modification, and addition of
accessories must comply with published
SnowEx recommendations and instructions.
Available capacity decreases as the vehicle is
loaded with cargo or other truck equipment, or
snowplow accessories are installed.
• If there is uncertainty as to whether available
capacity exists, the actual vehicle as
configured must be weighed.

Lit. No. 72448, Rev. 02 17 March 1, 2020
VEHICLE APPLICATION INFORMATION
BALLAST REQUIREMENTS
Ballast (additional weight) is an important part of
qualifying vehicles for snowplow eligibility. Rear
ballast must be used when necessary to remain
in compliance with axle ratings and ratios as
specified by the vehicle manufacturer.
If ballast is required, it is important that it be
secured properly behind the rear axle. A ballast
retainer kit is available from your SnowEx®outlet
(PN 62849).
NOTE: The ballast retainer kit is for snowplow
vehicles requiring ballast. See your SnowEx
outlet for the correct amount of ballast
required. Include the weight of the retainer as
part of the ballast requirement. Sand bags are
recommended for use as ballast.
Position
and secure ballast
as close to the tailgate
as possible.
NOTE: Ballast recommended and its weight
calculations assume the entire width of the
bed is filled as close to tailgate as possible.

Lit. No. 72448, Rev. 02 18 March 1, 2020
GETTING TO KNOW YOUR SNOWPLOW
Automatixx®SYSTEM
The SnowEx®snowplow consists of all the
components that are readily removable from
the vehicle as a unit. This includes the blade,
quadrant, headgear, A-frame, hydraulic unit,
and the snowplow headlamps. The snowplow
is ready and easy to mount when you need
to plow snow. When plowing is completed,
remove the snowplow.
The snowplow shall be installed according
to instructions supplied. SnowEx outlets
are trained to provide this service and
other services for this snowplow.
When the snowplow is offthe vehicle,
(see blade label or "Detaching Snowplow"
in the Detaching Snowplow from Vehicle
& Storage section of this manual), the
complete snowplow can be moved around
on most hard surfaces.
STORM SEEKER™ Headlamps or
STORM SEEKER™ LED Headlamps
with EdgeView™ Technology
Power Switch
Headgear
Attach/Detach
Switch
Cable Boot
Lift Ram
Stand (not used
on HDV™ plow)
Hitch Pin
Lever
Angle Ram
Quadrant
A-Frame
Cutting
Edge
Blade
Hydraulic Unit
Actual configuration varies by model.

Lit. No. 72448, Rev. 02 19 March 1, 2020
GETTING TO KNOW YOUR SNOWPLOW
6800LT and 7200LT
The 6800LT and 7200LT snowplows are designed
for personal use.
7600RD and 8000RD
The 7600RD and 8000RD blades are full-size,
full-featured snowplows designed exclusively
for half-ton pickup trucks. They handle light
commercial, institutional, and extended-use
homeowner applications, providing rugged,
pro-like performance without the extra weight.
Available in 7'6" and 8' sizes.
HD
HD snowplows feature a 73° attack angle, for
clean scraping action, and an aggressive blade
roll to promote snow-rolling and keep snow from
coming over the blade.
BLADES
SnowEx®snowplows use high-strength steel
components to maximize strength and reduce
weight where necessary. All products feature
vertical ribs for added strength and stability, and
straight blades utilize a formed base channel.
SnowEx blades have replaceable high-carbon
steel cutting edges bolted to the bottom. Cutting
edges should be replaced when worn to the
bottom edge of the blade. SPEEDWING™ wing
cutting edges are adjustable for wear. (See the
Maintenance section in this manual.)

Lit. No. 72448, Rev. 02 20 March 1, 2020
GETTING TO KNOW YOUR SNOWPLOW
SPEEDWING™
The SnowEx®SPEEDWING snowplow will
automatically configure the wings in scoop position
or windrow right or left, depending on how you
position the plow (centered, right angle, or left
angle), allowing you to carry up to 30% more snow
for increased plowing efficiency. Positions include
a scoop width of nearly 103" and windrow position
width of 100". Continuous welds and formed
torque box construction add strength and rigidity.
POWER PLOW™
The 8100 and 8611 POWER PLOW blades
can be extended hydraulically, allowing you
to carry up to 35% more snow for increased
plowing efficiency. Positions include a compact
8' width, a 10' WIDE PASS™ width, and a
BUCKET BLADE™ width of nearly 9' (8'6" to
11' for the 8611 POWER PLOW snowplow). The
blade can fully angle in the "BUCKET BLADE"
position, increasing the snow-carrying capacity
while effectively maneuvering around obstacles or
turning corners.
Continuous welds and formed torque box
construction add strength and rigidity. The dual
power bar design and six vertical ribs provide
exceptional strength, while the durable steel
cutting edge on each wing reduces wear and
helps protect the blade when tripping.

Lit. No. 72448, Rev. 02 21 March 1, 2020
HDV™
The flared-wing HDV snowplow is available in
8'6" or 9'6" widths with either gray powder coated
or stainless steel moldboards. The trip edge
protection feature allows the blade to trip in any
position, and double-acting cylinders enable the
blade wings to be controlled independently or
together for easy transition among one-touch
BUCKET BLADE™, vee, or angled positions.
RDV™
The RDV snowplow is built from high strength,
low-alloy steel and is designed to deliver superior
strength, allowing the performance and efficiency
of a V-plow with the agility of a half-ton truck
application. Double-acting cylinders allow precise
control of blade wings that operate independently
or together for straight-blade operation. The RDV
V-plow is available in either stainless steel or
powder-coated steel. Accessories include: a shoe
kit, rubber deflector, curb guards, 1/2" cutting edge
kit, back drag edge kit, poly cutting edge kit.

Lit. No. 72448, Rev. 02 22 March 1, 2020
GETTING TO KNOW YOUR SNOWPLOW
A-FRAME/T-FRAME, QUADRANT,
AND HEADGEAR
SPEEDWING™, POWER PLOW™, and
Straight Blade Snowplows
The quadrant is attached to the back of the blade
with heavy-duty trip springs and clevis pins with
cotters. The trip springs allow the blade to trip
forward and ride over obstacles such as low
curbs, manhole covers, etc., without damaging the
blade or the vehicle or injuring the driver. For trip
spring adjustment instructions, see "Maintenance
and Adjustment" in the Maintenance section of
this manual.
The quadrant is attached to the triangular A-frame
with a pivot bolt. The pivot bolt allows the quadrant
and blade to swing right or left.
The hydraulic unit is easy to access and the cover
can be removed without tools. It is conveniently
located in front of the lift ram.
The snowplow headlamps are also attached to the
headgear.
HDV™ and RDV™ Snowplows
The blade wings are attached to the T-frame with
a hinge pin, which allows the wings to extend and
retract.
The hydraulic unit is mounted on the front of the
headgear. The hoses remain connected to the
hydraulic unit and the rams.
The snowplow headlamps are also attached to the
headgear.
This manual suits for next models
13
Table of contents
Other SnowEx Automobile Accessories manuals
Popular Automobile Accessories manuals by other brands

Diamondback
Diamondback 180 installation guide

AutoLoc
AutoLoc SB3PR Series User guide and installation manual

Westfalia
Westfalia 303 186 Installation and operating instructions

Parrot
Parrot CK3100 LCD installation manual

energlaze
energlaze ZAPPI manual

Diode Dynamics
Diode Dynamics DD5002 installation guide