AutoLoc SB3PR Series Instruction Manual
SB3PRxx 3-POINT RETRACTABLE LAP BELT
USER GUIDE AND INSTALLATION MANUAL
IMPORTANT:
When available, be sure to use the vehicle manufacturer's provisions to attach belts. When you
use the manufacturer's threaded floor fittings, it is IMPORTANT that all full threads be engaged
to obtain the ultimate strength of the anchorage. Reuse factory mounting bolts or use 7/16th"
grade 5 or higher bolts.
CAUTION:
Do not attach this belt directly to the seat. Death or serious injury could occur in an accident if
the seat is not designed to withstand the additional load. FLOOR MOUNT ONLY!
Installation Instructions:
1. Mount the short side of the belt INBOARD, toward the center of the vehicle.
2. Avoid rough or sharp edges when choosing a belt path.
WHERE NO FACTORY FITTINGS ARE AVAILABLE:
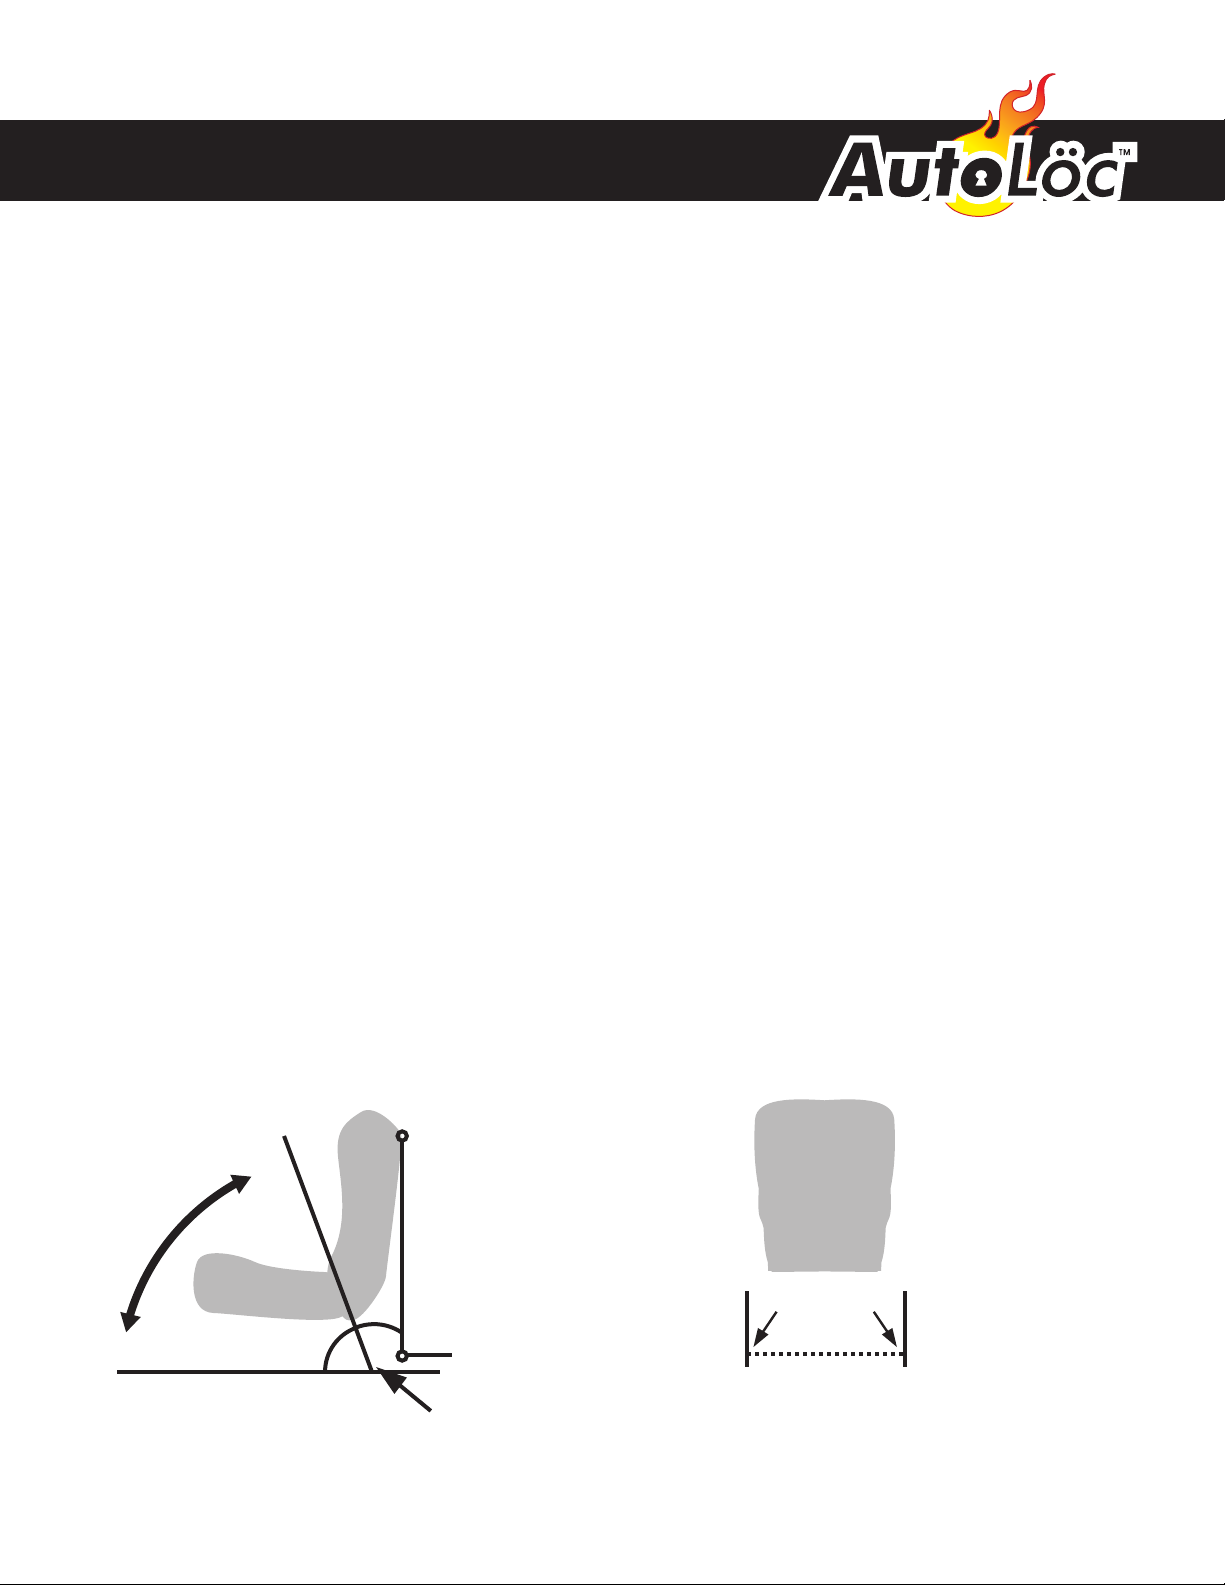
1. If the seat is adjustable, move to the rearmost position.
2. Mark the floor to mount down and behind the seat to assure that the lap belt is pulling down-
ward and rearward at approximately a 70 degree angle. (Figure 1)
3. Space the attachment points 15" to 25" apart so that the lap belt forms a "U" shaped loop
when in use. (Figure 2) Never attach both ends of the same lap belt to the same anchorage or
attachment point.
4. Carefully drill 1/2" holes to avoid damaging exhaust system, brake or fuel lines. Always use
the reinforcement plates (sold separately- part number SBHP, SKU# 12186) underneath the
floor. (Figure 3) Examine and reinforce any weakened area of the floor pan.
70°
Figure 1. Figure 2.
SEAT
I
n
s
t
a
l
l
a
t
i
o
n
A
n
g
l
e
Anchor Point
Anchor Points
BACK
OF SEAT
Anchor points:
Minimum of 15” apart
Maximum of 25” apart
90°
Retractor needs to
point at 90°

USER GUIDE AND INSTALLATION MANUAL
SB3PRxx 3-POINT RETRACTABLE LAP BELT
IMPORTANT:
1. For lap seat belts, mounting hardware to the floor should always have metal-to- metal contact. You
should avoid carpet, plastic or any other material between the lap seat belt fastener components and
the floor which could tend to loosen over time.
2. All bolts must have either a lock-nut, lock washer or apply a thread locking compound for security.
3. Bolts used for mounting seatbelts should be a minimum size 7/16" diameter, Grade 5 product.
4. Anchor points for belts must meet the strength load requirements of FMVSS 210. When replacing
belts, always use the anchorages provided by the vehicle, or seat manufacturer.
5. Do not connect both ends of this belt to the same, single mounting point. Mounted ends of the belt
should form a "U" shape.
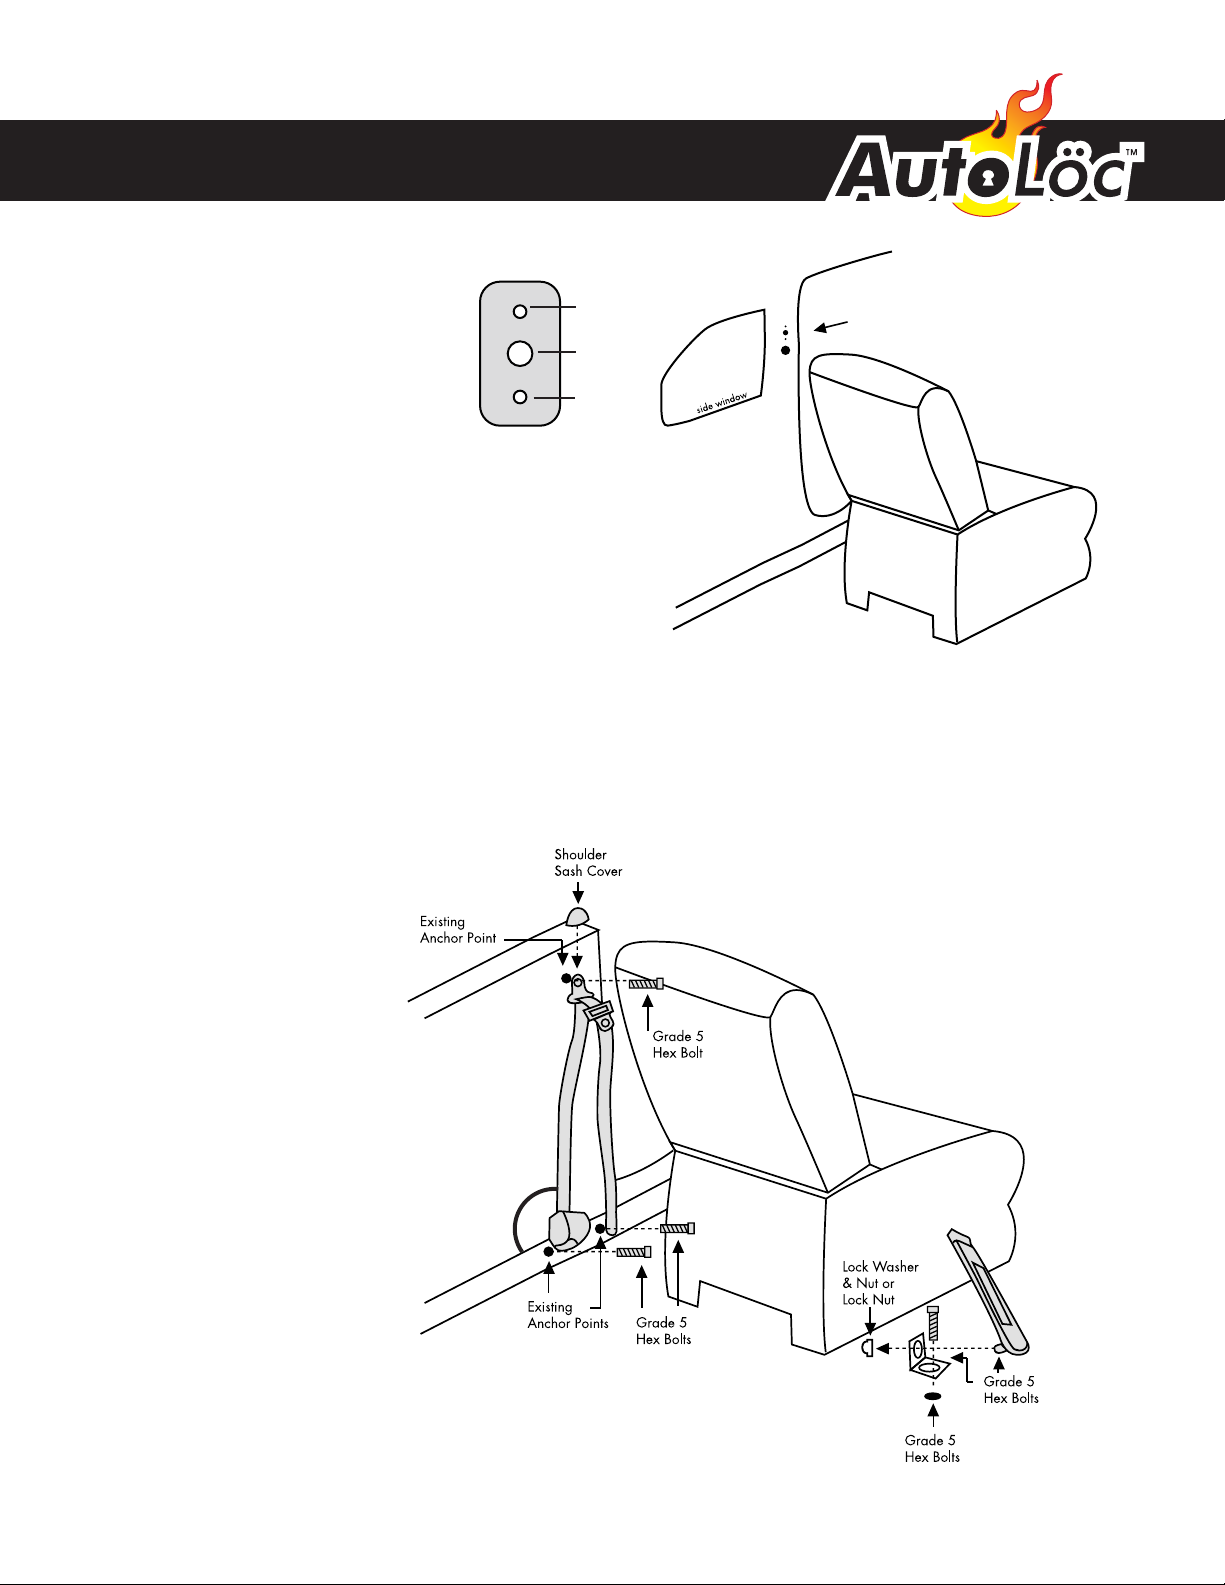
Seatbelt Anchor
Plate
Figure 4.
Mounting Seat Belt
Anchors to the Floor
*Note- if your vehicle does not
have a shoulder anchor point,
see figure 5.
90°
USER GUIDE AND INSTALLATION MANUAL
SB3PRxx 3-POINT RETRACTABLE LAP BELT
Mounting Plate
1/8”
1/8”
1/2”
Creating a Shoulder Anchor Point
To create a should anchor point, remove
anything covering the metal. Find a spot on
your B-pillar between 0 and 8 inches
above the top of the seat and slightly
behind it for the anchor.
Mark out four holes. Using the anchor plate
itself as a template, mark the holes for the
anchor plate and a 1½” hole below it. You
will use this hole to insert the anchor plate
behind the interior metal of your B-pillar.
The 1/8” holes are for rivets to hold the
plate in place, and the 1/2” hole is for the
seatbelt anchor bolt.
Once the anchor plate is in place, you will
need to drill a 1/2” hole in any interior
trim that covers your B-pillar. Measure
carefully so all the 1/2” holes align
perfectly. If you do not have any trim, a
1½” plastic plug will fill the large hole, or
you can plan to have the hole covered by
the seatbelt webbing once installed.
Figure 5- Creating Shoulder Anchor Point
Figure 6- Anchor Point in Convertibles
Note: The user assumes all risk of determining a safe
location for the anchor point. In some applications this point
may be above the rear window.
Location of four necessary holes to be
drilled in B-pillar.
90°

USER GUIDE AND INSTALLATION MANUAL
SB3PRxx 3-POINT RETRACTABLE LAP BELT
Seat Belt Use
1. Always wear your seat belt when the vehicle is in operation.
2. Adjust and wear belt low and snug across your hips.
3. Each belt is intended to restrain only one person at a time. Do not put two people under one belt.
4. Never attempt to restrain a child in your lap using the lap belt around both you and the child. The child
could be severely injured or even killed in the event of a collision.
5. Seat Belts are matched sets. Do not mix or use this belt or parts of this belt with other types of seatbelts.
Use and Maintenance Instructions
Print and keep this instruction sheet for future review.
WARNING:
FAILURE TO PROPERLY INSTALL, USE, PERIODICALLY INSPECT AND MAINTAIN THIS SEAT BELT COULD LEAD
TO SERIOUS INJURY OR DEATH! PLEASE FOLLOW ALL OF THE IMPORTANT INFORMATION BELOW:
Maintenance
1. Inspect belt regularly. If the assembly does not work properly or you find cuts, frayed or worn webbing the belt must be
replaced.
2. More frequent inspections may be necessary if the belt is subjected to harsh treatment or extreme conditions.
3. Whenever a vehicle is involved in a collision you must replace every part of the seat belt system; both sides of the belt
including the mounting hardware!
4. Clean with mild soap and water. Do not bleach or re-dye as it will tend to severely weaken the webbing.
Universal Installation Information:
If the vehicle is equipped with seat belt anchorages, these should be used in lieu of other methods. All U.S. passenger cars,
beginning with 1962 models, have seat belt anchorages for at least two lap belts in the front seat. Since 1/1/68, vehicle
manufacturers have been required to install lap belt anchorages for each front and rear seating positions and upper torso belt
anchorages at each forward facing outboard seating position (except convertibles). Since 1/1/72, this same requirement
became effective for trucks.
CAUTION: DEATH OR SERIOUS INJURY COULD RESULT FROM NOT PROPERLY THREADING THE WEBBING THROUGH THE
ADJUSTABLE ENDS. MAINTAIN A MINIMUM OF ONE INCH WEBBING BEYOND THE ANCHOR. (SEE FIG. 3)
CAUTION: IF THE FIXED END OF A SEATBELT IS TOO LONG TO ALLOW A SNUG FIT ON A SMALL
OCCUPANT, DO NOT USE THE BELT! YOU MUST SHORTEN THE BELT THROUGH THE
ADJUSTABLE ANCHOR ENDS TO ALLOW A PROPER FIT.
AS A GENERAL RULE, CHILDREN WEIGHING LESS THAN 80 LBS SHOULD BE SECURED IN AN APPROVED
CHILD SAFETY/BOOSTER SEAT ACCORDING TO MANUFACTURER'S RECOMMENDATIONS!!!
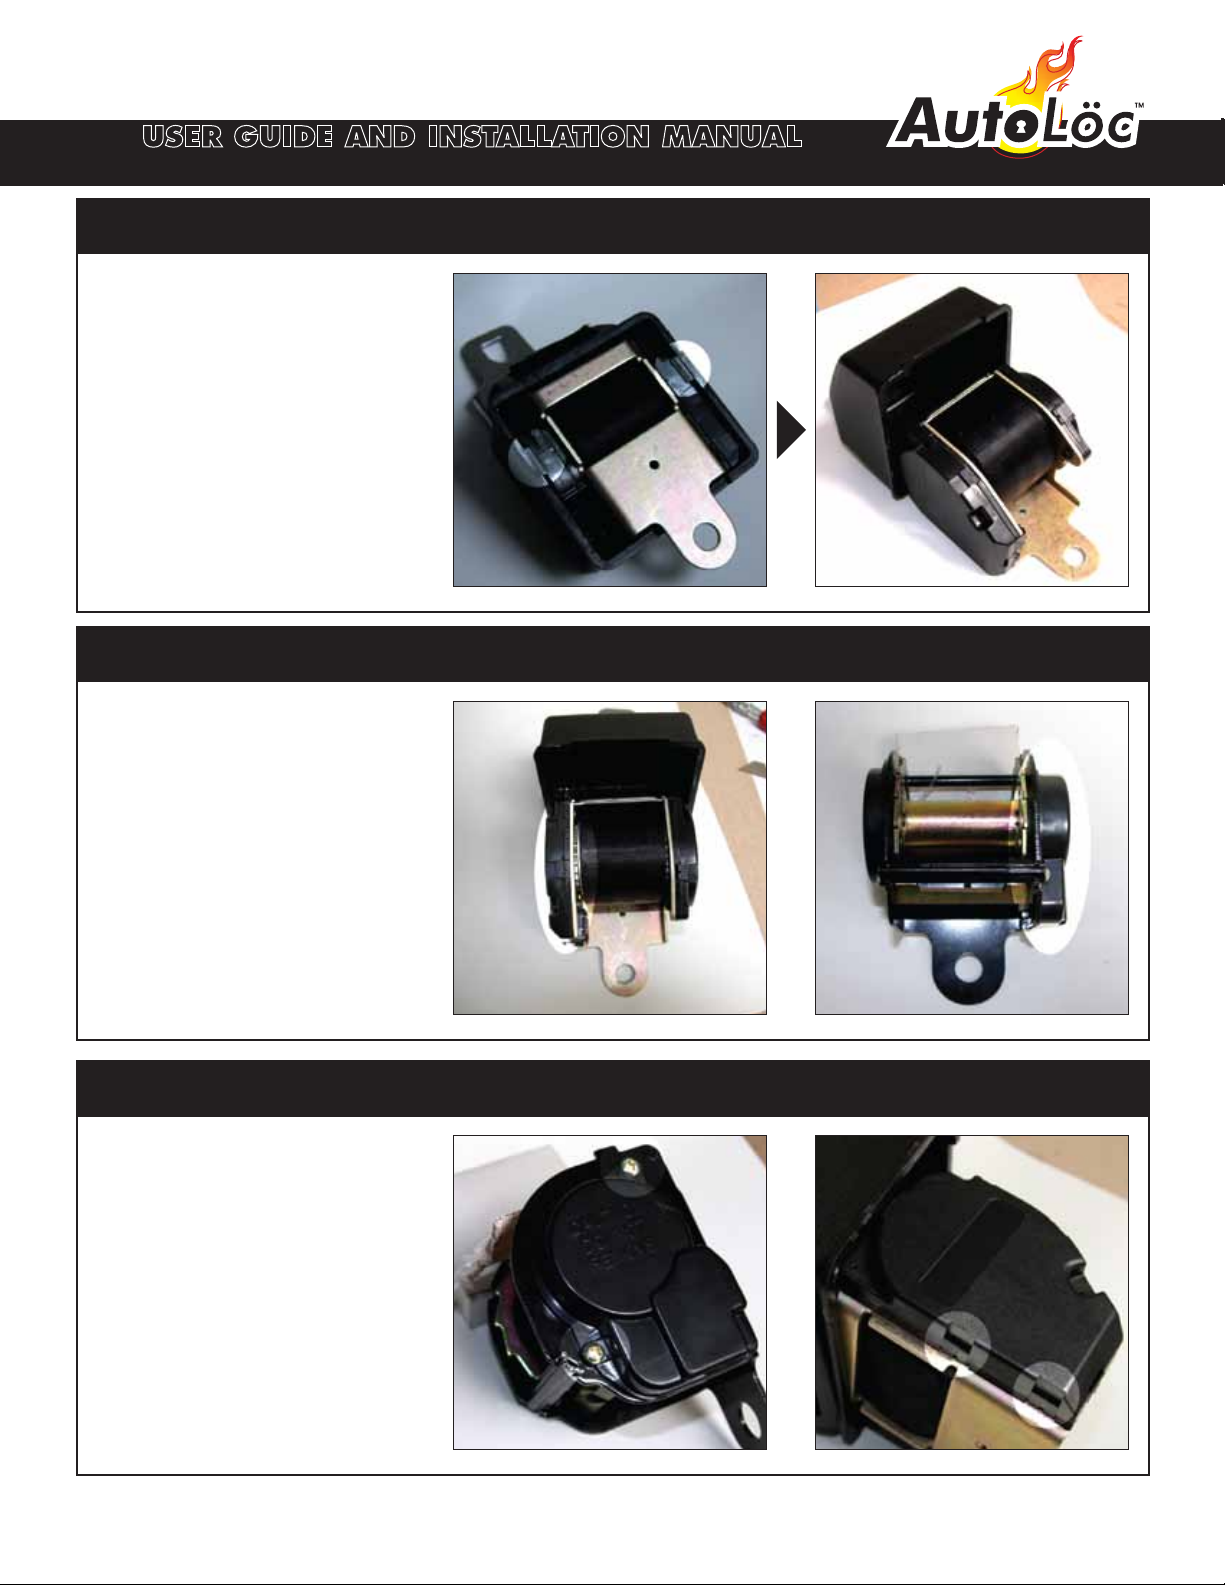
SEATBELT REPAIR GUIDE
Remove the outer shell of the belt
by locating the two tabs on both
sides and pulling away and out
from the belt mechanism. *Note - be
careful not to crack the casing when
removing it.
1. REMOVE THE OUTER SHELL
With the casing off, on either side of
the belt cylinder are plastic covers.
Locate the largest cover and move
onto the next step.
Take the cover off. Depending on
the model, either remove the two
screws or locate the pull tabs and use
a screw driver to carefully separate
the cover from the body. There are a
total of six tabs.
2. LOCATE THE GEAR HOUSING
3. REMOVING THE HOUSING

SEATBELT REPAIR GUIDE
Hold the belt mechanism with the
floor mount pointing down. With the
device level, locate the ball bearing.
Be sure that it is free to roll around in
its housing. If it isn’t free, lightly move
it until it becomes loose.
4. LOCATE THE BALLBEARING
Directly above the ball baring is a
pressure arm. With the belt level, be
sure that this arm can move up and
down freely.
With the device level, locate the gear
stopper. If it is pressed up against
the belt gear, lightly press down and
dislodge it so the belt cylinder and
gear can rotate freely. At this point
you should be able to extend and
retract teh belt as long as the device
level. Re-assemble and install.
5. LOCATE THE PRESURE ARM
6. LOCATE THE GEAR STOPPER
AUTOLOC SEATS RACING SEATS
Table of contents
Other AutoLoc Automobile Accessories manuals


Popular Automobile Accessories manuals by other brands


Toyota
Toyota PU100-3415S-01 installation instructions

BMW
BMW 84 64 0 301 448 Parts and Accessories Installation Instructions

Lonsdor
Lonsdor K518ISE user manual

Alexo Sweden
Alexo Sweden 667-0220 Installation and operating instructions

Road Angel
Road Angel Halo Pro user guide

TMT 4x4
TMT 4x4 Skyline installation manual