SNUG TOP CH Service manual

Part #213110
INSTALLATION INSTRUCTIONS
& OWNERS MANUAL
NOTICE D’INSTALLATION
ET GUIDE DU PROPRIÉTAIRE
INSTALACIÓN INSTRUCCIONES
& MANUAL DEL USUARIO
CH
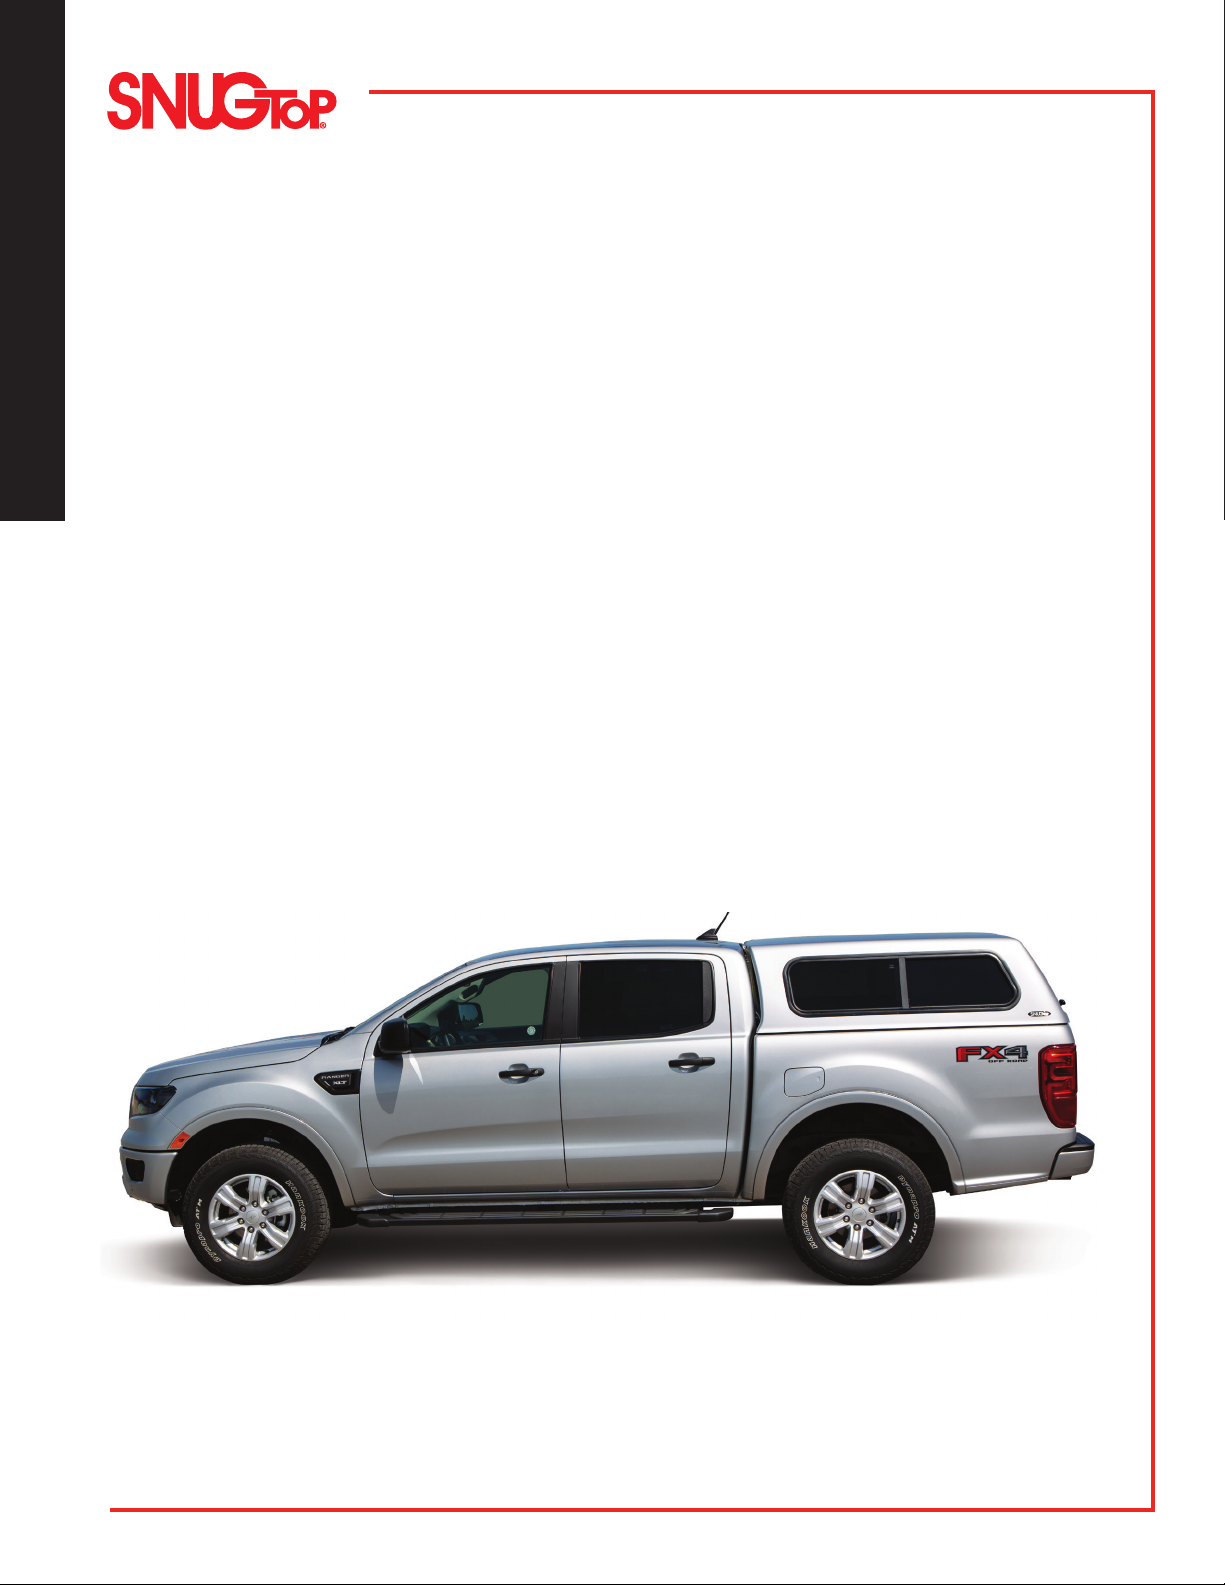
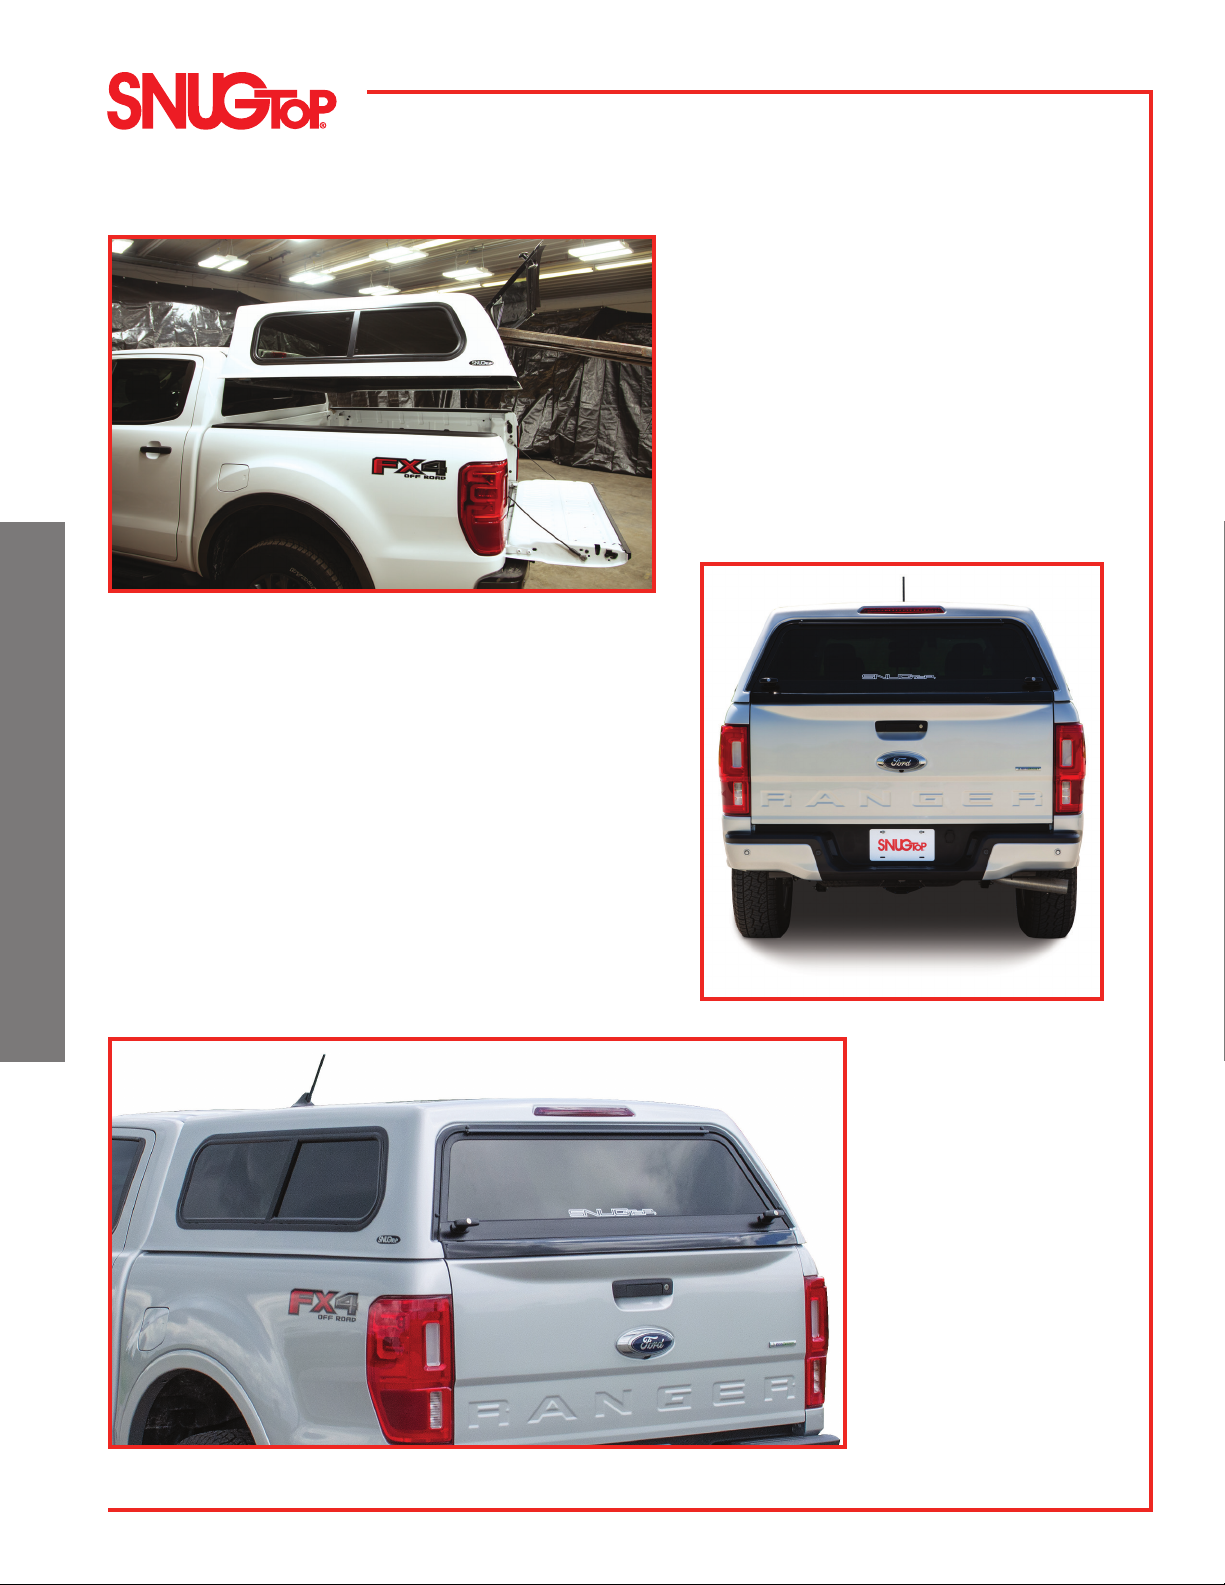
FORD RANGER
CAB HIGH
HAUTEUR CABINE
CABINA ALTA
2
ENGLISH
TABLE OF CONTENTS
KEEP THESE INSTALLATION INSTRUCTIONS IN A CONVENIENT LOCATION
FOR FUTURE REFERENCE
Snugtop CH Cap Components ......................................................................................................................... 3
Cap Installation Instructions................................................................................................................................ 4
Installing Gap Filler................................................................................................................................................ 5
Placing The Cap On The Truck........................................................................................................................... 6
Secure Cap To Truck............................................................................................................................................. 7
Making Electrical Connections....................................................................................................................7 – 8
Service Parts CH Fiberglass Cap...................................................................................................................... 9
Limited Warranty..................................................................................................................................................10
Caring For Your Truck Cap ................................................................................................................................11
3
ENGLISH
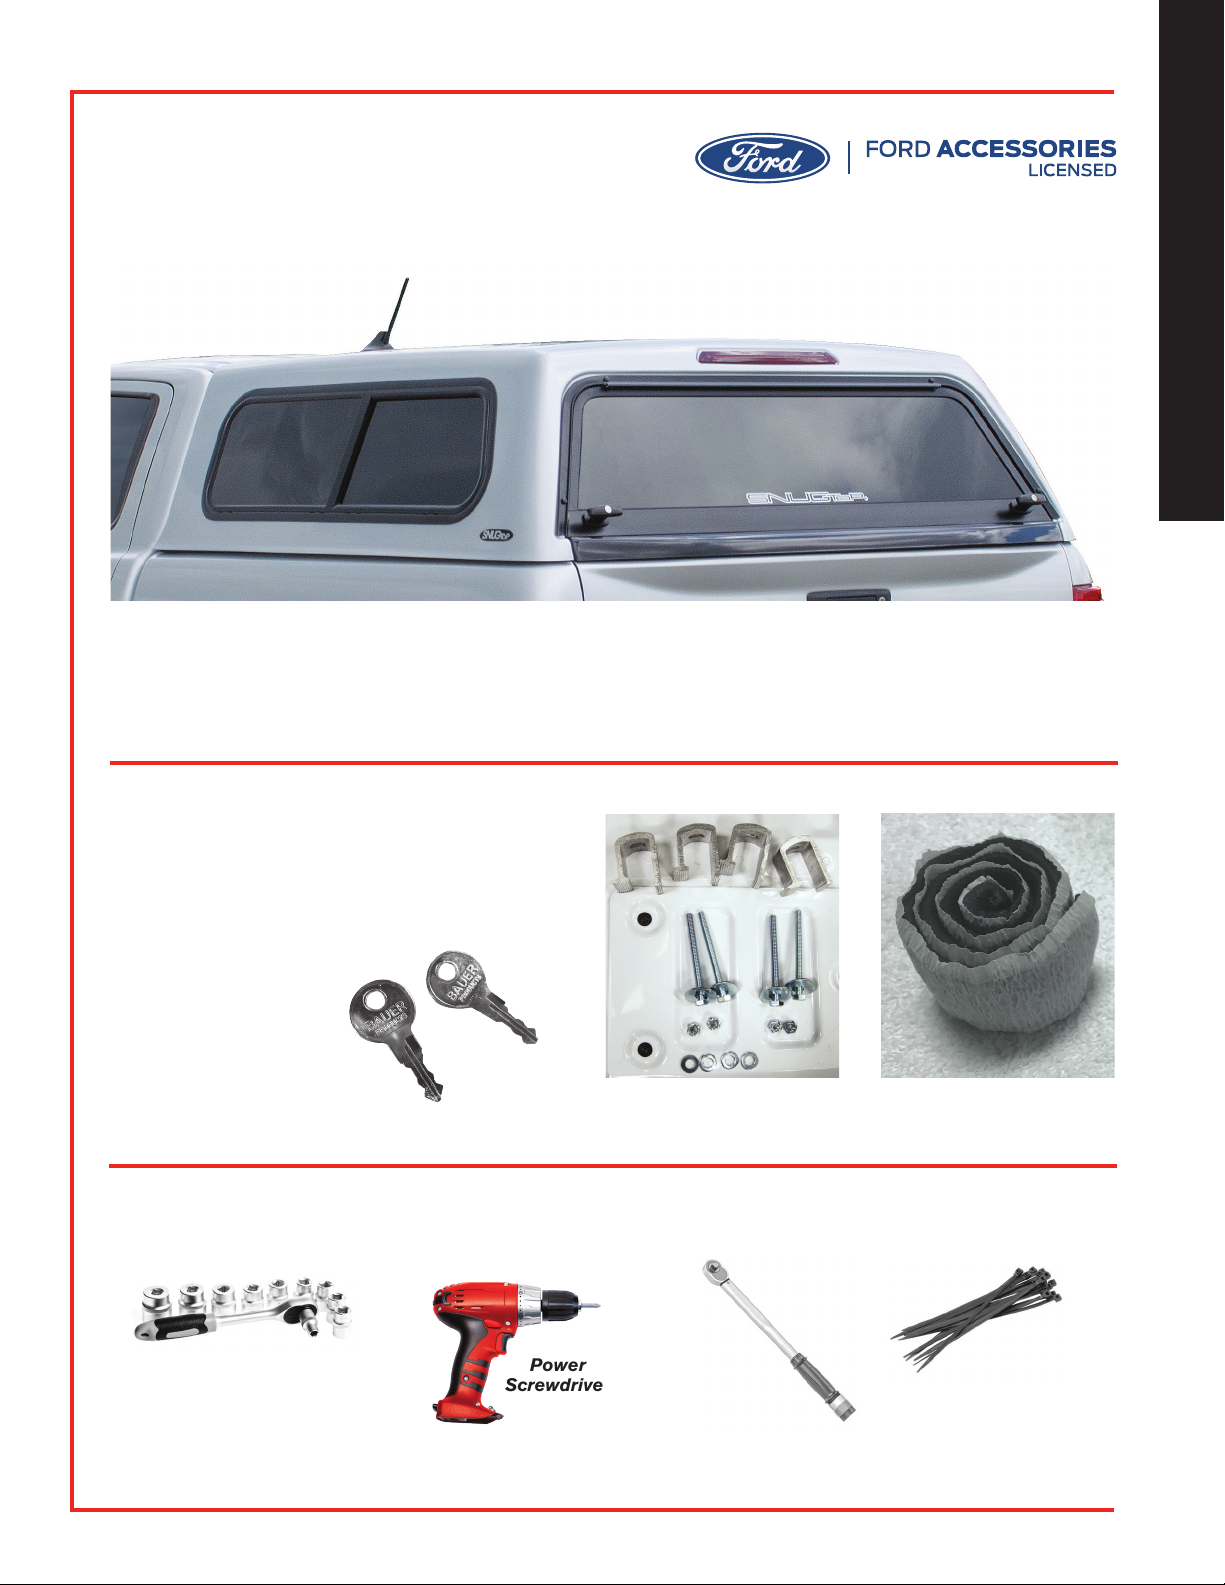
CHECKLIST:
q Keys
q (4) Clamps, Bolts, Nuts,
and Washers
q Putty/Butyl Tape
q Wiring Harness
(Not shown)
SNUGTOP CH CAP COMPONENTS
UNPACK COMPONENTS AND INSPECT FOR
MISSING OR DAMAGED ITEMS
PLEASE SELECT ONE
q 5’ SNUGTOP CH CAP q 6’ SNUGTOP CH CAP
TOOLS NEEDED
1/2” Box End Wrench
Socket Wrench
1/2” Socket
Clamps, Bolts, Nuts and
Washers Putty/Butyl Tape
Power
Screwdriver 6” Nylon
Cable Ties
Torque
Wrench
4
ENGLISH
INSTALLATION INSTRUCTIONS
OPEN THE TRUCK TAILGATE AND CLEAN TRUCK BED RAIL
BEFORE YOU INSTALL:
• We recommend using safety
glasses during installation.
• Keep truck tailgate down at all times
during assembly.
• Cap installation or removal requires
four people or use of a forklift.
• Read all instructions thoroughly
before installing cap.
INSTALLING CAP
(FOUR PEOPLE OR
FORKLIFT REQUIRED)
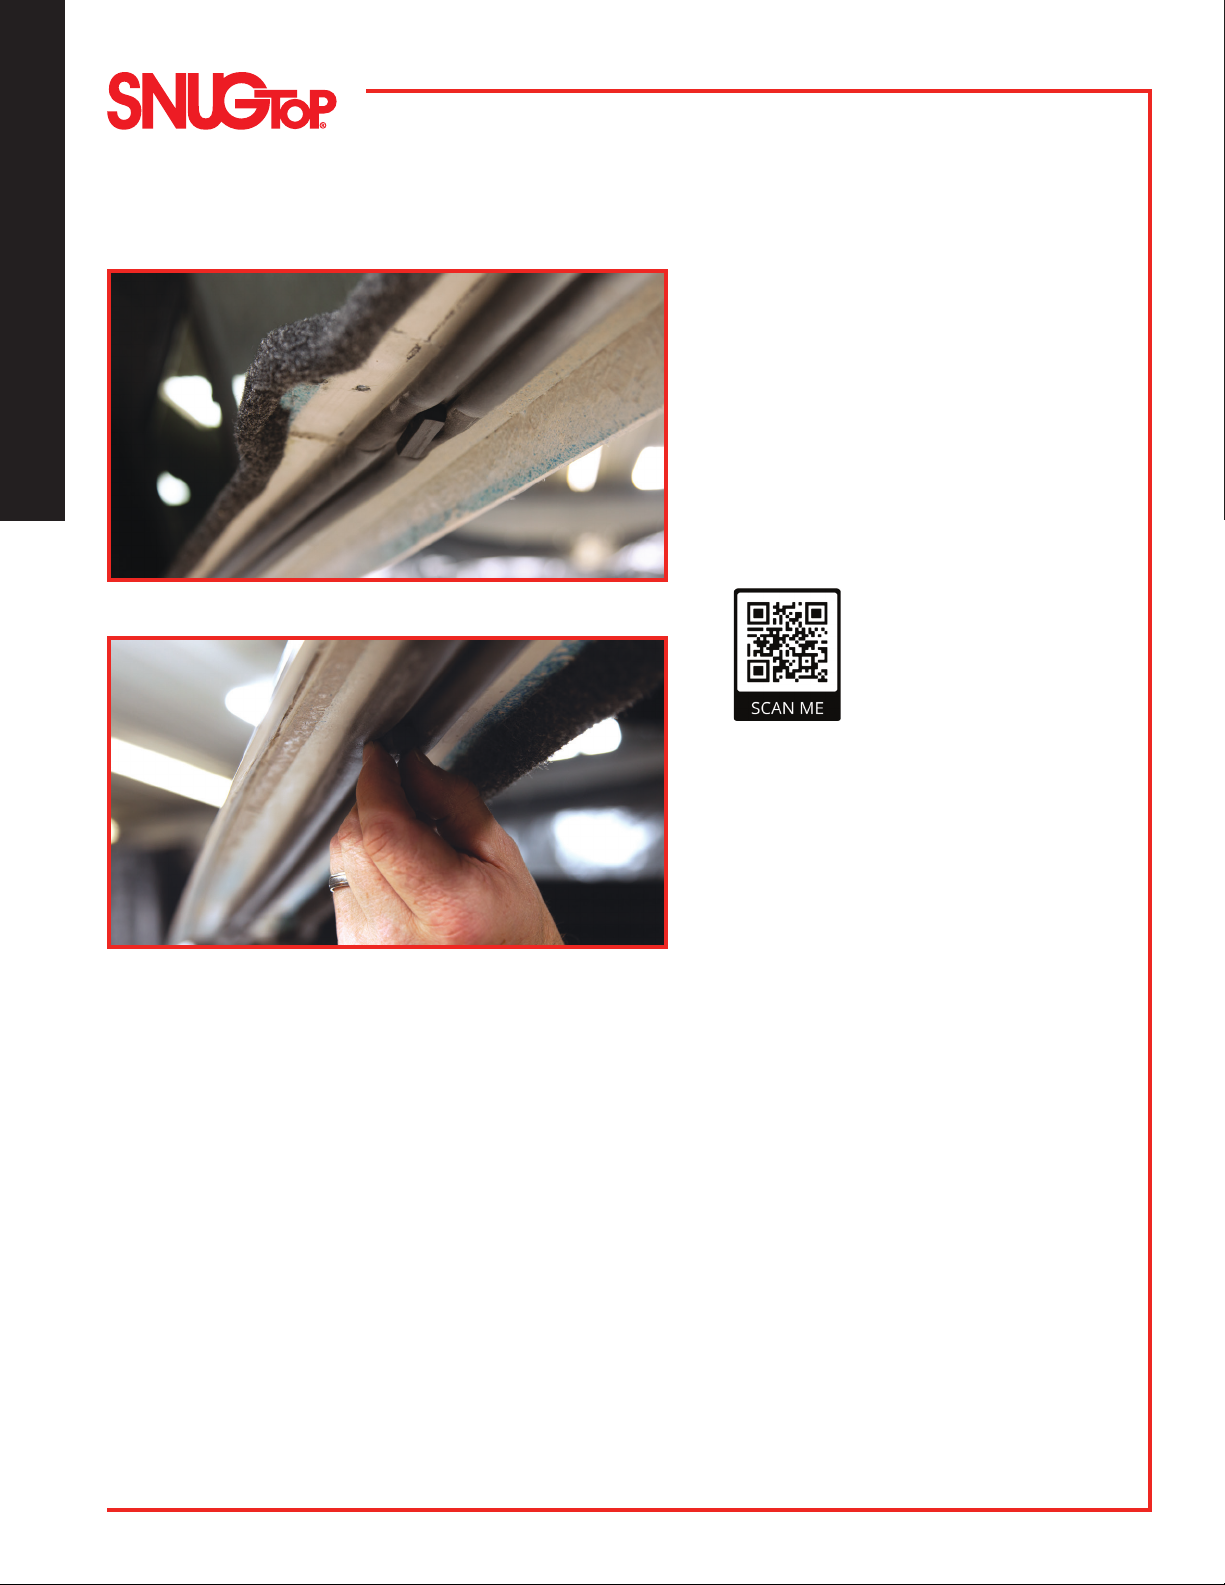
1. Clean bedrails, top of bulkhead, rear
truck window and front window of
cap with 50/50 isopropyl alcohol
and a clean cloth.
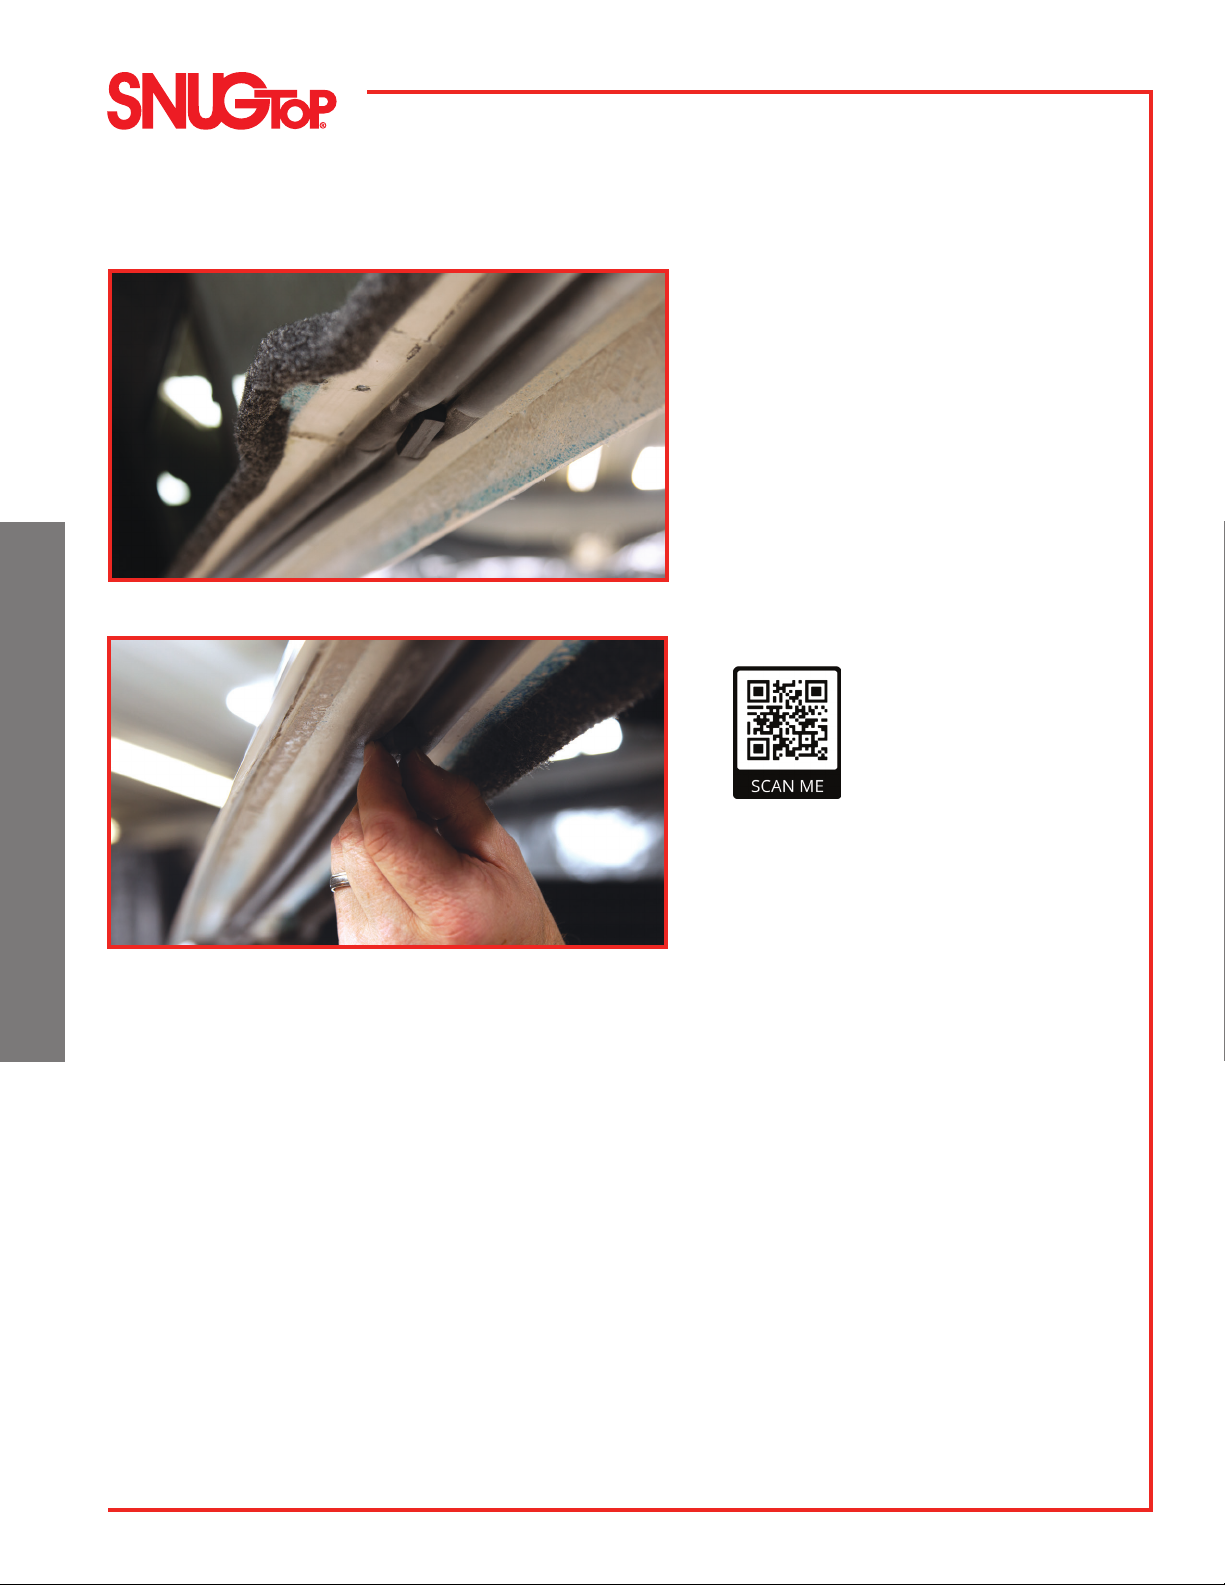
2. Remove all spacers from both sides
tucked into the bulb seal, located on
the under side of the cap sill, if still
present.
Spacer position, shown close-up, should be removed.
Remove (4) spacers tucked into the bulb seal, on the underside
of the cap sill.
Scan to See
Installation
Videos
5
ENGLISHENGLISH
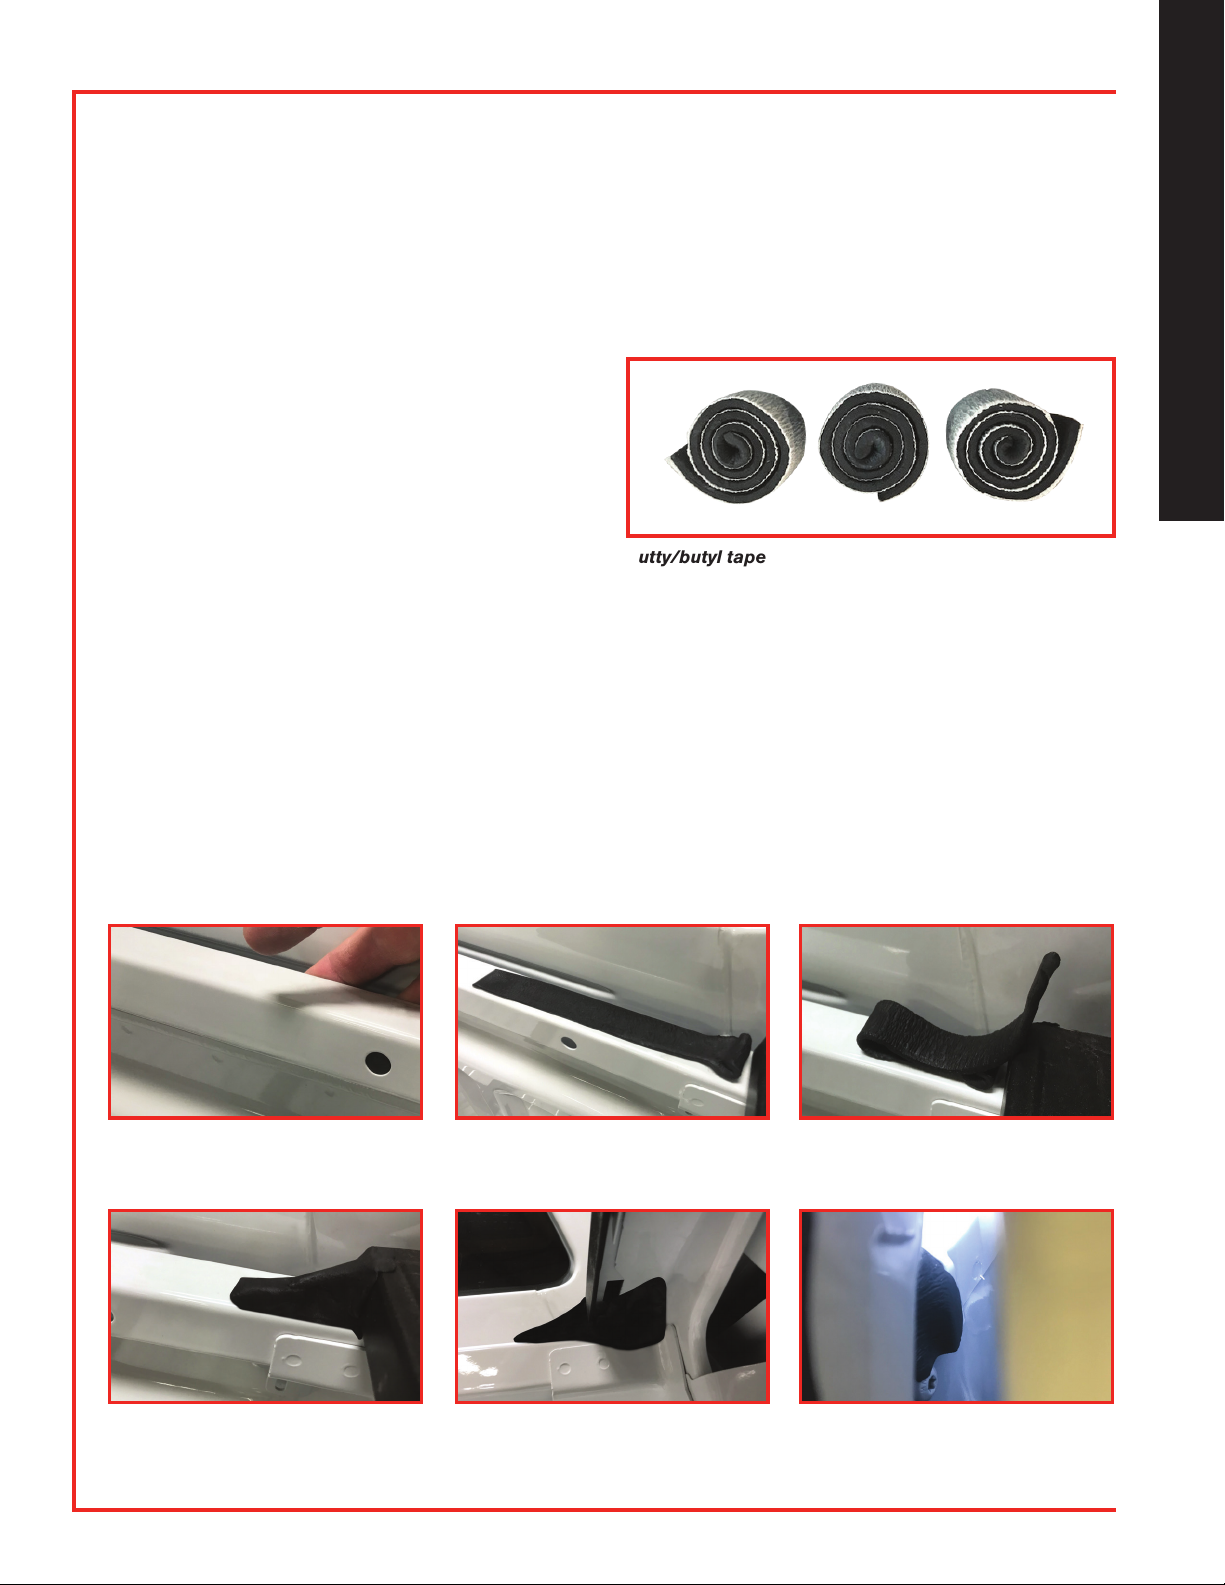
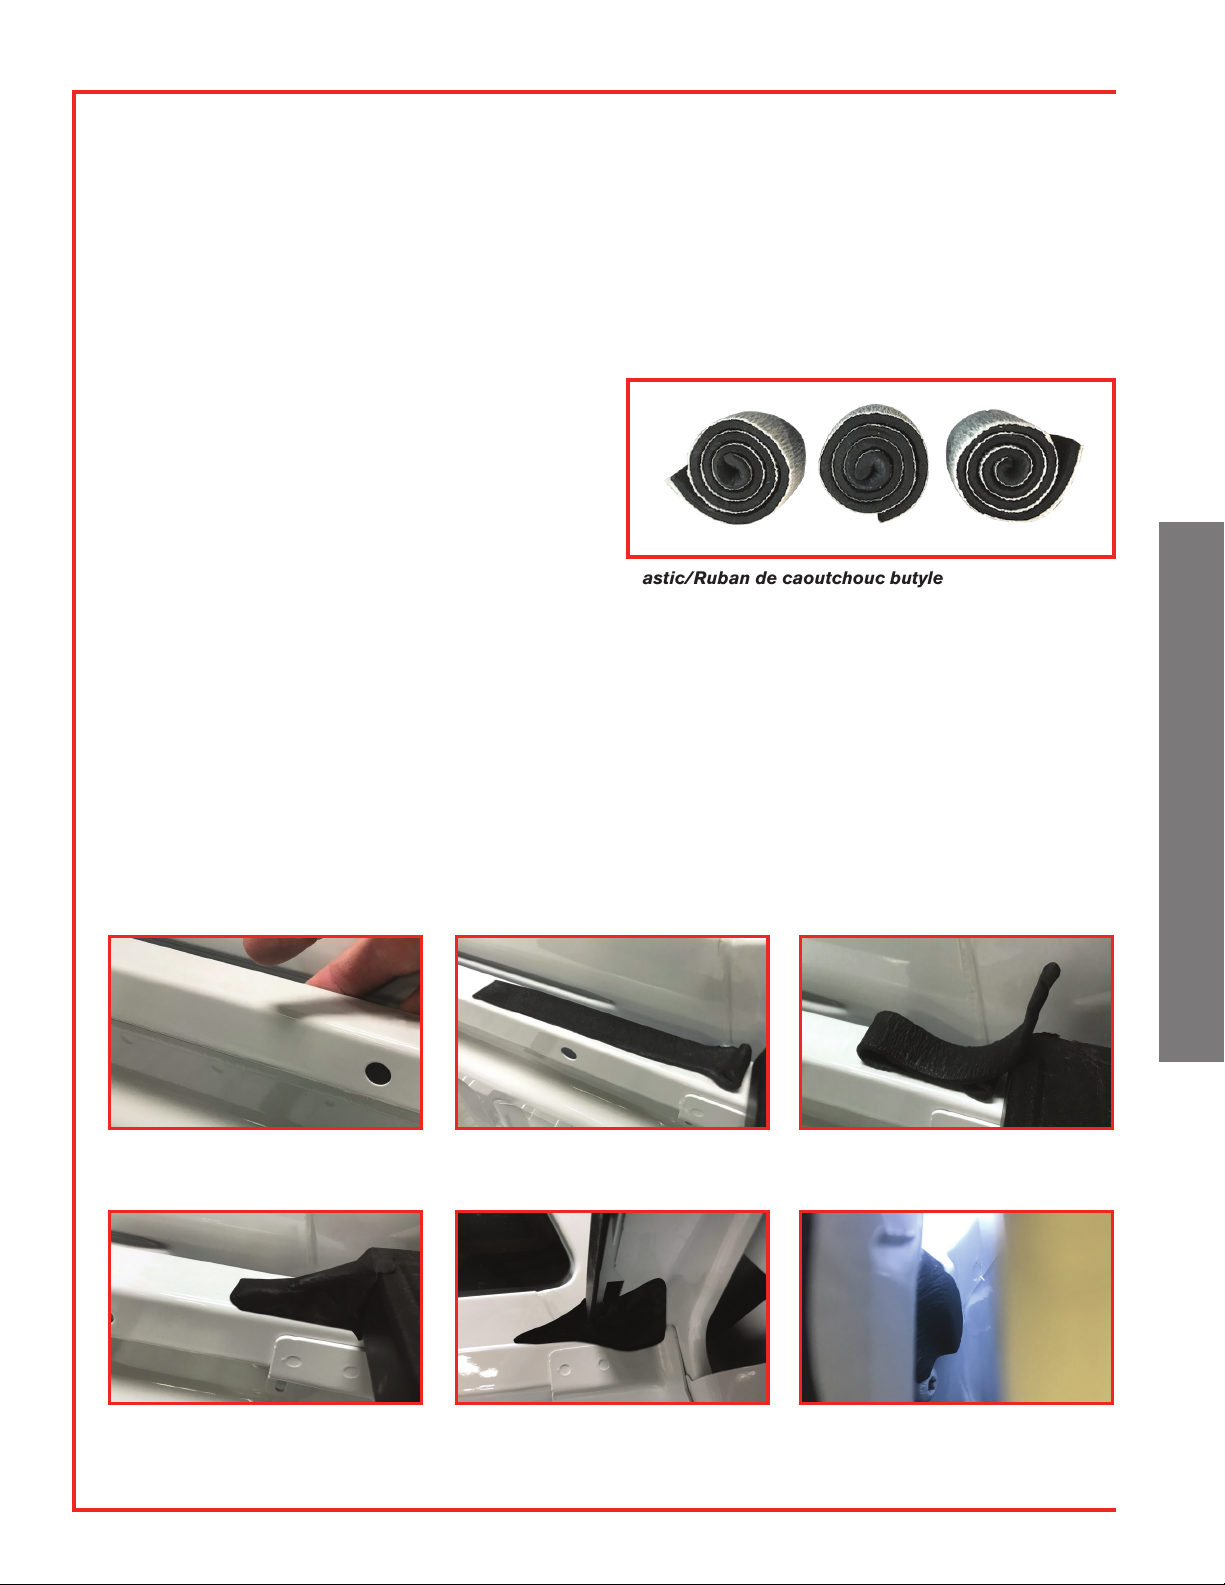
INSTALLING GAP FILLER
THE FORD RANGER TRUCK BED HAS A GAP BETWEEN THE SIDE PLASTIC
BED RAIL CAPS AND THE FRONT BULKHEAD
Here is a solution tested by the Truck Accessories Group Engineering and Technical Support
teams. Steps should be followed on both sides of the vehicle.
MATERIALS REQUIRED
q As Needed: 50/50 Isopropyl Alcohol and
Clean Cloth / Alcohol Prep Pad(s)
INSTALLATION STEPS
1. Locate gaps in the bed.
2. Clean top surfaces of bed and bed caps.
3. Cut putty/butyl tape into a 6” piece and
place on front bulkhead.
4. Fold putty/butyl tape into thirds, approximately 2” from bed cap.
5. Compact putty/butyl tape and create a transition from bed cap to front rail.
6. Cut another piece of putty/butyl tape 6” long and fold in half.
7. Compact putty/butyl tape and create a transition from bed cap to front rail.
8. Cut a 1” piece of putty/butyl tape and place on outside of bed to cover the hole in
inside of the rail.
9. Locate gap in the front of the bed.
10. Cut and place 2” piece of putty/butyl tape over gap.
Clean top surfaces of bed and bed
caps. Cut putty/butyl tape into a 6” piece
and place on front bulkhead. Fold putty/butyl tape into thirds,
approximately 2” from bed cap.
Compact putty/butyl tape and create a transition from bed cap to front rail. Locate gap in front of bed. Cut and
place a 2” piece of putty/butyl tape
over gap.
Putty/butyl tape

6
ENGLISHENGLISH
1. Open truck tailgate and rear door of cap.
2. Using a forklift or (4) four people, place the cap
on the truck. (Make sure not to damage the
truck cab or bed.)
3. Square cap on truck bed from side to side and
flush to front of truck bed. Cap should overhang
the rear of the truck bed by 7/16”. Align cap door
opening with truck tailgate opening.
4. Close the truck tailgate and cap rear door.
Check fit and function of door, handle, and seals.
5. Adjust as necessary for proper fit.
PLACING THE CAP ON THE TRUCK
Adjust as necessary
for proper fit.
Open truck tailgate and
rear door of cap, using a
forklift or (4) people place
the cap on the truck.
7
ENGLISHENGLISH
Torque
Wrench
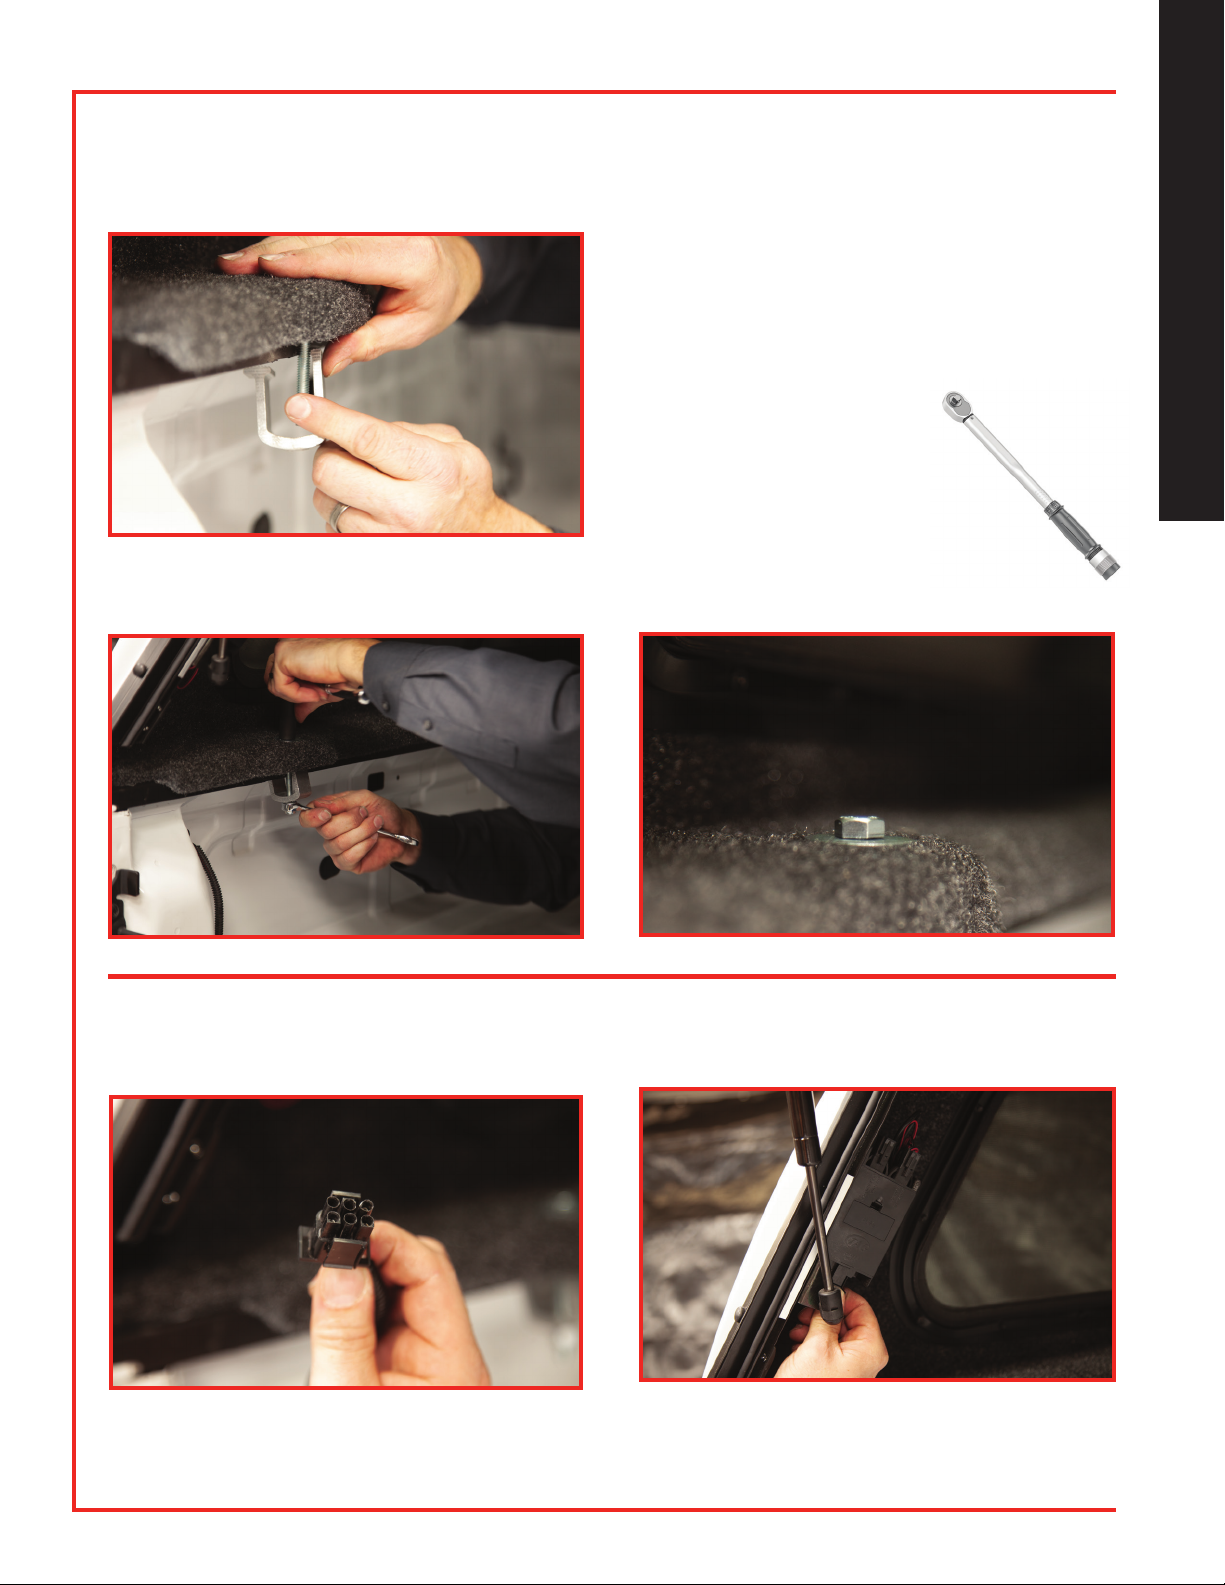
SECURE CAP TO TRUCK
1. Insert the clamp bolt with washer through
the holes in the cap sill. Slide the clamp
up from the bottom. Thread the nut and
washer onto the bolt.
2. Repeat in (4) locations.
3. Tighten clamps with a
Torque Wrench to
150 +/- 10 inch-lbs.
(12.5 +/- 0.8 foot-lbs.)
4. Clamps should be checked
and/or re-torqued periodically,
due to normal use.
MAKING ELECTRICAL CONNECTIONS
1. Standard Harness – See page 8.
Place clamp bolt with washer through J-Bolt pockets
in cap. Align J-Clamp as shown. Insert washer and
nut, then tighten bolt. Repeat at all (4) locations.
8
ENGLISHENGLISH
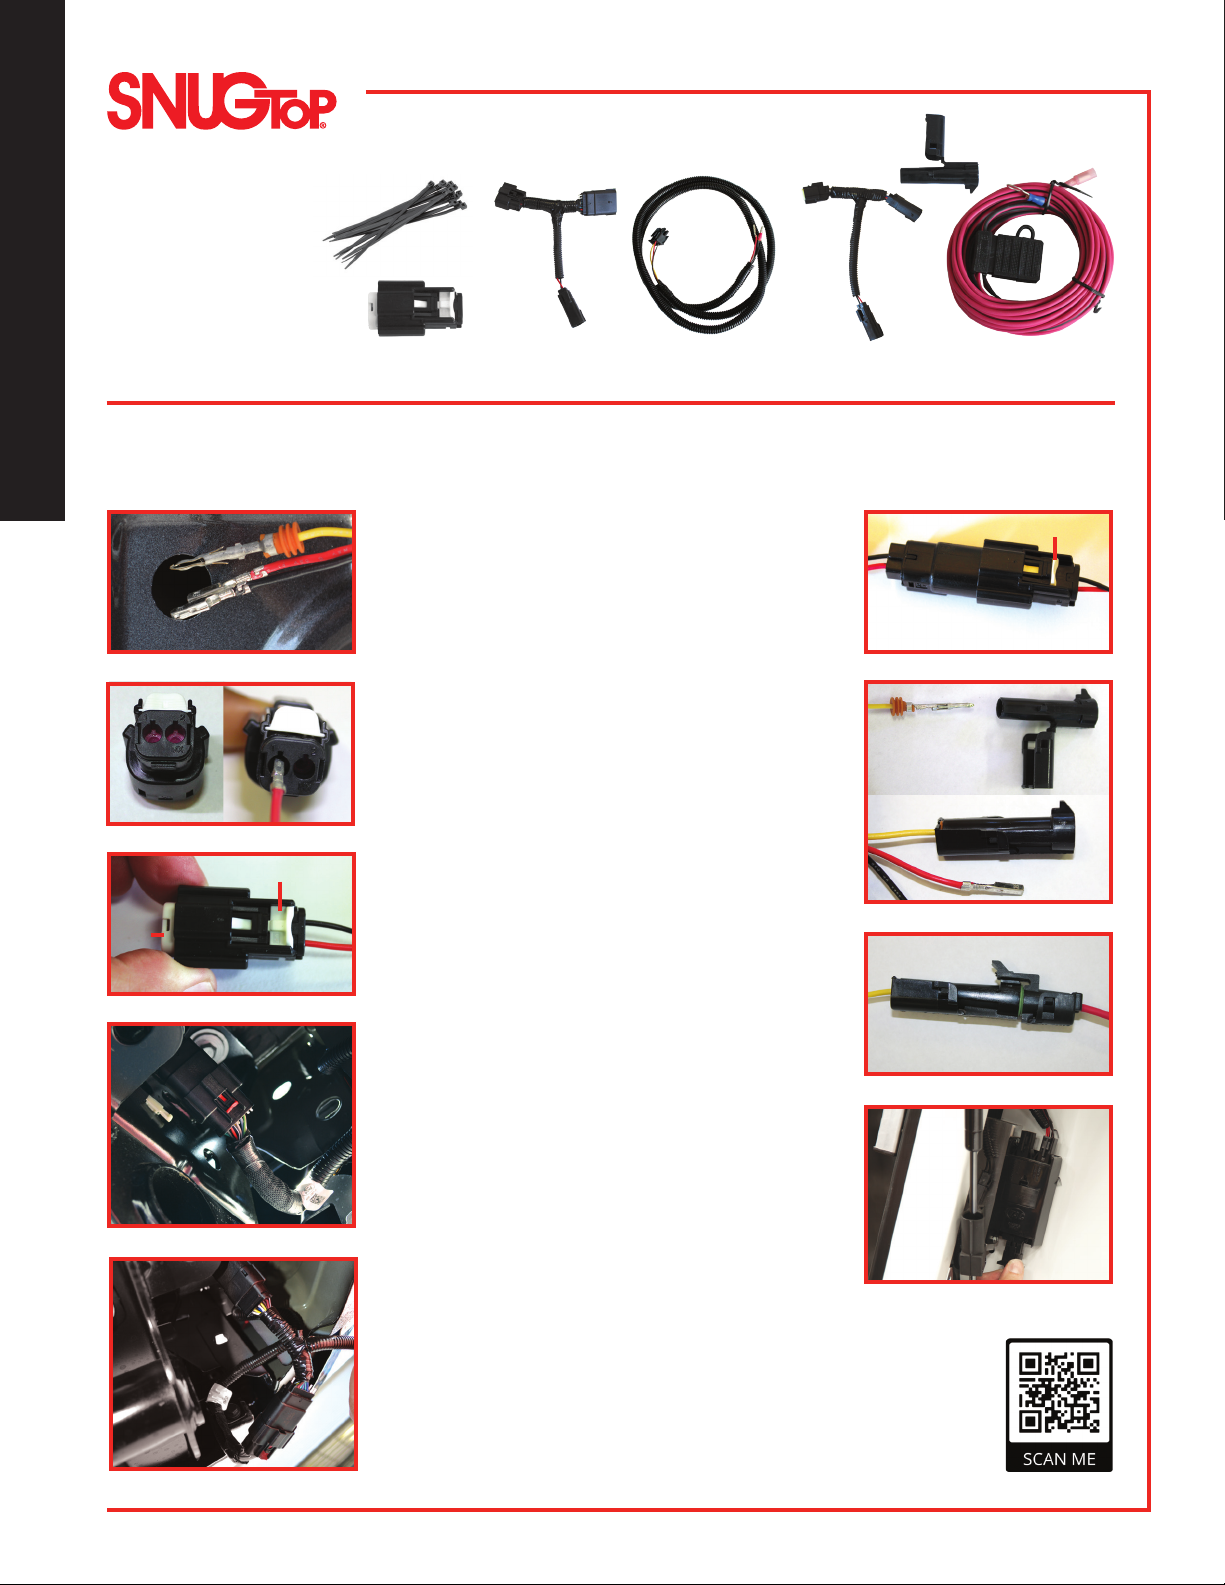
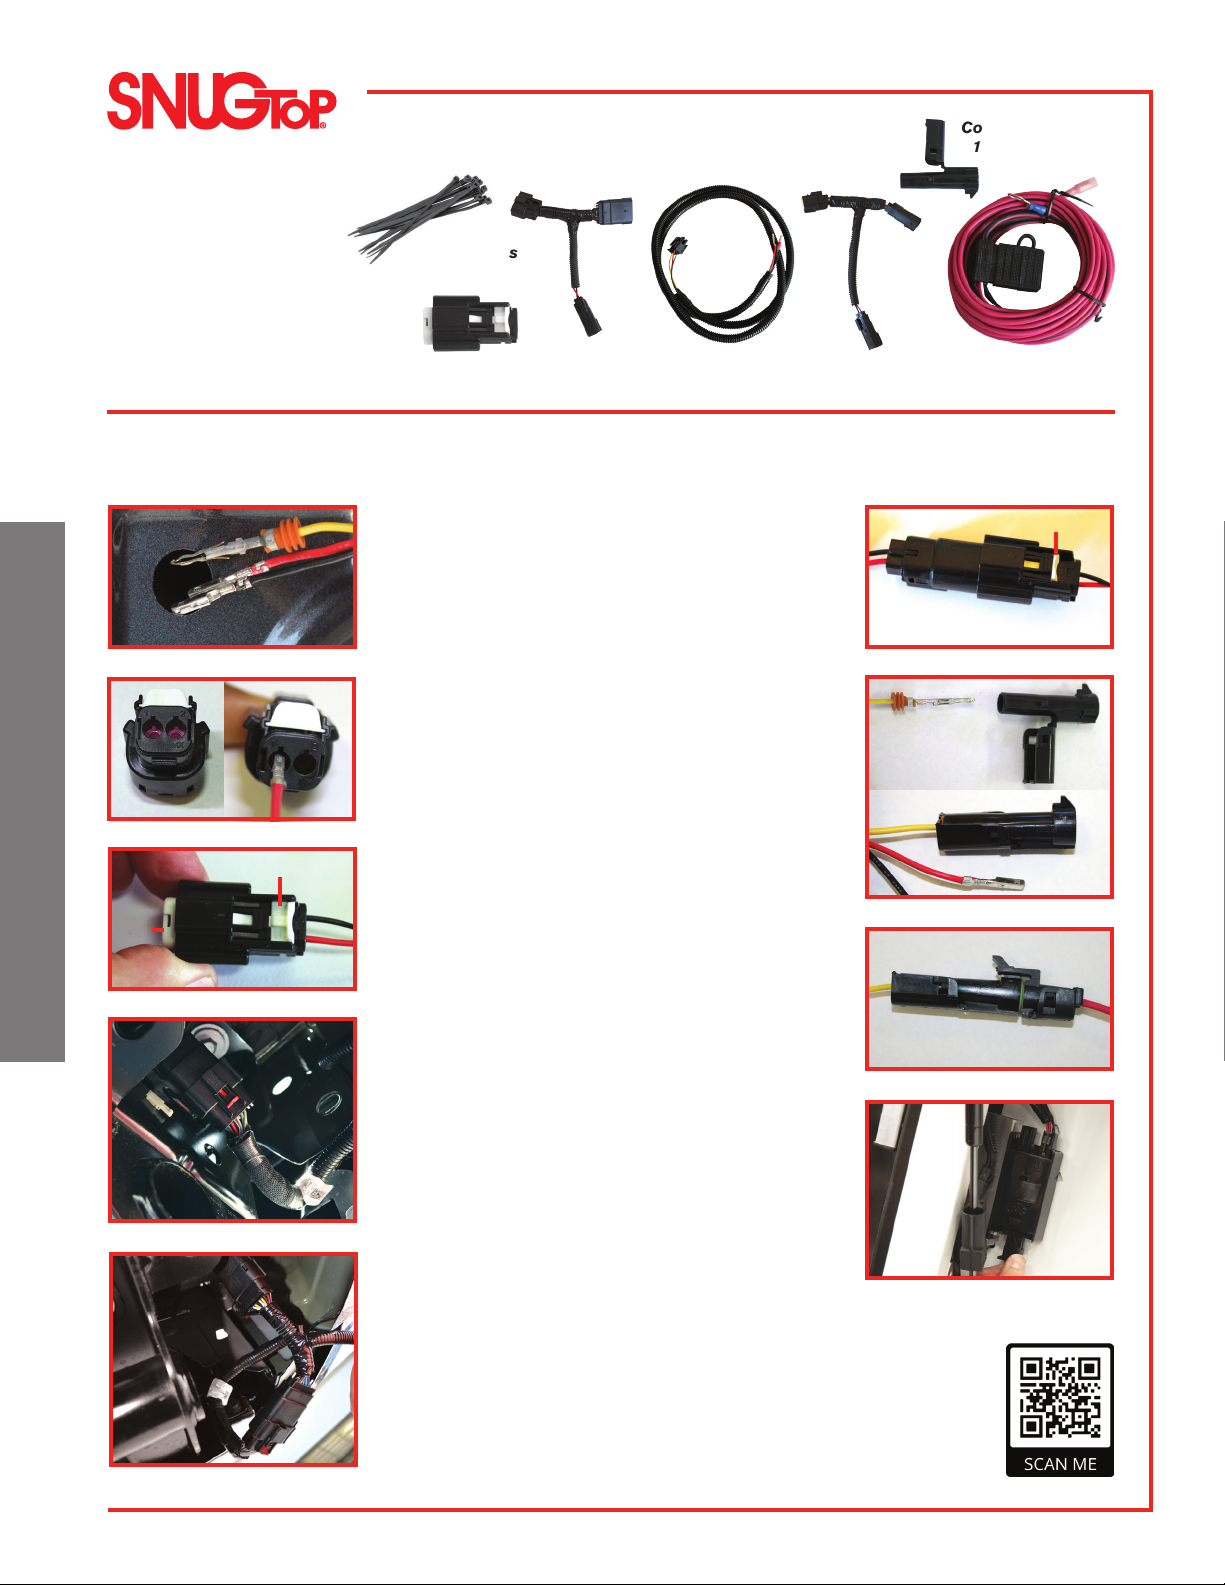
WIRING INSTRUCTIONS FORD RANGER SNUGTOP CH
PLEASE FOLLOW THESE STEPS IN PROPER SEQUENCE
WIRING HARNESS COMPONENTS
CHECKLIST
q 6” Nylon Cable Ties
q 16-Pin T-Harness
q 6-Pin T-Harness
q Fuse Box Harness
q 2-Pin Connector
q 1-Pin Connector
q Battery Harness
6” Nylon
Cable Ties
Battery
Harness
16-Pin
T-Harness
Fuse Box
Harness
2-Pin
Connector
6-Pin
T-Harness
1-Pin
Connector
Fig. 3
Fig. 1
Fig. 2
TPA
CPA
Fig. 4
Fig. 5
Fig. 6
Fig. 8
Fig. 9
CPA
Fig. 7
1. Insert the separate end of the fuse box harness through
the access hole on the driver side rear of the truck bed,
until the harness extends below the truck fender.
See Fig. 1.
2. Assemble the 2-pin connector to the fuse box harness.
See Fig. 2. Insert the red wire into pin position 1,
aligning the key slot in the connector with the key on
the terminal. Insert until it clicks. Insert black wire into
position 2, following the same steps as described
above. Secure wires to the connector by pushing the
TPA into the connector. See Fig. 3.
3. From under the truck on the drivers side, between the
rear tire and tail light, locate and disconnect either
the 16-pin BLIS connector, or the 6-pin NON-BLIS
connector. See Fig. 4. Insert and connect the proper
T-harness provided. See Fig. 5. Secure T-harness to
truck frame using zip ties provided. No wires should
be visible or hanging below the truck.
4. Insert the 2-pin connector end of the T-harness into
the 2-pin connector of the fuse box harness. See
Fig. 6. Lock harnesses to connector by pushing the
CPA forward.
5. Insert the third wire in the fuse box harness into the
smaller diameter end of the 1-pin connector. The water
seal should be fully seated into the connector. See
Fig. 7. Rotate the locking feature of the connector
until it secures the terminal in the connector.
6. Insert the battery harness terminal into the opposite
end of the 1-pin connector until it clicks. See Fig. 8.
7. Route the battery wire harness to the truck battery,
following the main truck wiring harness. Secure the
battery harness with zip ties as you go. Connect the
ring terminal to the positive terminal on the truck battery.
8. Pull fuse box harness back into the truck bed, inside
the cap. Insert the fuse box harness connector into the
truck bed fuse box. See Fig. 9. Push remaining fuse box
harness wire back into access hole in truck bed. Dress
harness inside cap. Secure harness under truck using
zip ties provided. No wires should be visible or hanging
below the truck.
9. Check for proper functions of truck and cap lights.
The unused T-harness can be discarded.
Scan to
See Wiring
Installation
Video

3
ENGLISH
9
ENGLISH
SERVICE PARTS SNUGTOP CH CAP
5 FT. SNUGTOP CH FIBERGLASS CAP
PART # DESCRIPTION
213132 FRONT WINDOW
213133 DRIVER SIDE WINDOW
213134 PASSENGER SIDE WINDOW
213135 REAR DOOR ASSEMBLY
213136 BULB SEAL
213137 CLAMP
213138 FUSE BOX
213103 20” TUBE LIGHT
213079 DOOR SKIRT
69747 DOOR SKIRT FLAP SEAL
716346 THIRD BRAKE LIGHT
6 FT. SNUGTOP CH FIBERGLASS CAP
PART # DESCRIPTION
213132 FRONT WINDOW
213273 DRIVER SIDE WINDOW
213274 PASSENGER SIDE WINDOW
213135 REAR DOOR ASSEMBLY
213136 BULB SEAL
213137 CLAMP
213138 FUSE BOX
213103 20” TUBE LIGHT
213079 DOOR SKIRT
69747 DOOR SKIRT FLAP SEAL
716346 THIRD BRAKE LIGHT

10
ENGLISHENGLISH
LIMITED WARRANTY
SNUGTOP CAPS BY TRUCK ACCESSORIES GROUP, LLC
All Ford part numbers provided by Truck Accessories Group, LLC are warranted to be free from
defects in materials or workmanship on products properly installed per the installation instructions
provided with the product. This warranty covers repair or replacement of any defective product at
no charge during the applicable warranty period listed below. Labor for replacement or service of
defective product is not paid or reimbursed by Truck Accessories Group, LLC.
WARRANTY PERIOD
USA
Product which appears on New Vehicle Monroney Label (window sticker)
Coverage which matches new vehicle warranty – Ford - 3 years or 36,000 miles whichever
comes first; Lincoln 4 years or 50,000 miles whichever comes first.
Part purchased and installed during or after the original vehicle warranty
Whichever of the following options provides the greater benefit to the customer:
1) 2 years / unlimited miles
or
2) The remainder of the new vehicle warranty
OUTSIDE USA
Product which appears on New Vehicle Monroney Label (window sticker)
Coverage which matches new vehicle warranty – Ford - 3 years or 60,000 kilometers whichever
comes first; Lincoln 4 years or 80,000 km whichever comes first
Part purchased and installed during or after the original vehicle warranty
Whichever of the following options provides the greater benefit to the customer:
1) 2 years / unlimited kilometers
or
2) The remainder of the new vehicle warranty
This limited warranty does not cover any damage, defect or malfunction caused by misuse, abuse,
accident, improper installation, modification or improper or lack of maintenance. Incidental and
consequential damages are not recoverable under this warranty. This warranty offers you specific
legal rights. You may have additional or other rights as which vary from state to state or province
to province.
If you experience a warranty issue with this product please visit your Ford Dealer. If the repair is
covered by the warranty above and completed by the dealership, labor is also covered by Ford –
Ford Warranty and Policy – Section 3.
Please note that Truck Accessories Group, LLC has replacement component parts available to
assist consumers and dealers to resolve warranty and non-warranty issues as quickly as possible.
NOTE TO DEALER
Ford Dealers should contact Truck Accessories Group, LLC by email:
For technical assistance call 1-844-756-4247
NOTE TO OWNER
Ford truck owners should contact their Ford Dealer with any questions.

11
ENGLISHENGLISH
Your SnugTop brand product has been finished with premium-grade automotive paint.
Proper maintenance of this new finish will be rewarded with a long-lasting beautiful
appearance. The following guidelines are provided for you:
• Avoid wiping or waxing your cap for 90 days and avoid commercial or high-pressure car
washes for 90 days. This gives the fresh paint finish the maximum time to cure completely.
• Do not wipe your cap with a dry cloth.
• Do not spill chemicals such as anti-freeze or coolant on the finish.
• Do not scrape ice or snow from the finish.
• Do not use polishes not formulated for clear-coat finishes.
• Do not add exterior wraps* or stickers until the cap has been installed for 48 hours.
• After 90 days, wash and wax your cap regularly with a product designed to preserve and protect
painted finish. Ask your Ford Dealer for product recommendations. Make sure to wash your cap
in a shaded area using cool water and a mild detergent.
• Do not subject the windows of your cap to the direct force of high-pressure commercial car
washes or pressure washers. Windows are not warranted against leaks under the pressure of
such equipment.
*Exterior wraps and stickers applied incorrectly may void paint warranty.
MAINTENANCE RECOMMENDATIONS
Regular maintenance will keep your truck cap working well. Your Ford Dealer would be happy
to help you for a nominal fee
1. Keep window tracks free of debris. Lubricate the sliding portions of your windows monthly with
an oil-based lubricant. Lubricate door locks with oil based lubricant like WD40. Do not use
silicone or petroleum distillate (WD40, etc.) spray lubricant on gas props.
Caution: Do not get oil based lubricant near any of the cap seals.
2. Check J-Bolt clamp for tightness monthly. Torque clamps to 150 +/- 10 inch-lbs.,
(12.5 +/- 0.8 foot-lbs.).
J-Bolt clamps are suitable for securing caps when properly installed.
Ask your Ford Dealer if you have any questions about the attachment process.
IMPORTANT SAFETY TIPS
• Never drive your vehicle with the cap door open.
• Do not use the product for passenger occupancy while the vehicle is in motion or while the
engine is running.
• Contact your auto insurance company to make them aware you have added a truck cap to
your vehicle.
CARING FOR YOUR TRUCK CAP
TAKE A MOMENT TO REVIEW THE FOLLOWING CARE AND MAINTENANCE
INSTRUCTIONS TO KEEP YOUR SNUGTOP PRODUCT LOOKING ITS BEST
AND PERFORMING SAFELY

12
FRANÇAIS
TABLE DES MATIÈRES
CONSERVER CETTE NOTICE DANS UN ENDROIT PRATIQUE
POUR CONSULTATION FUTURE
Composants de la boîte de camionnette Snugtop CH .............................................................................13
Installation de la boîte de camionnette ...........................................................................................................14
Pose du mastic.....................................................................................................................................................15
Mise en place de la boîte sur la camionnette................................................................................................16
Fixation de la boîte à la camionnette ...............................................................................................................17
Connexion électrique ................................................................................................................................17 – 18
Pièces de rechange – Boîte de camionnette CH en fibre de verre.........................................................19
Garantie limitée ....................................................................................................................................................20
Entretien de votre boîte de camionnette ........................................................................................................21

13
FRANÇAIS
LISTE DE CONTRÔLE
q Clés
q (4) étriers, boulons,
écrous
et rondelles
q Mastic/Ruban de
caoutchouc butyle
q Faisceau de câblage
(non montré)
COMPOSANTS DE LA BOÎTE DE
CAMIONNETTE SNUGTOP CH
DÉBALLER LES COMPOSANTS; VÉRIFIER QU’ILS SONT INTACTS ET QU’IL
N’EN MANQUE AUCUN
SÉLECTIONNER LA BOÎTE DE CAMIONNETTE
q BOÎTE SNUGTOP CH 152 CM q BOÎTE SNUGTOP CH 183 CM
TOOLS NEEDED
Clé polygonale 1/2 po
Clé à douille
Douille 1/2 po
Étriers, boulons, écrous et
rondelles Mastic/Ruban de
caoutchouc butyle
Tournevis
électrique Attaches
autobloquantes
en nylon 15 cm
Clé
dynamométrique
14
FRANÇAIS
REMARQUES PRÉLIMINAIRES :
• Nous recommandons de porter
des lunettes de sécurité pendant
l’installation.
• Laisser le hayon ouvert pendant le
montage.
• Quatre personnes ou un chariot
à fourche sont nécessaires à la
pose ou à la dépose de la boîte de
camionnette.
• Lire attentivement toutes les
instructions avant d’installer la boîte.
INSTALLATION DE LA BOÎTE
DE CAMIONNETTE
(QUATRE PERSONNE OU
UN CHARIOT À FOURCHE
NÉCESSAIRES)
1. Avec un linge propre imbibé d’une
solution d’alcool isopropylique
50/50, nettoyer les rails de caisse,
le rebord de la paroi avant, la lunette
arrière de la cabine et la fenêtre
avant de la boîte.
2. Le cas échéant, retirer les entretoises
de maintien du joint à bulbe (sous le
rebord de la boîte).
NOTICE D’INSTALLATION
OUVRIR LE HAYON, PUIS NETTOYER LES RAILS DE CAISSE
Position d’une entretoise (en gros plan), qui doit être enlevée.
Enlever les (4) entretoises logées dans le joint à bulbe, sous le
rebord de la boîte.
Scanner
pour regarder
les vidéos
d’installation
15
FRANÇAIS
POSE DU MASTIC
LA CAISSE DU FORD RANGER A DES VIDES (ENTRE LES PROTÈGE-REBORDS LATÉRAUX
PLASTIQUE ET LA PAROI AVANT) QU’IL FAUT BOUCHER.
Voici une solution éprouvée par les équipes de Truck Accessories Group Engineering et de
l’assistance technique. Les étapes doivent être suivies de chaque côté du véhicule.
MATÉRIEL REQUIS
q Selon le besoin : Solution d’alcool
isopropylique 50/50 et linge
propre/tampon(s) alcoolisé(s)
ÉTAPES D’INSTALLATION
1. Repérer les vides dans la caisse.
2. Nettoyer le rebord de caisse avant et les
protège-rebords.
3. Placer un morceau de 15 cm de mastic sur le rebord avant.
4. Plier le morceau en trois, à environ 5 cm du protège-rebord.
5. Presser le morceau et colmater le passage entre le protège-rebord et le rail avant.
6. Couper un autre morceau de mastic, soit 15 cm, puis le plier en 2.
7. Presser le morceau et colmater le passage entre le protège-rebord et le rail avant.
8. Boucher le trou de la paroi avant avec un morceau de 2,5 cm de mastic.
9. Repérer le vide en avant de la caisse.
10. Remplir le vide avec un morceau de mastic de 5 cm.
Nettoyer le rebord de caisse avant
et les protège-rebords. Placer un morceau de 15 cm de
mastic sur le rebord avant. Plier le morceau en trois, à environ
5 cm du protège-rebord.
Presser le morceau et colmater le passage entre le protège-rebord et le
rail avant.
Repérer l’espace vide en avant de
la caisse. Remplir le vide avec un
morceau de mastic de 5 cm.
Mastic/Ruban de caoutchouc butyle
16
FRANÇAIS
1. Ouvrir le hayon de la camionnette et la porte
arrière de la boîte.
2. Placer la boîte sur la caisse avec un chariot
à fourche ou (4) personnes. (Veiller à ne pas
endommager la cabine ou la caisse.)
3. Centrer la boîte sur la caisse d’un côté à l’autre et
en plein sur le rebord avant. La boîte doit déborder
de 1 cm l’arrière de la caisse. Aligner l’ouverture
de la porte de la boîte sur l’ouverture du hayon.
4. Fermer le hayon et la porte de la boîte.
Vérifier l’alignement et le jeu de la porte, des
poignées et des joints.
5. Rectifier au besoin pour bien aligner la porte sur le
hayon.
MISE EN PLACE DE LA BOÎTE SUR LA CAMIONNETTE
Rectifier au besoin pour
bien aligner la porte sur
le hayon.
Ouvrir le hayon de la
camionnette et la porte
arrière de la boîte; placer
celle-ci sur la caisse avec
un chariot à fourche ou (4)
personnes.

17
FRANÇAIS
Clé
dynamométrique
FIXATION DE LA BOÎTE À LA CAMIONNETTE
1. Insérer le boulon d’étrier avec la rondelle
dans le trou du rebord de la boîte. Glisser
l’étrier sur le boulon par en bas. Enfiler la
rondelle puis l’écrou.
2. Répéter le processus aux
(4) emplacements.
3. Serrer les étriers avec une clé
dynamométrique à un couple de
150 po-lb [+/- 10].
(17 Nm [+/- 1]).
4. Vérifier et resserrer les étriers
périodiquement (utilisation normale).
CONNEXION ÉLECTRIQUE
1. Faisceau classique – Cf. page 18.
Insérer le boulon d’étrier avec la rondelle dans
le logement d’étrier du rebord. Aligner l’étrier tel
qu’illustré. Enfiler la rondelle et l’écrou, puis serrer
le boulon. Répéter le processus aux
(4) emplacements.
18
FRANÇAIS
CÂBLAGE DU SNUGTOP CH AU FORD RANGER
SUIVRE CES ÉTAPES DANS L’ORDRE
COMPOSANTS DE FAISCEAUX DE CÂBLAGE
Attaches
autobloquantes
en nylon 15 cm
Faisceau
de batterie
Faisceau en T
16 broches
Faisceau du
boîtier à fusibles
Connecteur
2 broche
Faisceau en T
6 broches
Connecteur
1 broche
Fig. 3
Fig. 1
Fig. 2
TPA
CPA
Fig. 4
Fig. 5
Fig. 6
Fig. 8
Fig. 9
CPA
Fig. 7
1. Introduire les fils du faisceau du boîtier à fusibles dans
le trou d’accès arrière de la caisse (côté conducteur);
faire sortir les fils par le bas de l’aile de la camionnette.
Cf. Fig. 1.
2. Brancher le connecteur 2 broches sur le faisceau
du boîtier à fusibles (cf. Fig. 2). Aligner la rainure du
connecteur sur la clavette de borne, puis insérer le fil
rouge dans la broche de position 1 et l’enclencher;
insérer le fil noir, position 2, selon le même processus
ci-dessus. Pousser le TPA (dispositif d’assurance de
position de borne) pour bloquer les fils. Cf. Fig. 3.
3. Sous la camionnette côté conducteur, entre le pneu et
le feu arrière, repérer puis débrancher le connecteur
BLIS 16 broches ou le connecteur NON-BLIS 6
broches (BLIS : Système de surveillance des angles
morts). Cf. Fig. 4. Insérer et brancher le faisceau en T
pertinent (deux sont fournis). Cf. Fig. 5. Fixer le faisceau
en T au cadre de la camionnette avec les attaches
fournies. Aucun fil ne doit être visible ni pendre sous
la camionnette.
4. Insérer le connecteur 2 broches du faisceau en T dans le
connecteur 2 broches du faisceau du boîtier à fusibles.
Cf. Fig. 6. Pousser le CPA (dispositif d’assurance de
position de connecteur) pour bloquer les fils.
5. Insérer le troisième fil du faisceau du boîtier à fusibles
dans le petit trou du connecteur 1 broche. Le joint
hydraulique doit être parfaitement assis dans le
connecteur. Cf. Fig. 7. Pivoter le dispositif de blocage
du connecteur pour enclencher la borne.
6. Enclencher la borne du faisceau de batterie dans
l’extrémité opposée du connecteur 1 broche. Cf. Fig. 8.
7. Diriger le faisceau de batterie vers la batterie, le long du
faisceau principal de la camionnette. Fixer le faisceau de
batterie avec les attaches au fur et à mesure. Brancher
la cosse sur la borne positive de la batterie.
8. Tirer le faisceau du boîtier à fusibles dans la boîte de
camionnette, puis insérer le connecteur du faisceau dans
le boîtier à fusibles de la caisse. Cf. Fig. 9. Tendre ensuite
les fils du faisceau dans le trou d’accès de la caisse.
Arranger le faisceau dans la boîte. Fixer le faisceau sous
la camionnette avec les attaches fournies. Aucun fil ne
doit être visible ni pendre sous la camionnette.
9. Vérifier le bon fonctionnement des feux de la
camionnette et de la boîte.
Le faisceau en T inutilisé peut être jeté.
Scanner
pour
regarder
la vidéo
d’installation
LISTE DE CONTRÔLE
q Attaches autobloquantes
en nylon 15 cm
q Faisceau en T 16 broches
q Faisceau en T 6 broches
q Faisceau du boîtier à fusibles
q Connecteur 2 broches
q Connecteur 1 broche
q Faisceau de batterie

19
FRANÇAIS
PIÈCES DE RECHANGE BOÎTE DE CAMIONNETTE SNUGTOP CH
BOÎTE DE CAMIONNETTE EN FIBRE DE VERRE SNUGTOP CH 150 CM
CODE-ARTICLE DÉSIGNATION
213132 FENÊTRE AVANT
213133 FENÊTRE LATÉRALE CONDUCTEUR
213134 FENÊTRE LATÉRALE PASSAGER
213135 ENSEMBLE PORTE ARRIÈRE
213136 JOINT À BULBE
213137 ÉTRIER
213138 BOÎTIER À FUSIBLES
213103 BAGUETTE D’ÉCLAIRAGE 51 CM
213079 SEMELLE DE PORTE
69747 COUPE-FROID DE SEMELLE DE PORTE
716346 TROISIÈME FEU DE FREINAGE
BOÎTE DE CAMIONNETTE EN FIBRE DE VERRE SNUGTOP CH 183 CM
CODE-ARTICLE DÉSIGNATION
213132 FENÊTRE AVANT
213273 FENÊTRE LATÉRALE CONDUCTEUR
213274 FENÊTRE LATÉRALE PASSAGER
213135 ENSEMBLE PORTE ARRIÈRE
213136 JOINT À BULBE
213137 ÉTRIER
213138 BOÎTIER À FUSIBLES
213103 BAGUETTE D’ÉCLAIRAGE 51 CM
213079 SEMELLE DE PORTE
69747 COUPE-FROID DE SEMELLE DE PORTE
716346 TROISIÈME FEU DE FREINAGE

20
FRANÇAIS
GARANTIE LIMITÉE
BOÎTE DE CAMIONNETTE SNUGTOP DE TRUCK ACCESSORIES GROUP, LLC
Tous les codes d’articles Ford fournis par Truck Accessories Group, LLC sont garantis pièces et
main-d’œuvre lorsque l’installation de ces produits est conforme à la notice d’installation qui les
accompagne. Cette garantie couvre la réparation ou le remplacement d’un produit défectueux pendant la
période applicable de garantie stipulée ci-dessous. Les coûts de la main-d’œuvre pour remplacer ou pour
réparer un produit défectueux ne sont pas versés ni remboursés par Truck Accessories Group, LLC.
PÉRIODE DE GARANTIE
ÉTATS-UNIS
Produit listé sur l’étiquette Monroney du véhicule neuf (autocollant de vitre)
La couverture correspondant à la garantie du véhicule neuf : Ford – 36 mois ou 36 000 milles
(selon le premier terme atteint); Lincoln – 48 mois ou 50 000 milles (selon le premier terme atteint).
Pièce achetée et installée pendant ou après la garantie d’origine du véhicule
L’option de l’alternative suivante qui profite le mieux au client :
1) 2 ans / millage illimité
ou
2) La période restante de la garantie du véhicule neuf.
EXTÉRIEUR DES ÉTATS-UNIS
Produit listé sur l’étiquette Monroney du véhicule neuf (autocollant de vitre)
La couverture correspondant à la garantie du véhicule neuf : Ford – 36 mois ou 60 000 km (selon le
premier terme atteint); Lincoln – 48 mois ou 80 000 km (selon le premier terme atteint).
Pièce achetée et installée pendant ou après la garantie d’origine du véhicule
L’option de l’alternative suivante qui profite le mieux au client :
1) 2 ans / kilométrage illimité
ou
2) La période restante de la garantie du véhicule neuf.
Cette garantie limitée ne couvre pas un endommagement, une défectuosité ou un mauvais fonctionnement
causés par un mésusage, une utilisation abusive, un accident, une mauvaise installation, une modification ou
un entretien négligé ou non conforme. Cette garantie ne couvre pas les dommages accessoires et indirects.
Elle vous accorde des droits précis, reconnus par la loi. Vous pouvez avoir d’autres droits, qui varient selon
l’État ou la province.
Si vous avez une demande liée à la garantie, veuillez rendre visite à votre concessionnaire Ford. Si la
réparation est couverte par la garantie ci-dessus et qu’elle est effectuée par le concessionnaire, la
main-d’œuvre sera également couverte par Ford – Manuel de garantie et de politique Ford – Section 3.
Notez que Truck Accessories Group, LLC a en stock des pièces de rechange pour aider les consommateurs
et les concessionnaires à régler le plus rapidement possible les questions de garantie et de non-garantie.
NOTE AU CONCESSIONNAIRE
Les concessionnaires Ford doivent communiquer par courriel avec Truck Accessories Group, LLC :
Pour de l’assistance technique, composez le 1 844 756-4247
NOTE AU PROPRIÉTAIRE
Les propriétaires de camionnettes Ford doivent joindre leur concessionnaire Ford s’ils ont des questions.
Table of contents
Languages:
Other SNUG TOP Automobile Accessories manuals

Popular Automobile Accessories manuals by other brands


DEFA
DEFA 411715 Fitting instructions

Menabo
Menabo 000102200000 Fitting instructions

Rear view safety
Rear view safety RVS-83112-BA instruction manual

Cipa
Cipa 70100 installation instructions

Audiovox
Audiovox 50-0312x SERIES installation instructions

Feig Electronic
Feig Electronic ID MAX.U500i Series installation guide


