SOC LOOKET N6 User manual
(ver1.6)
User Guide Manual
www.looket.com
User Guide Manual - 1
Thank yo u fo r cho osing and
purchasing the Look et N6
model as your GPS navig ation
and welcom e to User Guide
Manual.
The device is very easy to use
and it takes you just few step s
to understand how it works.

www.looket.com
User Guide Manual - 2
- CONTENTS –
1. Looket N6 Models .......................................................... 9
2. B efore Starting Looket .................................................. 9
3. Des ignation ............................................................... 11
4. Main Menu ................................................................... 14
4.1. N AVIGATION Menu ............................................... 14
4.1.1. F irst Launch ................................................. 14
4.1.2. Des ignation of Navigation Screen ............... 16
4.1.3. U seful Function on Main Menu .................... 17
4.1.4. How to set Home Location .......................... 25
4.1.5. How to check or re-set GPS hardware ......... 26
4.1.6. How to set TMC ........................................... 26
4.1.7. Menu Bar on Navigation Screen .................. 27
4.2. MU LTIMEDIA Menu ............................................... 30
4.3. B luetooth Menu ..................................................... 32
4.3.1. B efore you start ........................................... 32
4.3.2. Get ting Started ............................................ 33
4.3.3. Hands-fr ee Calling ....................................... 34
4.4. Video- in Menu ....................................................... 36
4.5. SETTING Menu ...................................................... 37
4.5.1. Sys tem ......................................................... 37
4.5.2. Volume & Backlight ..................................... 37
4.5.3. B luetooth ..................................................... 38
5. Ex tra Function ............................................................. 41
5.1. U SB Connection ..................................................... 41
5.2. N ot Installed Software .......................................... 42
5.3. Sleep Function ....................................................... 42
5.4. Smart Power-off Function ..................................... 43
5.5. Lower Battery Warning ......................................... 44
6. T rouble Shooting ......................................................... 45
7. Warrant y ..................................................................... 46
8. P ackage & Accessory ................................................... 48

www.looket.com
User Guide Manual - 3
- NOTICE & WARNING -
Reset - To reset a Looket N6, please turn off and on a switch
on the top of the device.
Installation
- Before installing a suction cup of a mount, please clean and
inside of windshield and remove any dust or grease.
- Avoid placing your device and accessories near or in an air
bag deployment area. If not, may cause serious injury when
air bags inflate rapidly.
- Do not place unsecured on a dashboard.
- Do not mount where a driver's field of vision is blocked.
- D evice i s des igned and appr oved f or v ehicle windshield
installation, han d-held only to meet FCC RF exposure
compliance req uirements, othe r o perating conf iguration are
not approved.
GPS (Global Positioning System)
- I f taking long tim e to g et G PS sig nal and f ind curre nt
location, place it wher e it has a clear view of th e sky. GPS
signals c an be o bstructed by c eilings, tr ees, nearby t all
buildings and the roof of the vehicle.
- Initial GPS f ix may take up to 2~10 minutes depending on
circumstances.
Important: Some vehicles with a coated or heat reflective
windshield m ay req uire on a n e xternal GPS a ntenna (n ot
included).

www.looket.com
User Guide Manual - 4
- Fix in itial GPS with a full charged battery. It will take longer
than before with a low battery.
- The Loo ket dev ice is supporting a Si RFInstantFixII
technology, so it is ab le to re ceive s ignal m ore quickly from
GPS sa tellites a nd ind icate a current l ocation on t he m ap
without waiting for long time.
- If there is no sav ed GPS sate llites information or the sav ed
information i s not e nough, th e SiRFIn stantFixII f unction
would no t be working no rmally. A lso when receiving G PS
signal at f irst, the location error can be happened dependi ng
on op erating circumstances. Moreover, i n ca se o f no t u sing
the device f or o ver 3 da ys, th e SiRFIn stantFixII f unction
would not be operated.
※ SiRFInstantFixII technology
It can red uce warm start s, the typ ical PND star t-up m ode,
from over half a minute to as little as five seconds, and in
urban canyons the di fference can be ev en more significant.
It do es this while demo nstrating exc ellent po sitional
accuracy, a n im portant attrib ute f or nav igation devices. I t
accomplishes thes e us ing s ophisticated, pat ent-pending
algorithms tha t enab le th e PN D to m odel th e b ehavior of
visible GPS s atellites duri ng the da y and pr edict their
position in th e sky f or u p to th ree da ys in t he f uture. It
continuously refines its calculations based on the late st data
it receives from the sa tellites b eing tr acked ev ery tim e t he
PND is used. I t p erforms t hese cal culations completely
autonomously, wit hout ev er ne eding updates o f an y kind
from a network.

www.looket.com
User Guide Manual - 5
Battery and Chargers
- Use onl y b atteries and charg ers inc luded in the p ackage
provided or officially approved by the manufacturer.
- Ri ck o f expl osion i f bat teries ar e r eplaced by an i ncorrect
type.
- Una uthorized batteries or c hargers may harm the d evice
and any accidents or damages. This will not responsible for
the manufacturer.
- Dispose of used batteries according to the instructions.
- Nev er di spose o f bat teries o r devices i n a f ire o r heat ing
devices such as ovens or stoves.
- Nev er c rush or punct ure t he bat tery o r dev ice. A void
exposing them to high externa l pressure, which can lead to
an internal short circuit and overheating.
- To protect the device against sudden current, connect a car
charger only after the car engine has been started.
- Conn ect th e char ger during o peration. Low b attery ma y
deteriorate GPS performance.
Memory Card
- Do not remove the card while the device is transferring or
accessing inf ormation, as it c ould re sult i n l oss o f d ata
and/or damage to the card of device.
- Pro tect card s f rom s trong shoc ks, sta tic el ectricity, and
electrical noise from other devices.
- F requent wri ting and er asing wi ll s horten the l ife s pan o f
memory cards.
- Do not touch gold-colored contacts or terminals with fingers
or metal objects. If dirty, wipe the card with a soft cloth.

www.looket.com
User Guide Manual - 6
Safety Warnings
- Looket N6 has the mi crophone on the front si de and the
speaker on the b ack side. So if talk ing with the sp eaker to
the ear, the o ther canno t hear your c onversation because
the microphone is on the opposite.
- Looket N6 is designed to make or answer a call via
Bluetooth connection with the phone after mounted in a car.
- In case of using the unit as a portable device, we do not
recommend to use the Bluetooth hands-free function.
- Do not p ut th e sp eaker to the ear. I t is a p ortable d evice
with high volumes so it can damage your hearing.
- An ear set provided or approved by SysOnChip, Inc. is able
to b e conne cted to the ear set p ort f or p hone
communication.
- Please ma intain a mi nimum of 20 c m bet ween t he devi ce
and the body to avoid potential interference while bei ng on
the uni t as a po rtable dev ice a nd/or us ing it i n a v ehicle
although the device has a voice communication function.
- Do no t use and/or lea ve the device in high or low
temperature an d potentia lly explosive envir onments to
prevent permanent damage. Spec ially, do no t l eave t he
device in the vehicle o n ho t s ummer days or d uring c old
winter nights.

www.looket.com
User Guide Manual - 7
- In ca se o f no t usi ng the de vice f or a lo ng tim e, off t he
power switch to protect the unit.
- The suction of the mount may be lost if left overnight, due
to condensation and low temperature.
- Wipe or dry the LCD screen of the device using a soft cloth.
- Do no t use any liquid cleaners. It is a g ood idea to u se a
LCD protection film.
- Do not al low the d evice t o g et w et - liquids can ca use
serious damage. Do not handle t he device wi th wet hands.
Water damage to the device can void the warranty.
- Do not expose the device and the memory card to magnetic
fields.
- Allow only qualified personnel to service the device. If not,
the device can be damaged and will void the warranty.
- T he use of access ories t hat d o not s atisfy the se
requirements m ay not com ply w ith FCC R F exp osure
requirements, and should be avoided.
FCC Verification
This device complies with part 5 of the FCC Ru les. Operation
is sub ject to the f ollowing tw o c onditions; (1 ) This d evice
may not ca use harmful i nterference, and (2) this dev ice
must accept any interference received, including interference
that may cause undesired operation.

www.looket.com
User Guide Manual - 8
U.S.FEDERAL COMMUN ICATIONS COMM ISSION RADIO
FREQUENCY INTERFERENCE STATEMENT
INFORMATION TO THE USER
NOTE: Thi s equipment has been t ested and f ound t o co mply
with the limits for a Class B digital device pursuant to Part 15 of
the FCC Rules
.
There limits ar e designed to provide r easonable p rotection
against harmful Interference in a residential installation.
This equi pment gener ates, uses , and c an r adiate r adio
frequency en ergy and, if Not installed and used in accor dance
with the instructions, may cau se harmful Interference to r adio
communication. Howev er, there is no g uarantee that
interference will not occur in a particular Installation.
If this equipmen t does cau se ha rmful in terference to r adio or
television r eception, Whi ch c an be det ermined by t urning t he
equipment off and on, the user is encouraged to try to correct
the interference by one or more of the following measures;
Reorient or relocate the receiving antenna.
Increase t he se paration b etween the eq uipment and
receiver.
Connect the equipmen t into an outlet of a circu it
difference from that to which the receiver is connected.
Connect the deal er o r an experi enced r adio/TV
technician for assistance.
Changes o r mo dification no t exp ressly appr oved by t he part y
responsible f or Compliance c ould v oid the u ser’s auth ority to
operate the equipment.
Connecting of peripherals requires the us e of gr ounded
shielded signal cable.
www.looket.com
User Guide Manual - 9
1. Loo ket N6 Models
Models
Features
N600 N 630 N 670
Navigation O O O
Multimedia Player O O O
Bluetooth Support X O O
Video-in X O O
TMC X X O
※ Models and features are subject to be changed without notice.
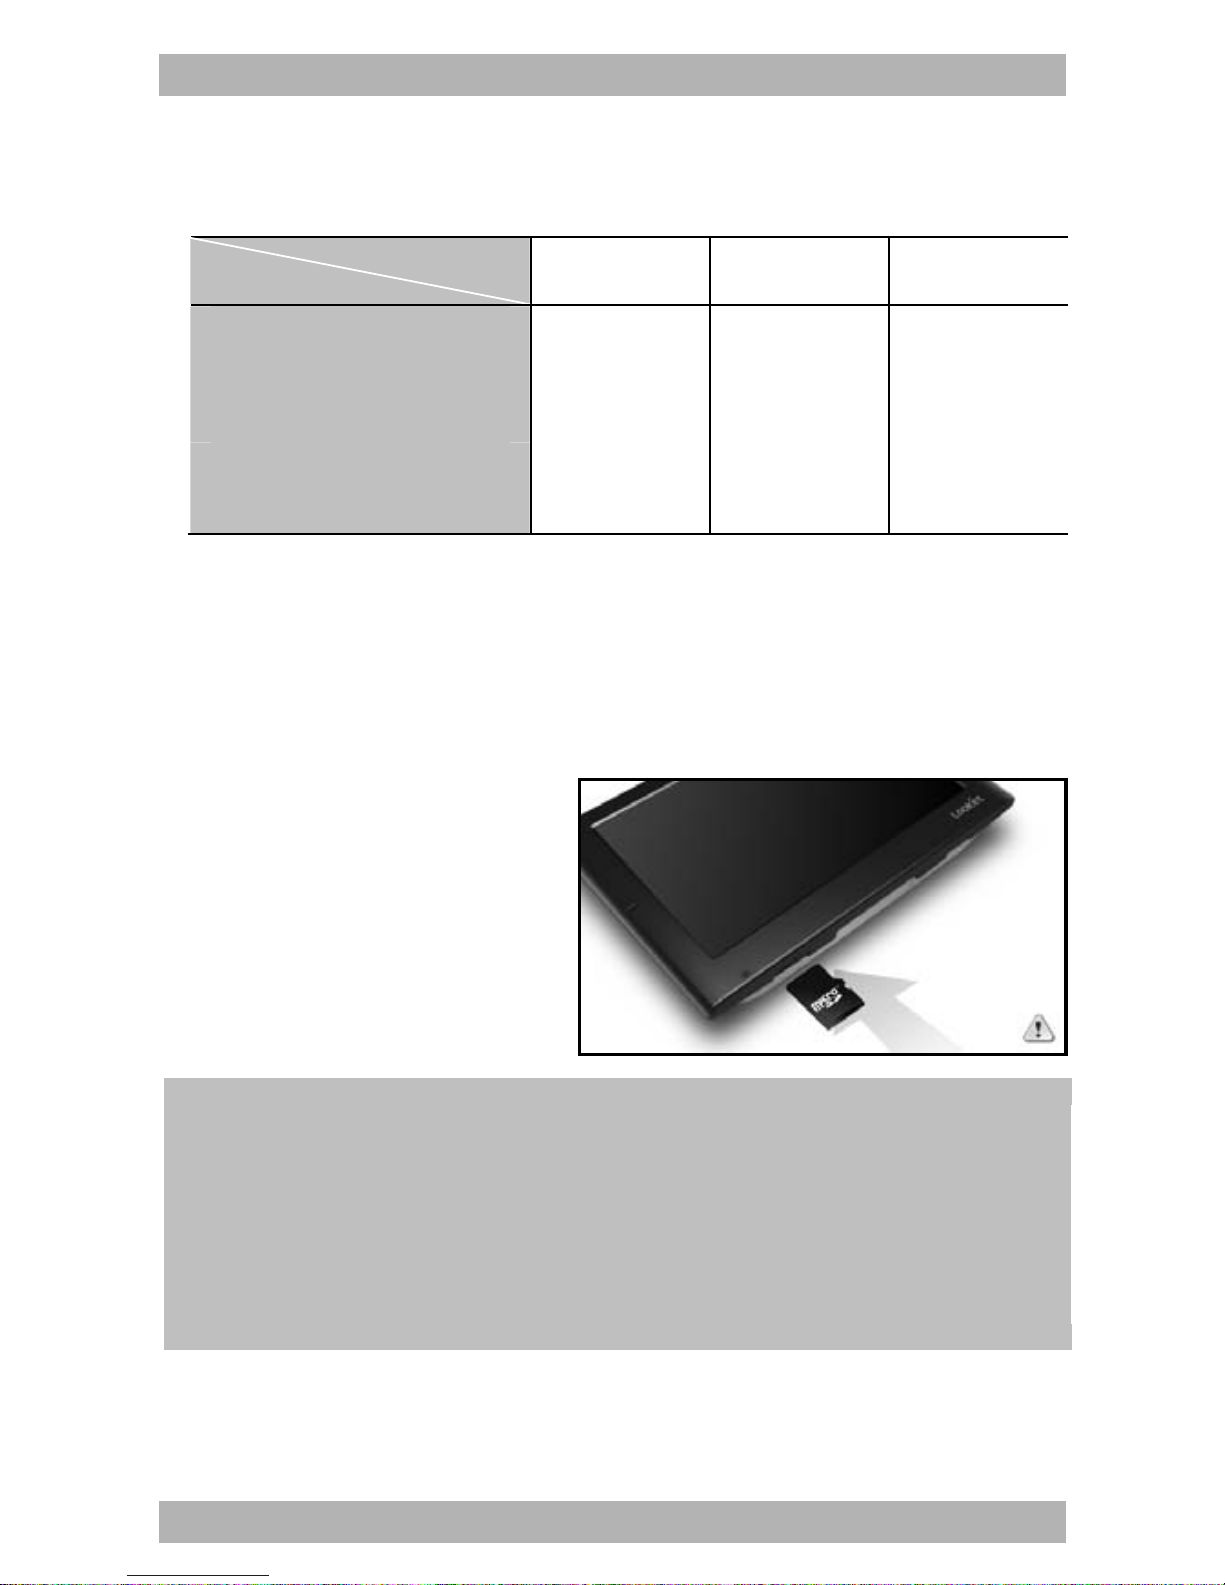
2. Befor e Starting Looket
◈ How to insert micro SD card
- Turn off before putting
a microSD card.
- Insert the microS D
card li ke a f ollowing
picture.
Be careful of the direction when inserting the card.
Do no t r emove the ca rd while the device is po wered on ,
doing so ma y r esult in the dev ice mal function. W e
recommend t o turn o ff t he dev ice bef ore r emoving t he
card.
www.looket.com
User Guide Manual - 10
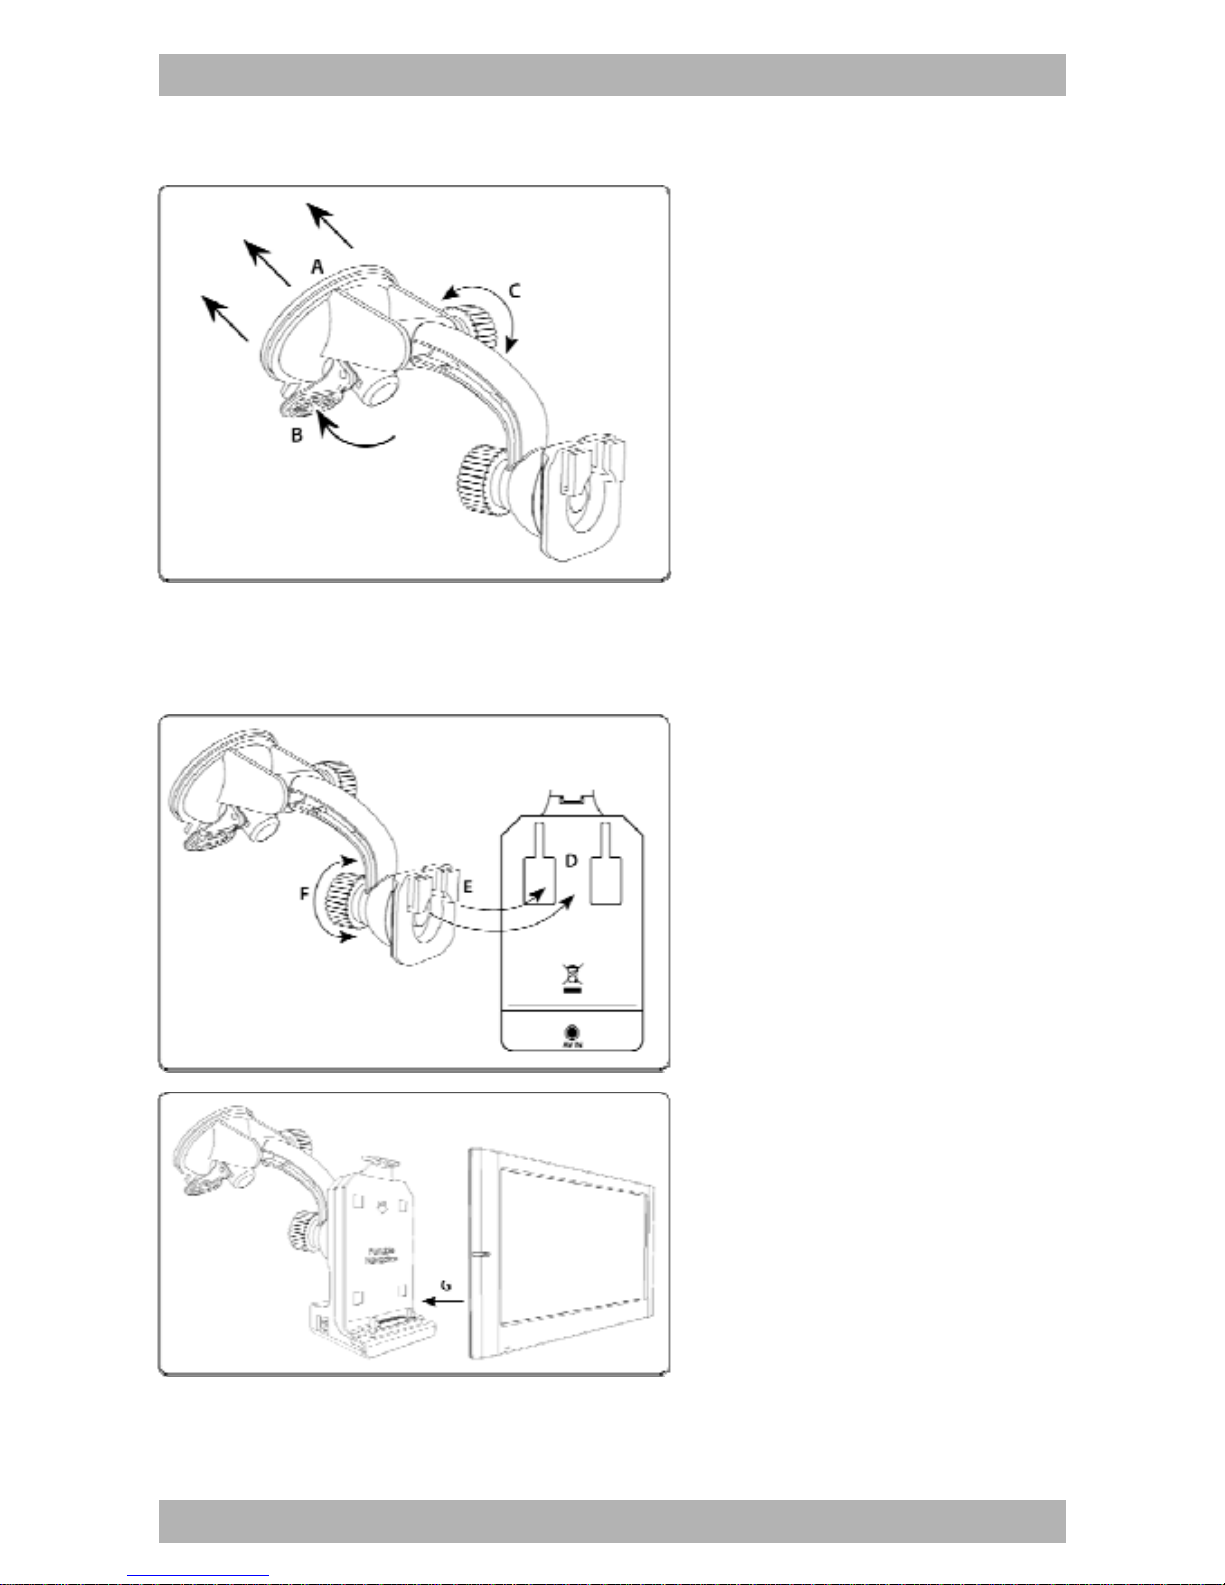
◈ How to install Windshield Mount
1. Push th e su ction b ase
(A) against the
windshield.
2. Flip the base lever down
(B) to the lock ed
position.
3. Adjust the ang le of the
pedestal arm by
tightening t he ang le
adjustment k nob (C) at
the b ase to the d esired
angle.
4. Connect t he cr adle (D)
on th e du al T -tabs (E)
on the pedestal head.
5. Adjust the ang le and
rotation o f the head b y
tightening the head
adjustment knob (F).
6. Mount the device on the
connector (G) of th e
cradle.
7. Connect th em with a
snap.
www.looket.com
User Guide Manual - 11
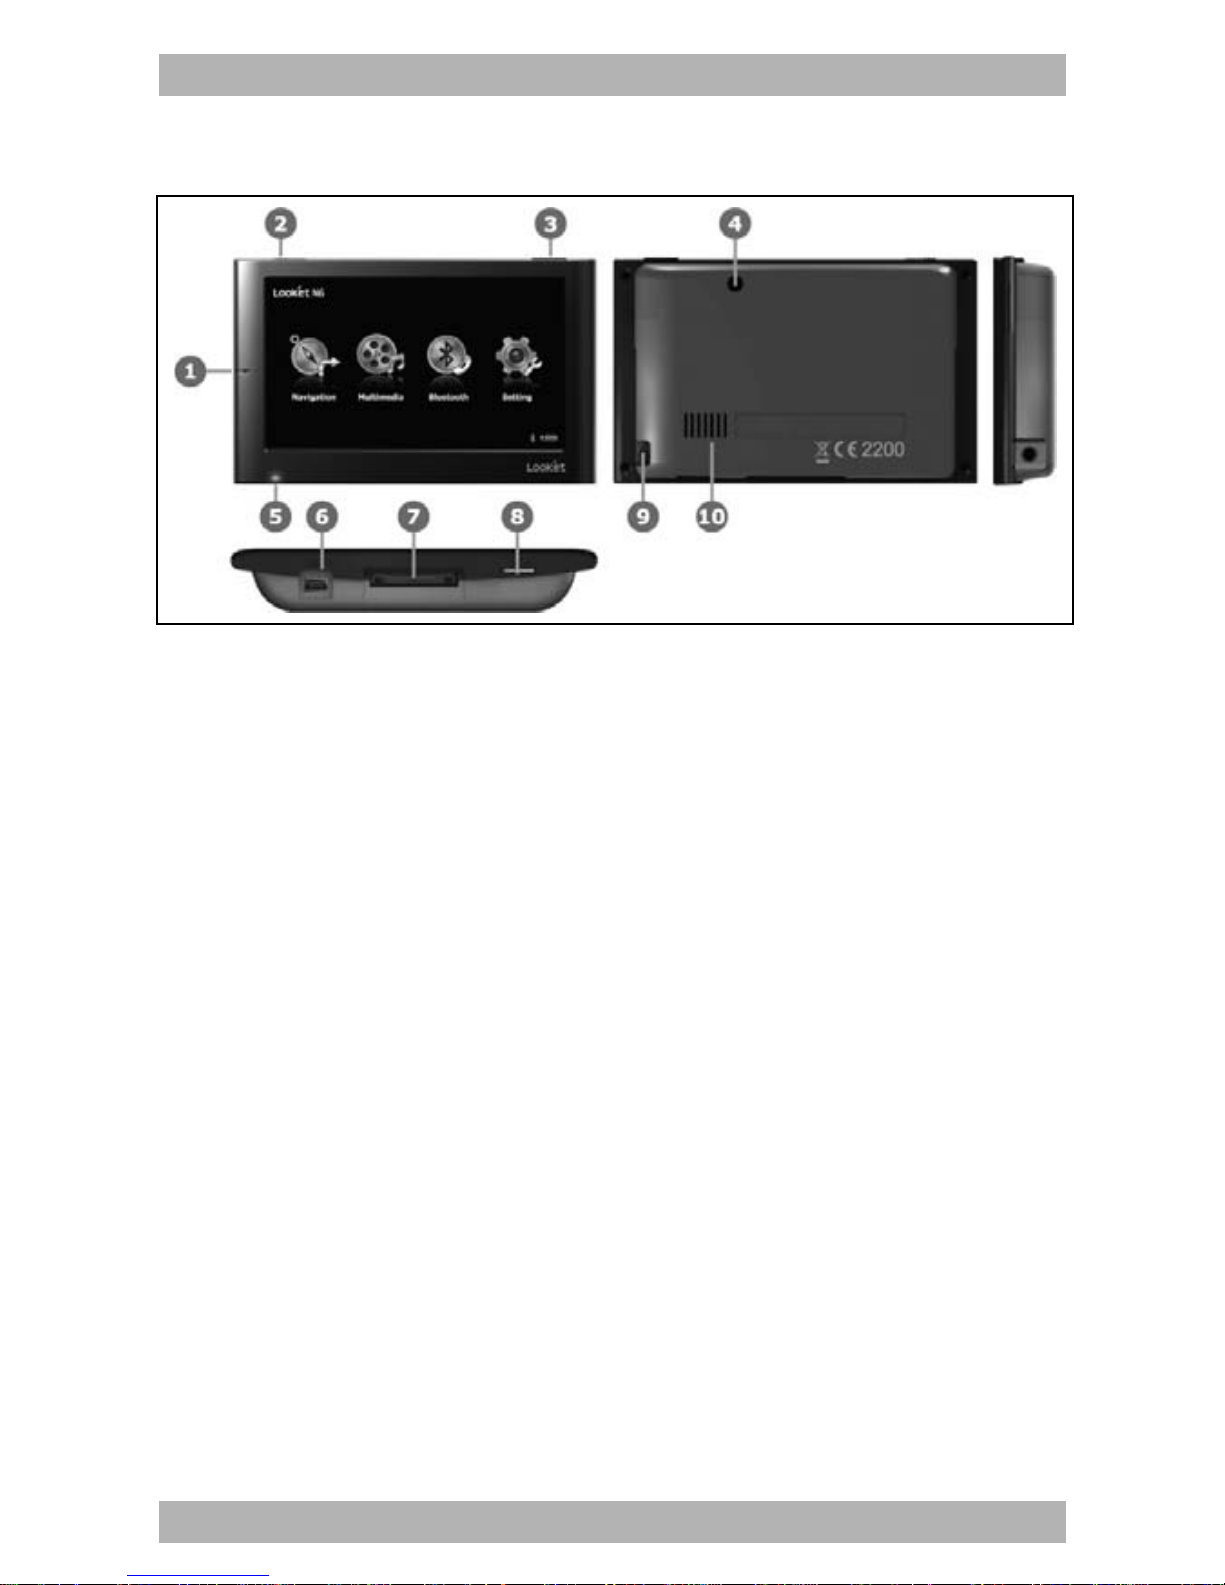
3. Designation
① Microphon e
When you mak e and/or answer calls through B luetooth hands -
free function, you can speak into the microphone.
②Power On/Off Button
When sw itched off and on, th e hardware of the device is r eset.
At this time, saved setting s et c. will be deleted. The switch ca n
be used f or the hard ware reset of the d evice and to sav e the
power for long time in case of being used as a portable memory
device without external power.
③Menu Button
A menu bar i s come o ut when t he but ton is pus hed at t he
contents supporting the menu in the application program. So the
application pr ograms s howing o n t he menu bar are abl e t o be
conducted or set.
④ External GPS Antenna Port
An external GPS antenna provided or approved by SysOnChip is
able to be connected.

www.looket.com
User Guide Manual - 12
⑤ Charging Status Indicator
- Red: An internal battery is charging.
- Blue: An internal battery is fully charged.
- Off: A power connector is disconnected.
⑥ mini USB & Power Port
The device can be used as an external portable memory device
by connecting with PC via the port. Also, it is able to be charged
by an AC Adap ter o r Car Charger pr ovided o r appr oved by
SysOnChip.
⑦ Mounti ng Connector Port
The d evice can b e conne cted with a cr adle, and p ower is
supplied from the c radle. Also, the device can receive data from
RS232 serial port and Video-in port (optional) on the cradle.
⑧ mini SD Card Slot
Be careful of the direction when it is inserted.
⑨ Ear-phone Jack & TMC Antenna Port
It is able to enjoy the sound from the device via earphones while
the device is using as a portable player.
Also, an exter nal TMC antenna pr ovided or appr oved by
SysOnChip is c onnected t o the port t o us e the TM C (T raffic
Messaging Channel) function. If you purchased or po ssessed the
Looket N6 model supporting the TMC function, you will be able to
access your ow n desti nation f aster than befor e with up- to-date
traffic information via the external TMC antenna.
※ Only Looket N670 i s supporting the TMC function. Therefore,
you are not able to use the TMC service with other models.
⑩ Speaker
Enjoy sound from the device through the internal speaker.
www.looket.com
User Guide Manual - 13
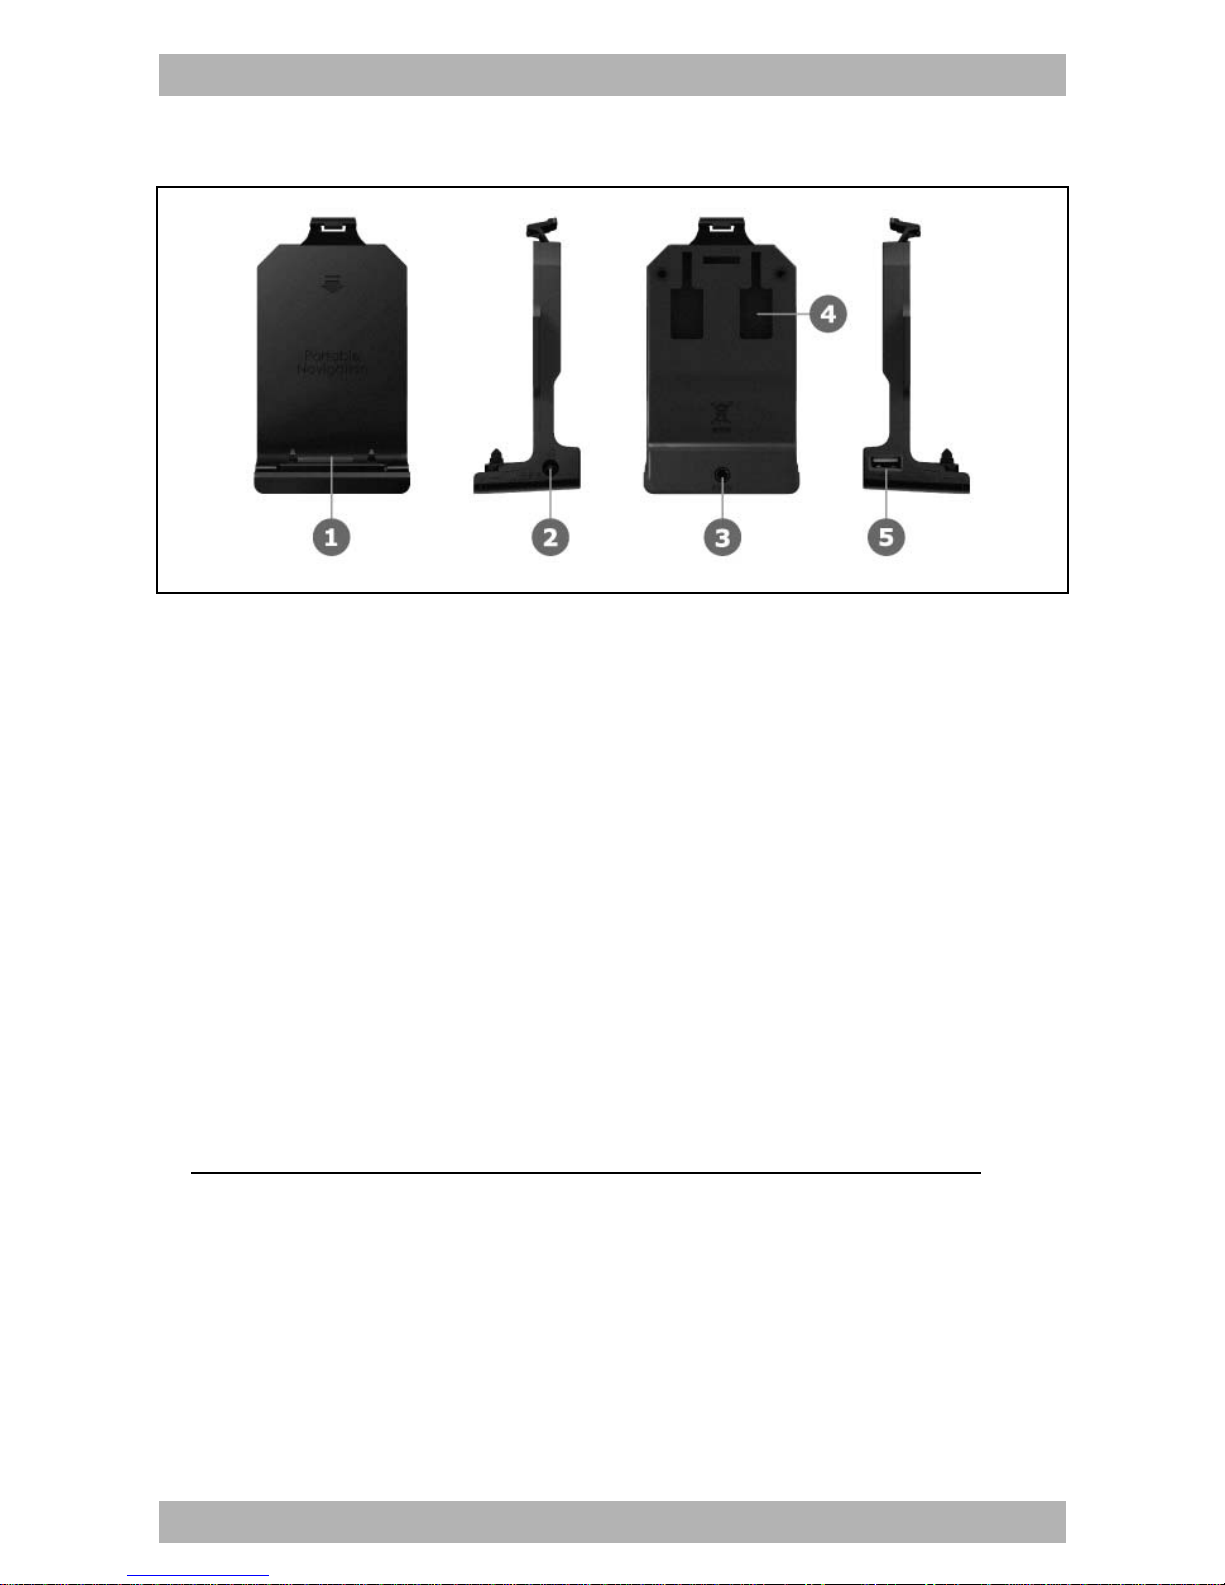
◈ Cradle
① Mounti ng Connector
N6 models are connected to the cradle and able to supply power
as well as r eceive dat a f rom R S232 s erial and AV-in (op tional)
through the connector.
② Power Port
A Car Char ger or AC Ho me Ch arger pr ovided o r appr oved by
SysOnChip is able to be connected to the port.
③ Video-in Port
If a r ear c amera o r ext ernal devi ce suppo rting Vi deo o utput is
connected to the N6 enabling this function through the port, you
can enjoy the video on the screen.
※ The N630 & N670 are only able to support this function.
④ Mounti ng Hole
A mount provided or approved by SysOnChip is connected to the
cradle.
⑤ RS232 Serial Port
An external device is able to be connected through this port.
www.looket.com
User Guide Manual - 14
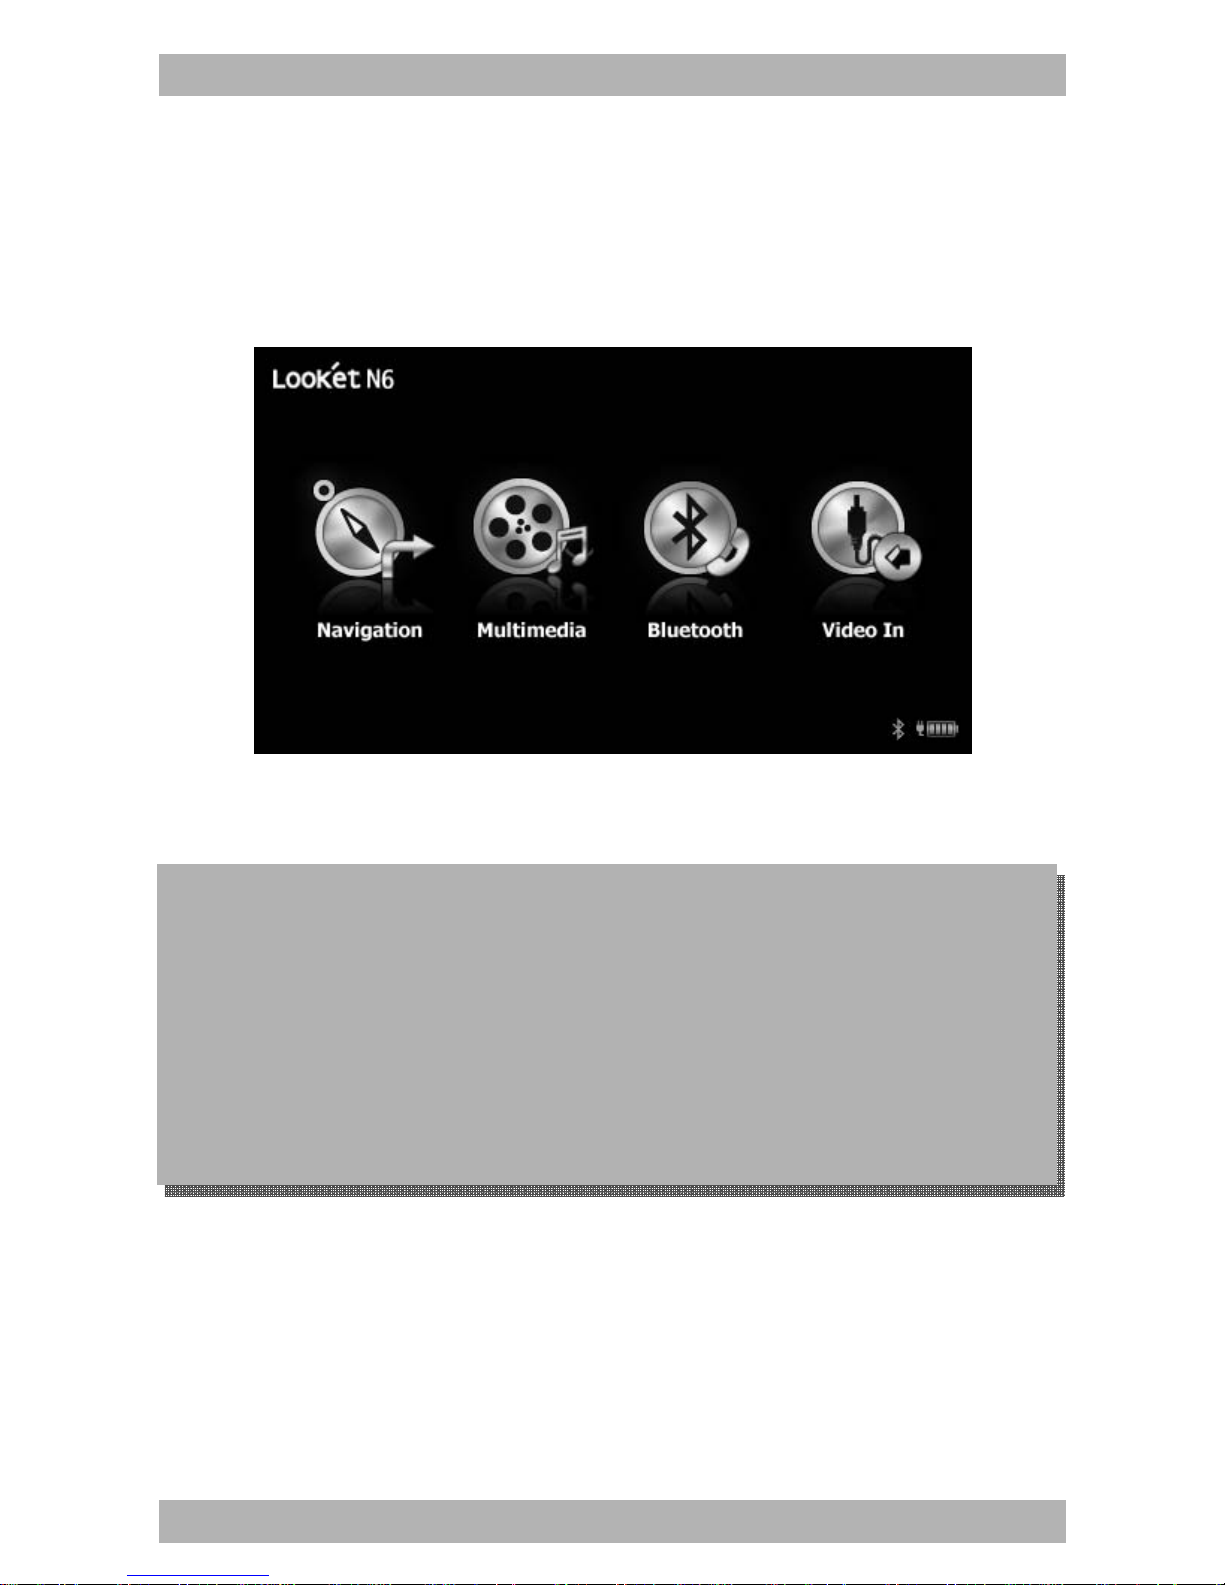
4. Main Menu
After turning on th e Lo oket N 6 f or th e f irst time, N avigation,
Multimedia, Bluetooth, Video-in can be sele cted (in case of th e
Looket N630 and N670 models).
4.1. NAVIGATION Menu
4.1.1. First Launch
When you conduct NAVIGATION f irst time, you should be ask ed to
set language, v oice, m ap, GP S s ignal et c. A ll i nformation you set
will be saved in a SD card automatically after launch.
This Us er Guid e Manual w hich i s a q uite sim ple m anual to
follow w ill ta ke y ou to u nderstand how it w orks. F or m ore
detail i nformation, pl ease do wnload t he ma nual o n our web-
site.
Also, you can co nsult Quick Guides on the setti ngs menu from
the main menu of the navigation in the device.
To enter Quick Guides, please do as follow;
T
ouch screen → Ta
p
Settin
g
on menu →
Q
uick Guides

www.looket.com
User Guide Manual - 15
1. T ap NA VIGATION on t he
Main m enu. A fter read ing
the i mportant mes sage,
click I AGREE.
2. Sele ct y our lang uage,
voice, dis tance unit s,
keyboard pr eference and
map.
3. After choosing your map, the device is auto-searching for GPS
signal, and t hen its COM port and baud rate which the device is
supporting will be set automatically.
4. You wo uld probably see your c urrent valid GP S po sition o n the
map after successful launch.
5. I f y ou tap an ywhere o n the m ap area, the Mai n m enu of t he
NAVIGATION is shown. On the bottom of the screen you can see
useful information about your cu rrent position - street name with
numbers.
※ The process of the first launch is subject to be passed according
to countries and maps.
After s uccessful l aunch, you
would probably see your current
valid GP S position on the map.
If you see only grey screen after
launch, y ou should pr obably
check your G PS st atus f irst a nd
wait for valid GPS signal.
It takes some time t o get valid signal from available satellites. First of all ,
tap on th e g rey screen to open th e Main m enu and find a GP S status
button.

www.looket.com
User Guide Manual - 16
If a ' Closed GPS connection'
message is di splayed, c heck if
the GPS module is turned on.
Settings
GPS
hardware
Turn G PS
module off
4.1.2. Designation of Navigation Screen
* These information are shown only if you have already computed a route.
If the navigation pane displaying Arrival Time, Speed, Current Position, etc.
is tapped, the following context menu is appeared.
Show I mportant Places - t his o ption w ill s how y our 2 POI
categories chosen close to your position.
Avoid Roadblock - set the circle on your map to avoid all street
blocked within circle area.
Memorize P osition - this o ption le ts you s ave a nd m emorize
your actual po sition. P osition wi ll be au tomatically sa ved and
you can find it any time later in History.
T
a
p
an
y
where on the ma
p
area to o
p
en the Main menu
Zoom Out Zoom In
Next Turning
Point*
A
rrival time
/
Speed
/
Distance
to finish
/
GPS si
g
nal
Distance to next turnin
g
p
oint* Current
p
osition

www.looket.com
User Guide Manual - 17
4.1.3. Useful Function on Main Menu
4.1.3.1. Navigation to
If you c lick 'Navi gation to.. .' o n t he Ma in m enu, t here a re various
ways t o set y our destination an d pl an y our ro ute eas ily. They will
give you great opportunity to choose just the perfect option for you.

www.looket.com
User Guide Manual - 18
a) Address - standard way of navigating. You can choose in steps
Country, City, Street and number.
b) Favorite - this function allows you to navigate to one of your
favorite Points of Interest.
c) History - list of your memorized positions. Option to navigate to
memorized his tory en tries or d elete t hese en tries i s
available.
d) Point of Interest - nav igate to P oint o f Inte rest: res taurant,
hotel, school, wine-room, etc.
e) ZIP Code - instead of name of the city, simply type in the zip
code will find the exact address.
f) Home - navigate to Home location saved by you who can set up
the home location in: Settings → Set home location.
g) Point on Map - choose your destination straight from the map.
h) Enter GPS position - navigate to exact GPS position entered as
longitude and latitude coordinate.
i) City Center - navig ate to straight the ce nter of the cho sen city.
You will be asked to look up the city within the
country.
j) POI in Ci ty - ins tead of navi gating t o address, y ou can simply
select POI of the chosen city and Sygic will find it for
you.
k) Last Valid Position - navigate to last GPS position received last
time GPS signal was available.

www.looket.com
User Guide Manual - 19
In this guide, we'll s how you how to use the Navi gation to function
using the Address option.
1. Touch Address on the Main menu.
2. Select Country, City, Street and Number step by step.
Or find them using the keyboard on the screen.
3. Sel ect your departure screen appears.
You c an choose from three options - wait for valid signal, Last
valid position or Select from map. (Wait for valid signal and Last
valid position work properly when the GPS is turned on.)
4. As soon as the route is ca lculated, basic information on y our
route i s shown. A sk fo r m ore i nto d eep ro ute description b y
pressing Details.
5. Select a ctive i tem you wa nt to av oid o n route. I f yo u c lick o n
item, your route will be recalculated without these items.
※ Management of Favorites
There are t wo ways how to add t he address and/or destination to
the Favorites.
1) Browse map on Main Menu
① Select the point (where you'd like to add on the Favorites) on
the m ap. Or tap Op tions - Find - A ddress and then y ou ca n
enter the exact address (or other options available).
② Click the Co ntext m enu b utton in t he m iddle of the b ottom
black title bar wher e you have several option (navigate there,
travel via, etc.).
③ Select Add as POI , then tap Favorites.
2) Manage POI on Main Menu
① Clic k Add POI.
② Choose Address (or other) to insert the place to Favorites.
③ Tap Favorites on 'Select or create a category' menu.
Table of contents
Other SOC GPS manuals


