Softube VST User manual
Supporting VST/VST3/AU/RTAS/AAX Native and AAX DSP. Rev. Nov 27, 2013
User Manual
User Manual

Softube User Manual
© 2007-2013. Amp Room is a registered trademark of Softube AB, Sweden. Softube is a registered
trademark of Softube AB, Sweden. All visual and aural references to the Valley People Dyna-mite, Trident
A-Range, Tonelux and Tilt are trademarks being made with written permission from PMI Audio. e
Tonelux and Tilt logo, the Valley People, Dyna-mite and associated logos, and the Trident, A-Range and
Triangle logo are trademarks of PMI Audio Group, used under license. Tube -Tech is a registered trademark
of Lydkraft ApS, Denmark. EMI and Abbey Road are trademarks of EMI (IP) Limited. REDD, RS127
and RS135 are trademarks of EMI (IP) Limited. All specications subject to change without notice. All
Rights Reserved.
Other company and product names mentioned herein are trademarks of their respective companies. Men-
tion of third-party products is for informational purposes only and constitutes neither an endorsement
nor a recommendation. Softube assumes no responsibility with regard to the performance or use of these
products.
Softube products are protected by patents SE526523 and SE525332, and related patents/patent ap-
plications, including WO06054943, US11/667360, US2004 0258250, EP1492081, EP1815459, and
JP2004 183976.
Your rights to the software are governed by the accompanying software license agreement (End User Li-
cense Agreement).
Disclaimer
Every eort has been made to ensure that the information in this manual is accurate. However, there are a
chance that we have made mistakes, and we hope that you understand that we are only humans. Please let
us know about the mistake, and we’ll x it in the mix (or in the next version of this manual).
Support
On the Softube website (www.softube.com) you will nd answers to common questions (FAQ) and other
topics that might interest you.
Support questions can be posted at http://www.softube.com, where we will help you as fast as we can!
Web: www.softube.com
E-mail: [email protected]
Phone: +46 13 21 1623 (9 am – 5 pm CET)

SOFTUBE USER’S GUIDE | III
Contents
2 Installation and Authorization 7
Step 1. License Registration . . . . . . . . . . . 7
Step 2. Transfer License to iLok . . . . . . . . . . . . . 7
Step 3. Installation on Mac OS X . . . . . . . . . . . . 8
Step 3. Installation on Windows . . . . . . . . . . . . 9
Step 4. Activate Plug-Ins . . . . . . . . . . . . . . . 10
System Requirements . . . . . . . . . . . . . . . . 12
VENUE System Requirements. . . . . . . . . . . . . 12
AAX DSP Supported Sample Rates . . . . . . . . . . 13
Plug-In Latencies . . . . . . . . . . . . . . . . . . 14
3 User Interface 15
Menu Row . . . . . . . . . . . . . . . . . . . . . 15
Key Commands . . . . . . . . . . . . . . . . . . . 18
4 Abbey Road Studios Brilliance Pack 19
Foreword by Peter Cobbin . . . . . . . . . . . . . . 19
Introduction . . . . . . . . . . . . . . . . . . . . 21
RS127 Rack. . . . . . . . . . . . . . . . . . . . . 21
RS127 Box . . . . . . . . . . . . . . . . . . . . . 22
RS135 . . . . . . . . . . . . . . . . . . . . . . . 23
Credits . . . . . . . . . . . . . . . . . . . . . . . 23
5 Active Equalizer 25

iv | Table of Contents
User Interface . . . . . . . . . . . . . . . . . . . . 25
Knobs . . . . . . . . . . . . . . . . . . . . . . . 26
Buying Recommendations . . . . . . . . . . . . . . 27
Credits . . . . . . . . . . . . . . . . . . . . . . . 27
6 Acoustic Feedback and Acoustic Feedback Deluxe 29
Introduction . . . . . . . . . . . . . . . . . . . . 29
Getting Started . . . . . . . . . . . . . . . . . . . 30
Playing Techniques . . . . . . . . . . . . . . . . . 30
User Interface . . . . . . . . . . . . . . . . . . . . 31
Using MIDI . . . . . . . . . . . . . . . . . . . . . 33
FAQ . . . . . . . . . . . . . . . . . . . . . . . . 34
Credits . . . . . . . . . . . . . . . . . . . . . . . 35
7 Bass Amp Room 37
Introduction . . . . . . . . . . . . . . . . . . . . 37
User Interface . . . . . . . . . . . . . . . . . . . . 38
The Amplier . . . . . . . . . . . . . . . . . . . . 39
The Cabinets . . . . . . . . . . . . . . . . . . . . 40
The Mix Panel . . . . . . . . . . . . . . . . . . . . 41
Bypassing Amps or Cabs . . . . . . . . . . . . . . . 42
Block Diagram . . . . . . . . . . . . . . . . . . . 43
Buying Recommendations . . . . . . . . . . . . . . 44
Credits . . . . . . . . . . . . . . . . . . . . . . . 44
8 FET Compressor 45
Introduction . . . . . . . . . . . . . . . . . . . . 45
User Interface . . . . . . . . . . . . . . . . . . . . 46
Tweaking Tips. . . . . . . . . . . . . . . . . . . . 50
Block Diagram . . . . . . . . . . . . . . . . . . . 51
Credits . . . . . . . . . . . . . . . . . . . . . . . 51
9 Focusing Equalizer 53
Work Flow . . . . . . . . . . . . . . . . . . . . . 55
Knobs . . . . . . . . . . . . . . . . . . . . . . . 56
Meters . . . . . . . . . . . . . . . . . . . . . . . 57
Dierences Between Passive and Active . . . . . . . . 58
Finally, a Note on Modeling . . . . . . . . . . . . . 58
Credits . . . . . . . . . . . . . . . . . . . . . . . 58
10 Metal Amp Room 59
Introduction . . . . . . . . . . . . . . . . . . . . 59
User Interface . . . . . . . . . . . . . . . . . . . . 60
The Amplier . . . . . . . . . . . . . . . . . . . . 62
The Cabinets . . . . . . . . . . . . . . . . . . . . 63
The Microphones . . . . . . . . . . . . . . . . . . 64
The Balancing Stereo Preamps . . . . . . . . . . . . 64
Mono and Stereo Operation . . . . . . . . . . . . . 65
Bypassing Amps or Cabs . . . . . . . . . . . . . . . 66
Buying Recommendations . . . . . . . . . . . . . . 66
Credits . . . . . . . . . . . . . . . . . . . . . . . 66
11 Passive Equalizer 67
Knobs . . . . . . . . . . . . . . . . . . . . . . . 67
Buying Recommendations . . . . . . . . . . . . . . 68
Credits . . . . . . . . . . . . . . . . . . . . . . . 68
12 Spring Reverb 69
Introduction . . . . . . . . . . . . . . . . . . . . 69
User Interface . . . . . . . . . . . . . . . . . . . . 70
Tweaking Tips. . . . . . . . . . . . . . . . . . . . 71
Credits . . . . . . . . . . . . . . . . . . . . . . . 72
13 Summit Audio Grand Channel 73
The Tone Sculpter . . . . . . . . . . . . . . . . . . 73
User Interface . . . . . . . . . . . . . . . . . . . . 74
Signal Routing . . . . . . . . . . . . . . . . . . . 75
Credits . . . . . . . . . . . . . . . . . . . . . . . 76
14 Summit Audio EQF-100 Full Range Equalizer 77
Introduction . . . . . . . . . . . . . . . . . . . . 77
Applications . . . . . . . . . . . . . . . . . . . . 79
Mono and Stereo Operation . . . . . . . . . . . . . 80
Credits . . . . . . . . . . . . . . . . . . . . . . . 80
15 Summit Audio TLA-100A Compressor 81
More Than a TLA-100A . . . . . . . . . . . . . . . . 81
User Interface . . . . . . . . . . . . . . . . . . . . 82
Mono and Stereo Operation . . . . . . . . . . . . . 84

SOFTUBE USER’S GUIDE | V
Credits . . . . . . . . . . . . . . . . . . . . . . . 84
16 Tonelux Tilt 85
Foreword by Paul Wol . . . . . . . . . . . . . . . 85
Introduction . . . . . . . . . . . . . . . . . . . . 86
User Interface . . . . . . . . . . . . . . . . . . . . 86
Tilt Live . . . . . . . . . . . . . . . . . . . . . . 88
Buying Recommendations . . . . . . . . . . . . . . 89
Credits . . . . . . . . . . . . . . . . . . . . . . . 89
17 Trident A-Range 91
Foreword by Malcolm Toft . . . . . . . . . . . . . . 91
Background . . . . . . . . . . . . . . . . . . . . 91
User Interface . . . . . . . . . . . . . . . . . . . . 92
Buying Recommendations . . . . . . . . . . . . . . 95
Credits . . . . . . . . . . . . . . . . . . . . . . . 95
18 TSAR-1 Reverb and TSAR-1R Reverb 97
Introduction . . . . . . . . . . . . . . . . . . . . 98
Anatomy of a Reverb . . . . . . . . . . . . . . . . 98
User Interface at a Glance . . . . . . . . . . . . . . 99
Reverb Parameters . . . . . . . . . . . . . . . . . 100
Presets. . . . . . . . . . . . . . . . . . . . . . . 106
TSAR-1R Reverb. . . . . . . . . . . . . . . . . . . 109
Automation . . . . . . . . . . . . . . . . . . . . 110
Mono and Stereo Operation . . . . . . . . . . . . . 110
Credits . . . . . . . . . . . . . . . . . . . . . . . 110
19 Tube Delay 111
Introduction . . . . . . . . . . . . . . . . . . . . 111
User Interface . . . . . . . . . . . . . . . . . . . . 112
Block Diagram . . . . . . . . . . . . . . . . . . . 114
Credits . . . . . . . . . . . . . . . . . . . . . . . 114
20 Tube-Tech Classic Channel 115
User Interface . . . . . . . . . . . . . . . . . . . . 115
Gain Staging . . . . . . . . . . . . . . . . . . . . 117
Sidechain and the Equalizers . . . . . . . . . . . . . 117
Credits . . . . . . . . . . . . . . . . . . . . . . . 117
21 Tube-Tech CL 1B Compressor 119
Foreword by John G. Petersen . . . . . . . . . . . . 119
About the CL 1B. . . . . . . . . . . . . . . . . . . 119
User Interface . . . . . . . . . . . . . . . . . . . . 120
Suggested Applications . . . . . . . . . . . . . . . 122
Mono and Stereo Operation . . . . . . . . . . . . . 122
Credits . . . . . . . . . . . . . . . . . . . . . . . 123
22 Tube-Tech ME 1B Midrange Equalizer 125
Introduction . . . . . . . . . . . . . . . . . . . . 125
User Interface . . . . . . . . . . . . . . . . . . . . 126
Filter Graphs . . . . . . . . . . . . . . . . . . . . 128
Buying Recommendations . . . . . . . . . . . . . . 128
Credits . . . . . . . . . . . . . . . . . . . . . . . 128
23 Tube-Tech PE 1C “Pultec” Equalizer 129
Foreword by John G. Petersen . . . . . . . . . . . . 129
Introduction . . . . . . . . . . . . . . . . . . . . 129
User Interface . . . . . . . . . . . . . . . . . . . . 130
Buying Recommendations . . . . . . . . . . . . . . 132
Credits . . . . . . . . . . . . . . . . . . . . . . . 132
24 Valley People Dyna-mite 133
Basic Limiting . . . . . . . . . . . . . . . . . . . 135
Basic Expanding . . . . . . . . . . . . . . . . . . 136
Switches . . . . . . . . . . . . . . . . . . . . . . 137
Knobs . . . . . . . . . . . . . . . . . . . . . . . 139
Limiting Modes . . . . . . . . . . . . . . . . . . . 141
Expanding Modes . . . . . . . . . . . . . . . . . . 144
Mono and Stereo Operation . . . . . . . . . . . . . 147
Buying Recommendations . . . . . . . . . . . . . . 147
Credits . . . . . . . . . . . . . . . . . . . . . . . 147
25 Vintage Amp Room 149
Introduction . . . . . . . . . . . . . . . . . . . . 149
User Interface . . . . . . . . . . . . . . . . . . . . 150
White Amp. . . . . . . . . . . . . . . . . . . . . 152
Brown Amp . . . . . . . . . . . . . . . . . . . . 153
Green Amp . . . . . . . . . . . . . . . . . . . . . 155

vi | Table of Contents
Bypassing Amps or Cabs . . . . . . . . . . . . . . . 157
Buying Recommendations . . . . . . . . . . . . . . 157
Credits . . . . . . . . . . . . . . . . . . . . . . . 157
26 Other Platforms 159
Reason Rack Extensions . . . . . . . . . . . . . . . 159
Cakewalk Sonar ProChannel . . . . . . . . . . . . . 159
UAD Powered Plug-Ins . . . . . . . . . . . . . . . . 160
TC Electronic PowerCore . . . . . . . . . . . . . . . 160
27 Control Surfaces 161
Introduction . . . . . . . . . . . . . . . . . . . . 161
Active Equalizer. . . . . . . . . . . . . . . . . . . 162
FET Compressor . . . . . . . . . . . . . . . . . . . 163
Focusing Equalizer . . . . . . . . . . . . . . . . . 164
Passive Equalizer . . . . . . . . . . . . . . . . . . 165
Summit Audio Grand Channel EQ Section . . . . . . . 166
Summit Audio Grand Channel Compressor Section . . . 167
Summit Audio EQF-100 Full Range Equalizer . . . . . . 168
Summit Audio TLA-100 Tube Leveling Amplier . . . . 169
Tonelux Tilt and Tilt Live . . . . . . . . . . . . . . . 170
Trident A-Range Equalizer . . . . . . . . . . . . . . 171
Tube-Tech Classic Channel EQ Section . . . . . . . . . 172
Tube-Tech Classic Channel Compressor Section . . . . . 173
Tube-Tech CL 1B Compressor . . . . . . . . . . . . . 174
Tube-Tech ME 1B Mid Range Equalizer. . . . . . . . . 175
Tube-Tech PE 1C “Pultec” Equalizer . . . . . . . . . . 176
Valley People Dyna-mite. . . . . . . . . . . . . . . 177
28 END USER LICENSE AGREEMENT clxxix

| 7
2 Installation and Authorization
Step 1. License Registration
you will have to
register it in order to transfer it to your iLok account.
1. Go to http://softube.com/register to transfer the license to
your iLok account.
You will need the License Code that you got from the dealer, your
iLok.com User ID, and your iLok USB dongle.
Follow the instructions on the web page and continue with step 2
below.
Step 2. Transfer License to iLok
from the Softube webstore
and have got the conrmation e-mail, the license will already be regis-
tered, and you can skip the rst step.
2. Make sure that you have the latest version of iLok License Man-
ager installed on your computer. It can be found at http://www.
ilok.com.
3. Launch the iLok License Manager application on your computer.
Drag and drop the newly received license to the iLok icon that
represents the physical iLok where you want to put the license.
4. Download the latest version of Softube Plug-ins Control from
http://www.softube.com/download.
e installer includes all Softube’s plug-ins and will let you easily
install any plug-ins you have bought a license for.

8 | INSTALLATION AND AUTHORIZATION
Step 3. Installation on Mac OS X
e same installer and Softube Plug-Ins Control application is used for both 32- and 64-bit plug-ins.
1. Choose which format you want to download:
//: Installs VST, VST3, AU (Audio Units), AAX and AAX DSP formats for both 32- and
64-bit hosts. Used in for example Pro Tools, Logic, Cubase, Studio One, Ableton Live, etc.
: Installs RTAS plug-ins for Pro Tools 9
2. Run the installer and step through the instructions. You will be asked to enter the username and pass-
word.
3. When the installer is nished, it will start the Softube Plug-Ins Control application, in which you can
choose which plug-ins you want to show up in your host software.
You can always go back and start the Softube Plug-Ins Control application again! It is located in the Applications folder.
Softube Plug-Ins Control
(Step 4. Activate Plug-Ins)

SOFTUBE USER’S GUIDE | 9
Step 3. Installation on Windows
1. Choose which format you want to download:
/ -: Installs VST, VST3, AAX and AAX DSP formats for 32-bit applications. Use with
32-bit compatible hosts.
/ -: Installs VST, VST3, AAX and AAX DSP formats for 64-bit applications. Use with
64-bit compatible hosts.
: Installs RTAS plug-ins for Pro Tools 9
2. Run the installer and step through the instructions. You will be asked to enter the username and pass-
word.
3. Before the nal step it will start the Softube Plug-Ins Control application, in which you can choose
which plug-ins you want to install.
You can always go back and start the Softube Plug-Ins Control application again! It is located in the Applications folder.
Softube Plug-Ins Control
(Step 4. Activate Plug-Ins)
10 | INSTALLATION AND AUTHORIZATION
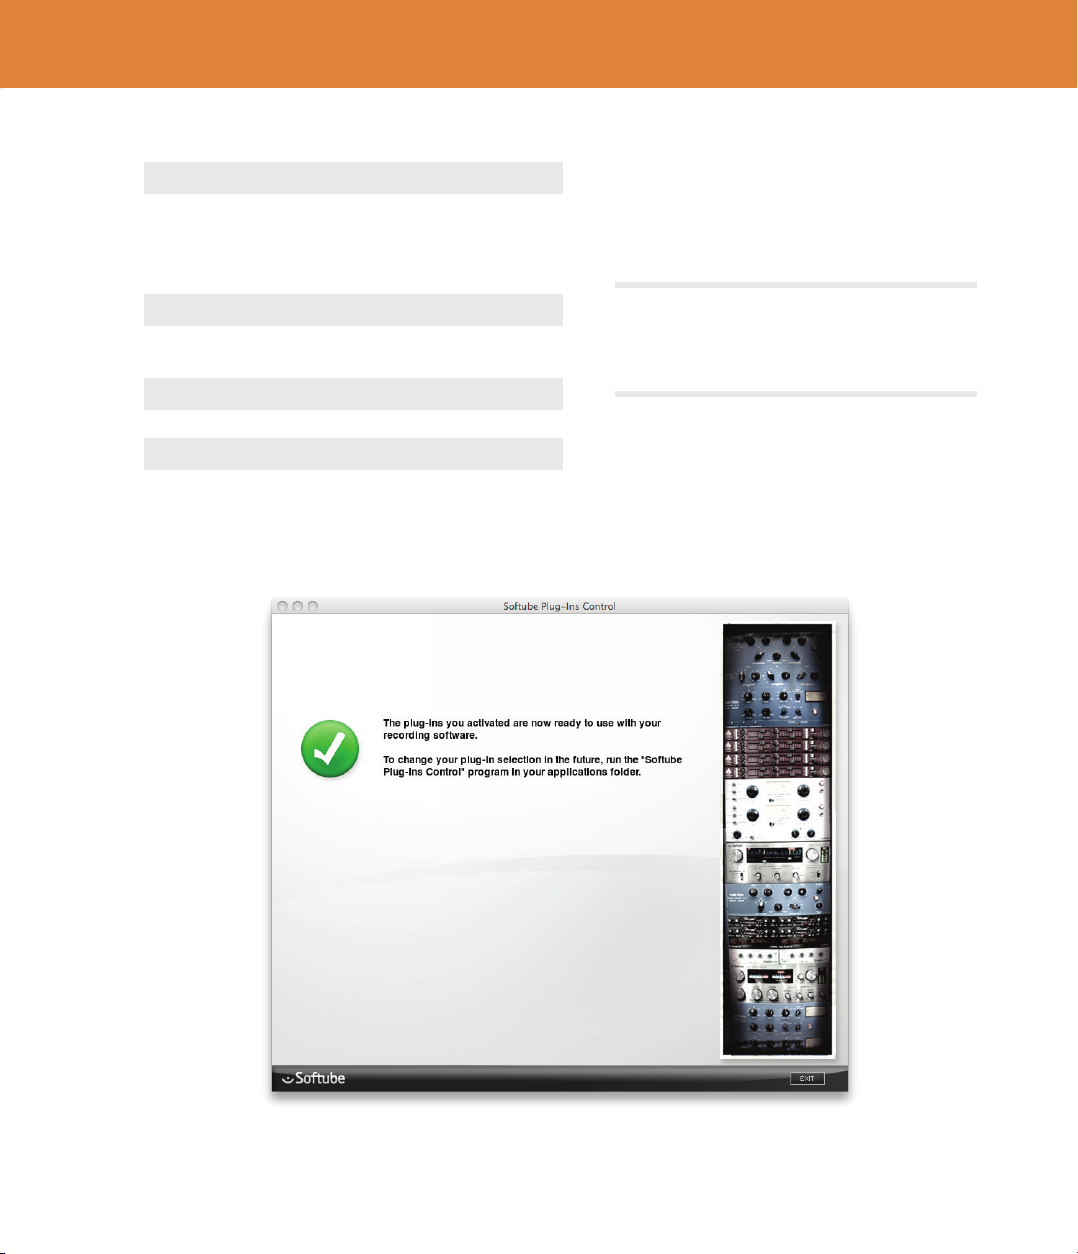
Step 4. Activate Plug-Ins
After installation has nished the Softube Plug-
Ins Control will automatically open. If that doesn’t
happen, please open it from the Applications folder.
e Softube Plug-Ins control will help you to
activate those products or plug-ins that you want to
be visible in your host software. Activate only the
products that you have licenses for.
You can also access the Softube Plug-Ins Control from the
“About” box in the plug-ins. See “About Box” on page 16 for
more information.
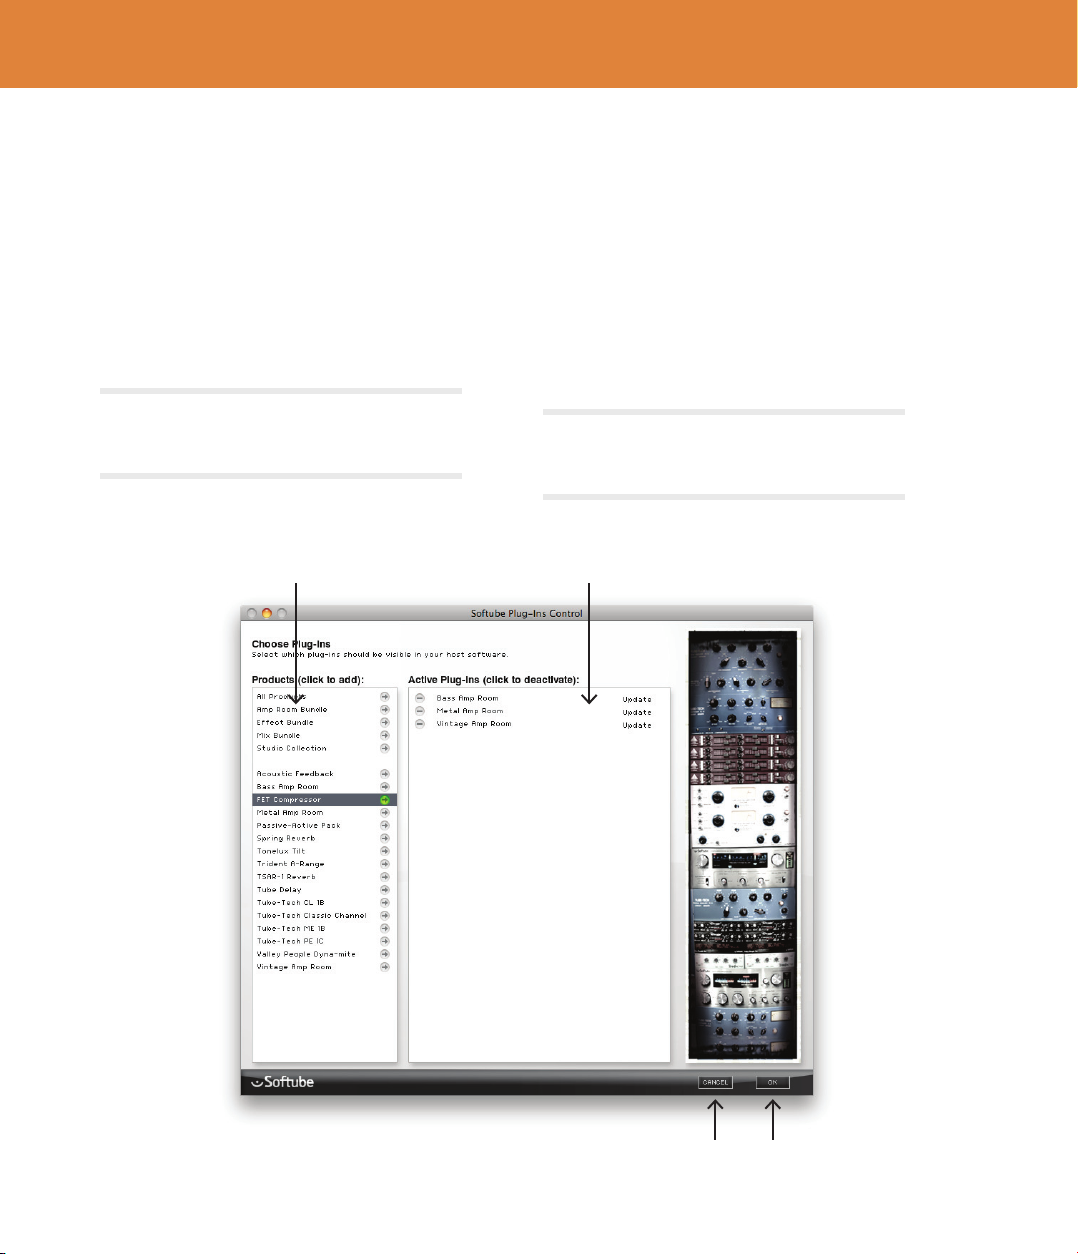
Products Active Plug-ins
Cancel OK
1. Select product(s) from the “Products” list. If
you have a previously installed product, it will
already be activated.
2. You can remove plug-ins from the “Active Plug-
ins” list by clicking on the red minus button.
3. Click OK to save changes and exit.
4. e Plug-Ins Control application is available in
your applications folder. Start the application to
make activate or de-activate plug-ins.
If you would like to remove a plug-in after an expired
demo license, just start the Softube Plug-Ins Control and
remove it from the Active Plug-Ins list.
SOFTUBE USER’S GUIDE | 11
Products A list of all Softube products.
Clicking on a bundle will
activate all plug-ins in that
bundle.
Active Plug-Ins A list of plug-ins that will be
visible in your host software.
OK Save changes and exit
Cancel Discard changes and exit
If you want to activate all plug-ins except one or two, it is
faster to click on the “All Products” item from the Products
list and then de-activate the plug-ins you don’t wish to
install.

System Requirements
Version 2.0 of the Softube plug-ins have the fol-
lowing minimum requirements:
All native versions
• Mac OS X 10.6, 10.7 or 10.8, with the latest
updates.
• Windows 8, Windows 7 (latest Service Pack,
32/64 Bit)
• Intel Core Duo, AMD Athlon 64 X2 or newer
• Screen resolution larger than 1280x800
• Any VST, VST3, AU, RTAS (Pro Tools 9)
or AAX (Pro Tools 10.3.7, 11.0.2 or higher)
compatible host application
• iLok USB key and the latest iLok License
Manager (download them from www.ilok.com)
• Broadband internet access for downloading
installer and register licenses.
Please, make sure that you always use the latest iLok Li-
cense Manager. It is not included in the Softube installer,
but can be downloaded from www.ilok.com.
All Softube plug-ins support both 32- and 64-bit
hosts and operating systems.
Supported sample rates: 44.1, 48, 88.2, 96, 176.4
and 192 kHz, in both mono and stereo.
Windows XP and Vista are no longer ocially sup-
ported.
VENUE System Requirements
e following Softube products are available for the
Avid VENUE consoles. is table shows the maxi-
mum processor usage or the number of instances in
mono on 44.1/48 kHz.
Product Core Accel
Acoustic Feedback Deluxe < 68% < 31%
FET Compressor < 77% < 35%
Tonelux Tilt 3 inst. 10 inst.
Tonelux Tilt Live 8 inst. 18 inst.
Trident A-Range – < 66%
Tube-Tech PE 1C 1 inst. 4 inst.
Vintage Amp Room – < 62%

SOFTUBE USER’S GUIDE | 13
AAX DSP Supported Sample Rates
e following sample rates are currently supported for the AAX DSP format.
44.1/48 kHz 88.2/96 kHz 176.4/192 kHz
Active Equalizer √ √ √ (mono)
Acoustic Feedback √ (mono) √ (mono) √ (mono)
Acoustic Feedback Deluxe
Bass Amp Room √ √ √ (mono)
FET Compressor √ √ √
Focusing Equalizer √ √ √
Metal Amp Room √ √
Passive Equalizer √ √ √
Spring Reverb √ √ √
Summit Audio Grand Channel √ √ √
Summit Audio EQF-100 √ √ √
Summit Audio TLA-100A √ √ √
Tonelux Tilt √ √ √
Tonelux Tilt Live √ √ √
Trident A-Range √ √ √
TSAR-1 & TSAR-1R Reverb
Tube Delay √ √ √ (mono)
Tube-Tech Classic Channel √ √ √
Tube-Tech CL 1B √ √ √
Tube-Tech ME 1B √ √ √
Tube-Tech PE 1C √ √ √
Valley People Dyna-mite √ √ √
Vintage Amp Room √ √ √ (mono)
White Amp √ √ √ (mono)
√ = sample rate supported in both mono and stereo.
√ (mono) = sample rate only supported in mono. Use “multi-mono” for stereo.
Product Core Accel
Acoustic Feedback Deluxe < 68% < 31%
FET Compressor < 77% < 35%
Tonelux Tilt 3 inst. 10 inst.
Tonelux Tilt Live 8 inst. 18 inst.
Trident A-Range – < 66%
Tube-Tech PE 1C 1 inst. 4 inst.
Vintage Amp Room – < 62%

Plug-In Latencies
is table shows the plug-in latency in samples.
ese numbers are also reported to the DAW.
44.1/48 kHz 88.2/96 kHz 176.4/192 kHz
Active Equalizer 8 samples 0 (no latency) 0 (no latency)
Acoustic Feedback 0 0 0
Acoustic Feedback Deluxe 0 0 0
Bass Amp Room 3 0 0
FET Compressor 4 0 0
Focusing Equalizer 4 0 0
Metal Amp Room 3 0 0
Passive Equalizer 8 0 0
Spring Reverb 0 0 0
Summit Audio Grand Channel 8 4 0
Summit Audio EQF-100 4 0 0
Summit Audio TLA-100A 4 4 0
Tonelux Tilt 0 0 0
Tonelux Tilt Live 0 0 0
Trident A-Range 4 0 0
TSAR-1 & TSAR-1R Reverb 0 0 0
Tube Delay 3 0 0
Tube-Tech Classic Channel 4 4 0
Tube-Tech CL 1B 4 0 0
Tube-Tech ME 1B 12 8 0
Tube-Tech PE 1C 12 8 0
Spring Reverb 0 0 0
Summit Audio TLA-100A 4 4 0
Valley People Dyna-mite 4 0 0
Vintage Amp Room 3 0 0

| 15
3 User Interface
- “what you see is what you
get” products. You should be able to intuitively learn
the products within minutes, so that you can work
fast and ecient with them. ere are a couple of
things that remain the same for all of our plug-ins,
like keyboard commands and menu row. ese will
be explained in this chapter. For detailed informa-
tion of a particular plug-in, please see its chapter.
Menu Row
In the bottom of the plug-in interface, you will see
a thin black row with some buttons. We’ll use the
Dyna-mite plug-in as example, but the same goes
for all plug-ins.
About Box Open the “About” Box with
version info, check for updates
and plug-ins control center.
Value Display Displays the knob value when
the mouse is pointing at the
knob.
Setup Changes global options for all
instances of that plug-in.
Quick Guide Opens the Quick Guide (if
applicable) in a PDF reader.
Open Manual Opens the User Manual in a
PDF reader.
“About” Box
with Check Updates
and Plug-ins Control
Value Display Setup
Open Quick Guide
(if applicable)
Open Manual
in PDF reader

16 | USER INTERFACE
About Box
Clicking on the Softube logo opens the “About”
box, with information about the current version,
trademarks and legal yada-yada. at’s not really
interesting, but the cool stu is the buttons on the
bottom row.
Check Updates Opens the web browser and
checking with softube.com
if there are newer versions
of this plug-in and all other
Softube plug-ins that you have
installed.
Plug-Ins Control Opens the Plug-Ins Control
application, which allows you
to install, de-activate, check for
updates, change install loca-
tions, etc. For more informa-
tion, please see the Installation
chapter.
Newsletter Opens the web browser and
lets you sign up for our news-
letter, so that you will be the
rst to know about new prod-
ucts, tips & tricks, updated
versions, etc.
OK Closes the “About” box.
SOFTUBE USER’S GUIDE | 17
If you messed something up and manually need to
set these options, you’ll nd them in text format in
the following locations:
: ~/Library/Application Support/
Softube
: username\Application Data\
Setup
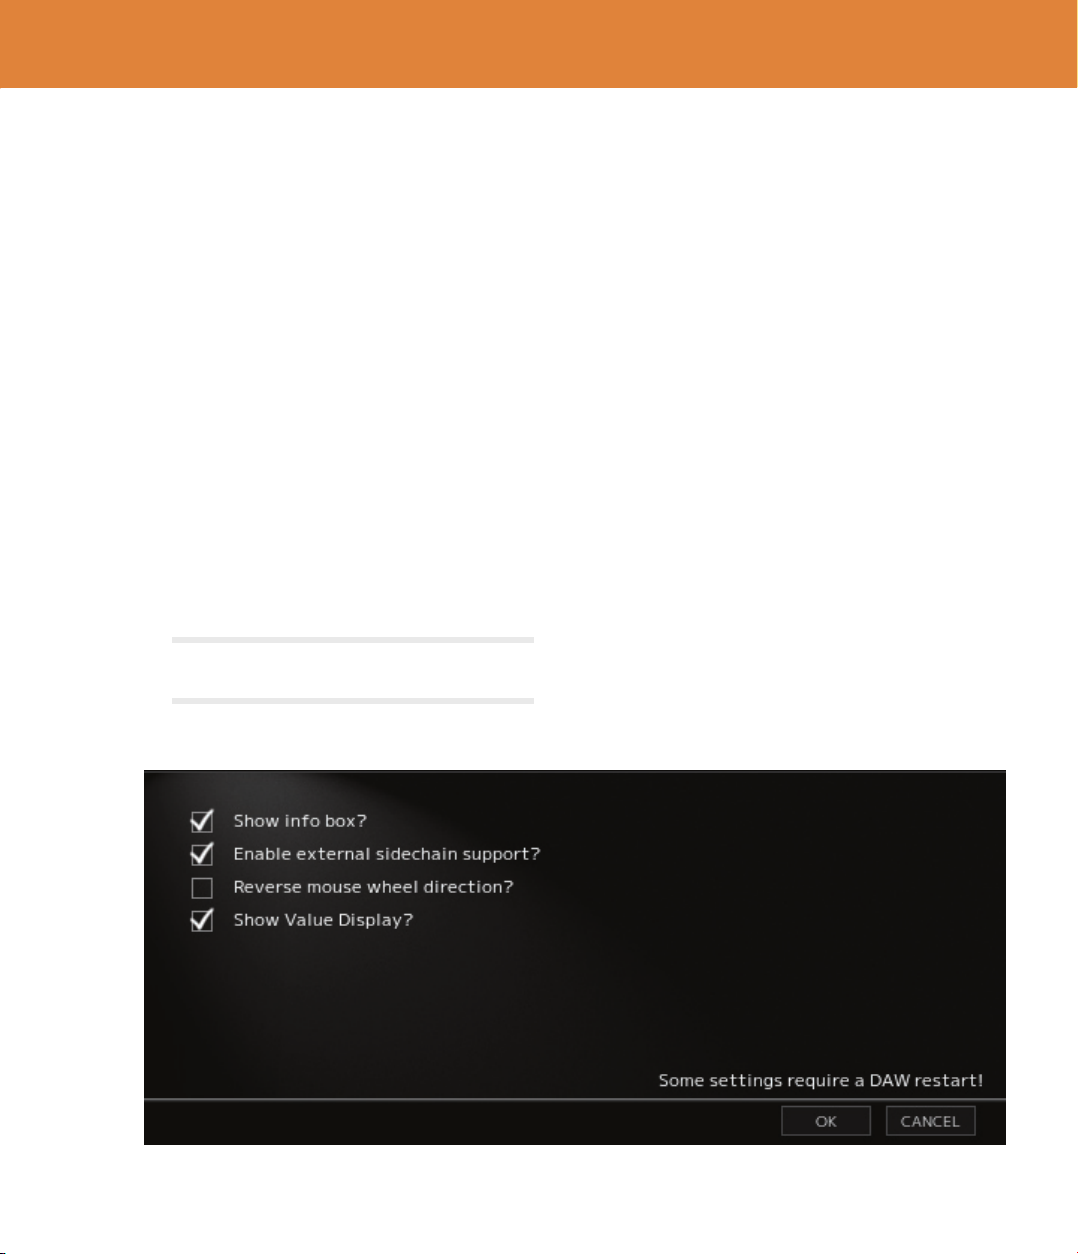
In the Setup window you can change settings that
will aect all instances of that particular plug-in. If
you for example de-select the “Show Value Display”
option in the Valley People Dyna-mite plug-in the
value display will be o for all Dyna-mites on your
system until you select that option again.
e dierent options vary between Windows and
Mac, and also dierent formats and plug-ins. e
most common options are:
: If you
want to use external sidechaining in VST2.
: Enables the parameter and
value display in the bottom row of the plug-in.
: 32-bit Mac Only. Tries to use
a newer graphics system. Select this if you experi-
ence problems with the user interface.
You need to restart your host software (DAW) before the
changes to fully take eect!

18 | USER INTERFACE
Plug-In Specic Key Commands
In many plug-ins, you can -click on a knob or
a switch to get some extra functionality
Metal Amp Room
-click and drag a mic will move both mics
simultaneously.
All Amp Rooms
-click in the cabinet background will change
cabinet (or amp) without any animations
Focusing Equalizer
-click on the Low and High Cut faders will
move both faders simultaneously.
Key Commands
All numbers and labels in the plug-in are clickable.
is allows you to easy select a setting by clicking
on the wanted value. Hovering above a label will
turn the mouse pointer into a pointing hand.
Mouse
Up/Down or
Mouse Wheel Change a parameter, such as a
knob or a switch.
Keyboard
Fine Adjust ⌘ (Mac) or (Win),
while changing the parameter
value.
Reset to Default , while clicking on the
knob or fader.
Pro Tools Specic Commands
Automation Control
Window ++right click (Win)
or +⌘++click (Mac)
Show Automation
Track +right click (Win) or
+⌘+click (Mac)
| 19
4 Abbey Road Studios
Brilliance Pack
Foreword by Peter Cobbin
“Welcome to a little Abbey Road brilliance.
roughout the ‘60s there were a number of small boxes dotted around Abbey Road
Studios, which were simply known as ‘Brilliance’ or ‘Presence’ boxes. In this era, engi-
neers were looking for ways of adding presence to their recordings, especially in popular
music. Enter the Brilliance boxes: these simple passive equalizers were portable versions
of the grey RS127s that were rack-mounted into the studio control room patchbays.
ey were designed to give Abbey Road Studios recording engineers additional fre-
quencies that were not found on the EMI REDD studio mixing desks of the time.
Meet Lester
Lester Smith is a technical engineer at Abbey Road Studios and, amongst other things,
is the custodian of our vintage equipment and microphone collection.

20 | ABBEY ROAD STUDIOS BRILLIANCE PACK
through an EMI interfacing transformer. e trans-
former “eect” exaggerated the EQ curves.
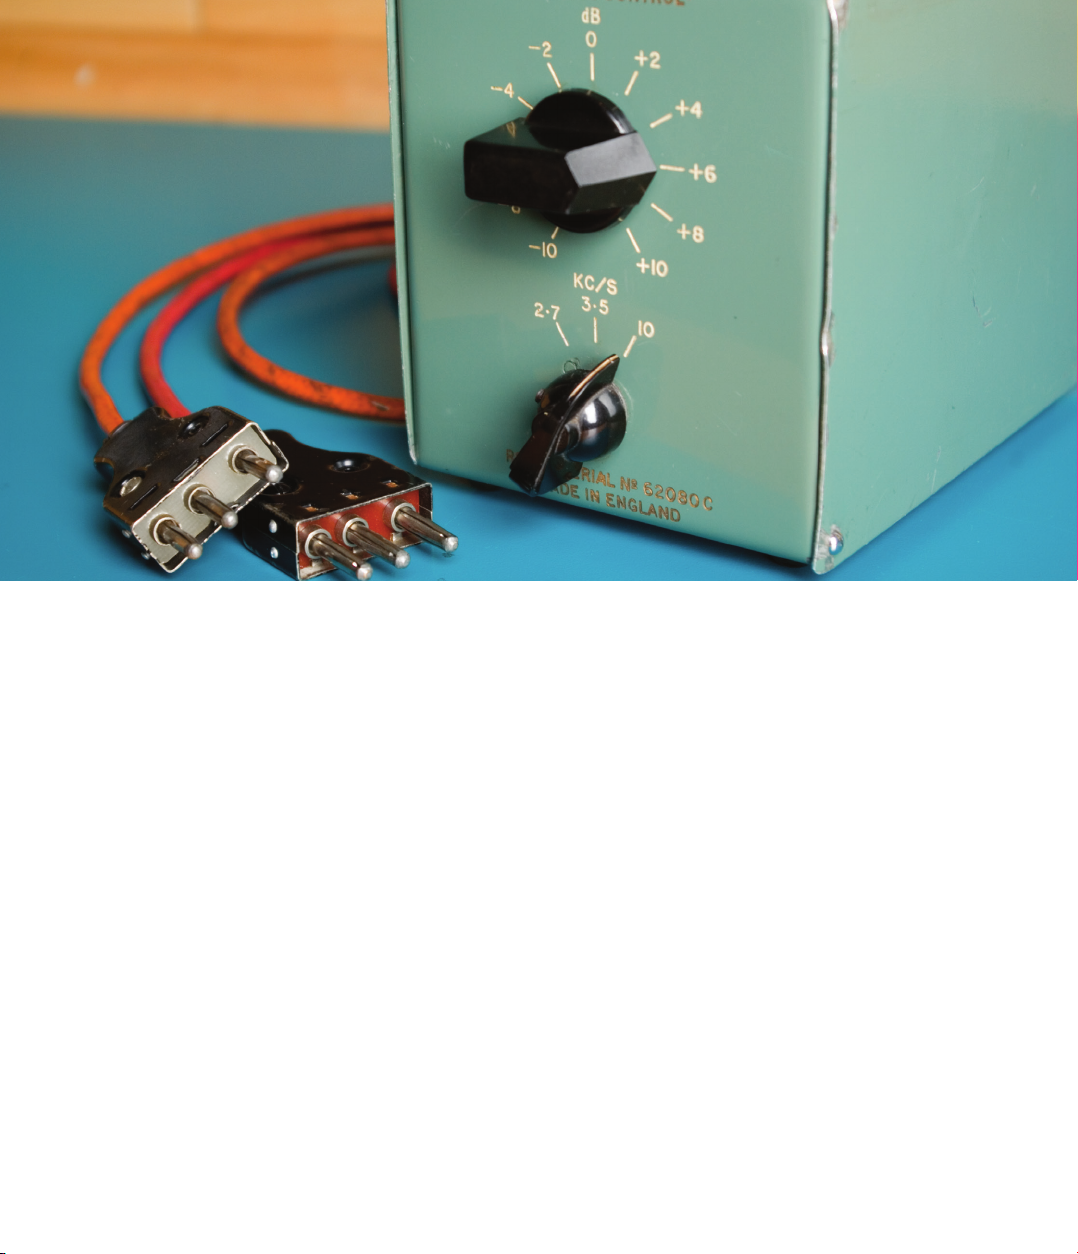
And so, in the spirit of the ‘60s, we have included
this “not so precise” eect by providing two RS127
plug-ins: the grey rack version and the green
standalone unit with the transformer eect. I have
seen old setups where engineers used two RS127s
in series for heavy EQ treatment, and I can highly
recommend using these EQs on guitars, keyboards
and vocals. If you nd that +/-10 dB is not enough,
do what they did back then – use two of them!
The RS135
e RS127 was primarily made to supplement the 5
kHz REDD desk EQ, and proved to be immensely
useful and popular. However, there was still a need
to boost frequencies between 5 kHz and 10 kHz.
EMI 8 kHz boost boxes were widely used but little
was know about them. Only recently, when putting
this project together, Lester removed the 8 kHz
label (incidentally, made with a Dymo prototype)
and found on the reverse that these boxes were in
fact originally RS135s. Our researchers have shown
that these boxes were designed for a 16.4 kHz
boost, but modications made at the time choked
this frequency by half – enabling engineers to boost
signals at 8 kHz. We have decided to add this to
our ‘Brilliance’ suite, thus completing the range of
presence EQs that were signicantly used at Abbey
Road Studios in the ‘60s.
Peter Cobbin, Director of Engineering, Abbey
Road Studios April 2008
In recent years, while working on various Beatles
and John Lennon-related mix projects, Lester intro-
duced me to these little boxes. My assistants Mirek
Stiles and Sam O’Kell had observed that, in various
‘60s setup sheets, the prevailing EQ was marked as
“RS127”. is equalizer was the 127th item made
in-house by EMI for the Recording Sector. Keen to
try these, Lester blew 40 years of dust from some of
the boxes and wired them into our patchbay via the
old ‘Siemens’ connectors and presto – instant zing!
e large cut and boost control made it very easy to
hear an immediate presence. Put simply – they’re
brilliant!
e Sixties were an adventurous period in our his-
tory. Rule books were put aside and considerable
experimentation by engineers helped shape ways
and means of producing sounds not heard before.
Following this spirit of experimentation, our latest
plug-in suite provides today’s engineer and musician
with a bundle of little boxes straight from this era.
The RS127s
e green and grey RS127s have identical circuits
and controls. e grey has a chrome rack handle
that made it convenient to plug into the control
room patch-bays. ere were usually two of these
in each room, but due to their popularity additional
EQ was often needed, and so stand-alone boxes
were made to achieve this. ese were painted
green. Because of their portability, they were often
used throughout the studio complex; not just in the
studios themselves but also in the mastering, trans-
fer and post-production rooms.
e RS127 is well documented in the highly rec-
ommended “Recording e Beatles” book (Kevin
Ryan & Brian Kehew, Curvebender Publishing,
2006) which also refers to the change in line level
and EMI standard impedance that has taken place
since the early Sixties. By happy accident, when
comparing the green and grey units, we heard a
dramatic dierence when one of them was passed
This manual suits for next models
5
Table of contents
Other Softube Music Mixer manuals


Popular Music Mixer manuals by other brands

Crest Audio
Crest Audio X 18R owner's manual

Solidyne
Solidyne UNIDEX Series Disassembly guide

Architectural Acoustics
Architectural Acoustics AUTOMIX CONTROL 8 user manual

Behringer
Behringer PRO MIXER DJX USB DJX900USB quick start guide

Yamaha
Yamaha RIVAGE PM10 Operation manual

Avolites
Avolites Sapphire Touch Operator's manual


