Sogatel Pearl User manual

Compatible with Mac OS X 10.4.3 and higher.
Microphone not compatible with Macs.
USER GUIDE

Thank you for purchasing your new Sogatel Webcam.
This user guide will provide you with all the information you need to get
the most from your system.
Before you make your first video call you will need to install and set up
your webcam. Simple instructions are provided on the following pages.
Need help?
If you have any problems setting up or using your Sogatel Webcam please
check the Sogatel website or contact us at support@sogatel.com
Alternatively, solutions to common problems can be found in the FAQ section
at the end of this manual.

3Setting up your webcam
Your Sogatel webcam is a plug and play device. It will be recognised when it is connected to your computer
without any need to install extra drivers. We recommend that the USB cable is connected directly to a port on
your computer, rather than through a USB hub or extension.
The installation CD contains some optional video recording tools for Windows and Mac users. Remember to
connect your webcam to the computer before installing any of the software from the CD.
Windows users can also connect the microphone plug to the microphone socket on their computer or sound
card (usually pink).
Please note that the built-in microphone feature does not work on Macs.
Fig. 1.1

4Contents
Installation and operation
Recording video in Webcam Videocap
Installing Debut Video Capture Software
Recording video in Debut Video Capture Software
Setting up the microphone (Windows XP)
Setting up the microphone (Windows 7/Vista)
Installation and operation
Setting up video
Recording video in WebCam Monitor
Recording video in Quick Time X
Recording video in Quick Time 7
5
6
7
8
9
10
AOL Instant Messanger (AIM)
Google Mail (Gmail)
iChat (Mac OS X)
Photo Booth (Mac OS X)
Skype
Windows setup
Mac OS X setup
Windows Live Messenger (MSN)
Yahoo! Messenger
Windows setup
Mac OS X setup
Windows
Mac OS X
Other problems
11
12
13
14
15
16
17
18
19
20
20
21
22
24
24
26
27
28
29
5Windows 7/VistaXP Installation
Connect the webcam to an available USB port on your computer. Windows should immediately recognise the camera
and make it available to your video chat applications. The microphone jack can be connected to the computer’s micro-
phone port (usually pink) if required.
Windows XP users must make sure that they have Service Pack 2 or later installed before the webcam will be
recognised. Service Pack 2 is a free update available through Windows Update to all XP users and is recom-
mended for security and compatibility.
Your Sogatel webcam comes with some optional Sogatel video software.
This can be installed at any time. Run the software from your CD or download the latest version here:
www.sogatel.com/downloads/
The on-screen instructions will guide you through the installation process.
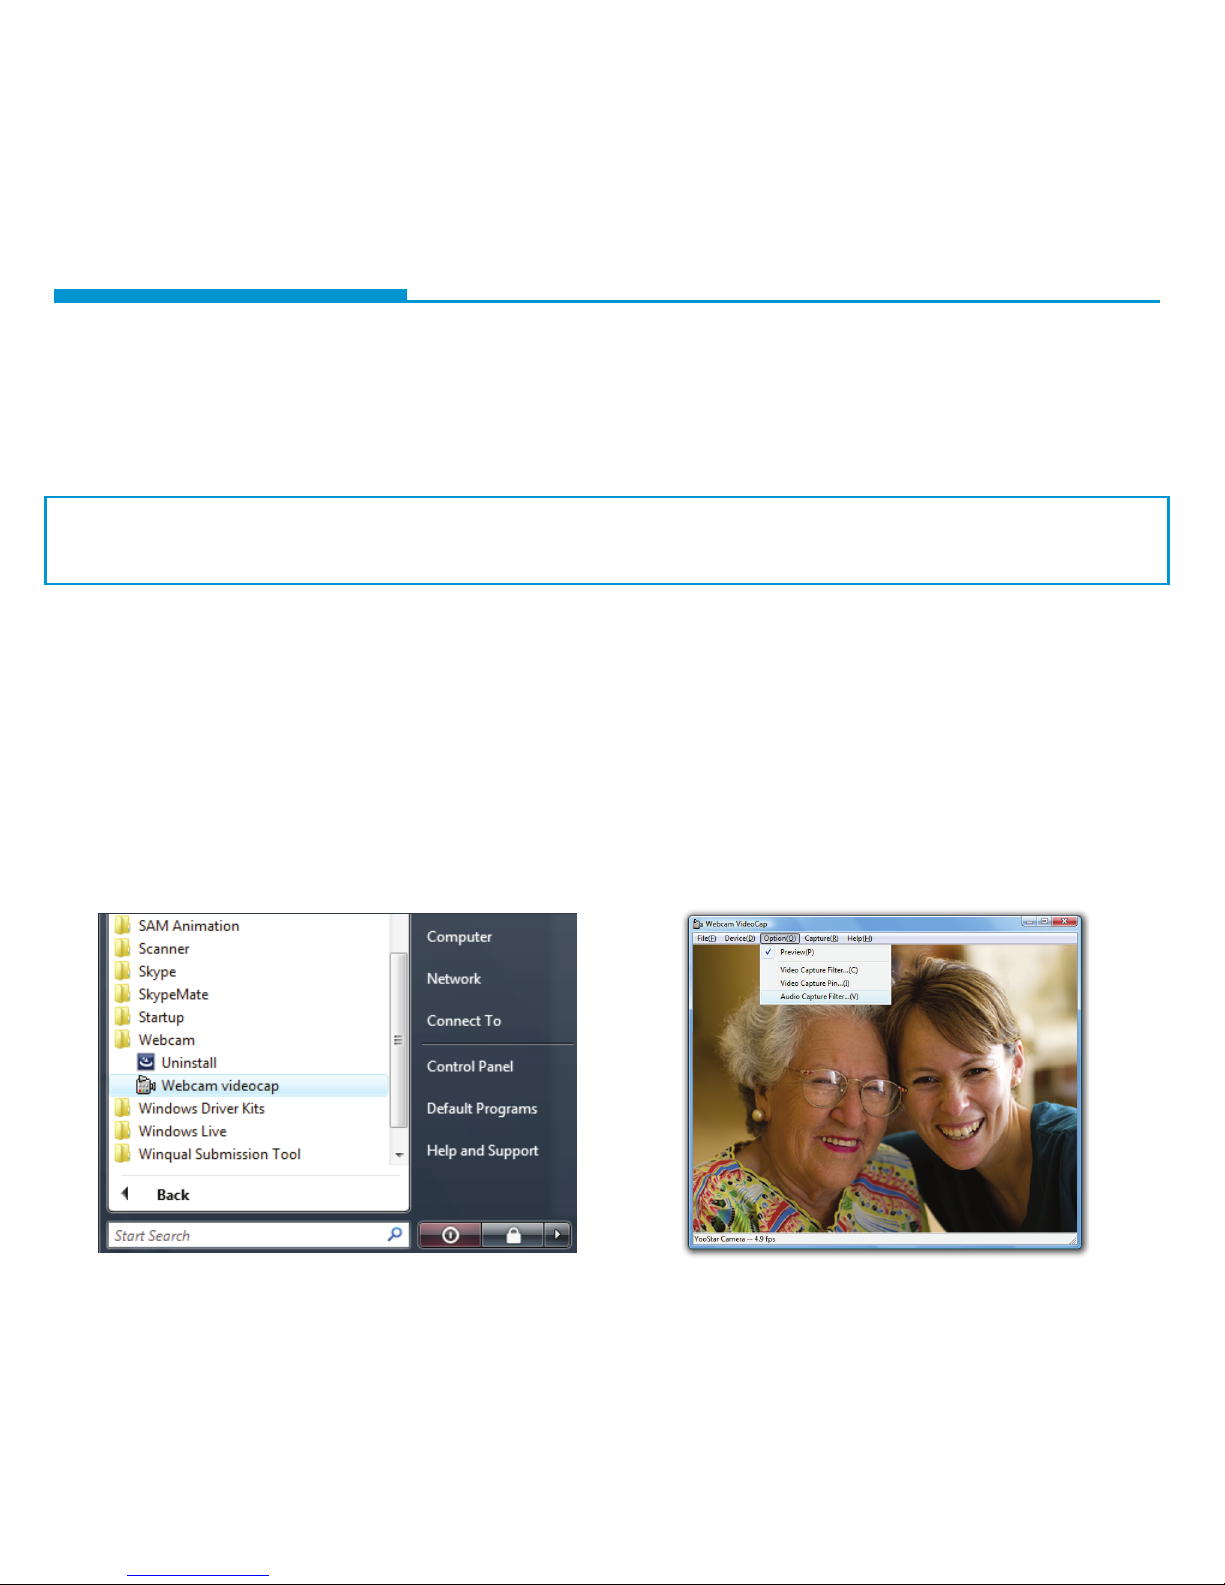
Once the installation is complete, go to your Windows Start Menu and select All Programs, Webcam, and then
Webcam videocap [Fig. 2.1]; your picture will appear on the screen.
If you have more than one webcam installed or the picture does not immediately appear, select the Device menu
and choose the webcam from the list. The Video Capture Filter... and Video Capture Pin... settings in the Option
menu allow you to adjust the picture quality [Fig. 2.2].
You can focus the picture by manually turning the focusing ring around the camera lens.
•
•
•
•
•
Fig. 2.1 Fig. 2.2
6Windows 7/VistaXP Recording video
Make sure all other webcam software is closed, then open Webcam Videocap. Select the webcam in the Device menu.
If you plan to also record sound, make sure that the correct audio source is selected in the Device menu as well.
Record Audio should also be ticked in the Capture menu.
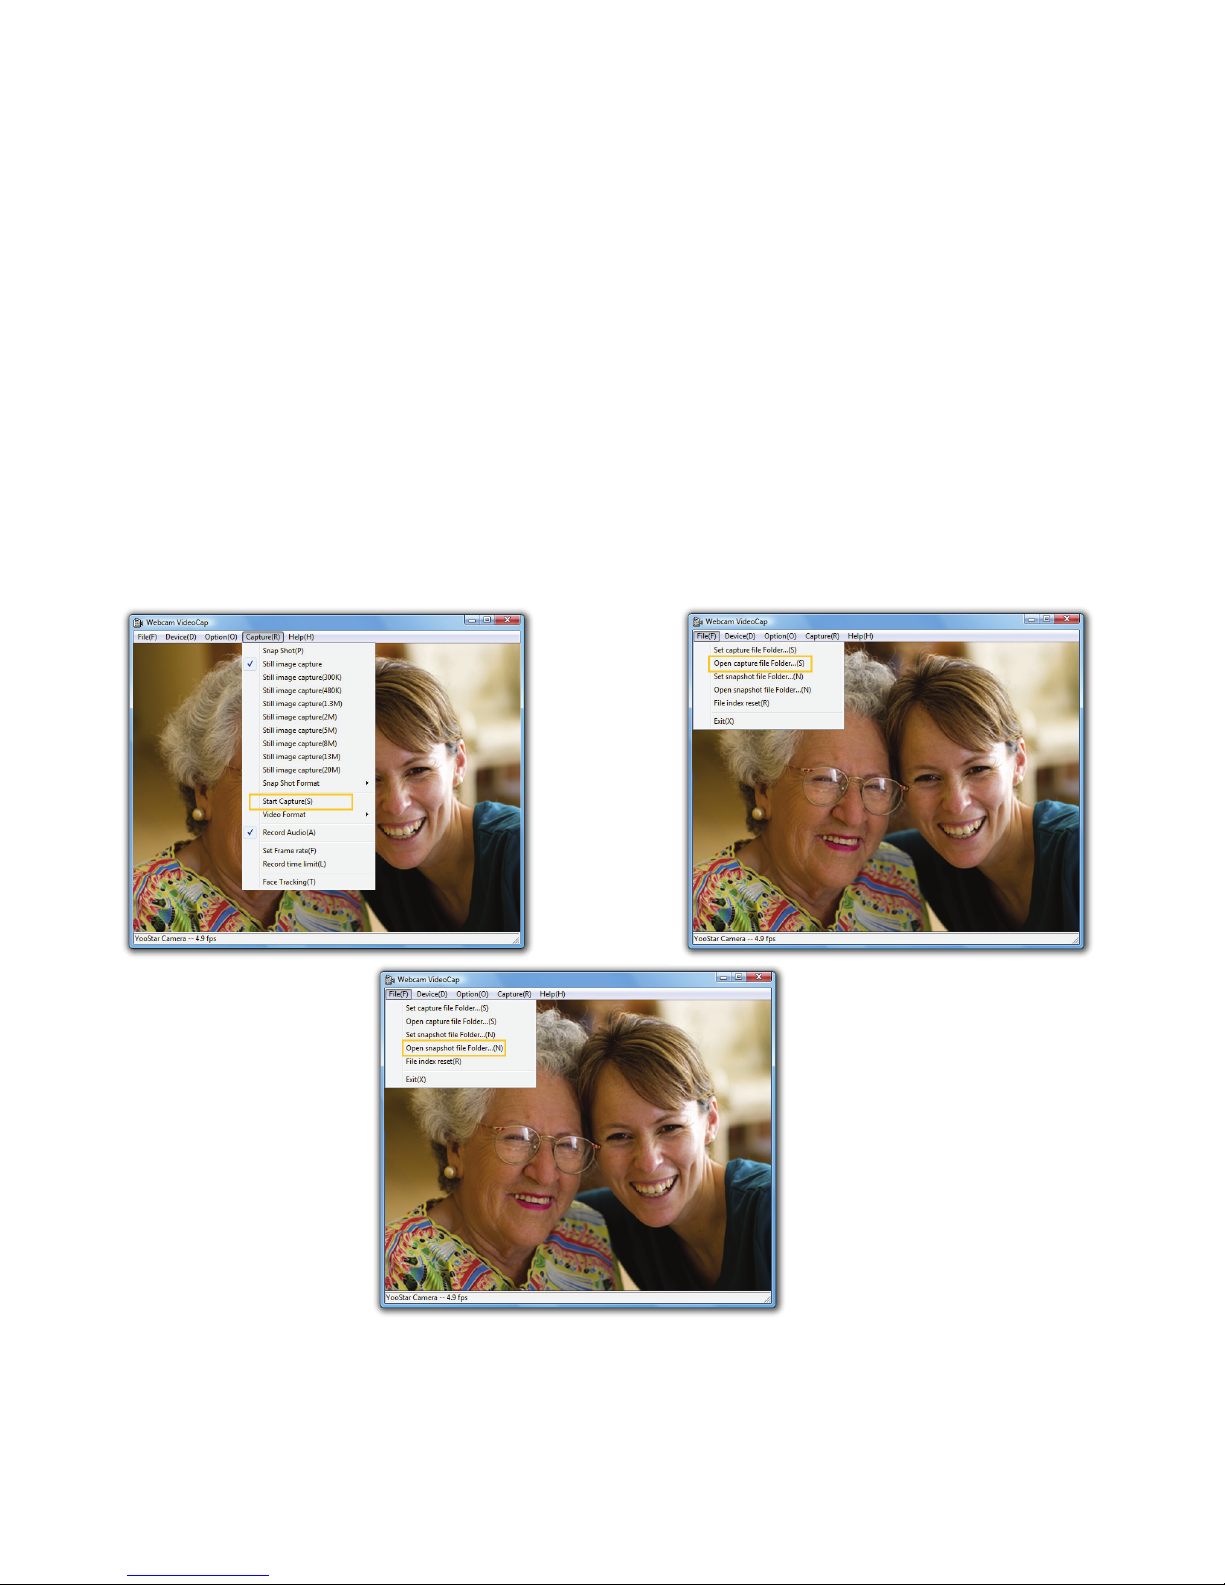
Before recording a video, select Set capture le Folder… from the File menu and choose a location on your com-
puter where your recorded video will be saved.
You can then record a video using the Start Capture and Stop Capture options in the Capture menu [Fig. 2.3].
To view your finished video, select Open capture le Folder... from the File menu [Fig. 2.4].
You can also take still pictures at any time using the snapshot button on the camera itself, or by selecting Snap
Shot from the Capture menu.
To view your snapshot collection, select Open snapshot le Folder... from the File menu [Fig. 2.5].
•
•
•
•
•
•
Fig. 2.3 Fig. 2.4
Fig. 2.5
7Windows 7/VistaXP Installaing Debut Video Capture Software
Fig. 2.6 Fig. 2.7
•
•
•
•
•
Your Sogatel webcam comes with a free trial version of Debut Video Capture Software.
This can be installed at any time. Run the software from your CD or download the latest version here:
www.nchsoftware.com/capture/index.html
The on-screen instructions will guide you through the Debut installation process.
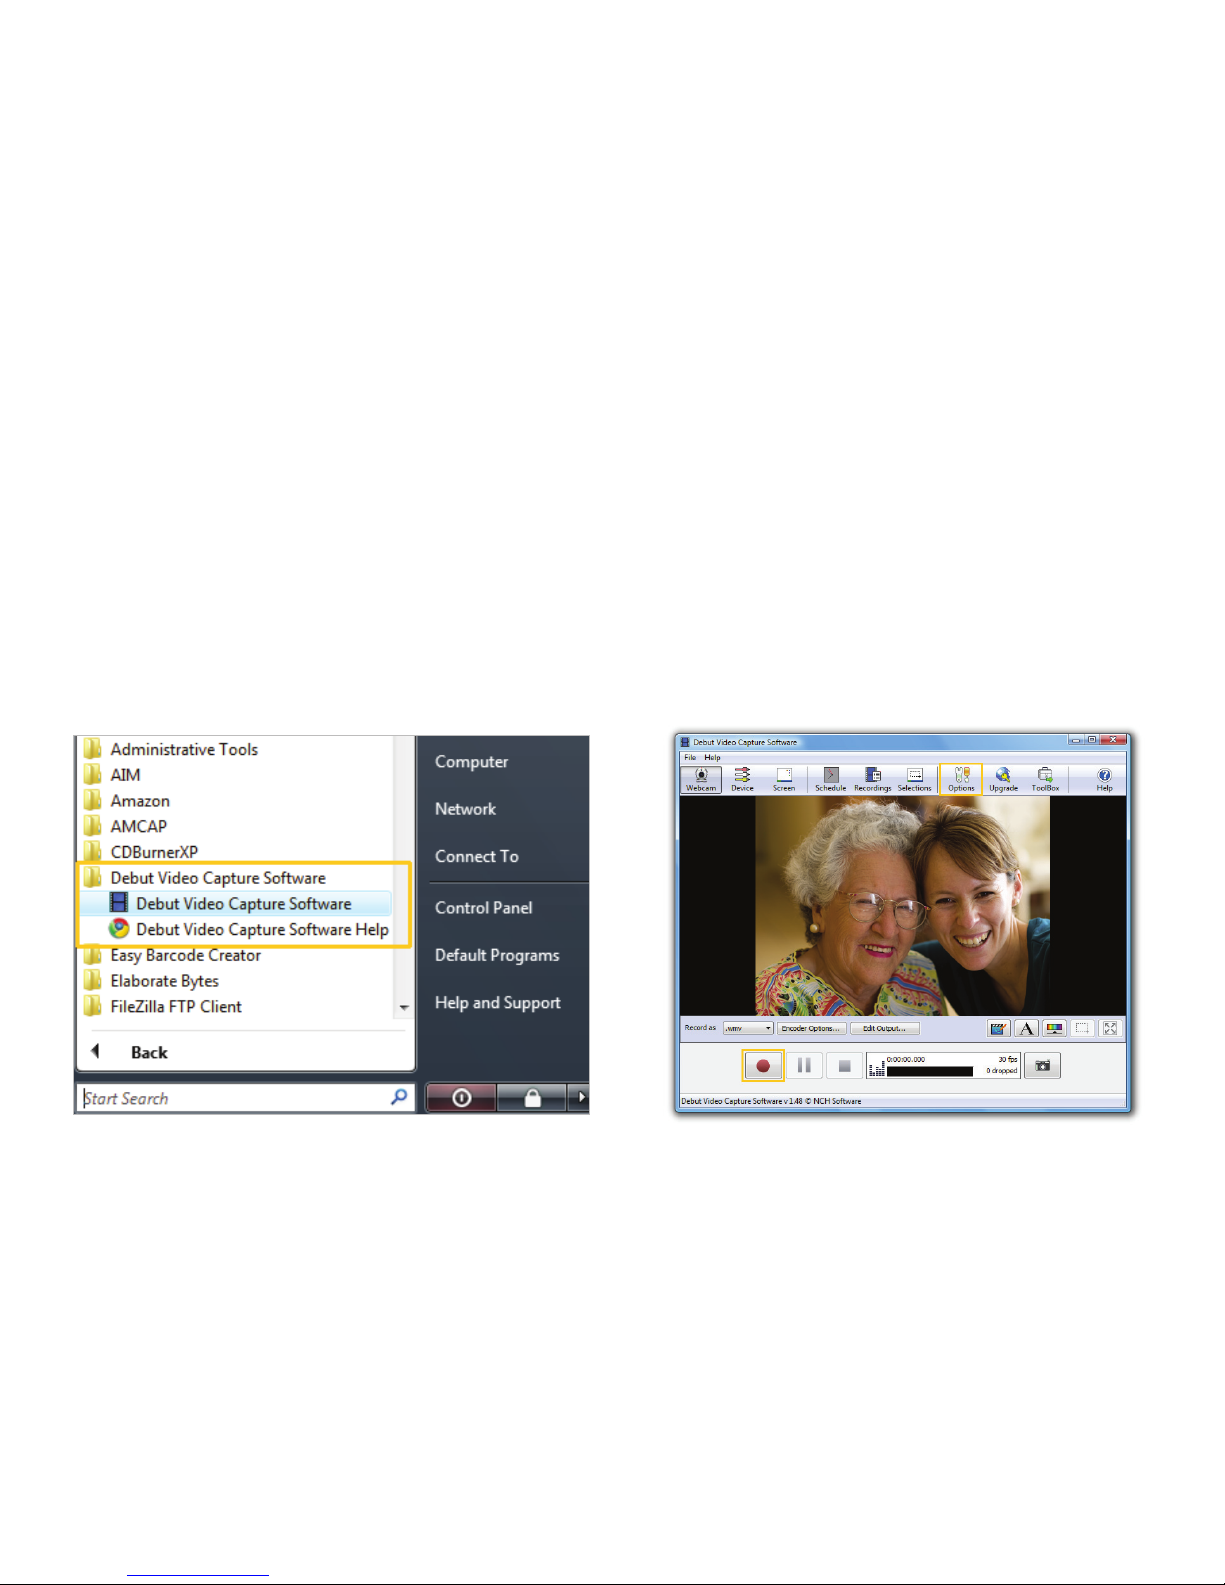
Once Debut Video Capture Software has been installed, go to your Windows Start Menu and select All Programs,
Debut Video Capture Software, and then Debut Video Capture Software again [Fig. 2.6]; your picture will appear
on the screen.
If you have more than one webcam installed or the picture does not immediately appear, click the Options button
and choose the Sogatel USB 2.0 Camera from the list [Fig. 2.7]. The Device Settings button and Format dropdown
menu allow you to adjust the picture quality. Click OK after making any changes to store your new settings.
You can focus the picture by manually turning the focusing ring around the camera lens.
8Windows 7/Vista/XP Recording video
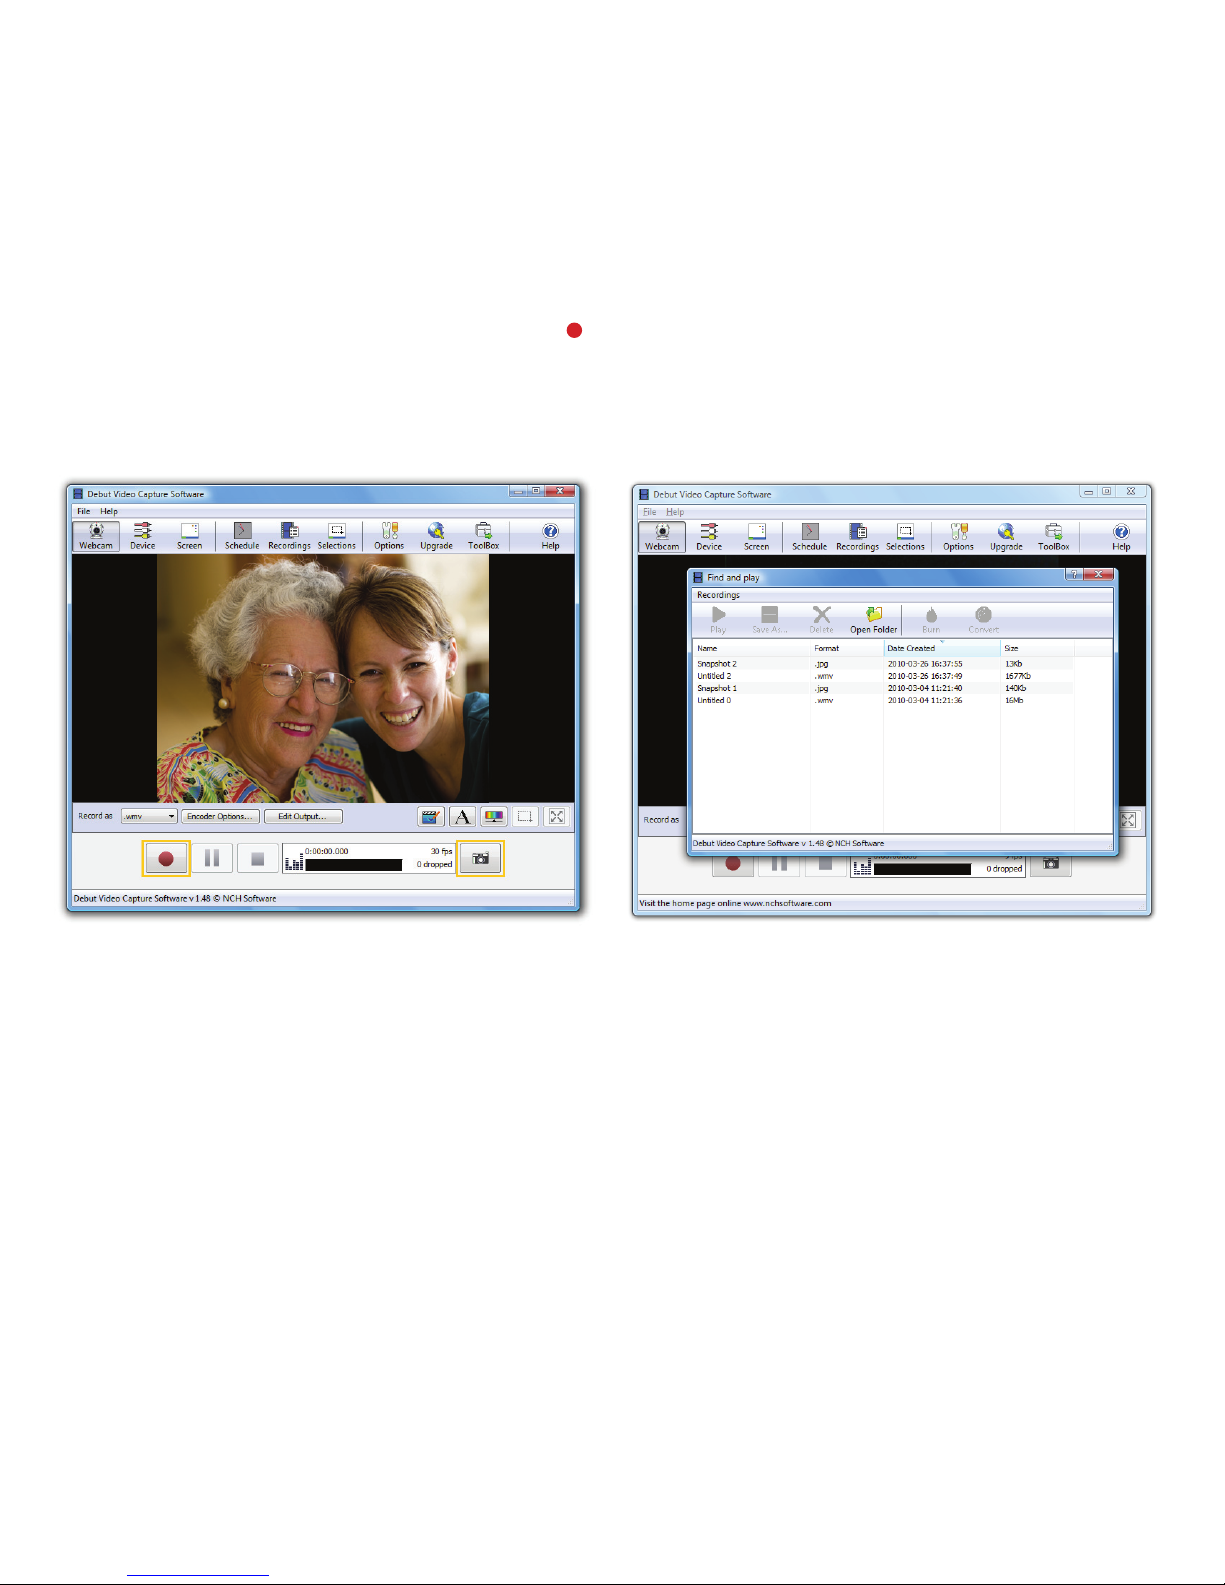
To create a video simply click the red Record button on the main Debut Video Capture window [Fig. 2.8].
You can also take still pictures at any time using the Camera button in the bottom right [Fig. 2.8].
You can browse your videos and snapshots by clicking the Recordings button at the top of the main Debut Video
Capture window [Fig. 2.9].
•
•
•
Fig. 2.8 Fig. 2.9

9Windows XP Setting up the microphone
•
•
•
•
•
Connect the webcam’s microphone jack to the microphone socket of the computer (usually pink).
Open your Control Panel from the Start Menu and select the Sound and Audio Devices panel.
Click the Voice tab along the top of the settings window which appears.
Make sure that the correct sound device is selected as the default in the drop down menu under Voice Recording
[Fig. 2.10], and then click OK to save your changes.
If the microphone is too quiet or too loud, you can adjust it with the Volume… [Fig. 2.11] setting in the same Voice
Recording panel. Make sure that the microphone is not muted.
You may also need to set up the default device for the individual applications you use.
Fig. 2.11Fig. 2.10
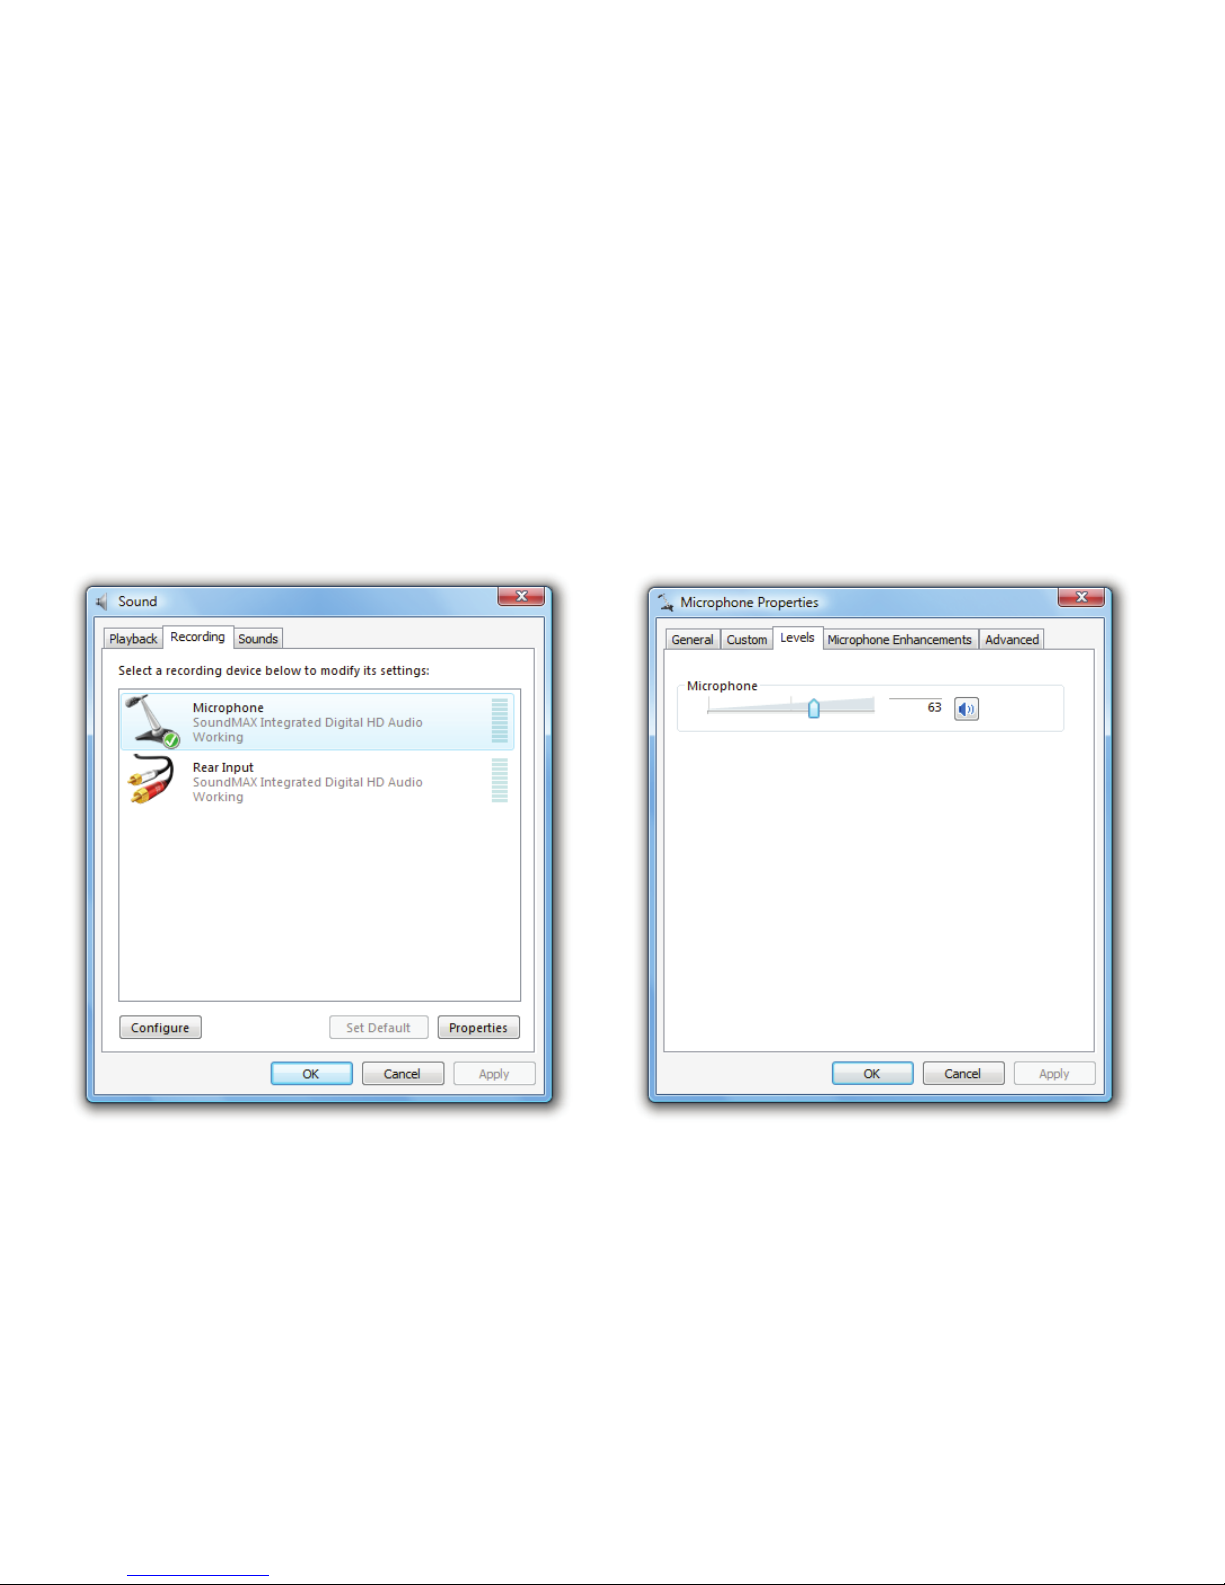
10Windows 7/Vista Setting up the microphone
Connect the webcam’s microphone jack to the microphone socket of the computer (usually pink).
Open your Control Panel from the Start Menu and select the Hardware and Sound panel.
Click Manage Audio Devices and then the Recording tab [Fig. 2.12] along the top of the settings window which appears.
Make sure that the correct port is selected as the default device under Recording, and then click OK to save your changes.
If the microphone is too quiet or too loud, you can go back to the same screen and select Properties to adjust the
Levels. Make sure that the microphone is not muted [Fig. 2.13].
You may also need to set up the default device for the individual applications you use.
Fig. 2.12 Fig. 2.13
•
•
•
•
•
11Mac OS X Installation and operation
As soon as you connect the webcam to an available USB port on your Mac, the camera will be ready for use in your
chosen application.
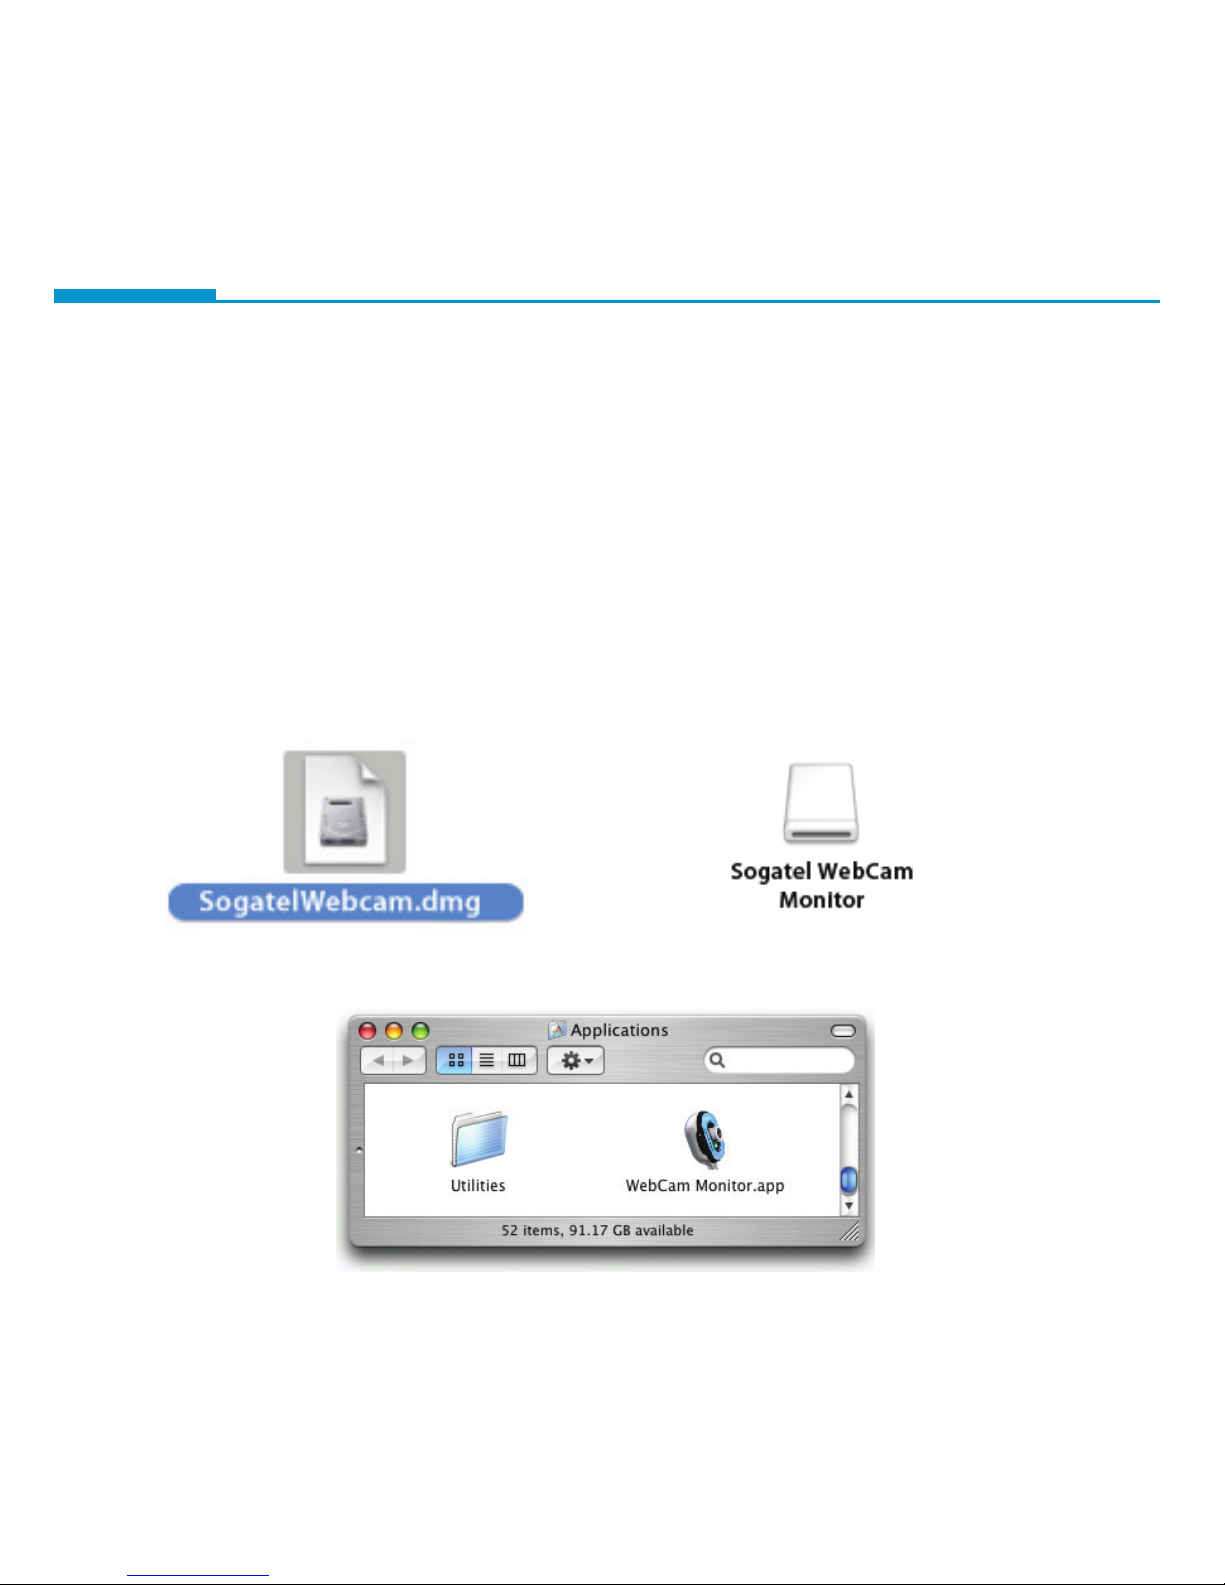
If you require extra software for making videos or testing the webcam, an application called WebCam Monitor is
included on the CD or downloadable at www.sogatel.com/drivers/SogatelWebcam.dmg
Double click the SogatelWebcam.dmg file [Fig 3.1].
Open the Sogatel WebCam Monitor icon which appears on your desktop [Fig 3.2].
Follow the drag and drop instructions to copy WebCam Monitor to your computer.
You can then open WebCam Monitor from your Applications folder at any time to use the software [Fig. 3.3].
Fig. 3.3
•
•
•
Fig. 3.1 Fig. 3.2
12Mac OS X Setting up video
Note: You can focus the picture by manually turning the focusing ring around the camera lens.
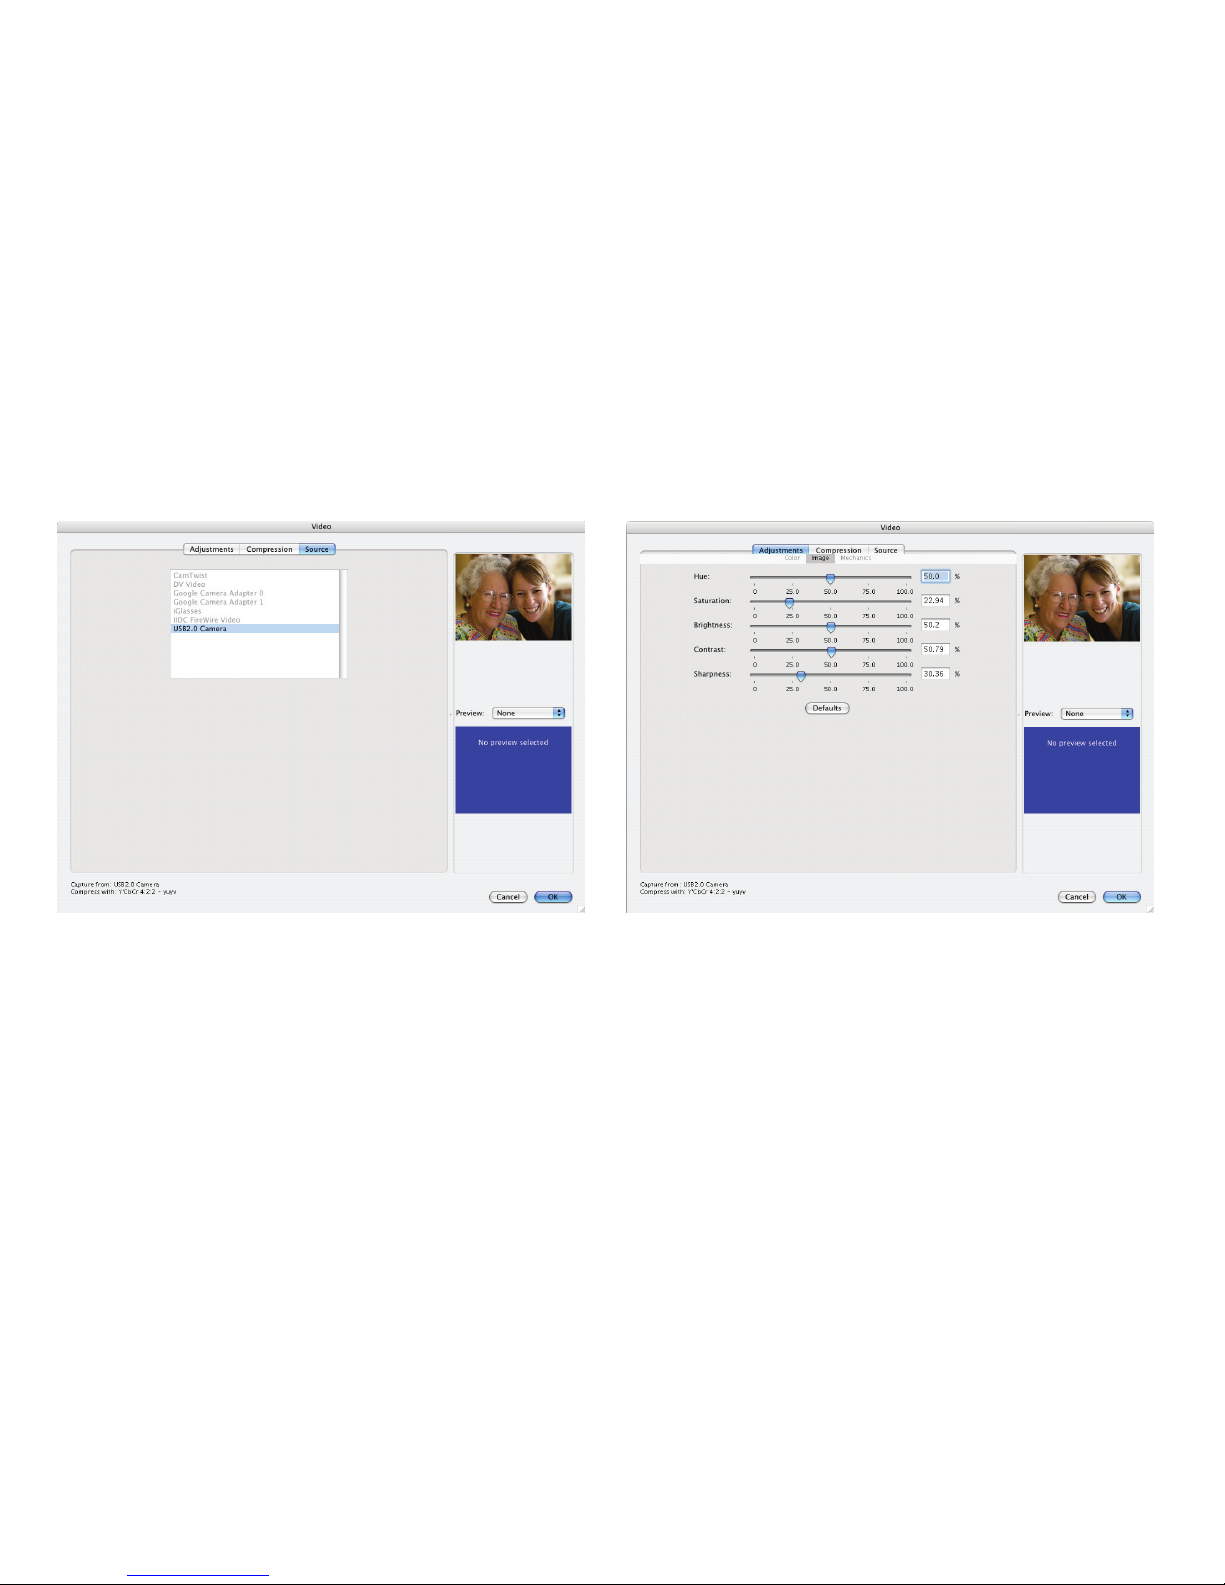
To configure your video settings:
Open WebCam Monitor and select Video Settings… from the Monitor menu.
Check that the correct camera is selected under Source [Fig. 3.4] and if required, adjust the settings to match
your personal preferences [Fig. 3.5].
Fig. 3.4 Fig. 3.5
•
•
The Sogatel webcam’s microphone does not work on current Macs as they do not have an audio port for a traditional
microphone. It is possible to use the computer’s built-in microphone or a separate USB device for video calls.
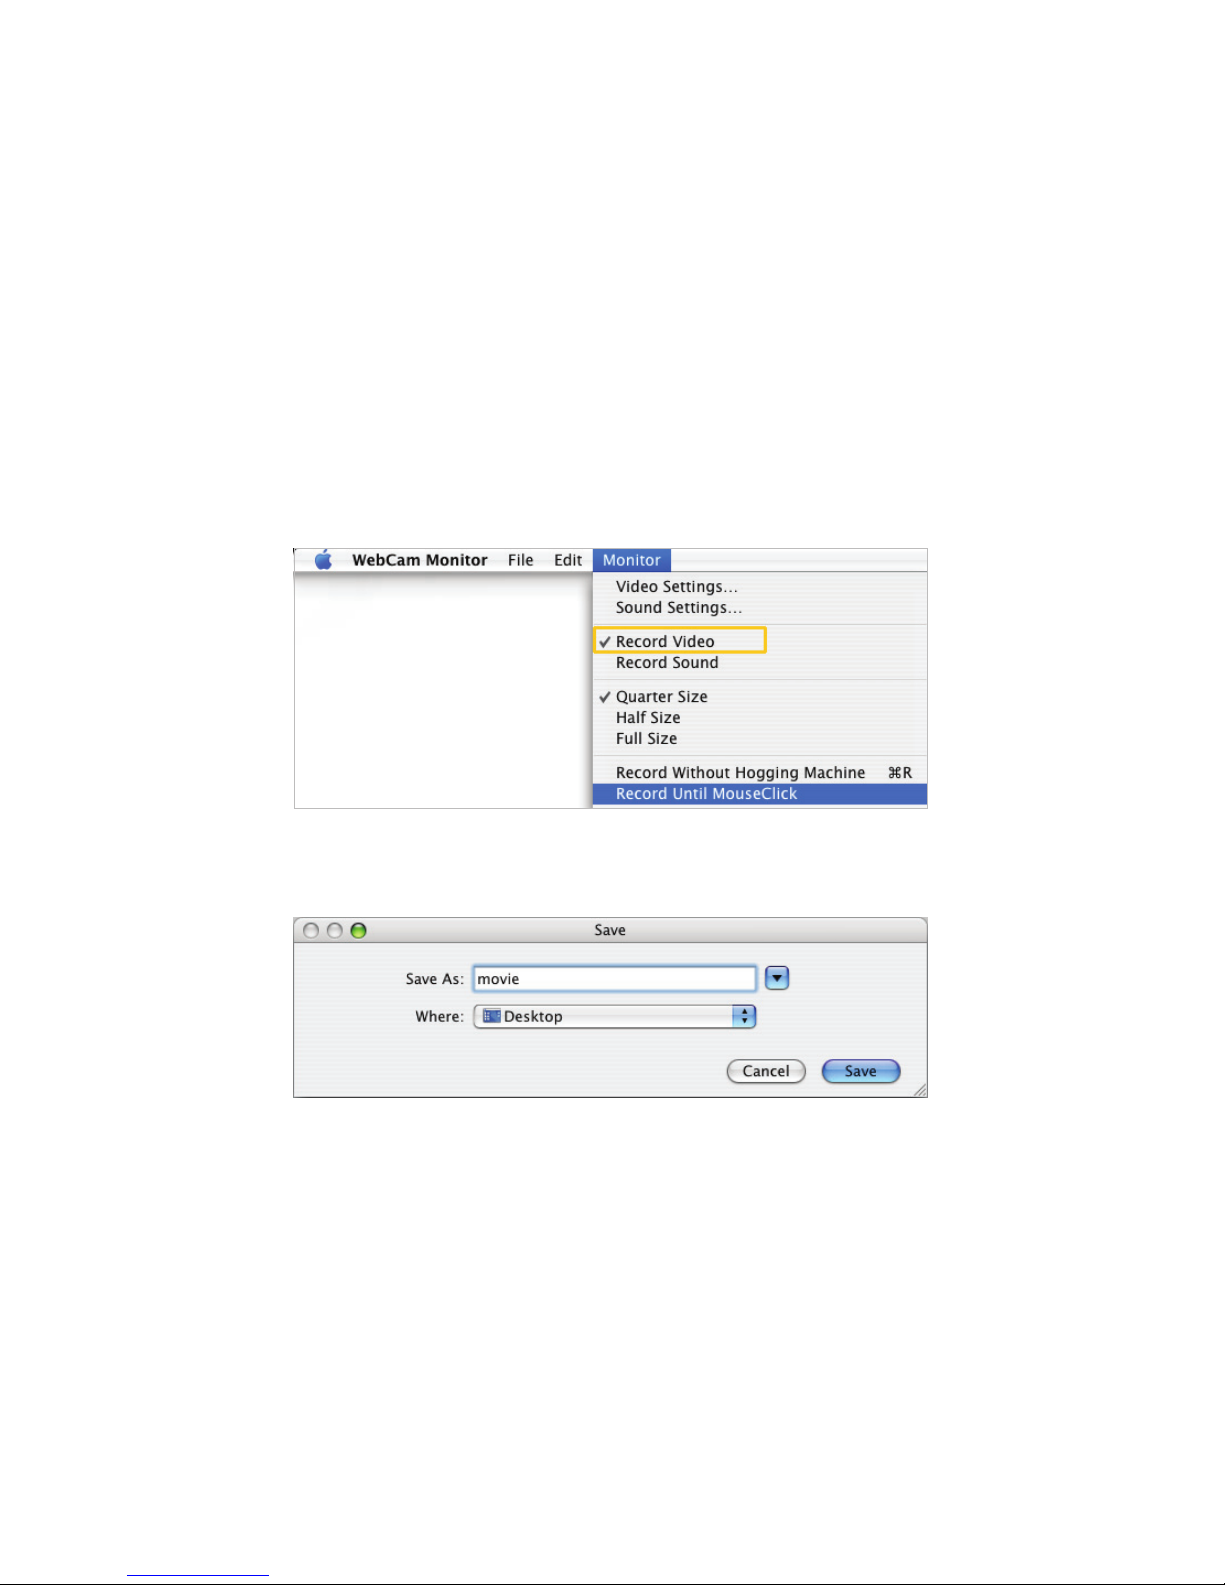
13Mac OS X Recording video
You can record a video in WebCam Monitor by going to the Monitor menu and making sure Record Video is ticked.
Then select Record Until MouseClick to begin, clicking the mouse button when you want to stop [Fig. 3.6].
Remember to save your video somewhere convenient on your computer as the camera has no internal storage [Fig. 3.7].
You may wish to first make some adjustments in the Video Settings for a perfect recording.
Fig. 3.6
Fig. 3.7
14Mac OS X Recording video
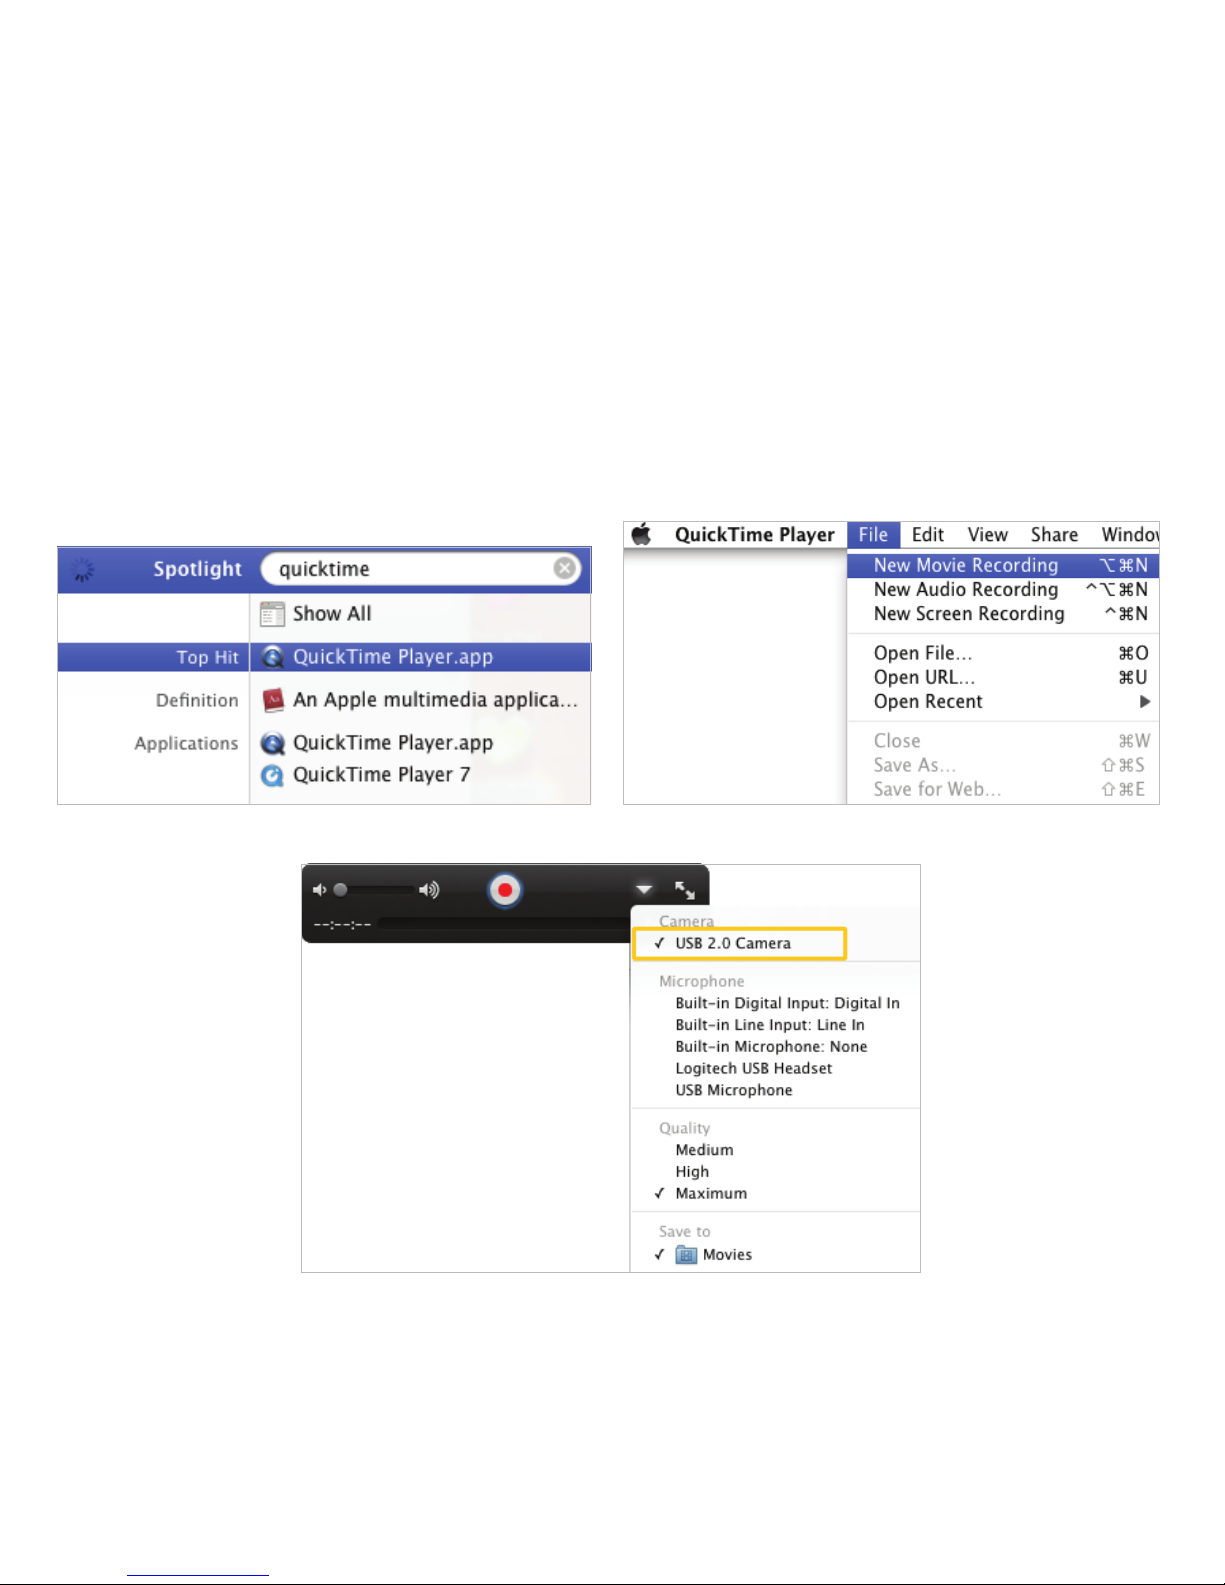
Users of Snow Leopard (Mac OS X 10.6) can also use QuickTime X to record videos.
Open Quicktime Player [Fig. 3.8].
Select New Movie Recording from the File menu [Fig. 3.9].
Click the triangle icon in the recording window [Fig. 3.10] and make sure that the correct camera is ticked.
There is also an option to choose where the video is Saved.
When you are ready, press the red button to start recording your video.
Fig. 3.8
Fig. 3.10
•
•
•
•
•
Fig. 3.9

15Mac OS X Recording video
Users of Tiger and Leopard (Mac OS X 10.4 and 10.5) can also use QuickTime 7 Pro to record videos.
Note: Apple charges for this upgrade to the basic QuickTime Player 7, accessible through the QuickTime menu
or in System Preferences.
Open Quicktime Player 7 .
In the Quicktime menu, select Preferences...[Fig. 3.11] and then go to the Recording tab. Make sure that the correct
camera is selected in the drop down menu. There is also an option to choose where the video is Saved.
Next, select New Movie Recording from the File menu [Fig. 3.12].
When you are ready, press the red button to start recording your video.
•
•
•
•
Fig. 3.11
Fig. 3.12

16Chat software configuration AOL Instant Messenger
Note: AIM only supports video chat for Windows users. Mac users wishing to use the AIM network should follow the
instructions for iChat on Page 18.
If you do not have an AIM account, first download the software and register at: www.aim.com
Before running AIM, make sure that all other webcam programs are fully closed. Failure to do so will mean that
AIM may not recognise the webcam.
Open AIM and go to Settings… in the menu (or press F7 to go directly to the settings).
Under Enhanced IM, change the Camera dropdown to the Sogatel USB 2.0 Camera. Speakers and microphone
should be set to your default device (or internal sound card) [Fig. 4.1].
Save your settings and double click the name of the person you want to start a video chat with in the AIM contacts window.
Clicking the Camera button in the chat window which will start a video chat [Fig. 4.2].
Fig. 4.1 Fig. 4.2
•
•
•
•
17Chat software configuration Google Mail
If you do not have a Google account or haven’t activated Gmail chat, first download the software and register at:
http://mail.google.com/videochat/
Before running the browser you plan on using to access Gmail chat, make sure that the webcam program
(AMCap on Windows, WebCam Monitor on Mac OS X) is fully closed. Failure to do so will mean that Google
may not recognise the webcam.
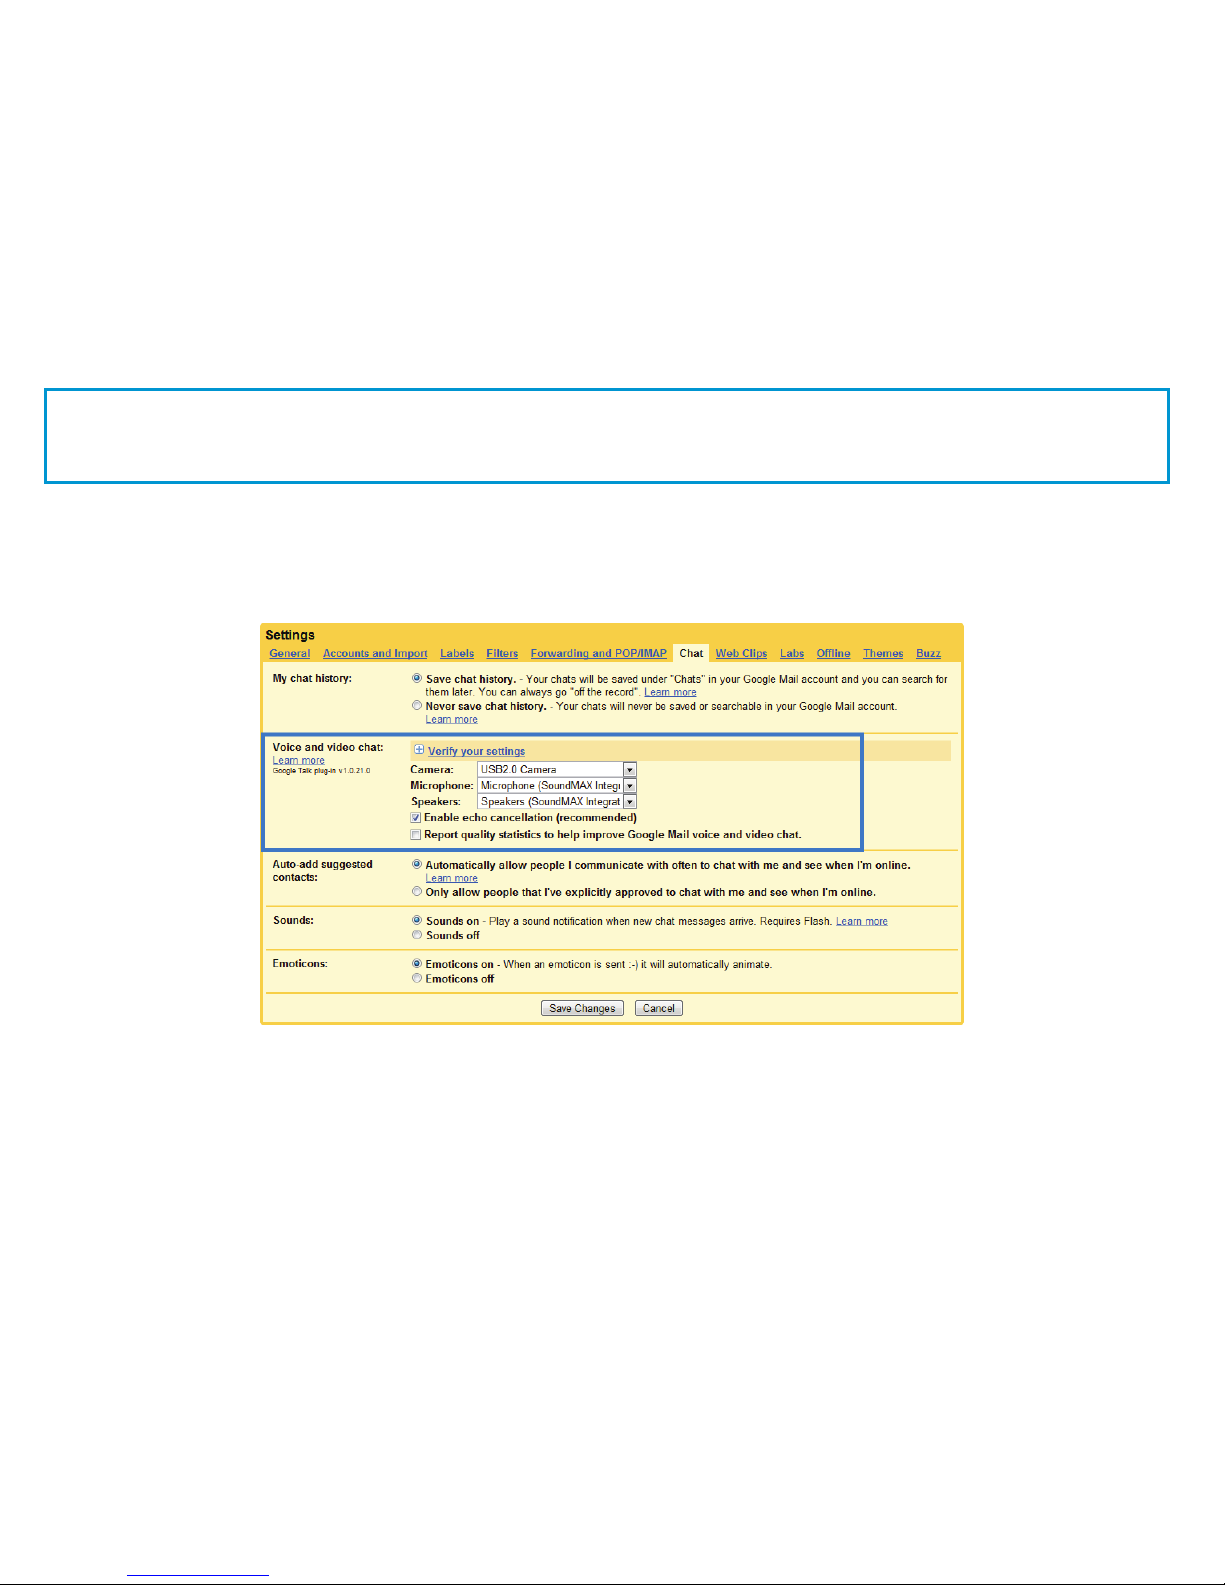
Log in to your Gmail account as usual and click the Settings link at the top of the main Gmail inbox page.
Click the Chat link and under Voice and Video Chat, make sure that the camera is set to the Sogatel USB 2.0 Camera.
Speakers and microphone should be set to your default device or internal sound card (Fig. 4.3).
Fig. 4.3
You can click the Verify Your Settings option to check that everything is working correctly.
Click Save Changes at the bottom of the window to complete the setup.
In the Chat box in your Gmail window select the person you want to call and pick Video & More in the box which
appears, then Start Video Chat.
Contacts with no camera icon by their name may also need to install the Gmail voice and video chat software on
their computer.
•
•
•
•
•
•
•
18Chat software configuration iChat
Note: iChat is only available for Macs.
Before running iChat, make sure that the WebCam Monitor program is fully closed. Failure to do so will mean
that iChat will not recognise the webcam. If you are not sure, open the application again and select Quit from the
WebCam Monitor menu.
For users running Mac OS X 10.4.9 or later, iChat should automatically detect the camera.
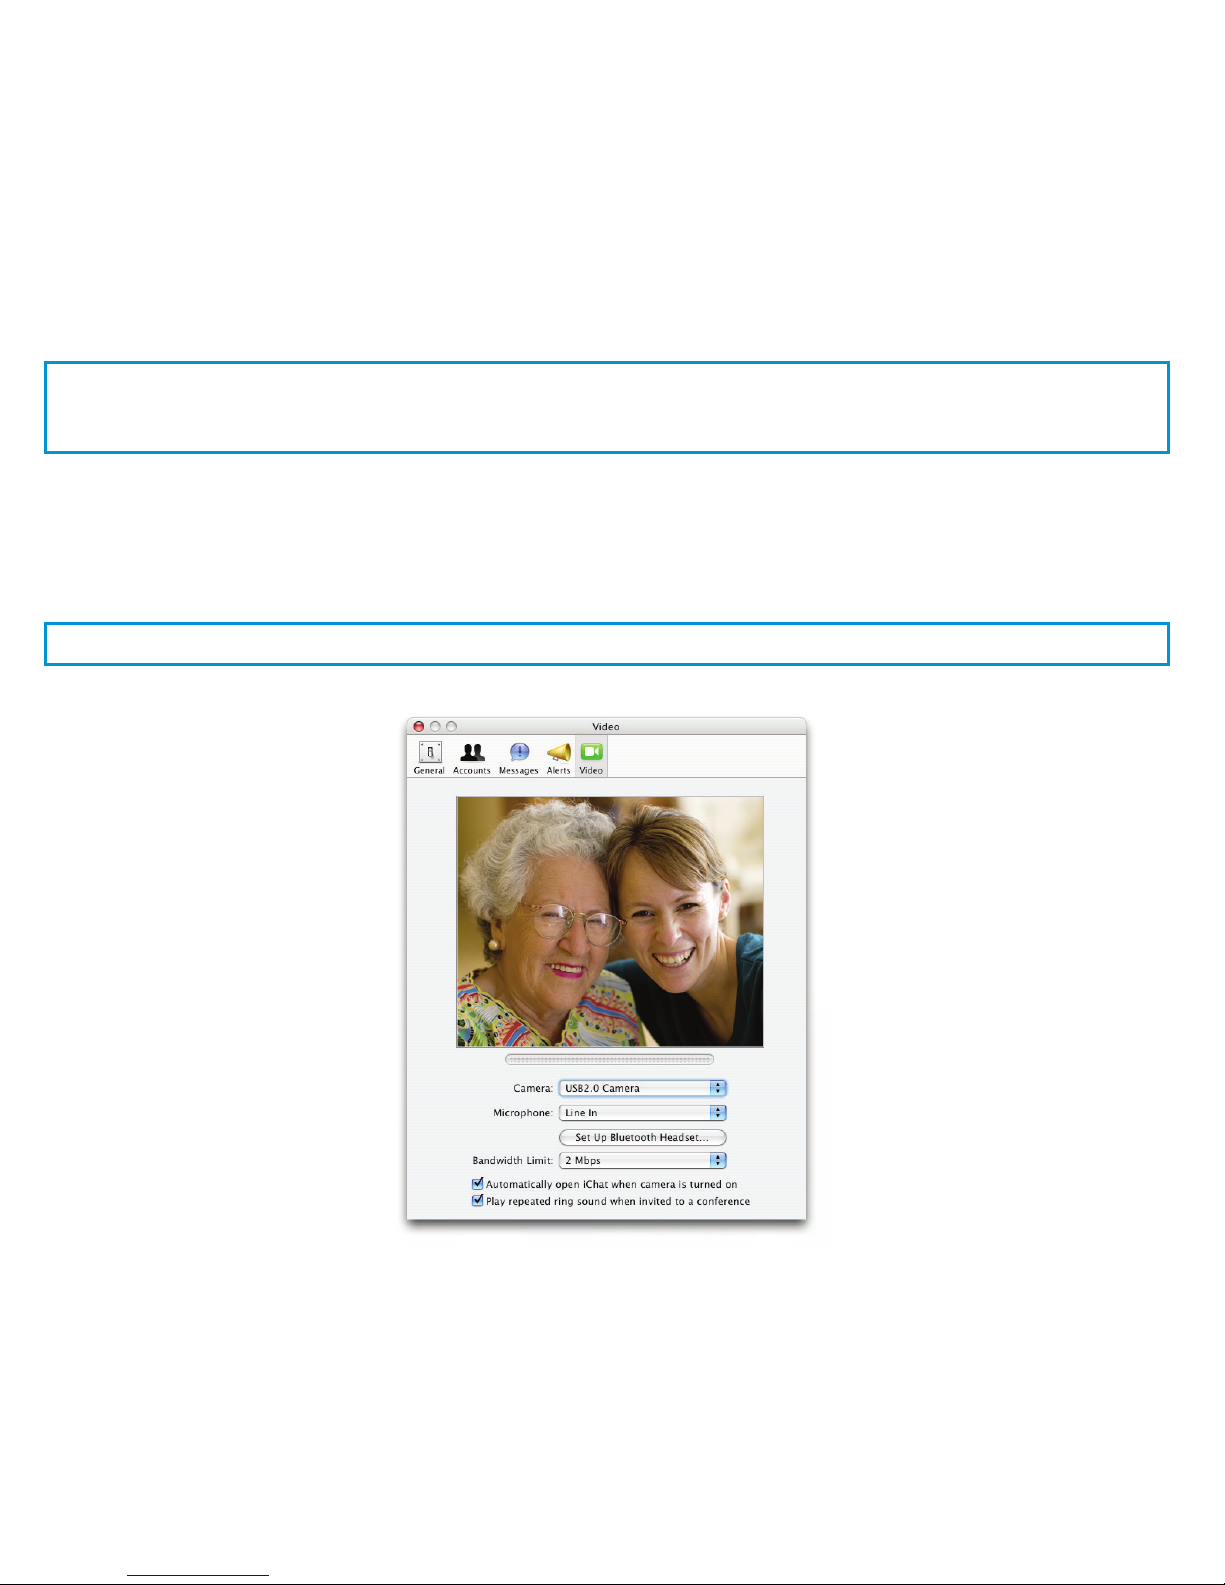
Select Preferences from the iChat menu and go to the Video tab.
Your preview will appear if you have only the Sogatel Webcam connected; if you have other webcams connected first
use the Camera dropdown menu to choose the right one [Fig. 4.4].
Close the Preferences window when you can see the preview video.
To open a video chat, select the person you want to chat with and click the green camera icon on your buddy list.
Fig. 4.4
•
•
•

19Chat software configuration Photo Booth
Note: Photo Booth is only available for Macs.
So long as your Mac meets Apple’s guidelines for running Photo Booth (having either OS X 10.5 installed or, on
a small number of models, a built-in iSight camera and OS X 10.4), simply follow the installation instructions
for Macs. Your system should automatically detect the webcam in Photo Booth if it has no internal camera of its
own. In rare cases where it does not please try disconnecting the camera and reconnecting it once Photo Booth
is already running.
If your Mac has a built-in camera already, Photo Booth will default to using that. As there is no way to change
settings in the current version of Photo Booth you will have to open the built-in camera in another program,
then try opening Photo Booth again. Because the built-in camera will be in use Photo Booth will instead select
your Sogatel webcam.
You can put the built-in camera in use in this way by using the webcam’s own WebCam Monitor software; open
WebCam Monitor and pick the Mac’s internal camera in Video Settings. You can then open Photo Booth as
described above.

20Chat software configuration Skype
If you do not have a Skype account, first download the software and register at: www.skype.com
Before running Skype, make sure that all other webcam programs are fully closed. Failure to do so will mean
that Skype may not recognise the webcam.
Within the Skype application:
Select the Tools menu and go to Options. In the General tab, make sure that your settings are as follows:
Audio Settings: Select the Windows Default Device (or soundcard) for both Microphone, Ringing and Speakers [Fig. 4.5];
Video Settings: Select the Sogatel USB 2.0 Camera from the dropdown menu [Fig. 4.6].
We recommend that users also uncheck the box below the Microphone dropdown menu marked “Automatically
adjust microphone settings” [Fig. 4.5]. This option, when checked, can sometimes cause sound interruptions dur-
ing voice calls. Initially it is best to set the volume slider a little less than halfway along the bar, as shown. You can
adjust this later to suit your preferences.
Remember to save your changes before closing the window.
•
•
•
Fig. 4.6Fig. 4.5
This manual suits for next models
2
Table of contents
Other Sogatel Webcam manuals


