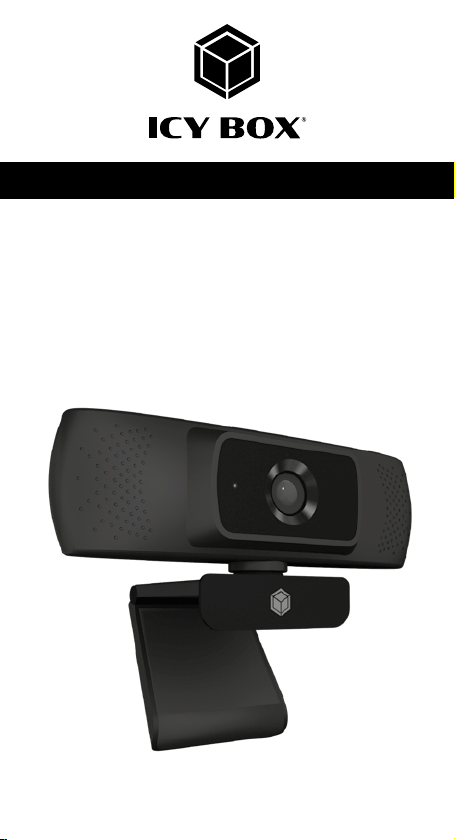
Icy Box IB-CAM301-HD User manual
Manual IB-CAM301-HD
Full HD webcam with microphone
Handbuch IB-CAM301-HD
Full-HD Webcam mit Mikrofon


Safety information
Please read carefully the following information to prevent injuries, damage to
material and device as well as data loss:
Warning levels
Signal words and safety codes indicate the warning level and provide immediate
information in terms of the probability of occurrence as well as the type and severity of the
consequences if the measures to prevent hazards are not complied with.
Warns of a directly hazardous situation causing death or
serious injury.
Warns of a potentially hazardous situation that may cause
death or serious injury.
Warns of a potentially hazardous situation that may cause
minor injury.
Warns of a potential situation that may cause material or
environmental damage and disrupt operative processes.
1. Risk of electrical shock
Contact with parts conducting electricity
Risk of death by electrical shock
• Read the operating instructions prior to use
• Make sure the device has been de-energised prior to working on it
• Do not remove contact protection panels
• Avoid contact with conducting parts
• Do not bring plug contacts in contact with pointed and metal objects
• Use in intended environments only
• Operate the device using a power unit meeting the specifications of the type plate only!
• Keep the device/power unit away from humidity, liquid, vapour and dust
• Do not modify the device
• Do not connect the device during thunderstorms
• Approach specialist retailers if you require repairs
2. Hazards during assembly (if intended)
Sharp components
Potential injuries to fingers or hands during assembly (if intended)
• Read the operating instructions prior to assembly
• Avoid coming into contact with sharp edges or pointed components
• Do not force components together
• Use suitable tools
• Use potentially enclosed accessories and tools only
3. Hazards caused by a development of heat
Insufficient device/power unit ventilation
Overheating and failure of the device/power unit
• Prevent externally heating up components and ensure an exchange of air
• Do not cover the fan outlet and passive cooling elements
• Avoid direct sunlight on the device/power unit
• Guarantee sufficient ambient air for the device/power unit
• Do not place objects on the device/power unit
DANGER
WARNING
CAUTION
IMPORTANT
WARNING
CAUTION
IMPORTANT

Safety information
4. Hazards caused by very small parts and packaging
Risk of suffocation
Risk of death by suffocation or swallowing
• Keep small parts and accessories away from children
• Store/dispose of plastic bags and packaging in an area that is inaccessible to children
• Do not hand over small parts and packaging to children
5. Potential data loss
Data lost during commissioning
Potentially irreversible data loss
• Always comply with the information in the operating instructions/Manual
• Exclusively use the product once the specifications have been met
• Back up data prior to commissioning
• Back up data prior to connecting new hardware
• Use accessories enclosed with the product
6. Cleaning the device
Harmful cleaning agents
Scratches, discolouration, damage caused by moisture or
short circuit in the device
• Disconnect the device prior to cleaning
• Aggressive or intense cleaning agents and solvents are unsuitable
• Make sure there is no residual moisture after cleaning
• We recommend cleaning devices using a dry, anti-static cloth
7. Disposing of the device
Environmental pollution, unsuitable for recycling
Potential environmental pollution caused by components,
recycling circle interrupted
This icon on product and packaging indicates that this product must not be
disposed of as part of domestic waste. In compliance with the Waste Elec-
trical and Electronic Equipment Directive (WEEE) this electrical device and
potentially included batteries must not be disposed of in conventional, dome-
stic waste or recycling waste. If you would like to dispose of this product
and potentially included batteries, please return it to the retailer or your local
waste disposal and recycling point.
The included batteries must be completely discharged before return.
Take precaution to protect the batteries from short circuits (e.g. by insulating the contact
poles with adhesive tape).
If you have any questions, please do not hesitate to contact our support at
WARNING
IMPORTANT
IMPORTANT
IMPORTANT

Sicherheitshinweise
Zur Vermeidung körperlicher Schäden, sowie von Sach-, Geräteschäden und
Datenverlust beachten Sie bitte folgende Hinweise:
Warnstufen
Signalwort und Sicherheitszeichen kennzeichnen die Warnstufe und geben einen sofortigen
Hinweis auf Wahrscheinlichkeit, Art und Schwere der Folgen, wenn die Maßnahmen zur
Vermeidung der Gefahr nicht befolgt werden.
warnt vor einer unmittelbar gefährlichen Situation, die zum
Tod oder zu schweren Verletzungen führen wird.
warnt vor einer möglicherweise gefährlichen Situation, die
zum Tod oder zu schweren Verletzungen führen kann.
warnt vor einer möglicherweise gefährlichen Situation, die
zu leichten Verletzungen führen kann.
warnt vor einer möglichen Situation, die zu Sach- und
Umweltschäden führen und den Betriebsablauf stören kann.
1. Gefahren durch elektrische Spannung
Kontakt mit elektrisch leitenden Teilen
Lebensgefahr durch Stromschlag
• vor Benutzung Betriebsanleitung lesen
• vor Arbeiten am Gerät, Spannungsfreiheit sicherstellen
• Kontaktschutzblenden nicht entfernen
• Kontakt mit Spannungsführenden Komponenten vermeiden.
• Steckkontakte nicht mit spitzen und metallischen Gegenständen berühren
• Verwendung nur in dafür vorgesehenen Umgebungen
• Gerät ausschließlich mit Typenschildkonformen Netzteil betreiben!
• Gerät/Netzteil fern von Feuchtigkeit, Flüssigkeit, Dampf und Staub halten
• Eigenständige Modifikationen sind unzulässig
• Gerät nicht während eines Gewitters anschließen
• Geben Sie Ihr Gerät im Reparaturfall in den Fachhandel
2. Gefahren während Montage (wenn vorgesehen)
Scharfkantige Bauteile
Finger- oder Handverletzungen bei Zusammenbau (wenn
vorgesehen) möglich
• vor Montage, Betriebsanleitung lesen
• Kontakt mit scharfen Kanten oder spitzen Bauteilen vermeiden
• Bauteile nicht mit Gewalt zusammensetzen
• geeignetes Werkzeug verwenden
• nur gegebenenfalls mitgeliefertes Zubehör und Werkzeug verwenden
3. Gefahren durch Wärmeentwicklung
Mangelhafte Belüftung des Geräts/Netzteils
Überhitzung und Ausfall des Geräts/Netzteils
• externe Erwärmung vermeiden und Luftaustausch zulassen
• Lüfter-Auslass und passive Kühlkörper freihalten
• direkte Sonneneinstrahlung auf Gerät/Netzteil vermeiden
• ausreichend Umgebungsluft für Gerät/Netzteil sicherstellen
GEFAHR
WARNUNG
VORSICHT
ACHTUNG
WARNUNG
VORSICHT
ACHTUNG

• keine Gegenstände auf dem Gerät/Netzteil abstellen
4. Gefahren durch Kleinstteile und Verpackung
Erstickungsgefahr
Lebensgefahr durch Ersticken oder Verschlucken
• Kleinteile, Zubehör für Kinder unzugänglich verwahren
• Plastiktüten und Verpackung für Kinder unzugänglich verwahren/entsorgen
• Kleinteile und Verpackungen nicht in Kinderhände geben
5. Möglicher Datenverlust
Datenverlust bei Inbetriebnahme
Unwiederbringlicher Datenverlust möglich
• Unbedingt Hinweise in der Bedienungsanleitung/Schnellinstallationsanleitung beachten
• Produkt nur verwenden, wenn Spezifikationen erfüllt sind
• Datensicherung vor Inbetriebnahme durchführen
• Datensicherung vor Anschluss neuer Hardware durchführen
• dem Produkt beiliegendes Zubehör verwenden
6. Reinigung des Gerätes
Schädigende Reinigungsmittel
Kratzer, Farbveränderungen, Feuchteschäden oder
Kurzschluss am Gerät
• vor Reinigung, das Gerät außer Betrieb nehmen
• aggressive bzw. scharfe Reinigungs- und Lösungsmittel sind ungeeignet
• nach der Reinigung sicherstellen, dass keine Restfeuchtigkeit vorhanden ist
• Reinigung der Geräte am besten mit trockenem Antistatiktuch durchführen
7. Entsorgung des Gerätes
Umweltverschmutzung, Wiederverwertung nicht möglich
Mögliche Umweltbelastung durch Bestandteile, Recyclingkreislauf
unterbrochen
Dieses auf dem Produkt und der Verpackung angebrachte Symbol zeigt an,
dass dieses Produkt nicht mit dem Hausmüll entsorgt werden darf. In Über-
einstimmung mit der Richtlinie über Elektro- und Elektronik-Altgeräte (WEEE)
darf dieses Elektrogerät und ggf. enthaltene Batterien nicht im normalen
Hausmüll oder dem Gelben Sack entsorgt werden. Wenn Sie dieses Pro-
dukt und ggf. enthaltene Batterien entsorgen möchten, bringen Sie diese bitte
zur Verkaufsstelle zurück oder zum Recycling-Sammelpunkt Ihrer Gemeinde.
Die enthaltenen Batterien müssen vor Rückgabe vollständig entladen sein.
Treffen Sie Vorsorge, um die Batterien vor Kurzschluss zu schützen (z.B. durch das Isolieren
der Kontaktpole mit Klebeband).
besuchen Sie unsere Internetseite www.icybox.de.
WARNUNG
ACHTUNG
ACHTUNG
ACHTUNG
Sicherheitshinweise

Manual IB-CAM301-HD
Package content
1x IB-CAM301-HD, 1x lens cover, 1x manual
Front view
1. Built-in microphone (left)
2. Link/activity LED (blue)
3. Glass optical lens
4. Tiltable and rotatable base
5. Built-in microphone (right)
6. Build-in USB 2.0 Type-A plug
Side view Placed on top of a monitor
1. Integrated cable for connection
to host PC (190 cm)
2. 1/4'' tripod thread at the bottom
for stative (not included)
3. Fold-out clamp base for monitor mounting
1. 5. 6.
2.
3. 4.
1. 2. 3.
Manual IB-CAM301-HD
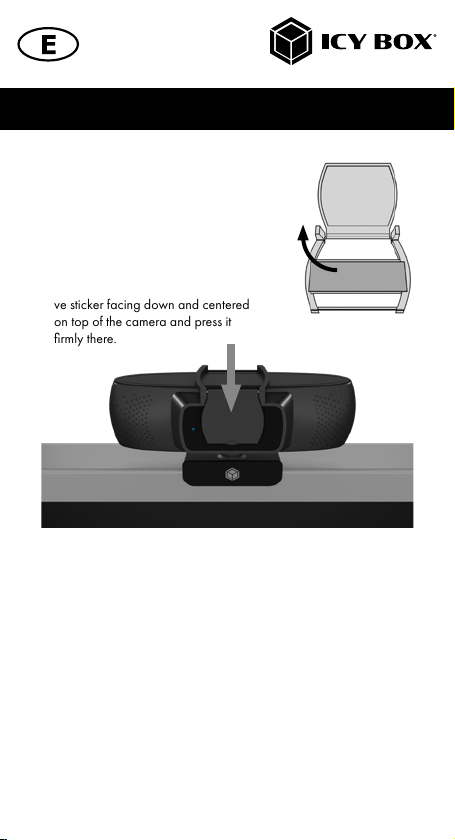
Optional lens cover installation
• Unfold the supplied lens cover and
remove the protective film of the 3M
adhesive sticker.
• Make sure the adhesive surface on
the camera is free of dust and grease
to ensure a secure fit.
• Place the lens cover with the adhesi-
ve sticker facing down and centered
on top of the camera and press it
firmly there.
Full HD webcam with microphone
Key features
• Full HD webcam for videos and live streams in best quality with up to
1080p
• High-resolution CMOS sensor with 30 frames per second and 84°
viewing angle
• HD autofocus and automatic light correction for sharp images in any
situation
• Stereo audio with two omni-directional microphones
• Ideal for home schooling, home office and video calls (Skype, Teams,
Zoom, YouTube)
• Clamp foot for mounting on the monitor and with integrated 1/4''
tripod thread
• Camera lens cover included in package content for optional use
• Plug & Play, no driver or software installation required
• Connection via USB 2.0 Type-A, supports OTG protocol

Manual IB-CAM301-HD
Usage
1. The IB-CAM301-HD features full Plug & Play support for Windows
®
and macOS
®
!
2. Place the camera in front of you at a position of your choice (using the clamp base at
the top of a monitor is recommended)
3. Plug the USB 2.0 Type-A into a supported USB port of the host computer.
Note: The IB-CAM301-HD can be connected to or disconnected from the computer
via USB cable without shutting down the computer.
Maybe the system will automatically install some of the required drivers once it is
connected to your computer’s USB Type-A port. If you receive any prompt, follow the
on-screen instructions to complete the installation.
To use the camera’s internal microphone, you will have to select it as a USB audio
input in your application settings.
Important: If the computer does not automatically recognise the camera when it is
plugged in, try plugging it into a different USB port. If this does not work, then restart
the computer. This will cause the camera to be recognised in most cases.
4. Start any application that accepts a USB video stream, such as Skype, Teams, Zoom,
YouTube, and begin using your camera.
View camera on Windows
®
Windows
®
10 users can use the camera app, which is already installed with the operation
system. This will allow you to preview the camera image, capture still frames and video clips.
If you want to use the camera with other applications, you must activate the camera in the
Windows
®
security settings.
• To begin, select the Start button, and then select Camera in the list of apps, or type
“camera” in the search bar.
• If you want to use the camera within other apps, select the Start button, select
Settings > Privacy > Camera, and then turn on “Let apps use my camera”.
• From there, turn on each of the listed apps where you want to use the camera.
After you open the Camera app, you may need to switch to the Full HD Camera
(IB-CAM301-HD). Here’s how to switch from one to another:
• Select Start > Camera > Change camera (button upper right).
When you can see an image from the camera:
• Select Photo or Video and take a picture or make a video.
• To see your new photo or video, or ones you’ve taken before, select Start > Photos
and then choose the collection you want to see.
View camera on macOS
®
macOS
®
users can use the Photo Booth app, which is already installed with the OS. This will
allow you to preview the camera images, capture still frames and video clips.
Note: While Photo Booth can be used to quickly preview the camera image, higher-quality
videos using the full camera resolution should be created in iMovie or QuickTime, since

Photo Booth does not use the full camera image.
As in Windows
®
, you may need to allow apps installed on your computer to access the
camera in the macOS
®
security settings.
• To begin, select the Finder button, click Applications, and start Photo Booth.
If you want to use the camera within other apps, you will need to enable access in the
macOS
®
Security & Privacy settings:
• Go to the Apple menu in the top left corner of the screen and choose System
Preferences.
• Go to the “Security & Privacy” preference panel.
• Select the Privacy tab then choose Camera from the left side list.
• Locate the app(s) that you want to enable camera access for, and check the box
alongside that app name to enable camera access for that application.
• To see an image from the camera in Photo Booth, you may need to select the camera
from the list of attached devices in the app.
• At the top of your screen, click Camera in the app menu, and select the Full HD
camera (IB-CAM301-HD) from the list of options.
When you can see an image from the camera:
• To capture images from the camera, click the red camera icon.
• To switch to video mode, click the film strip icon in the bottom left corner of the app.
The red camera icon will change to a video icon at which point you will be able to
record a video.
Capture HD video with QuickTime player
QuickTime on macOS
®
offers a method for easily creating video recordings that use the full
camera resolution.
• To begin, select the Finder button, click Applications, and start QuickTime Player.
• After QuickTime launches, click File > New Movie Recording.
• To select the camera input, click the small downward-facing arrow next to the round
record button.
• Click the record button to capture video.
View camera on Android
™
• You will need a USB OTG (On-The-Go) adapter from USB Type-A to Type-C
®
or
Micro-B, depending on the existing port on the Android
™
device (not included).
• You will need an Android
™
app that supports USB webcams (search for: USB Webcam).
• After installing the app of your choice and connecting the camera via OTG adapter,
you can use the camera via the app interface.
Caution
If the webcam becomes hot after running for a long time, we suggest that you stop using it for a while.
• Avoid touching the lens with fingers, sharp or coarse materials, and use a clean, soft
Manual IB-CAM301-HD

cloth for cleaning.
• Do not use the camera in hot, cold, dusty or humid environments.
• Avoid dropping the camera, as impacts may cause damage to the lens, internal
malfunction or scratches to the camera surfaces.
Additional technical details
Manual IB-CAM301-HD
Imaging sensor 1/2.7 inch CMOS digital image sensor
Pixel size 3.0x3.0 µm
Image area 5.808x3.288 mm
Active pixels 1920(H)x1080(V)
Horizontal resolution MJPEG: 1920x1080@30 fps, 1280x960@30
fps, 1280x720@30 fps, 800x600@30 fps,
640x480@30 fps, 320x240@30 fps
Video format YUY2/MJPG
SNR 38.6 dB
Dynamic range 72 dB
Viewing angle D=93.4º/H=84.4º/V=52º
TV distortion <-3%
Minimum illumination <1 Lux
Focal length 3.5 mm
F/NO 2.0 mm
Focus type Automatic focus
Minimum object distance 50 mm
Shutter type Electronic rolling shutter/frame exposure
Adjustable parameter Brightness, contrast, sharpness, white balance,
contrast, exposure gain
Low brightness
compensation
Auto
Image processing Automatic exposure/automatic white balance/
automatic focus
Microphone Built-in omnidirectional microphone
Listening range Speak normally within 5 meters and the voice is clear
and distinct

Manual IB-CAM301-HD
Frequency spectrum 300 Hz - 8 KHz
Audio sample rate Monaural 16 bit 8 KHz, 16 KHz, 32 KHz, 48 KHz
Audio coding format PCM, compatibility UAC 1.0
Compatible system Windows®XP, Windows®7, Windows®8, Windows®
10. Android™V 5.0 or higher.
macO®10.6 or higher
USB interface type USB 2.0 high-speed and full-speed transceiver
applicable to UVC 1.1 or 1.5
Support OTG protocol USB 2.0 OTG
Power consumption 2 W

Handbuch IB-CAM301-HD
Verpackungsinhalt
IB-CAM301-HD, 1x Linsenabdeckung, 1x Handbuch
Vorderansicht
1. Eingebautes Mikrofon (links)
2. Verbindung/Aktivität LED (blau)
3. Optische Linse aus Glas
4. Kipp- und drehbare Basis
5. Eingebautes Mikrofon (rechts)
6. Integrierter USB 2.0 Type-A Stecker
Seitenansicht Auf einem Monitor platziert
1. Integriertes Kabel für Host PC
Verbindung (190 cm)
2. 1/4'' Stativgewinde an der Unterseite
für Stative (nicht enthalten)
3. Ausklappbarer Klemmfuß für Monitorbefestigung
1. 5. 6.
2.
3. 4.
1. 2. 3.
Handbuch IB-CAM301-HD
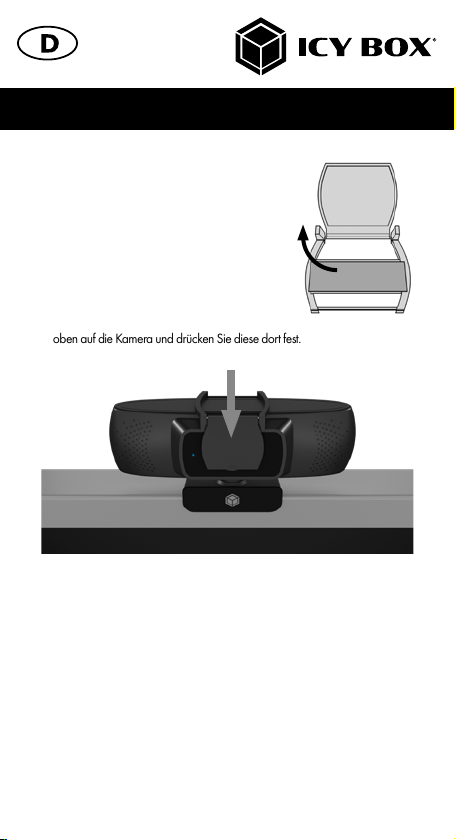
Optionale Installation der
Linsenabdeckung
• Klappen Sie die mitgelieferte Linsenabde-
ckung auf und entfernen Sie die Schutzfolie
des 3M Klebestickers.
• Stellen Sie sicher, dass die Klebefläche an
der Kamera staub- und fettfrei ist, um einen
sicheren Halt zu gewährleisten.
• Platzieren Sie die Linsenabdeckung mit
dem Klebesticker nach unten und zentriert
oben auf die Kamera und drücken Sie diese dort fest.
Full-HD Webcam mit Mikrofon
Hauptmerkmale
• Full-HD Webcam für Videos und Live-Streams in bester Qualität mit bis zu 1080p
• Hochauflösender CMOS-Sensor mit 30 Bildern pro Sekunde und 84°
Blickwinkel
• HD-Autofokus und automatische Lichtkorrektur für scharfe Bilder in jeder Situation
• Stereo-Audio mit zwei omnidirektionalen Mikrofonen
• Ideal für Home Schooling, Home Office und Videoanrufe (Skype, Teams, Zoom,
YouTube)
• Klemmfuß zur Montage am Monitor und mit integriertem ¼“ Stativgewinde
• Kameralinsenabdeckung im Lieferumfang enthalten zum optionalen Gebrauch
• Plug & Play, keine Treiber- oder Softwareinstallation erforderlich
• Anschluss per USB 2.0 Type-A, unterstützt OTG Protokoll

Handbuch IB-CAM301-HD
Verwendung
1. Die IB-CAM301-HD bietet volle Plug & Play Unterstützung für Windows
®
und macOS
®
!
2. Platzieren Sie die Kamera vor sich an einer Position Ihrer Wahl (empfohlen wird die
Verwendung des Klemmsockels an der Oberseite eines Monitors).
3. Stecken Sie den USB 2.0 Type-A Stecker in einen unterstützten USB-Anschluss des
Hostcomputers.
Anmerkung: Die IB-CAM301-HD kann per USB Kabel an den Computer ange-
schlossen oder von diesem getrennt werden, ohne dass der Computer heruntergefah-
ren werden muss.
Möglicherweise installiert das System automatisch einige der erforderlichen Treiber,
sobald es mit dem USB Type-A Anschluss Ihres Computers verbunden ist. Wenn Sie
eine entsprechende Aufforderung erhalten, folgen Sie den Anweisungen auf dem
Bildschirm, um die Installation abzuschließen.
Um das interne Mikrofon der Kamera zu verwenden, müssen Sie es in den Einstellun-
gen Ihrer Anwendung als USB Audioeingang auswählen.
Wichtig: Wenn der Computer die Kamera nicht automatisch erkennt, sobald sie
verbunden wird, versuchen Sie, die Kamera über einen anderen USB Anschluss
anzuschließen. Wenn dies nicht funktioniert, starten Sie den Computer neu. Dadurch
wird die Kamera in den meisten Fällen erkannt.
4. Starten Sie eine beliebige Anwendung, die einen USB Videostream akzeptiert, z. B.
Skype, Teams, Zoom, YouTube, und beginnen Sie mit der Verwendung Ihrer Kamera.
Kamera unter Windows
®
verwenden
Windows
®
10 Benutzer können die Kamera-App verwenden, die bereits mit dem Betriebssys-
tem installiert ist.
Damit können Sie eine Vorschau des Kamerabildes anzeigen lassen, sowie Standbilder und
Videoclips aufnehmen.
Wenn Sie die Kamera mit anderen Anwendungen verwenden möchten, müssen Sie die
Kamera in den Windows
®
Sicherheitseinstellungen aktivieren:
• Wählen Sie dazu die Schaltfläche "Start" und dann "Kamera" in der Liste der
Anwendungen aus oder geben Sie "Kamera" in die Suchleiste ein.
• Wenn Sie die Kamera in anderen Apps verwenden möchten, wählen Sie die Schalt-
fläche "Start", dann "Einstellungen" > "Datenschutz" > "Kamera" und aktivieren
Sie "Zulassen, dass Apps auf Ihre Kamera zugreifen".
• Aktivieren Sie von dort aus jede der aufgelisteten Apps, in denen Sie die Kamera
verwenden möchten.
Nachdem Sie die Kamera-App geöffnet haben, müssen Sie möglicherweise zur Full-
HD Kamera (IB-CAM301-HD) wechseln.
So wechseln Sie von einer zur anderen angeschlossenen Kamera:
• Wählen Sie Start > Kamera > Kamera wechseln (Schaltfläche oben rechts).
Wenn Sie ein Bild von der Kamera sehen können:
• Wählen Sie Foto oder Video und nehmen Sie ein Foto auf oder machen Sie ein Video.

• Um Ihr neues oder bereits aufgenommenes Foto oder Video zu sehen, wählen Sie
"Start" > "Fotos" und wählen Sie dann die gewünschte Sammlung.
Kamera unter macOS
®
verwenden
macOS
®
Benutzer können die Photo Booth-App verwenden, die bereits mit dem Betriebs-
system installiert ist. Damit können Sie eine Vorschau der Kamerabilder anzeigen, sowie
Standbilder und Videoclips aufnehmen.
Hinweis:
Während Photo Booth für eine schnelle Vorschau des Kamerabilds verwendet werden kann,
sollten qualitativ hochwertigere Videos mit der vollen Kameraauflösung in iMovie oder
QuickTime erstellt werden, da Photo Booth nicht das volle Kamerabild verwendet.
Wie in Windows
®
müssen Sie eventuell in den macOS
®
Sicherheitseinstellungen den auf
Ihrem Computer installierten Apps den Zugriff auf die Kamera erlauben.
• Wählen Sie dazu die Finder-Schaltfläche, klicken Sie auf Programme und starten
Sie Photo Booth.
Wenn Sie die Kamera innerhalb anderer Apps verwenden möchten, müssen Sie den Zugriff in
den macOS
®
Sicherheits- und Datenschutzeinstellungen erlauben.
• Gehen Sie in das Apple-Menü in der oberen linken Ecke des Bildschirms und wählen
Sie "Systemeinstellungen".
• Gehen Sie zum Einstellungsfeld "Sicherheit & Datenschutz".
• Wählen Sie die Registerkarte "Datenschutz" und dann "Kamera" in der Liste auf
der linken Seite.
• Suchen Sie die App(s), für die Sie den Kamerazugriff aktivieren möchten, und markie-
ren Sie das(die) Kästchen neben dem App-Namen, um den Kamerazugriff für diese
Anwendung(en) zu aktivieren.
• Um ein Bild von der Kamera in Photo Booth zu sehen, müssen Sie möglicherweise
die Kamera aus der Liste der angeschlossenen Geräte in der App auswählen.
Klicken Sie hierzu oben auf dem Bildschirm im App-Menü auf Kamera und wählen
Sie die Full-HD Kamera (IB-CAM301-HD) aus der Liste der Optionen aus.
Wenn Sie ein Bild von der Kamera sehen können:
Um Bilder von der Kamera aufzunehmen, klicken Sie auf das rote Kamerasymbol.
Um in den Videomodus zu wechseln, klicken Sie auf das Filmstreifensymbol in der unteren
linken Ecke der App. Das rote Kamerasymbol ändert sich in ein Videosymbol, woraufhin Sie
ein Video aufnehmen können.
HD-Video mit dem QuickTime-Player aufnehmen
QuickTime unter macOS
®
bietet eine Methode zum einfachen Erstellen von Videoaufnahmen,
die die volle Kameraauflösung nutzen.
• Um zu beginnen, wählen Sie die Finder-Schaltfläche, klicken auf Programme und
starten den QuickTime Player.
Handbuch IB-CAM301-HD

• Nachdem QuickTime gestartet ist, klicken Sie auf Datei > Neue Filmaufnahme.
• Um den Kameraeingang auszuwählen, klicken Sie auf den kleinen, nach unten
zeigenden Pfeil neben der runden Aufnahmetaste
• Klicken Sie auf die Aufnahmetaste, um das Video aufzunehmen.
Kamera unter Android
™
verwenden
• Sie benötigen einen USB OTG (On-The-Go) Adapter von USB Type-A auf Type-C
®
oder Micro-B, je nach vorhandenem Anschluss am Androidgerät (nicht enthalten).
• Sie benötigen eine Android
™
App, die USB Webcams unterstützt (suchen Sie nach:
USB Webcam)
• Nach Installation der App und Anschluss der Kamera via OTG Adapter können Sie
die Kamera über die App-Oberfläche verwenden.
Hinweise
Wenn die Webcam nach längerem Betrieb zu heiß wird, empfehlen wir, sie für eine Weile
nicht zu benutzen.
Vermeiden Sie es, das Objektiv mit Fingern, scharfen oder groben Materialien zu berühren
und verwenden Sie ein sauberes, weiches Tuch zur Reinigung.
Verwenden Sie die Kamera nicht an heißen, kalten, staubigen oder feuchten Umgebungen.
Vermeiden Sie es, die Kamera fallen zu lassen: Stöße können zu Schäden am Objektiv,
internen Fehlfunktionen oder Kratzern auf den Oberflächen der Kamera führen.
Weitere technische Details
Handbuch IB-CAM301-HD
Bildsensor 1/2,7 Zoll CMOS-Digitalbildsensor
Pixelgröße 3,0x3,0 µm
Bildfläche 5,808x3,288 mm
Aktive Bildpunkte 1920(H)x1080(V)
Horizontale Auflösung
MJPEG
1920x1080@30 fps, 1280x960@30 fps,
1280x720@30 fps, 800x600@30 fps,
640x480@30 fps, 320x240@30 fps
Video-Format YUY2/MJPG
SNR 38,6 dB
Dynamischer Bereich 72 dB
Betrachtungswinkel D=93,4º/H=84,4º/V=52º
TV-Verzerrung <-3%
Minimale
Beleuchtungsstärke
<1 Lux
Brennweite 3,5 mm

Handbuch IB-CAM301-HD
F/NO 2,0 mm
Fokus-Typ Automatischer Fokus
Minimaler Objektabstand 50 mm
Verschlusstyp Elektronischer Rolling Shutter/Bildaufnahme
Einstellbare Parameter Helligkeit, Kontrast, Schärfe, Weißabgleich, Kontrast,
Belichtungsverstärkung
Kompensation für geringe
Helligkeit
Auto
Bildverarbeitung Automatische Belichtung/automatischer Weißab-
gleich/automatischer Fokus
Mikrofon Eingebautes omnidirektionales Mikrofon
Hörbereich Sprechen Sie normal innerhalb von 5 Metern und die
Stimme ist klar und erkennbar
Frequenzspektrum 300 Hz - 8 KHz
Audio-Abtastrate Monaural 16 Bit 8 KHz, 16 KHz, 32 KHz, 48 KHz
Audio-Codierungsformat PCM, Kompatibilität UAC 1.0
Kompatibles System Windows®XP, Windows®7, Windows®8, Windows®
10
Android™V5.0 oder höher
macOS®10.6 oder höher
USB-Schnittstellentyp USB 2.0 Hochgeschwindigkeits- und Full-Speed-Tran-
sceiver anwendbar auf UVC 1.1 oder 1.5
Unterstützt OTG-Protokoll USB 2.0 OTG
Leistungsaufnahme 2 W


© Copyright 2021 by RaidSonic Technology GmbH. All Rights Reserved
The information contained in this manual is believed to be accurate and reliable. RaidSonic
Technology GmbH assumes no responsibility for any errors contained in this manual. RaidSonic
Technology GmbH reserves the right to make changes in the specifications and/or design of
the above mentioned product without prior notice. The diagrams contained in this manual may
also not fully represent the product that you are using and are there for illustration purposes only.
RaidSonic Technology GmbH assumes no responsibility for any differences between the product
mentioned in this manual and the product you may have. Microsoft, Windows and the Windows
logo are registered trademarks of Microsoft Corporation. Apple and macOS, MAC, iTunes and
Macintosh are registered trademarks of Apple Computer Inc. All other trademarks and brand
names are the Property of their respective owners.
Table of contents
Languages:
Other Icy Box Webcam manuals


