Soho ClearView 5 User manual
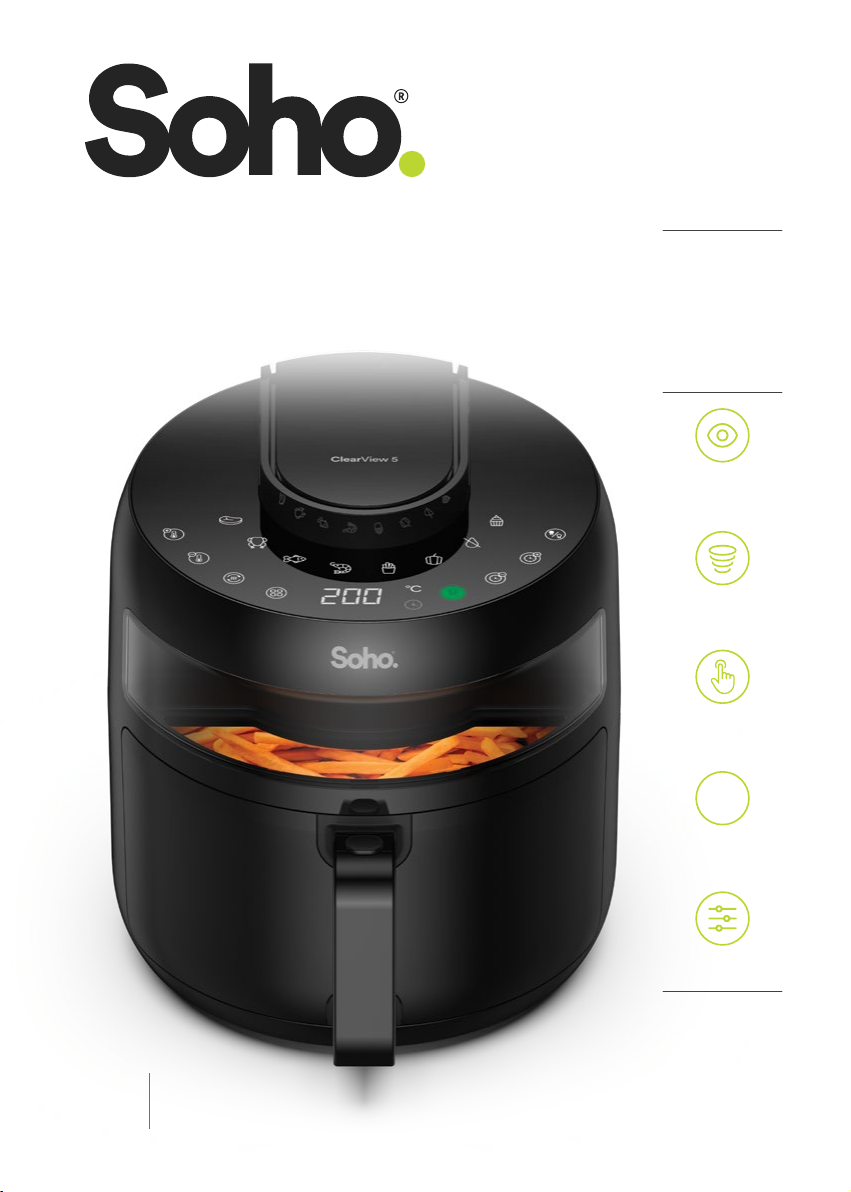
360° Airow
Technology
9 Pre-Set
Programs
5.0L Air Fryer with Cooking
Window & Digital Touch Control
Preset Cooking
Modes
ClearView 5
User Manual
SO-50AF
Digital Touch
Controls
LARGE
Capacity
5.0L
9
ClearView
Window
1500 Watts
Turbo Power
1500w

2
IMPORTANT SAFEGUARDS
SAVE THESE INSTRUCTIONS. FOR HOUSEHOLD USE ONLY
When using electrical appliances, always follow the standard safety precautions. They
are explained in further detail below:
1. PLEASE READ ALL INSTRUCTIONS.
2. DO NOT touch hot surfaces. Use handles, oven mitts or potholders.
3. To protect against electric shock DO NOT immerse the cord, plugs, or appliance in
water or other liquid.
4. Unplug the appliance from the power outlet when not in use and before cleaning.
Allow to cool before putting on or taking o parts, and before cleaning the appliance.
5. DO NOT operate the appliance if it has malfunctioned or has been damaged in any
manner, including the power cord or plug. If the power cord is damaged, it must be
replaced by the manufacturer, its service agent or qualied technician in order to
avoid a hazard.
6. The use of accessory attachments not recommended by the appliance manufacturer
may cause injuries and void the product warranty.
7. DO NOT use outdoors.
8. DO NOT let the cord hang over the edge of tables or counters, or touch hot surfaces.
9. DO NOT place on or near a hot gas or electric burner, or in a heated oven.
10. Extreme caution must be used when moving an appliance containing hot oil or other
hot liquids.
11. Always attach the plug to the appliance rst, then plug the cord into the wall outlet.
To disconnect the appliance, turn any controls to “OFF”, then remove the plug from
the wall outlet.
12. DO NOT use the appliance for other than intended use.
13. Make sure the removeable airow tray is in place before adding food to be air fried.
14. Make sure the frying basket is locked securely into the front of the Air Fryer while
the Air Fryer is in operation.
15. This appliance is not intended for use by persons (including children) with reduced
physical, sensory or mental capabilities, or lack of experience and knowledge, unless
they have been given supervision or instruction concerning use of the appliance by
a person responsible for their safety.
• Children should be supervised to ensure that they DO NOT play with the
appliance.
• Close supervision is necessary when your appliance is being used near
children or infants.
• The appliance is not intended to be operated by means of an external timer
or seperate remote control system.
• This appliance is intended for household use only, it is not warranted for use
in a commercial or business application.
WARNING! • THE AIR FRYER WILL NOT OPERATE PROPERLY UNLESS THE FRYING
BASKET IS FULLY CLOSED.

3
CAUTION! • AFTER HOT AIR FRYING, EXTREME CAUTION MUST BE USED WHEN
HANDLING THE HOT FRYING BASKET, REMOVEABLE AIRFLOW TRAY, AND
COOKED FOODS.
• DO NOT USE ON ACRYLIC OR STONE SURFACES AS HEAT MAY CAUSE
CRACKS OR SURFACE DAMAGE
• DO NOT PLACE DIRECTLY IN FRONT OF GLASS SPLASHBACKS, LEAVE A
MINIMUM OF 10CM FROM REAR OF UNIT
ADDITIONAL IMPORTANT SAFEGUARDS
CAUTION HOT SURFACES!
• THIS APPLIANCE GENERATES HEAT AND ESCAPING STEAM DURING
USE. FOLLOW SAFETY PRECAUTIONS AND TAKE THE UTMOST CARE TO
PREVENT THE RISK OF BURNS, FIRES OR OTHER INJURY TO PERSONS OR
DAMAGE TO PROPERTY.
• THIS APPLIANCE IS HOT DURING OPERATION AND RETAINS HEAT FOR
SOME TIME AFTER TURNING OFF. ALWAYS USE OVEN MITTS WHEN
HANDLING HOT MATERIALS AND ALLOW METAL PARTS TO COOL BEFORE
CLEANING. DO NOT PLACE ANYTHING ON TOP OF THE APPLIANCE WHILE
IT IS OPERATING OR WHILE IT IS HOT.
1. All users of this appliance should read and understand this instruction manual
before operating or cleaning this appliance.
2. The cord to this appliance should be plugged into a 220- 240V AC electrical outlet
only.
3. If this appliance begins to malfunction during use, pull the frying basket drawer out
of the body. Then remove the plug from the wall outlet. DO NOT use or attempt to
repair the malfunctioning appliance.
4. DO NOT leave this appliance unattended during use.
5. DO NOT immerse power cord in any liquid. If the power cord to this appliance is
damaged, it must be replaced.
6. Keep the cord out of reach of children and infants to avoid the risk of electric shock
and choking. Place the Air Fryer on a at, heat-resistant work area.
7. DO NOT obstruct the air outlet or air inlets on the back and sides of the Air Fryer
with any objects. Avoid escaping steam from the air outlet during air frying.
8. Keep the appliance at least 15 cm away from walls or other objects during operation.
9. Always use the frying basket handle to open the frying basket drawer.
WARNING! • AFTER AIR FRYING, MAKE SURE TO PLACE THE FRYING BASKET DRAWER
ON A FLAT, HEATRESISTANT SURFACE. OVERFILLING THE FRYING BASKET
MAY DAMAGE THE AIR FRYER AND COULD RESULT IN SERIOUS PERSONAL
INJURY.
10. NEVER move a hot Air Fryer or an Air Fryer containing hot food. Allow to cool
before moving.
11. DO NOT clean with metal scouring pads. Pieces can break o the pad and touch
electrical parts, creating a risk of electric shock.
WARNING! • THIS AIR FRYER SHOULD NOT BE USED TO BOIL WATER OR DEEP FRY
FOODS.

4

5
CONTENTS
1. GETTING TO KNOW YOUR AIR FRYER ...................................................... 7
2. TOUCHSCREEN CONTROL ....................................................................... 8
3. SHAKE FOOD FUNCTION ......................................................................... 9
4. PRESET COOKING MODES SETTING ........................................................ 9
5. BEFORE USING FOR THE FIRST TIME .......................................................10
6. OPERATING INSTRUCTIONS.................................................................... 11
7. A NOTE ON AIR FRYING PRE-PACKAGED FROZEN FOODS....................... 12
8. EASY-ASSIST FUNCTION: PREHEAT ........................................................ 12
9. AIR FRYING CHART ................................................................................. 13
10. AIR FRYER MAINTENANCE......................................................................14
11. CARE & CLEANING INSTRUCTIONS.........................................................14
12. STORING INSTRUCTIONS........................................................................14
13. TROUBLESHOOTING ...............................................................................15
14. WARRANTY TERMS & CONDITIONS ........................................................16
15. INDEMNITY.............................................................................................16
16. WARRANTY & DISCLAIMER ..................................................................... 17
17. LIMITATIONS & LIABILITY........................................................................ 17

6

7
1. GETTING TO KNOW YOUR AIR FRYER
1. Whats in the box:
• Air Fryer with removeable Frying Basket
• Removeable Airow Tray
Product may vary slightly from illustration
Air Inlets
Touchscreen
Control
Heat insulator located
on the back to allow
hot air to escape
(not shown)
Power Cord
(not shown)
Non Slip Feet
(not shown)
Non stick removable
airow tray
Frying Basket with
Cool Touch Handle
ClearView
Window
Air Fryer Body
Frying Basket
with Cool Touch
Handle
Button to release
frying basket

8
2. TOUCHSCREEN CONTROL
1. Plug in the Air Fryer. All
the buttons on the display
will light up for 1 second
and then turn o after
a tone is heard. The red
power button will stay lit,
indicating it is on.
2. Press the red button. It
will turn green (MENU
MODE) once pressed. As a default, the display screen will alternate between 175°C
and 15 MIN (this is the default time and temperature). All buttons and icons will also
light up.
3. Pressing the button will go through each of the cooking presets in sequence.
MEAT > CHICKEN > FISH > SEAFOOD > CHIPS > VEGETABLE > DEHYDRATE
> BAKE. Upon preset selection, the indicator will ash and the display screen will
alternate between the default temperature and time for the chosen preset.
4. If you want to adjust the temperature and time, just press or .
5. To begin air frying, press button. The other icons: “LIGHT” , “MENU” ,
“POWER” button and “START/STOP” button will continue to be lit while
the other cooking presets and buttons will turn o.
NOTE: BY DEAFULT THE VIEWING LIGHT IS ON. TO TURN OFF PRESS THE BUTTON
THE LIGHT INSIDE THE AIR FRYER WILL BE LIT FOR 60 SECONDS AND THEN IT
WILL TURN OFF. THE BUTTONS ARE ONLY OPERATIONAL WHEN THE ICONS ARE
LIT. WHILE THE AIR FRYER IS ON, THE LIGHTS WILL REMAIN ON UNTIL THE UNIT
IS TURNED OFF. TO TURN THE LIGHT INSIDE THE BASKET ON, PLEASE TURN THE
LIGHT BUTTON ON OR OFF, DEPENDING ON YOUR PREFERENCE.
6. You can adjust the cooking temperature and time by pressing or and or
. Pressing and adjusts the cooking time in 1 minute increments. Pressing
and adjusts the cooking temperature in 5°C increments.
NOTE: WHEN IN DEHYDRATE MODE, THE TIME ADJUSTMENT WILL BE IN HOURLY
INCREMENTS.
7. While cooking, you can look in the viewing window at any time to see the progress,
however if you need to pause the Air Fryer press the “START/PAUSE” button.
The “START/PAUSE” button will ash until cooking resumes. Press the “START/
PAUSE” button again to begin the resume cooking.
NOTE: WHEN PAUSED, IT IS NORMAL THAT THE FAN WILL KEEP RUNNING FOR 20
SECONDS.
9
8. While cooking, you can also pull the basket out and the unit will turn o and will
resume function when the basket is inserted back into place.
NOTE: IF THE BASKET IS NOT PLACED SECURELY BACK WITHIN 5 MINUTES, ALL BUTTONS
AND ICONS WILL TURN OFF AND THE UNIT WILL TURN OFF.
9. When cooking time is complete, the unit will beep once and the display will show
“END”. The fan will continue to run for 20 seconds to cool down and return to
standby mode. If you want to stop cooking, please hold down the power ON/
OFF button for 3 seconds.
3. SHAKE FOOD FUNCTION
French Fries, Seafood and Fish functions are set with a shake reminder as default.
At 2/3 cooking time, the unit will beep and display “trn”on display. Shaking food is
recommended for an even cooking around the food surface.
NOTE: IF THE AIR FRYER IS POWERED ON AND THERE IS NO ACTION WITHIN 5 MINUTES,
THE UNIT WILL AUTOMATICALLY RETURN TO OFF MODE.
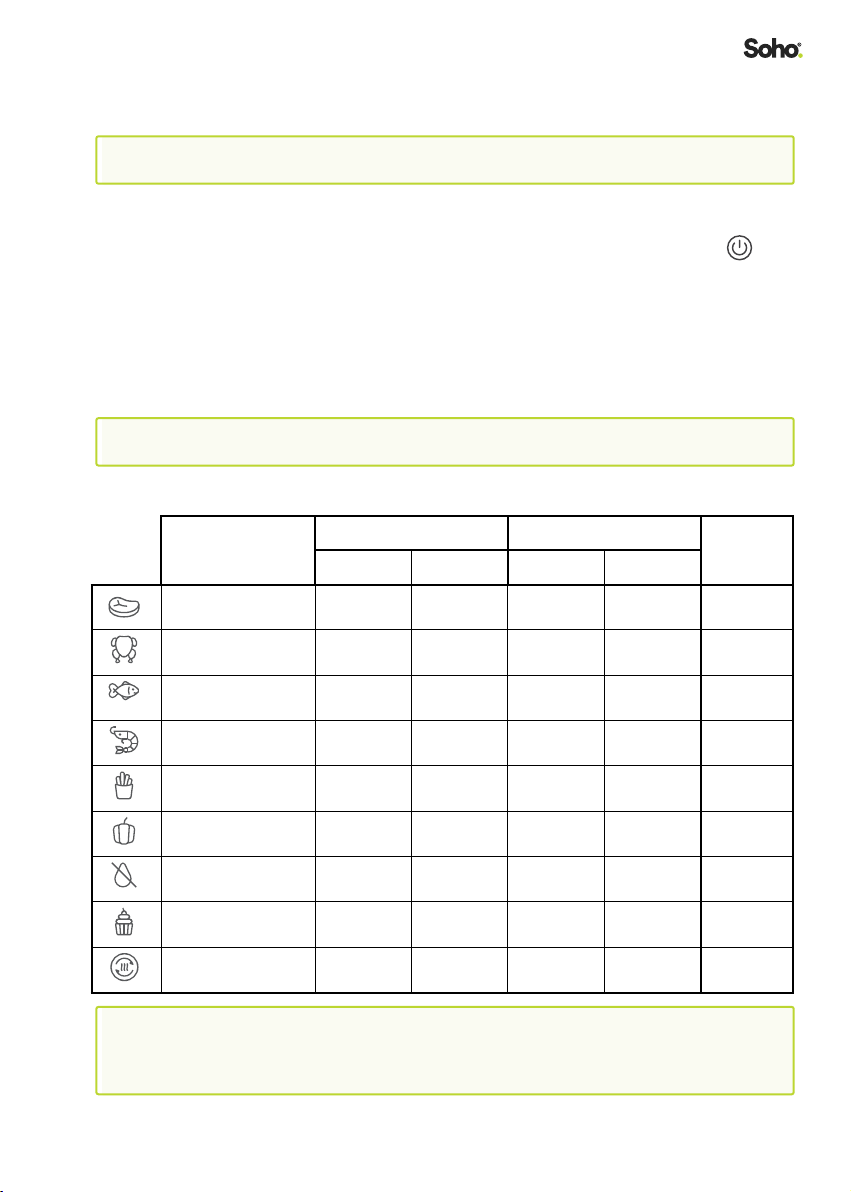
4. PRESET COOKING MODES SETTING
PRESET
FUNCTIONS
TIME (Min) TEMP (°C) SHAKE
DEFAULT RANGE DEFAULT RANGE
MEAT 15min 1min - 60min 175°C 80-200°C Yes
CHICKEN 25min 1min - 60min 200°C 80-200°C Yes
FISH 15min 1min - 60min 160°C 80-200°C Yes
SEAFOOD 8min 1min - 60min 180°C 80-200°C Yes
FRIES 20min 1min - 60min 200°C 80-200°C Yes
VEGETABLES 10min 10min 150°C 80-200°C Yes
DEHYDRATION 8H 1-24H 70°C 40-80°C No
BAKE 12min 1min - 60min 150°C 80-200°C No
PREHEAT 4min 1min - 60min 200°C 80 - 200°C No
IMPORTANT! DEPENDING ON THE THICKNESS AND/OR DENSITY OF FOODS, IT MAY
BE NECESSARY TO USE A MEAT THERMOMETER TO CHECK COOKING
PROGRESS AFTER PRESET TIME HAS EXPIRED. IF MORE TIME IS NEEDED,
COOK AT SHORTER TIME INTERVALS UNTIL FOOD TESTS ARE DONE.

10
5. BEFORE USING FOR THE FIRST TIME
1. Remove all packing material and labels from the
inside and outside of the Air Fryer. Check that there
is no packaging underneath and around the frying
basket.
2. The Air Fryer is shipped with the frying basket
locked inside the Air Fryer body. Firmly grasp the
frying basket handle and press the button with your
thumb to open the frying basket and place on a at,
clean work area.
3. Wash the frying basket and removeable airow tray
in hot, soapy water.
4. DO NOT IMMERSE THE AIR FRYER BODY IN WATER. Wipe the Air Fryer body
with a damp cloth. Dry all parts thoroughly.
5. To ensure the removeable airow tray ts snugly into the frying basket drawer,
there are 4 rubber tips attached to the sides of the tray. Before using, check to make
sure all 4 rubber tips are in place. If they become separated from the tray, simply
slide them onto the tabs as shown. (See FIG 2.)
NOTE: DURING FIRST USE, THE AIR FRYER MAY EMIT A SLIGHT ODOUR. THIS IS NORMAL
AND WILL NOT AFFECT FLAVOUR OR AIR FRYING.
CAUTION - HOT SURFACES:
• THIS APPLIANCE OPERATES AT HIGH TEMPERATURES. DO NOT TOUCH
EXTERNAL SURFACES OF THE APPLIANCE AS THEY CAN BE HOT. DO
TOUCH INSIDE THE APPLIANCE WHILE IT IS IN OPERATION.
• DURING OPERATION, HOT STEAM IS RELEASED THROUGH THE HOT AIR
OUTLETS. PLEASE KEEP YOUR HANDS AND FACE AWAY FROM THE STEAM
AND AIR OUTLETS.
FIG.2
Rubber
Tips
Unlock Basket
Button

11
6. OPERATING INSTRUCTIONS
THE AIR FRYER NEEDS TO BE FULLY CLOSED TO COOK PROPERLY, BUT THE UNIT WILL
CONTINUE TO COOK EVEN IF LEFT SLIGHTLY AJAR. THIS IS NOT A DESIGN FEATURE, AND
IS AN UNSAFE WAY TO COOK. WE ENCOURAGE YOU TO ENSURE THE BASKET IS CLOSED
AND LOCKED IN DURING USE TO ENSURE COOKING QUALITY AND TO PROTECT YOUR
SAFETY.
1. Please refer to the Air Frying Chart and/or follow the package directions for the
suggested cooking TIME and TEMP.
2. Always pat food dry before cooking to encourage browning and avoid excess
smoke.
3. To ensure even cooking and browning, ALWAYS open the basket drawer halfway
through the cook time and check, turn or shake foods in the frying basket. Some
recipes may need you to brush or spray oil halfway through cooking. Adjust the
TIME or TEMP if needed.
CAUTION: • ALWAYS USE OVEN MITTS WHEN HANDLING THE HOT AIR FRYER BASKET.
• MAKE SURE THE CLEAR BASKET LOCK IS IN THE LOCKED POSITION WHEN
SHAKING FOODS. DO NOT PRESS THE BASKET RELEASE BUTTON WHILE
SHAKING THE FRYING BASKET BECAUSE IT CAN DAMAGE THE BASKET
AND THE UNIT.
• HOT OIL CAN POOL AT THE BASE OF THE DRAWER. TO AVOID RISK OF
BURNS OR PERSONAL INJURY AND TO AVOID OIL FROM CONTAMINATING
AIR FRIED FOODS, ALWAYS ENSURE YOU UNLOCK AND REMOVE THE
FRYING BASKET FROM THE DRAWER BEFORE YOU EMPTY IT. NEVER TURN
THE DRAWER UPSIDE DOWN WHILE THE FRYING BASKET IS ATTACHED.
4. Allow cooked food to rest for 5 to 10 minutes. Remove the basket from the machine
and place on a at, heat resistant surface. Then remove the air ow tray from the
basket.
5. Shake air fried foods out onto serving area. Return the airow tray to the basket and
lock basket into place. Continue air frying subsequent batches, if any.
6. To avoid excess smoke, when cooking naturally high fat foods, such as bacon,
chicken wings or sausages, it may be necessary to empty fat from the frying basket
between batches.
7. For crispier results, air fry small batches of freshly bread crumbed food. Create
more surface area by cutting food into smaller pieces. Bathe pieces of meat in egg
and milk and then press bread crumbs onto the meat.
8. Arrange crumbed food in frying basket so that it is not touching to allow air ow on
all surfaces.
9. Spray oils work best because oil is distributed evenly and less oil is needed. Canola,
olive, avocado, coconut, grapeseed, peanut, or vegetable oil all work well.
10. Unplug the Air Fryer when not in use.

12
7. A NOTE ON AIR FRYING PRE-PACKAGED FROZEN FOODS
1. Where microwave ovens often produce hot, mushy results and toaster ovens take
forever, air frying assures reasonably fast, crispy, delicious results!
2. As a rule, (depending on the food and amount to be cooked), the suggested cook
TIMES may have to be reduced slightly. Always check food halfway through
cooking time to determine nal cook TIME and TEMP.
3. Always check cooking progress after TIME has expired.
8. EASY-ASSIST FUNCTION: PREHEAT
Save time and make perfect air frying eortless.
1. PREHEAT: If a recipe calls for a preheated oven, or when cooking meats or proteins
that benet from a hot initial sear, use the PREHEAT function.
• Insert the empty air frying basket/drawer into the body of the Air Fryer.
• Press the button to begin.
• The default TIME and TEMP: 4:00 MINUTES and 200°C will alternate on the
digital display and within 5 seconds the Air Fryer will begin to Preheat.
• After 1 beep, place food into the frying basket, program the Air Fryer to the
desired temperature and time manually or by using the preset menu.
IMPORTANT! WHEN USING THE PREHEAT FUNCTION, REDUCE THE TOTAL COOKING
TIME BY 4 MINUTES.
13
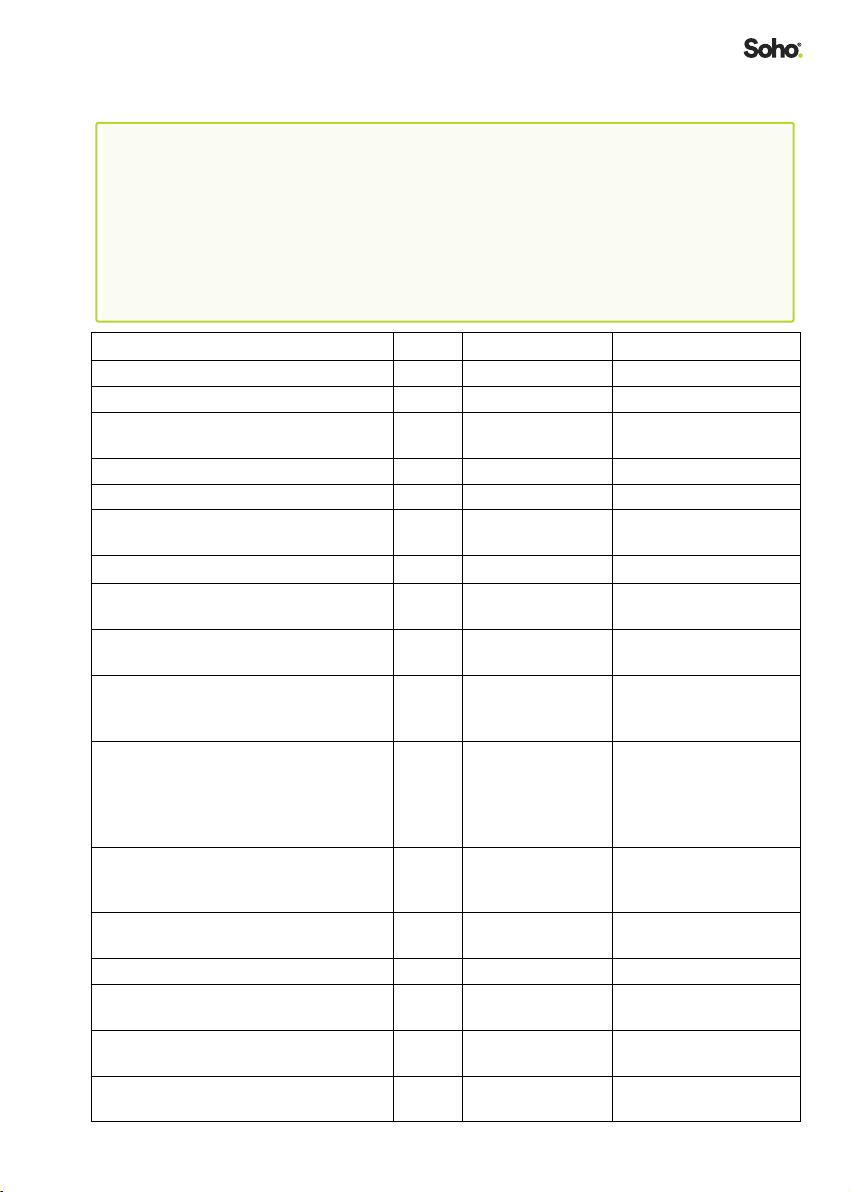
9. AIR FRYING CHART
WARNING! • TIMES ARE ESTIMATED AND BASED ON AVERAGE SIZES AND WEIGHTS.
ALWAYS USE A MEAT THERMOMETER TO ENSURE THAT MEAT, POULTRY
AND FISH ARE COOKED THOROUGHLY BEFORE SERVING.
• FRYING SMALLER BATCHES WILL RESULT IN SHORTER COOKING TIMES
AND HIGHER FOOD QUALITY. ADJUST AIR FRYING TEMPERATURES AND
TIMES AS NECESSARY TO SUIT YOUR TASTE.
• UNLESS FOOD IS PREPACKAGED AND PREOILED, FOR BROWNED AND
CRISPY RESULTS, ALL FOODS SHOULD BE LIGHTLY OILED BEFORE AIR
FRYING.
FOOD TEMP TEMP AIR FRY TIME ACTION
Root Vegetables, 3 - 4 cups fresh (roasted) 190°C 15-20 minutes Toss with oil shake 3x
Asparagus, 3 - 4 cups, fresh thin stems 190°C 7-9 minutes Spray with oil, shake 2x
Green Beans, Sugar Snap Peas, 3 - 4 cups
fresh
190°C 7-9 minutes Spray with oil, shake 1x
Broccoli, 3 - 4 cups fresh (roasted) 190°C 5-7 minutes Spray with oil, shake 3x
Brussels Sprouts, halved, 3 - 4 cups fresh 190°C 8-10 minutes Spray with oil, shake 2x
Butternut Squash, seeded, 1.5cm chunks,
3 - 4 cups fresh
190°C 15 minutes Spray with oil, shake 3x
Fennel, fresh, chopped, 3 - 4 cups 190°C 7-9 minutes Spray with oil, shake 2x
Fried Sweet Potato Fries (fresh, hand cut,
3mm to 6mm thick)
200°C 13-15 minutes Spray with oil, shake 3x
French Fries, Idaho Potatoes, 2 - 3
(fresh, hand cut, 6mm to 8.5mm thick)
200°C
200°C
12 minutes
12 minutes
Spray with oil, shake 3x
Meat, Roast, Chops 180°C 25 minutes Rub or spray with oil, add
seasoning, turn over test
for doneness
Ribeye Steaks, (2) 500g.,
4cm. thick, room temp.
medium rare
medium
well done
200°C
200°C
200°C
Preheat + 6 mins
Preheat + 10 mins
Preheat + 14 mins
Rub or spray with oil,
add seasoning, turn over
test for doneness, rest
15 minutes - check at 12
minutes, rest 15 minutes
Hamburgers, 150g. (up to 4),
rare-well done
175°C Preheat + 3-6 mins Spray with oil, add
seasoning, turn over test
for doneness
Chicken Wings, 900gm - 1.2kg. (fresh/
thawed)
180°C 20 minutes Spray with oil, shake 2x,
test for doneness
Chicken Tenders/Fingers, boneless 180°C 18 - 20 minutes Spray with oil, shake 1x
Chicken Pieces, bone in 180°C 20 - 30 minutes Spray with oil, turn over,
test for doneness
Fish Filet (fresh, thawed, battered) 200°C 10 minutes Spray with oil, turn over,
test for doneness
Shrimp (thawed, battered), 450gm - 1kg. 160°C 8 minutes Spray with oil, turn over,
shake

14
PLEASE NOTE: THE USDA RECOMMENDS THAT MEATS SUCH AS BEEF AND LAMB, ETC.
SHOULD BE COOKED TO AN INTERNAL TEMPERATURE OF 63°C. PORK
SHOULD BE COOKED TO AN INTERNAL TEMPERATURE OF 71°C AND
POULTRY PRODUCTS SHOULD BECOOKED TO ANINTERNAL TEMPERATURE
OF 77°C 82°C TO BE SURE ANY HARMFUL BACTERIA HAS BEEN KILLED.
WHEN REHEATING MEAT/POULTRY PRODUCTS, THEY SHOULD ALSO BE
COOKED TO AN INTERNAL TEMPERATURE OF 74°C.
10. AIR FRYER MAINTENANCE
This appliance requires little maintenance. It contains no user-serviceable parts. Any
servicing requiring disassembly other than cleaning must be performed by a qualied
appliance repair technician.
11. CARE & CLEANING INSTRUCTIONS
WARNING! ALLOW THE AIR FRYER TO COOL FULLY BEFORE CLEANING.
1. Unplug the Air Fryer. Remove frying basket. Make sure the frying basket and crisping
tray have cooled completely before cleaning. Use the center hole of the crisping
tray to lift crisping tray up and out of the frying basket.
2. Wash the frying basket and removeable airow tray in hot soapy water. Do not
use metal kitchen utensils or abrasive cleansers or cleaning products as this may
damage the non-stick coating.
3. The frying basket and removeable airow tray are dishwasher-safe. For best results,
place them both on the rack of your dishwasher to clean.
4. Wipe the Air Fryer body with a soft, non-abrasive damp cloth to clean.
5. The ClearView transparent window is glass and should only be cleaned when cool
and the unit is o. It should only be cleaned by a warm cloth.
12. STORING INSTRUCTIONS
1. Make sure the Air Fryer is unplugged and all of its parts are clean and dry before
storing.
2. NEVER store the Air Fryer while it is hot or wet.
3. Lock the frying basket into the drawer, and store inside the Air Fryer body.
4. Store the Air Fryer in its box or in a clean, dry place.

15
13. TROUBLESHOOTING
PROBLEM POSSIBLE CAUSE SOLUTION
The Air Fryer
doesn’t work
• The Air Fryer is not
plugged in.
• The Air Fryer has turned
itself o.
• Plug the cord into the wall outlet.
To begin, press the button.
• Make sure the frying basket/drawer is
assembled correctly and fully inserted
into the Air Fryer body.
Food is not
cooked
• The frying basket is
overloaded.
• Air fry smaller batches of food.
• Shake food 2 OR 3 TIMES during the
cooking process.
• Increase TEMPERATURE.
• Increase AIR FRY TIME.
Food is not fried
evenly
• The frying basket is
overloaded.
• Air fry smaller batches of food.
• Apply a light even coat of spray oil to
food before frying.
• Shake foods 2 OR 3 TIMES during the
cooking process.
Frying basket /
drawer won’t slide
into the Air Fryer
body properly
• The frying basket is
overloaded.
• Air fry smaller batches of food.
• Air Fryer will not turn ON until the
frying basket/drawer is assembled
correctly and fully inserted properly
into the fryer body.
White smoke
coming from the
Air Fryer
• The Air Fryer is overloaded
with oil.
• The frying basket and
drawer have not been
cleaned.
• When frying oily foods, such as bacon,
you may need to clean out the frying
basket drawer more often.
• Clean the frying basket and drawer
after each use.
Fresh potato
fries are not fried
evenly
• The frying basket is
overloaded.
• Soak, rinse and fully dry potatoes
before frying.
• Use fresh, rm potatoes.
Fries are not
crispy
• Raw fries have too much
water.
• Use a clean kitchen towel to wrap and
dry cut potato fries thoroughly before
adding oil.
• Cut potato fries into smaller slices.
• Shake and spray potato fries frequently.

16
14. WARRANTY TERMS & CONDITIONS
Our goods come with guarantees that cannot be excluded under the Australian
Consumer Law. You are entitled to a replacement or refund for a major failure and
for compensation for any other reasonably foreseeable loss or damage. You are also
entitled to have the goods repaired or replaced if the goods fail to be of acceptable
quality and the failure does not amount to a major failure.
This warranty is provided in addition to your rights under the Australian Consumer Law.
Directed Electronics Australia Pty Ltd (Directed Electronics) warrants that this product
is free from defects in material and workmanship for a period of 12 months from the date
of purchase or for the period stated on the packaging. This warranty is only valid where
you have used the product in accordance with any recommendations or instructions
provided by Directed Electronics.
This warranty excludes defects resulting from alterations of the product, accident,
misuse, abuse or neglect. In order to claim the warranty, you must return the product to
the retailer from which it was purchased or if that retailer is part of a National network,
a store within that chain, along with satisfactory proof of purchase. The retailer will
then return the goods to Directed Electronics.
Directed Electronics will repair, replace or refurbish the product at its discretion. The
retailer will contact you when the product is ready for collection. All costs involved in
claiming this warranty, including the cost of the retailer sending the product to Directed
Electronics, will be borne by you.
Email: service@sohohome.com.au
Phone: +61 3 8331 4800
15. INDEMNITY
You agree to defend, indemnify and hold harmless Soho from and against any and all
claims, proceedings, injuries, liabilities, losses, costs and expenses (including reasonable
legal fees), including but not limited to, claims alleging negligence, invasion of privacy,
copyright infringement and/or trademark infringement against Soho products and
services, relating to or arising out of your breach of any provision of these terms,
your misuse of the Soho products and services, or your unauthorized modication or
alteration of products or software.

17
16. WARRANTY & DISCLAIMER
Soho has a limited warranty whereby Soho warrants to you and only to you that Soho
products will be free from defects in materials and workmanship for one (1) year from
the date of your purchase of the Soho products (unless a longer warranty period is
required by law).
The specics of this Soho limited warranty are at https://www.sohohome.com.au/
warranty
Soho also assumes no responsibility for and shall not be liable for any damages caused
by misuse of the product or failure to follow the instructions provided.
Other than the above product warranty for the Soho products, Soho and its suppliers
disclaim all warranties of any kind, whether express, implied, or statutory, regarding the
Soho equipment. Including any implied warranty of title, merchantability, tness for a
particular purpose, or noninfringement of third party rights. Because some jurisdictions
do not permit the exclusion of implied warranties, the last sentence of this section may
not apply to you. Soho hereby further expressly disclaims all liability for any claims for
service failures that are due to normal product wear, product misuse, abuse, product
modication, improper product selection or your non-compliance with any and all
applicable federal, state or local laws. This warranty and warranty disclaimer give
you specic legal rights, and you may have other rights that vary by state, province,
or country. Other than as permitted by law, Soho does not exclude, limit or suspend
other rights you have, including those that may arise from the nonconformity of a sales
contract. For a full understanding of your rights you should consult the laws of your
state, province, or country. For our Australian customers: please note that this warranty
is in addition to any statutory rights in Australia in relation to your goods which, pursuant
to the Australian Consumer Law, cannot be excluded.
1 7. LIMITATIONS & LIABILITY
Soho liability for damages, especially for breach of duty or obligation, delay in
performance, non-performance, or malperformance shall be precluded, except when
these are due to negligent breaches of any signicant contractual duty or obligation
on the part of Soho. Any liability for negligence is limited to direct losses usually and
typically foreseeable in such case. Should the claim for damages be based on wilful
or grossly negligent breach of contractual duty or obligation on the part of Soho, the
preclusion and limitation of liability mentioned in the preceding sentences will not
apply. The preceding preclusion and limitation of liability will also not apply to claims
for damages arising out of loss of life, bodily injury or health impacts for which Soho
may be liable, or for non-contractual liability.
Some states and countries do not allow the exclusion or limitation of incidental or
consequential damages, so the above limitation or exclusion may not apply to you.
Additionally, this provision is not intended to limit Soho’s liability in the event of Soho’s
wilful or intentional misconduct.

18

19

www.sohohome.com.au
ANOTHER
DIRECTED
BRAND
All Images, Information and Content are Copyright © 2021
Directed Electronics Australia Pty Ltd. All Rights Reserved.
www.directed.com.au | www.directed.co.nz
This manual suits for next models
1
Table of contents
Other Soho Fryer manuals


