Soho FamilyChef Duo User manual

1700 Watts
Turbo Power
8 Pre-Set
Programs
8.0L Dual Basket Air Fryer
& Digital Touch Control
Preset Cooking
Modes
FamilyChef Duo
User Manual
SO-80DAF
Digital Touch
Controls
X-LARGE
Capacity
8.0L
8
Independently
Controlled Baskets
Dual 4L Baskets

2
IMPORTANT SAFEGUARDS
SAVE THESE INSTRUCTIONS. FOR HOUSEHOLD USE ONLY
When using electrical appliances, basic safety precautions should always be followed,
including the following:
1. PLEASE READ ALL INSTRUCTIONS.
2. DO NOT touch hot surfaces. Use handles, oven mitts or potholders.
3. To protect against electric shock DO NOT immerse the cord, plugs, or appliance
in water or other liquid.
4. Unplug the appliance from the power outlet when not in use and before cleaning.
Allow to cool before putting on or taking o parts, and before cleaning the
appliance.
5. DO NOT operate the appliance if it has malfunctioned or has been damaged in
any manner, including the power cord or plug. If the power cord is damaged, it
must be replaced by the manufacturer, its service agent or qualied technician in
order to avoid a hazard.
6. The use of accessory attachments not recommended by the appliance
manufacturer may cause injuries and void the product warranty.
7. DO NOT use outdoors.
8. DO NOT let the cord hang over the edge of tables or counters, or touch hot
surfaces.
9. DO NOT place on or near a hot gas or electric burner, or in a heated oven.
10. Extreme caution must be used when moving an appliance containing hot oil or
other hot liquids.
11. Always attach the plug to the appliance rst, then plug the cord into the wall
outlet. To disconnect the appliance, turn any controls to “OFF”, then remove the
plug from the wall outlet.
12. DO NOT use the appliance for other than intended use.
13. Make sure the removeable airow tray is in place before adding food to be air
fried.
14. Make sure the frying basket is locked securely into the front of the Air Fryer, while
the Air Fryer is in operation.
15. This appliance is not intended for use by persons (including children) with reduced
physical, sensory or mental capabilities, or lack of experience and knowledge,
unless they have been given supervision or instruction concerning use of the
appliances by a person responsible for their safety.
• Children should be supervised to ensure that they DO NOT play with the
appliance.
• Close supervision is necessary when your appliance is being used near
children or infants.
• The appliance is not intended to be operated by means of an external timer or
seperate remote control system.
• This appliance is intended for household use only, it is not warranted for use in
a commercial or business application.

3
WARNING! THE AIR FRYER WILL NOT OPERATE UNLESS BOTH FRYING BASKETS ARE
FULLY CLOSED.
CAUTION! AFTER HOT AIR FRYING, EXTREME CAUTION MUST BE USED WHEN
HANDLING THE HOT FRYING BASKET, REMOVEABLE AIRFLOW TRAY, AND
COOKED FOODS.
WARNING: DO NOT USE ON ACRYLIC OR STONE SURFACES AS HEAT MAY CAUSE
CRACKS OR SURFACE DAMAGE.
DO NOT PLACE DIRECTLY IN FRONT OF GLASS SPLASHBACKS, LEAVE A
MINIMUM OF 10CM FROM THE REAR OF THE UNIT
ADDITIONAL IMPORTANT SAFEGUARDS
CAUTION HOT SURFACES! THIS APPLIANCE GENERATES HEAT AND ESCAPING STEAM
DURING USE. PROPER PRECAUTIONS MUST BE TAKEN TO PREVENT THE RISK
OF BURNS, FIRES, OR OTHER INJURY TO PERSONS OR DAMAGE TO PROPERTY.
CAUTION! THIS APPLIANCE IS HOT DURING OPERATION AND RETAINS HEAT FOR
SOME TIME AFTER TURNING OFF. ALWAYS USE OVEN MITTS WHEN HANDLING
HOT MATERIALS AND ALLOW METAL PARTS TO COOL BEFORE CLEANING. DO
NOT PLACE ANYTHING ON TOP OF THE APPLIANCE WHILE IT IS OPERATING OR
WHILE IT IS HOT.
1. All users of this appliance should read and understand this instruction manual
before operating or cleaning this appliance.
2. The cord to this appliance should be plugged into a 220- 240V AC electrical outlet
only.
3. If this appliance begins to malfunction during use, pull the frying basket drawer
out of the body. Then remove the plug from the wall outlet. DO NOT use or
attempt to repair the malfunctioning appliance.
4. DO NOT leave this appliance unattended during use.
5. DO NOT immerse power cord in any liquid. If the power cord to this appliance is
damaged, it must be replaced.
6. Keep the cord out of reach of children and infants to avoid the risk of electric
shock and choking. Place the Air Fryer on a at, heat-resistant work area.
7. DO NOT obstruct the air outlet or air inlets on the back and sides of the Air Fryer
with any objects. Avoid escaping steam from the air outlet during air frying.
8. Keep the appliance at least 15 cm away from walls or other objects during
operation.
9. Always use the frying basket handle to open the frying basket drawers.
WARNING! AFTER AIR FRYING, MAKE SURE TO PLACE THE FRYING BASKET DRAWER
ON A FLAT, HEATRESISTANT SURFACE.
WARNING! OVERFILLING THE FRYING BASKET MAY DAMAGE THE AIR FRYER AND
COULD RESULT IN SERIOUS PERSONAL INJURY.
10. NEVER move a hot Air Fryer or an Air Fryer containing hot food. Allow to cool
before moving.
11. DO NOT clean with metal scouring pads. Pieces can break o the pad and touch
electrical parts, creating a risk of electric shock.
WARNING! THIS AIR FRYER SHOULD NOT BE USED TO BOIL WATER OR DEEP FRY
FOODS.

4

5
CONTENTS
1. GETTING TO KNOW YOUR FAMILYCHEF DUO 8L AIR FRYER .................... 6
2. DUAL TOUCHSCREEN CONTROL ............................................................ 7
ON/OFF.......................................................................................................................7
SHAKE ....................................................................................................................... 8
DUAL COOK .............................................................................................................. 8
SYNC FINISH ........................................................................................................... 9
START/PAUSE ........................................................................................................... 9
3. BEFORE USING FOR THE FIRST TIME........................................................ 9
4. OPERATING INSTRUCTIONS ...................................................................10
5. PAUSE FUNCTION...................................................................................10
6. PREPROGRAMMED TEMPERATURE & TIMES CHART FOR MANUAL
OPERATION ............................................................................................ 11
7. INDIVIDUAL BASKET: MANUAL OPERATION ........................................... 12
8. DUAL BASKET: MANUAL OPERATION...................................................... 13
9. SYNC FINISH...........................................................................................14
10. AIR FRYING TECHNIQUE......................................................................... 15
11. AIR FRYING PREPACKAGED FROZEN FOODS .........................................16
12. HINTS FOR ROAST ..................................................................................16
13. HINTS FOR BAKE.....................................................................................16
14. HINTS FOR DEHYDRATE..........................................................................16
15. AIR FRY / ROAST COOKING CHART ........................................................ 17
16. DEHYDRATE CHART................................................................................19
17. FRUIT / VEGETABLES ............................................................................. 20
18. AIR FRYER MAINTENANCE..................................................................... 20
19. CARE & CLEANING INSTRUCTIONS ....................................................... 20
20. STORING INSTRUCTIONS ....................................................................... 21
21. TROUBLESHOOTING............................................................................... 21
22. WARRANTY TERMS & CONDITIONS........................................................22
23. INDEMNITY.............................................................................................22
24. WARRANTY DISCLAIMER....................................................................... 23
25. LIMITATIONS & LIABILITY ...................................................................... 23
6
1. GETTING TO KNOW YOUR FAMILYCHEF DUO 8L AIR
FRYER
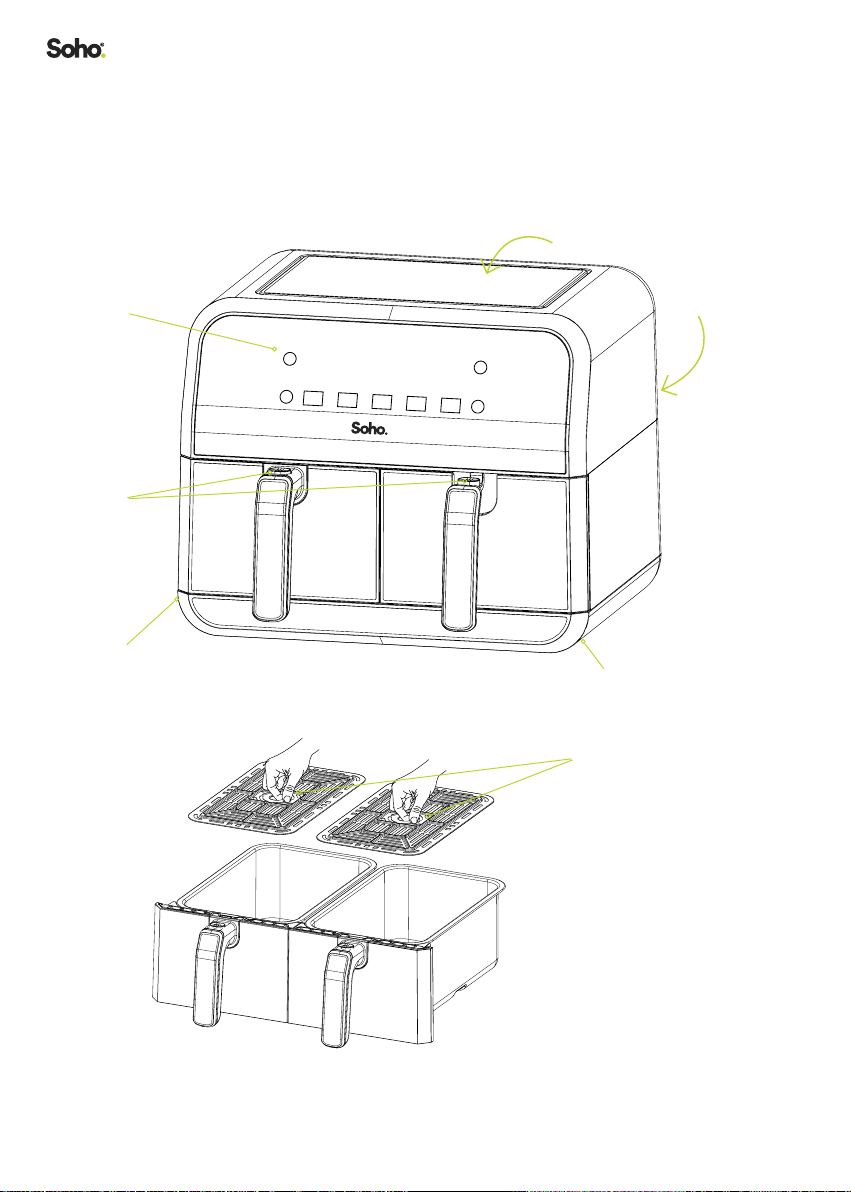
1. Whats in the box:
• Air fryer with 2 removable baskets
• 2x Removeable Airow Trays
Product may vary slightly from illustration
Dual
TouchScreen
Control
Panel
2x (4L.)
Removable
Air Fryer
Baskets with
Handles L
(Left) and R
(Right)
Power Cord with Polarized
Plug (not shown)
Non-Slip Feet
(not shown)
Air Inlet
Heat insulator
located on
the back to
allow hot air
to escape
(not shown)
2 Non-Stick
Removable Airow
Trays (no handles)

7
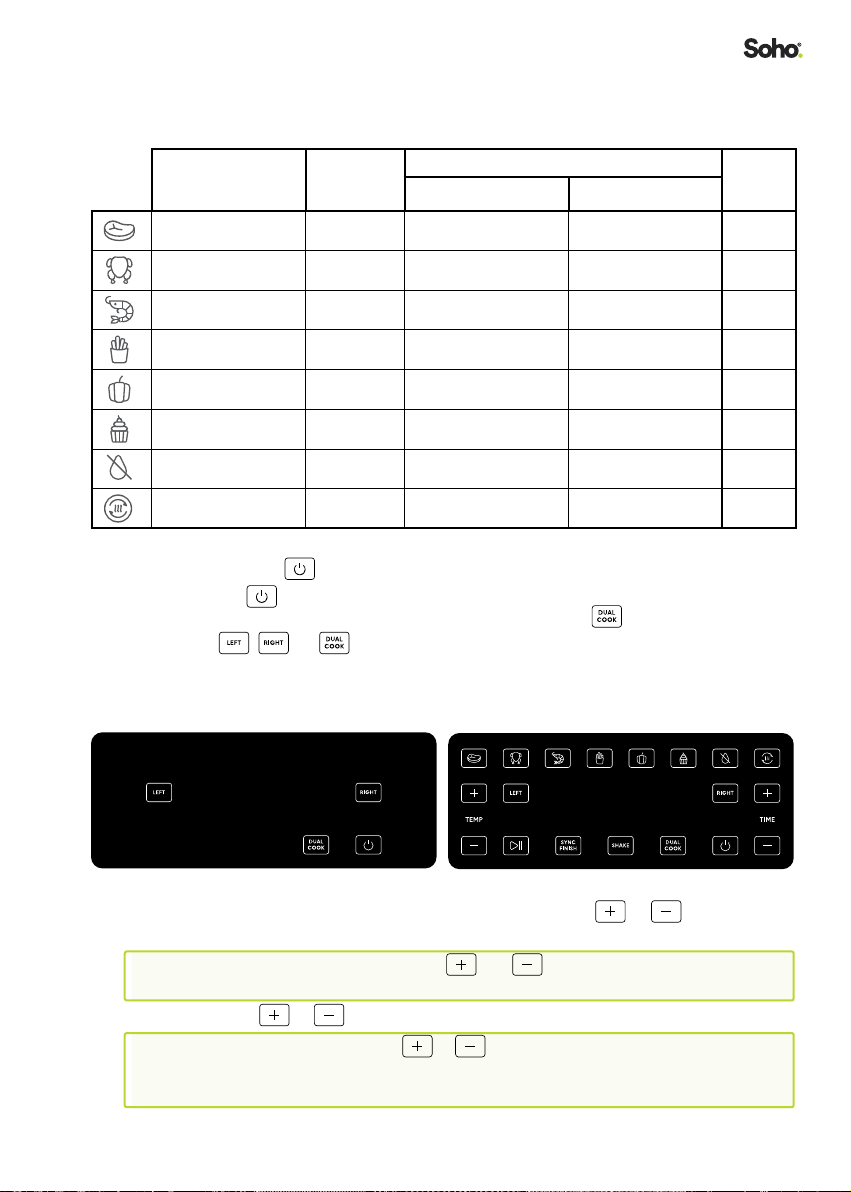
2. DUAL TOUCHSCREEN CONTROL
ON/OFF
• When the Air Fryer is plugged in, a beep will sound and the control panel will
illuminate, then disappear. The button will then light up red, indicating
that the unit is on and ready for use.
• When is pressed, a beep will sound, the will turn green, , and
buttons will light up.
• When in operation, press to turn both LEFT and RIGHT basket controls
OFF.
CAUTION HOT SURFACES:
• THIS APPLIANCE OPERATES AT HIGH TEMPERATURES. DO NOT TOUCH
EXTERNAL SURFACES OF THE APPLIANCE AS THEY CAN BE HOT. DO TOUCH
INSIDE THE APPLIANCE WHILE IT IS IN OPERATION.
• DURING OPERATION, HOT STEAM IS RELEASED THROUGH THE HOT AIR
OUTLETS. PLEASE KEEP YOUR HANDS AND FACE AWAY FROM THE STEAM
AND AIR OUTLETS.
1. ON/OFF
2. Dual Digital TIME/
TEMP Display
3. LEFT /RIGHT
Basket Control
4. MEAT
5. CHICKEN
6. SEAFOOD
7. FRIES
8. VEGETABLES
9. BAKE
10. DEHYDRATE
11. PREHEAT
12. TEMP and
13. TIME and
14. SHAKE FOOD
15. SYNC FINISH
16. DUAL COOK
1 7. START/PAUSE

8
HOW TO USE THE LEFT/RIGHT BASKET
• When the red is pressed, a beep will sound. From here, you can choose
to cook in each basket together or separately by pressing / or .
NOTE: DUAL COOK CAN BE USED TO COOK THE SAME TYPE OF FOOD IN BOTH
BASKETS.
• Press the or button to program the LEFT or RIGHT basket. While Left
or Right ashes, press any PRESET MENU button to continue.
• Aftter pressing or / PRESET MENU, the selected PRESET menu and
the temperature /time will start ashing alternatively.
• The or button will illuminate steadily on the screen when active. To
adjust or add programming at any time, press the appropriate or
basket control button. When the button begins to ash the TEMP/TIME can
be adjusted.
NOTE: LEFT OR RIGHT BASKETS MAY BE PROGRAMMED INDEPENDENTLY, AT ANY
TIME BEFORE OR DURING OPERATION.
• Press the to start cooking.
TEMP OR / TIME OR
• Press or on the left side of the control panel to increase or reduce the
TEMP in 5°C increments.
• Press or on the right side of the control panel to increase or decrease
TIME in 1 minute increments.
NOTE: WHEN USING DEHYDRATE, TIME WILL INCREASE OR DECREASE IN 1 HOUR
INCREMENTS.
NOTE: BOTH COOKING BASKETS CAN HAVE THEIR TIME AND/OR TEMPERATURE
SETTING PROGRAMMED INDEPENDENTLY, AT ANY TIME BEFORE OR DURING
USE.
• Press the or button. When or begins to ash, you can adjust
the programming.
SHAKE
• Each preset menu selection will remind you to shake the basket for better
cooking results. Five beeps will sound at the 2/3 point of the duration of the
cooking time. This does not apply to the PREHEAT and DEHYDRATE
settings as there are NO alerts needed for this function.
• Press to turn this feature OFF. SHAKE will disappear from the screen.
NOTE: SHAKE WILL NOT WORK IF COOKING TIME IS BELOW 3 MINUTES
DUAL COOK
• Press to eortlessly duplicate settings for both LEFT and RIGHT Air Fryer
baskets. You can also select to program the LEFT and RIGHT baskets
at the same time. After making your menu selecton, you can adjust the
temperature and time for both baskets at the same time.

9
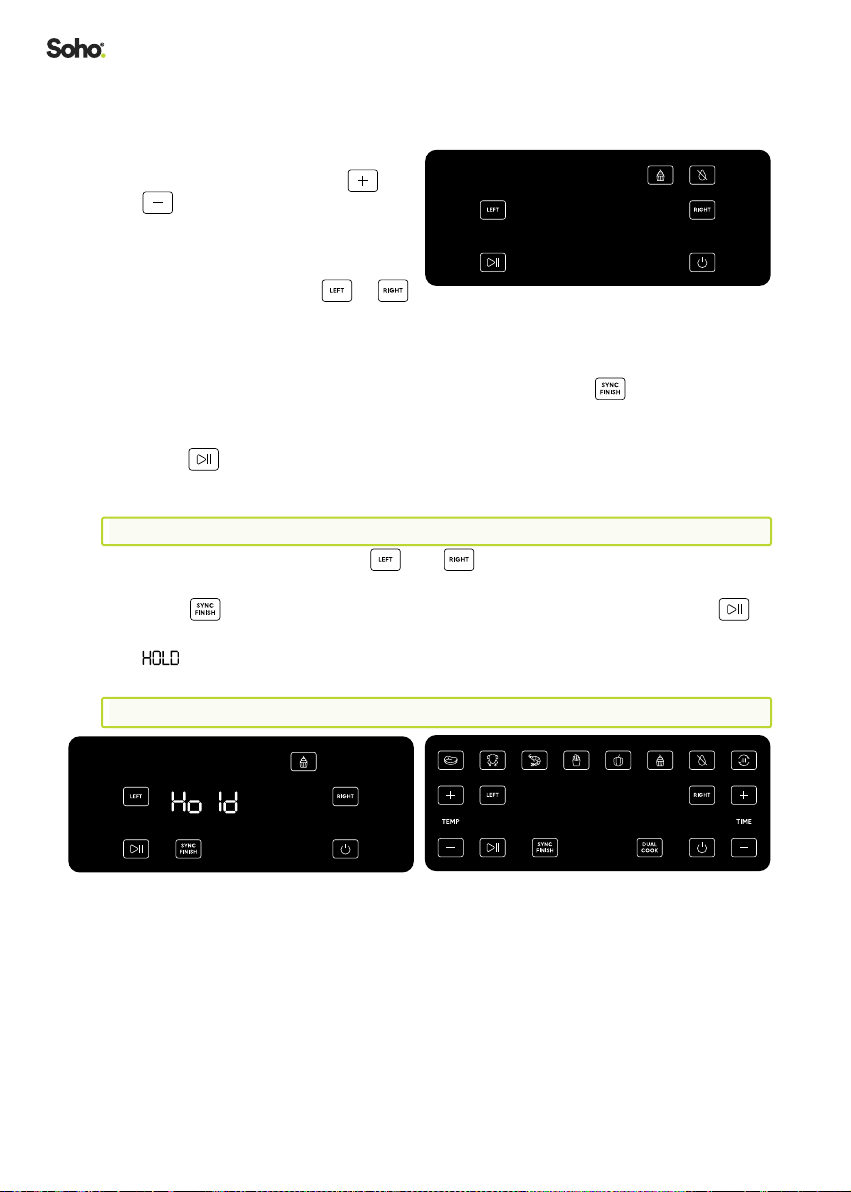
SYNC FINISH
• Program each basket before use.
• Press to ensure both baskets will complete cooking together.
• will appear on the display as the Dual Air Fryer synchronises the nal
cook times.
NOTE: YOU CAN NOT SYNC YOUR COOKING ONCE COOKING HAS BEGUN IF SYNC
COOKING HAS NOT ALREADY BEEN SET.
START/PAUSE
• Once programming is complete, press to START the cooking process or
to PAUSE cooking. Cooking will resume when pause is pressed again.
3. BEFORE USING FOR THE FIRST TIME
Please remove all packing material and labels
from the inside and outside of the Air Fryer. Check
that there is no packaging underneath and around
each of the fryer baskets and crisping trays.
1. Your Dual Basket Air Fryer is shipped with the
2 crisping trays locked into each fryer basket
inside the Air Fryer body.
2. Firmly grasp each fryer basket handle, to pull
the fryer baskets out of the main body.
3. Grasp each crisping tray handle and lift to remove from each basket. FIG. 1
4. Wash both fryer baskets and crisping trays in hot, soapy water.
5. DO NOT IMMERSE THE AIR FRYER BODY IN WATER. Wipe the Air Fryer body
with a damp cloth. Dry all parts thoroughly.
6. Replace crisping trays into each fryer basket. With the handle facing up, insert
each tray so that the rubber corners t and lock comfortably into each basket.
7. Due to base unit’s front curve, the air fryer baskets must be inserted into the
proper sides.
8. The tops of the drawers are labeled LEFT or RIGHT . Slide the LEFT air
fryer basket/crisping tray into the left side of the Air Fryer body. Slide the RIGHT
air fryer basket/crisping tray into the right side of the body. Before use, make sure
each basket is fully inserted and locked into place. FIG. 1
NOTE: THE DUAL AIR FRYER MAY EMIT A SLIGHT ODOR WHEN USED FOR THE FIRST
TIME. THIS IS NORMAL AND WILL NOT AFFECT THE FLAVOUR OF YOUR
COOKING.
FIG. 1

10
4. OPERATING INSTRUCTIONS
IMPORTANT! THE MAXIMUM FOOD CAPACITY RECOMMENDED FOR EACH AIR FRYER
BASKET IS 1.7KG OF FOOD PER BASKET.
WARNING! THIS DUAL BASKET AIR FRYER IS NOT TO BE USED TO BOIL WATER.
WARNING! THIS DUAL BASKET AIR FRYER SHOULD NEVER BE USED TO DEEP FRY
FOODS.
1. Place the Dual Basket Air Fryer on a at, stable, heat-resistant work area, close to
an electrical outlet.
2. If needed, add crisping tray(s). See “Before Using for the First Time” on page
9for a detailed description.
3. Place food into either or both fryer baskets. Do not overll. To ensure proper
cooking and air circulation, NEVER ll any fryer basket more than 2/3 full. When
air frying fresh vegetables, we do not recommend adding more than 2 to 3 cups
of food to the fryer basket.
NOTE: UP TO 6 CUPS OF INGREDIENTS MAY BE DEHYDRATED AS FOOD WILL SHRINK
TO A FRACTION OF ITS ORIGINAL VOLUME. PLACE A SINGLE LAYER OF
INGREDIENTS INTO THE EMPTY AIR FRYER BASKET. CREATE A SECOND LAYER
BY PLACING THE CRISPING TRAY INTO THE BASKET OVER THE INGREDIENTS.
ADD FOOD ON TOP OF THE CRISPING TRAY.
4. Insert the assembled fryer basket(s) into the front of the Dual Basket Air Fryer.
5. PAUSE FUNCTION
Both the baskets have to be inserted properly for the Air Fryer to function.
If one basket is under operation and the 2nd basket is unlocked, the operation will
pause and will be displayed showing which basket is unlocked.
11
6. PREPROGRAMMED TEMPERATURE & TIMES CHART
FOR MANUAL OPERATION
PRESET
FUNCTIONS
DEFAULT
TEMP
DEFAULT TIME (Min) SHAKE
SINGLE BASKET DUAL BASKET
MEAT 175°C 15min 20min Yes
CHICKEN 200°C 25min 30min Yes
SEAFOOD 180°C 8min 10min Yes
FRIES 200°C 20min 28min Yes
VEGETABLES 150°C 10min 12min Yes
BAKE 150°C 12min 12min No
DEHYDRATION 70°C 8H 8H No
PREHEAT 200°C 4min 4min No
1. Plug cord into the wall outlet. An audible tone will sound, the control panel will
illuminate. The button will light up red.
2. When the is pressed, a tone will sound and the power button will turn green
and the control panel will illuminate LEFT, RIGHT and FIG. 2
3. Select , , or . Press the desired MENU button. A tone will sound. The
LEFT or RIGHT basket control and both the default TEMP (in large numerals) and
default TIME (smaller numerals) will ash on the display and alternate between
time and temperature. FIG. 3
4. When both the TEMP and TIME light up, press TEMP or to increase or
reduce TEMPERATURE in 5°C increments.
NOTE: PRESS AND HOLD THE TEMP or BUTTON TO QUICKLY CYCLE
THROUGH THE OPTIONS.
5. Press TIME or to increase or decrease TIME in 1 minute increments.
NOTE: PRESS AND HOLD THE TIME or BUTTON TO QUICKLY CYCLE THROUGH
THE OPTIONS.
NOTE: IN THE DEHYDRATE SETTING, TIME IS ADJUSTED IN 1 HOUR INCREMENTS.
FIG. 2 FIG. 3
180C

12
7. INDIVIDUAL BASKET: MANUAL OPERATION
1. Plug cord into the wall outlet. An audible tone will sound, the control panel will
illuminate. The button will light up red.
2. When the is pressed, a tone will sound and the power button will turn green
and the control panel will illuminate the , and buttons. FIG. 3
3. Select or . Press the desired MENU button. A tone will sound. The LEFT
or RIGHT basket control and both the default TEMP (in large numerals) and
default TIME (smaller numerals) will ash on the display and alternate between
time and temperature. FIG. 4
4. Press to START the cooking process. FIG. 4
5. If you are using one basket to cook, and then decide to add another basket and
start Dual Cooking, press either the or button (depending on what
basket you are adding). The MENU selections will appear and you can select your
cooking preset. (FIG 5).
NOTE: YOU CAN NOT SYNC COOK ONCE YOU HAVE STARTED COOKING IN A SINGLE
BASKET, EVEN IF YOU MANUALLY START COOKING IN THE OTHER ONE.
6. Press the desired MENU button for RIGHT basket cooking.
7. When both the TEMP and TIME light up, press TEMP or to increase or
reduce TEMPERATURE in 5°C increments.
NOTE: PRESS AND HOLD THE TEMP or BUTTON TO QUICKLY CYCLE
THROUGH THE OPTIONS.
8. Press TIME or to increase or decrease TIME in 1 minute increments.
NOTE: PRESS AND HOLD THE TIME or BUTTON TO QUICKLY CYCLE THROUGH
THE OPTIONS.
NOTE: IN THE DEHYDRATE SETTING, TIME IS ADJUSTED IN 1 HOUR INCREMENTS
9. When the desired TIME and TEMP appear on the digital display, press to turn
the Dual Basket Air Fryer ON. The target TIME will begin to count down. TEMP
and remaining TIME will appear on the digital display. FIG. 4
NOTE: TO PAUSE AIR FRYING IMMEDIATELY, PUSH THE BASKET RELEASE BUTTON AND
PULL THE ACTIVE FRYER BASKET OUT OF THE BODY AT ANY TIME. WHEN THE
BASKET IS PUT BACK IN, COOKING WILL RESUME.
NOTE: PRESS TO PAUSE THE COOKING PROCESS AT ANY TIME. WHEN IS
PRESSED AGAIN, COOKING WILL RESUME.
FIG. 4
180C
180C
FIG. 5
180C 3:00

13
10. When cooking has nished and time says , the display will show |
then change to |and beep 5 times when it is safe to remove food.
NOTE: THE QUANTITY, DENSITY & WEIGHT OF FOOD WILL ALTER THE TOTAL COOKING
TIME NECESSARY. REMEMBER, FRYING SMALLER BATCHES WILL RESULT IN
SHORTER COOKING TIMES AND HIGHER FOOD QUALITY.
IMPORTANT: ALWAYS CHECK YOUR FOOD HALFWAY THROUGH COOKING TIME TO
DETERMINE IF YOU NEED TO ADJUST FINAL COOKING TIME AND TEMP.
11. To adjust the air frying TEMP or TIME during operation, use the TEMP or TIME
or to increase or decrease TEMP or TIME as you cook.
12. Press to START the cooking process.
8. DUAL BASKET: MANUAL OPERATION
1. Plug cord into the wall outlet. An
audible tone will sound, the control
panel will illuminate. The
button will light up red.
2. Once on, the control panel will
light up. A tone will sound, and the
power button will now be ‘green.’
The buttons for the and
basket and will also now be illuminated. FIG. 6
3. Press .
4. Choose your PRESET MENU function. A tone will sound and the or
button will ash.
5. Choose which basket ( or ) that this cooking PRESET option will
correspond to (ie - chicken, LEFT basket, chips RIGHT basket).
NOTE: YOU CAN MANUALLY CHANGE THE COOKING TIME AND TEMPERATURE IN
BOTH BASKETS, HOWEVER WE RECOMMEND THAT YOU USE YOUR AIR FRYER
AND GET A SENSE OF HOW IT WORKS AND YOUR TASTE PREFERENCES BEFORE
OVERRIDING THE COOKING PRESETS.
6. Your options for changing the time and temperature settings are as follows:
• Two dierent time and temp settings across each basket.
• Same time and temp settings across each basket.
• One time and temp setting on one basket only (the other remains with its
preset temp and time).
FIG. 6
1:00 5:00
14
TO MANUALLY CHANGE THE TIME AND TEMP
SETTINGS FOLLOW THESE INSTRUCTIONS:
1. You can now change temperature
and time by pressing or
button. The change will be
applicable to both baskets at the
same time. You can also change
the setting of an individual basket
ONLY by pressing the or
button rst.
2. Now only the selected basket, PRESET MENU, TEMP and TIME button will ash
once each basket has begun cooking with the new time and temp settings.
3. When the TEMP and TIME button lights up, pressing the button will ensure
both the baskets compete cooking at the same time. (Please refer to “SYNC
FINISH” on page 14 for further details )
4. Press to begin operation. FIG. 7
9. SYNC FINISH
IMPORTANT: PLEASE PROGRAM BOTH LEFT AND RIGHT BASKETS FIRST.
1. Program the Dual Air Fryer and baskets following the “Dual Basket:
Manual Operation” on page 13 Steps 1 through 3.
2. Press to ensure both baskets will complete cooking together. Press to
begin operation.
3. will appear on the display on the basket side that is being held as the Dual
Air Fryer synchronises the nal cook times. FIG. 8
NOTE: ONCE COOKING HAS STARTED SYNC FUNCTION WILL NOT BE OPERABLE.
FIG. 7
5:00 5:00
FIG. 8
3:00
FIG. 9
5:00 3:00

15
10. AIR FRYING TECHNIQUE
Please refer to the Air Fry / Roast Cooking Chart and/or follow package directions for
suggested TIME and TEMP.
1. ALWAYS pat food dry before you start cooking to encourage better and more
consistent browning and to avoid excess smoke.
2. To ensure even cooking/browning, ALWAYS open the active basket halfway
through the cook time and check, turn or shake foods in the fryer basket. Some
recipes may call to brush or spray oil halfway through cooking. Adjust TEMP or
TIME if needed.
WARNING: EXTREME CAUTION MUST BE USED WHEN HANDLING ANY HOT FRYER
BASKET OR CRISPING TRAY. KEEP YOUR FACE AND HANDS AWAY FROM
ESCAPING STEAM.
CAUTION: ALWAYS USE OVEN MITTS WHEN HANDLING THE HOT AIR FRYER BASKET.
CAUTION: HOT OIL CAN COLLECT AT THE BASE OF THE BASKET. USE CAUTION WHEN
REMOVING COOKING FOODS.
3. To avoid excess smoke, when cooking naturally high fat foods (such as bacon,
chicken wings or sausages) it may be necessary to empty fat from the fryer basket
between batches.
4. For extra crispiness, make sure the skin or exterior of your food is dry. Air fry small
batches of food that has been pre-crumbed. Improve your cooking results by
cutting crumbed food into smaller pieces. Using a binder like eggs will help your
breadcrumbs adhere to your seafood/meat/poultry/vegetables. We recommend
you refrigerate crumbed foods for at least 30 minutes before frying.
5. To improve crispiness, dust poultry skin or exterior surface lightly with corn
starch. Spray with oil.
6. Arrange crumbed food in the air fryer basket so that food is not touching to allow
air ow on all surfaces.
7. Spray oils work best. Oil is distributed evenly and thus less oil is needed. Canola,
olive, avocado, coconut, grapeseed, peanut, or vegetable oil work well.
8. Shake air fried foods out onto the serving area. Promptly insert a fryer basket into
the Air Fryer body and lock into place. Continue air frying subsequent batches,
if any.
9. Press REHEAT to air fry food for 6 minutes at 120ºC. Pull out the active basket at
any time to check on your food’s temperature. Repeat to continue cooking until
food is heated to your liking.
10. Unplug the Dual Basket Air Fryer when not in use.

16
11. AIR FRYING PREPACKAGED FROZEN FOODS
• As a rule, depending on the food and amount to be cooked, recommended
cooking times can be reduced slightly. Always check food halfway to
determine nal cook TIME and TEMP.
• Always check cooking progress after TIME has nished.
12. HINTS FOR ROAST
IMPORTANT! CONSULT THE USDA COOKING GUIDELINES SECTION OF THIS
INSTRUCTION MANUAL BEFORE COOKING BEGINS. ALWAYS TEST MEAT
USING AN ACCURATE COOKING THERMOMETER.
• Always use a meat thermometer to ensure it is cooked properly.
• Cook meats to 5 to 10 degrees below desired doneness (internal temperature).
Allow meat to stand 15 to 20 minutes before serving. The temperature will
continue to rise while standing.
• Roast large, tender cuts of meat and poultry. Seasoning prior to cooking adds
to the avour and the aroma.
• A layer of fat on the top of the roast promotes better browning and provides
natural basting.
• To speed up browning, brush lean cuts of meat, chicken and sh with oil,
margarine or melted butter.
• Place meat (fat side up) and turn over half-way through ROAST time.
IMPORTANT: TURN AND CHECK FOOD HALFWAY THROUGH ROAST TIME.
• Press to turn this feature OFF. SHAKE will disappear from the screen.
Times are estimated and based on average sizes and weights.
13. HINTS FOR BAKE
• When using , you may need to lower the bake recipe temperature by 10°C
to a minimum of 150°C.
• Check package directions to determine the food you are considering is
suitable for use in an Air Fryer.
• Press to turn this feature OFF. SHAKE will disappear from the screen.
14. HINTS FOR DEHYDRATE
NOTE: WHEN MANUALLY PROGRAMMING DEHYDRATE MENU SELECTION, TIME WILL
INCREASE OR DECREASE IN 1 HOUR INCREMENTS.
• Dehydrate fresh, ripe foods to preserve nutrients and enhance avor.
• Your Dual Basket Air Fryer’s automated drying makes home dehydration both
simple and rewarding and ensures safe, preservative-free results.
• DEHYDRATE combines low, steady heat with steady convection fan power.
• Precise low temperatures dry out foods evenly without cooking or overheating.
NOTE: TURN FOOD SEVERAL TIMES DURING DEHYDRATE .

17
15. AIR FRY / ROAST COOKING CHART
Times are estimated and based on average sizes and weights.
ALWAYS USE A MEAT THERMOMETER TO ENSURE THAT MEAT, POULTRY AND
FISH ARE COOKED THOROUGHLY BEFORE SERVING.
NOTE: FRYING SMALLER BATCHES WILL RESULT IN SHORTER COOKING TIMES AND
HIGHER FOOD QUALITY. ADJUST AIR FRYING TEMPERATURE AND TIME AS
NECESSARY TO SUIT YOUR TASTE. NOTE: UNLESS FOOD IS PREPACKAGED
AND PREOILED, FOR BROWNED AND CRISPY RESULTS, FOOD CAN BE LIGHTLY
OILED BEFORE AIR FRYING.
SINGLE BASKET DUAL BASKET
VEGETABLES TEMP TIME TIME
Asparagus, 1 bunch thin spears 200°C 5-7 minutes 10-14 minutes
Asparagus, 1 bunch thick spears 200°C 7-9 minutes 12-15 minutes
Cauliower Florets, 3-4 cups 200°C 7-9 minutes 18-25 minutes
Eggplant. 38mm cubes (roasted) 200°C 5-7 minutes 24 minutes
Kale, 3 cups, stems removed 190°C 9 minutes 15-18 minutes
Peppers, Bell, 25mm chunks 190°C 10 minutes 15-20 minutes
Pickles, crumbed 200°C 5-7 minutes 9-13 minutes
Potatoes, white, French Fries, (freshly
soaked, 6 to 8mm thick)
200°C 16-20 minutes 30-40 minutes
Potatoes, white, 25mm cubed 200°C 12-14 minutes 24-35 minutes
Potatoes, white, wedges 200°C 20-25 minutes 35-40 minutes
Broccoli Florets, 3-4 cups 200°C 15-20 minutes 22-28 minutes
Brussels Sprouts, 450g 190°C 12-15 minutes 20-25 minutes
Corn on the Cob, 4 ears 190°C 12-15 minutes 18-20 minutes
Carrots, 2 1/2 cups, 13mm pieces 200°C 10-12 minutes 20-24 minutes
Mushrooms, 3 cups sliced 200°C 10-12 minutes 18-22 minutes
Peppers, Jalapeno, poblano (roasted) 190°C 10 minutes 12-15 minutes
Zucchini, 6mm discs 200°C 14-17 minutes 22-24 minutes
Root Vevegables, 13mm chunks (roasted) 200°C 15-20 minutes 25-40 minutes
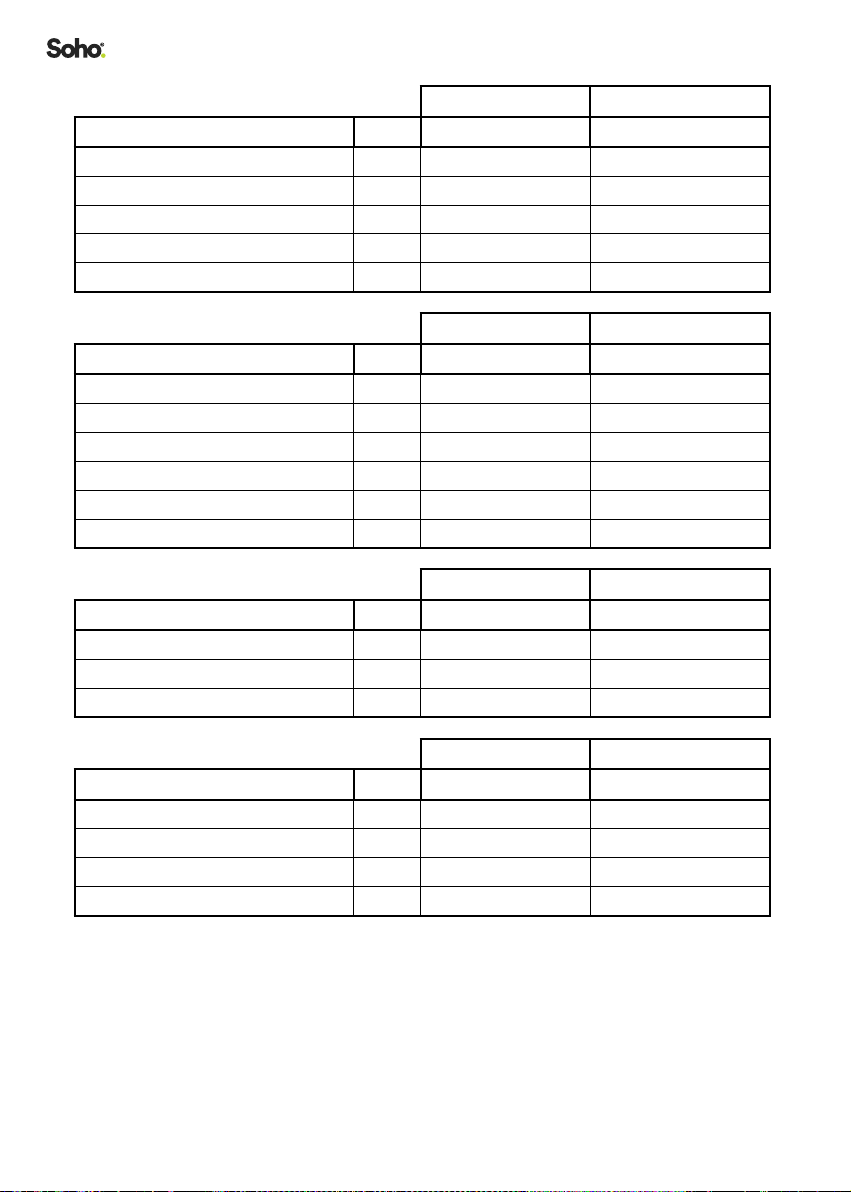
18
SINGLE BASKET DUAL BASKET
BEEF TEMP TIME TIME
Hamburger, 110g (up to 4) 180°C 12-16 minutes 16-18 minutes
Hot Dogs / Sauages 180°C 10-15 minutes 20-25 minutes
Meat Loaf, 450g 180°C 33-40 minutes 45-50 minutes
Steak, 2 (225g) Steaks 180°C 8-21 minutes 10-24 minutes
Beef Tenderloin, 450g, rare 180°C 16 minutes 18-20 minutes
SINGLE BASKET DUAL BASKET
CHICKEN TEMP TIME TIME
Chicken Breast, boneless, skinless 180°C 18-20 minutes 22-25 minutes
Chicken Thighs, 6 - 8oz ea, boneless 180°C 20-25 minutes 28-30 minutes
Chicken Tenders/Fingers: battered 180°C 13-15 minutes 16-19 minutes
Chicken Wings, 900g 205°C 22-27 minutes 40-45 minutes
Steak, 2 (225g) Steaks 180°C 8-21 minutes 10-24 minutes
Beef Tenderloin, 450g, rare 180°C 16 minutes 18-20 minutes
SINGLE BASKET DUAL BASKET
PORK TEMP TIME TIME
Lamb Loin Chops, 25mm thick 200°C 8-12 min 14-18 min
Pork Chops, 25mm thick 190°C 10 -14 min 20-25 min
Pork Chops, 50mm thick 190°C 15-19 min 22-28 min
SINGLE BASKET DUAL BASKET
FISH & SEAFOOD TEMP TIME TIME
Shrimp, thawed and battered 160°C 12 minutes 14-15 minutes
Catsh Fingers, thawed and battered 200°C 10-15 minutes 18-25 minutes
Shrimp, thawed and sauced 160°C 5-8minutes 10-12 minutes
Salmon Filets, thawed 200°C 9-12 minutes 17-24 minutes

19
All items are to be air fried from frozen (do not thaw). SINGLE BASKET DUAL BASKET
FROZEN FOODS TEMP TIME TIME
Cheese Sticks 175°C 6-9 minutes 10-12 minutes
French Fries, Thick, 2 cups 200°C 17-21 minutes 24-30 minutes
French Fries 200°C 15-17 minutes 20-24 minutes
Onion Rings 180°C 12-16 minutes 18-22 minutes
Chicken nuggets, 340g box 180°C 10-15 minutes 17-22 minutes
Fish Sticks 200°C 12-18 minutes 18-22 minutes
Meatballs, 25mm pre-cooked 200°C 7-9minutes 11-14 minutes
Pizza 18cm 180°C 12-15 minutes 15-17 minutes
SINGLE BASKET DUAL BASKET
DESSERT TEMP TIME TIME
Apple Turnovers 200°C 10 minutes 14 minutes
Donuts 175°C 8 minutes 9-11 minutes
PLEASE NOTE: THE USDA RECOMMENDS THAT MEATS SUCH AS BEEF AND LAMB,
ETC. SHOULD BE COOKED TO AN INTERNAL TEMPERATURE OF 63°C.
PORK SHOULD BE COOKED TO AN INTERNAL TEMPERATURE OF 71°C
AND POULTRY PRODUCTS SHOULD BE COOKED TO AN INTERNAL
TEMPERATURE OF 77°C 82°C TO BE SURE ANY HARMFUL BACTERIA
HAS BEEN KILLED. WHEN REHEATING MEAT/POULTRY PRODUCTS,
THEY SHOULD ALSO BE COOKED TO AN INTERNAL TEMPERATURE OF
74°C.
16. DEHYDRATE CHART
Please turn food several times during DEHYDRATE function for even drying.
HERB TEMP TIME HERB TEMP TIME
Oregano 55°C 2-3 hrs Parsley 55°C 2-3 hrs
Thyme 55°C 3-4 hrs Rosemary 55°C 2-3 hrs
Tarragon 55°C 3-4 hrs Sage 55°C 3-4 hrs
Kale Chips Stems Removed 55°C 2-3 hrs

20
1 7. FRUIT / VEGETABLES
1. Wash all fruit skins well.
2. Slice fruit into 13mm thick slices and arrange with space between each slice to
ensure even drying.
3. Rotate foods halfway through DEHYDRATE operation for even drying.
DEHYDRATE TEMP TIME DEHYDRATE TEMP TIME
Apple Rounds
Core Slice into
6mm slices
55°C 8-9 hrs Orange Slices
Fully dried
Citrus is crisp
when fully dried
55°C 10 hrs
Mango/Papaya
Pieces peal slice
into 6mm slices
55°C 8-10 hrs Tomatos Roma
Skin side down
65°C 8-9 hrs
Kiwi 6mm rounds 55°C 6 hrs Tomatoes, Cherry/
Grape Skin side
down
65°C 5-9 hrs
18. AIR FRYER MAINTENANCE
This appliance requires little maintenance. It contains no user-serviceable parts. Any
servicing requiring disassembly other than cleaning must be performed by a qualied
appliance repair technician.
19. CARE & CLEANING INSTRUCTIONS
WARNING! ALLOW THE AIR FRYER TO COOL FULLY BEFORE CLEANING.
1. Unplug the Air Fryer. Remove the frying basket. Make sure the frying basket and
removeable airow tray have cooled completely before cleaning. Use the center
hole of the removeable airow tray to lift it up and out of the frying basket.
2. Wash the frying basket and removeable airow tray in hot soapy water. Do not
use metal kitchen utensils or abrasive cleansers or cleaning products as this may
damage the non-stick coating.
3. The frying basket and removeable airow tray are dishwasher-safe. For best
results, place in the top rack of your dishwasher to clean.
4. Wipe the air fryer body with a soft, non-abrasive damp cloth to clean.
This manual suits for next models
1
Table of contents
Other Soho Fryer manuals


Popular Fryer manuals by other brands


Henny Penny
Henny Penny EVOLUTION ELITE EEE-182 Technical manual

Elite Gourmet
Elite Gourmet EAF-0201 user manual

Silvercrest
Silvercrest SEF 2300 C3 operating instructions

BRAYER
BRAYER BR2836 instruction manual

Emeril Lagasse
Emeril Lagasse Pressure AirFryer Plus owner's manual

Oursson
Oursson AG3202 instruction manual


