Sojet ELFIN ID User manual

Edition: E1D20150415
High Resolution Inkjet Printer
User Manual
XiaMen Sojet Electronics Co.,Ltd.

IMPORTANT
To ensure the best printing quality, we recommend using only our specified cartridges and
the corresponding accessories. Any malfunction or poor printing quality caused by improper
use of other kinds of inks or accessories will be not be guarranteed.
Safety Precautions
There is high voltage inside the machine when it is live. Maintenance or disassembly by
unqualified or unauthorized person is strictly prohibited, so as not to cause any accident.
Machine must be reliably grounded by connecting the grounding wire for the machine during
equipment setup. Unreliable grounding will result in machine failure that the machine cannot
work normally.
Do not expose ink to direct sunlight or high temperature (35℃above). The heat of direct sun-
light or high temperature will affect ink’s storage life and print quality.
If you get ink spill on the eyes or skin during use, please clean your eyes or skin by clean
water.
Ink leakage inside printer can result in burnout damage to the machine. Switch off the
machine and unplug it from power outlet when there’s ink leakage inside printer. Contact
qualified service technician for test and repair.
Warning Signs
Caution: The sign “ ” indicates information for caution of possible damage to hardware
of inkjet printer or data loss.
Attention: The sign “” indicates important notes helpful for your trouble-free operation
of the machine.

Content
Introduction
06 Chapter One: Important Precautions for Using
06 1.1 Important Setup Precautions
6 1.2 Important Operation Precautions
7 Chapter Two: Setup and Installation Instructions
8 2.1 Parts List
9 2.2 Deviceinstallation
09 2.2.1 Side printing installation
9 2.2.2 Down printinginstallation
10 2.2.3 Springback mechanism installation(optional)
11 Chapter Three: DeviceIntroduction
11 3.1 Controller Introduction
11 3.2 Printer head Introduction
12 3.3 Technical Specifications
13 Chapter Four: How to Use the Printer and the Check Work before/afterUse
13 4.1 How to Use the Printer
13 4.2 Check Work before Use
13 4.3 Check Work afterUse
14 Chapter Five: Printer Operation Instructions
14 5.1 Main Interface
15 5.2 Printing Management
15 5.2.1 Find/Preview Data
15 5.2.2 Start Printing / Printing Report
15 5.2.3 Printing Delay
16 5.2.4 Print Initial Values
16 5.2.5 Stop Printing

17 5.3 New/Edit Data
17 5.3.1 New/Edit Data
18 5.3.2 Add TextObject
18 5.3.3 Add Production Date Object
18 5.3.4 Add Expiration DateObject
19 5.3.5 Add Image LogoObject
19 5.3.6 Add Counter Object
19 5.3.7 Add Shift CodeObject
20 5.3.8 Add BarcodeObject
21 5.3.9 Delete Data or Object
22 5.4 System Management
22 5.4.1 System Setting
23 5.4.2 Edit Options
24 5.4.3 Printing Options
26 5.4.4 Special Features
27 5.4.5 Screen TouchCorrection
28 5.5 Tools Management
28 5.5.1 Image Management
28 5.5.2 System Upgrade
29 5.5.3 System Backup
29 5.5.4 System Record
29 5.5.5 AboutEquipment
30 5.5.6 System Reset
31 5.6 Edit Input Method Options
32 5.7 Status Bar
33 Chapter Six: Care and Maintenance
33 6.1 Printer Care and Maintenance
33 6.2 Ink Cartridge Care and Maintenance
34 Chapter Seven:Troubleshooting
34 7.1 Troubleshooting for InkCartridge
35 7.2 Troubleshooting for Printer
36 Appendix 1: Terms and Definitions

Please read this manual carefully before you use thisequipment.
Introduction
Thank you for your purchase of this high resolution printer. We want you to get helpful information
for your work with this equipment; therefore we would like to explain a little bit about how to use this
machine by this user manual by the following content:
Important precautions for use of themachine
Introduction of printer: Parts and components of themachine
Setup and Installation Instructions: Instructions for Equipment Setup and Cartridge Installation.
How to use the printer and the check work before/after use of the printer: explanations of general
operation and startup/shutdown.
Operation instructions: explanations on how to new/edit data for printing, and how to adjust
printer settings.
Care and Maintenance: Care and maintenance for printer andcartridge
Troubleshooting: Common failures occurred andsolutions
Appendix 1 - Terms and Definitions: Definitions for terms used in thisdocument.
Please read this user manual carefully before first use of the printer for full understanding and atten-
tion of important information so that you will get maximum use from your new equipment. This will
also help you have a quick reference to related sections when you have any problems during use.
Note 1: If you cannot solve the problem encountered during use, please contact us for assistance.
Note 2:The information contained herein is subject tochange without notice.The amended informa-
tion will be updated in user manual by newedition.
Note 3: Any machine failure or damage caused by user’s negligence in following this manual will not
be covered by the warranty.

ChapterOne:ImportantPrecautionsforUsing
Welcome to use this printer. In order to protect your personal safety and user rights, ensure correct
installation and operation, and full play of the machine, it is important that you read the precautions
carefully.
1.1 Important Setup Precautions
1.1.1 Use exclusive power supply for the equipment. Do not share same power supply with other
equipment. Besides, Installation of an additional UPS isrecommended.
1.1.2 Mount the support in sound and stable place. Do not choose the location that will be easily
affected by shock or sway.
1.1.3 Choose well-working conveyor belt for high printquality.
1.1.4 Add deflector to the printer for production line setup in order to prevent any printing object
hitting the nozzle plate to causedamage.
1.1.5 Make sure the printer is wellgrounded.
1.1.6 Maintain the distance between deflector and printing object at 0.5-2.5mm as recommended.
1.1.7 Make sure to insert and remove the ink cartridge by an angle of 15 degree so as not tocause
damage to the cartridge.
1.1.8 Make sure the setup environment is tidy and clean. Clean the dust on printer from time to time
when dusty environment isunavoidable.
1.2 Important Operation Precautions
1.2.1 Do not poke or impact the touch screen sharply.
1.2.2 Do not cover up the built-in photocell. Otherwise the printer doesn’tprint.
1.2.3 Use Non-woven to wipe the nozzle plate when the print is not clear or dots are missing.
1.2.4 Set print delay value for best print result when print position changes (see Section5.2.3).
1.2.5 Do not insert or remove ink cartridge while the machine is in printing process so asnot to cause
damage to the cartridge.
1.2.6 Do not use compressed air for cleaning the touch screen. High pressure of the compressed air
will damage the touch screen.
1.2.7 Do not use compressed air for direct or indirect cleaning of the ink cartridge. High pressureof
the compressed air will damage the nozzleplate.
1.2.8 Read Chapter Seven for troubleshooting when there’s failure occurs. If you cannot solve the
problem encountered, contact your local dealer or our after-saleservice.
Note: Depending on properties, some ink cartridge may require to be removed from printer after
use. Turn off the machine and remove the cartridge from printer.Wipe the printhead clean with Non-
woven; cap the printhead with the designed cap for prevention of the nozzles from clogging.
(Contact our after-sale service for information of inkproperties.)

ChapterTwo:InstallationandSetupInstructions
This chapter will illustrate how to set up the equipment and how to install an ink cartridge. Firstly
please check the machine parts by looking at the packing picture and parts list.
Packing Picture

2.1 Parts List
Once you have unpacked your machine, check to make sure that you have all the parts shownhere.
1、Controller 2、Printer head 3、USB
4、power line 5、power supply adapter 6、printer head
connection line
7、ground line 8、round bar fixer X 2 9、round bar
10、bi-directionbracket 11、bi-pass clamp x 2 12、A. M8*16 SCREW: 11PCS
B. M4*8 SCREW: 2PCS
13、inner hexagon spanner 14、Springback holder and
anti shock groups (selectable)
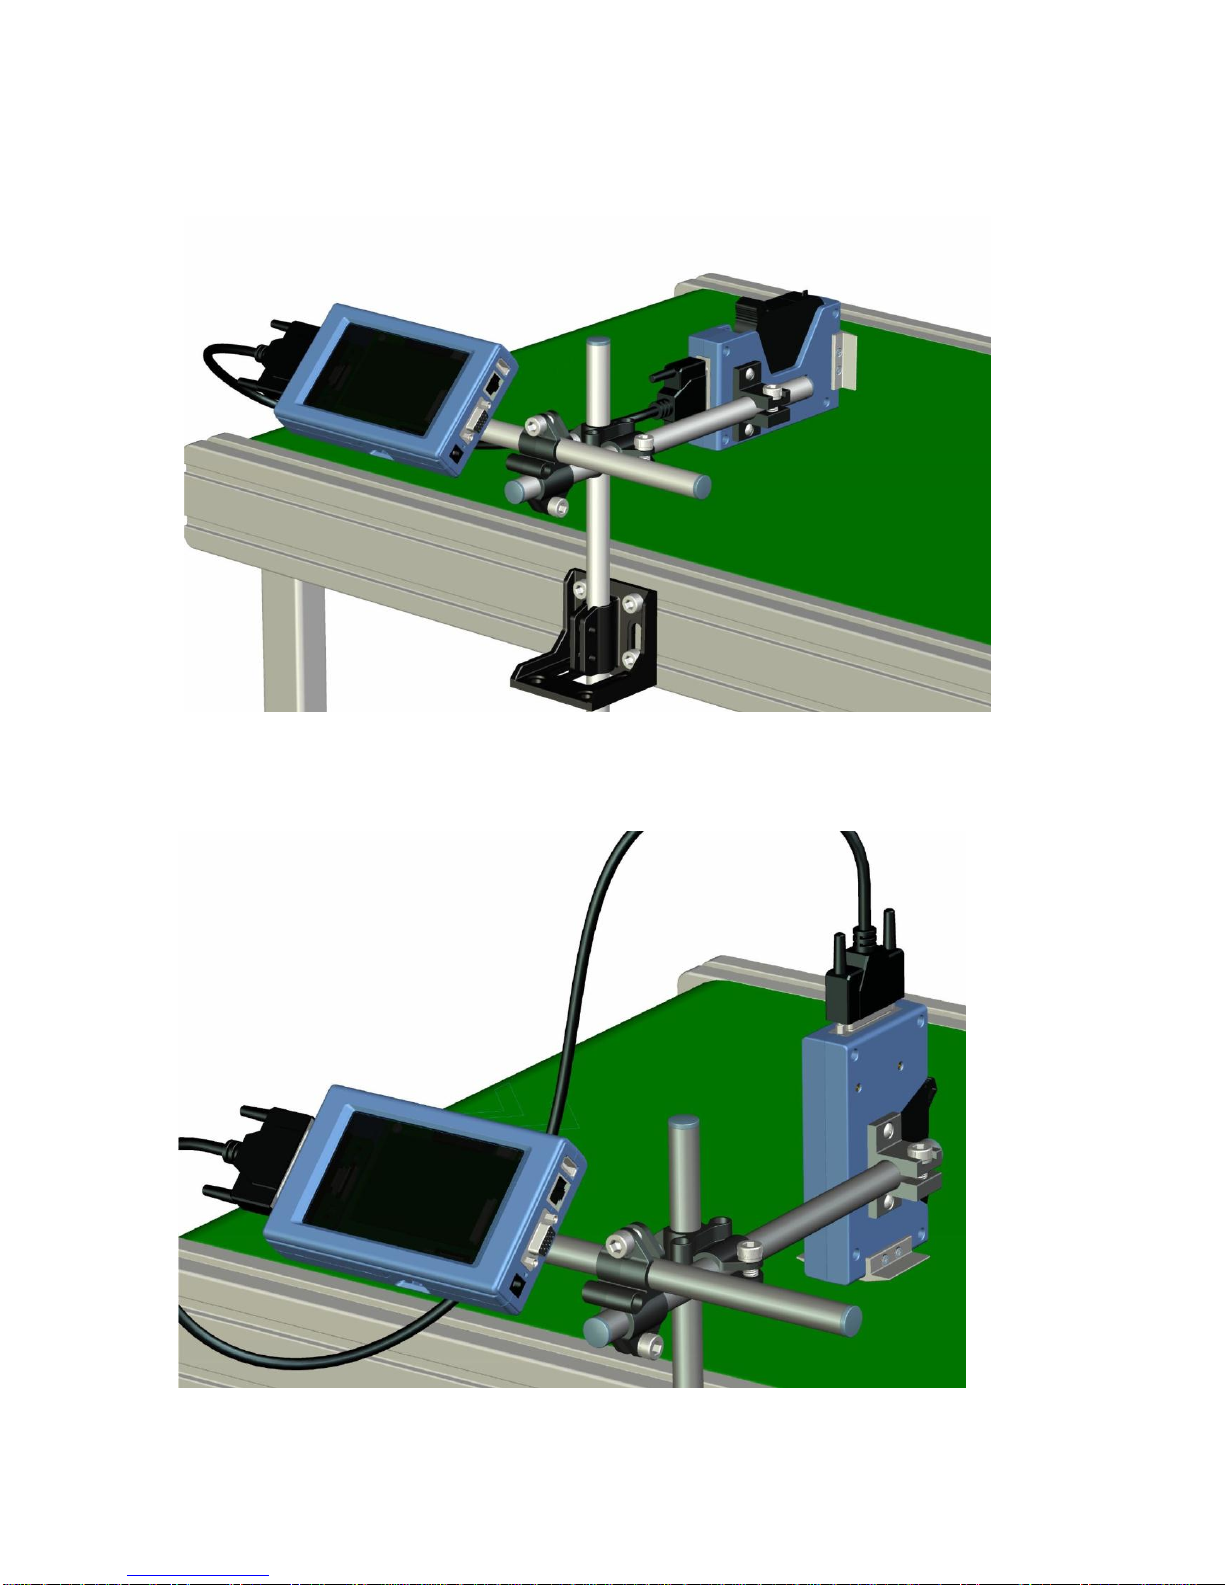
2.2 Device installation
2.2.1 Side printing installation
2.2.2 Down printing installation
2.2.3 Springback mechanism installation (optional)
Springback mechanism installation Anti-shock plate installation

Chapter three:Device Introduction
3.1 Controller Introduction
Touch screen
Power port
DB15 port
Ethernet port
USB 接口
DB25 port
Power switch
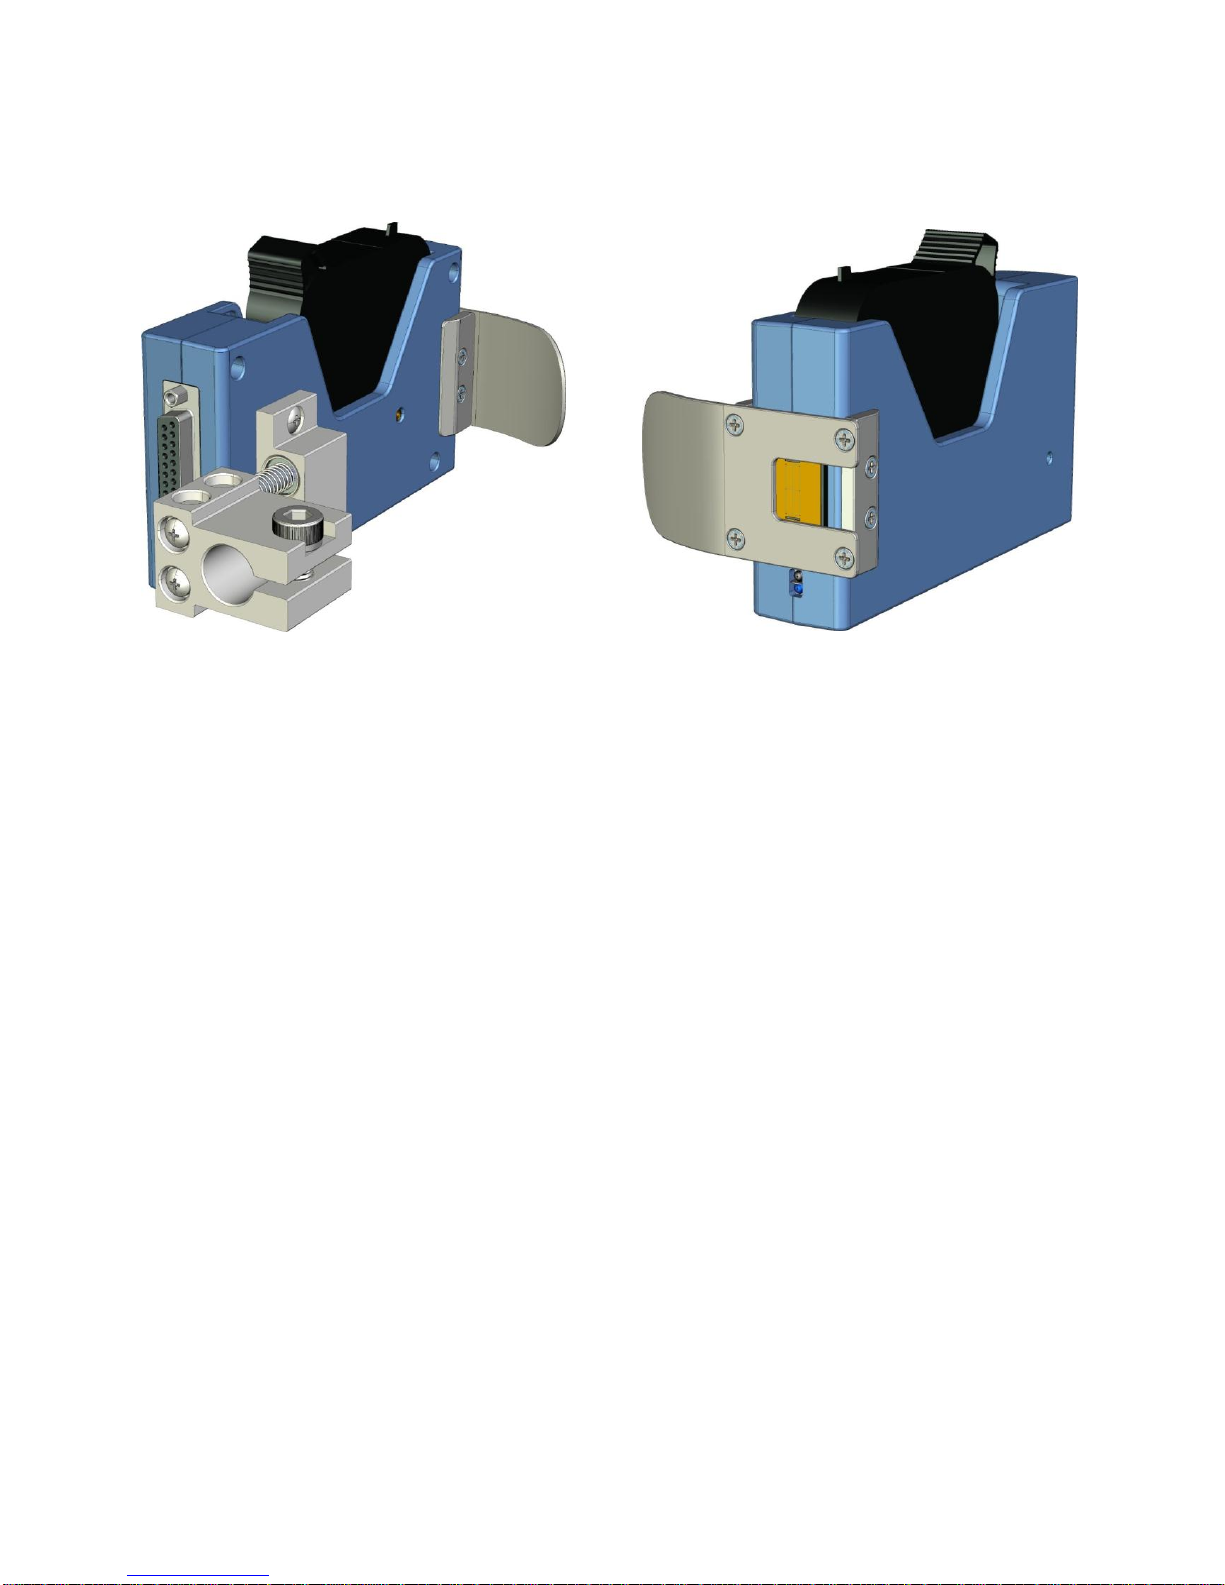
3.2 Printer head Introduction
Anti-shock plate
Ground connection screw
DB25 port
3.3Technical Specifications
A. Performance Values
Item
Specifications
Note
Technical source
HP TIJ 2.5 Thermal Ink Jettechnology
Dimension
Controller(H*W*D):142*65*98mm
Printer head(H*W*D):145*80*60mm
support size
Two steel tubes:
Φ16mm*350mm, and Φ16mm*280mm.
Clamp and bracket
not included
Power supply
Input: AC 90V-240V/50-60HZ,60W;
With power adapter
Output: 12V DC / 5A;
Power cord length: 1.8m;
Power adapter cord length: 1.2m
Print heights
1-12.7mm
Print speed and
resolution
horizontal resolution
(DPI)
Maximum speed (m/min)
600
30.4
400
45.7
300
60.9
150
121.9
Print application
Barcode, alphabetic, numeric, image logos,
date/time, expiration date, shift code, counter, lot-box
code
Connection Ports
1.Ethernet port;
2.USB2.0 port;
3.DB15 port.
4.DB25 port.
Interface
5inch full-color large LCD touch screen with
resolution 800*480.
Ink management
1.Automatically recognizes ink types, and identifies
optimum printing parameters for each inktype;
2. Guarantees the using of genuine original HPink;
3. Automatic measuring system for the usage ofink.
Mounting
Standard side, downward and anti-shocksupport.
Product Certification
CE, FCC.
Environment
requirement
1. Working environment: -10°C~ +55°C; 10%-85%RH;
2. Storage environment: -25°C~ +80°C; 10%-90%RH.
B. Features:
Item
Specifications
Note
Languages
Chinese, English, Japanese, French, German,
Spanish, Portuguese andRussian.
Font
Default font is Arial; allow users to load fonts they
need.
Barcode
UPCA, UPCE, EAN13, EAN8, INT25, CODE39,
CODE128, EAN128, PDF417, DATAMATRIX, QR.
Date format
Variety of date formats available
Counter
Flexible setting for common counter, lot-Box code
counters.
Print speed
Print speed can be set, automatically tested, or set
and tested by externalencoder.
Built-in photocell
Good for simple print, no external photocellneeded.
Multi-management
Multi-level password protection (Operator, Technician
and administrator).
C. Ink Solutions:
1. Support 42ml, 370ml, 350ml cartridges of HP TIJ2.5technology;
2. Support ink of various colors: black, red, green, yellow andblue;
3. Support porous, semi-porous and non-poroussubstrates.
Chapter Four: How to Use the Printer and
the Check Work before/after Use
In this Chapter, you will learn how to use the printer, including check work before and afteruse.
4.1 How to Use the Printer
Sq #
Procedure
Instructions
1
cartridge
Installation
Insert cartridge into the printer stall by an angle of 15 degree, close cartridge clip
to secure. (see 2.3 CartridgeInstallation)
Connect poweradapter
2
Turn on
printer
to printer power input,
switch on power,printer
entersinitialization
startup.
After initialization startup,
3
Main
Interface -
Printing
Management
“main interface” appears
(see Section 5.1).
Click to enter
“Printing Management” (see
Section 5.2).
4
Select data -
Start printing
Select a file on data list,click
to Start printing.
5
Printing
report
When printing starts, the
button change to the icon
for stop printing,
meanwhile a printing report
appears.
6
Stop printing
Click to stop
printing, printing report exits,
and the button returns to
“Start printing” status.
7
Switch off
Exit printing, and switch off power.
4.2 Check Work before Use
Sq #
Item
Check Work
1
Printer
support
Is the support securelymounted?
2
Printer
position
Is the printer orientation correct? Is the nozzle plate parallel to printing object? Is
the throw distance controlled within 0.5-2.5mm?
3
cartridge
Is the cartridge wiped clean? Has the cartridge been installed to printer?
4
Power input
Is the printer input voltagenormal?
5
Printer status
Check status bar, is the equipment statusnormal?
4.3 Check Work after Use
Sq #
Item
Check Work
1
Printer
PowerStatus
Is the printer power switched off?
2
cartridge
Is the cartridge removed from printer and wiped clean and printheadcapped?

Chapter Five: Printer Operation Instructions
This chapter explains how to operate printer interface, including Printing Management, Data Man-
agement, System Management, Tools Management, and Status Bar.
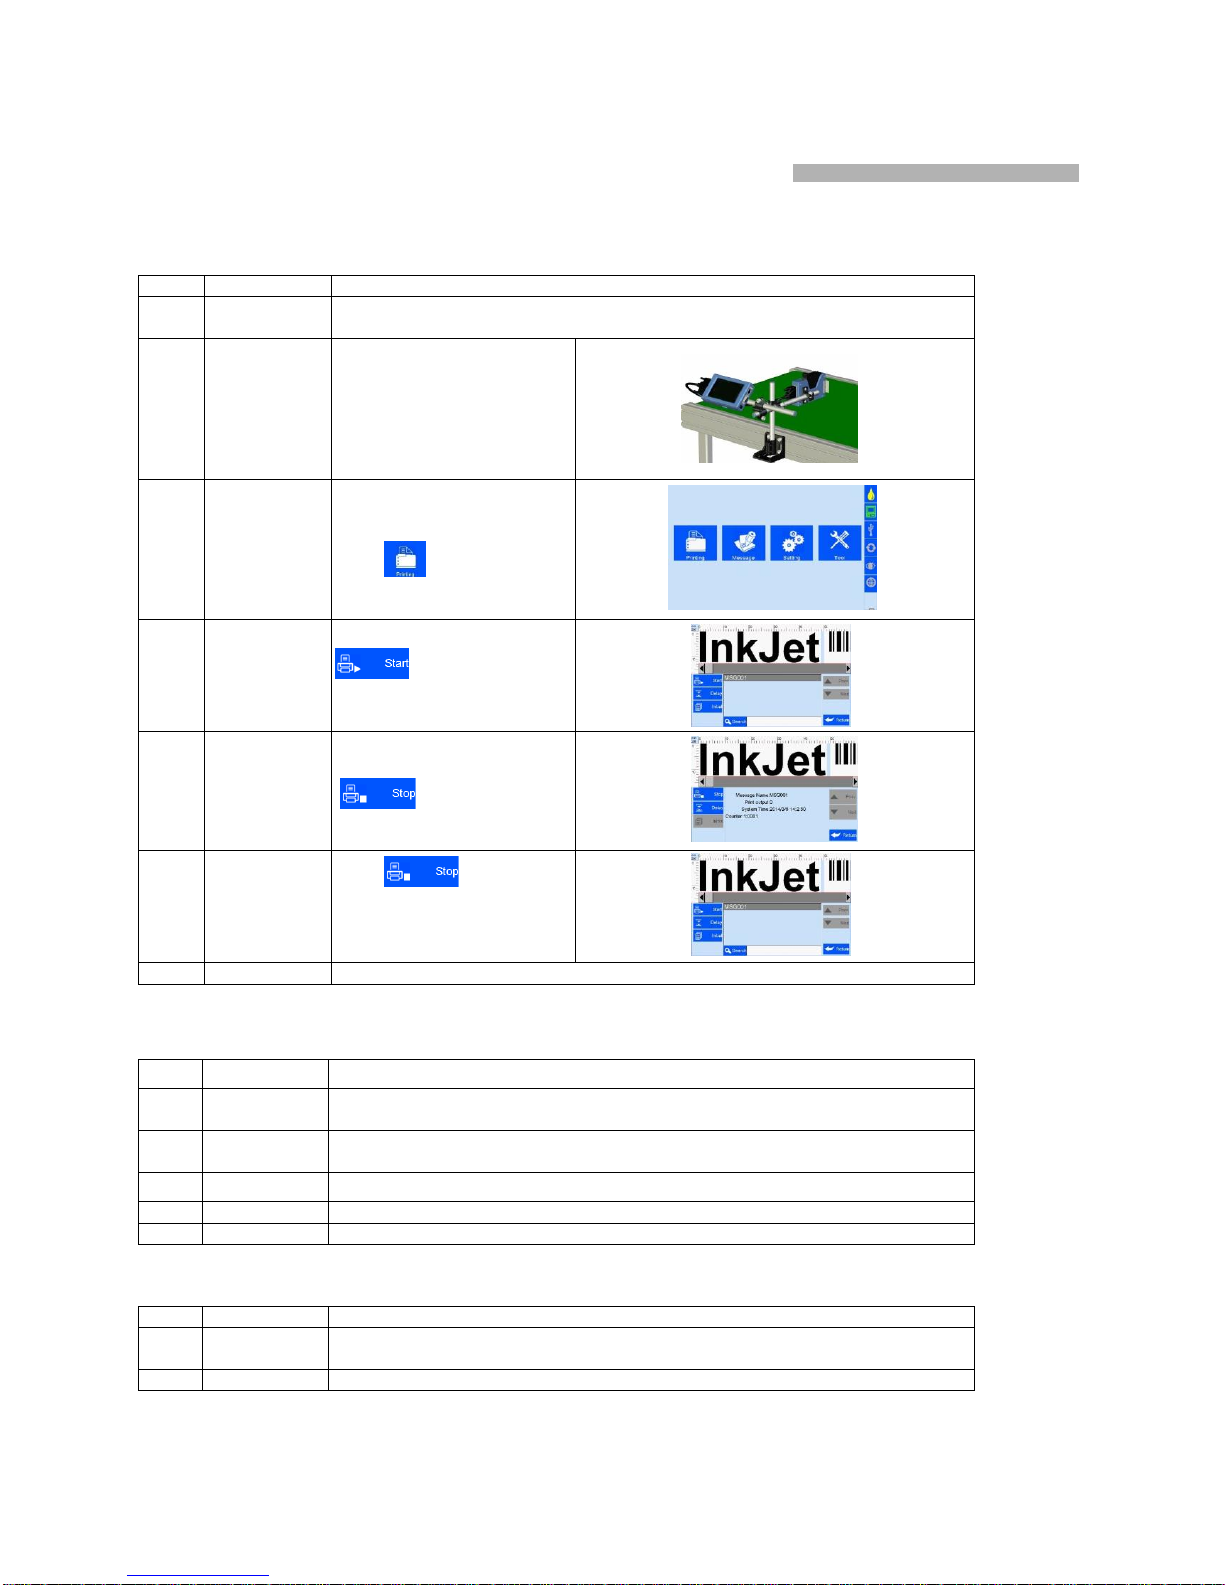
5.1 Main Interface
Switch on power,
Settin
g
Management
Printin
g
Management
Data
Management
Tools
Management
Status bar
(Figure 1)
printer starts
initialization
startup. After
initialization
startup, “main
interface” appears
(see Figure 1).
Printing
Management
Tofind and preview data, start/stop printing, set printing delay value, andset
printing initial values (see Section5.2).
Data
Managemen
ToFind/Preview, File-new, Edit, Delete data (see Section5.3).
System
Management
Tomanage system setting, editing options, printing options, user authority,and
screen correction setting (see Section 5.4).
Tools
Management
Tomanage image logo, system upgrade, system backup, system record, equip-
ment default restoring, system resetting (see Section 5.5).
Status bar
Display information of ink, equipment, USB, encoder, external photocell, and
Ethernet status (see Section 5.7).

5.2 Printing Management
Click on maininterface
Preview
Page up
Page
Down
Return
(Figure 2)
to enter printing management
interface
(see Figure 2)
Scroll bar
Start
printing
Printing
File name
delay
Search
Keywords enteringbar
5.2.1 Find/Preview Data (see Figure 2)
A. Find data
Find by Pageup/Pagedown/keywords.
B. Preview data
Preview data by locating or selecting a file of data to display on preview interface;
data located/selected will be displayed in sequence on preview interface, and can
be viewed scaled up and down by times of 1 and2.
Note: Drag the scroll bar horizontally to view the data when it exceeds the screen horizontally.
5.2.2 Start Printing / Printing Report
5.2.3 Printing Delay
Click , printing delay
setting interface appears (see
Figure 4)
See Appendix 1:Terms
and Definitions 1 for more
information.
(Figure 4)
A. Printing delay default value:30mm;
B. Printing delay value range:0.0-999.9mm;
C. It is allowed to set printing delay value during printing process: the newly set value becomes valid for
immediately nextprinting.
D. Printing delay value for each message are independent from one another, the delay setting for current
data file will not affect another datafile.
Click
button to start
printing. When printing starts,a
printing report appears (see Figure3).
Printing report: It is the timely record
of printing in process, includingdata
file name in process, print output
quantity, counter value, shift code,
system time. The printing report
exits when printing stops.
Stop
printing
Printing
report
(Figure 3)
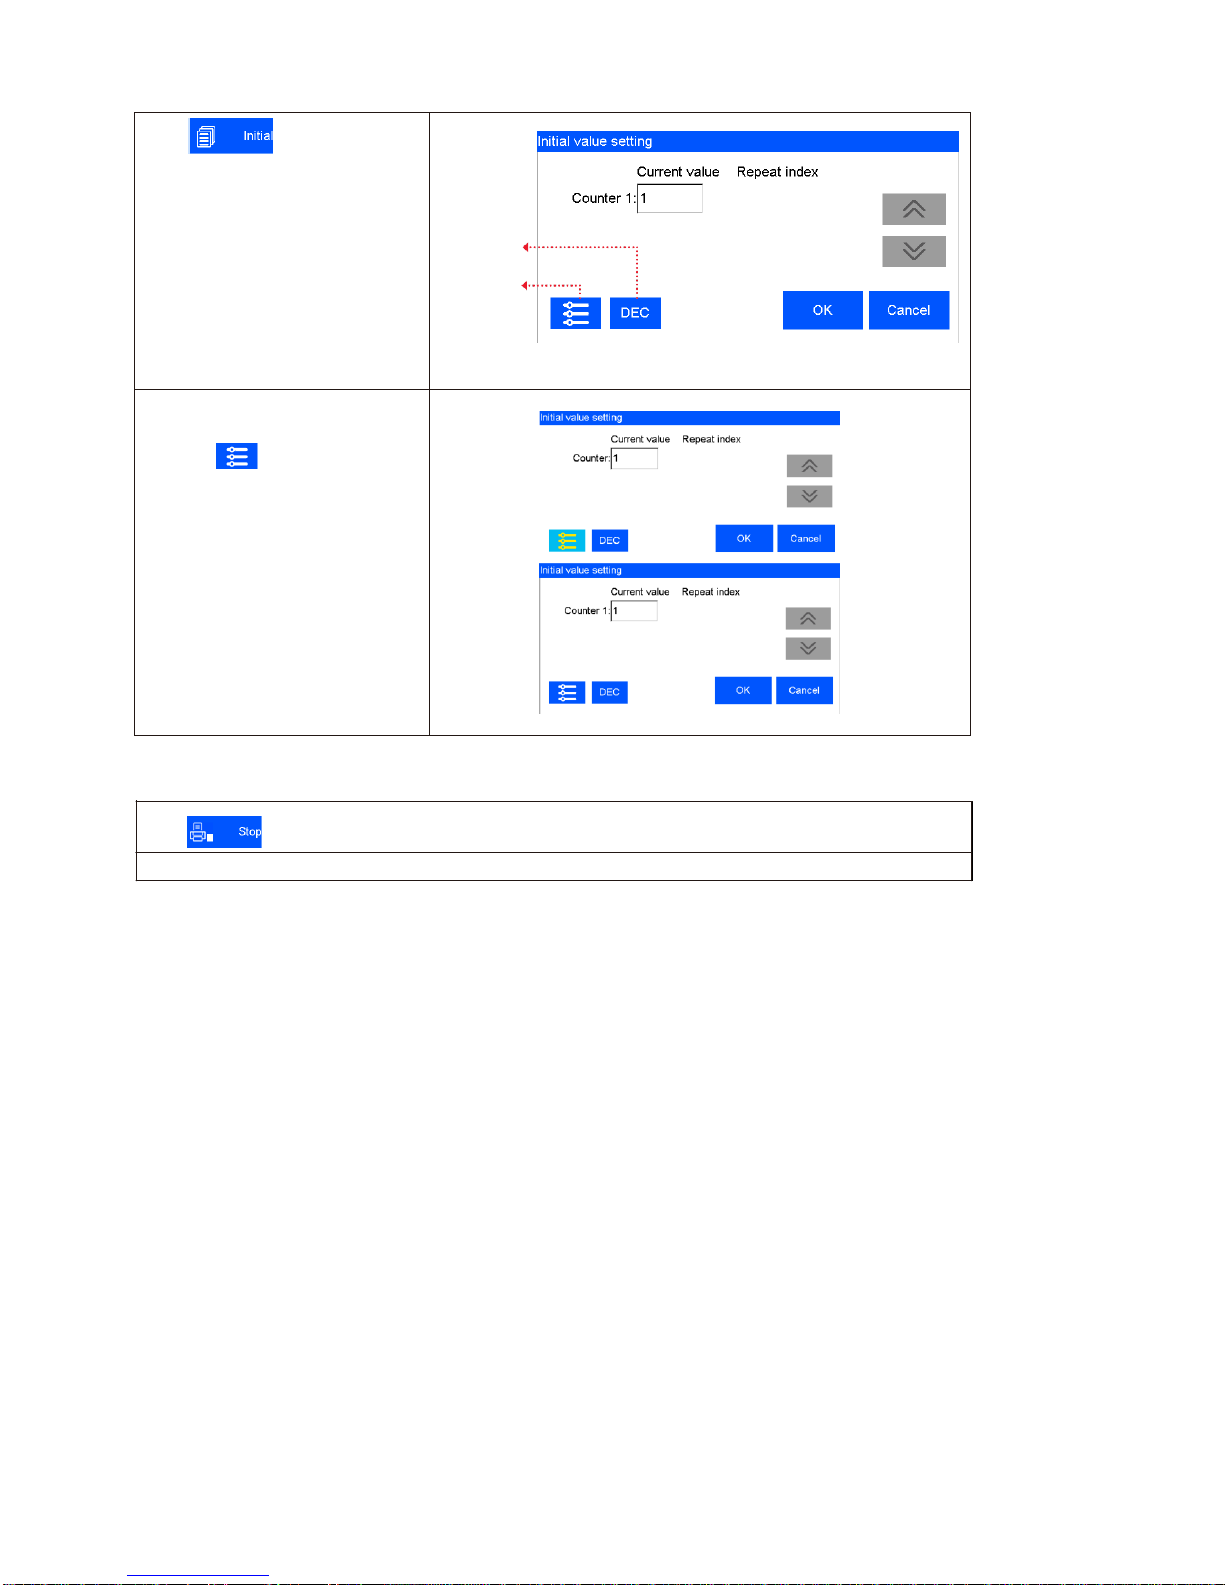
5.2.4 Print Initial Values
Click , the interface of
initial values setting and repeated
index value checking appears.
System switch
DEC-10 decimal (0-9)
H36-36 hexadecimal (0-Z)
The Generic Binary is editable;
See5.4.2
System switch
Counter
synchronizing
Counter Synchronizing: when
multi counter included in the same
file, click , then all counters’
current value will be synchronized
to counter 1’s current value.
After confirmed, a dialog boxwill
display the counters’ setting, user
can set the counter’s
begin/end/step/repeat numberand
the binary regulation.
5.2.5 Stop Printing
Click
to stop printing and exit printing report, return to Start Printing status (see Figure2).
Note: Printer automatically stops printing when there is case as power-off, out of ink, alarming etc.
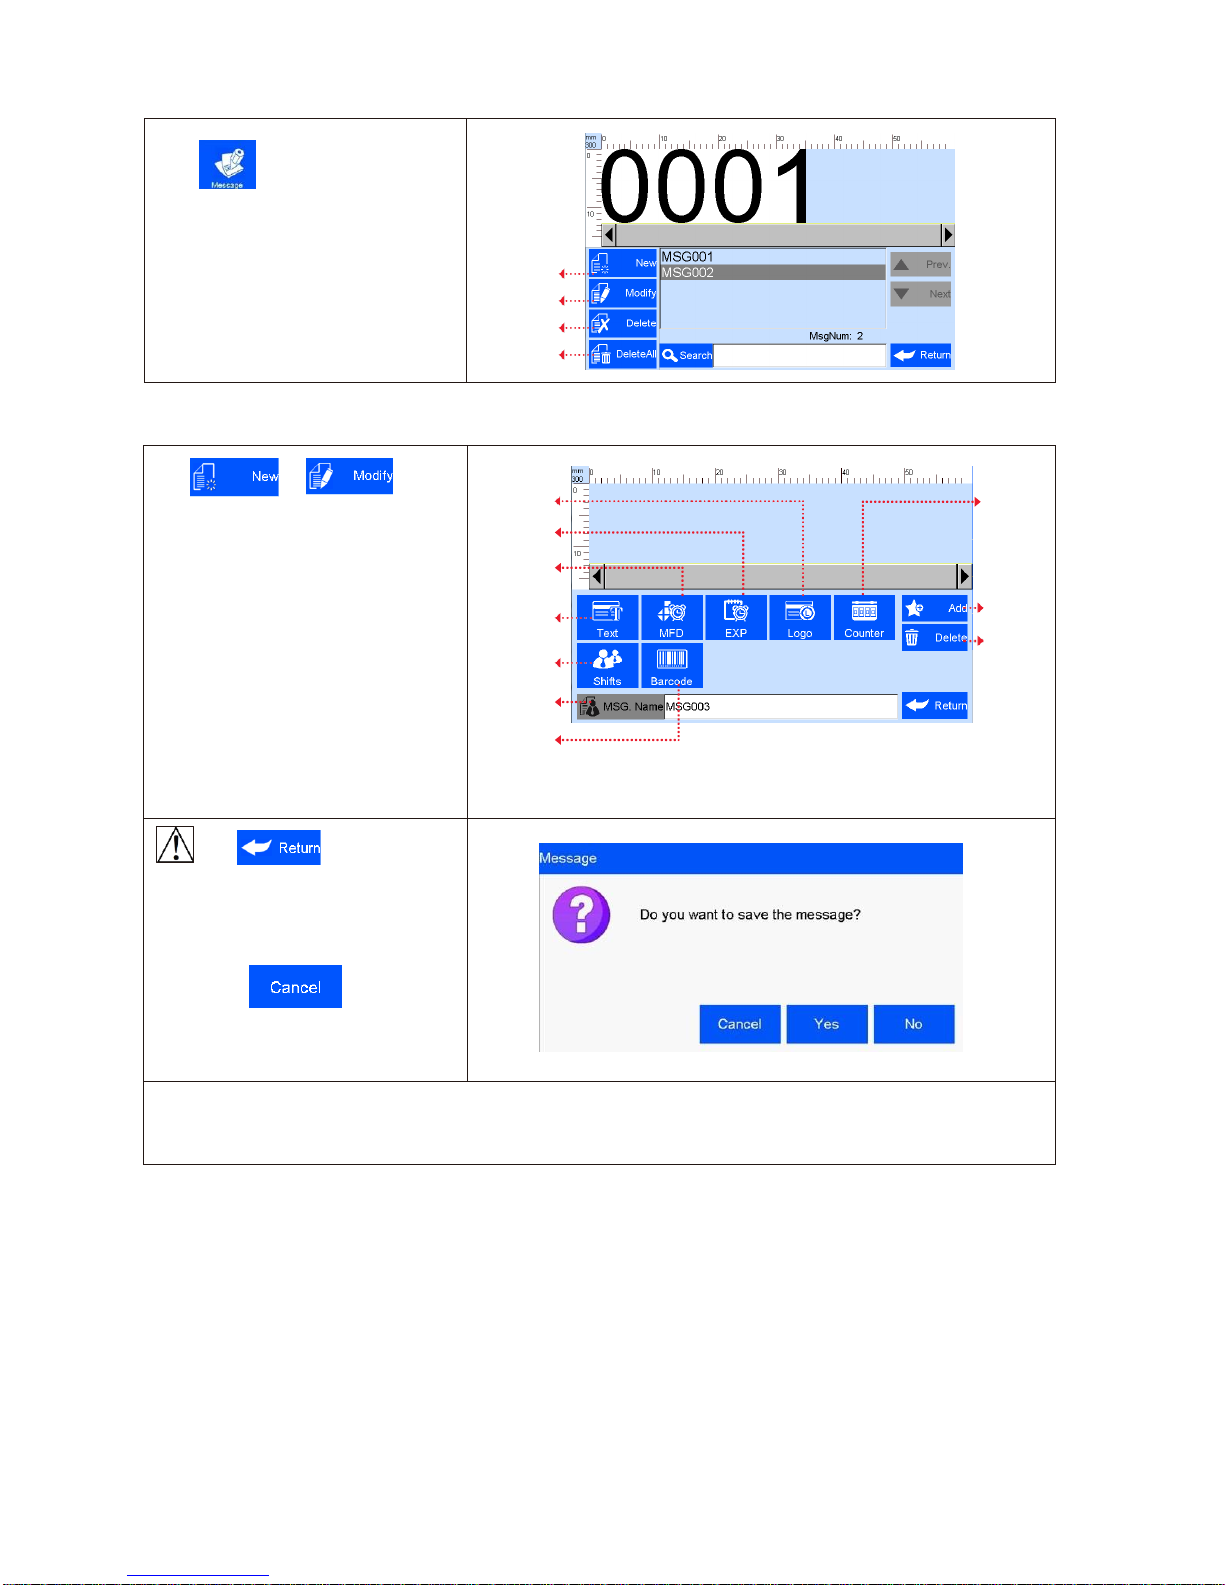
5.3 New/Edit Data
Click on main interface to
enter data management interface.
New
Modify
Delete
DeleteAll
5.3.1 New/Edit Data
Click or on Data
Management interface to enter data
edit interface (see Figure7).
A. New: text, counter, shift,production
date, expiration date, image logo,
barcode.
B. Edit: data in printing processcannot
be edited.
C. File name: maximum 15 characters,
empty file name or repeated filename
not allowed.
Image Logo
Counter
Expiration
date
Production
date
Add
Text objects
Delete
objects
Shift code
File name
barcod
e
(Figure 7)
Click to save data
when finish editing, a check box
appears to ask “Are you sure youwant
to save the message? Cancel, Yes,
No” (see Figure8).
If you click “ ”, the machine
will remain on editinginterface.
(Figure 8)
Note: “MSG001” is default data in system, not editable and not erasable.
The system allows maximum 500 files of data (including defaultMSG001).
The system does not save emptydata.
5.3.2 Add Text Object
Click to add text object, see Figure9.
Horizontal
scale
Click to enter text editinginterface:
A. Font: default font Arial, support 2 fontsat
Height
Text
same time, Arial and one alternativefont.
Edit
B. 16-208( adjust freely within the scopeof
1-12.7mm);
Vertical
scale down
C. Texthorizontal scale: 1-300%;
D. Textcontent cannot exceed 25 characters.
and
locationup
Vertical scale upand
locationdown
(Figure 9)
Click to enter textadjustment
interface.
E. Coordinate location: adjustable range for
X axis 0-3000mm; for Y axis, 0-12.7mm.
F.Textorientation: 0°, 90°, 180°, 270°.
Four orientations adjustable.
G. Font effects: bold, italy,underline,
strikeout, four effects adjustable.
Coordinate
position
Orientation
Adjust
Font effect
(Figure 10)
Note: Please refer to this Section (Section5.3.2) regarding how to add objectsas “production date”,
“expiration date”, ”image Logo”, ”counter”, ”shift code”,"dynamical text""dynamical logo", butthe
content of “production date”, “expirationdate”, ”counter”, ”shift code”"dynamical text""dynamical logo"
cannotbe revised or adjusteddirectly when you add, and the font, height,
content and font effect of “image Logo”"dynamical logo" cannotbe reviseddirectly. There is no option
of horizontalscale“” for “logo” “barcode”,"dynamical logo".
5.3.3 Add Production Date
5.3.4 Add Expiration Date
Click
date.
to add object of expiration
Click
to enter date formatsetting
and days to expire (scope: 0~9999)�
Gregorian and Hijri available.
(see Figure 12).
Days to
expire
Calendar Type
(Figure 12)
Click
date”.
to add object“production
Click
to enter date formatsetting,
choose a format by arrow up anddown�
Gregorian and Hijri available.
(see Figure 11).
Date format
Calendar Type
Adjust
(Figure 11)

for
5.3.5 Add Image Logo
Click to addobject
imageLogo.
Select a logo on filelist by page up
and down (see Figure13).
Image
file list
(Figure 13)
Note:Whenthereis no imagefilefound,
a message box appears to promptimage
import (see Figure 14).
See Section 5.5.1 ImageManagement
for image logoimport.
(Figure 14)
5.3.6 Add Counter
Click to add object counter.
Click to for option ofcommon
counter, box number,lotnumber.
A. Click for common countersetting:
minimumvalue,maximumvalue, stepping
value, repetition number.
Commo
n
counter
Box No.
Lot No.
Stepping
value
Repetition
number
B. Click and option ofbox
numberand lot numbersetting:minimum
value,maximum value, stepping value for box
number and lot number (see Figure16).
Note: There is no repetition number forbox
number or lot number.
Minimum
value
Maximum
value
(Figure 16)
5.3.7 Add Shift Code
Click
to add object “shift code”.
Click to entersetting
(see Figure 17).
Shift code: shift name and time forsetting.
Shift name: maximum fivecharacters.
Shift time: four different times for setting.Shift
code varies according to different timeperiods.
(Figure 17)

5.3.8 Add Barcode
Click to add object“barcode”.
A. Click to enter barcode edit:
Barcodetype, horizontal scalelevel, barcode
height, barcode text (see Figure18).
Barcode
height
Barcode
type
Horizontal
scalelevel
Barcode
text
(Figure 18)
B. Click to enter barcode
adjustment:coordinatelocation, text
orientation, text display/hide, text height,
error correctionlevel, white space level
(see Figure 19,20).
Note: Setting options may differdepending
on different barcodetypes.
: Textdisplay;
: Texthide;
~: errorcorrection
level;
~
: whitespace
level.
Textdisplay
Textheight (Figure 19)
Error
correctio
n level
White
space level (Figure 20)
Table of contents
Other Sojet Printer manuals


