Solar Goes Green SGG-S12-WW User manual

Page1of3
SolarGoesGreenSGG‐S12‐WW
READ AND FOLLOW ALL INSTRUCTIONS BEFORE OPERATING YOUR SOLAR LIGHT.
SAVE THIS MANUAL FOR FUTURE REFERENCE.
DESCRIPTION
TheSGG‐S12‐WWisdesignedasastand‐alonespotlightwhichautomaticallyilluminatesatdusk.Itiscompletelysolarpowered
andmustbeinstalledinpositionwherethesolarpanelwillreceivethemaximumsunperday.It’senergy‐saving,autoswitches
on/offandhasanappealingdesign.
Theunithasasinglespotlightwith12WarmWhiteLED’s,andaLi‐ionrechargeablebatterywhichiseasilyreplaceable.The
SGG‐S12caneasilybeinstalledandusedinabroadrangeofapplicationssuchas;gardens,yards,walls,signs,flagsetc.
PARTS
BatteryBoxandintegratedsolarpanel
LEDlampfitting
Spikeforlampfittings
BatteryBoxSpike
OptionalFlatMountKit
OptionalPoleMountKit
Optional9’wirekit
*Pleasecontactyourretailertopurchaseoptionalmountandwirekits.
INSTALLATION
ISolarSpotLight
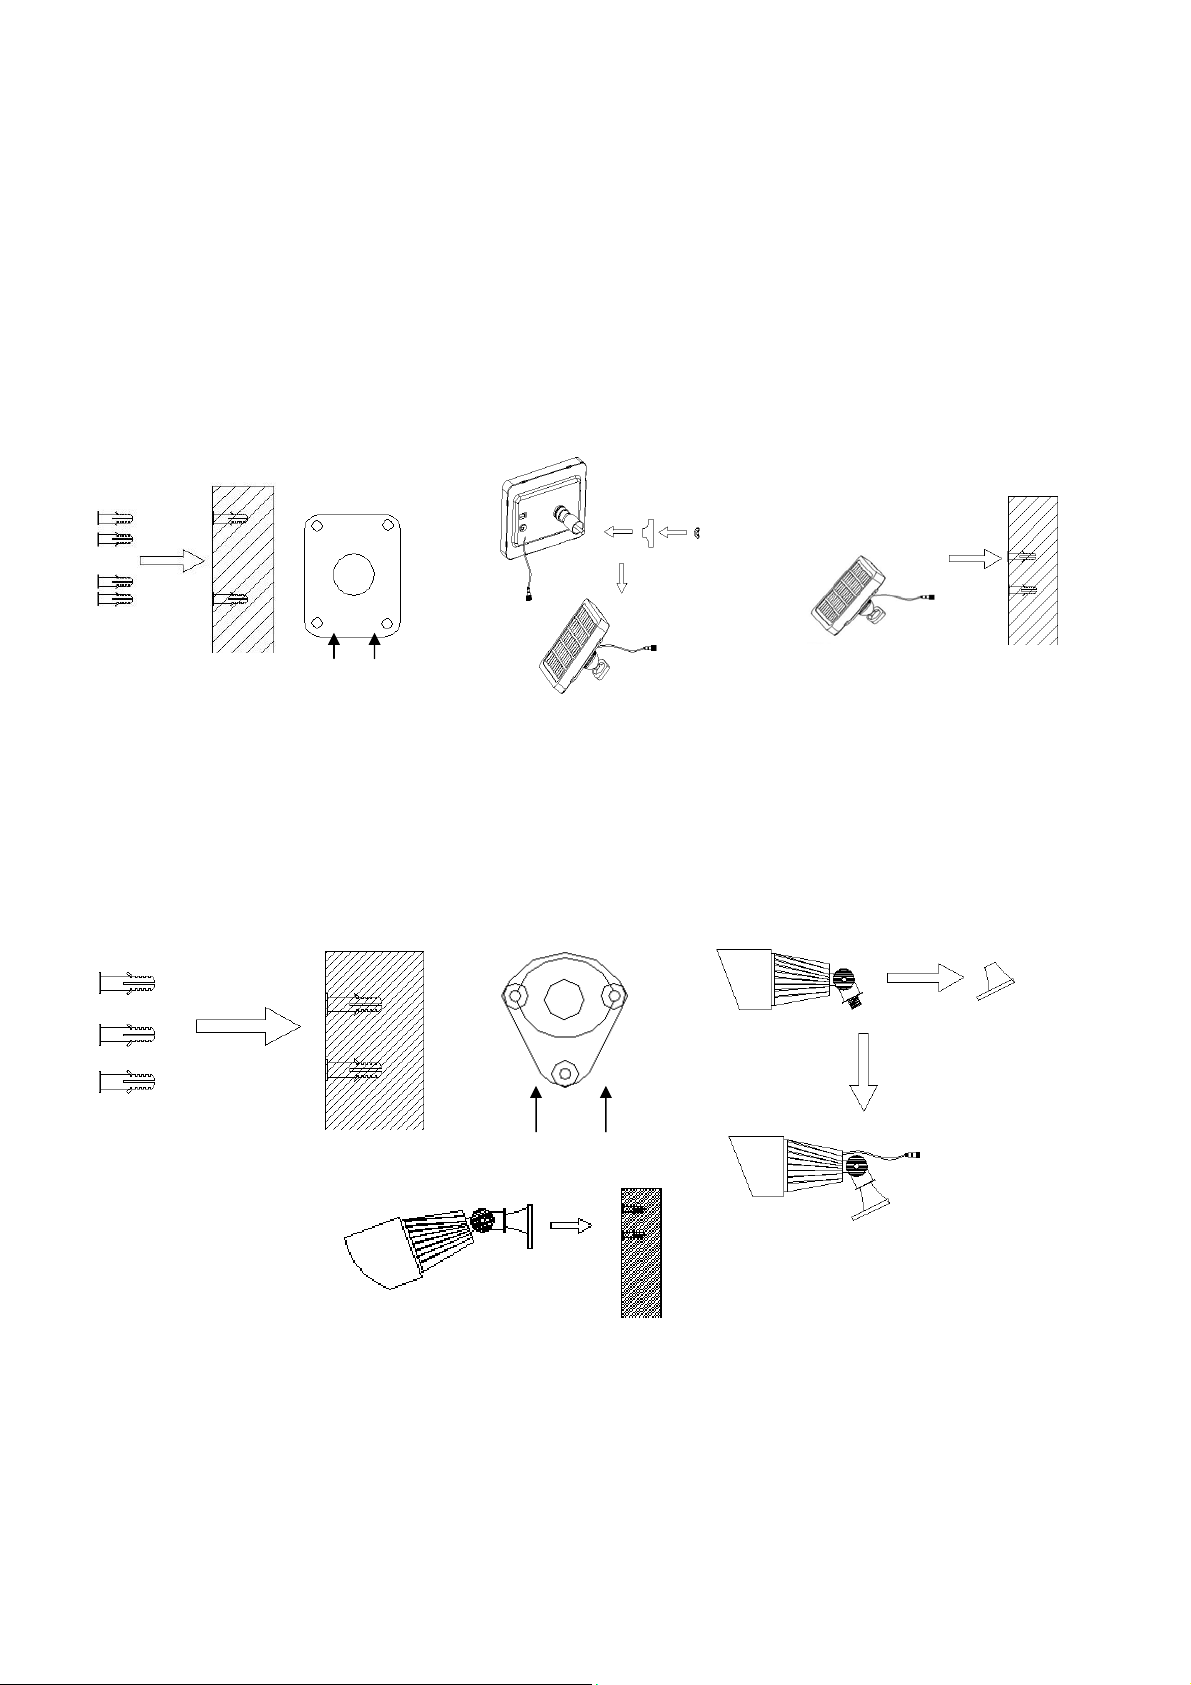
INSTALLATIONOFTHESOLARPANEL
•Chooseaplacetolocatetheunitwherethereisabundantandunobstructedsunshineduringtheday.Anycoveror
shadeonthesolarpanelwillaffectitsperformancetochargethebatteryresultinginashorterruntimeofthelight
duringthenight(Fig.1).IDEALLOCATIONOFTHESOLARPANELWILLBEFACINGSOUTHATA45DEGREEANGLETO
THEHORIZON.
•Thesolarpanelisadjustable.Adjusttheangleofsolarpanelto45degreesforbestresults.Theselectedlocationshould
notbenearanighttimelightsourcelikeaporchorstreetlight.Ifthepanelreceiveslightonitatanytimeitwillnot
allowtheautomaticday/nightsensortoturnthelighton.
Fig.1
Fig.2
Page2of3
INSTALLATIONOFLIGHT
•Spikeitintosoftground.Adjustlampaimingdirectionbeforeinstallation(Fig.2)
•Afterinstallation,connectSpotlightwirewithSolarpanelwire(optionalwirekitforlongeruse)andswitchtheunitto
theONpositionlocatedonthebackofsolarpanel.Thelightwillautomaticallybeoperationalwhenthepaneldetects
thatit’sdarkenough.
IISolarFlatMountLight(OPTIONALUSE)
INSTALLATIONOFTHESOLARPANEL
•Drill4holes(dia.8mm)onanyflatsurfaceusingtheflatwallmountasatemplatetodetermineholelocation.(Fig.3)
•Fixwallmounttosolarpanelbyusingprovidedbutterflynut(Fig.4)
•Fixthesolarpaneltothesurfacebyusingprovidedscrews(Fig.5)
•Thesolarpanelisadjustable.Adjusttheangleofsolarpanelto45degreesforbestresults.Theinstallationlocation
mustbelocatedtocapturethemostpossiblesunshineduringtheday.IDEALLOCATIONOFTHESOLARPANELWILLBE
FACINGSOUTHATA45DEGREEANGLETOTHEHORIZON.
INSTALLATIONOFLIGHT
•Drill3holes(dia.8mm)onanappropriateflatsurfaceusinglampflatmountbaseastemplatetodeterminehole
location.(Fig.6)
•Fixwallmounttolampbyusingprovidednut(Fig.7)
•Fixthelampunittothesurfacebyusingprovidedscrewsandanchors.(Fig.8).Adjustlampinitialaimingdirection
beforeinstallation.
•Afterinstallation,connectSpotlightwirewithSolarpanelwire(optionalwirekitforlongeruse)andswitchtheuniton
thebackofthesolarpanel.Thelightwillautomaticallybeoperationalwhenthepaneldetectsthatit’sdarkenough.
IIISolarFlagPoleLight(OPTIONALUSE)
•TakeofftheconnectionpartofLEDlamp(Fig.9)
•Fixlamptopolemountbasebyusingscrewsprovided.
•MountSolarPaneltopolemountbaseusingprovidedbutterflynut(Fig.10).Adjustlampinitialaiming
directionbeforefixingit.
•Fixthepolelightunittoflagpolebyusingstainlesssteelclamps.Therearedifferentsizesofclampssuitable
fordifferentsizeofflagpole.(Fig.11)
Fig.4
Fig.7
Fig.3
Drillholesfollowingto
thisunit
Fig.5
Fig.6Drillholesfollowingtothis
unit
Fig.8

Page3of3
•Afterinstallation,connectSpotlightwirewithSolarpanelwireandswitchtheunitonthesolarpanel.The
lightwillautomaticallybeoperationalwhenthepaneldetectsthatit’sdarkenough.
NOTESANDTROUBLESHOOTING
•Ifthereisnotenoughsunlightonthesolarpanel,theunitmaynotcharge,pleaseensurethattheunitis
placedinapositionwherethereisatleast8‐10hoursofsunlightaday.
•Ifthereistoomuchambientlight,theunitwillnotactivateasitwillassumethatitisnotdarkenough.
•Pleasekeepthesolarpanelcleanbywipingitonceeveryfewmonthswithadampclothorpapertowel.
Don’tusestrongdetergentsoracidbasedcleaners.
•Rainyandcloudyconditionsovercontinuousdayswillalsoaffectthechargingabilityofthelight.
•PLEASENOTETHISUNITCHARGESINTHEONPOSITION.(‐‐)LINEDEPRESSEDINTOPANEL
•IFLIGHTWILLNOTILLUMINATEAFTER2SUNNYDAYS,UNPLUGLIGHTFROMSOLARPANEL,LEAVE
PANELSWITCHINONPOSITIONANDCONTINUETOCHARGELIGHT.
•REATTACHLIGHTANDRESUMEOPERATIONASNORMAL.IFLIGHTSTILLWILLNOTWORK,REPLACE
BATTERY.
BATTERYREPLACEMENT
Thebatteryis3.7V2000mAhLi‐ionrechargeablebatterywhichiseasilyreplaceable.
Ifthebatterybeginstoilluminatedimlyorforshortdurationsoftimeandyouknowthatithashadsufficient
sunlightonthepanelinordertocharge,youshouldreplacethebatteryinthefollowingway:
1.Unscrewthebatterycoveronthebackofsolarpanelboxandtakeofftheoldbatterycarefullywithout
damagingthecables.
2.Replacethenewbatteryandremounttheunit.
WARNING–Polarityisveryimportant.Switchingpolarityontheunitisdangerousandwilldestroy
theunit.
UPC850901003446
www.SolarGoesGreen.com
Fig.9
Fig.10
Fig.11
Table of contents
Other Solar Goes Green Spotlight manuals

Popular Spotlight manuals by other brands


Meister
Meister WU7490590 operating instructions

brennenstuhl
brennenstuhl Power Jet-Light ELP 55 operating instructions

Stairville
Stairville BTL-30 user manual

Endon
Endon EL-20093 instruction manual

Toshiba
Toshiba 00701760656A Mounting instructions

Bauer
Bauer HYPERMAX 1917C-B Owner's manual & safety instructions


