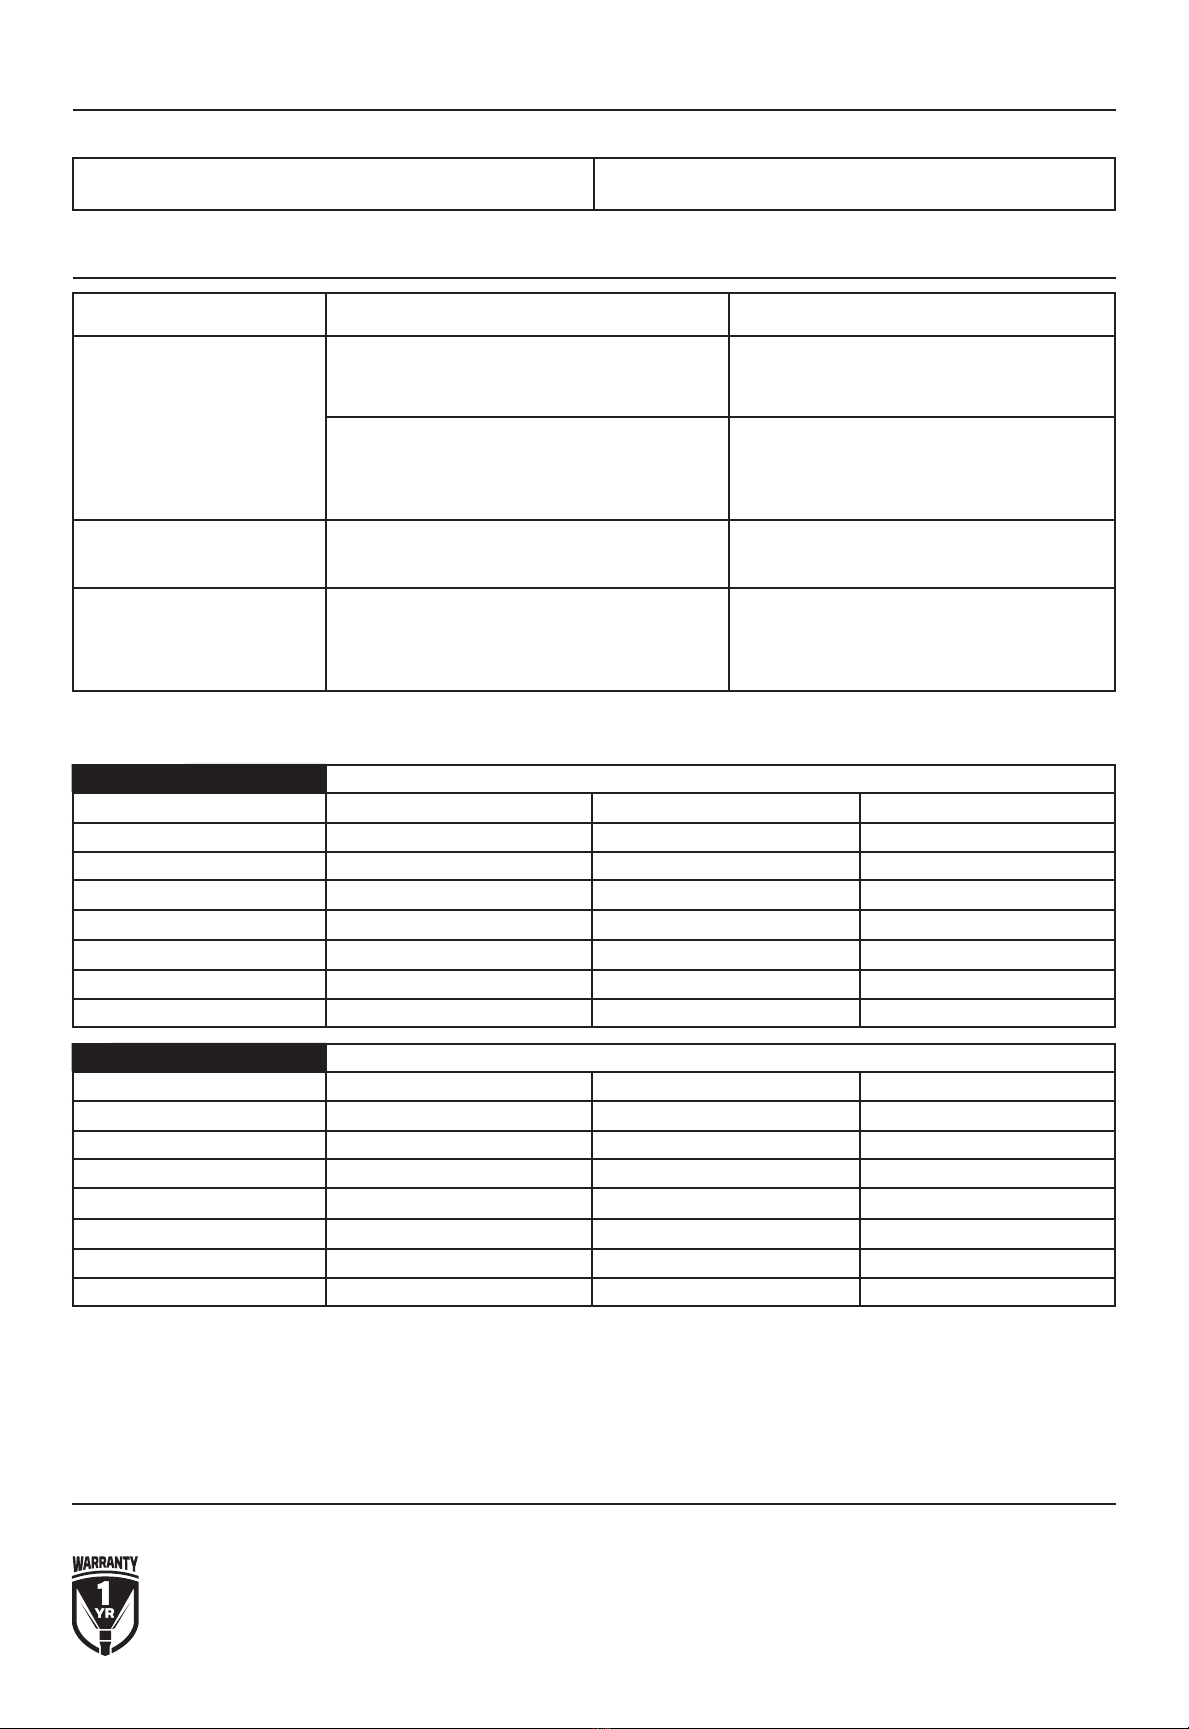
manuals.online logo
Brands
  1. Home
  2. •
  3. Brands
  4. •
  5. NEBO
  6. •
  7. Spotlight
  8. •
  9. NEBO NEB-LSP-0016 User manual

NEBO NEB-LSP-0016 User manual

Other NEBO Spotlight manuals

NEBO NEB-LSP-0013 User manual

NEBO

NEBO NEB-LSP-0013 User manual

NEBO NEB-LSP-0006 User manual

NEBO

NEBO NEB-LSP-0006 User manual

NEBO NEB-LSP-0014 User manual

NEBO

NEBO NEB-LSP-0014 User manual

Popular Spotlight manuals by other brands

Foscam S41/SPC user manual

Foscam

Foscam S41/SPC user manual

EuroLite LED SLS-144 UV Floor Spot user manual

EuroLite

EuroLite LED SLS-144 UV Floor Spot user manual

Guangzhou Yinhe Lighting&Sound Equipment Factory NE-204 user manual

Guangzhou Yinhe Lighting&Sound Equipment Factory

Guangzhou Yinhe Lighting&Sound Equipment Factory NE-204 user manual

LIVARNO home 375304 2101 Installation, operating and safety information

LIVARNO home

LIVARNO home 375304 2101 Installation, operating and safety information

Leviton Ellipsoid 5/50 user guide

Leviton

Leviton Ellipsoid 5/50 user guide

Vector SL3AKV instruction manual

Vector

Vector SL3AKV instruction manual

Quantum Q262 Product data sheet

Quantum

Quantum Q262 Product data sheet

EUROSPOT C51 instruction manual

EUROSPOT

EUROSPOT C51 instruction manual

DTS MINI BRICK ARC user manual

DTS

DTS MINI BRICK ARC user manual

Federal Signal Corporation VISIBEAM II Installation, operation and maintenance instructions

Federal Signal Corporation

Federal Signal Corporation VISIBEAM II Installation, operation and maintenance instructions

ACME LED-MS350B user manual

ACME

ACME LED-MS350B user manual

EuroLite Akku flat light 1 user manual

EuroLite

EuroLite Akku flat light 1 user manual

Commercial Electric SPTM-1401 Use and care guide

Commercial Electric

Commercial Electric SPTM-1401 Use and care guide

Vision & Control SLB-500-W5K7-P-SL Instructions for use

Vision & Control

Vision & Control SLB-500-W5K7-P-SL Instructions for use

Craftsman CMXLSB10 instruction manual

Craftsman

Craftsman CMXLSB10 instruction manual

Cameo CLQS40WW user manual

Cameo

Cameo CLQS40WW user manual

EverStart maxx SL5W09E quick start guide

EverStart

EverStart maxx SL5W09E quick start guide

Philips 6919114PH brochure

Philips

Philips 6919114PH brochure

manuals.online logo
manuals.online logoBrands
  • About & Mission
  • Contact us
  • Privacy Policy
  • Terms and Conditions

Copyright 2025 Manuals.Online. All Rights Reserved.

USE AND CARE GUIDE
PATH LIGHT
MODEL # NEB-LSP-0016
ALight Body (1) BConnector Clip (1) CGround Stake (1)
1. Preparation
• Before beginning assembly of product, make sure all parts
are present. Compare parts with package contents list. If
any part is missing or damaged, do not attempt to assemble
the product.
• Estimated installation time: 10-15 minutes.
• No Tools Required for Assembly.
2. Assembly
• Screw together the light body (A) and the ground stake (C)
as shown above. Ensure the wire goes through the center
of the stake.
3. Installation
• Determine the location of your light. Dig a small starter hole
in the ground with a screw driver or trowel.
• Press the stake into the hole until the light is secure, but
can still be adjusted.
• Dig a small trench from the light to the transformer wire.
• Secure the connector clip (B) to the transformer wire, as
shown above.
• Test the connection by turning on the lights. Make any
desired adjustments.
• Secure the light in the ground and fill in the trenches
with dirt.
A
C
B
ASSEMBLY AND INSTALLATION
WARNING: Never use a hammer to insert the light into the ground.
WARNING: The wire connector (B) contacts have sharp edges for piercing the
main low voltage cable. To avoid injury, do not touch the metal contacts.
CAUTION: The wire from low voltage power unit should be 12-18 AWG type
underground Low Energy Circuit Cable.
IMPORTANT:
• Do not submerge the fixture in water.
• Do not install the fixture within
10 ft. of water.
• The landscape wire can also be
hidden under surface.
• Protect the wiring by routing it in
close proximity to the light fixture,
or next to a building structure.
(Power Pack Sold Separately)
TROUBLESHOOTING
Problem
12 VOLT TAP
15 VOLT TAP
Total Fixture Wattage
0-60 Watts
0-60 Watts
61-120 Watts
61-120 Watts
121-180 Watts
121-180 Watts
181-240 Watts
181-240 Watts
241-300 Watts
241-300 Watts
600W Transformer = (2x300) Watts
900W Transformer = (3x300) Watts
Possible Cause
CABLE LENGTH
CABLE LENGTH
0-50 feet
0-50 feet
16 AWG
16 AWG*
16 AWG
16 AWG*
14 AWG
14 AWG*
14 AWG
14 AWG*
12 AWG
12 AWG*
12 AWG
12 AWG*
12 AWG
12 AWG*
51-100 feet
51-100 feet
16 AWG
16 AWG
14 AWG
16 AWG
12 AWG
14 AWG
12 AWG
14 AWG
Not Recommended
12 AWG
Not Recommended
12 AWG
Not Recommended
12 AWG
101-150 feet
101-150 feet
14 AWG
16 AWG
12 AWG
12 AWG
Not Recommended
12 AWG
Not Recommended
12 AWG
Not Recommended
Not Recommended
Not Recommended
Not Recommended
Not Recommended
Not Recommended
Solution
The fixture will not light.
The light flickers (one only)
The lights flicker (all)
There is no power.
There is a disconnect or
break in the wire.
There is a loose connection to the fixture.
There is a loose connection
at the transformer.
The transformer setting is incorrect.
Check the outlet and ensure that a breaker or
GFCI circuit has not been tripped.
Repair the loose connection and ensure proper
contact.
Unplug the transformer from the outlet and
visually inspect the positive and negative
connecting points. Each wire should securely be
screwed in and ot contact with each other.
Follow the wires from the fixture and ensure
continuity back to the transformer.
.
Check the settings on the transformer.
PRODUCT GUARANTEE
CABLE SELECTION
* NOT RECOMMENDED FOR HALOGEN LANDSCAPE LIGHTS
This data is provided as a general guideline. Actual performance will depend on the installation layout, the fixtures, and the condition of the cable.
NOTE: Most LED landscape lighting fixtures can operate with full illumination down to as little as 8VAC. It is possible to have extended length runs with LED fixtures that go beyond the
specifications shown in the guidelines above.
For more information, detailed video
instructions, and warranty registration,
visit NEBOLIGHTS.com
If you experience a problem, please do not return to your local store. Contact our Customer Service team at 800-255-6061
CARE AND CLEANING
Before Cleaning, Disconnect the power to the fixture by unplugging the fixture.
Do not use any cleaners with chemicals,
solvents or harsh abrasives.
Clean the fixture with a soft damp cloth.