Solarbayer DD2 User manual

User manual
Setting manual
Installation manual
Room unit DD2
GB
O3060006
stran 1 torek, 15. julij 2008 07:20
Standardizirana barva 1

2
O3060006
stran 2 torek, 15. julij 2008 07:20
Standardizirana barva 1

3
After the wiring connection, the DD2 shall be synchronized
with the controller. To synchronize the DD2, hold the key for
30 seconds. Release the key after two successive beeps . The
DD2 synchronization is now in progress. After another beep, the
DD2 is synchronized and the work can continue.
The signal cable length between the DD2 and the con-
troller must not exceed 50 metres.
DD2 shall be synchronized with the controller only after
all the temperature sensors have been connected.
Room unit synchronization
O3060006
stran 3 torek, 15. julij 2008 07:20
Standardizirana barva 1

4
Table of contents
Room unit synchronization ....................................................................3
User manual
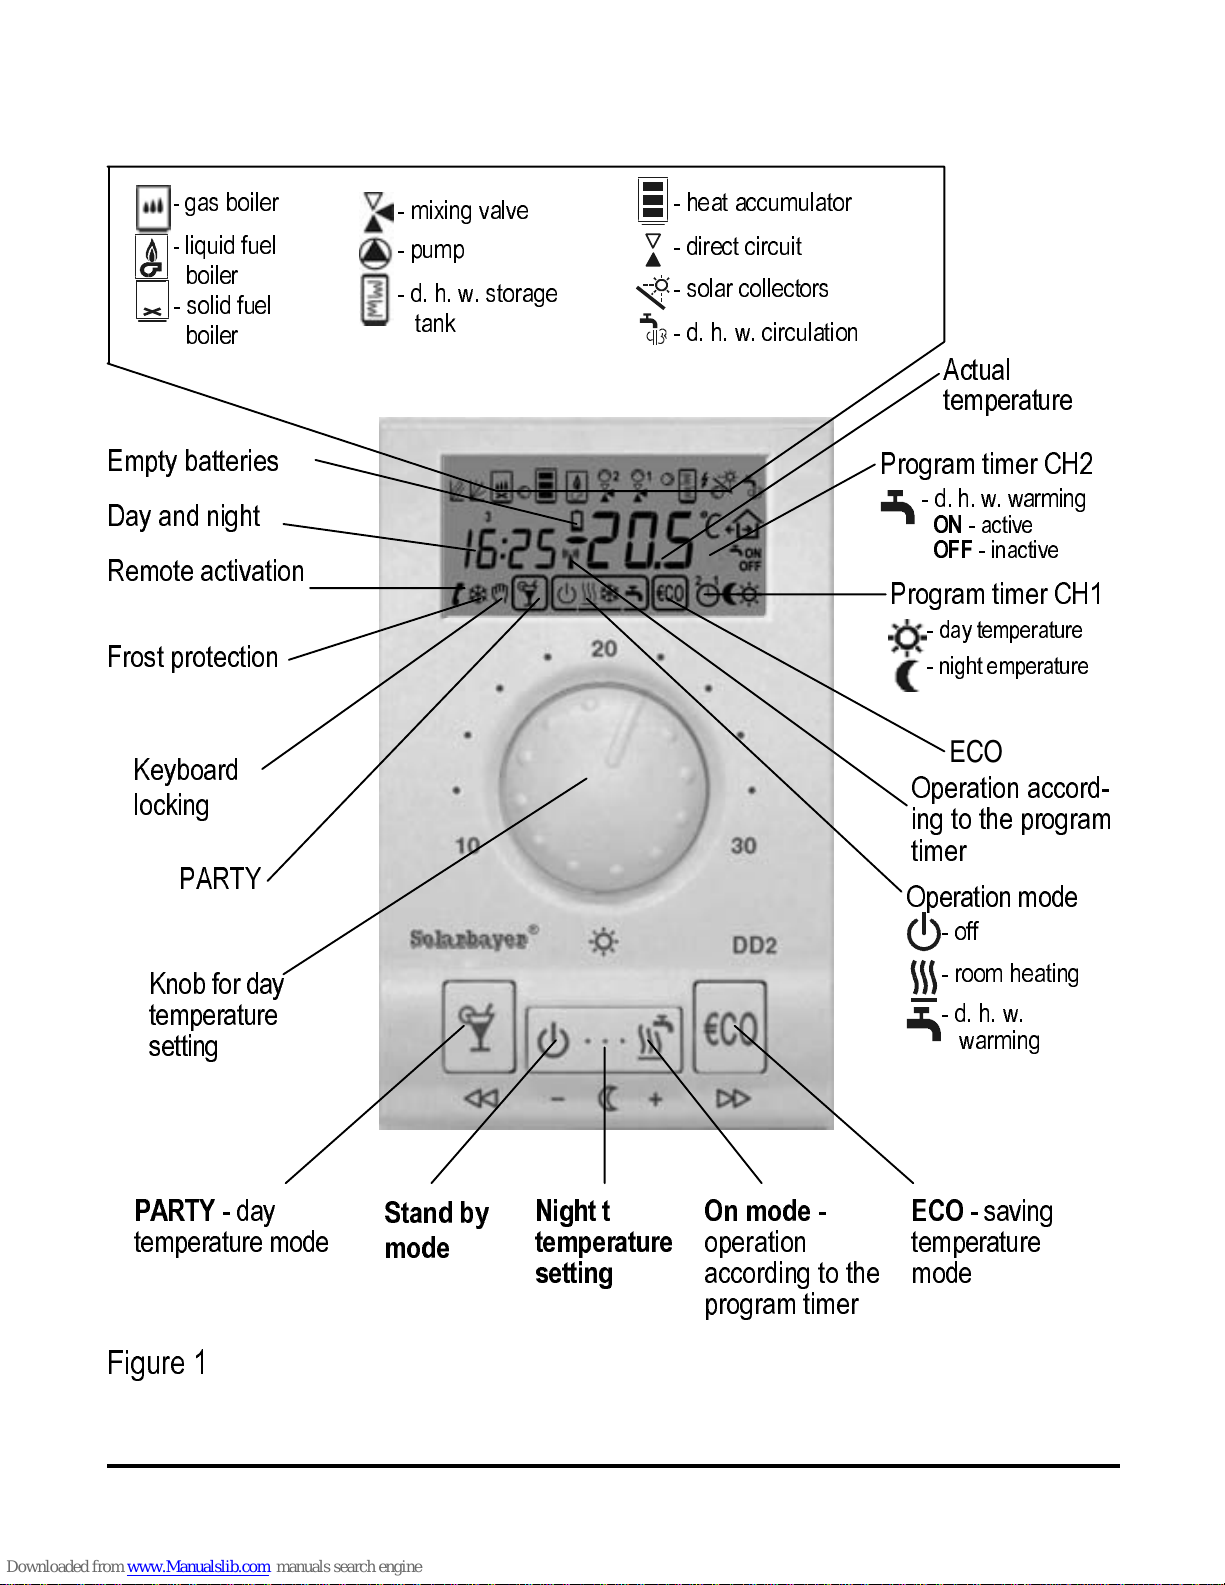
DD2 description.....................................................................................6
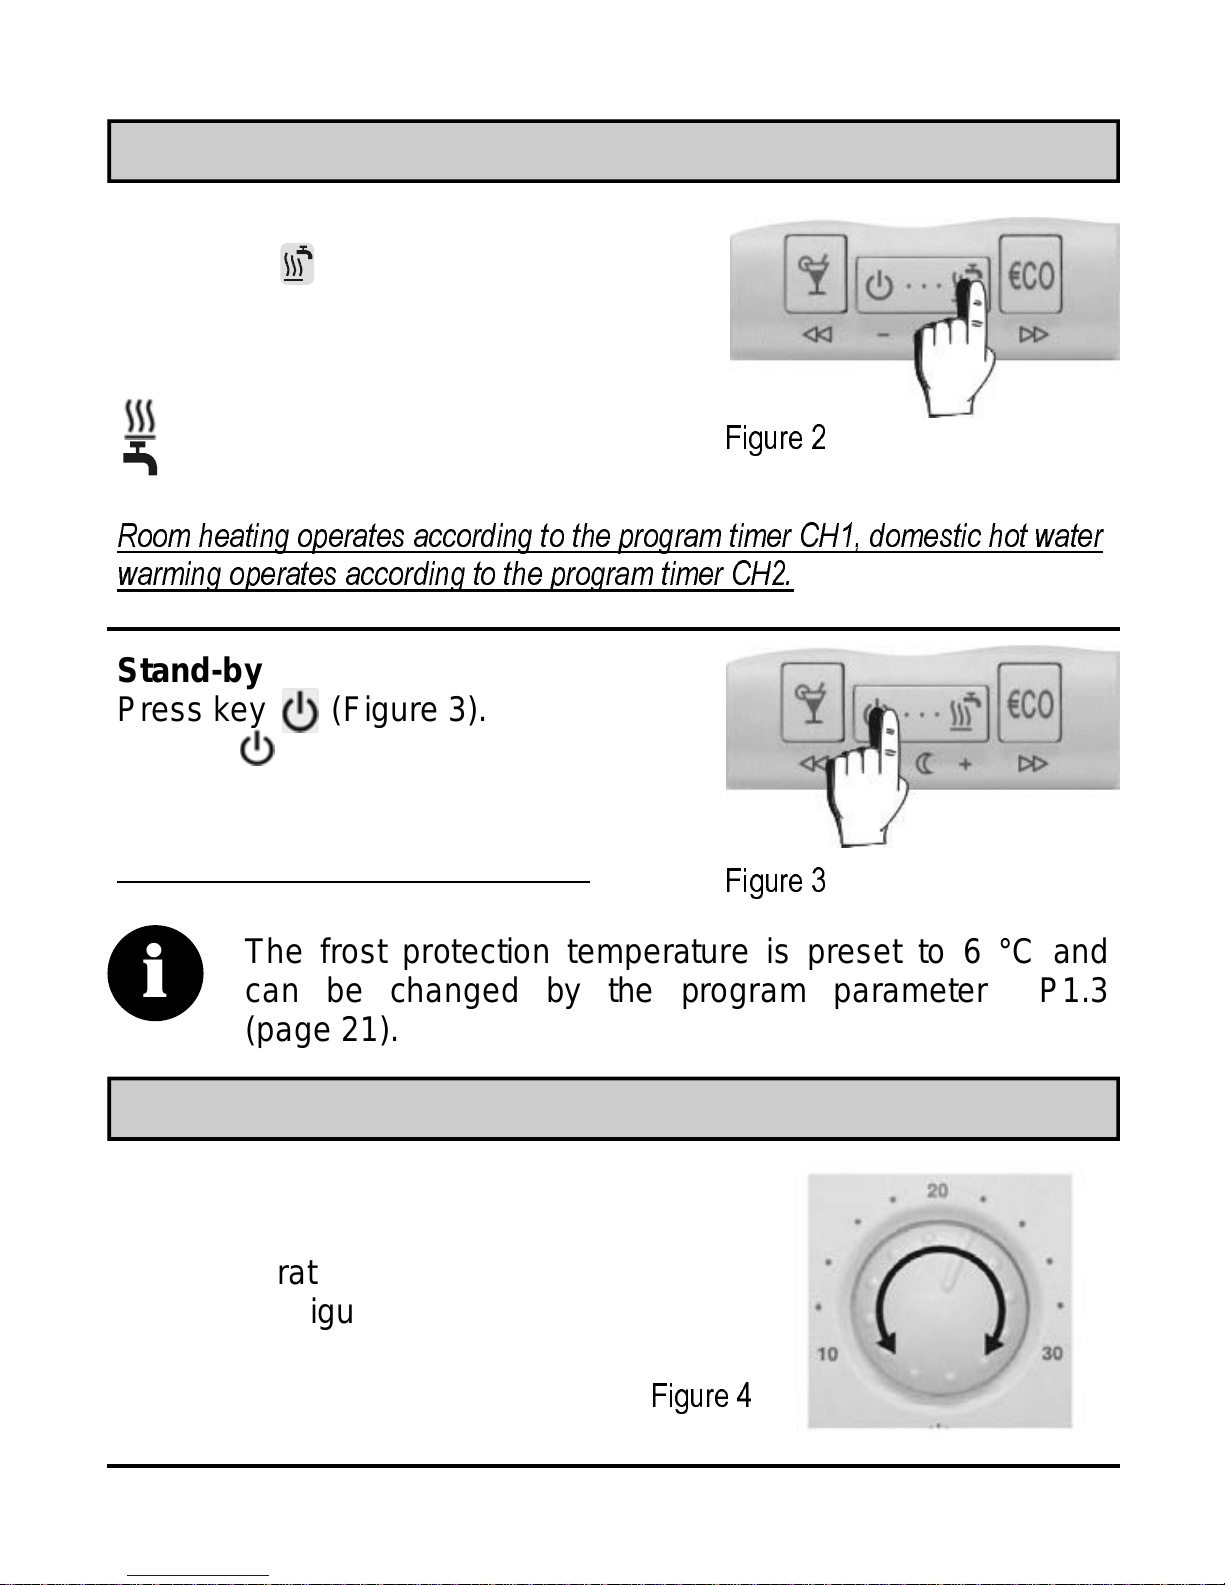
Operating mode selection......................................................................7
Setting the day and night temperatures .................................................7
Setting the comfort temperature ............................................................8
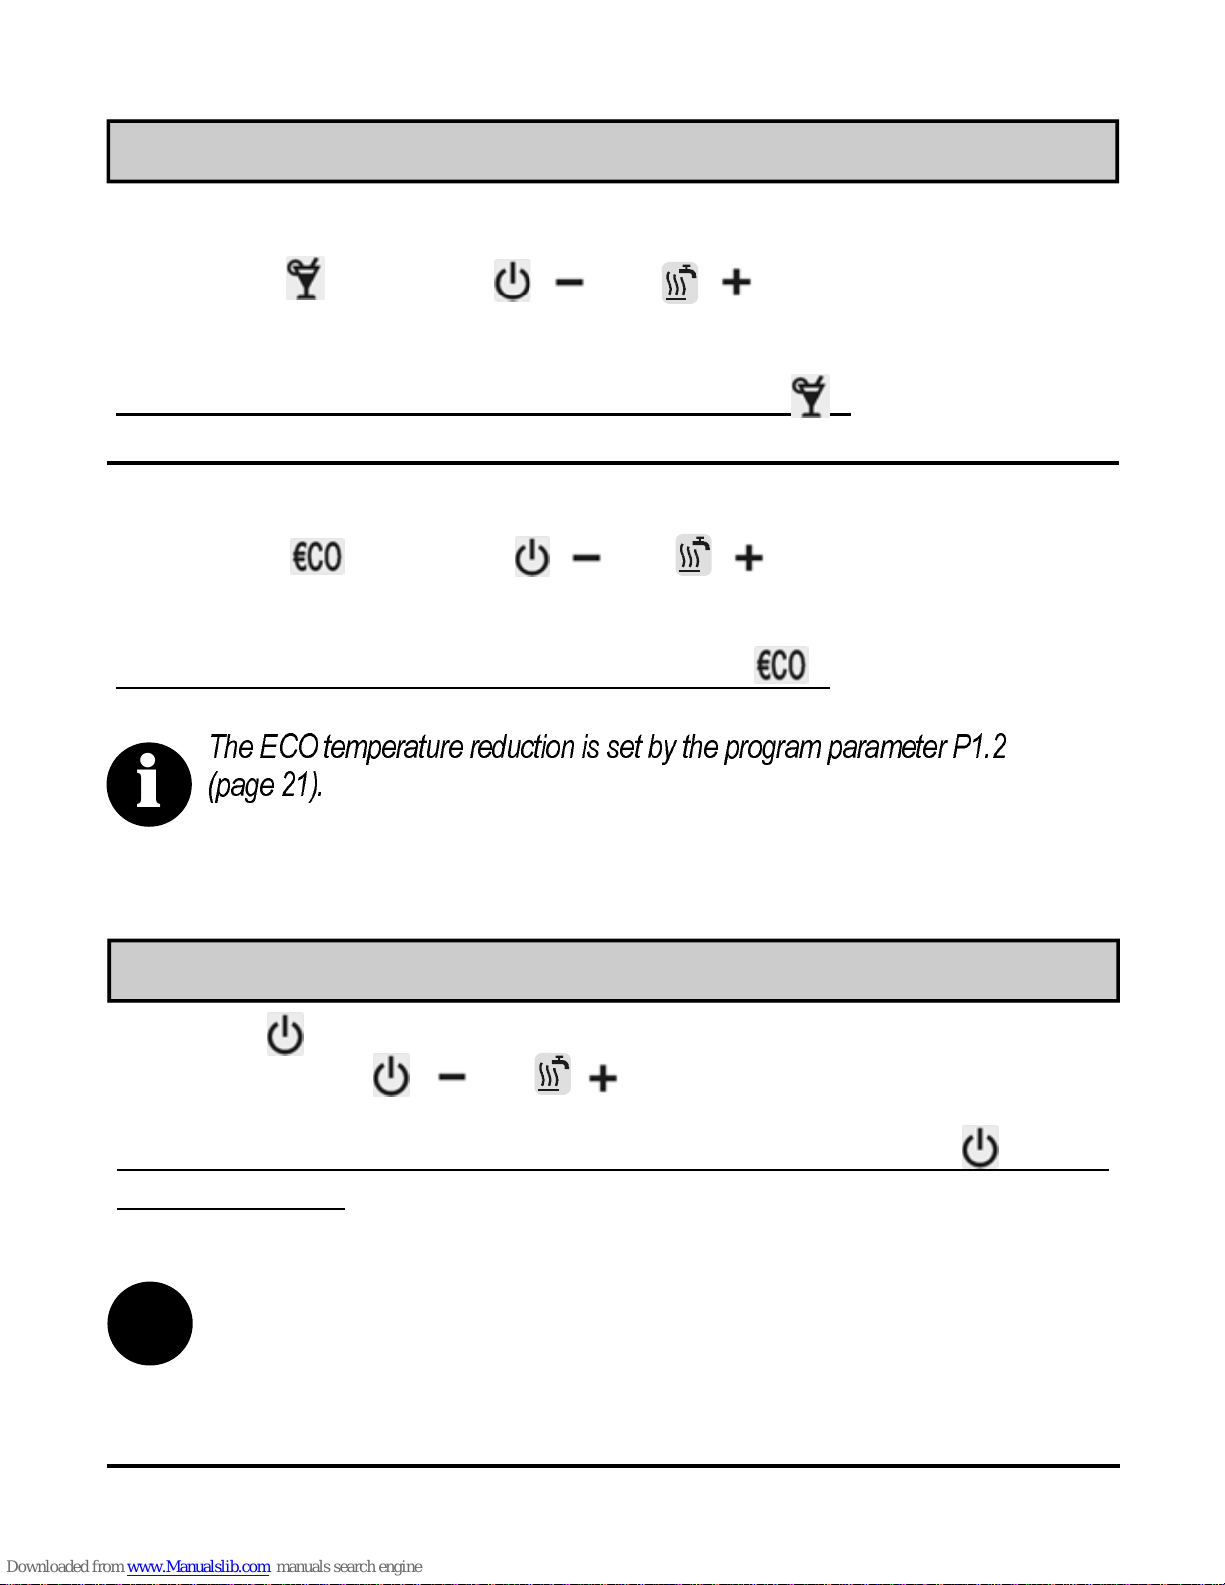
PARTY and ECO operating modes........................................................9
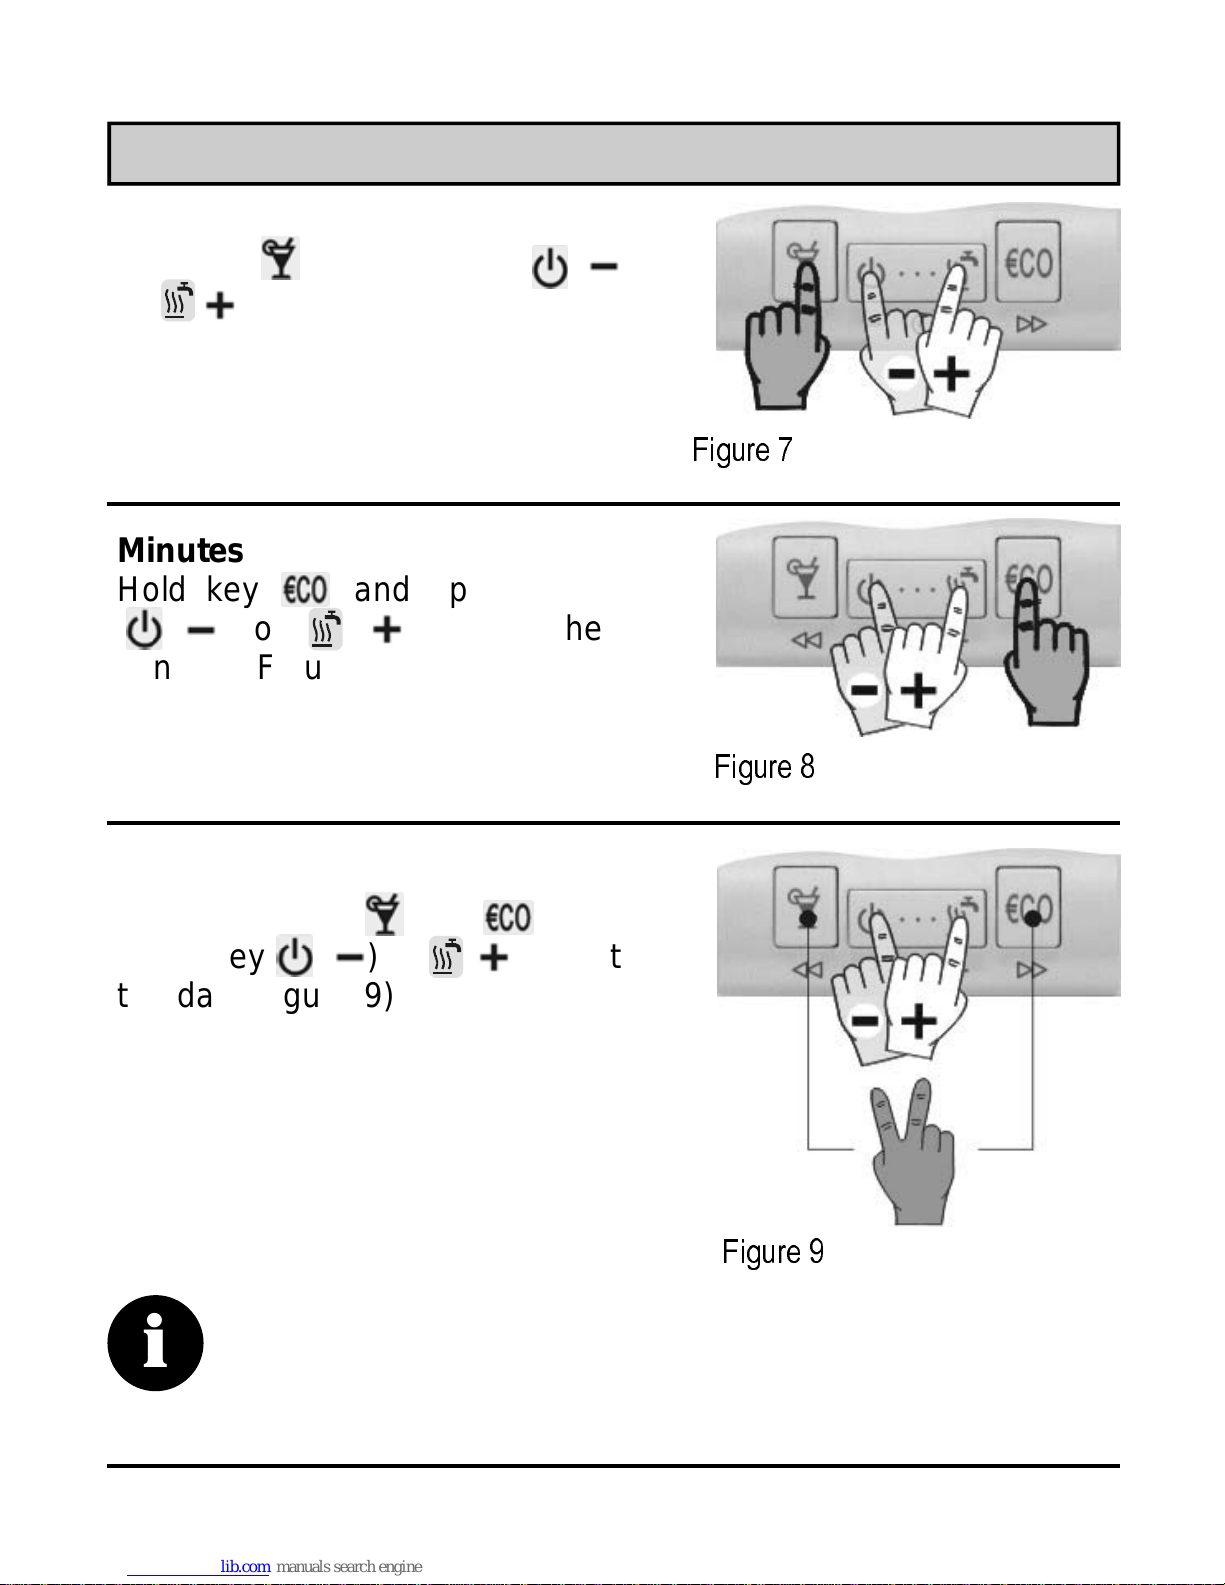
Holiday mode ........................................................................................9
Setting the accurate time.......................................................................10
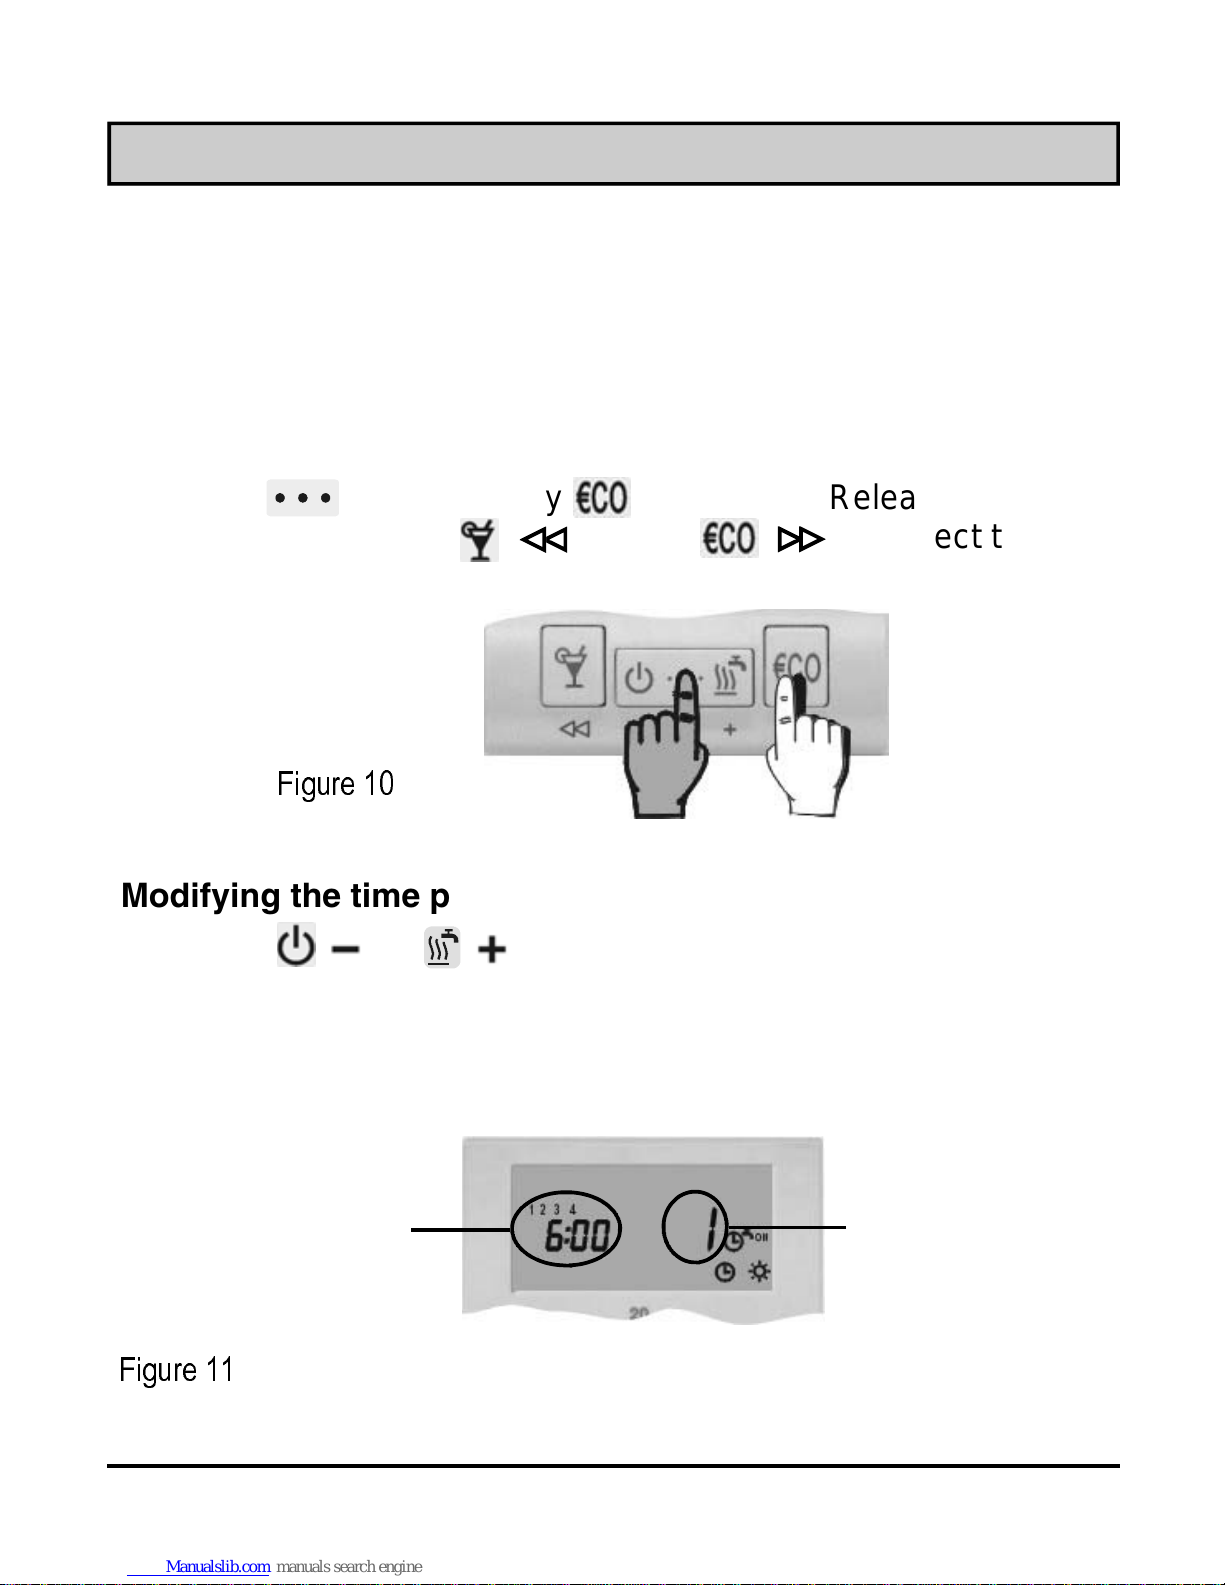
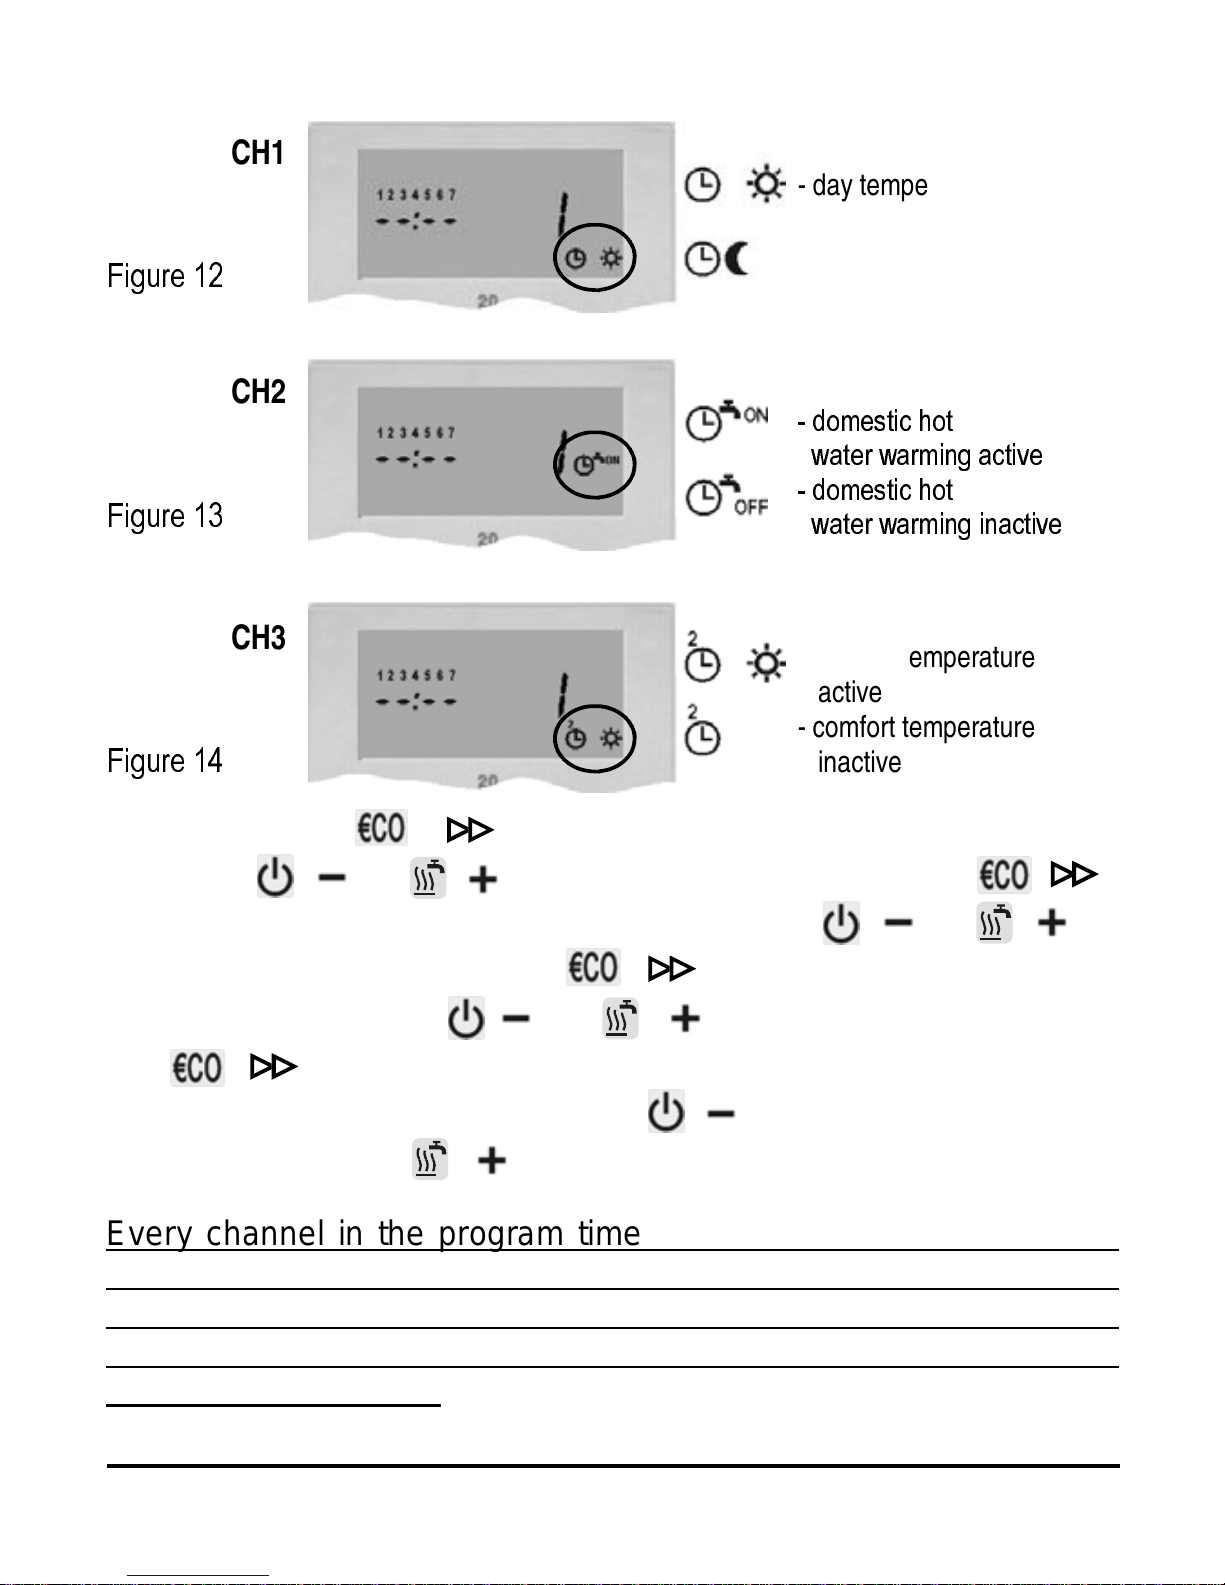
Program timer........................................................................................11
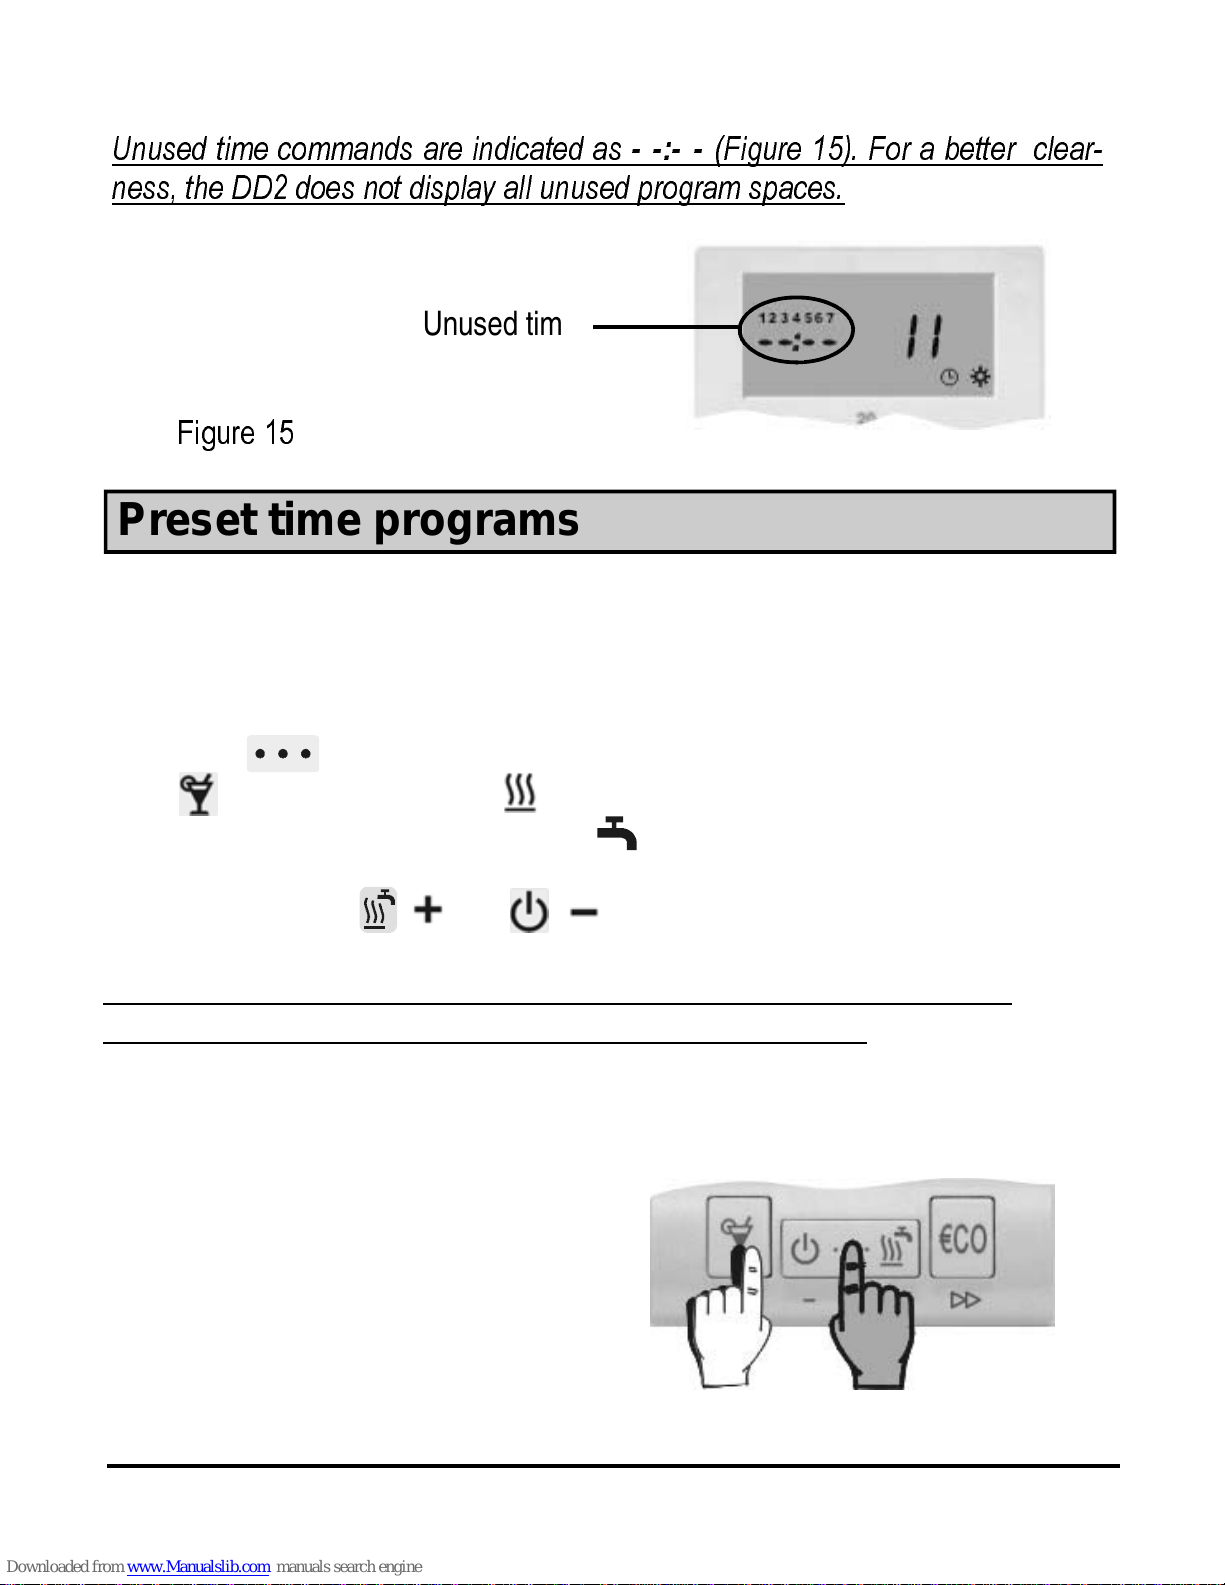
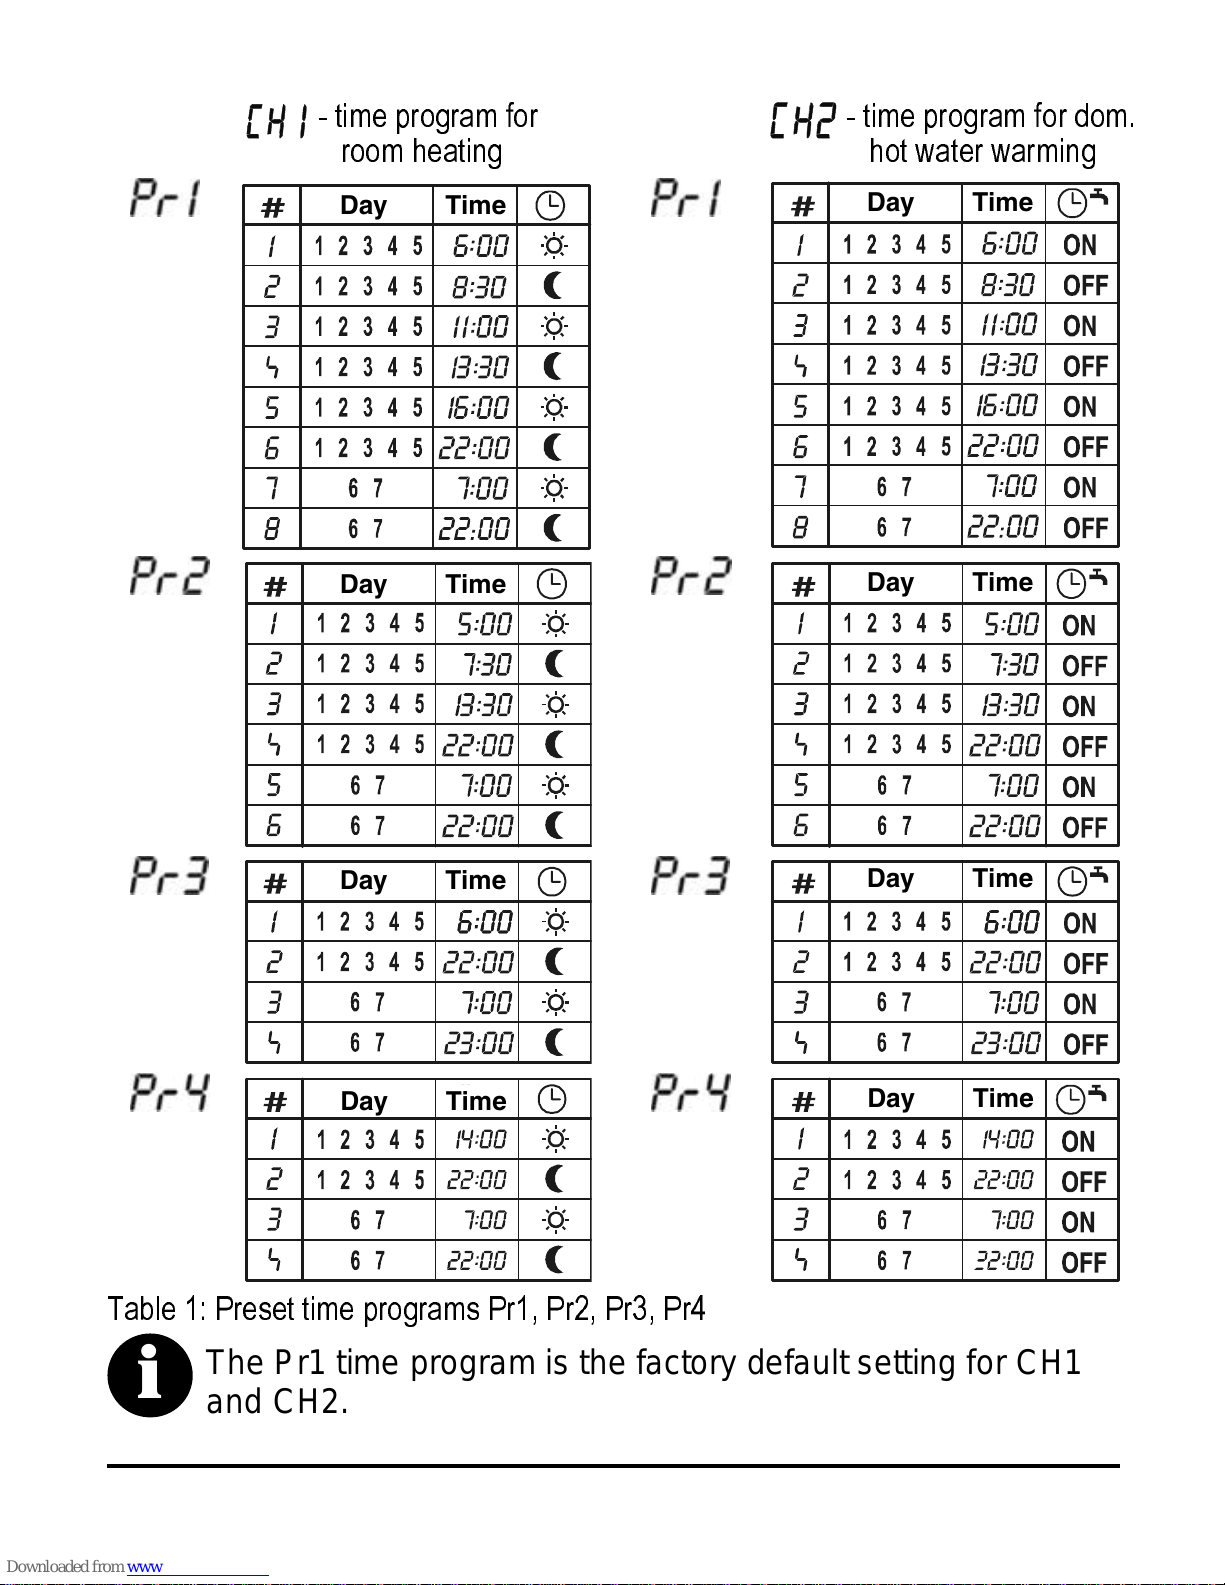
Preset time programs............................................................................15
Remote control......................................................................................15
Room unit locking..................................................................................15
One-time manual d. h. w. warming activation.........................................15
Indication of controlled devices on the display........................................15
Quick save and exit command (Escape)................................................16
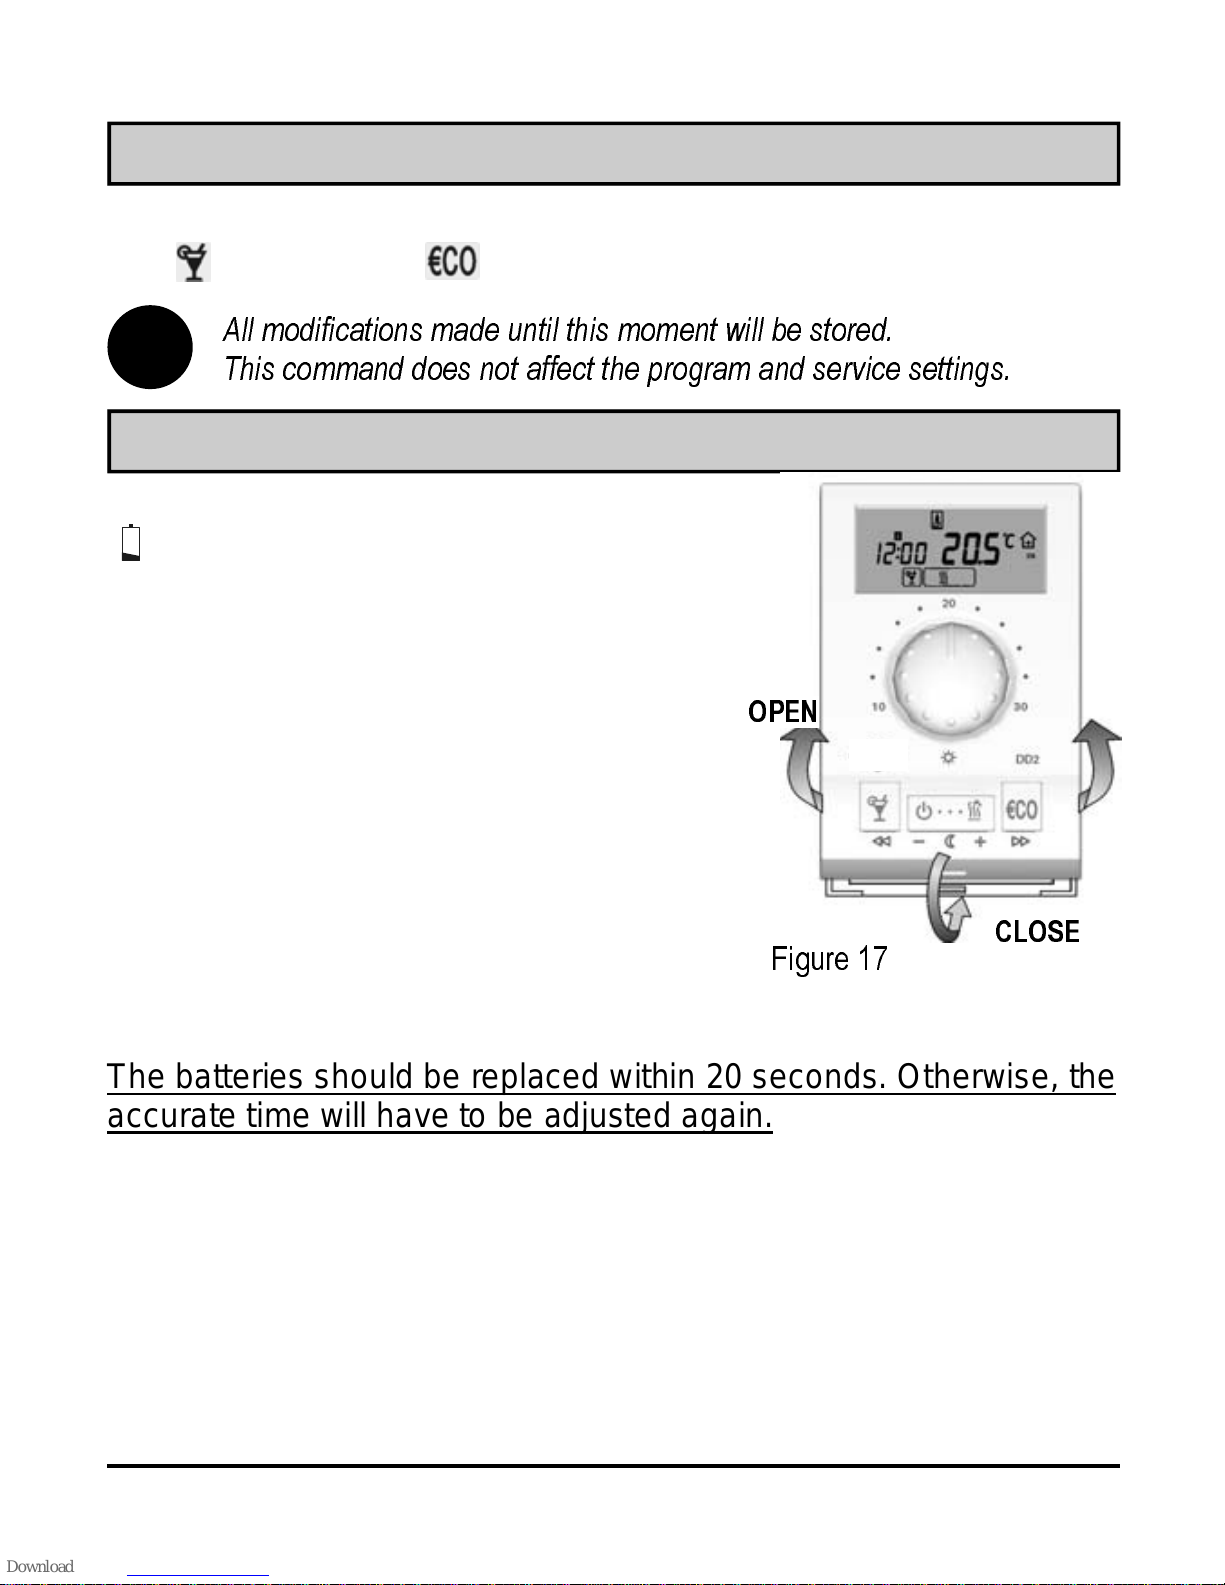
Battery insertion and replacement .........................................................16
Setting manual
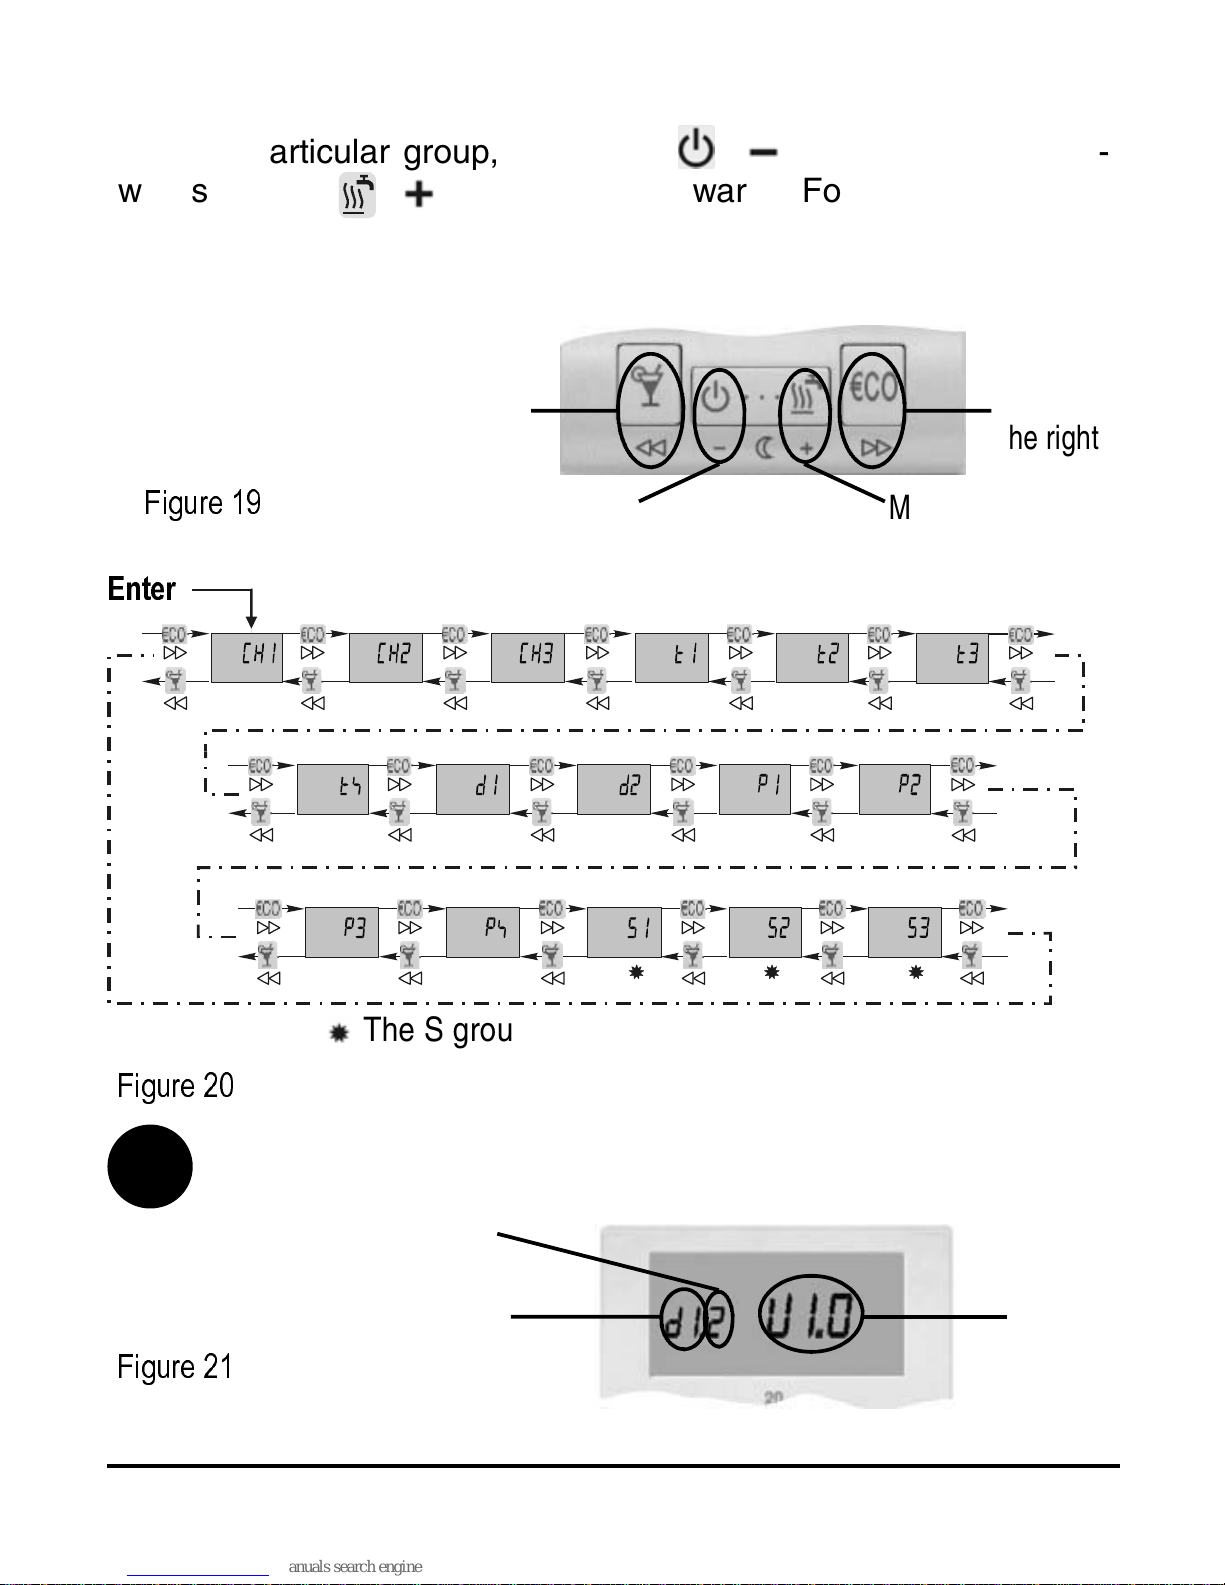
Menu.....................................................................................................17
Factory default settings - DD2 reset.......................................................25
Installation manual
Mounting location ..................................................................................26
Wall plate mounting...............................................................................26
Wiring connections................................................................................27
Active an passive room unit operating mode..........................................30
Behaviour with solid fuels......................................................................30
Adaptive algorhythm..............................................................................30
Coding switch........................................................................................31
DD2 troubleshooting..............................................................................32
Technical data.......................................................................................35
Conformity with standards and directives...............................................35
Guarantee.............................................................................................36
Disposal of Old Electrical & Electronic Equipment ................................37
Notes.....................................................................................................38
O3060006
stran 4 torek, 15. julij 2008 07:20
Standardizirana barva 1

USER MANUAL 5
DD2 description
LEGEND
Hold key while pressing other keys.
Hold key until a beep sound is heard.
Press and release key.
Press key to increase or decrease value.
The DD2 room unit is a modern designed and efficient device for
remote central heating control. It has the following features:
- selection of preset programs for room heating and domestic
hot water warming,
- operating mode selection,
- desired room temperature setting, and
- customer time programs for room heating and d. h. w. warming.
All measured temperatures and settings can be viewed on the
LCD display and modified. With the Party and Eco keys, the day
or economic temperature mode can be selected. The DD2 room
unit also enables the connection of an auxiliary temperature sen-
sor as well as remote activation via telephone.
O3060006
stran 5 torek, 15. julij 2008 07:20
Standardizirana barva 1

USER MANUAL
6
Controlled devices
-
gas boiler
-
liquid fuel
boiler
- solid fuel
boiler
Day and night
Knob for day
temperature
setting
Figure 1
Program timer CH1
- day temperature
- night emperature
Operation mode
- off
- room heating
- d. h. w.
warming
ECO
Remote activation
Program timer CH2
- d. h. w. warming
ON
- active
OFF
- inactive
Frost protection
Keyboard
locking
PARTY
- mixing valve
- pump
- d. h. w. storage
tank
Empty batteries
Operation accord-
ing to the program
timer
- heat accumulator
- direct circuit
- solar collectors
- d. h. w. circulation
Actual
temperature
PARTY
- day
temperature mode
Stand by
mode Night t
temperature
setting
On mode
-
operation
according to the
program timer
ECO
- saving
temperature
mode
O3060006
stran 6 torek, 15. julij 2008 07:20
Standardizirana barva 1

USER MANUAL 7
Operating mode selection
Heating activation
Press key to select the desired
operating mode (Figure 2). The
selected operation mode appears
on the display.
- room heating
- domestic hot water warming
Figure 2
Figure 3
Figure 4
Room heating operates according to the program timer CH1, domestic hot water
warming operates according to the program timer CH2.
i The frost protection temperature is preset to 6 °C and
can be changed by the program parameter P1.3
(page 21).
Stand-by
Press key (Figure 3). The
Symbol appears on the dis-
play.
Frost protection remains active.
Day temperature
Turn the knob to set the desired
day temperature between 10 °C
and 30 °C (Figure 4).
Setting the day and night temperature
O3060006
stran 7 torek, 15. julij 2008 07:20
Standardizirana barva 1

USER MANUAL
8
Night temperature
Hold key ( ) for approx. 5 seconds (Figure 5a). Release
key after a beep. Now press key ( ) or ( ) to set the de-
sired night temperature (Figure 5b). To save and quit set-up,
press key ( ) once more.
Figure 5b
Figure 5a
Setting the comfort temperature
Room heating with the comfort temp. operates according to program timer CH3
and has priority over the room heating according to the program timer CH1.
If the comfort heating mode is inactive, the setting of comfort
temperature is also inactive. The comfort temperature mode is
set by the program parameter P1.5 (page 21).
i
Figure 6b
Figure 6a
Hold key for 5 approx. seconds (Figure 6a). Use key ( ) or
( ) to set the COMFORT temperature between 10 °C and
30 °C (Figure 6b). To save and quit set-up, press key once
more or don’t touch any key for a while.
O3060006
stran 8 torek, 15. julij 2008 07:20
Standardizirana barva 1

USER MANUAL 9
Hold key for approximately 15 seconds. Release the key after
a beep. Use key ( ) or ( ) to set the duration of the HOLI-
DAY mode between 1 and 99 days.
To stop the HOLIDAY mode at anytime, hold the key for 15
seconds again.
Holiday mode
The HOLIDAY mode temperature is set by the program pa-
rameter P1.4 (page 21). The factory preset HOLIDAY tempera-
ture is 12 °C.
i
PARTY and ECO operating modes
PARTY - day temperature operation
Press key . Use key ( ) or ( ) to set duration of the
PARTY mode between 1 and 24 hours. For permanent PARTY
mode, select on.
To stop PARTY mode at any time, press key .
ECO - night temperature operation
Press key . Use key ( ) or ( ) to set duration of the
ECO mode between 1 and 24 hours. For permanent ECO mode,
select on.
To stop ECO mode at any time, press key .
The ECO temperature reduction is set by the program parameter P1.2
(page 21).
i
O3060006
stran 9 torek, 15. julij 2008 07:20
Standardizirana barva 1

USER MANUAL
10
Setting the accurate time
Hours
Hold key and press key ( )
or ( ) to set the hours
(Figure 7).
Figure 7
Figure 8
i
Figure 9
Minutes
Hold key and press key
( ) or ( ) to set the
minutes (Figure 8).
Day
Hold both keys and , then
press key ( ) or ( ) to set
the day (Figure 9). The days are
marked from 1 to 7. Monday is
marked as 1and Sunday as 7.
If the battery is reinserted after the DD2 hasn’t been
operating for a while, the time is set to Monday, 20:00.
O3060006
stran 10 torek, 15. julij 2008 07:20
Standardizirana barva 1

USER MANUAL 11
Press key ( ) or ( ) to select the program place that has to
be modified. The time command, the successive number of the
program place (Figure 11) and the switch-on/off command
(Figures 12, 13 and 14) are shown in the display simultaneously.
Figure 10
Figure 11
Modifying the time program
The program timer has three channels: CH1, CH2 and CH3.
CH1 is used for programming the room heating (day / night),
CH2 is used for programming the domestic hot water warming,
CH3 is used for programming the comfort room heating.
Time
command
Program timer programming
Selecting the program channel
Hold key and press key (Figure 10). Release both keys
after beep. Press key ( ) or key ( ) to select the pro-
gram channel that has to be modified.
Successive number
of the program place
O3060006
stran 11 torek, 15. julij 2008 07:20
Standardizirana barva 1

USER MANUAL
12
Now press key ( ). The day starts to flash on the display.
Press key ( ) or ( ) to set the day, then press key ( ).
Hours start to flash on the display. Press key ( ) or ( ) to
set the hours, then press key ( ). Minutes start to flash on
the display. Press key ( ) or ( ) to set minutes, then press
key ( ). The display stops flashing. It is possible to move to
the next program place now. Press ( ) to move to the next pro-
gram place or press ( ) to move to the previous program place.
Figure 12
- day temperature
- night temperature
Figure 13
Figure 14
- domestic hot
water warming active
- domestic hot
water warming inactive
- comfort temperature
active
- comfort temperature
inactive
CH1
CH2
CH3
Every channel in the program timer (CH1, CH2 and CH3) has 32
program places. Time commands for day and night temperature
mode, time commands for active and inactive d. h. w. warming and
time commands for active and inactive comfort temp. mode are
displayed sucessively.
O3060006
stran 12 torek, 15. julij 2008 07:20
Standardizirana barva 1

USER MANUAL 13
The DD2 room unit has 4 preset time programs for room heating
and 4 preset time programs for domestic hot water warming.
Preset time program selection
Hold key and select the suitable time program by pressing the
key (Figure 16). The symbol indicates programs for room
heating (CH1), while the symbol indicates programs for domes-
tic hot water warming. (CH2). To view the time commands in a pro-
gram, press key ( ) or ( ).
The selected time program always cancels the previous one.
Select - - - to keep the current time program active.
Figure 15
Unused time
command
Unused time commands are indicated as
- -:- -
(Figure 15). For a better clear-
ness, the DD2 does not display all unused program spaces.
Figure 16
Preset time programs
O3060006
stran 13 torek, 15. julij 2008 07:20
Standardizirana barva 1

USER MANUAL
14
- time program for dom.
hot water warming
- time program for
room heating
Table 1: Preset time programs Pr1, Pr2, Pr3, Pr4
Day Time Day Time
Day Time Day Time
Day Time Day Time
Day Time Day Time
The Pr1 time program is the factory default setting for CH1
and CH2.
i
O3060006
stran 14 torek, 15. julij 2008 07:20
Standardizirana barva 1

USER MANUAL 15
One-time manual d. h. w. warming activation
Hold the key for 5 seconds. Release the key after a beep.
The one-time manual domestic hot water warming is
automatically deactivated as soon as the desired d. h. w.
temperature is reached or, at the latest, after 1 hour.
i
Indication of controlled devices on the display
If the indication of controlled devices is deactivated (setting by pro-
gram parameter P1.11), the currently controlled devices can be
viewed by holding the key and pressing the key (Escape).
All the controlled devices will appear on the display for 15 seconds.
Remote control
Room unit locking
Hold the key for 15 seconds. Release the key after a beep. The
symbol indicates a locked room unit. To unlock the DD2, hold
the key for 15 seconds.
DD2 locking is set by the service parameter S1.8
(page 23).
i
Setting or modifying the parameters by locked DD2 isn’t possible or
is limited.
The day temperature operating mode can be activated remotely
via telephone. This function is described in the chapter Program
group P3 (page 22).
O3060006
stran 15 torek, 15. julij 2008 07:20
Standardizirana barva 1

USER MANUAL
16
Low batteries are indicated by the
symbol on the display. The batteries
should be replaced every 2 years. The
DD2 uses two 1.5 V type AAA alkaline
batteries as its power supply. The battery
socket is inside the ST1. To remove the
room unit from the wall plate, the room
unit shall be gripped in the height of the
keys and pulled off the wall plate (Figure
17 - OPEN). After the battery replace-
ment, put the DD2 back to the wall plate
by sticking it on top and pushing it with
its bottom towards the wall plate (Figure
17 - CLOSE).
Battery replacement
Command to quick save and quit (Escape)
Every time when the set-up mode has to be quit quickly, hold the
key and press the key. Release both keys after a beep.
i
All modifications made until this moment will be stored.
This command does not affect the program and service settings.
The batteries should be replaced within 20 seconds. Otherwise, the
accurate time will have to be adjusted again.
Figure 17
OPEN
CLOSE
O3060006
stran 16 torek, 15. julij 2008 07:20
Standardizirana barva 1

USER MANUAL 17
Menu navigation
In the menu, the keys get a new significance marked below them
(Figure 19). To move between the groups, press the ( ) key
to move to the left and the ( ) key to move to the right
(Figure 20). To move
All data and settings are divided into 16 groups:
CH1 ··············program timer for room heating
CH2 ··············program timer for d. h. w. warming
CH3 ··············program timer for comfort room heating
t1 ··················measured temperatures
t2 ··················preset and controller-calculated temperatures
t3 ··················controller settings
t4 ··················room temperature during the last heating interval
d1 ·················room unit data
d2 ·················controller data
P1·················program settings
P2·················heating curve slope
P3·················remote activation via telephone
P4·················overview of controllers in the BUS network
S1·················service group 1
S2·················service group 2
S3·················service group 3
Menu
To enter the menu, hold key and press key (Figure 18).
Release both keys after a beep. The first group CH1 appears on
the display.
Menu
Figure 18
O3060006
stran 17 torek, 15. julij 2008 07:20
Standardizirana barva 1

SETTING MANUAL
18
Figure 20
The S groups are locked by factory default settings.
For unlocking the S groups, see chapter Service group S3 (page 24).
i
Enter
Figure 21
within a particular group, press the ( ) key to move down-
wards and the ( ) key to move upwards. For an easier under-
standing and navigation, all the lines are designated. The first two
symbols stand for the group, while the third one indicates the suc-
cessive number of the line within the group (Figure 21).
Successive No.
of the line
Group
name Parameter
Figure 19
Move to
the left
Move to
the right
Move up or
increase
Move down or
decrease
O3060006
stran 18 torek, 15. julij 2008 07:20
Standardizirana barva 1

SETTING MANUAL 19
Set and controller-calculated temperatures t2
This group is intended for the overview of all set and controller-
calculated temperatures. The temperatures are displayed in the
following order:
- [t2.1] average (current) outdoor temperature
- [t2.2] desired room temperature
- [t2.3] calculated stand-pipe temperature - indirect circuit
- [t2.4] calculated stand-pipe temperature - direct circuit
- [t2.5] calculated boiler temperature
- [t2.6] desired d. h. w. temperature
- [t2.7] calculated solid-fuel boiler temperature
Measured temperatures t1
This group is intended for the overview of all measured tempera-
tures. The temperatures are displayed in the following order:
- [t1.1] outside temperature AF
- [t1.2] room temperature RF
- [t1.3] stand-pipe temperature VF
- [t1.4] return-pipe temperature RLF
- [t1.5] boiler temperature KF
- [t1.6] boiler return-pipe temperature RLKF
- [t1.7] d. h. w. temperature BF1
- [t1.8] d. .h. w.
temperature BF2 or solid fuel boiler temp. KF2
- [t1.9] solar collectors temperature KTF
- [t1.10] auxiliary room sensor temperature RF2
- [t1.11] floor temperature EF
Program timer for room heating CH1
For changing the time program see chapter Modifying the time
program (page 11).
Program timer for domestic hot water warming CH2
For changing the time program see chapter Modifying the time
program (page 11).
Program timer for comfort room heating CH3
For changing the time program see chapter Modifying the time
program (page 11).
O3060006
stran 19 torek, 15. julij 2008 07:20
Standardizirana barva 1

SETTING MANUAL
20
Room unit data d1
This group is a sort of DD2 ID. In contains information about the
DD2. The information are displayed in the following order:
- [d1.1] room unit type (DD2)
- [d1.2] software version
- [d1.3] heating or cooling
- [d1.4] built-in temperature sensor calibration
- [d1.5] battery voltage
Controller settings t3
This group is intended for the overview of all controller settings.
The settings are displayed in the following order:
- [t3.1] minimum boiler temperature
- [t3.2] heat curve slope - indirect circuit
- [t3.3] heat curve slope - direct circuit or
[solid fuel boiler temperature] or
[temperature difference for solar collectors]
- [t3.4] desired d. h. w. temperature
- [t3.5] desired day temperature
- [t3.6] desired night temperature
- [t3.7] coding switch position
- [t3.8]
minimum or maximum stand-pipe temperature limitation
- [t3.9] coding switch setting
- [t3.10] battery condition on controller
Room temperature during the last heating interval t4
This group is intended for the overview of room temperatures dur-
ing the last heating interval. The temperatures are displayed in the
following order:
- [t4.1] minimum room temperature during the last heating interval
- [t4.2] maximum room temperature during the last heating interval
- [t4.3] average (current) room temperature deviation
O3060006
stran 20 torek, 15. julij 2008 07:20
Standardizirana barva 1
Table of contents